
If there’s one dessert that consistently steals the show at every gathering, it’s Oreo cheesecake. This showstopping treat combines two of America’s most beloved desserts—rich, creamy cheesecake and crunchy, chocolatey Oreo cookies—into one utterly irresistible creation that has people coming back for seconds (and thirds!).
This no-bake Oreo cheesecake is everything you could want in a dessert: decadently creamy, perfectly sweet, impressively beautiful, and surprisingly easy to make. Unlike traditional cheesecake that requires precise oven temperatures and water baths, this version comes together with simple mixing and chilling, making it accessible even for beginner bakers. The Oreo cookie crust provides the perfect crunchy contrast to the silky-smooth filling studded with chunks of cookies throughout.
What makes this Oreo cheesecake recipe truly special is its versatility. It’s elegant enough for special occasions like birthdays, holidays, and dinner parties, yet simple enough to whip up for a weekend family dessert. Whether you’re celebrating someone’s birthday, bringing dessert to a potluck, or just treating yourself because you deserve something amazing, this cookies and cream cheesecake delivers every single time. Plus, since it’s made ahead and chilled, you can prepare it the day before your event—talk about stress-free entertaining!
History & Background of Oreo Cheesecake
To understand Oreo cheesecake, we need to appreciate the rich histories of both its parent desserts. Cheesecake itself has ancient roots dating back to ancient Greece, where it was served to athletes during the first Olympic games in 776 BC. However, the creamy, smooth American-style cheesecake we know today was popularized in New York in the late 1800s when cream cheese was invented.
The Oreo cookie, meanwhile, was introduced by Nabisco in 1912 in New York City. Originally called the “Oreo Biscuit,” it became America’s best-selling cookie by the 1950s. The iconic sandwich cookie with its chocolate wafers and sweet cream filling has remained virtually unchanged for over a century—a testament to its perfect design.
The marriage of Oreos and cheesecake likely happened organically in home kitchens during the mid-to-late 20th century as both products gained popularity. Home bakers began experimenting with crushing Oreos for pie crusts and mixing them into cheesecake batters, discovering that the combination was nothing short of magical. The cookies’ structure holds up beautifully when mixed into cream cheese filling, providing textural interest without becoming soggy.
By the 1990s and 2000s, Oreo cheesecake had become a staple at restaurants like The Cheesecake Factory, which helped cement its status as an American dessert icon. The no-bake version gained popularity through food blogs and Pinterest in the 2010s, making this once-intimidating dessert accessible to home cooks everywhere.
Today, Oreo cheesecake represents the perfect fusion of nostalgia and indulgence. It takes the familiar comfort of childhood cookies and elevates them into a sophisticated dessert that feels both playful and elegant. The black-and-white color scheme makes it visually striking, while the combination of textures and flavors creates a multi-sensory experience that explains why this dessert has remained so beloved for decades.
Why You’ll Love This Oreo Cheesecake Recipe
This isn’t just any Oreo cheesecake recipe—this is THE recipe that will have everyone begging you to make it again and again. I’ve perfected this no-bake version over years of making it for family gatherings, birthday parties, and special occasions, and it never fails to be the star of the dessert table.
Here’s why this recipe will become your go-to showstopper dessert:
- No baking required – Absolutely zero oven time means no risk of cracks, no water baths, no precise temperature monitoring—just simple mixing and chilling
- Foolproof for beginners – Even if you’ve never made cheesecake before, you can nail this recipe on your first try with confidence
- Make-ahead friendly – Prepare it a day or two in advance so you can enjoy your event stress-free instead of scrambling in the kitchen
- Crowd-pleasing flavor – The combination of Oreos and cheesecake is universally loved by both kids and adults—it’s the ultimate people-pleaser
- Impressive presentation – Looks like it came from a fancy bakery, but requires minimal decorating skills to achieve stunning results
- Uses simple ingredients – No exotic items or specialty ingredients—everything you need is available at any grocery store
- Perfect texture every time – The no-bake method guarantees silky-smooth, creamy filling that slices beautifully without cracks or imperfections
- Highly customizable – Easy to adapt with different cookie flavors, toppings, or mix-ins to create your own signature version
- Feeds a crowd – One 9-inch cheesecake serves 12-16 people, making it economical for entertaining
- Kid-approved – Children absolutely love helping crush the Oreos and eating the finished product—it’s a fun family baking project
- Stays fresh for days – Actually tastes even better on day 2 or 3 as flavors meld and texture sets perfectly
Whether you’re a nervous first-time cheesecake maker or an experienced baker looking for a reliable, impressive dessert, this easy Oreo cheesecake recipe checks every box.
Ingredient Notes
Understanding your ingredients helps you create the perfect Oreo cheesecake every time. Let’s break down what makes this recipe work so beautifully.
Oreo Cookies: You’ll need about 36 Oreo cookies total—some for the crust and some for the filling. Use regular Oreos, not Double Stuf or Thins, as those have different ratios that can throw off the recipe. The cookies provide both structure in the crust and delightful chunks of texture in the filling. No need to remove the cream filling—use the whole cookie! You can substitute with other chocolate sandwich cookies, but Oreos deliver the best flavor.
Cream Cheese: This is the foundation of your cheesecake filling. Use full-fat, brick-style cream cheese—not spreadable or whipped varieties, which contain too much air and moisture. The cream cheese MUST be at room temperature (leave it out for 1-2 hours) or it will be lumpy and won’t blend smoothly. Don’t try to rush this step!
Heavy Whipping Cream: This is the secret to achieving that cloud-like, mousse-like texture in a no-bake cheesecake. When whipped to stiff peaks and folded into the cream cheese mixture, it creates an incredibly light and fluffy filling. Don’t substitute with Cool Whip or non-dairy whipped topping—real heavy cream whips up with more volume and provides superior flavor.
Powdered Sugar: Also called confectioner’s sugar, this sweetens the filling while dissolving more easily than granulated sugar. The cornstarch in powdered sugar also helps stabilize the filling slightly. If you only have granulated sugar, you can use it, but blend it in a food processor first to make it finer.
Vanilla Extract: Pure vanilla extract adds depth and rounds out all the flavors. While imitation vanilla can work in a pinch, pure extract provides noticeably better flavor in a simple recipe like this where every ingredient shines through.
Butter: Melted butter binds the crushed Oreos together to form the crust. Use unsalted butter so you can control the salt level, though salted butter works fine too. The butter should be fully melted but not hot, which would melt the cream filling of the Oreos.
Gelatin (Optional): Some recipes use a small amount of unflavored gelatin to help stabilize no-bake cheesecake. I’ve made this both ways and find it optional—the recipe works beautifully without it, but gelatin does help it hold its shape for cleaner slices if you’re serving a crowd.
Equipment Needed
Having the right tools makes creating a perfect Oreo cheesecake much easier. Here’s what you’ll need:
- 9-inch springform pan – Essential for easy removal and clean presentation; the removable sides are crucial for no-bake cheesecake
- Food processor or blender – For crushing Oreos into fine crumbs quickly and evenly
- Large mixing bowl – For beating the cream cheese mixture
- Medium mixing bowl – For whipping the heavy cream
- Electric hand mixer or stand mixer – Necessary for properly whipping cream and beating cream cheese until smooth
- Rubber spatula – For folding ingredients together gently and scraping down bowl sides
- Measuring cups and spoons – For accurate ingredient measurements
- Plastic wrap or aluminum foil – To cover the cheesecake while it chills
- Sharp knife – For crushing Oreo chunks and slicing the finished cheesecake
- Microwave-safe bowl – For melting butter
- Offset spatula (optional) – Makes spreading the filling evenly much easier
- Cake plate or serving platter – For presenting your masterpiece
Pro tip: If you don’t have a springform pan, you can line a regular 9-inch pie pan with parchment paper, leaving overhang on the sides to lift out the cheesecake, though the presentation won’t be quite as elegant.
Print
Oreo Cheesecake Recipe
- Total Time: 4 hours 30 minutes
- Yield: 12-16 slices 1x
- Diet: Vegetarian
Description
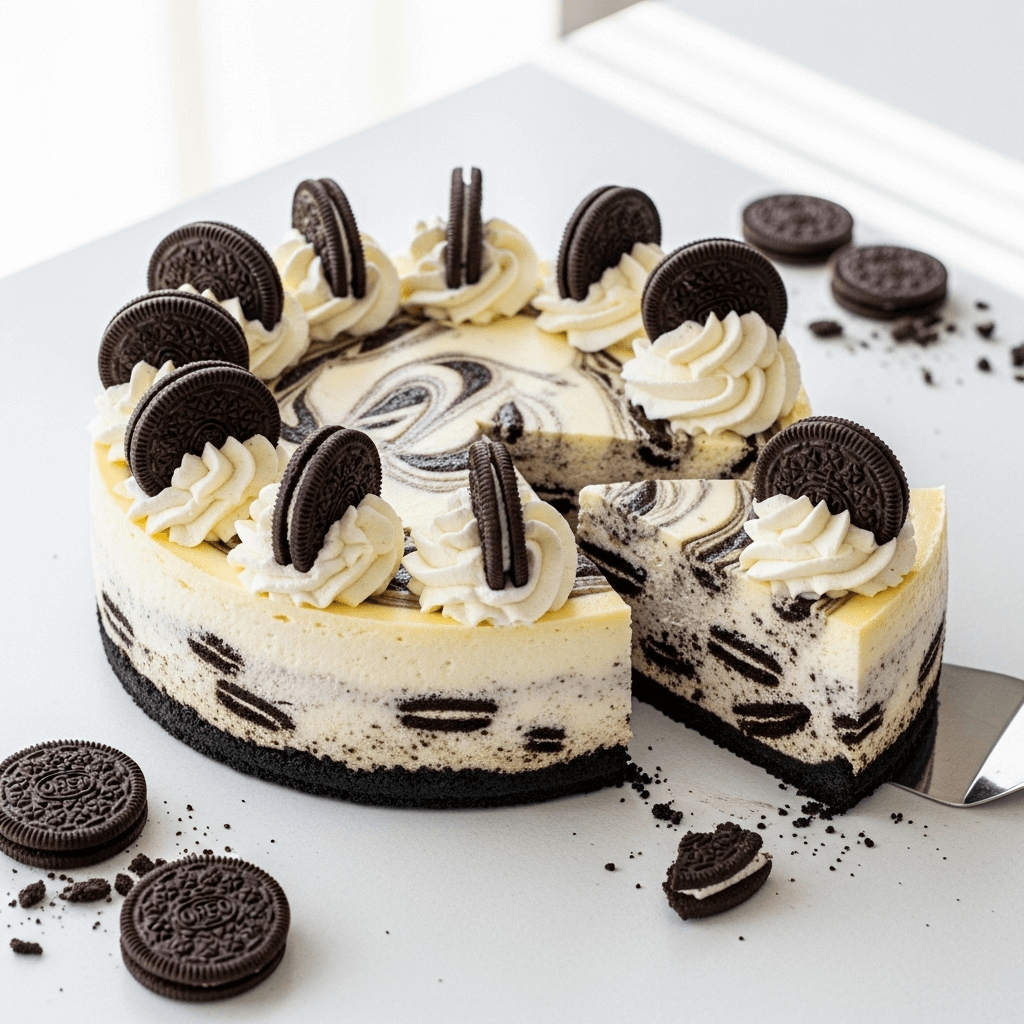
This no-bake Oreo cheesecake features a crunchy Oreo cookie crust filled with a silky-smooth cream cheese filling loaded with crushed Oreos throughout. It’s the ultimate crowd-pleasing dessert that’s surprisingly simple to make and absolutely guaranteed to impress!
Ingredients
For the Oreo Crust:
- 24 Oreo cookies (about 2 cups crushed)
- 5 tablespoons unsalted butter, melted
- Pinch of salt
For the Cheesecake Filling:
- 24 oz (3 packages) cream cheese, softened to room temperature
- 1 cup powdered sugar
- 2 teaspoons vanilla extract
- 2 cups heavy whipping cream, cold
- 12 Oreo cookies, roughly chopped (about 1½ cups chunks)
For Topping:
- 8–10 Oreo cookies, halved
- Optional: whipped cream, chocolate ganache, or chocolate shavings
Instructions
Step 1: Prepare the Springform Pan
Line the bottom of a 9-inch springform pan with parchment paper for easier removal. Make sure the pan is secure with no gaps where filling could leak through. You can also wrap the outside bottom with aluminum foil for extra insurance against leaks.
Step 2: Make the Oreo Crust
Place 24 Oreo cookies (including the cream filling) in a food processor and pulse until you have fine, even crumbs. You should have about 2 cups of crumbs. Transfer to a medium bowl, add the melted butter and a pinch of salt, and stir until the mixture resembles wet sand and holds together when pressed. The butter should coat all the crumbs evenly.
Step 3: Press the Crust
Pour the Oreo crumb mixture into your prepared springform pan. Using the bottom of a measuring cup or glass, press the crumbs firmly and evenly across the bottom and about 1 inch up the sides of the pan. The firmer you press, the better it will hold together. Place in the refrigerator while you prepare the filling.
Step 4: Beat the Cream Cheese
In a large mixing bowl, beat the softened cream cheese with an electric mixer on medium speed for 2-3 minutes until completely smooth, light, and fluffy with no lumps remaining. Scrape down the sides and bottom of the bowl several times to ensure even mixing. This step is crucial for a lump-free cheesecake.
Step 5: Add Sugar and Vanilla
Add the powdered sugar and vanilla extract to the cream cheese. Beat on medium speed for another 1-2 minutes until fully incorporated and the mixture is smooth and creamy. The sugar should be completely dissolved with no grittiness.
Step 6: Whip the Heavy Cream
In a separate clean, cold mixing bowl, beat the cold heavy whipping cream with clean beaters on high speed until stiff peaks form. This takes about 3-4 minutes. The cream should stand up in peaks when you lift the beaters and hold its shape without falling. Don’t overbeat or you’ll end up with butter!
Step 7: Fold in the Whipped Cream
Using a rubber spatula, gently fold about one-third of the whipped cream into the cream cheese mixture to lighten it. Then add the remaining whipped cream and fold gently until just combined with no streaks remaining. Use a folding motion (cut down through the center, across the bottom, and up the side) rather than stirring to maintain the airiness. The filling should be light, fluffy, and uniform in color.
Step 8: Add the Oreo Chunks
Roughly chop 12 Oreo cookies into chunks—some pieces should be large, some medium, some small for varied texture. Gently fold the Oreo chunks into the cheesecake filling, distributing them evenly throughout. Reserve a few pieces for topping if desired.
Step 9: Assemble the Cheesecake
Remove the crust from the refrigerator. Pour the filling into the prepared crust, smoothing the top with an offset spatula or the back of a spoon. Tap the pan gently on the counter a few times to release any air bubbles. The filling should come nearly to the top of the pan.
Step 10: Add Toppings and Chill
Arrange halved Oreo cookies around the edge of the cheesecake, pressing them gently into the filling. You can also create a pattern in the center with cookie pieces. Cover the cheesecake loosely with plastic wrap (don’t let it touch the surface) and refrigerate for at least 4 hours, but preferably overnight for the best texture and easiest slicing.
Step 11: Serve
When ready to serve, run a thin knife around the edge of the pan, then carefully remove the springform ring. Transfer the cheesecake to a serving plate. For the cleanest slices, dip your knife in hot water and wipe it clean between each cut. Let slices sit at room temperature for 5-10 minutes before serving for the best flavor and texture.
Notes
- Room Temperature Cream Cheese is Essential: This cannot be stressed enough. Cold cream cheese will create lumps that are nearly impossible to remove. Plan ahead and leave cream cheese out for 1-2 hours before starting.
- Chill Time Matters: While 4 hours is the minimum, overnight chilling produces the best texture and makes slicing much cleaner and easier.
- Stabilizing Option: If you want extra-firm slices for a formal event, dissolve 1 tablespoon unflavored gelatin in ¼ cup hot water, cool slightly, and beat into the cream cheese before adding whipped cream.
- Crust Variations: For a thicker crust, use 30 Oreos and 6 tablespoons butter. For a thinner crust, use 18 Oreos and 4 tablespoons butter.
- Make It Ahead: This cheesecake actually improves with time. Make it 1-2 days before your event for the best flavor as the cookies soften slightly and the flavors meld.
- Serving Temperature: Remove from refrigerator 10-15 minutes before serving for the creamiest texture and best flavor.
- Prep Time: 30 minutes
- Cook Time: 4 hours (or overnight)
- Category: Dessert
- Method: No-Bake
- Cuisine: American
Nutrition
- Serving Size: 1 slice (1/12 of cheesecake)
- Calories: 485
- Sugar: 28g
- Sodium: 295mg
- Fat: 35g
- Saturated Fat: 20g
- Unsaturated Fat: 12g
- Trans Fat: 0g
- Carbohydrates: 38g
- Fiber: 1g
- Protein: 6g
- Cholesterol: 95mg
Tips & Variations
The beauty of Oreo cheesecake is how easily you can customize it to create exciting new flavors. Here are some delicious variations to try:
Flavor Variations:
Peanut Butter Oreo Cheesecake: Add ½ cup creamy peanut butter to the cream cheese mixture and use peanut butter Oreos throughout. Drizzle with melted peanut butter before serving for extra indulgence.
Mint Oreo Cheesecake: Use Mint Oreos for both crust and filling, or add 1 teaspoon peppermint extract to the filling. Top with chocolate ganache and crushed candy canes for a festive holiday version.
Birthday Cake Oreo Cheesecake: Use Golden Birthday Cake Oreos and add rainbow sprinkles throughout the filling. Top with more sprinkles and Birthday Cake Oreos for a celebration-worthy dessert.
Cookies and Cream Brownie Cheesecake: Add a layer of fudgy brownies between the crust and cheesecake filling for an ultra-decadent triple-threat dessert.
Chocolate Ganache Topped: Melt ½ cup chocolate chips with ¼ cup heavy cream, cool slightly, and pour over the chilled cheesecake for a glossy, professional finish.
Salted Caramel Oreo Cheesecake: Drizzle salted caramel sauce over the top and between layers for sweet-salty perfection. Add a sprinkle of flaky sea salt.
Individual Mini Cheesecakes: Make these in a muffin tin lined with cupcake liners for perfect portion-controlled servings and easy party desserts.
Lighter Version: Use reduced-fat cream cheese (not fat-free) and substitute 1 cup of the heavy cream with Greek yogurt for a lighter option that’s still delicious.
Pro Chef Tips
1. Room Temperature Ingredients Are Non-Negotiable: This is the single most important tip for smooth, lump-free cheesecake. Cold cream cheese will never fully incorporate, leaving you with tiny lumps throughout your filling. Set it out 1-2 hours before starting, or microwave in 10-second bursts if you’re really in a pinch (but room temperature is always better).
2. Don’t Over-Whip Your Cream: Stop beating as soon as stiff peaks form. Over-whipped cream becomes grainy and butter-like, which will affect your cheesecake’s texture. The cream should be billowy and hold its shape firmly but still look smooth and glossy.
3. Fold, Don’t Stir: When combining the whipped cream with the cream cheese mixture, use a gentle folding motion with a rubber spatula. This preserves the air you’ve incorporated, keeping the cheesecake light and fluffy. Vigorous stirring deflates the cream and results in a denser texture.
4. Press the Crust Firmly: Use significant pressure when pressing the Oreo crust into the pan. A firmly packed crust won’t crumble when you slice the cheesecake. Use the bottom of a flat measuring cup to get even, firm pressure across the entire surface.
5. Let It Chill Completely: Resist the temptation to cut into your cheesecake early! A properly chilled cheesecake (overnight is ideal) slices cleanly and has the best texture. Rushing this step results in messy, soft slices that don’t hold their shape.
6. The Hot Knife Trick: For picture-perfect slices, heat your knife under hot running water, wipe it completely dry, then make one cut. Wipe the knife clean, reheat it, and repeat for each slice. This professional technique creates clean edges worthy of a bakery.
7. Release the Springform Carefully: Before removing the springform ring, run a thin knife around the edge while the cheesecake is still in the pan. This prevents the filling from sticking to the sides and tearing when you release the latch.
Common Mistakes to Avoid
Mistake #1: Using Cold Cream Cheese
This is the number one mistake that ruins no-bake cheesecake. Cold cream cheese creates lumps that no amount of mixing will remove. The lumps don’t disappear as the cheesecake chills—they’re there forever. Always allow cream cheese to come to room temperature for 1-2 hours before starting. It should be soft enough to leave an indentation when pressed with your finger.
Mistake #2: Over-Mixing After Adding Whipped Cream
Once you add the whipped cream to the cream cheese mixture, switch from an electric mixer to a rubber spatula and fold gently. Continued aggressive mixing or using the electric mixer at this stage deflates all the air you carefully whipped into the cream, resulting in a dense, heavy cheesecake instead of a light, mousse-like one.
Mistake #3: Not Pressing the Crust Firmly Enough
A loosely packed crust crumbles apart when you try to slice the cheesecake, creating a messy presentation. Apply serious pressure when packing the crust—really press down hard with the bottom of a measuring cup or glass. The crust should feel solid and compact, not loose and sandy.
Mistake #4: Using Cool Whip Instead of Real Whipped Cream
While Cool Whip seems like a convenient shortcut, it contains stabilizers and has a different texture that doesn’t create the same luxurious, creamy result as freshly whipped heavy cream. Take the extra 4 minutes to whip real cream—the difference in taste and texture is dramatic.
Mistake #5: Cutting Before It’s Fully Chilled
I know waiting is hard when something smells so good, but cutting into warm or partially chilled cheesecake results in a soft, messy disaster that won’t hold its shape. The filling needs at least 4 hours (preferably overnight) to set properly. Plan accordingly and make this dessert the day before you need it.
Mistake #6: Forgetting to Line the Pan
While not absolutely necessary, lining the bottom of your springform pan with parchment paper makes removing the cheesecake from the base infinitely easier. Without it, you risk damaging your beautiful dessert when trying to transfer it to a serving plate.
Storage & Meal Prep
Refrigerator Storage:
Store Oreo cheesecake covered in the refrigerator for up to 5 days. Keep it in the springform pan with plastic wrap over the top, or transfer to an airtight container if you’ve already sliced it. Individual slices can be stored in airtight containers separated by parchment paper to prevent sticking. The cheesecake actually improves slightly over the first 2-3 days as the Oreos soften and flavors meld.
Covering Properly:
When covering cheesecake with plastic wrap, either press it directly against the surface (if you don’t care about preserving decorations) or tent it loosely over the top without touching. You can also use aluminum foil or place the whole springform pan in a large cake keeper.
Maintaining Freshness:
Cheesecake absorbs refrigerator odors easily, so make sure it’s well-sealed. If your refrigerator has strong-smelling foods, consider double-wrapping or using an airtight cake carrier. The Oreo cookies will gradually soften as the cheesecake sits, which most people find improves the texture.
How Long Does It Last:
Properly stored, no-bake Oreo cheesecake stays fresh and delicious for 5 days in the refrigerator. After that point, the cookies become very soft and the texture deteriorates, though it’s still safe to eat for up to 7 days.
Make-Ahead & Freezer Notes
Make-Ahead Instructions:
Oreo cheesecake is the perfect make-ahead dessert! In fact, it’s even better when made 1-2 days in advance. Prepare the cheesecake completely, cover well, and refrigerate. The extra time allows the filling to set perfectly and the flavors to develop. Add any final decorations (like whipped cream rosettes or extra cookie crumbles) just before serving for the freshest appearance.
Freezing Instructions:
Yes, this cheesecake freezes beautifully for up to 2 months! After the cheesecake is completely chilled and set, wrap the entire springform pan tightly in two layers of plastic wrap, then one layer of aluminum foil. Alternatively, slice the cheesecake, wrap individual slices in plastic wrap, place in a freezer bag, and freeze for easy single servings.
Thawing Instructions:
For best results, thaw frozen cheesecake slowly in the refrigerator for 6-8 hours or overnight. Never thaw at room temperature, which can create condensation and make the cheesecake watery. Individual slices thaw in about 3-4 hours in the refrigerator. Once thawed, the texture and flavor are virtually identical to fresh.
Freezing Tips:
Remove decorative toppings like whipped cream or cookie garnishes before freezing, as these don’t freeze well. Add them fresh after thawing. Label your wrapped cheesecake with the date so you know when you froze it. Place the wrapped cheesecake on a flat surface in the freezer so it doesn’t get damaged or develop an uneven surface.
Best Practices:
For the absolute best quality, consume frozen cheesecake within 1 month, though it remains safe and good for up to 2 months. The texture may become slightly denser after freezing and thawing, but it’s still delicious and a huge time-saver for party planning.
Serving Suggestions
Oreo cheesecake is spectacular on its own, but these accompaniments and serving ideas take it to the next level.
Classic Presentations:
Serve each slice on a dessert plate with a dollop of freshly whipped cream and a dusting of cocoa powder. Add a fresh strawberry or raspberry on the side for a pop of color and a bright, fruity contrast to the rich chocolate and cream. A mint sprig adds an elegant touch for formal occasions.
Decadent Drizzles:
Top individual slices with warm chocolate fudge sauce, salted caramel sauce, or raspberry sauce for beautiful color contrast and extra flavor. The warm sauce against the cold, creamy cheesecake creates a delightful temperature contrast.
Beverage Pairings:
Coffee is the classic pairing—the slight bitterness perfectly balances the sweet richness. An espresso, cappuccino, or even iced coffee are all excellent choices. For something special, try a dessert wine like Port or a sweet Moscato. Irish cream liqueur-spiked coffee is perfect for adult gatherings. Cold milk is the nostalgic choice that honors the Oreo cookie origins.
Party Presentation Ideas:
For impressive party presentation, place the whole cheesecake on a cake stand and surround the base with fresh berries or Oreo cookies. Dust the top with powdered sugar or cocoa powder just before serving. For kids’ parties, add colorful sprinkles and mini Oreos on top.
Occasion-Specific Serving:
For birthdays, add birthday candles right into the cheesecake—the dense texture holds candles perfectly. For holidays, theme the decorations appropriately: red and green sprinkles for Christmas, candy corn for Halloween, or red and pink hearts for Valentine’s Day. The neutral black and white base adapts beautifully to any holiday color scheme.
Creating a Dessert Board:
Build a stunning dessert platter with slices of Oreo cheesecake alongside chocolate-covered strawberries, additional Oreo cookies, chocolate truffles, fresh berries, and whipped cream. This creates an impressive spread perfect for celebrations.
Temperature Tips:
While cheesecake is stored in the refrigerator, let individual slices sit at room temperature for 10-15 minutes before serving. This slight warming brings out the flavors more fully and creates the creamiest, most luxurious texture.
FAQs Section
Q: Can I make Oreo cheesecake without a springform pan?
A: Yes, though presentation will be different. Line a 9-inch deep-dish pie pan with parchment paper with extra overhang on the sides. After chilling, use the parchment overhang to lift the cheesecake out onto a serving plate. Alternatively, make it in a 9×9-inch square baking dish and cut into squares—this “cheesecake bars” approach works wonderfully and is easier to serve.
Q: Why is my no-bake cheesecake not setting?
A: The most common reasons are: not whipping the cream to stiff peaks (it should stand up firmly), over-mixing after adding the whipped cream (which deflates the air), or not chilling long enough. Make sure you beat the cream until very firm, fold gently, and chill for at least 4 hours, preferably overnight. If it’s still too soft after overnight chilling, the heavy cream may not have been whipped sufficiently.
Q: Can I use a different type of cookie?
A: Absolutely! This recipe works with any chocolate sandwich cookie—try Hydrox, store brands, or fun Oreo flavors like mint, peanut butter, or golden Oreos. You can also use chocolate graham crackers or chocolate wafer cookies for the crust. Each creates a slightly different but equally delicious result.
Q: Do I have to use cream cheese, or can I use mascarpone?
A: While this recipe is designed for cream cheese, you can use mascarpone for an even richer, more luxurious texture. Mascarpone is softer and more delicate than cream cheese, so the cheesecake will be slightly less firm but incredibly silky and creamy. It’s a wonderful variation for special occasions.
Q: Why does my Oreo cheesecake have cracks?
A: One of the major advantages of no-bake cheesecake is that it never cracks! If you’re seeing cracks, you might be overmixing after adding the whipped cream, which can create structural issues as it sets. Remember to fold gently rather than beating vigorously once the whipped cream is added.
Q: Can I make this cheesecake dairy-free?
A: Yes, with some substitutions. Use dairy-free cream cheese (like Kite Hill or Tofutti), coconut cream instead of heavy whipping cream (refrigerate a can of full-fat coconut milk overnight and scoop out the solid cream), and dairy-free butter for the crust. The texture will be slightly different but still delicious. Make sure to use Oreos that fit your dietary needs—regular Oreos are actually accidentally vegan!
Q: How do I transport Oreo cheesecake safely?
A: Keep the cheesecake in the springform pan for transport to provide structural support. Place the pan on a flat, stable surface (like a rimmed baking sheet) in your vehicle, keep it refrigerated until the last possible moment, and transport in a cooler with ice packs if traveling more than 30 minutes. The cheesecake can safely be out of refrigeration for up to 2 hours in moderate temperatures.
Q: What’s the difference between baked and no-bake Oreo cheesecake?
A: Baked cheesecake has a denser, more traditional texture and a slightly tangy flavor from the longer interaction of ingredients. No-bake cheesecake is lighter, fluffier, almost mousse-like, and doesn’t require turning on your oven. No-bake is easier for beginners since there’s no risk of cracking, underbaking, or overbaking. Both are delicious but offer different textural experiences.
Conclusion
And there you have it—the ultimate guide to making absolutely perfect Oreo cheesecake that will have everyone convinced you ordered it from an expensive bakery! This no-bake cookies and cream cheesecake has been a showstopper at countless gatherings in my own kitchen, and I genuinely believe it can become your signature dessert too.
What I love most about this recipe is how it combines impressive results with surprising simplicity. You don’t need advanced baking skills, specialized equipment, or hours of your time—just some simple ingredients, a little mixing and folding, and patience while it chills. The reward is a stunning dessert that tastes as incredible as it looks and feeds a crowd beautifully.
The best part? Once you master this basic technique, you can customize it endlessly with different cookie flavors, toppings, and mix-ins to create new versions that suit any occasion or preference. From birthday parties to holiday celebrations to simple weekend indulgences, this easy Oreo cheesecake recipe has you covered.
I’d absolutely love to hear about your experience making this recipe! Did you try any of the variations? What did your family think? Did you discover any brilliant new topping combinations? Drop a comment below and share your Oreo cheesecake adventures—I read every single one and love seeing how readers make this recipe their own.