
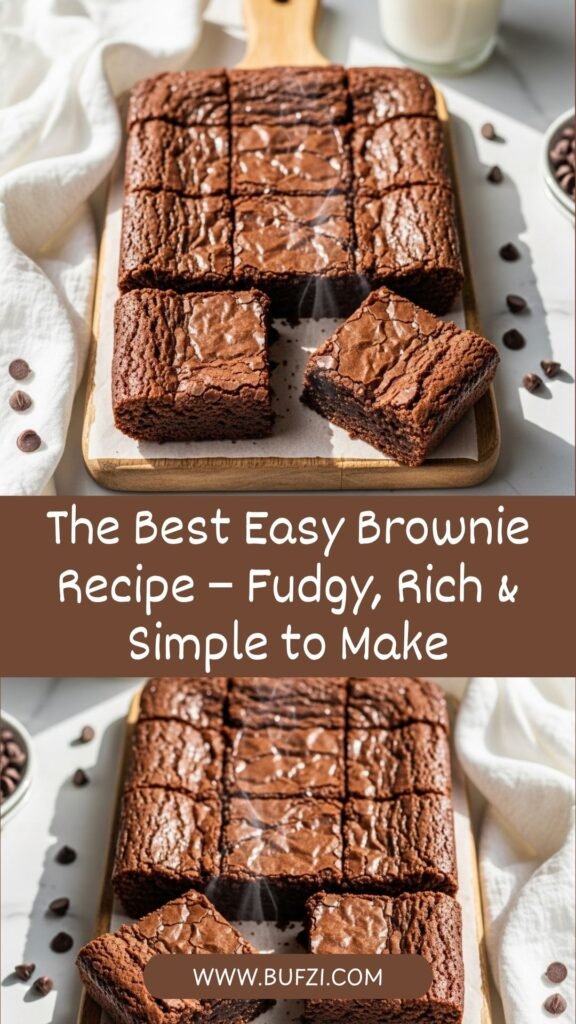
There’s something magical about biting into a perfectly baked brownie – that incredible combination of crackly top, fudgy center, and rich chocolate flavor that melts in your mouth. This easy brownie recipe is your go-to solution for satisfying chocolate cravings, impressing guests at potlucks, or creating a memorable dessert for family gatherings. Whether you’re a beginner baker or an experienced home cook, these homemade brownies come together in just one bowl with simple ingredients you probably already have in your pantry.
Unlike complicated desserts that require special techniques or expensive ingredients, this fudgy brownie recipe delivers bakery-quality results with minimal effort. They’re perfect for birthday parties, holiday celebrations, bake sales, or simply treating yourself on a cozy weekend afternoon. The best part? You can have these chocolate brownies in the oven in less than 15 minutes, making them one of the quickest homemade desserts you’ll ever make.
History / Background
The brownie is a uniquely American invention, with a fascinating backstory that’s as rich as the dessert itself. The first brownie recipe appeared in the late 19th century, with several origin stories claiming to be the “true” beginning of this beloved treat. One popular legend credits Bertha Palmer, a prominent Chicago socialite, who requested a dessert for ladies attending the 1893 World’s Columbian Exposition. She wanted something more elegant than cake but more portable than pie – and the brownie was born.
Another story attributes the creation to a chef at the Palmer House Hotel in Chicago, who accidentally created brownies when a batch of chocolate cookies didn’t rise properly. Instead of discarding the “mistake,” he cut the dense, fudgy result into bars, and guests loved them. The name “brownie” itself became official when the recipe appeared in the 1906 edition of Fannie Farmer’s Boston Cooking School Cookbook.
Throughout the 20th century, brownies evolved from a simple chocolate bar cookie into an American cultural icon. They became a staple at bake sales, school cafeterias, and family gatherings across the country. The debate between “fudgy” and “cakey” brownie lovers has raged for decades, with passionate advocates on both sides. This recipe delivers on the fudgy side – dense, moist, and intensely chocolatey, just the way brownies were originally intended to be.
Today, brownies represent comfort food at its finest. They’re the dessert that brings people together, the treat that makes everything feel a little better, and the baked good that even novice bakers can master with confidence.
Why You’ll Love This Recipe
This easy homemade brownie recipe has become my absolute favorite for good reason. Every time I make these, they disappear within hours, and I get countless requests for the recipe. What makes these brownies special is that they deliver professional bakery quality without any of the fuss or complexity you might expect.
Here’s why this brownie recipe will become your new favorite:
- Simple ingredients – No fancy chocolate or hard-to-find items required
- One-bowl method – Minimal cleanup means more time enjoying your brownies
- Incredibly fudgy texture – Dense, moist, and perfectly chewy in every bite
- Rich chocolate flavor – Deep, satisfying chocolate taste that doesn’t disappoint
- Quick preparation – Ready for the oven in just 10 minutes
- Foolproof results – Works perfectly every single time, even for beginners
- Budget-friendly – Costs less than $5 to make a full pan
- Family-approved – Kids and adults alike can’t resist these brownies
- Versatile base – Easy to customize with nuts, chocolate chips, or swirls
- Perfect for gifting – Wraps beautifully for bake sales or holiday presents
Ingredient Notes
Let me walk you through each ingredient and why it matters for creating the perfect fudgy brownies. Understanding your ingredients helps you make smart substitutions when needed.
Unsalted Butter – I always use unsalted butter so I can control the salt level in the recipe. The butter creates richness and contributes to that beautiful crackly top. You can substitute with salted butter if that’s what you have, just reduce the added salt by half. For a dairy-free version, use coconut oil or vegan butter.
Granulated Sugar – This isn’t just for sweetness; sugar creates structure and contributes to the shiny, crackly crust on top of your brownies. Don’t substitute with brown sugar as it will change the texture significantly.
Eggs – These provide structure and moisture. Use large eggs at room temperature for best results. The eggs help create that fudgy, dense texture we’re after. For egg-free brownies, you can try flax eggs, though the texture will be slightly different.
Vanilla Extract – Pure vanilla extract enhances the chocolate flavor and adds depth. Don’t skip this! Imitation vanilla works in a pinch, but pure extract gives superior results.
All-Purpose Flour – Provides just enough structure without making the brownies cakey. For gluten-free brownies, use a 1:1 gluten-free baking flour blend.
Unsweetened Cocoa Powder – This is where the chocolate flavor comes from. Use high-quality cocoa powder for best results. Dutch-process cocoa gives a darker color and milder flavor, while natural cocoa powder provides a more intense chocolate taste. Either works beautifully.
Salt – Essential for balancing sweetness and enhancing chocolate flavor. Never skip the salt!
Optional: Chocolate Chips – Folding in semi-sweet or dark chocolate chips creates pockets of melty chocolate throughout. This is optional but highly recommended for chocolate lovers.
Equipment Needed
You won’t need any fancy kitchen gadgets to make these brownies. Here’s everything you’ll need:
- 9×9-inch baking pan – The standard size for this recipe. You can also use an 8×8-inch pan for thicker brownies (add 5 minutes to baking time)
- Large mixing bowl – For combining all ingredients
- Whisk – To mix the batter smoothly
- Measuring cups and spoons – For accurate ingredient measurements
- Rubber spatula – For scraping down the bowl and spreading batter
- Parchment paper or aluminum foil – Makes cleanup easy and helps lift brownies out
- Cooling rack – For cooling the pan after baking
- Sharp knife – For cutting clean brownie squares
The Best Easy Brownie Recipe
- Total Time: 35 minutes
- Yield: 16 brownies 1x
- Diet: Vegetarian
Description
These easy fudgy brownies are incredibly rich, chocolatey, and simple to make with just one bowl. Perfect for chocolate lovers who want bakery-quality brownies at home without any fuss.
Ingredients
- ½ cup (115g) unsalted butter, melted
- 1 cup (200g) granulated sugar
- 2 large eggs, room temperature
- 1 teaspoon pure vanilla extract
- ⅓ cup (40g) unsweetened cocoa powder
- ½ cup (65g) all-purpose flour
- ¼ teaspoon salt
- ¼ teaspoon baking powder
- Optional: ½ cup (90g) chocolate chips
Instructions
- Preheat and Prepare: Preheat your oven to 350°F (175°C). Line a 9×9-inch baking pan with parchment paper, leaving an overhang on two sides for easy removal. Lightly grease the parchment paper.
- Mix Wet Ingredients: In a large mixing bowl, whisk together the melted butter and sugar until well combined and slightly lighter in color, about 1 minute. This creates the foundation for that shiny top crust.
- Add Eggs and Vanilla: Add the eggs one at a time, whisking well after each addition until the mixture becomes smooth and glossy. Stir in the vanilla extract. The mixture should look thick and satiny.
- Combine Dry Ingredients: In a small bowl, sift together the cocoa powder, flour, salt, and baking powder. This prevents lumps and ensures even distribution.
- Mix the Batter: Gently fold the dry ingredients into the wet ingredients using a spatula or wooden spoon. Mix just until no flour streaks remain – don’t overmix or your brownies will be tough. The batter will be thick and glossy.
- Add Chocolate Chips: If using, fold in the chocolate chips, reserving a few to sprinkle on top if desired.
- Bake: Pour the batter into your prepared pan and spread evenly with a spatula. Tap the pan on the counter a few times to release air bubbles. Bake for 25-30 minutes, or until a toothpick inserted in the center comes out with a few moist crumbs (not wet batter). The edges should look set while the center remains slightly soft.
- Cool and Slice: Allow the brownies to cool completely in the pan on a wire rack, at least 1 hour. This step is crucial for achieving the perfect fudgy texture. Once cooled, lift the brownies out using the parchment paper overhang and cut into 16 squares with a sharp knife.
Notes
- Don’t Overbake: The key to fudgy brownies is slightly underbaking them. They’ll continue cooking as they cool.
- Room Temperature Eggs: This helps create a smoother batter and better texture.
- Quality Cocoa: Use the best cocoa powder you can afford – it makes a noticeable difference in flavor.
- Clean Cuts: For picture-perfect squares, wipe your knife clean between each cut.
- Storage: Keep in an airtight container at room temperature for 3-4 days.
- Prep Time: 10 minutes
- Cook Time: 25 minutes
- Category: Dessert
- Method: Baking
- Cuisine: American
Nutrition
- Serving Size: 1 brownie (1/16 of pan)
- Calories: 145
- Sugar: 15g
- Sodium: 52mg
- Fat: 7g
- Saturated Fat: 4g
- Unsaturated Fat: 2.5g
- Trans Fat: 0g
- Carbohydrates: 20g
- Fiber: 1g
- Protein: 2g
- Cholesterol: 35mg
Tips & Variations
One of the best things about this easy brownie recipe is how versatile it is. Here are my favorite ways to customize these brownies:
Nutty Brownies: Fold in ½ cup of chopped walnuts, pecans, or almonds for added crunch and flavor. Toast the nuts first for even better taste.
Double Chocolate Brownies: Add ½ cup of chocolate chips or chunks to the batter and sprinkle more on top before baking for an extra chocolatey experience.
Swirled Brownies: Drop spoonfuls of cream cheese mixture, peanut butter, or caramel on top of the batter and swirl with a knife before baking.
Mint Chocolate Brownies: Add ½ teaspoon peppermint extract along with the vanilla and fold in dark chocolate chips or chopped Andes mints.
Espresso Brownies: Add 1 tablespoon of instant espresso powder to enhance the chocolate flavor without making them taste like coffee.
S’mores Brownies: Press graham cracker pieces into the bottom of the pan, make the brownies, and top with mini marshmallows in the last 3 minutes of baking.
Salted Caramel Brownies: Drizzle with caramel sauce after baking and sprinkle with flaky sea salt.
Raspberry Brownies: Gently press fresh raspberries into the top of the batter before baking for a fruity twist.
Pro Chef Tips
After years of perfecting brownies, here are my professional tips for achieving bakery-quality results every time:
Measure Flour Correctly: Spoon flour into your measuring cup and level it off with a knife. Don’t pack or scoop directly from the bag, as this adds too much flour and makes dry brownies.
Use Room Temperature Ingredients: Cold eggs don’t incorporate as smoothly and can affect texture. Let them sit on the counter for 15 minutes before baking.
Don’t Overmix: Once you add the flour, mix just until combined. Overmixing develops gluten, which makes brownies tough instead of tender and fudgy.
The Toothpick Test: Insert a toothpick about 2 inches from the edge, not the center. It should come out with a few moist crumbs, not wet batter. The center will look slightly underdone, but it will finish cooking as it cools.
Cool Completely Before Cutting: I know it’s tempting, but warm brownies are nearly impossible to cut cleanly. Cooling allows them to set properly and develop that perfect fudgy texture.
Use Quality Chocolate: Since chocolate is the star ingredient, using high-quality cocoa powder makes a noticeable difference. Brands like Ghirardelli, Valrhona, or Guittard deliver superior flavor.
Line Your Pan Properly: Create a parchment paper sling by cutting two pieces that overlap in the center. This makes removing the entire brownie slab effortless.
Bang Out the Bubbles: After pouring batter into the pan, tap it firmly on the counter 10-15 times to release air bubbles and create a smooth top.
Common Mistakes to Avoid
Even with a simple recipe, there are a few pitfalls that can affect your brownie success. Here’s what to watch out for:
Overbaking: This is the number one mistake! Fudgy brownies need to be slightly underbaked. Remember they continue cooking as they cool. If you wait until a toothpick comes out completely clean, you’ve gone too far.
Using Cold Ingredients: Cold butter, eggs, or other ingredients don’t combine smoothly and can create an uneven texture. Always use room temperature ingredients for the best results.
Skipping the Cooling Time: I know waiting is hard, but cutting brownies while they’re still warm results in a crumbly mess. Give them at least an hour to cool, or better yet, refrigerate for 30 minutes before cutting.
Not Greasing the Parchment: Even though you’re using parchment paper, a light spray or butter coating prevents sticking and ensures easy removal.
Measuring Cocoa Incorrectly: Cocoa powder should be spooned into the measuring cup and leveled, not packed. Too much cocoa creates dry, bitter brownies.
Opening the Oven Door Too Often: Every time you open the oven, the temperature drops, which affects baking time and can prevent that beautiful crackly top from forming.
Using a Dull Knife: A sharp knife makes clean cuts. Wipe the blade clean between each cut for the most professional-looking brownies.
Storage & Meal Prep
Proper storage keeps your brownies tasting fresh and fudgy for days. Here’s how to store them correctly:
Room Temperature Storage: Place brownies in an airtight container with parchment or wax paper between layers. They’ll stay fresh at room temperature for 3-4 days. Don’t refrigerate unless your kitchen is very warm, as refrigeration can dry them out.
Refrigerator Storage: If you prefer your brownies cold and extra fudgy, or if your kitchen is hot, refrigerate them in an airtight container for up to 1 week. Bring to room temperature before serving for the best flavor and texture.
Freezer Storage: Brownies freeze beautifully! Wrap individual brownies tightly in plastic wrap, then place them in a freezer-safe bag or container. They’ll keep for up to 3 months. Thaw at room temperature for about an hour, or microwave for 15-20 seconds for a warm, gooey treat.
Maintaining Freshness: Always store brownies in an airtight container to prevent them from drying out. If they do get a bit dry, a few seconds in the microwave with a cup of water nearby helps restore moisture.
Reheating Tips: For that fresh-from-the-oven experience, warm individual brownies in the microwave for 10-15 seconds, or place the entire pan in a 300°F oven for 5-7 minutes.
Make-Ahead & Freezer Notes
These brownies are perfect for advance preparation, making them ideal for parties, potlucks, or simply having a sweet treat ready when cravings strike.
Make-Ahead Instructions: You can prepare the entire brownie batter up to 24 hours in advance. Store covered in the refrigerator, then bring to room temperature before baking (this takes about 30 minutes). Alternatively, bake the brownies completely, let them cool, and store covered at room temperature for up to 2 days before serving.
Freezing Unbaked Batter: While I generally prefer freezing baked brownies, you can freeze the batter in the lined pan, wrapped tightly in plastic wrap and aluminum foil, for up to 1 month. Bake from frozen, adding 10-15 minutes to the baking time.
Freezing Baked Brownies: This is my preferred method. Cut brownies into squares, wrap each individually in plastic wrap, then place in a freezer bag. They’ll stay fresh for 3 months. This method is perfect for portion control and having dessert ready anytime.
Best Thawing Method: Remove brownies from the freezer and let them thaw at room temperature for 45-60 minutes. For a warm treat, microwave frozen brownies for 20-30 seconds. They taste like they just came out of the oven!
Party Planning Tip: Make brownies 1-2 days ahead and store at room temperature, cutting them the day of your event. This actually improves the texture, as the flavors meld and the consistency becomes even more fudgy.
Serving Suggestions
While these brownies are absolutely incredible on their own, here are some delicious ways to serve them that will take your dessert game to the next level:
Classic Pairing: Serve warm brownies with a tall glass of cold milk for the ultimate comfort food combination.
Ice Cream Sundae: Top a warm brownie with vanilla ice cream, hot fudge sauce, whipped cream, and a cherry for an indulgent brownie sundae.
With Fresh Berries: Balance the richness with fresh strawberries, raspberries, or sliced bananas on the side. The fruit adds brightness and freshness.
Coffee Bar Dessert: Serve brownies alongside coffee, espresso, or hot chocolate for an elegant dessert buffet at dinner parties.
Brownie à la Mode: Warm brownies topped with a scoop of your favorite ice cream (vanilla, mint chip, or coffee flavored) create an irresistible dessert.
Dusted with Powdered Sugar: A light dusting of powdered sugar adds a professional bakery look and a touch of extra sweetness.
Drizzled with Sauce: Top with caramel sauce, chocolate ganache, peanut butter drizzle, or raspberry coulis for an elegant presentation.
With Whipped Cream: A dollop of freshly whipped cream or Cool Whip adds a light, creamy contrast to the dense, fudgy brownies.
Crumbled Over Ice Cream: Break brownies into chunks and layer with ice cream in parfait glasses for a show-stopping dessert.
FAQs Section
Can I make these brownies without eggs?
Yes! You can substitute each egg with a “flax egg” (1 tablespoon ground flaxseed mixed with 3 tablespoons water, let sit 5 minutes) or use ¼ cup applesauce per egg. The texture will be slightly different but still delicious.
Why are my brownies cakey instead of fudgy?
This usually happens from overbaking or using too much flour. Make sure you’re measuring flour correctly (spoon and level), and remove brownies from the oven when they still look slightly underdone in the center. They’ll finish cooking as they cool.
Can I double this recipe?
Absolutely! Double all ingredients and bake in a 9×13-inch pan for 30-35 minutes. Check for doneness with the toothpick test, as oven temperatures vary.
How do I get that shiny, crackly top?
The key is beating the sugar and melted butter together vigorously for at least a minute before adding eggs. This incorporates air and creates that signature glossy crust. Also, make sure your oven temperature is accurate.
Can I use a different size pan?
Yes, but baking time will change. An 8×8-inch pan makes thicker brownies (bake 35-40 minutes), while a 9×13-inch pan makes thinner brownies (bake 20-25 minutes). Always use the toothpick test to check doneness.
What’s the best way to cut clean brownie squares?
Use a sharp knife and wipe it clean with a damp cloth between each cut. For the cleanest cuts, chill brownies for 30 minutes before cutting. You can also use a plastic knife, which prevents sticking.
Can I use melted chocolate instead of cocoa powder?
You can add melted chocolate in addition to cocoa powder for extra richness, but don’t replace the cocoa powder entirely as it would change the recipe’s liquid ratio and texture.
Conclusion
There’s nothing quite like a batch of homemade fudgy brownies to make any day special. This easy brownie recipe has become a staple in my kitchen, and I’m confident it’ll become one of yours too. Whether you’re baking for a crowd, treating your family, or simply satisfying your own chocolate cravings, these brownies deliver every single time.
The beauty of this recipe lies in its simplicity – no mixer required, no complicated steps, just one bowl and basic ingredients transformed into something absolutely magical. The rich chocolate flavor, dense fudgy texture, and that gorgeous crackly top make these brownies taste like they came from a gourmet bakery, but only you’ll know how easy they were to make.
I’d love to hear how your brownies turn out! Did you try any of the variations? Do you prefer yours with nuts or extra chocolate chips? Drop a comment below and share your experience. And if you loved this recipe as much as my family does, please save it to your Pinterest boards so you can find it again and again. Your friends and family will thank you when you show up with a batch of these incredible brownies!
Happy baking, and enjoy every fudgy, chocolatey bite!