
There’s nothing quite like the aroma of teriyaki chicken cooking – that intoxicating combination of savory soy sauce, sweet brown sugar, and charred chicken that fills your kitchen with the scent of something absolutely delicious. This best teriyaki chicken recipe delivers authentic Japanese-inspired flavors with a gorgeous glossy glaze that makes perfectly juicy chicken absolutely irresistible. Whether you’re seeking a quick weeknight dinner that feels special, looking to impress family and guests, or craving restaurant-quality Asian flavors at home, this easy teriyaki chicken recipe delivers outstanding results every single time.
What makes this homemade teriyaki chicken recipe so special is achieving that perfect balance of tender, juicy chicken with a rich, sticky glaze that’s neither too sweet nor too salty – just perfectly balanced. Unlike restaurant versions that can be overly thick or one-dimensional, this teriyaki chicken recipe uses proper technique and quality ingredients to create authentic teriyaki flavors that feel complex yet remain surprisingly simple to make. In just 25 minutes from prep to plate, you’ll have restaurant-quality sticky teriyaki chicken that tastes like takeout but is infinitely more delicious and budget-friendly. This elegant yet simple teriyaki chicken recipe has become a family favorite because it’s quick, impressive, customizable, and absolutely delicious.
History / Background
Teriyaki is a traditional Japanese cooking method with a fascinating history rooted in Japanese culinary tradition. The word “teriyaki” comes from two Japanese words: “teri,” meaning gloss or shine, and “yaki,” meaning grilled or broiled. The cooking method creates that characteristic glossy finish on food through a specific glazing technique.
Teriyaki as a cooking method emerged during the Edo Period in Japan (1603-1868) when sugar became more widely available as a luxury ingredient. Before this time, Japanese cooking relied heavily on fermented ingredients and salt for flavor. The introduction of more accessible sugar allowed Japanese cooks to develop new cooking techniques, including teriyaki.
Traditional teriyaki involves cooking protein or vegetables and then finishing with a thick, glossy glaze made from soy sauce, sugar (or mirin – a sweet rice wine), and other seasonings. The glaze is cooked until it becomes thick and shiny, clinging to the food and creating both visual appeal and complex flavors through caramelization.
Teriyaki remained relatively unknown outside Japan until after World War II when American soldiers returned home with stories of Japanese cuisine. The technique gained broader recognition during the 1960s and 1970s as Japanese restaurants opened in American cities and Japanese cuisine became increasingly trendy. Teriyaki chicken specifically became hugely popular in America as restaurants adapted the traditional technique for chicken, a protein more familiar to American palates than some traditional Japanese preparations.
The American adaptation of teriyaki chicken created a unique fusion reflecting both authentic Japanese technique and American preferences. While traditional teriyaki might use different proteins or vegetables, American-style teriyaki chicken became simplified for home cooking – accessible to busy cooks while maintaining the essential character of the dish.
Today, teriyaki chicken represents one of America’s favorite Asian-inspired dishes, appearing on restaurant menus, in home kitchens, and in countless recipe collections. The dish demonstrates how culinary traditions evolve and adapt while maintaining their essential appeal and character.
Why You’ll Love This Recipe
This easy teriyaki chicken recipe is the ultimate quick dinner solution – impressive, delicious, and absolutely foolproof. I’ve perfected this recipe through countless dinners to bring you the definitive version that delivers restaurant-quality sticky teriyaki chicken every single time.
Here’s why this best teriyaki chicken recipe will become your new favorite:
- Ready in just 25 minutes – From prep to dinner plate in less time than ordering takeout
- Restaurant-quality glaze – That gorgeous glossy finish and complex flavor without complicated techniques
- Perfectly juicy chicken – Tender, juicy chicken that stays moist and delicious
- Naturally customizable – Add vegetables, adjust sweetness, or create spicy variations
- Budget-friendly – Costs just dollars to make compared to restaurant takeout
- Impressively easy – Looks fancy but requires no special skills or complicated steps
- Make-ahead friendly – Marinate chicken ahead and cook fresh, or prepare completely ahead
- One-pan meal – Everything cooks in one skillet for minimal cleanup
- Perfect for entertaining – Impressive enough for dinner guests yet simple enough for family dinners
- Freezer-ready – Leftover teriyaki chicken freezes beautifully for quick future meals
- Kid-approved – Sweet glaze appeals to various palates while tasting genuinely good
- Naturally customizable – Adjust heat, sweetness, or add vegetables to personalize
Ingredient Notes
Creating perfect teriyaki chicken requires understanding each ingredient’s role and choosing quality options that create authentic, complex flavors.
Chicken Thighs or Breasts – Two pounds of boneless, skinless chicken thighs or breasts provide the protein base. Chicken thighs stay juicier than breast during cooking, though breasts work beautifully with proper technique. Cut chicken into roughly 2-inch pieces for even cooking and easier sauce adherence. Uniform sizing ensures even cooking throughout.
Soy Sauce – One-third cup of soy sauce provides the foundational salty, umami-rich flavor that defines teriyaki. Use regular soy sauce for traditional flavor, or tamari for gluten-free option. Soy sauce brings depth and complexity that salt alone can’t replicate. Quality soy sauce makes a noticeable difference.
Brown Sugar – One-quarter cup of packed brown sugar provides sweetness and develops complex caramelized flavors during cooking. Brown sugar creates deeper, molasses-forward sweetness than white sugar. The sugar caramelizes slightly during cooking, creating rich flavor complexity.
Ginger and Garlic – One and a half tablespoons each of fresh minced ginger and garlic provide aromatic depth and complexity. Fresh ginger and garlic taste dramatically better than powdered versions. These aromatics are essential to authentic teriyaki flavor.
Rice Vinegar – Two tablespoons of rice vinegar adds brightness and acidity that balances the sweetness of sugar and saltiness of soy sauce. Rice vinegar’s milder flavor is perfect for Asian dishes. The acidity is crucial for proper flavor balance.
Mirin – Two tablespoons of mirin (sweet rice wine) adds authentic depth and natural sweetness. If unavailable, substitute with honey or additional brown sugar, though flavor will be slightly different. Mirin creates the traditional teriyaki glaze shine.
Cornstarch – One tablespoon mixed with water creates a slurry that thickens the sauce to proper glaze consistency. This optional ingredient creates the thick, glossy glaze characteristic of teriyaki. Without it, the sauce remains thin.
Neutral Oil – Two tablespoons of vegetable or canola oil for cooking chicken. This neutral oil provides the fat needed for browning without interfering with sauce flavors.
Optional Additions:
- Red pepper flakes for heat
- White pepper for subtle spice
- Fresh ginger for extra intensity
- Scallions for garnish
- Sesame seeds for texture
- Lime juice for brightness
Substitutions: Use chicken breast instead of thighs if preferred. Replace mirin with honey or maple syrup. Use tamari instead of soy sauce for gluten-free option. Substitute rice vinegar with lemon juice for different acidity. Add pineapple juice for sweetness.
Equipment Needed
- Large skillet or wok – 12-14 inch skillet is ideal for cooking chicken evenly
- Cutting board and sharp knife – For cutting chicken into uniform pieces
- Measuring cups and spoons – For accurate ingredient quantities
- Small bowl – For mixing glaze ingredients
- Whisk – For combining sauce ingredients smoothly
- Wooden spoon or silicone spatula – For stirring without scratching pan
- Tongs – For turning chicken pieces during cooking
- Paper towels – For patting chicken dry before cooking
- Small saucepan or microwave-safe bowl – For warming glaze if needed
- Garlic press or mincer – Optional but helpful for mincing garlic quickly
- Ginger grater or microplane – For mincing fresh ginger
- Meat thermometer – Optional but helpful for checking doneness
- Serving platter or individual bowls – For presenting finished teriyaki chicken
Teriyaki Chicken Recipe
- Total Time: 25 minutes
- Yield: 4 servings 1x
- Diet: Gluten Free
Description
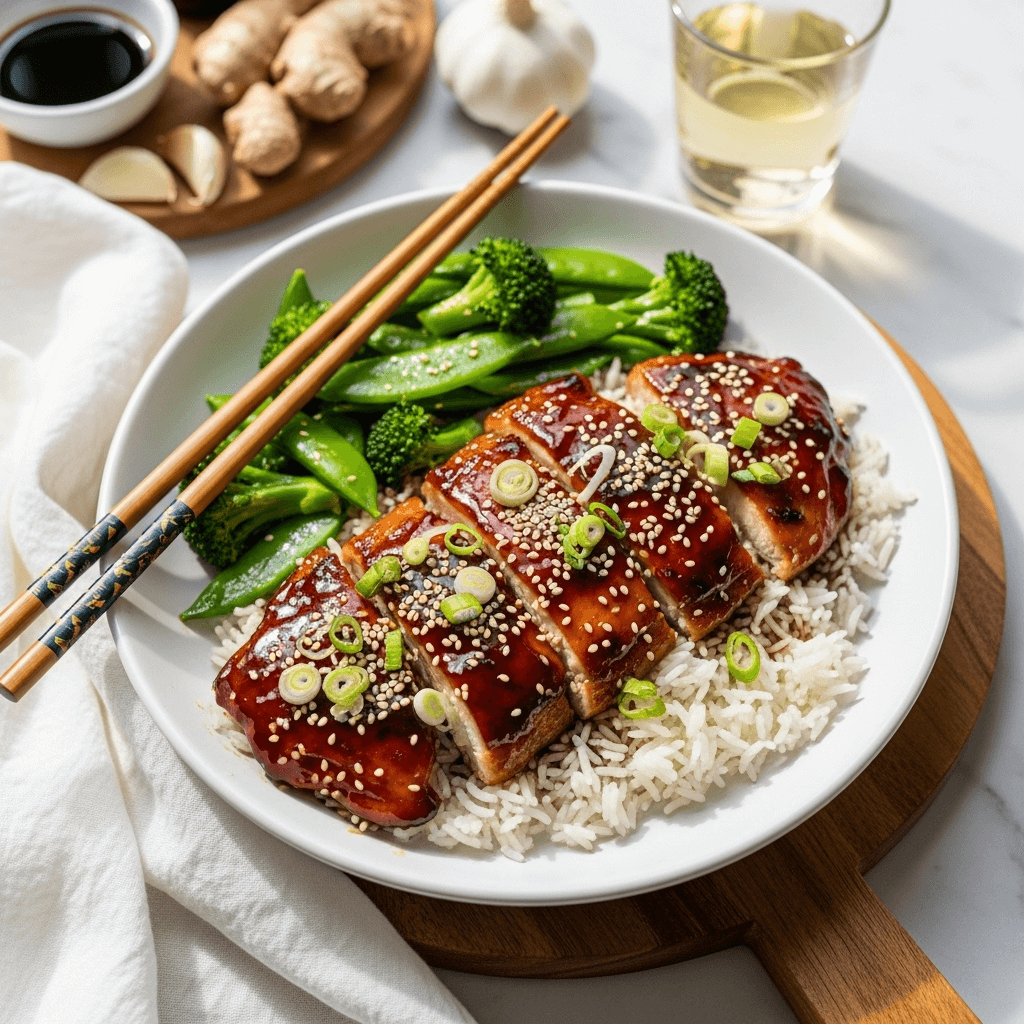
This best teriyaki chicken recipe delivers tender, juicy chicken with a gorgeous glossy glaze in just 25 minutes. Made with simple, quality ingredients and proper technique, this easy homemade teriyaki chicken tastes restaurant-quality while being surprisingly simple to make at home.
Ingredients
For the Chicken:
- 2 pounds boneless, skinless chicken thighs or breasts, cut into roughly 2-inch pieces
- 2 tablespoons neutral oil (vegetable or canola)
- Salt and pepper to taste
For the Teriyaki Glaze:
- ⅓ cup soy sauce (or tamari for gluten-free)
- ¼ cup packed brown sugar
- 2 tablespoons rice vinegar
- 2 tablespoons mirin (or honey/maple syrup if unavailable)
- 1½ tablespoons fresh ginger, minced
- 3 cloves garlic, minced
- 1 tablespoon cornstarch mixed with 2 tablespoons water (optional, for thicker glaze)
Optional Garnish:
- 2 tablespoons sliced scallions
- Sesame seeds
- Fresh cilantro
- Red pepper flakes
- Lime wedges
Instructions
- Prepare the chicken. Pat chicken pieces completely dry with paper towels. Moisture prevents proper browning. Season lightly with salt and pepper. Uniform sizing ensures even cooking – aim for roughly 2-inch pieces.
- Mix teriyaki glaze. In a small bowl, whisk together soy sauce, brown sugar, rice vinegar, mirin, minced ginger, and minced garlic until sugar is mostly dissolved. The mixture should be well combined and aromatic. This creates the base for your teriyaki sauce.
- Heat skillet and prepare to cook chicken. Place a large skillet over medium-high heat. Let it preheat for about 1 minute. The pan should be hot enough for proper browning but not smoking – you want to brown the chicken, not char it.
- Add oil to hot skillet. Add neutral oil to the hot skillet and let it heat for 30 seconds until shimmering. The oil should coat the bottom evenly. Don’t skip preheating – cold oil results in different browning.
- Brown the chicken. Working in batches if necessary to avoid overcrowding (crowded pan prevents proper browning), add chicken pieces to the hot skillet in a single layer. Let them cook undisturbed for 3-4 minutes until golden brown on the bottom. Don’t move them around – you want that golden brown color to develop.
- Turn and continue browning. Flip chicken pieces and cook for another 3-4 minutes until the second side is golden brown. The chicken doesn’t need to be completely cooked through at this point – it will finish cooking in the glaze.
- Pour glaze over chicken. Pour the prepared teriyaki glaze over the browned chicken in the skillet. Stir gently to coat all chicken pieces with the glaze. The sauce should coat the chicken and fill the bottom of the skillet.
- Simmer and reduce glaze. Reduce heat to medium and let the mixture simmer for about 5-7 minutes, stirring occasionally, until the chicken is cooked through (internal temperature 165°F) and the glaze has thickened and reduced slightly. The sauce should be glossy and coat the chicken beautifully.
- Thicken glaze if desired. If you prefer a thicker glaze, add the optional cornstarch slurry (cornstarch mixed with water) and stir for about 1 minute until the sauce thickens to desired consistency. This creates that thick, glossy glaze characteristic of teriyaki, though it’s optional.
- Taste and adjust. Taste the teriyaki chicken and adjust seasonings. Add a pinch more salt if needed, or a splash more rice vinegar for brightness. Adjust heat level by adding red pepper flakes if desired.
- Serve immediately. Transfer teriyaki chicken to a serving platter or individual bowls. Garnish with sliced scallions, sesame seeds, and fresh cilantro if desired. Serve immediately while hot, over steamed rice or with your choice of sides.
Notes
- Pat chicken dry – Moisture prevents proper browning; dry thoroughly with paper towels
- Don’t overcrowd – Cook chicken in batches if necessary; crowding prevents browning
- Brown first, glaze second – Browning develops flavor before adding sauce
- Cornstarch is optional – Use for thicker glaze, or skip for thinner sauce
- Fresh ginger and garlic matter – Quality aromatics make authentic flavor difference
- Adjust sweetness to taste – Add more brown sugar for sweeter glaze, or reduce for less sweet
- Serve over rice – Traditional presentation with steamed white or brown rice
- Make ahead components – Prepare glaze ahead and cook chicken fresh, or cook completely ahead
- Prep Time: 10 minutes
- Cook Time: 15 minutes
- Category: Dinner
- Method: Stovetop
- Cuisine: Japanese
Nutrition
- Serving Size: 1 serving (about 6 ounces)
- Calories: 320
- Sugar: 12g
- Sodium: 580mg
- Fat: 12g
- Saturated Fat: 3g
- Unsaturated Fat: 7g
- Trans Fat: 0g
- Carbohydrates: 18g
- Fiber: 0f
- Protein: 38g
- Cholesterol: 140mg
Tips & Variations
Protein Variations:
- Teriyaki Salmon: Use salmon fillets instead of chicken; reduce cooking time to 8-10 minutes
- Teriyaki Shrimp: Use large shrimp; cook for just 3-4 minutes total until pink
- Teriyaki Beef: Use sirloin or flank steak sliced thin; increase cooking time slightly
- Teriyaki Pork: Use pork tenderloin cubed; cook for 10-12 minutes
- Vegetarian Teriyaki: Use extra-firm tofu or thick vegetable slices
Vegetable Additions:
- Mixed Vegetable Teriyaki: Add broccoli, bell peppers, snap peas, and carrots
- Pineapple Teriyaki: Add fresh pineapple chunks for tropical sweetness
- Mushroom Teriyaki: Add sliced shiitake or cremini mushrooms for earthiness
- Ginger Stir Fry Teriyaki: Add diced ginger and scallions for extra aromatics
- Sesame Vegetable: Add sesame seeds and Asian vegetables
Flavor Variations:
- Spicy Teriyaki: Add red pepper flakes, sriracha, or chili oil for heat
- Honey Teriyaki: Replace brown sugar with honey for smoother sweetness
- Orange Teriyaki: Add fresh orange juice and zest for brightness
- Maple Teriyaki: Use maple syrup for different sweetness profile
- Sesame Ginger: Increase ginger and add sesame oil for deeper flavor
- Pineapple Teriyaki: Add ¼ cup pineapple juice for tropical notes
Cooking Method Variations:
- Oven Teriyaki: Bake marinated chicken at 400°F for 18-20 minutes, then broil with glaze
- Slow Cooker: Cook on low for 4-5 hours with glaze; thicken at the end if desired
- Grilled Teriyaki: Grill chicken and brush with glaze multiple times
- Air Fryer: Cook at 375°F for 12-14 minutes, glazing in final minutes
Make-Ahead Strategies:
- Marinate overnight: Marinate chicken in glaze ingredients overnight for maximum flavor
- Prep components: Mix glaze ahead; cut chicken ahead; combine and cook fresh
- Cook completely ahead: Cook teriyaki chicken completely and refrigerate; reheat gently
Healthier Versions:
- Lower sugar: Reduce brown sugar to 2 tablespoons and increase ginger for flavor
- Lower sodium: Use low-sodium soy sauce or reduce amount by one-third
- Extra vegetables: Add 2-3 cups vegetables for more volume and nutrition
- Oil reduction: Use just 1 tablespoon oil or use cooking spray
Pro Chef Tips
Pat chicken completely dry – Moisture prevents proper browning and creates steam. Use paper towels and really dry the surface. This simple step is crucial for achieving that golden brown color.
Brown chicken first, glaze second – Browning develops flavor through the Maillard reaction. Add glaze only after achieving proper browning. This two-stage cooking creates more complex flavors than cooking in sauce from the start.
Use high enough heat for browning – Medium-high heat is necessary for proper browning. Lower heat results in steamed chicken rather than browned. Your skillet should be hot enough that oil shimmers, not smokes.
Don’t overcrowd the skillet – If chicken pieces touch, they steam instead of brown. Cook in batches if needed. Properly browned chicken in batches is far superior to crowded, steamed chicken.
Fresh aromatics matter – Quality fresh ginger and garlic make an enormous difference in final flavor. Don’t use powdered ginger or garlic powder – fresh is worth the extra step.
Taste and adjust seasonings – Every soy sauce brand varies slightly in saltiness. Taste the finished teriyaki and adjust with additional soy sauce, vinegar, or sweetener as needed. Balance is everything.
Optional cornstarch creates authentic glaze – While not essential, a cornstarch slurry creates that thick, glossy glaze characteristic of teriyaki. If you prefer thinner sauce, simply skip this step.
Use proper oil for cooking – Neutral oils with higher smoke points work best. Avoid olive oil which has lower smoke point and different flavor. Vegetable or canola oil is traditional choice.
Rest chicken briefly after cooking – Let finished teriyaki chicken rest for a minute before serving. This allows juices to redistribute, keeping the chicken juicier when you bite into it.
Balance flavors carefully – Teriyaki should have balanced sweetness, saltiness, acidity, and umami. Taste and adjust – no single flavor should overwhelm. The glaze should be complex, not one-dimensional.
Common Mistakes to Avoid
Not patting chicken dry – Wet chicken won’t brown properly. Pat completely dry with paper towels before cooking. This is crucial for achieving proper browning and flavor development.
Not browning chicken before adding glaze – Adding glaze immediately results in steamed chicken rather than browned. Brown first for 6-8 minutes, then add glaze. Browning develops essential flavor.
Overcrowding the skillet – Too much chicken at once lowers temperature and creates steam. Cook in batches if needed. Properly browned chicken in batches is far better than crowded chicken.
Using low-quality soy sauce – Budget soy sauce lacks complexity and depth. Use quality soy sauce – the difference is noticeable. Soy sauce is a primary ingredient that should be good quality.
Not tasting and adjusting seasonings – Different soy sauce brands vary in saltiness. Always taste finished teriyaki and adjust with soy sauce, vinegar, or sweetener. Don’t assume it’s perfect without tasting.
Using powdered ginger or garlic – Powdered versions lack the fresh, bright quality of fresh ginger and garlic. Fresh aromatics are essential to authentic teriyaki flavor. Use fresh or don’t add.
Cooking too long – Chicken becomes tough if overcooked. Cook just until internal temperature reaches 165°F. Don’t continue cooking in the glaze longer than necessary.
Storage & Meal Prep
Storing Leftovers: Keep leftover teriyaki chicken in an airtight container in the refrigerator for up to 4 days. The chicken maintains good flavor and the glaze tastes great reheated. Store with or without glaze.
Reheating Instructions: Reheat teriyaki chicken gently on the stovetop over medium-low heat in a covered skillet with a splash of water or broth, stirring occasionally, for about 5 minutes until heated through. Alternatively, microwave in a microwave-safe container, stirring every 30 seconds. Stovetop reheating preserves texture better than microwaving.
Freezing: Cool teriyaki chicken completely, then freeze in airtight containers for up to 3 months. Thaw overnight in the refrigerator before reheating. Freezing slightly affects chicken texture but flavor remains excellent.
Shelf Life: Properly stored in the refrigerator, teriyaki chicken maintains best quality for 3-4 days, though still safe to eat for up to 5 days. The glaze becomes slightly thicker as it cools.
Meal Prep Strategy: Prepare teriyaki chicken in a double batch on the weekend. Cool, portion into containers, and refrigerate for up to 4 days or freeze for up to 3 months. Use for quick lunches and dinners throughout the week.
Make-Ahead & Freezer Notes
Can You Make It Ahead? Absolutely! Marinate chicken in glaze ingredients overnight for maximum flavor. Cook teriyaki chicken completely and refrigerate for up to 4 days. The dish actually improves as flavors continue to meld.
Freezer-Friendly Details: Cooked teriyaki chicken freezes beautifully for up to 3 months. Cool completely before freezing in airtight containers. The chicken emerges from freezing with good quality and excellent flavor.
Best Reheating Method: Thaw overnight in the refrigerator, then reheat gently on the stovetop over medium-low heat in a covered skillet with a splash of water or broth, stirring occasionally, for about 5 minutes. This method preserves texture better than microwave reheating.
Make-Ahead Timeline:
- One day ahead: Marinate chicken in glaze and refrigerate
- Morning of: Remove from refrigerator 30 minutes before cooking
- Cooking time: Prepare teriyaki chicken in about 25 minutes
- Leftovers: Refrigerate for up to 4 days or freeze for up to 3 months
Batch Cooking: Make a triple batch on Sunday. Cool separate portions in different containers and freeze for grab-and-go meals throughout the month. This spreads preparation time while providing quick meals.
Component Freezing: You can freeze just the cooked chicken separately from the glaze, then combine with fresh glaze when reheating for maximum fresh flavor.
Serving Suggestions
Perfect teriyaki chicken deserves equally delicious accompaniments that enhance its sweet-savory appeal.
Rice Options:
- Steamed white rice for traditional presentation
- Brown rice for nuttier flavor and added nutrition
- Jasmine rice for aromatic option
- Sticky rice for Asian presentation
- Cauliflower rice for lower-carb option
- Basmati rice for fragrant grain
Vegetable Sides:
- Steamed broccoli for simple green vegetable
- Roasted bok choy with garlic
- Stir-fried snap peas with ginger
- Steamed edamame with sea salt
- Roasted Brussels sprouts
- Sautéed mushrooms
Salad Pairings:
- Asian cucumber salad with rice vinegar
- Sesame spinach salad
- Coleslaw with ginger-sesame dressing
- Spring mix with ginger vinaigrette
- Arugula with citrus dressing
Beverage Pairings:
- Green tea for traditional pairing
- Sake for Japanese pairing
- Beer – lager or pale ale
- Sparkling water with lime
- Ginger ale for spicy complement
- Iced tea with lemon
- White wine for lighter pairing
Sauce Accompaniments:
- Sriracha for additional heat
- Chili oil for depth and heat
- Rice vinegar for brightness
- Lime wedges for fresh contrast
- Sesame seeds for garnish
- Fresh cilantro for brightness
Complete Meal Examples:
- Teriyaki chicken over brown rice with stir-fried vegetables
- Japanese-style bowl with teriyaki chicken, rice, and pickled vegetables
- Teriyaki chicken with roasted broccoli and steamed jasmine rice
- Asian fusion: teriyaki chicken, cauliflower rice, and steamed edamame
Occasion Ideas:
- Quick weeknight family dinner
- Impressive entertaining main course
- Meal prep lunch portions
- Restaurant-style dinner at home
- Casual weeknight cooking
- Date night dinner
- Sunday family gathering
- Potluck contribution
FAQs Section
Can I use chicken breast instead of thighs? Absolutely! Chicken breast works beautifully, though it’s slightly less forgiving due to lower fat content. Cut breast into smaller pieces and don’t overcook – breast meat becomes tough if overcooked. Monitor internal temperature carefully, aiming for exactly 165°F without going higher.
What if I don’t have mirin? You can substitute with honey, maple syrup, or additional brown sugar using the same amount. The flavor will be slightly different – less complex than with mirin – but still delicious. Mirin creates authentic depth, but alternatives work well.
Can I make this in the oven instead? Yes! Marinate chicken, arrange on a baking sheet, and bake at 400°F for 18-20 minutes. Then broil for 2-3 minutes while basting with glaze. This method works well but doesn’t create the same browning as stovetop cooking.
How do I make it spicier? Add red pepper flakes, sriracha, or chili oil to the glaze. Start with ¼ teaspoon red pepper flakes and adjust upward to your heat preference. You can also serve hot sauce on the side for individual customization.
What if my glaze is too thin? Add the cornstarch slurry (cornstarch mixed with water) as described in the recipe. Whisk in and simmer for a minute until thickened. Alternatively, simmer the finished dish longer to reduce and concentrate the sauce.
Can I make this vegetarian? Yes! Use extra-firm tofu cubed, thick vegetable slices, or seitan. Follow the same technique – brown the protein or vegetables first, then add glaze. Cooking time may vary based on what you use.
Is this recipe gluten-free? Use tamari or coconut aminos instead of regular soy sauce for a gluten-free version. All other ingredients are naturally gluten-free. Double-check any added ingredients if cooking for someone with celiac disease.
Conclusion
There you have it – the ultimate guide to making the best teriyaki chicken recipe that tastes absolutely restaurant-quality yet comes together in your own kitchen in just 25 minutes! This easy teriyaki chicken recipe proves that impressive, authentic Asian-inspired meals don’t require complicated techniques or hard-to-find ingredients. With just simple quality ingredients, a hot skillet, and about 25 minutes of your time, you can create restaurant-quality teriyaki chicken that’s healthier, more delicious, and significantly cheaper than takeout.
The magic of this teriyaki chicken recipe lies in its beautiful simplicity combined with incredible flavor complexity. The combination of proper browning, quality aromatics, balanced sauce, and simple technique creates something special that tastes restaurant-quality. Whether you’re cooking for a busy weeknight family dinner, batch cooking for meal prep, looking for an impressive yet simple main course, or craving takeout-style food at home, this best teriyaki chicken recipe delivers consistent, absolutely delicious results every single time.
I’d absolutely love to hear about your teriyaki chicken adventures! What’s your favorite way to serve it – over rice, with vegetables, or something creative? Have you made any variations? What occasion did you serve this for? Drop a comment below and let me know how your cooking turned out and what made this recipe special for you. And if you loved this recipe, please save it to your favorite Pinterest board so you can find it easily whenever you need a quick, impressive main course, and share it with friends and family who deserve to experience restaurant-quality teriyaki chicken made at home!
Happy cooking, and may your skillet always be hot and your teriyaki chicken always perfectly glazed and absolutely delicious!