
If you’ve ever savored the smoky, spiced perfection of tandoori chicken at your favorite Indian restaurant and wished you could recreate it at home, you’re in for a treat! This authentic tandoori chicken recipe brings the bold, vibrant flavors of India right to your kitchen without requiring a traditional clay tandoor oven. With its gorgeous crimson color, incredibly tender meat, and complex layers of spice, this dish is a showstopper that’s surprisingly easy to make.
Tandoori chicken is one of the most beloved dishes in Indian cuisine, and for good reason. The chicken is marinated in a luscious blend of yogurt and aromatic spices, then cooked at high heat until it develops those characteristic char marks and smoky flavor. The result? Juicy, flavorful chicken with a beautiful reddish hue and an irresistible aroma that’ll have everyone gathering around your table.
This homemade tandoori chicken is perfect for special dinners, weekend gatherings, or any time you want to impress with restaurant-quality Indian food. Serve it with warm naan bread, fragrant basmati rice, and cooling raita for an unforgettable meal that transports you straight to the bustling streets of Delhi or Mumbai. Whether you’re new to Indian cooking or a seasoned home chef, this recipe will guide you through every step to tandoori perfection.
History / Background
Tandoori chicken has a fascinating history that spans centuries and continents. The dish originates from the Punjab region, which straddles modern-day India and Pakistan, and its name comes from the “tandoor” – a traditional cylindrical clay oven that has been used in South Asian cooking for over 5,000 years. These ancient ovens, which can reach temperatures of 900°F (480°C), were originally used by nomadic tribes and eventually became central to Punjabi cuisine.
The tandoori chicken we know and love today was popularized in the early 20th century by Kundan Lal Gujral, the founder of the iconic Moti Mahal restaurant in Delhi. Legend has it that Gujral’s family ran a restaurant in Peshawar (now in Pakistan) before partition in 1947. During the turmoil of partition, his family fled to Delhi, where Gujral opened Moti Mahal in 1947. The restaurant became famous for its tandoori specialties, and tandoori chicken quickly became the signature dish.
What made Gujral’s version revolutionary was his marinade technique. He combined traditional Punjabi spices with yogurt, creating a marinade that not only flavored the chicken but also tenderized it beautifully. The yogurt’s lactic acid breaks down the protein fibers, resulting in incredibly succulent meat. The addition of Kashmiri red chili powder (or food coloring in some versions) gave the chicken its iconic bright red appearance, making it visually stunning as well as delicious.
From Delhi, tandoori chicken spread across India and eventually around the world, becoming one of the most recognizable dishes of Indian cuisine globally. It influenced countless other dishes, including the beloved butter chicken (murgh makhani), which was actually created by using leftover tandoori chicken in a rich tomato cream sauce. Today, tandoori chicken represents not just a dish, but a cooking technique and flavor profile that has inspired fusion cuisine worldwide, from tandoori pizza to tandoori tacos.
While traditional tandoori chicken requires a tandoor oven, home cooks have adapted the recipe brilliantly using conventional ovens, grills, and even stovetop methods. The key remains the same: a flavorful yogurt-based marinade, high heat cooking, and those beautiful char marks that give tandoori its distinctive appearance and taste.
Why You’ll Love This Recipe
This easy tandoori chicken recipe at home brings the magic of authentic Indian restaurant cooking to your kitchen, and trust me when I say it’s about to become one of your favorite ways to prepare chicken. The marinade does all the heavy lifting, infusing the meat with incredible flavor while tenderizing it to perfection. Once that’s done, the actual cooking is simple and straightforward.
What makes this recipe truly special is how it manages to capture that authentic tandoori taste without specialized equipment. You don’t need a clay tandoor oven to achieve that signature smoky flavor and beautiful charred exterior. Your regular oven or grill works beautifully, delivering results that’ll make you feel like a professional Indian chef.
Here’s why this tandoori chicken recipe will become your new go-to:
- Restaurant-Quality Results: Achieve that authentic Indian restaurant flavor and presentation right in your home kitchen – your family will be amazed!
- Make-Ahead Friendly: The marinade does its work while you go about your day. Marinate in the morning or even the night before, then simply cook when ready.
- Incredibly Flavorful: The yogurt marinade combined with aromatic spices creates layers of complex flavor that penetrate deep into the meat.
- Tender and Juicy: The yogurt’s natural enzymes break down proteins, ensuring your chicken stays moist and tender, never dry.
- Versatile Serving Options: Serve it as a main course with sides, stuff it in wraps, top salads with it, or enjoy it as an appetizer.
- Crowd-Pleaser: The mild heat and balanced spices appeal to a wide range of palates, making it perfect for gatherings.
- Healthy and Protein-Packed: High in protein, relatively low in calories, and made with wholesome ingredients like yogurt and spices.
- Customizable Heat Level: Easily adjust the spice level to suit your family’s preferences, from mild to fiery hot.
- Impressive Presentation: The vibrant red-orange color and char marks make this dish Instagram-worthy and perfect for special occasions.
- Cost-Effective: Uses affordable chicken pieces and pantry spices to create a meal that tastes like expensive restaurant fare.
Ingredient Notes
The secret to outstanding tandoori chicken lies in the marinade, and each ingredient plays a crucial role in creating that signature flavor and texture. Let’s break down what you’ll need:
Plain Yogurt: The foundation of tandoori marinade, yogurt does double duty – it tenderizes the chicken through its lactic acid while adding tanginess and helping spices adhere to the meat. Use full-fat plain yogurt (not Greek yogurt, which is too thick) for the best results. The yogurt should be thick but pourable. If using Greek yogurt, thin it with a little milk or water. Avoid flavored or sweetened yogurt.
Kashmiri Red Chili Powder: This is the magic ingredient that gives tandoori chicken its iconic bright red color. Kashmiri chili powder is mild in heat but rich in color and adds a subtle, smoky sweetness. You can find it at Indian grocery stores or online. If unavailable, substitute with a combination of regular chili powder and paprika (use more paprika for color, less for heat).
Garam Masala: This aromatic spice blend is essential to authentic Indian flavor. It typically contains cinnamon, cardamom, cloves, cumin, coriander, and black pepper. Store-bought works great, but make sure it’s fresh (spices lose potency over time). You can find garam masala at most supermarkets now or easily make your own.
Ginger-Garlic Paste: Fresh ginger and garlic ground into a paste form the aromatic backbone of the marinade. You can buy pre-made paste at Indian stores, but freshly made tastes better. Simply blend equal parts fresh ginger and garlic with a tiny splash of water until smooth. The pungent, spicy notes are irreplaceable.
Lemon Juice: Adds brightness and helps tenderize the meat further. Fresh lemon juice is always better than bottled. The acidity balances the richness of the yogurt and helps the marinade penetrate deeper into the chicken.
Vegetable Oil: A small amount of oil helps the marinade coat the chicken evenly and prevents it from drying out during high-heat cooking. Use neutral-tasting oil like vegetable, canola, or sunflower oil. Avoid olive oil as its flavor can compete with the spices.
Ground Cumin: Provides that warm, earthy, slightly nutty flavor that’s characteristic of Indian cuisine. Cumin is one of the most important spices in the marinade and shouldn’t be skipped.
Ground Coriander: Offers a subtle citrusy, slightly sweet note that complements the other spices beautifully. Coriander and cumin are the dynamic duo of Indian cooking.
Turmeric: This golden spice adds color, earthiness, and anti-inflammatory properties. It also helps preserve the chicken naturally. Use sparingly as too much can make the dish bitter.
Cayenne Pepper (optional): For those who like heat! Kashmiri chili powder is mild, so cayenne adds the kick. Adjust according to your heat tolerance or omit entirely for a milder version.
Chicken: Bone-in, skin-on chicken pieces work best – thighs, drumsticks, and legs have more flavor and stay juicier than breast meat. You can use chicken breasts if preferred, but watch them carefully as they cook faster and can dry out. Making deep slashes in the meat allows the marinade to penetrate better.
Fresh Cilantro and Mint (for garnish): These fresh herbs add brightness and authentic Indian flavor when served. They’re optional but highly recommended.
Equipment Needed
The beauty of this recipe is that you don’t need any special equipment. Here’s what you’ll use:
- Large Mixing Bowl: For combining the marinade ingredients and coating the chicken. Glass or stainless steel works best.
- Whisk or Fork: For mixing the marinade until smooth and well combined.
- Sharp Knife: For making deep slashes in the chicken pieces, which allows the marinade to penetrate.
- Measuring Spoons and Cups: For accurate spice measurements.
- Baking Sheet or Roasting Pan: For oven cooking. Line it with foil for easy cleanup.
- Wire Rack (optional but recommended): Place on top of the baking sheet to elevate the chicken, allowing hot air to circulate and creating more even char marks.
- Blender or Food Processor (optional): For making fresh ginger-garlic paste if not using store-bought.
- Basting Brush: For brushing melted butter or oil on the chicken during cooking.
- Instant-Read Thermometer: To ensure chicken reaches safe internal temperature of 165°F (74°C).
- Tongs: For flipping chicken pieces during cooking.
Alternative Equipment: If using a grill, you’ll need your outdoor grill set up for medium-high heat. If using a stovetop grill pan, have it ready with a lid nearby.
Print
Tandoori Chicken Recipe
- Total Time: 55 minutes (plus marinating)
- Yield: 6 servings 1x
- Diet: Gluten Free
Description
This authentic tandoori chicken recipe delivers restaurant-quality Indian flavor right in your home kitchen! Juicy chicken pieces are marinated in spiced yogurt, then baked or grilled to smoky perfection with beautiful char marks. It’s easier than you think to make this classic dish that’s bursting with aromatic spices and incredible flavor.
Ingredients
For the Marinade:
- 1 cup plain whole milk yogurt (not Greek)
- 2 tablespoons lemon juice (about 1 large lemon)
- 2 tablespoons ginger-garlic paste (or 1 tablespoon each freshly grated ginger and minced garlic)
- 2 tablespoons vegetable oil
- 2 tablespoons Kashmiri red chili powder (or substitute with 1 tablespoon paprika + 1 teaspoon cayenne)
- 1 tablespoon garam masala
- 1 tablespoon ground cumin
- 1 tablespoon ground coriander
- 1 teaspoon turmeric powder
- 1 teaspoon cayenne pepper (optional, for extra heat)
- 2 teaspoons salt (adjust to taste)
- 1 teaspoon ground black pepper
For the Chicken:
- 3 pounds chicken pieces (bone-in, skin-on thighs, drumsticks, and/or legs)
- 2 tablespoons melted butter or ghee (for basting)
- Lemon wedges (for serving)
- Fresh cilantro, chopped (for garnish)
- Sliced onions (for serving)
Instructions
- Prepare the Chicken: Pat the chicken pieces completely dry with paper towels – this is important for the marinade to adhere properly. Using a sharp knife, make 2-3 deep diagonal slashes (about ½ inch deep) on each chicken piece. These cuts allow the marinade to penetrate deep into the meat, flavoring it from the inside out. If using skin-on chicken, you can remove the skin for better marinade absorption, though keeping it on adds flavor.
- Make the Marinade: In a large mixing bowl, combine the yogurt, lemon juice, ginger-garlic paste, and vegetable oil. Whisk until smooth and well blended. Add all the spices: Kashmiri red chili powder, garam masala, cumin, coriander, turmeric, cayenne pepper (if using), salt, and black pepper. Whisk everything together until you have a vibrant red-orange paste with no lumps. The marinade should be thick but spreadable, like a smooth, colorful sauce.
- Marinate the Chicken: Add the prepared chicken pieces to the marinade. Using your hands (wear gloves if you prefer), massage the marinade thoroughly into every piece of chicken, making sure to work it into the slashes and coat every surface generously. The chicken should be completely covered in the vibrant marinade. Cover the bowl tightly with plastic wrap or transfer to a large zip-top bag, squeezing out excess air. Refrigerate for at least 4 hours, but preferably 12-24 hours for maximum flavor and tenderness. The longer it marinates, the better it tastes!
- Prepare for Cooking: When ready to cook, remove the chicken from the refrigerator 30 minutes before cooking to bring it to room temperature. This ensures even cooking. Preheat your oven to 450°F (230°C) with a rack positioned in the upper third. Line a large baking sheet with aluminum foil for easy cleanup, then place a wire rack on top of it. The rack allows hot air to circulate around the chicken, creating more even charring.
- Arrange the Chicken: Remove the chicken pieces from the marinade, letting excess marinade drip off (but don’t wipe it off completely – that flavorful coating is what you want). Arrange the chicken pieces on the wire rack, leaving space between each piece so they cook evenly. Reserve any remaining marinade in the bowl.
- First Bake: Place the baking sheet in the preheated oven and bake for 25 minutes. The chicken will start to cook through and the edges will begin to char slightly. Your kitchen will smell absolutely incredible at this point!
- Baste and Broil: After 25 minutes, carefully remove the baking sheet from the oven. Brush the chicken pieces generously with melted butter or ghee – this adds richness and helps create those beautiful char marks. If you have any reserved marinade, you can brush a little on as well. Switch your oven to broil mode (high setting) and return the chicken to the oven. Broil for 5-7 minutes, watching carefully, until the chicken develops dark, slightly charred spots and the edges are crispy. The internal temperature should reach 165°F (74°C) when checked with an instant-read thermometer in the thickest part of the meat (not touching bone).
- Flip and Finish (optional): For extra char on both sides, carefully flip the chicken pieces using tongs, brush with more butter, and broil for an additional 3-5 minutes until the other side is beautifully charred.
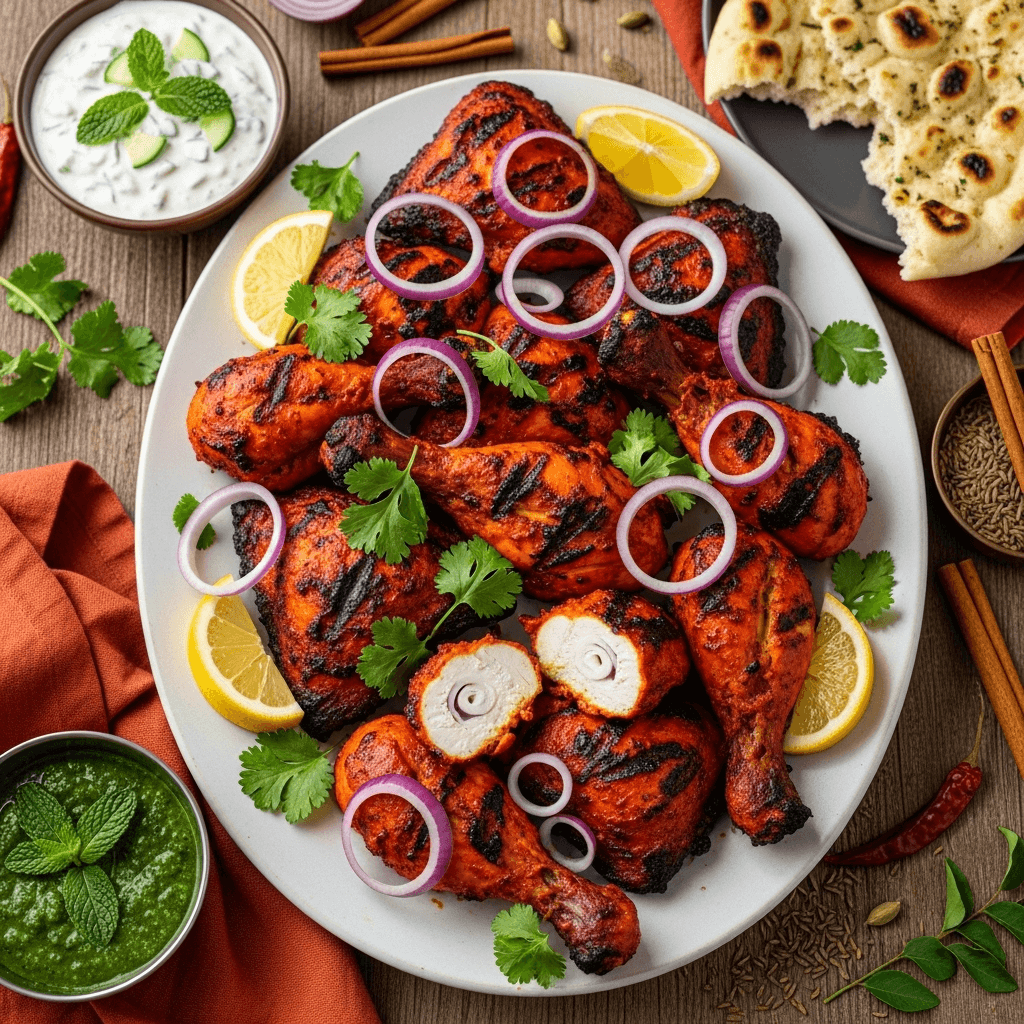
- Rest and Serve: Remove the chicken from the oven and let it rest for 5 minutes. This allows the juices to redistribute throughout the meat, keeping it moist. Transfer to a serving platter, squeeze fresh lemon juice over the top, and garnish with chopped cilantro and sliced onions. Serve immediately while hot!
Notes
- Grill Method: If grilling, preheat your grill to medium-high (about 400-450°F). Oil the grates well. Grill chicken for 6-8 minutes per side, turning once, until charred and cooked through. Baste with butter throughout cooking.
- Stovetop Grill Pan: Heat a grill pan over medium-high heat. Cook chicken 7-8 minutes per side, covered, reducing heat if it chars too quickly.
- Make It Less Spicy: Reduce or omit cayenne pepper and use only mild Kashmiri chili powder or substitute with sweet paprika.
- Boneless Chicken: You can use boneless, skinless chicken breasts or thighs. Reduce cooking time to 20-25 minutes total as they cook faster.
- Food Coloring (traditional): Some recipes add a few drops of red or orange food coloring for that bright restaurant color, though it’s purely aesthetic.
- Smoky Flavor: For authentic smokiness without a tandoor, add ½ teaspoon of liquid smoke to the marinade, or after cooking, place a small piece of charcoal on foil, set it on fire until red-hot, place it in a small bowl on the serving platter with chicken, drizzle oil on the charcoal to create smoke, and immediately cover everything for 5 minutes to infuse smoke flavor.
- Prep Time: 20 minutes (plus 4-24 hours marinating time)
- Cook Time: 35-40 minutes
- Category: Dinner
- Method: Baking
- Cuisine: Indian
Nutrition
- Serving Size: 1 chicken thigh or 2 drumsticks (about 5-6 oz)
- Calories: 285
- Sugar: 3g
- Sodium: 650mg
- Fat: 16g
- Saturated Fat: 5g
- Unsaturated Fat: 10g
- Trans Fat: 0g
- Carbohydrates: 6g
- Fiber: 1g
- Protein: 28g
- Cholesterol: 110mg
Tips & Variations
The wonderful thing about tandoori chicken is how adaptable it is to your preferences and dietary needs. Here are some fantastic ways to customize this recipe:
Spice Level Adjustments: For mild tandoori chicken that kids will love, omit the cayenne pepper entirely and use sweet paprika instead of Kashmiri chili powder. For extra spicy tandoori chicken, add more cayenne or include chopped green chilies in the marinade.
Protein Variations: While chicken is traditional, this marinade works beautifully with other proteins. Try it with lamb chops, fish fillets (reduce marinating time to 30 minutes-1 hour), prawns or shrimp (marinate for just 30 minutes), paneer cubes for a vegetarian version, or even tofu (press well and marinate for 2-4 hours).
Tandoori Chicken Tikka: Cut boneless chicken into bite-sized cubes, marinate, and thread onto skewers. This creates the popular appetizer version that’s perfect for parties.
Creamy Marinade: Some recipes add 2 tablespoons of heavy cream or cashew paste to the marinade for extra richness and a smoother texture.
Herb Variations: Add 2 tablespoons of fresh chopped cilantro or mint to the marinade for additional freshness and authentic flavor.
Smoky Tandoori: Add ½ teaspoon of smoked paprika or liquid smoke to enhance that authentic tandoor oven smokiness.
Keto-Friendly: This recipe is already low-carb and perfect for keto diets. Just serve with cauliflower rice instead of regular rice.
Air Fryer Method: Arrange marinated chicken in a single layer in your air fryer basket and cook at 400°F for 20-25 minutes, flipping halfway through.
Instant Pot Adaptation: While not traditional, you can pressure cook for 10 minutes, then finish under the broiler for char marks.
Pro Chef Tips
Want to elevate your tandoori chicken from good to absolutely extraordinary? Here are professional techniques that make all the difference:
Marinate Longer for Better Results: While 4 hours is the minimum, 24 hours is ideal. The longer marination allows the yogurt’s enzymes to break down proteins more thoroughly, creating incredibly tender meat. The spices also have more time to penetrate deeply into the chicken.
Room Temperature Before Cooking: Always bring marinated chicken to room temperature (30 minutes out of the fridge) before cooking. Cold chicken takes longer to cook and won’t develop those beautiful char marks as effectively.
Don’t Skimp on the Slashes: Those deep cuts in the meat aren’t just for show – they’re crucial for marinade penetration. Make them at least ½ inch deep and at an angle. This is especially important for bone-in pieces with thick meat.
Two-Stage Cooking is Key: The combination of baking at high heat followed by broiling replicates the tandoor oven effect. The bake cooks the chicken through, while the broil creates those essential char marks and smoky notes.
Baste Generously: Brushing with butter or ghee during the final broiling stage adds richness and helps achieve that glossy, slightly charred exterior. Real butter or ghee tastes significantly better than oil for this final step.
Use a Wire Rack: Elevating the chicken on a rack allows hot air to circulate completely around each piece, resulting in more even cooking and better char development. It also prevents the chicken from steaming in its own juices.
Watch the Broiler Carefully: Broilers vary significantly in intensity. Stay near the oven during broiling and check every 2-3 minutes. The line between perfectly charred and burnt is thin!
Kashmiri Chili is Worth Finding: While substitutions work, authentic Kashmiri red chili powder makes a noticeable difference in color and flavor. It’s worth ordering online if your local stores don’t carry it.
Fresh Spices Matter: Spices lose their potency over time. If your garam masala or chili powder has been sitting in your cabinet for years, replace it. Fresh spices are the difference between mediocre and magnificent tandoori.
The Char is Essential: Don’t be afraid of those dark, slightly blackened spots – they’re what give tandoori its signature smoky flavor. You want a good char on the exterior while keeping the interior juicy.
Create Smoke at Home: For authentic tandoor smokiness, use the “dhungar” method: after cooking, place a small piece of hot charcoal in a heat-proof bowl on your serving platter, drizzle it with ghee to create smoke, immediately cover everything, and let it infuse for 5-10 minutes.
Common Mistakes to Avoid
Even though this is a straightforward recipe, there are a few common pitfalls that can prevent your tandoori chicken from reaching its full potential:
Not Marinating Long Enough: Rushing the marination is the number one mistake. While you can technically marinate for just an hour or two, you’ll miss out on the tender texture and deep flavor that longer marination provides. Always plan ahead and give it at least 4 hours, preferably overnight.
Using Greek Yogurt Without Thinning: Greek yogurt is much thicker than regular yogurt and won’t coat the chicken as evenly. If using Greek yogurt, thin it with milk or water to achieve a marinade consistency similar to heavy cream. Regular plain yogurt is actually better for this recipe.
Skipping the Slashes: If you don’t cut deep slashes into the meat, the marinade only flavors the surface. This is especially problematic with thick bone-in pieces. Make those cuts deep and at angles for maximum marinade penetration.
Overcrowding the Pan: Leaving space between chicken pieces is crucial for even cooking and char development. If pieces are touching, they’ll steam rather than roast, and you won’t get those beautiful dark spots. Use two baking sheets if necessary.
Cooking Straight from the Fridge: Cold chicken thrown directly into the oven cooks unevenly – the outside may char before the inside is done. Always let it sit at room temperature for 30 minutes first.
Not Checking Internal Temperature: Guessing when chicken is done leads to either undercooked (unsafe) or overcooked (dry) meat. Invest in an instant-read thermometer and check that the thickest part reaches 165°F (74°C).
Fearing the Char: Some home cooks pull the chicken out too early because they’re worried about burning. Those dark, slightly charred spots are exactly what you want! They provide the smoky flavor that defines tandoori. As long as the chicken isn’t completely black or burnt, you’re good.
Using Old Spices: Spices that have been sitting in your pantry for years have lost most of their flavor. Check the dates on your spice jars and replace anything over a year old, especially chili powder and garam masala.
Storage & Meal Prep
Tandoori chicken is excellent for meal prep and actually tastes wonderful as leftovers, making it perfect for busy weeks.
Refrigerator Storage: Once cooled to room temperature, store leftover tandoori chicken in an airtight container in the refrigerator for up to 4 days. The flavors continue to develop as it sits, so many people actually prefer it the next day!
Reheating Instructions: The best way to reheat tandoori chicken while maintaining its texture is in the oven. Preheat to 350°F (175°C), place chicken on a baking sheet, cover loosely with foil, and heat for 15-20 minutes until warmed through. You can also reheat individual pieces in the microwave for 1-2 minutes, though the skin won’t be as crispy.
Meal Prep Ideas: Tandoori chicken is incredibly versatile for weekly meal prep. Cook a large batch on Sunday and use it throughout the week in different ways: serve it traditionally with rice and raita on Monday, slice it for tandoori chicken salad on Tuesday, stuff it in wraps or pitas on Wednesday, and add it to grain bowls on Thursday.
Marinated Chicken Storage: If you’ve marinated the chicken but haven’t cooked it yet, it can stay in the marinade in the refrigerator for up to 48 hours. This is actually beneficial as the flavors intensify!
Portioning for Meal Prep: Consider cooking a double batch and portioning it into individual containers with your choice of sides. This creates grab-and-go lunches that are both delicious and healthy.
Make-Ahead & Freezer Notes
One of the best things about tandoori chicken is how well it adapts to make-ahead preparation and freezing, making it perfect for advance meal planning.
Make-Ahead Marinade: You can prepare the marinade up to 2 days in advance and store it in an airtight container in the refrigerator. When ready, add your chicken and marinate as directed. This is great for breaking up the prep work.
Marinate and Freeze: Here’s a brilliant meal prep trick: marinate the raw chicken, then freeze it in the marinade in zip-top freezer bags. When you’re ready to cook, thaw it in the refrigerator overnight – as it thaws, it continues marinating! This method is perfect for having restaurant-quality chicken ready with minimal weeknight effort.
Freezing Cooked Tandoori Chicken: Cooked tandoori chicken freezes beautifully for up to 3 months. Let it cool completely, then wrap individual pieces or portions in plastic wrap, place in freezer bags, remove excess air, label with the date, and freeze. The spices and marinade help preserve the chicken’s moisture even after freezing.
Thawing Instructions: For best results, thaw frozen cooked tandoori chicken in the refrigerator overnight. For faster thawing, place the sealed package in a bowl of cold water, changing the water every 30 minutes until thawed.
Reheating from Frozen: You can actually reheat tandoori chicken directly from frozen. Place frozen pieces on a baking sheet, cover with foil, and bake at 350°F (175°C) for 30-40 minutes until heated through, removing the foil for the last 5 minutes to crisp up the exterior.
Best Practices: For the best texture after freezing, slightly undercook the chicken initially (to about 160°F internal temperature), then finish cooking when reheating. This prevents the meat from becoming overly dry.
Serving Suggestions
Tandoori chicken is incredibly versatile and pairs beautifully with a variety of sides and accompaniments. Here’s how to create a complete, authentic Indian meal:
Traditional Indian Sides: Serve with warm, buttery naan bread or tandoori roti for scooping up every bit of flavor. Fragrant basmati rice (plain or as pulao with peas and spices) makes a perfect base. Include cooling raita (yogurt with cucumber, mint, and spices) to balance the spices, and add a side of tangy onion salad (thinly sliced onions with lemon juice, chaat masala, and cilantro).
Sauces and Chutneys: Offer green chutney (cilantro-mint), tamarind chutney for sweetness, mint yogurt sauce for cooling, and extra lemon or lime wedges for squeezing over the chicken.
Complete Meal Ideas: For a full tandoori spread, start with vegetable samosas or pakoras as appetizers. Serve the tandoori chicken alongside dal (lentil curry), a vegetable dish like saag paneer or aloo gobi, and finish with rice pudding (kheer) or gulab jamun for dessert.
Lighter Options: For a lighter meal, serve tandoori chicken over mixed greens as a protein-packed salad, with quinoa or cauliflower rice for a low-carb option, or alongside roasted vegetables like eggplant, bell peppers, and zucchini.
Fusion Serving Ideas: Tandoori chicken works beautifully in fusion preparations: stuff it in whole wheat pitas or flatbreads with lettuce and tzatziki, slice it over grain bowls with quinoa, chickpeas, and tahini dressing, add it to tacos with cilantro-lime slaw, or top pizzas with tandoori chicken, red onions, and cilantro.
Beverages: Pair with sweet lassi (yogurt drink) – mango or rose flavored, Indian chai (masala tea), fresh lime soda, or for adults, a crisp lager beer or a bright rosé wine.
Party Presentation: For entertaining, serve tandoori chicken on a large platter lined with fresh lettuce, garnished generously with cilantro, sliced onions, and lemon wedges. Set out small bowls of various chutneys and sauces around the platter for a beautiful, interactive spread.
FAQs Section
Can I make tandoori chicken without a tandoor oven?
Absolutely! Traditional tandoori chicken is cooked in a clay tandoor oven that reaches extremely high temperatures, but home ovens work wonderfully. The key is using high heat (450°F) followed by broiling to create char marks. You can also use an outdoor grill for even more authentic smoky flavor. The yogurt marinade and spice blend are what create the signature tandoori taste – the cooking method can be adapted without sacrificing flavor.
What makes tandoori chicken red?
The distinctive red-orange color comes primarily from Kashmiri red chili powder, which is prized for its vibrant color more than its heat level. Some restaurants add food coloring (red or orange) to make it even brighter, but this is purely aesthetic and optional. If you can’t find Kashmiri chili powder, paprika (especially smoked paprika) provides nice color, though not quite as vibrant.
How long should I marinate tandoori chicken?
Minimum marination time is 4 hours, but for the most tender, flavorful results, marinate for 12-24 hours. The yogurt’s lactic acid needs time to break down the chicken’s protein fibers, and the spices need time to penetrate deeply. You can marinate up to 48 hours, though beyond that, the meat may become too soft. Never marinate for less than 2 hours or the flavor won’t develop properly.
Can I use chicken breast instead of dark meat?
Yes, but keep in mind that chicken breast is leaner and dries out more easily. If using breasts, I recommend boneless, skinless breasts pounded to even thickness, and reduce the cooking time to about 20-25 minutes total. Consider pulling them out when they reach 160°F (they’ll continue cooking while resting to reach 165°F). Dark meat (thighs and drumsticks) stays juicier and is more forgiving, making it ideal for this recipe.
Can I make tandoori chicken on a stovetop?
Yes! Use a cast-iron grill pan or heavy skillet over medium-high heat. Make sure the pan is very hot before adding the chicken. Cook for 7-8 minutes per side, covered, until chicken is charred and cooked through (165°F internal temperature). You may need to reduce the heat slightly if it’s charring too quickly on the outside before cooking through. This method works best with boneless pieces or smaller cuts that cook faster.
Is tandoori chicken spicy?
Traditional tandoori chicken has a moderate spice level – it’s flavorful and aromatic but not burn-your-mouth hot. The Kashmiri chili powder used is actually quite mild. Most of the “heat” comes from the optional cayenne pepper, which you can reduce or omit entirely for a milder version. The beauty of making it at home is you can completely customize the heat level to your family’s preferences.
What’s the difference between tandoori chicken and tikka masala?
Tandoori chicken is the grilled/baked chicken marinated in yogurt and spices – it’s a dry dish served as-is. Chicken tikka masala takes tandoori-style marinated chicken (called “tikka” when cut into chunks), grills it, then simmers it in a creamy tomato-based sauce. Think of tandoori chicken as the foundation dish that inspired many saucy variations, including the beloved tikka masala and butter chicken.
Conclusion
And there you have it – your complete guide to making restaurant-quality tandoori chicken right in your own kitchen! This authentic Indian recipe proves that you don’t need a traditional clay tandoor oven or professional chef skills to create incredibly flavorful, tender, and beautifully charred chicken that rivals anything you’d order at your favorite Indian restaurant.
The secret to outstanding tandoori chicken lies in patience – letting that glorious yogurt and spice marinade work its magic over several hours (or even better, overnight). Once the marinating is done, the actual cooking is surprisingly simple and straightforward. The combination of high heat baking followed by intense broiling creates those signature char marks and smoky notes that make tandoori chicken so irresistible.
What I love most about this recipe is its versatility. Serve it traditionally with naan and raita for an impressive dinner party, slice it over salads for healthy weekday lunches, stuff it in wraps for quick meals, or use it as a jumping-off point for other dishes like butter chicken or tikka masala. The bold, aromatic flavors work beautifully in so many applications, and it meal preps like a dream.
Whether you’re new to Indian cooking or looking to expand your repertoire of go-to dinner recipes, this tandoori chicken is about to become a regular star on your table. The vibrant colors, incredible aromas, and layers of complex flavor never fail to impress. Plus, it’s actually quite healthy – packed with protein, made with wholesome yogurt, and loaded with beneficial spices.
I’d absolutely love to hear how your tandoori chicken turns out! Did you grill it or use the oven? What did you serve alongside it? Did you make any fun variations? Drop a comment below and share your experience – I read every single one and love connecting with fellow home cooks!
If this recipe inspired you to bring the flavors of India into your kitchen, please consider pinning it to your Pinterest boards so other home cooks can discover it too. And don’t forget to rate the recipe – your feedback helps me create more of the content you love!
Now grab that yogurt and spices, and get ready to fill your kitchen with the most amazing aromas. Your family is going to be absolutely blown away by your homemade tandoori chicken skills! Happy cooking, friends! 🍗✨