
Stuffed bell peppers are one of those timeless comfort food classics that never go out of style. This hearty, wholesome dish features colorful bell peppers filled with a savory mixture of seasoned ground beef, tender rice, aromatic vegetables, and melted cheese—all baked to perfection. It’s a complete meal in one beautiful package that’s as nutritious as it is delicious.
Whether you’re looking for an easy weeknight dinner, a make-ahead meal for busy weeks, or something special enough to serve to guests, this stuffed bell pepper recipe checks all the boxes. The vibrant colors make it naturally Instagram and Pinterest-worthy, while the customizable filling means you can adapt it to your family’s preferences. Serve these beautiful stuffed peppers for Sunday dinner, meal prep for the week ahead, or bring them to your next potluck—they’re always a crowd-pleaser.
This recipe is incredibly versatile and forgiving, making it perfect for both beginner cooks and experienced home chefs. The best part? You probably already have most of the ingredients in your pantry right now.
History / Background
Stuffed bell peppers have a rich culinary history that spans multiple cultures and continents. The concept of stuffing vegetables dates back centuries, with various cultures developing their own unique versions based on regional ingredients and traditions.
In the United States, stuffed bell peppers became particularly popular in the mid-20th century as part of classic American home cooking. They represented the post-war era’s focus on hearty, economical meals that could feed a family without breaking the bank. American housewives embraced this dish because it stretched meat further by combining it with rice and vegetables, making it both budget-friendly and nutritious.
However, the roots of stuffed peppers extend far beyond American borders. In Eastern Europe, particularly Hungary and Romania, stuffed peppers (called “töltött paprika” and “ardei umpluți”) have been traditional dishes for generations, often featuring paprika-spiced meat and rice mixtures. The Mediterranean region has its own variations, with Greek “gemista” and Turkish “dolma” featuring similar concepts of stuffed vegetables.
Mexican cuisine contributed significantly to the American version we know today, with “chiles rellenos” influencing the flavor profiles and cooking methods. The beautiful marriage of these cultural influences created the American stuffed bell pepper—a dish that’s become a staple in home kitchens across the country.
What makes this recipe so enduringly popular is its adaptability. Throughout the decades, home cooks have modified the basic concept to reflect changing tastes, dietary needs, and ingredient availability. Today’s stuffed peppers can be vegetarian, keto-friendly, low-carb, or loaded with cheese—the possibilities are truly endless.
Why You’ll Love This Recipe
This stuffed bell pepper recipe is absolutely going to become a regular in your dinner rotation, and here’s why: it’s the perfect combination of healthy, delicious, and practical. You’re getting a complete balanced meal with protein, vegetables, and grains all in one gorgeous serving. Plus, the peppers themselves act as edible bowls, which means less cleanup—and who doesn’t love that?
Here’s what makes this recipe a winner:
- Family-Friendly: Even picky eaters love these! The mild sweetness of bell peppers pairs perfectly with the savory filling.
- Budget-Friendly: Uses affordable, everyday ingredients that won’t strain your grocery budget.
- Meal Prep Champion: Make a big batch on Sunday and enjoy easy dinners all week long.
- Naturally Gluten-Free: Perfect for anyone avoiding gluten without any special modifications.
- Customizable: Easily adapt to vegetarian, low-carb, or spicy preferences.
- One-Dish Wonder: Everything bakes together in one pan for minimal cleanup.
- Visually Stunning: Those vibrant colors make it perfect for sharing on Pinterest and Instagram.
- Freezer-Friendly: Double the batch and freeze extras for busy nights.
- Nutritious and Balanced: Packed with vegetables, protein, and wholesome ingredients.
Whether you’re feeding a hungry family, meal prepping for yourself, or looking for an impressive yet easy dinner party dish, these stuffed bell peppers deliver on every level.
Ingredient Notes
Let’s talk about what goes into these beautiful stuffed peppers and why each ingredient matters. Understanding your ingredients helps you make smart substitutions and adjustments based on what you have on hand.
Bell Peppers: Choose large, firm peppers with flat bottoms so they stand upright easily. Red, yellow, and orange peppers are sweeter and more colorful, while green peppers have a slightly bitter, more vegetal flavor. I love using a mix of colors for a gorgeous presentation. Look for peppers without soft spots or wrinkles.
Ground Beef: I use 85/15 ground beef (85% lean) for the best balance of flavor and moisture. You can substitute ground turkey, chicken, pork, or Italian sausage. For a vegetarian version, try crumbled tempeh, lentils, or a meat substitute.
Rice: White long-grain rice or jasmine rice works beautifully and cooks to a nice fluffy texture. You can also use brown rice (adjust cooking time), cauliflower rice for low-carb, or quinoa for extra protein and nutrition.
Onion and Garlic: These aromatics build the flavor foundation. Yellow or white onions work best. Fresh garlic is always preferable to jarred, but in a pinch, use ¾ teaspoon of garlic powder per clove.
Tomato Sauce: Provides moisture and tangy flavor to the filling. You can use marinara sauce, crushed tomatoes, or even salsa for a Mexican twist.
Diced Tomatoes: Adds texture and extra tomato flavor. Fire-roasted diced tomatoes bring a wonderful smoky depth.
Beef Broth: Keeps everything moist while baking and adds savory richness. Chicken or vegetable broth works equally well.
Cheese: Shredded mozzarella melts beautifully and creates that gorgeous cheese pull, while cheddar adds sharp flavor. Monterey Jack, pepper jack, or Italian blend are excellent alternatives.
Seasonings: Italian seasoning, paprika, salt, and pepper create a well-balanced flavor profile. Feel free to add cumin and chili powder for a Mexican-inspired version.
Fresh Herbs: Parsley adds freshness and color to the finished dish. Basil, cilantro, or oregano are lovely alternatives.
Equipment Needed
You won’t need any fancy equipment for this recipe—just basic kitchen tools that most home cooks already have:
- Large Skillet or Sauté Pan: For browning the meat and cooking the filling mixture.
- 9×13-inch Baking Dish: The perfect size for fitting 6 bell pepper halves comfortably.
- Sharp Knife: For cutting peppers and chopping vegetables.
- Cutting Board: Preferably a large one for prep work.
- Wooden Spoon or Spatula: For stirring the filling mixture.
- Measuring Cups and Spoons: For accurate ingredient measurements.
- Medium Pot with Lid: For cooking the rice (if not using pre-cooked).
- Aluminum Foil: To cover the baking dish while the peppers cook.
- Cheese Grater: If you’re shredding cheese from a block (highly recommended for better melting).
- Mixing Spoon or Ladle: For stuffing the peppers neatly.
Optional but helpful: A melon baller makes removing pepper seeds super easy, and an ice cream scoop is perfect for portioning the filling evenly into each pepper.
Print
Stuffed Bell Peppers Recipe
- Total Time: 1 hour 5 minutes
- Yield: 6 servings (6 stuffed pepper halves) 1x
- Diet: Gluten Free
Description
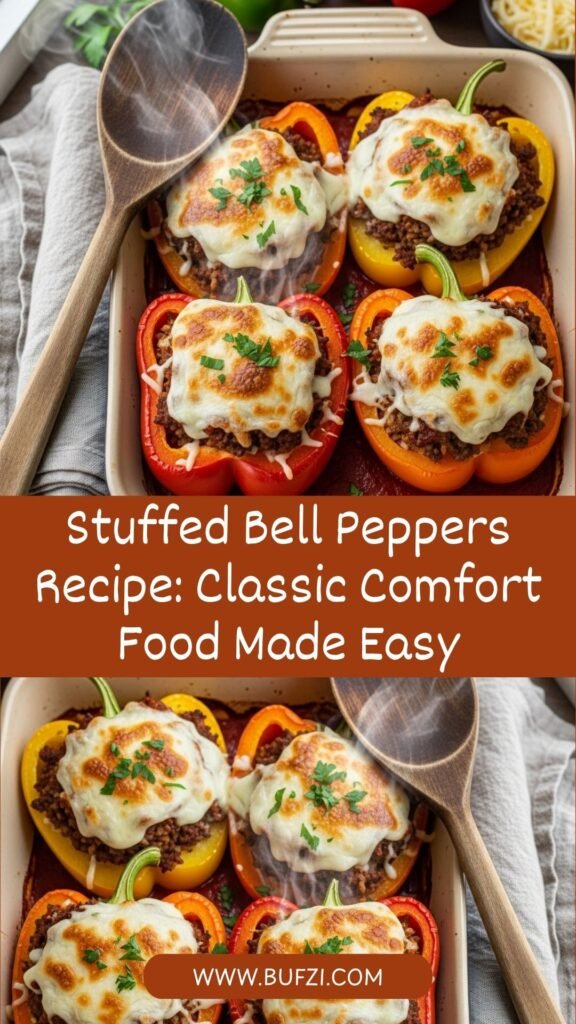
These classic stuffed bell peppers are filled with a savory mixture of seasoned ground beef, fluffy rice, tomatoes, and melted cheese. Baked until the peppers are tender and the cheese is golden and bubbly, this comforting one-dish meal is perfect for weeknight dinners or meal prep.
Ingredients
- 3 large bell peppers (any color), halved lengthwise and seeds removed
- 1 pound ground beef (85/15)
- 1 cup cooked white rice (from about ⅓ cup uncooked)
- 1 medium yellow onion, finely diced
- 3 cloves garlic, minced
- 1 can (15 oz) tomato sauce, divided
- 1 can (14.5 oz) diced tomatoes, drained
- 1 cup beef broth
- 1½ cups shredded mozzarella cheese, divided
- ½ cup shredded cheddar cheese
- 2 tablespoons olive oil
- 1 tablespoon Italian seasoning
- 1 teaspoon paprika
- 1 teaspoon salt
- ½ teaspoon black pepper
- ¼ teaspoon red pepper flakes (optional)
- 2 tablespoons fresh parsley, chopped (for garnish)
Instructions
- Preheat and Prep: Preheat your oven to 375°F (190°C). Cut bell peppers in half lengthwise, remove seeds and membranes. Arrange them cut-side up in a 9×13-inch baking dish. If your peppers won’t stand flat, trim a tiny bit off the bottom (not through to the cavity) to create a stable base.
- Cook the Rice: If you haven’t already cooked your rice, prepare 1 cup of cooked rice according to package directions. Set aside to cool slightly.
- Brown the Beef: Heat olive oil in a large skillet over medium-high heat. Add ground beef and cook for 5-7 minutes, breaking it apart with a wooden spoon, until browned and no longer pink. Drain excess fat if needed.
- Sauté Aromatics: Add diced onion to the beef and cook for 4-5 minutes until softened and translucent. Add minced garlic and cook for 1 minute until fragrant, stirring constantly to prevent burning.
- Build the Filling: Stir in the cooked rice, drained diced tomatoes, half of the tomato sauce (reserve the other half), Italian seasoning, paprika, salt, black pepper, and red pepper flakes if using. Mix everything together well and cook for 2-3 minutes until heated through and well combined.
- Add Cheese to Filling: Remove the skillet from heat and stir in 1 cup of mozzarella cheese and all of the cheddar cheese. The residual heat will start melting the cheese into the filling, creating a deliciously cohesive mixture.
- Stuff the Peppers: Divide the beef and rice mixture evenly among the six pepper halves, mounding it slightly on top. Press down gently to pack the filling in.
- Create Baking Liquid: Pour the remaining tomato sauce and beef broth around (not over) the peppers in the baking dish. This creates steam and prevents the peppers from drying out.
- First Bake: Cover the baking dish tightly with aluminum foil and bake for 35 minutes, or until the peppers are tender when pierced with a fork.
- Add Cheese Topping: Remove the foil and sprinkle the remaining ½ cup mozzarella cheese over the tops of the stuffed peppers. Return to the oven, uncovered, and bake for an additional 10 minutes until the cheese is melted, bubbly, and starting to turn golden brown.
- Rest and Serve: Remove from oven and let the stuffed peppers rest for 5 minutes. This allows the filling to set slightly and makes them easier to serve. Garnish with fresh chopped parsley and serve hot with the tomato sauce from the pan spooned over the top.
Notes
- For softer peppers, you can parboil the pepper halves for 3-4 minutes before stuffing.
- Leftover stuffed peppers can be stored in an airtight container in the refrigerator for up to 4 days.
- The peppers freeze beautifully! Wrap individually in plastic wrap, then place in a freezer bag for up to 3 months.
- If your filling seems dry, add a splash more tomato sauce or broth.
- For a low-carb version, substitute the rice with riced cauliflower and reduce baking time by 5 minutes.
- Prep Time: 20 minutes
- Cook Time: 45 minutes
- Category: Dinner
- Method: Baking
- Cuisine: American
Nutrition
- Serving Size: 1 stuffed pepper half
- Calories: 385
- Sugar: 8g
- Sodium: 720mg
- Fat: 19g
- Saturated Fat: 8g
- Unsaturated Fat: 9g
- Trans Fat: 0g
- Carbohydrates: 28g
- Fiber: 4g
- Protein: 26g
- Cholesterol: 75mg
Tips & Variations
One of the best things about stuffed bell peppers is how easily you can customize them to suit your taste preferences, dietary needs, or whatever ingredients you have on hand. Here are some delicious ways to make this recipe your own:
Mexican-Style Stuffed Peppers: Replace Italian seasoning with taco seasoning or a combination of cumin, chili powder, and oregano. Add black beans, corn, and jalapeños to the filling. Use pepper jack cheese and top with sour cream, cilantro, and avocado when serving.
Italian-Style Variation: Add Italian sausage instead of ground beef, increase the Italian herbs, and mix in some chopped spinach or kale. Top with parmesan cheese and serve with marinara sauce.
Greek-Inspired Peppers: Use ground lamb or beef, add dried oregano, cinnamon, and a pinch of nutmeg. Mix in some chopped Kalamata olives and crumbled feta cheese. Serve with a dollop of tzatziki sauce.
Vegetarian/Vegan Version: Replace meat with cooked lentils, black beans, chickpeas, or a plant-based ground meat substitute. Use vegetable broth and vegan cheese (or nutritional yeast for a cheesy flavor without dairy).
Low-Carb/Keto Option: Swap the rice for riced cauliflower, which you can cook with the meat mixture. This significantly reduces the carb count while keeping the dish filling and satisfying.
Turkey Taco Peppers: Use ground turkey, add a packet of taco seasoning, and include corn and black beans. Top with Monterey Jack cheese and serve with salsa, sour cream, and crushed tortilla chips.
Add More Veggies: Incorporate diced zucchini, mushrooms, spinach, or carrots into the filling for extra nutrition and flavor.
Spicy Kick: Add diced jalapeños, extra red pepper flakes, hot sauce to the filling, or use spicy Italian sausage for heat lovers.
Cheese Lovers: Create a cheese-stuffed center by placing a cube of mozzarella or cream cheese in the middle of the filling before baking.
Pro Chef Tips
Want to take your stuffed peppers from good to absolutely restaurant-quality? Here are some professional techniques that will elevate your dish:
Parboil for Perfectly Tender Peppers: While not always necessary, parboiling your pepper halves for 3-4 minutes in boiling water before stuffing ensures they’re perfectly tender without being mushy. This is especially helpful if you’re using thicker-walled peppers or prefer them very soft. Just plunge them in boiling water briefly, then shock in ice water to stop the cooking process.
Toast Your Spices: Before adding dried herbs and spices to your filling, toast them in the hot skillet for 30 seconds. This technique, called “blooming,” releases the essential oils and intensifies the flavors dramatically. You’ll notice a much more complex, aromatic filling.
Don’t Skip the Baking Liquid: That mixture of tomato sauce and broth at the bottom of the pan isn’t just for show—it creates steam that helps cook the peppers evenly while keeping everything moist. It also becomes a delicious sauce to spoon over the finished peppers.
Season in Layers: Professional cooks know that seasoning at each step builds better flavor than adding all the salt and pepper at the end. Season the beef as it browns, season again when you add the vegetables, and taste the filling before stuffing to adjust seasoning.
Use Day-Old Rice: If possible, use rice that’s been cooked and refrigerated overnight. The drier texture prevents the filling from becoming mushy. Freshly cooked rice contains too much moisture and can make your filling soggy.
Let the Meat Rest: After browning your ground beef, let it rest for a minute before adding other ingredients. This allows the moisture to redistribute, resulting in juicier, more flavorful meat.
Create a Flat Bottom: If your peppers are wobbly, slice the tiniest bit off the bottom to create a flat surface. Be careful not to cut through to the cavity, or the filling will leak out.
Finish Under the Broiler: For that gorgeous golden-brown cheese top that looks like it came from a restaurant, pop the dish under the broiler for the last 2-3 minutes of cooking. Watch it carefully to prevent burning.
Reserve Some Fresh Herbs: Always save some fresh herbs to sprinkle on just before serving. That pop of bright green color and fresh flavor makes the dish look and taste professionally prepared.
Common Mistakes to Avoid
Even though stuffed peppers are pretty forgiving, there are a few pitfalls that can trip up home cooks. Here’s how to avoid them:
Overstuffing the Peppers: While it’s tempting to pack in as much filling as possible, overstuffed peppers can burst during cooking, making a mess and losing their shape. Fill them generously but leave a little room at the top, and remember the filling expands slightly as it heats.
Not Draining the Ground Beef: If you skip draining excess fat from the beef, you’ll end up with greasy filling that’s swimming in oil. After browning, tilt the pan and spoon off the excess fat, or drain the meat in a colander before proceeding with the recipe.
Using Uncooked Rice: This is the number one mistake I see! Raw rice needs a lot of liquid and time to cook properly. In the closed environment of a stuffed pepper, it simply won’t cook all the way through, leaving you with crunchy, undercooked rice. Always use pre-cooked rice.
Skipping the Cover: Baking uncovered from the start will dry out your peppers and leave them tough and leathery. The foil cover traps steam that tenderizes the peppers. Only remove it for the final cheese-melting stage.
Cutting Peppers Too Small: Choosing small peppers or cutting them into tiny pieces means less filling and more chance of them falling over or burning. Look for large, thick-walled peppers that can hold a generous amount of filling and stand up to baking.
Forgetting to Season Enough: Bell peppers are mild, and the filling needs to be well-seasoned to create a flavorful dish. Taste your filling mixture before stuffing and adjust the salt, pepper, and spices. It should taste slightly over-seasoned on its own, as the pepper will dilute the flavors.
Baking at Too High Temperature: Cranking up the heat to speed things along will char the peppers before the filling heats through. Stick with 375°F for evenly cooked, tender peppers with perfectly heated filling.
Storage & Meal Prep
Stuffed bell peppers are fantastic for meal prep and make-ahead cooking, which is one of the reasons I love them so much. Here’s everything you need to know about storing and reheating:
Refrigerator Storage: Allow leftover stuffed peppers to cool completely, then transfer them to an airtight container. They’ll keep beautifully in the refrigerator for up to 4 days. You can store them in the baking dish covered tightly with plastic wrap or foil, or transfer individual portions to meal prep containers for grab-and-go lunches.
Reheating from Refrigerated: The best method is reheating in the oven. Place peppers in a baking dish, add a splash of broth or water to the bottom, cover with foil, and bake at 350°F for 20-25 minutes until heated through. For a quicker option, microwave individual peppers for 2-3 minutes, though they won’t be quite as crispy. If you have an air fryer, reheat at 350°F for 8-10 minutes for wonderfully crispy edges.
Freezing Cooked Peppers: Stuffed peppers freeze exceptionally well. Let them cool completely after baking, then wrap each pepper half individually in plastic wrap, followed by aluminum foil. Place wrapped peppers in a freezer-safe bag or container, removing as much air as possible. They’ll maintain their quality for up to 3 months in the freezer.
Reheating from Frozen: You can reheat frozen peppers without thawing. Place them in a baking dish, cover with foil, and bake at 350°F for 45-55 minutes until heated through. Remove the foil for the last 10 minutes to crisp up the cheese topping.
Meal Prep Strategy: Make a double batch on Sunday and portion them into individual containers with a side salad or roasted vegetables for complete meals throughout the week. They reheat beautifully, making them perfect for busy weeknight dinners or work-from-home lunches.
Storing Uncooked Stuffed Peppers: If you prefer to freeze them before baking, stuff the peppers, wrap them individually, and freeze. When ready to cook, bake from frozen at 375°F for about 60-70 minutes, covered for the first 50 minutes.
Make-Ahead & Freezer Notes
Planning ahead? These stuffed peppers are incredibly freezer-friendly and perfect for make-ahead meal planning:
Prepare Completely in Advance: You can assemble the entire dish up to 24 hours before baking. Stuff the peppers, arrange them in the baking dish with the sauce, cover tightly with plastic wrap and then foil, and refrigerate. When ready to cook, let the dish sit at room temperature for 20 minutes, then bake as directed, adding 5-10 extra minutes to the covered baking time.
Freezer Meal Assembly: For the ultimate make-ahead meal, stuff the peppers, place them on a parchment-lined baking sheet, and freeze until solid (about 2-3 hours). Once frozen, wrap each pepper individually in plastic wrap, then place all peppers in a large freezer bag. This method prevents them from sticking together and allows you to grab just the number you need.
Freezer-to-Oven Instructions: When baking from frozen, don’t thaw first. Place frozen stuffed peppers in a baking dish, add the tomato sauce and broth mixture, cover tightly with foil, and bake at 375°F for 60-70 minutes. Remove foil, add cheese, and bake uncovered for another 10 minutes.
Prep the Filling Ahead: Short on time? The filling can be prepared 2-3 days in advance and stored in an airtight container in the refrigerator. When ready to cook, simply stuff the peppers with the cold filling and proceed with the baking instructions.
Blanch and Freeze Peppers: You can prep just the peppers in advance by blanching the halves and freezing them. This cuts down on cooking time when you’re ready to make the dish, and pre-blanched peppers become perfectly tender during baking.
Best Reheating Method: For frozen peppers, the oven method yields the best results with tender peppers and evenly heated filling. If you’re in a rush, you can microwave individual portions, but expect a softer texture. Add a quick blast under the broiler at the end to recrisp the top.
Quality Timeline: For best flavor and texture, consume frozen cooked stuffed peppers within 3 months. They’re still safe beyond that, but quality may decline with ice crystal formation affecting the texture of the peppers.
Serving Suggestions
While stuffed bell peppers are technically a complete meal all on their own, serving them with the right accompaniments can create an even more satisfying and well-rounded dinner. Here are my favorite pairings:
Bread Options: A slice of warm, crusty garlic bread or a fluffy dinner roll is perfect for soaking up that delicious tomato sauce at the bottom of the pan. Cheesy garlic bread takes it to the next level. For a lighter option, serve with warm pita bread or naan.
Salad Pairings: Balance the richness of the stuffed peppers with a crisp, refreshing salad. A simple mixed green salad with balsamic vinaigrette, a classic Caesar salad, or a Mediterranean cucumber and tomato salad all work beautifully. In summer, try a caprese salad with fresh mozzarella, tomatoes, and basil.
Vegetable Sides: Roasted vegetables like zucchini, asparagus, or Brussels sprouts add color and nutrition. Steamed broccoli with garlic butter, sautéed green beans with almonds, or roasted carrots with honey glaze are all excellent choices.
Grain Sides: If you’re serving the low-carb cauliflower rice version of stuffed peppers, you might want to add a grain side like quinoa pilaf, couscous, or wild rice blend for heartier appetites.
Toppings Bar: Create a DIY toppings station with sour cream, sliced avocado, fresh cilantro, diced tomatoes, jalapeño slices, hot sauce, and extra shredded cheese. This is especially fun when serving the Mexican-style variation.
Beverage Pairings: For wine lovers, a medium-bodied red wine like Merlot, Chianti, or Zinfandel complements the tomato-based filling beautifully. Prefer beer? An amber ale or lager is perfect. For non-alcoholic options, iced tea, lemonade, or sparkling water with lemon are refreshing choices.
Soup Start: Begin the meal with a light soup like minestrone, tomato basil, or a simple chicken broth-based vegetable soup. This makes the meal feel more special for dinner guests.
Finishing Touch: Drizzle the stuffed peppers with a balsamic glaze just before serving for an elegant restaurant-style presentation. Fresh herbs sprinkled on top add both color and fresh flavor.
FAQs Section
Can I make stuffed peppers without meat?
Absolutely! Stuffed peppers are incredibly versatile and work beautifully as a vegetarian dish. Replace the ground beef with cooked lentils (brown or green work best), black beans, chickpeas, or a plant-based ground meat substitute. You can also use a mixture of quinoa and vegetables, or try a combination of mushrooms, walnuts, and bulgur for a meaty texture. The cooking time and method remain the same, and you’ll still get a delicious, protein-packed meal.
Do I need to cook the rice before stuffing the peppers?
Yes, you must use pre-cooked rice. Uncooked rice won’t have enough time or liquid to cook properly inside the pepper, and you’ll end up with crunchy, undercooked grains. Cook your rice according to package directions before mixing it into the filling. Day-old refrigerated rice actually works even better because it’s drier and won’t make the filling soggy.
Why are my stuffed peppers watery?
Watery stuffed peppers usually result from not draining the diced tomatoes or using too much liquid in the filling. Always drain canned tomatoes well before adding them to the mixture. Also, make sure you’ve drained excess fat from the ground beef. If you’re using vegetables like zucchini or mushrooms in your filling, sauté them first to release their moisture before adding them to the mixture. Finally, don’t add the broth/tomato sauce mixture directly over the peppers—pour it around them in the dish.
Can I use different colored bell peppers?
Definitely! In fact, using a variety of colors makes the dish more visually appealing. Red, yellow, and orange peppers are sweeter and slightly more expensive, while green peppers are more budget-friendly but have a slightly bitter, vegetal flavor. Many people prefer the sweeter varieties, but green peppers are traditional and work perfectly well. Choose based on your taste preference and budget, or use a colorful mix for the prettiest presentation.
How do I keep my peppers from falling over in the baking dish?
The key is choosing peppers with relatively flat bottoms and cutting them evenly. If a pepper is tippy, you can slice a very thin layer off the bottom to create a flat, stable base—just be careful not to cut through into the cavity. You can also nestle the peppers close together in the baking dish so they support each other. Some cooks place them in a muffin tin for extra stability, though this works best with smaller peppers.
Can I stuff peppers the night before and bake them the next day?
Yes! This is actually a great meal prep strategy. Assemble the stuffed peppers completely, including the sauce in the bottom of the pan, then cover the dish tightly with plastic wrap and refrigerate for up to 24 hours. When ready to bake, let the dish sit at room temperature for 15-20 minutes, then bake as directed. You may need to add an extra 5-10 minutes to the covered baking time since you’re starting with cold ingredients.
What’s the best way to reheat leftover stuffed peppers?
For the best results, reheat them in the oven. Place peppers in a baking dish, add a tablespoon or two of water or broth to the bottom, cover with foil, and bake at 350°F for 20-25 minutes until heated through. This method keeps the peppers tender and the filling moist. You can also microwave them for 2-3 minutes for a quicker option, though the texture won’t be quite as nice. If you want to crisp up the top, finish under the broiler for 1-2 minutes.
Conclusion
There you have it—the ultimate guide to making perfectly delicious stuffed bell peppers! This classic comfort food recipe is one that I return to again and again because it never disappoints. Whether you’re making it for a cozy family dinner, prepping meals for the week ahead, or looking for something special enough to serve to guests, these stuffed peppers deliver on every level.
What I love most about this recipe is how it brings everyone together around the table. The vibrant colors, the amazing aromas filling your kitchen as they bake, and that first bite of tender pepper with savory, cheesy filling—it’s pure comfort food magic. Plus, knowing that you can customize it endlessly means you’ll never get bored. Try the Mexican version one week, go Italian the next, or keep it classic every time—they’re all absolutely delicious.
I hope you love this stuffed bell pepper recipe as much as my family and I do! Don’t forget to save this recipe to your Pinterest boards so you can find it easily whenever you need a reliable, crowd-pleasing dinner idea. And if you make these beauties, I’d absolutely love to hear about it! Leave a comment below sharing how they turned out, any creative variations you tried, or questions you might have.
Happy cooking, and enjoy every delicious bite of these wonderful stuffed peppers.