

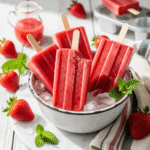
Get ready to beat the heat with these refreshing homemade strawberry popsicles that taste like summer in frozen form! Made with fresh strawberries, a touch of sweetness, and just a handful of simple ingredients, these easy strawberry popsicles are light-years better than anything you’ll find at the store. They’re bursting with real fruit flavor, naturally vibrant in color, and so simple that even kids can help make them.
These fresh strawberry popsicles are perfect for hot summer days, pool parties, backyard barbecues, or just a healthy after-school snack that kids will actually get excited about. Unlike store-bought popsicles loaded with artificial colors, flavors, and high fructose corn syrup, you’ll know exactly what goes into these homemade treats. The best part? You can control the sweetness level and even sneak in some extra nutrition!
Whether you’re looking for a fun weekend project with the kids, want to preserve fresh strawberries at their peak season, or simply need a guilt-free frozen treat, this strawberry popsicle recipe is your answer. They’re naturally gluten-free, can easily be made dairy-free or vegan, and are customizable with endless flavor variations. Pop them in the freezer, wait a few hours, and you’ll have a batch of beautiful, delicious popsicles that everyone will love!
History / Background
The history of frozen treats dates back thousands of years! Ancient civilizations enjoyed flavored ice and snow—the Romans had slaves run to the mountains to bring back snow, which was then flavored with honey and fruit. Chinese royalty enjoyed frozen milk and rice mixtures as early as 200 BC. However, the popsicle as we know it today has a charming, accidental origin story.
The modern popsicle was invented in 1905 by an 11-year-old boy named Frank Epperson in San Francisco. On a cold night, young Frank left a mixture of powdered soda, water, and a stirring stick on his porch overnight. The temperature dropped, and by morning, his drink had frozen solid with the stick standing upright. He called his creation the “Epsicle,” combining his name with “icicle.” Years later, in 1923, Frank began selling his frozen treats at an amusement park, and his children started calling them “Pop’s ‘sicles,” which eventually became “popsicles.”
Frank Epperson patented his invention in 1924, and the Popsicle brand was born. The original popsicles came in seven flavors, and they quickly became an American summertime staple. Over the decades, popsicles evolved into countless varieties, shapes, and flavors, becoming a nostalgic symbol of childhood summers.
The homemade popsicle movement has exploded in recent years as parents and health-conscious consumers seek alternatives to sugar-laden commercial versions. With the rise of farmers’ markets, fresh produce availability, and a growing interest in whole food ingredients, making fresh fruit popsicles at home has become incredibly popular. Strawberry popsicles, in particular, are beloved because strawberries are widely available, naturally sweet, and create that gorgeous pink color without any artificial dyes.
Today, making homemade strawberry popsicles is easier than ever with affordable popsicle molds available online and in stores. It’s a wonderful way to enjoy seasonal fruit, reduce food waste, control ingredients, and create healthy treats that bring joy to both kids and adults!
Why You’ll Love This Recipe
These homemade strawberry popsicles are about to become your summer essential! They’re incredibly refreshing, naturally delicious, and so much better than store-bought versions. The flavor is bright and fruity—you’ll actually taste real strawberries, not artificial flavoring.
Here’s why this easy strawberry popsicle recipe deserves a spot in your freezer all summer long:
- Made with Real Fruit – Fresh strawberries create authentic flavor and natural sweetness without any artificial ingredients
- Kid-Approved & Healthy – A treat parents feel good about serving with real nutrition from fruit
- Incredibly Easy – Just blend, pour, freeze—no cooking required! Perfect for beginner cooks and kids
- Budget-Friendly – Costs a fraction of store-bought popsicles and makes a big batch
- Customizable Sweetness – Control exactly how sweet they are based on your preference and the ripeness of your berries
- Naturally Gluten-Free – Safe for those with gluten sensitivities or celiac disease
- Vegan-Friendly – Can easily be made completely plant-based with non-dairy options
- No Artificial Anything – No dyes, no preservatives, no weird ingredients you can’t pronounce
- Fun Family Activity – Kids love helping make these and choosing flavor combinations
- Perfect for Meal Prep – Make a big batch and have healthy treats ready for weeks
- Great Way to Use Ripe Berries – Preserve peak-season strawberries or use up fruit that’s getting too soft
- Beautiful Natural Color – That gorgeous pink-red hue comes entirely from strawberries!
Whether you’re making these fresh strawberry popsicles for a summer party, stocking your freezer with healthy snacks, or just trying to cool down on a hot day, they’re guaranteed to be a hit with everyone from toddlers to grandparents!
Ingredient Notes
The beauty of this strawberry popsicle recipe is its simplicity—you need just a few ingredients to create something amazing!
Fresh Strawberries – The star ingredient! Use ripe, sweet strawberries for the best flavor. Peak season (spring through early summer) strawberries are ideal, but this recipe works year-round. Look for bright red berries that are fragrant and slightly soft to the touch. Hull them (remove the green tops) before using. You’ll need about 1 pound or roughly 3 cups of strawberries. Substitution: Frozen strawberries work perfectly too! Just thaw them first and include any juice they release.
Sweetener – This recipe uses honey, but you have options! Honey adds natural sweetness and helps prevent the popsicles from freezing rock-hard by lowering the freezing point slightly. The amount of sweetener you need depends on how sweet your strawberries are—taste your fruit first! Start with less and add more if needed. Substitutions: Maple syrup, agave nectar, simple syrup, or granulated sugar (dissolve it first in a bit of warm water). For sugar-free versions, use stevia or monk fruit sweetener.
Lemon Juice – Fresh lemon juice brightens the strawberry flavor and adds a subtle tang that makes everything taste fresher. It also helps preserve the beautiful red color. Just 1-2 tablespoons makes a big difference! Don’t skip this ingredient—it’s the secret to professional-tasting popsicles. Substitution: Lime juice works beautifully too and adds a slightly different flavor profile.
Water or Liquid Base – A small amount of liquid helps achieve the right consistency for pouring into molds. Water keeps things light and lets the strawberry flavor shine. Substitutions: Coconut water adds subtle tropical notes and electrolytes; fruit juice (like orange or pineapple) creates flavor layers; coconut milk or Greek yogurt makes creamy, dreamy popsicles; or use lemonade for a strawberry lemonade popsicle!
Optional: Vanilla Extract – A splash of pure vanilla extract enhances the strawberry flavor and adds warmth. It’s not essential but makes a noticeable difference in the final taste.
Optional: Fresh Mint – A few mint leaves blended in create a refreshing strawberry-mint combination that’s incredibly cooling on hot days.
Optional: Whole Strawberry Slices – For a beautiful presentation, you can add thin strawberry slices to the molds before pouring in the mixture. They’ll suspend in the popsicle and look gorgeous!
Equipment Needed
Making homemade popsicles requires minimal equipment—you probably have most of it already!
- Popsicle Molds – Essential for this recipe! You can find plastic molds, silicone molds, or even make your own using small paper cups and popsicle sticks. Standard molds hold about 3-4 ounces each. Silicone molds are easiest to remove popsicles from.
- Blender or Food Processor – For pureeing the strawberries into a smooth mixture. A high-powered blender gives the smoothest results, but any blender works fine.
- Measuring Cups and Spoons – For accurate ingredient measurements.
- Cutting Board and Sharp Knife – For hulling and slicing strawberries.
- Fine-Mesh Strainer (Optional) – If you want super smooth popsicles without any seeds, strain the blended mixture. Most people skip this step and enjoy the natural texture.
- Small Pitcher or Measuring Cup with Spout – Makes pouring the mixture into molds much easier and less messy.
- Popsicle Sticks – If your molds don’t come with them, wooden popsicle sticks are inexpensive and widely available.
- Spatula or Spoon – For scraping down the blender and transferring mixture.
DIY Popsicle Mold Alternatives:
- Small paper or plastic cups with wooden sticks
- Ice cube trays (for mini popsicles!)
- Silicone muffin tins
- Small mason jars or glass jars
Strawberry Popsicles Recipe
- Total Time: 4 hours 10 minutes
- Yield: 8-10 popsicles (depending on mold size) 1x
- Diet: Gluten Free
Description
These easy homemade strawberry popsicles are made with fresh strawberries, a touch of natural sweetness, and bright lemon juice for the most refreshing frozen treat! They’re healthy, kid-friendly, and taste like pure summer. Better than any store-bought version, these fresh fruit popsicles are simple to make and endlessly customizable!
Ingredients
- 1 pound fresh strawberries (about 3 cups), hulled and quartered
- ¼ cup honey (or sweetener of choice, adjust to taste)
- 2 tablespoons fresh lemon juice
- ¼ cup water (or coconut water, juice, etc.)
- ½ teaspoon vanilla extract (optional)
- Pinch of salt (optional, enhances sweetness)
Optional Add-Ins:
- 2–3 fresh mint leaves
- ¼ cup Greek yogurt or coconut milk (for creamy popsicles)
- Fresh strawberry slices (for visual appeal)
Instructions
Step 1: Prepare the Strawberries
Wash your strawberries thoroughly under cold water. Remove the green tops (hulling) by cutting around the stem or using a strawberry huller. Cut the strawberries into quarters to make blending easier. If using frozen strawberries, let them thaw completely and use any accumulated juice in the recipe.
Step 2: Blend the Mixture
Add the prepared strawberries, honey (or your chosen sweetener), lemon juice, water, and vanilla extract (if using) to your blender. If you want to test sweetness first, taste a strawberry—if they’re very sweet, start with 3 tablespoons of honey; if they’re tart, use the full ¼ cup or more. Blend on high speed for 45-60 seconds until completely smooth and no chunks remain. The mixture should be bright red and beautifully smooth.
Step 3: Taste and Adjust
This is the secret to perfect popsicles! Taste your mixture and adjust as needed. Remember that flavors taste less intense when frozen, so it should taste slightly sweeter than you want the final popsicle to be. If it’s too tart, add more honey. If strawberry flavor isn’t strong enough, add a few more berries. If it’s too thick, add a splash more water.
Step 4: Strain (Optional)
If you want super smooth popsicles without any strawberry seeds, pour the mixture through a fine-mesh strainer into a large measuring cup or bowl, using a spoon to press the mixture through. Personally, I skip this step because the seeds don’t bother me and they contain fiber, but this is a matter of preference!
Step 5: Pour into Molds
If adding fresh strawberry slices for visual appeal, place a few thin slices inside each mold first. Pour the strawberry mixture into your popsicle molds, leaving about ¼ inch of space at the top for expansion during freezing. Using a measuring cup with a spout or small pitcher makes this step much easier and less messy. Tap the molds gently on the counter to release any air bubbles.
Step 6: Insert Sticks
If your molds have built-in sticks or tops, insert them according to the manufacturer’s instructions. If using DIY cups, cover the tops with aluminum foil and poke the sticks through the foil to hold them upright in the center. The foil keeps the sticks in place as the popsicles freeze.
Step 7: Freeze
Place the filled molds on a level surface in your freezer. Freeze for at least 4-6 hours, or until completely solid. For best results, freeze overnight. The popsicles should be rock-solid before unmolding—if they’re still soft in the middle, give them more time.
Step 8: Unmold and Enjoy
To release popsicles from molds, run the outside of the mold under warm (not hot) water for 10-15 seconds. This slightly melts the outer layer, making them slide right out. Gently pull on the stick to remove. If using paper cups, simply peel away the paper. Enjoy immediately or wrap individually and store in the freezer!
Notes
- Sweetness Level: The amount of sweetener needed varies based on strawberry ripeness. Always taste your mixture before freezing and adjust. Frozen treats taste less sweet than the liquid version, so err on the slightly-sweeter side.
- Texture Tips: For smoother popsicles, blend longer and consider straining. For creamier popsicles, add yogurt or coconut milk. For icier, more traditional popsicles, use just fruit and water.
- Preventing Ice Crystals: A small amount of fat (from yogurt or coconut milk) or sugar/honey helps create smoother texture by preventing large ice crystals from forming. Blending thoroughly also helps.
- Mold Size Variations: This recipe fills about 8-10 standard popsicle molds (3-4 oz each). Adjust yield based on your specific mold size.
- No Molds? Use small paper cups or ice cube trays! Insert sticks after 1-2 hours of freezing when mixture is partially frozen and sticks will stand upright.
- Unmolding Trick: If popsicles are stubborn, let the mold sit at room temperature for 2-3 minutes, then try the warm water trick again. Patience is key!
- Prep Time: 10 minutes
- Cook Time: 0 minutes (freezing time: 4-6 hours)
- Category: Dessert
- Method: Freezing
- Cuisine: American
Nutrition
- Serving Size: 1 popsicle (approximately 3 oz)
- Calories: 45
- Sugar: 10g
- Sodium: 2mg
- Fat: 0g
- Saturated Fat: 0g
- Unsaturated Fat: 0g
- Trans Fat: 0g
- Carbohydrates: 12g
- Fiber: 1g
- Protein: 0g
- Cholesterol: 0mg
Tips & Variations
Creamy Strawberry Popsicles: Add ½ cup of Greek yogurt, coconut milk, or heavy cream to the blender for rich, creamy popsicles with a smoother texture. These taste more like ice cream bars!
Strawberry Lemonade Popsicles: Replace the water with lemonade for a sweet-tart combination that’s incredibly refreshing. You can reduce the honey since lemonade is already sweetened.
Layered Popsicles: Make two different flavors (strawberry and vanilla, or strawberry and mango) and pour them in layers, freezing each layer for 30-45 minutes before adding the next. Beautiful and delicious!
Strawberry Banana Popsicles: Add one ripe banana to the blender with the strawberries. The banana adds natural sweetness and creaminess while keeping it dairy-free.
Chocolate-Dipped Popsicles: Once frozen, dip popsicles in melted chocolate and immediately sprinkle with crushed graham crackers, chopped nuts, or coconut flakes. Return to freezer briefly to set.
Strawberry Basil Popsicles: Add 4-5 fresh basil leaves to the blender for a sophisticated, herbal flavor that pairs beautifully with strawberries.
Protein-Packed Version: Blend in a scoop of vanilla protein powder for a post-workout treat that’s both refreshing and nutritious.
Lower Sugar Option: Use only 2 tablespoons of honey and rely on the natural fruit sweetness. Add a few drops of stevia if needed for sweetness without extra sugar.
Berry Medley: Combine strawberries with other berries like raspberries, blueberries, or blackberries for a mixed berry popsicle with more complex flavor.
Coconut Strawberry: Use coconut milk as your liquid base and add ¼ teaspoon coconut extract for tropical vibes.
Pro Chef Tips
Choose Peak-Season Berries: The quality of your strawberries directly impacts the final product. In-season berries are sweeter, more flavorful, and naturally vibrant. If making these in winter with less flavorful berries, you may need to add more sweetener or a splash of vanilla extract to boost flavor.
Taste Your Mixture Multiple Times: Professional popsicle makers always over-sweeten slightly because freezing dulls flavor perception. Your mixture should taste almost too sweet at room temperature—it’ll be perfect when frozen. This is the single most important tip for success!
Control Texture with Ingredients: The ratio of sugar/fat to water determines texture. More sugar or fat (from honey, yogurt, coconut milk) creates smoother, creamier popsicles. More water creates icier, more refreshing popsicles. Neither is wrong—it’s about your preference! For the smoothest texture, add a tablespoon of vodka or corn syrup (it prevents hard freezing).
Prevent Air Bubbles: After filling molds, gently tap them on the counter several times to release trapped air bubbles. This creates smooth, professional-looking popsicles without air pockets.
Layer Colors and Flavors: If making layered popsicles, freeze each layer until it’s firm enough to support the next layer (about 45 minutes to 1 hour). This prevents colors from bleeding together and creates distinct, beautiful layers.
The Unmolding Secret: Running molds under warm water works, but here’s the pro trick: fill a tall container (like a pitcher or vase) with warm water and dip just the mold portion (not the stick area) for 10-15 seconds. This gives you more control and prevents water from getting on the popsicle stick or top.
Proper Storage: Once unmolded, individually wrap popsicles in parchment paper, wax paper, or plastic wrap before storing together in a freezer bag. This prevents them from sticking together and protects them from freezer burn and absorbing other freezer odors.
Common Mistakes to Avoid
Not Tasting Before Freezing: The biggest mistake is freezing without tasting first! Once they’re frozen, it’s too late to adjust sweetness or flavor. Always taste your mixture and adjust sweetness, tartness, or intensity before pouring into molds. Remember, it should taste slightly sweeter than you want the final product to be.
Using Underripe Strawberries: Pale, white-shouldered strawberries that aren’t fully ripe will create bland, flavorless popsicles. If your strawberries aren’t naturally sweet and flavorful, popsicles made from them won’t be either. Choose deeply red, fragrant berries, or compensate with extra sweetener and a splash of vanilla.
Overfilling Molds: Liquids expand when frozen, so if you fill molds to the absolute top, they’ll overflow and make a mess in your freezer. Always leave about ¼ inch of space at the top. If mixture does overflow, simply wipe it away before unmolding.
Removing Too Soon: Popsicles need to be completely frozen solid before you try to unmold them. Partially frozen popsicles will break apart or slide off the stick. Be patient and give them at least 4-6 hours, preferably overnight. You can test one—if it’s still soft in the middle, give them more time.
Using Too Much Force to Unmold: If you yank and pull aggressively, the popsicle will break or the stick will come out. Always use the warm water method first, and if it still doesn’t slide out easily, wait a minute and try again. Gentle, patient pressure is key.
Freezer Burn from Poor Storage: Unwrapped popsicles in the freezer will develop ice crystals on the surface (freezer burn) and absorb odors from other foods. Always wrap them individually or use a covered container to maintain quality for weeks.
Storage & Meal Prep
Freezer Storage: Properly stored homemade strawberry popsicles will keep beautifully in the freezer for up to 2-3 months, though they’re best enjoyed within the first month for optimal flavor and texture. After freezing solid, unmold them and individually wrap each popsicle in parchment paper, wax paper, or plastic wrap. Store all wrapped popsicles together in a large freezer-safe bag or airtight container.
Preventing Freezer Burn: The key to long-term storage is protecting popsicles from air exposure. Make sure they’re tightly wrapped with no gaps. Removing as much air as possible from your storage bag helps tremendously. If you notice ice crystals forming on the surface, they’re still safe to eat but quality will decline.
Meal Prep Strategy: These popsicles are perfect for meal prep! Make a double or triple batch on a Sunday and have healthy treats ready for weeks. You can make different flavors in different molds and create variety. They’re great for packed lunches (use an insulated bag with ice pack), after-school snacks, or portion-controlled desserts.
Labeling: If you’re making multiple flavors or batches, label your storage bag with the flavor and date. This helps you keep track of what you have and use older ones first.
No Mold Storage: If you want to keep your popsicle molds available for making new batches, unmold all popsicles once frozen and store as described above. This frees up your molds for continuous popsicle production all summer!
Make-Ahead & Freezer Notes
Perfect Make-Ahead Treat: The entire point of popsicles is that they’re made ahead and frozen, so they’re inherently make-ahead friendly! You can prepare these up to 3 months in advance of when you want to serve them. This makes them perfect for parties, gatherings, or just having on hand.
Prep in Stages: If you’re short on time, you can prepare the strawberry mixture and refrigerate it for up to 2 days before pouring into molds and freezing. This is helpful if you want to make them but your molds are currently occupied with another batch!
Freezing Timeline: While popsicles will be firm enough to eat after 4-6 hours, they continue to freeze more solidly over 24 hours. For easiest unmolding and best texture, let them freeze overnight before serving.
Party Planning: For parties or gatherings, make popsicles at least 2-3 days ahead. This gives you plenty of time and removes last-minute stress. You can even make them weeks ahead! Set them out in a large bowl of ice or a cooler when serving so guests can help themselves.
No “Reheating” Needed: Obviously popsicles don’t get reheated, but if one starts to melt, you can refreeze it. The texture might change slightly (it may become icier), but it’s still perfectly safe and delicious to eat.
Batch Freezing: If you’re lucky enough to have access to lots of ripe strawberries (maybe you went berry picking!), make multiple batches and fill your freezer. They’ll last for months and you’ll be so happy to have them during hot weather!
Serving Suggestions
These fresh strawberry popsicles are delightful on their own, but here are some fun ways to serve and enjoy them!
Poolside Refreshment: Keep a cooler filled with ice and stocked with popsicles for easy poolside access. They’re the perfect way to cool down on hot summer days while swimming or lounging.
Party Presentation: For parties, create a “popsicle bar” by setting out various dipping options: melted chocolate, crushed cookies, sprinkles, chopped nuts, coconut flakes, and mini chocolate chips. Let guests customize their popsicles by dipping and decorating!
Afternoon Snack: These make perfect after-school snacks for kids. They feel like a treat but provide real fruit nutrition, making parents and kids equally happy. Pair with cheese and crackers for a more substantial snack.
Breakfast Treat: Yes, popsicles for breakfast! On especially hot summer mornings, a fruit popsicle can be a fun, refreshing way to start the day. Pair with whole grain toast, eggs, or yogurt for a balanced breakfast.
Dessert Alternative: Serve these after dinner as a light, refreshing dessert that won’t leave you feeling heavy and overstuffed. They’re perfect after grilled meals, BBQ, or any summer dinner.
Beverage Float: Drop a strawberry popsicle into a glass of lemonade, sparkling water, or ginger ale for a fun drink-dessert combo. As it melts, it flavors the beverage!
Adult Versions: For grown-up gatherings, add a splash of prosecco, champagne, or vodka to your strawberry mixture before freezing for boozy popsicles (clearly labeled for adults only!).
Smoothie Bowl Topper: Break or chop a strawberry popsicle and use pieces as a refreshing topping for smoothie bowls or frozen yogurt.
Picnic Perfect: Pack frozen popsicles in an insulated bag with ice packs for picnics and outdoor adventures. They’ll stay frozen for hours!
FAQs Section
Can I use frozen strawberries instead of fresh?
Absolutely! Frozen strawberries work perfectly for this recipe and are often more affordable, especially out of season. Thaw them completely first and use any juice they release—it’s flavorful and shouldn’t be wasted! Frozen strawberries are actually picked at peak ripeness and flash-frozen, so they’re very flavorful. You might need slightly less liquid (water) since thawed berries release moisture.
Why are my popsicles icy instead of smooth?
Iciness happens when large ice crystals form during freezing. This can be caused by too much water in the mixture, not enough sugar or fat, or slow freezing. To create smoother popsicles, add some yogurt or coconut milk (fat smooths texture), ensure adequate sweetener (sugar/honey lowers freezing point), and make sure your freezer is cold enough (0°F or below). Also, blend very thoroughly—better blending creates smoother texture.
How do I get popsicles out of the molds easily?
The trick is running the mold under warm (not hot) water for 10-15 seconds. Hold just the mold portion under water, not the stick area. You can also fill a tall container with warm water and dip the molds. The warm water slightly melts the outer layer, allowing the popsicle to slide right out. If still stuck, wait 30 seconds and try again. Never force them or they’ll break!
Can I make these without a blender?
Yes, though the texture will be different! You can mash the strawberries very thoroughly with a potato masher or fork, then stir in the other ingredients. The popsicles will have more texture and visible fruit pieces rather than being smooth. Some people actually prefer this rustic style! Another option is finely chopping the strawberries and stirring them into juice or lemonade for chunky-style popsicles.
How long do homemade popsicles need to freeze?
Minimum 4-6 hours, but overnight (8-12 hours) is ideal for completely solid popsicles that unmold easily. The freezing time depends on your freezer temperature, the size of your molds, and the sugar content of your mixture. Smaller molds freeze faster than larger ones. When in doubt, give them more time—you can’t over-freeze them!
Can I make these sugar-free or lower sugar?
Yes! Strawberries contain natural sugars, so you can reduce or eliminate added sweeteners if your berries are very ripe and sweet. Taste test first—the mixture should taste sweeter than you want the final product since freezing dulls sweetness. For sugar-free versions, use stevia, monk fruit sweetener, or erythritol. Note that sugar helps create smooth texture, so sugar-free versions may be slightly icier.
What if I don’t have popsicle molds?
No problem! Use small paper cups (3-5 oz size), ice cube trays, or small mason jars. Pour in the mixture, cover with aluminum foil, and poke popsicle sticks through the foil to hold them in place. Freeze as directed. When ready to eat, peel away paper cups or run other containers under warm water to release. You can even use silicone muffin tins for fun shapes!
Conclusion
There you have it—everything you need to make the most delicious, refreshing, healthy homemade strawberry popsicles! These easy strawberry popsicles are proof that the simplest recipes often taste the best. With just fresh strawberries, a touch of sweetness, and a squeeze of lemon, you can create frozen treats that are infinitely better than anything from the store.
The beauty of this fresh strawberry popsicle recipe is its versatility and simplicity. Whether you’re making them exactly as written or experimenting with the endless variations, you’ll always end up with something delicious. They’re perfect for using up ripe berries, feeding hungry kids a healthy snack, cooling down on hot days, or just bringing a smile to anyone’s face. There’s something magical about homemade popsicles—they taste like summer, childhood, and happiness all frozen into one perfect treat!
I’d love to hear how your strawberry popsicles turn out! Did you try any fun variations? What did your family think? Did they disappear as fast as they do in my house? Leave a comment below and share your experience! And if this recipe helped you create something delicious, please share it on Pinterest so other home cooks can discover the joy of homemade popsicles too. Your pins help support this blog and inspire me to keep sharing recipes that make your life sweeter!
Now grab those strawberries, pull out those popsicle molds, and get ready to fill your freezer with the most refreshing treats of summer. Happy popsicle making!