
If you’ve ever dreamed of making bakery-worthy scones at home, this easy scone recipe is about to become your new obsession. These classic British scones are incredibly simple to make, requiring just a handful of pantry staples and about 30 minutes from start to finish. With their golden, crispy exterior and tender, buttery interior, these homemade scones are perfect for breakfast, afternoon tea, weekend brunch, or any time you’re craving something freshly baked and comforting.
The beauty of this recipe lies in its versatility and simplicity. Unlike fussy pastries that require precise temperatures and techniques, these foolproof scones come together quickly with minimal effort. Serve them warm with clotted cream and jam for a traditional English tea experience, or enjoy them plain with a pat of butter and your favorite coffee. Whether you’re hosting a sophisticated tea party or simply treating yourself to something special on a lazy Sunday morning, these easy homemade scones deliver impressive results without the stress.
History / Background
Scones have a rich and fascinating history that dates back to early 16th century Scotland. The name “scone” is believed to derive from the Dutch word “schoonbrot,” meaning beautiful bread, or possibly from the Stone of Destiny (Scone) where Scottish kings were crowned. Originally, scones were made with oats and cooked on a griddle rather than baked in an oven, resulting in a much different texture than the scones we know today.
The scone evolved significantly when it made its way to England and baking powder became widely available in the 19th century. This is when scones transformed into the light, fluffy, baked treats we’re familiar with. The addition of baking powder allowed for a tender crumb and beautiful rise, making them perfect for the British tradition of afternoon tea.
Speaking of afternoon tea, scones became inseparable from this quintessentially British custom thanks to Anna, the Duchess of Bedford, in the 1840s. She popularized the concept of afternoon tea as a way to curb hunger between lunch and dinner, and scones quickly became a staple of this elegant meal. The famous “cream tea” – scones served with clotted cream and jam – originated in Devon and Cornwall, and to this day, there’s a friendly debate about whether the cream or jam should be applied first (Devon says cream first, Cornwall says jam first).
Today, scones have evolved far beyond their humble Scottish origins. From the traditional English scone to American variations loaded with fruit, chocolate chips, or savory ingredients, these versatile baked goods have captured hearts worldwide. They represent comfort, tradition, and the simple pleasure of homemade baking.
Why You’ll Love This Recipe
This easy scone recipe is truly the best you’ll ever try, and I’m not exaggerating! These scones strike the perfect balance between crispy edges and a tender, slightly crumbly interior. They’re buttery without being greasy, sweet without being cake-like, and they come together so quickly that you can make them on a whim whenever the craving strikes.
Here’s why this recipe will become your go-to:
- Incredibly simple – Just 7 basic ingredients and one bowl required
- Lightning fast – Ready in 30 minutes from start to finish, perfect for last-minute guests
- Beginner-friendly – No special skills or fancy equipment needed
- Versatile base – Easily customizable with sweet or savory additions
- Make-ahead friendly – Dough can be prepared and frozen for fresh-baked scones anytime
- Budget-friendly – Uses inexpensive pantry staples you likely already have
- Impressive results – Looks and tastes like you spent hours at a fancy bakery
- Kid-approved – Great baking project to do with children on weekends
- Perfect texture – Crispy golden exterior with a tender, flaky crumb
- No mixer required – Everything comes together by hand in minutes
Ingredient Notes
Let’s break down the simple ingredients that create scone magic:
All-Purpose Flour – The foundation of your scones. All-purpose flour provides the perfect protein content for tender scones with good structure. You can substitute with half whole wheat flour for a heartier texture, though the scones will be slightly denser.
Baking Powder – This is what makes your scones rise and creates that light, fluffy interior. Make sure yours is fresh (check the expiration date) as old baking powder won’t provide adequate lift.
Granulated Sugar – Adds just the right amount of sweetness without making the scones taste like cake. You can reduce the sugar slightly if you prefer less sweet scones, or increase it for sweeter breakfast treats.
Salt – Essential for balancing flavors and enhancing the butter taste. Don’t skip it, even though it seems like a small amount!
Cold Butter – This is the secret to flaky, tender scones. The cold butter creates steam pockets as it melts during baking, resulting in those coveted flaky layers. Use unsalted butter so you can control the salt level. It must be very cold – straight from the fridge or even partially frozen works best.
Heavy Cream – Provides richness and moisture while keeping the dough tender. The fat content in heavy cream is what gives scones their luxurious texture. You can substitute with half-and-half in a pinch, though the scones won’t be quite as rich. Buttermilk is another excellent substitute that adds a slight tang.
Egg – Adds structure, richness, and helps bind everything together. It also contributes to the beautiful golden color on top. Use a large egg at room temperature for best results.
Vanilla Extract – A splash of pure vanilla enhances all the other flavors and adds warmth. While optional, it makes a noticeable difference in the final taste.
Equipment Needed
The beauty of this recipe is how little equipment you actually need:
- Large mixing bowl (for combining dry ingredients)
- Medium mixing bowl (for wet ingredients)
- Pastry cutter or fork (for cutting butter into flour – you can also use two knives or your fingers)
- Measuring cups and spoons
- Box grater (optional, for grating frozen butter – makes it even easier!)
- Rolling pin (or a wine bottle works in a pinch)
- Round biscuit cutter (2.5-3 inches) or a drinking glass
- Baking sheet
- Parchment paper or silicone baking mat
- Pastry brush (for brushing tops with cream)
- Sharp knife (if making wedge-shaped scones)
- Wire cooling rack

Easy Scone Recipe
- Total Time: 30 minutes
- Yield: 8 scones 1x
- Diet: Vegetarian
Description
These classic homemade scones are buttery, flaky, and incredibly easy to make with just 7 simple ingredients. Perfect for breakfast or afternoon tea, they come together in 30 minutes and are endlessly customizable with your favorite mix-ins.
Ingredients
For the Scones:
- 2 cups all-purpose flour, plus extra for dusting
- ⅓ cup granulated sugar
- 1 tablespoon baking powder
- ½ teaspoon salt
- ½ cup (1 stick) unsalted butter, very cold and cubed
- ½ cup heavy cream, plus 2 tablespoons for brushing
- 1 large egg
- 1 teaspoon vanilla extract
Optional Toppings:
- 1 tablespoon coarse sugar (for sprinkling)
- Extra heavy cream (for brushing tops)
Instructions
Step 1: Prepare Your Oven and Pan
Preheat your oven to 400°F. Line a baking sheet with parchment paper or a silicone baking mat. This prevents sticking and ensures even browning on the bottom.
Step 2: Mix the Dry Ingredients
In a large mixing bowl, whisk together the flour, sugar, baking powder, and salt until well combined. This ensures even distribution of the leavening agent and prevents pockets of baking powder in your scones.
Step 3: Cut in the Butter
Cut the cold butter into small cubes (about ½-inch pieces). Add the butter cubes to the flour mixture. Using a pastry cutter, two knives, or your fingertips, work the butter into the flour until the mixture resembles coarse crumbs with some pea-sized pieces of butter remaining. This should take 2-3 minutes. Pro tip: If using your hands, work quickly to prevent the butter from warming up. Some visible butter pieces are good – they create flaky layers!
Step 4: Prepare the Wet Ingredients
In a medium bowl, whisk together the heavy cream, egg, and vanilla extract until well combined and slightly frothy.
Step 5: Combine Wet and Dry
Make a well in the center of the flour-butter mixture. Pour in the wet ingredients. Using a wooden spoon or spatula, gently stir until the dough just comes together. The dough will look shaggy and a bit crumbly – this is perfect! Do not overmix, as this develops gluten and makes tough scones.
Step 6: Knead Gently
Turn the dough out onto a lightly floured surface. Gently knead 3-4 times just until the dough holds together. If there are dry flour patches, gently work them in, but avoid overworking the dough.
Step 7: Shape the Dough
Pat the dough into a circle about 8 inches in diameter and ¾-inch thick. You can also shape it into a rectangle if you prefer. The thickness is important – too thin and the scones will be dry; too thick and the centers won’t cook through.
Step 8: Cut the Scones
Using a 2.5-3 inch round biscuit cutter dipped in flour, cut out scones by pressing straight down without twisting (twisting seals the edges and prevents rising). Place them on the prepared baking sheet, spacing them about 2 inches apart. Gather the scraps, gently pat together once, and cut more scones. Alternatively, cut the circle into 8 wedges using a sharp knife.
Step 9: Brush and Top
Brush the tops of the scones with the remaining 2 tablespoons of heavy cream. This creates a beautiful golden crust. Sprinkle with coarse sugar if desired for extra sweetness and texture.
Step 10: Bake
Bake for 15-18 minutes until the scones are golden brown on top and a toothpick inserted in the center comes out clean. The bottoms should be golden as well. Watch carefully in the last few minutes to prevent over-browning.
Step 11: Cool and Serve
Remove from the oven and let cool on the baking sheet for 5 minutes, then transfer to a wire rack. Serve warm or at room temperature with butter, jam, clotted cream, or your favorite toppings.
Notes
- Butter Temperature: Keep your butter very cold. You can even freeze it for 15 minutes before using. Some bakers grate frozen butter with a box grater for ultra-flaky scones.
- Don’t Overmix: The key to tender scones is minimal mixing. Stop as soon as the dough comes together.
- Cutting Technique: Press the cutter straight down without twisting to allow maximum rise.
- Spacing: Leave room between scones on the pan. They’ll expand during baking.
- First Batch is Best: The first scones cut from the dough will be the fluffiest. Rerolled scraps may be slightly denser.
- Test for Doneness: The tops and bottoms should be golden brown, and the scones should feel firm to the touch.
- Prep Time: 15 minutes
- Cook Time: 15 minutes
- Category: Breakfast
- Method: Baking
- Cuisine: British
Nutrition
- Serving Size: 1 scone
- Calories: 295
- Sugar: 9g
- Sodium: 285mg
- Fat: 16g
- Saturated Fat: 10g
- Unsaturated Fat: 5g
- Trans Fat: 0g
- Carbohydrates: 33g
- Fiber: 1g
- Protein: 5g
- Cholesterol: 70mg
Tips & Variations
Sweet Variations:
- Blueberry Scones: Fold in 1 cup fresh or frozen blueberries (don’t thaw) after mixing the dough
- Cranberry Orange: Add ¾ cup dried cranberries and 1 tablespoon orange zest to the dry ingredients
- Chocolate Chip: Mix in ¾ cup mini chocolate chips for an indulgent treat
- Lemon Poppy Seed: Add 2 tablespoons poppy seeds and 1 tablespoon lemon zest, plus lemon glaze
- Cinnamon Chip: Add ½ teaspoon cinnamon to dry ingredients and ¾ cup cinnamon chips
- Strawberry: Fold in 1 cup diced fresh strawberries and add a vanilla glaze
Savory Variations:
- Cheddar Herb: Reduce sugar to 1 tablespoon, add 1 cup shredded sharp cheddar and 2 tablespoons fresh herbs
- Everything Bagel: Reduce sugar to 1 tablespoon, top with everything bagel seasoning
- Bacon Cheddar: Add ½ cup cooked, crumbled bacon and ¾ cup shredded cheddar
- Parmesan Rosemary: Replace sugar with ½ cup parmesan and 1 tablespoon fresh rosemary
Healthier Swaps:
- Use half whole wheat flour for added fiber (texture will be heartier)
- Replace half the butter with Greek yogurt (though texture will be less flaky)
- Reduce sugar to ¼ cup for less sweet scones
- Use coconut sugar instead of white sugar for lower glycemic index
Glaze Options:
- Simple glaze: 1 cup powdered sugar + 2-3 tablespoons milk
- Vanilla glaze: Add ½ teaspoon vanilla to simple glaze
- Lemon glaze: Use lemon juice instead of milk
- Maple glaze: Use maple syrup instead of milk
Pro Chef Tips
Tip #1: The Freeze-Butter Trick
Professional bakers know that super-cold butter is the secret to supremely flaky scones. Freeze your butter for 15 minutes before using, then grate it on a box grater directly into your flour mixture. This distributes the butter evenly and keeps it cold, creating maximum flakiness.
Tip #2: Chill the Dough
If your kitchen is warm or you’ve handled the dough a lot, pop the shaped scones (already on the baking sheet) into the freezer for 10 minutes before baking. This firms up the butter again, resulting in better rise and flakier texture.
Tip #3: Fold for Extra Layers
For even more flakiness, try the lamination technique: pat the dough into a rectangle, fold it in thirds like a letter, rotate 90 degrees, pat out again, and fold once more. Then shape as directed. This creates visible layers like a croissant.
Tip #4: Use Buttermilk for Tang
Replace the heavy cream with buttermilk for scones with a slight tang and even more tender crumb. The acidity in buttermilk also helps the scones rise higher and creates a more complex flavor.
Tip #5: Steam for Moisture
Place a shallow pan of water on the bottom rack of your oven while baking. The steam keeps the scones moist and helps them rise more before the crust sets.
Tip #6: The Touch Test
Scones are done when they’re golden brown and spring back slightly when touched. If they leave an indentation, they need a few more minutes. Don’t overbake or they’ll be dry.
Common Mistakes to Avoid
Mistake #1: Warm Butter
Using room temperature or even slightly softened butter will result in flat, dense scones instead of flaky, tall ones. The butter must be very cold to create those steam pockets that make scones light and tender. Always use butter straight from the fridge or freezer.
Mistake #2: Overmixing the Dough
Overworking the dough develops too much gluten, resulting in tough, chewy scones instead of tender, crumbly ones. Mix only until the ingredients just come together, even if the dough looks shaggy. A few dry streaks are fine.
Mistake #3: Twisting the Cutter
When cutting scones with a round cutter, press straight down and lift straight up. Twisting seals the edges and prevents the scones from rising properly. Dip the cutter in flour between cuts to prevent sticking.
Mistake #4: Overbaking
Scones continue cooking for a few minutes after you remove them from the oven. If you wait until they’re completely firm, they’ll end up dry and crumbly. Remove them when they’re just golden and still slightly soft to the touch.
Mistake #5: Skipping the Rest Time
If you bake scones immediately after cutting them in a warm kitchen, the butter may melt before the dough has a chance to set, resulting in flat scones. Give them a few minutes in the fridge or freezer if needed.
Storage & Meal Prep
Room Temperature Storage:
Store completely cooled scones in an airtight container at room temperature for up to 2 days. Line the container with paper towels to absorb excess moisture and keep the exteriors crispy.
Refrigerator Storage:
Scones can be refrigerated in an airtight container for up to 5 days, though the texture will become denser. They’re still delicious but won’t be quite as tender as fresh-baked.
Reheating Instructions:
- Oven (best method): Wrap scones in foil and warm at 300°F for 8-10 minutes until heated through. For crispy exteriors, unwrap for the last 2 minutes
- Microwave: Heat individual scones for 15-20 seconds on a microwave-safe plate. Place a damp paper towel over the scone to prevent drying out
- Toaster Oven: Cut scones in half and toast for 2-3 minutes for crispy edges and warm centers
- Air Fryer: Heat at 300°F for 3-4 minutes for perfectly warmed scones with crispy exteriors
Refreshing Day-Old Scones:
Brush slightly stale scones with melted butter or cream and reheat in a 350°F oven for 5-7 minutes. They’ll taste freshly baked!
Make-Ahead & Freezer Notes
Freeze Unbaked Dough (Recommended Method):
This is the best way to have fresh scones anytime! Cut the scones and place them on a baking sheet lined with parchment paper. Freeze until solid (about 2 hours), then transfer to a freezer bag or airtight container. Freeze for up to 3 months. When ready to bake, place frozen scones on a baking sheet, brush with cream, and bake at 400°F for 18-22 minutes (no need to thaw). They’ll taste just as good as fresh!
Freeze Baked Scones:
Let scones cool completely, then wrap individually in plastic wrap and place in a freezer bag. Freeze for up to 2 months. Thaw at room temperature for 1-2 hours or overnight in the refrigerator. Reheat using one of the methods above.
Refrigerate Unbaked Dough:
You can cut the scones and refrigerate them overnight on the baking sheet, covered with plastic wrap. Bring to room temperature for 15 minutes before baking, or add 2-3 minutes to the baking time if baking cold.
Make-Ahead Dough:
Mix the dry ingredients and cut in the butter up to 2 days ahead. Store in the refrigerator in an airtight container. When ready to bake, bring to room temperature, add the wet ingredients, and proceed with the recipe.
Best Reheating for Frozen Baked Scones:
Thaw at room temperature, then reheat wrapped in foil at 300°F for 10 minutes. Unwrap and heat for 2-3 more minutes for crispy exteriors.
Serving Suggestions
Scones are wonderfully versatile and can be served in so many delicious ways:
Traditional English Style:
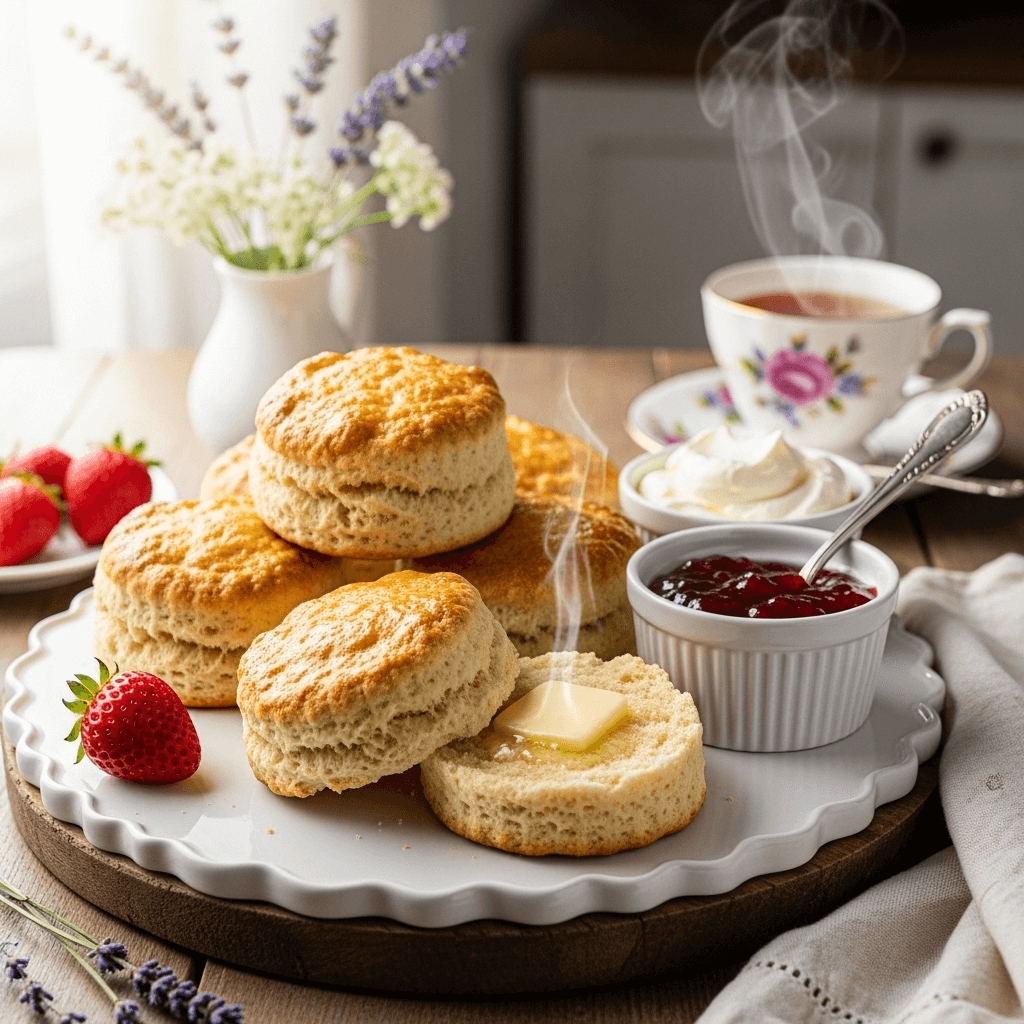
- Clotted cream and strawberry jam (the classic combination)
- Lemon curd and whipped cream
- Butter and honey
- Orange marmalade
- Raspberry preserves
Breakfast & Brunch Pairings:
- Fresh fruit salad with berries and melon
- Greek yogurt with granola
- Scrambled eggs and smoked salmon
- Crispy bacon or breakfast sausage
- Avocado toast for a complete spread
Beverages:
- English breakfast tea (the traditional pairing)
- Earl Grey tea with bergamot notes
- Chai latte with warming spices
- Fresh-brewed coffee (medium or light roast works best)
- Hot chocolate for a cozy treat
- Fresh-squeezed orange juice
- Mimosas or Bellinis for fancy brunches
Afternoon Tea Service: Arrange scones on a tiered cake stand with:
- Bottom tier: Finger sandwiches (cucumber, egg salad, smoked salmon)
- Middle tier: Warm scones with spreads
- Top tier: Petit fours and cookies
Make It Fancy:
- Dust with powdered sugar
- Drizzle with vanilla or lemon glaze
- Serve with mascarpone whipped cream
- Add edible flowers for elegant presentation
- Pair with seasonal fruit compote
Casual Serving: These scones are perfect for grab-and-go breakfast or afternoon snacks. Wrap individually and pack in lunchboxes, or enjoy with your morning coffee before work.
FAQs Section
Q: Can I make scones without heavy cream?
A: Yes! You can substitute with buttermilk (my favorite alternative), half-and-half, or even whole milk. Buttermilk creates tender scones with a slight tang. If using milk, the scones will be slightly less rich but still delicious. Some bakers use Greek yogurt thinned with a bit of milk.
Q: Why are my scones flat and not rising?
A: The most common causes are old baking powder (check the expiration date), warm butter (it must be cold), or overmixing the dough. Also make sure you’re cutting straight down with your cutter without twisting, and that your oven is fully preheated to 400°F.
Q: Can I use salted butter instead of unsalted?
A: Yes, but reduce or omit the added salt in the recipe. Salted butter can vary in saltiness by brand, so it’s harder to control the flavor. Unsalted butter gives you more control over the final taste.
Q: How do I know when scones are done baking?
A: Scones are done when they’re golden brown on top and bottom, spring back lightly when touched, and a toothpick inserted in the center comes out clean. They should feel firm but not hard. Internal temperature should reach about 200°F if using a thermometer.
Q: Can I add fresh fruit to this recipe?
A: Absolutely! Gently fold in up to 1 cup of fresh or frozen berries (don’t thaw frozen berries). Frozen berries are often better as they don’t release as much moisture. Toss fruit in a tablespoon of flour before adding to prevent sinking.
Q: What’s the difference between scones and biscuits?
A: While similar, scones typically contain eggs, sugar, and cream, making them richer and slightly sweeter than American biscuits. Biscuits use buttermilk or milk and are more savory. Scones also have a denser, more crumbly texture compared to the flaky layers of biscuits.
Q: Why do my scones taste dry?
A: Dry scones usually result from overbaking, too much flour (always spoon and level when measuring), or overmixing the dough. Try reducing baking time by 2 minutes, and make sure you’re not packing your flour into the measuring cup. The dough should be slightly sticky.
Conclusion
There’s something truly magical about pulling a batch of golden, buttery scones from your oven, filling your kitchen with that irresistible fresh-baked aroma. These easy homemade scones prove that you don’t need to be a professional baker to create something absolutely delightful. With just a handful of simple ingredients and 30 minutes of your time, you can serve bakery-quality scones that will impress everyone who tries them.
Whether you’re hosting an elegant afternoon tea, preparing a special weekend breakfast, or simply treating yourself to something homemade and delicious, this foolproof scone recipe delivers every single time. The best part? Once you’ve mastered this basic recipe, you can customize it endlessly to suit your taste preferences and whatever ingredients you have on hand.
I’d love to hear about your scone-baking adventures! Did you try any of the flavor variations? Do you prefer them with jam or clotted cream? What’s your favorite way to enjoy these easy scones? Drop a comment below and share your experience with this recipe. And if you loved these tender, flaky scones as much as I do, please save this recipe to your favorite Pinterest board so you can find it again – and help other home bakers discover the joy of homemade scones too!
Now grab your mixing bowl and get baking – fresh, warm scones are just 30 minutes away!