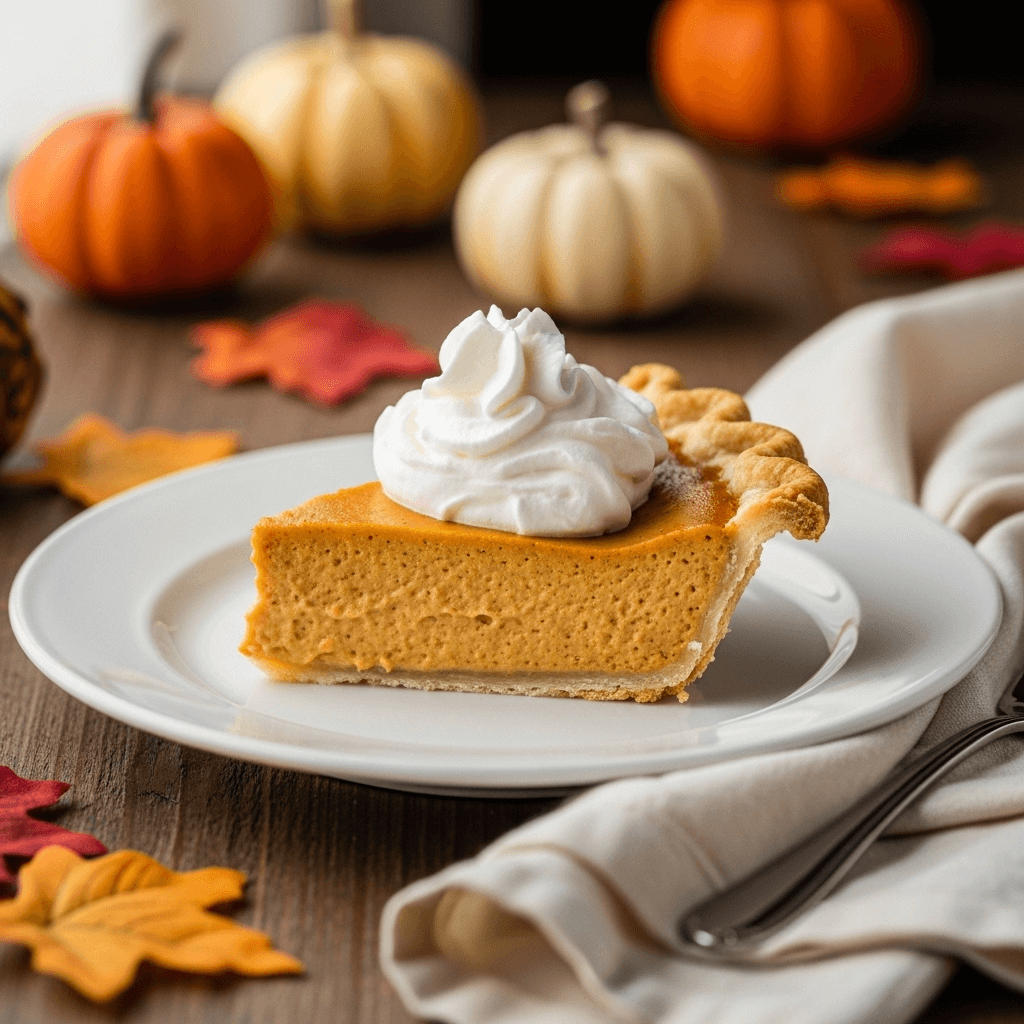
There’s nothing quite like the aroma of a freshly baked pumpkin pie filling your kitchen with warm spices and sweet, comforting fragrance. This classic homemade pumpkin pie recipe is the perfect dessert for Thanksgiving, fall gatherings, or any time you’re craving that cozy autumn feeling. With its silky-smooth custard filling, perfectly spiced flavor profile, and flaky, buttery crust, this pumpkin pie recipe delivers bakery-quality results right from your own oven.
Whether you’re a seasoned baker or making your first pumpkin pie from scratch, this recipe breaks down every step in a clear, easy-to-follow way. You’ll learn how to achieve that perfect creamy texture, avoid common baking mistakes, and create a dessert that’ll have everyone asking for seconds. This isn’t just any pumpkin pie—it’s the pumpkin pie that’ll become your go-to recipe for years to come. The best part? It’s surprisingly simple to make, using ingredients you probably already have in your pantry. Let’s dive into creating the most delicious, Instagram-worthy pumpkin pie that’ll steal the show at your next holiday table!
History / Background
Pumpkin pie holds a special place in American culinary history, with roots dating back to the early colonial period. While pumpkins are native to North America and were a staple food for Indigenous peoples long before European settlers arrived, the pumpkin pie as we know it today evolved over centuries.
The earliest versions of pumpkin pie were quite different from our modern dessert. Colonists would hollow out a pumpkin, fill it with milk, honey, and spices, then bake it in hot ashes. These primitive pumpkin custards were more practical than delicious, serving as a way to preserve the harvest and create sustenance during harsh winters.
By the 18th century, pumpkin pie had transformed into something closer to what we enjoy today. Recipes began appearing in American cookbooks, featuring pumpkin puree mixed with eggs, cream, sugar, and warming spices like cinnamon, ginger, and nutmeg—all baked in a pastry crust. The pie became synonymous with autumn celebrations and harvest festivals.
The connection between pumpkin pie and Thanksgiving became firmly established in the 19th century. As Thanksgiving evolved into a national holiday (officially declared by President Lincoln in 1863), pumpkin pie cemented its status as the quintessential Thanksgiving dessert. Regional variations emerged across the country, from New England’s molasses-sweetened versions to Southern recipes featuring sweet potato alongside pumpkin.
The introduction of canned pumpkin puree in the early 1900s revolutionized pumpkin pie baking, making it accessible year-round and significantly easier to prepare. The famous recipe on the back of Libby’s pumpkin can, first printed in 1950, became the standard that generations of American families have relied upon. Today, pumpkin pie represents more than just a dessert—it’s a symbol of American tradition, family gatherings, and the comfort of home cooking that connects us to our culinary heritage.
Why You’ll Love This Recipe
This homemade pumpkin pie recipe strikes the perfect balance between traditional flavor and modern convenience, making it ideal for both beginner bakers and experienced home cooks. Unlike complicated recipes that require advanced techniques, this one guides you through each step with clarity and confidence.
Here’s why this pumpkin pie recipe will become your new favorite:
- Perfectly Spiced – The blend of cinnamon, ginger, nutmeg, and cloves creates warm, aromatic flavor without overpowering the pumpkin
- Silky Smooth Texture – No grainy or watery filling here—just luxuriously creamy custard in every bite
- Foolproof Instructions – Detailed steps ensure success even if you’ve never made pie before
- Make-Ahead Friendly – Prepare components in advance to reduce stress on busy holiday cooking days
- Budget-Friendly – Uses simple, affordable ingredients that don’t break the bank
- Crowd-Pleaser – Appeals to picky eaters and food enthusiasts alike
- Classic Yet Customizable – Perfect as written, but easily adapted with creative variations
- Better Than Bakery – Fresher ingredients and homemade love create superior flavor and texture
- Beautiful Presentation – Creates an Instagram-worthy dessert that looks as good as it tastes
- Impressive Yet Easy – Looks like you spent hours, but comes together in under 30 minutes of active work
The beauty of this recipe lies in its reliability. You’ll get consistent, delicious results every single time, which means you can bake with confidence knowing your pumpkin pie will be the star of the dessert table.
Ingredient Notes
Understanding your ingredients is the first step to baking success. Here’s what goes into making the perfect pumpkin pie and why each component matters:
Pumpkin Puree: Use pure canned pumpkin (not pumpkin pie filling, which already contains spices and sugar). Look for 100% pumpkin with no added ingredients. You can also make fresh pumpkin puree from sugar pumpkins, though canned is more convenient and consistent. The pumpkin provides the base flavor and creamy texture.
Sweetened Condensed Milk: This creates the signature silky texture and adds sweetness. It’s different from evaporated milk—sweetened condensed milk is thick, sweet, and concentrated. This ingredient is key to achieving that smooth, custard-like consistency. Substitute: Regular evaporated milk plus extra sugar, though texture will be slightly different.
Eggs: These bind the filling and help it set properly during baking. Use large eggs at room temperature for best results. The eggs create structure and richness.
Spices (Cinnamon, Ginger, Nutmeg, Cloves): This classic quartet of warming spices defines pumpkin pie flavor. Use ground spices for convenience, or freshly grate nutmeg for extra aroma. Don’t skip any—each contributes unique flavor notes. Substitute: Pumpkin pie spice blend (about 2 tablespoons total).
Vanilla Extract: Pure vanilla enhances all the other flavors and adds depth. Use real vanilla extract, not imitation, for best flavor.
Salt: A small amount balances sweetness and enhances the pumpkin flavor. Don’t omit this crucial ingredient.
Pie Crust: Whether homemade or store-bought, use a standard 9-inch unbaked pie shell. Homemade pastry offers superior flavor and flakiness, but store-bought works perfectly when time is limited. Look for all-butter crusts for best taste.
Optional Toppings: Whipped cream, both homemade and store-bought, is traditional. You can also serve with vanilla ice cream, caramel sauce, or candied pecans for variety.
Quality ingredients make a noticeable difference in your final pie. When possible, choose organic pumpkin puree and real spices over artificial alternatives.
Equipment Needed
Having the right tools makes pumpkin pie baking easier and more successful. Here’s what you’ll need:
- 9-inch pie pan – Standard glass or ceramic pie dish (metal works too but glass allows you to check bottom crust doneness)
- Large mixing bowl – For combining filling ingredients
- Whisk or electric mixer – Whisk works fine; electric mixer makes it even easier and ensures smooth filling
- Measuring cups and spoons – Accurate measurements are crucial in baking
- Can opener – For opening canned pumpkin
- Rubber spatula – For scraping bowl and smoothing pie top
- Pie crust shield or aluminum foil – Protects crust edges from over-browning
- Cooling rack – Essential for proper cooling
- Sharp knife – For clean slicing when serving
- Oven thermometer (optional but recommended) – Ensures accurate baking temperature
Optional but helpful:
- Rolling pin (if making homemade crust)
- Pastry blender or food processor (for homemade crust)
- Pie weights or dried beans (for blind baking if pre-baking crust)
- Kitchen timer
- Offset spatula (for serving)
Most home kitchens already have these basics, making pumpkin pie one of the most accessible pies to bake without specialized equipment.
Print
Pumpkin Pie Recipe
- Total Time: 1 hour 10 minutes (plus 4 hours cooling)
- Yield: 8 servings 1x
- Diet: Vegetarian
Description
This classic homemade pumpkin pie features a smooth, creamy filling perfectly spiced with cinnamon, ginger, and nutmeg, all nestled in a flaky, buttery crust. It’s the ultimate Thanksgiving dessert that’s surprisingly easy to make from scratch.
Ingredients
For the Filling:
- 1 can (15 oz) pure pumpkin puree
- 1 can (14 oz) sweetened condensed milk
- 2 large eggs
- 1 teaspoon ground cinnamon
- ½ teaspoon ground ginger
- ½ teaspoon ground nutmeg
- ¼ teaspoon ground cloves
- ½ teaspoon salt
- 1 teaspoon pure vanilla extract
For the Crust:
- 1 unbaked 9-inch pie crust (homemade or store-bought)
For Serving:
- Whipped cream or vanilla ice cream (optional)
Instructions
- Preheat the oven: Set your oven to 425°F (220°C). Position the rack in the lower third of the oven for even bottom crust baking.
- Prepare the pie crust: If using homemade crust, roll it out and fit it into a 9-inch pie pan, crimping the edges decoratively. If using store-bought, simply unroll and press into the pan. Place in refrigerator while preparing filling.
- Mix the filling: In a large mixing bowl, whisk together the pumpkin puree, sweetened condensed milk, and eggs until completely smooth and well combined. Make sure there are no lumps.
- Add spices and flavoring: Add the cinnamon, ginger, nutmeg, cloves, salt, and vanilla extract to the pumpkin mixture. Whisk vigorously for about 1 minute until all spices are evenly distributed and the mixture is silky smooth.
- Pour filling into crust: Remove pie crust from refrigerator. Pour the pumpkin filling into the unbaked pie shell, spreading it evenly with a spatula. The filling should come nearly to the top of the crust but not overflow.
- Protect the crust edges: Cover the crimped edges of the crust with a pie shield or strips of aluminum foil to prevent over-browning during baking.
- Bake at high temperature: Place pie on a baking sheet (to catch any drips) and bake at 425°F for 15 minutes.
- Reduce temperature and continue baking: After 15 minutes, reduce oven temperature to 350°F (175°C) without opening the door. Continue baking for 40-45 minutes more, until the filling is set around the edges but still slightly jiggly in the very center (about a 2-inch circle).
- Check for doneness: The pie is done when a knife inserted near the center comes out mostly clean. The center should still wobble slightly—it will continue to set as it cools. Don’t overbake or the filling will crack.
- Cool completely: Remove pie from oven and immediately remove foil or pie shield from edges. Let cool on a wire rack for at least 2 hours at room temperature, then refrigerate for at least 2 hours more (or up to overnight) before serving. This cooling time is essential for proper setting.
- Serve and enjoy: Slice with a sharp knife, wiping the blade between cuts for clean slices. Serve chilled or at room temperature with whipped cream or vanilla ice cream.
Notes
- Temperature is crucial: The initial high heat sets the crust, while the lower temperature gently cooks the custard filling without curdling.
- Don’t skip cooling time: The pie needs to cool completely for proper texture. Cutting too early results in runny filling.
- Crust protection: Watch the crust edges carefully. If they brown too quickly, add foil protection even if you started without it.
- Storage: Cover and refrigerate leftover pie for up to 4 days.
- Freshness: Pumpkin pie tastes best within 2-3 days of baking.
- Prep Time: 15 minutes
- Cook Time: 55 minutes
- Category: Dessert
- Method: Baking
- Cuisine: American
Nutrition
- Serving Size: 1 slice (1/8 of pie)
- Calories: 316
- Sugar: 28g
- Sodium: 346mg
- Fat: 13g
- Saturated Fat: 6g
- Unsaturated Fat: 6g
- Trans Fat: 0g
- Carbohydrates: 43g
- Fiber: 2g
- Protein: 7g
- Cholesterol: 68mg
Tips & Variations
Make this classic pumpkin pie your own with these creative twists and helpful tips:
Flavor Variations:
- Maple Pumpkin Pie: Replace 1/4 cup of the sweetened condensed milk with pure maple syrup for subtle maple flavor
- Bourbon Pumpkin Pie: Add 2 tablespoons bourbon to the filling for sophisticated depth
- Chocolate Pumpkin Pie: Melt 1/2 cup chocolate chips and swirl into filling before baking
- Spiced Rum Pumpkin Pie: Add 1-2 tablespoons dark rum and increase spices by 25%
- Ginger-Heavy Version: Triple the ginger for a more zingy, warming pie
- Honey Sweetened: Replace sweetened condensed milk with evaporated milk plus 1/2 cup honey
Topping Ideas:
- Classic sweetened whipped cream
- Cinnamon whipped cream (add 1/2 tsp cinnamon to whipped cream)
- Maple whipped cream
- Candied pecans or walnuts
- Caramel drizzle
- Cream cheese frosting
- Streusel topping added during the last 15 minutes of baking
Dietary Modifications:
- Dairy-Free: Use coconut cream sweetened with sugar instead of sweetened condensed milk; use dairy-free pie crust
- Lower Sugar: Reduce sweetened condensed milk by 1/4 cup (though this will affect texture slightly)
- Gluten-Free: Use a gluten-free pie crust; filling is naturally gluten-free
Presentation Enhancements:
- Create decorative crust edges with cutouts or braided dough
- Use mini pie pans for individual servings
- Dust with cinnamon sugar before serving
- Pipe decorative whipped cream around the edges
- Add candied orange peel as garnish
Pro Chef Tips
Take your pumpkin pie from good to exceptional with these professional baker secrets:
1. Room Temperature Ingredients: Bring eggs and canned pumpkin to room temperature before mixing. This creates a smoother, more homogenous filling that bakes evenly. Cold ingredients can create lumps and uneven texture.
2. Strain for Silky Texture: For ultra-smooth filling, press the mixed filling through a fine-mesh strainer before pouring into the crust. This removes any lumps and creates restaurant-quality texture.
3. Blind Bake the Crust: For the crispest bottom crust, blind bake it for 10 minutes at 375°F before adding filling. Line with parchment and pie weights, bake, remove weights, and cool slightly before adding filling. This prevents soggy bottom.
4. The Wobble Test: The pie is perfectly done when the outer 2-3 inches of filling is set but the center 2-inch circle still wobbles like jello when gently shaken. It will firm up as it cools. Overbaking causes cracks and grainy texture.
5. Prevent Cracking: Cracks form when pies bake too long or cool too quickly. Ensure proper baking time, and let the pie cool gradually at room temperature rather than immediately refrigerating.
6. Boost the Spices: Toast your ground spices in a dry skillet for 30 seconds before adding to the filling. This amplifies their flavor significantly and adds complexity.
7. Add Butter for Richness: Melt 2 tablespoons of butter and whisk into the filling for extra richness and flavor depth.
8. Water Bath Method: For the creamiest possible texture, bake the pie in a water bath (place pie pan in a larger pan with 1 inch of hot water). This gentle, humid heat prevents curdling.
9. Rest Before Slicing: Wait at least 4 hours total cooling time (2 hours room temp + 2 hours refrigerated) before cutting. This patience ensures clean slices and proper texture.
10. Sharp, Warm Knife: For the cleanest slices, dip your knife in hot water and wipe dry between each cut. This prevents filling from sticking and creates bakery-perfect presentation.
These professional techniques might seem small, but they make a dramatic difference in the final result!
Common Mistakes to Avoid
Even experienced bakers can stumble with pumpkin pie. Here are the most common pitfalls and how to avoid them:
1. Using Pumpkin Pie Filling Instead of Pure Pumpkin: This is the #1 mistake! Pumpkin pie filling already contains sugar and spices, which will make your pie overly sweet and incorrectly seasoned. Always check the label and buy pure pumpkin puree with only one ingredient: pumpkin.
2. Overbaking the Pie: Many people bake until the entire filling is firm, resulting in a dry, cracked pie with grainy texture. Remember, the center should still have a slight wobble when you remove it from the oven. It continues cooking from residual heat and will set perfectly as it cools.
3. Not Protecting the Crust Edges: Exposed crust edges burn easily during the long baking time. Always shield them with foil or a pie shield, especially during the first 30 minutes of baking when the oven temperature is higher.
4. Skipping the Cooling Time: Cutting into a warm pie results in a soupy, runny mess. Pumpkin pie is a custard that needs time to set properly. Plan ahead and allow a full 4 hours of cooling time (or overnight is even better). Patience pays off with perfect slices.
5. Forgetting to Reduce Oven Temperature: The recipe starts at 425°F then reduces to 350°F. This two-temperature method is crucial—the high heat initially sets the crust and starts the filling, while the lower temp gently finishes cooking without curdling. Set a timer so you don’t forget to reduce the heat.
6. Not Whisking Thoroughly: Lumpy filling with streaks of egg or unmixed spices results from insufficient mixing. Whisk vigorously for a full minute after adding each ingredient group to ensure complete incorporation and silky texture.
7. Using a Deep Dish Pie Pan: This recipe is designed for a standard 9-inch pie pan. Deep dish pans have too much volume, causing the filling to be too thin or requiring significantly longer baking time. Stick with standard depth for best results.
Avoiding these mistakes will ensure your pumpkin pie turns out perfect every single time!
Storage & Meal Prep
Proper storage keeps your pumpkin pie fresh and delicious for days. Here’s everything you need to know:
Storing Baked Pie:
- Cool completely to room temperature first (about 2 hours)
- Cover loosely with aluminum foil or plastic wrap
- Refrigerate within 2 hours of baking
- Store in refrigerator for up to 4 days
- Always keep refrigerated—pumpkin pie is a custard and requires cold storage for food safety
Shelf Life:
- Refrigerated: 3-4 days optimal freshness; up to 5 days maximum
- Room Temperature: No more than 2 hours total (including serving time)
- Frozen: Up to 2 months (though texture is best when not frozen)
Best Serving Temperature: Pumpkin pie can be served chilled directly from the refrigerator or at cool room temperature. Remove from fridge 30 minutes before serving if you prefer it less cold. Never reheat in microwave as this makes the filling watery.
Reheating (if desired): While traditionally served cold, some prefer pie slightly warm:
- Preheat oven to 300°F
- Place uncovered pie in oven for 10-15 minutes
- Check that center is just slightly warm (not hot)
- Let rest 10 minutes before serving
Protecting the Crust: To keep the crust from becoming soggy during storage, place a paper towel under the pie plate to absorb any moisture. Change daily.
Preventing Condensation: Allow pie to cool completely before covering to prevent moisture buildup that can make the crust soggy.
Transporting Tips:
- Keep pie refrigerated until the last minute
- Transport in a rigid container or pie carrier
- Use ice packs in a cooler for trips longer than 30 minutes
- Place on a flat surface in your vehicle
Pumpkin pie is actually better the second day after the flavors have melded, so don’t worry about making it ahead!
Make-Ahead & Freezer Notes
Pumpkin pie is an excellent make-ahead dessert, which takes pressure off busy holiday cooking schedules. Here’s how to prep in advance:
Make-Ahead Timeline:
2-3 Days Before:
- Make and bake the pie completely
- Cool thoroughly and refrigerate covered
- This is actually the ideal timing as flavors develop and improve
1 Week Before:
- Prepare homemade pie crust, wrap tightly, and refrigerate (unbaked)
- Or freeze unbaked crust for up to 3 months
1 Day Before:
- Bake pie according to recipe
- Cool and refrigerate
- Make whipped cream and store separately
Morning Of Serving:
- Prepare any toppings or garnishes
- Bring pie to desired serving temperature (if you prefer not ice-cold)
Freezing Instructions:
Freezing Baked Pie:
- Bake pie completely and cool thoroughly
- Flash freeze uncovered for 2 hours until solid
- Wrap tightly in plastic wrap, then aluminum foil
- Label with date
- Freeze for up to 2 months
Freezing Unbaked Pie:
- Prepare filling and pour into unbaked crust
- Flash freeze uncovered for 2 hours
- Wrap tightly in plastic wrap and foil
- Freeze for up to 1 month
- Bake from frozen, adding 10-15 minutes to baking time
Thawing Instructions:
- Transfer frozen pie to refrigerator 24 hours before serving
- Never thaw at room temperature (food safety concern)
- For faster thawing, leave in refrigerator for 12 hours, then finish at room temperature for 2 hours
- Don’t microwave to thaw—this ruins texture
Texture Notes: While freezing is possible, pumpkin pie has the best texture when refrigerated rather than frozen. The custard can become slightly grainy after freezing. If freezing is necessary, the taste will still be delicious even if texture is minimally affected.
Pie Crust Make-Ahead: Unbaked pie crust freezes beautifully. Make several crusts at once and freeze individually. Thaw overnight in refrigerator before using.
Making components ahead allows you to spread out the work and reduces stress on the day of serving!
Serving Suggestions
Pumpkin pie is delicious on its own, but these accompaniments and serving ideas will create a memorable dessert experience:
Classic Toppings:
- Whipped Cream: The traditional choice—lightly sweetened heavy cream whipped to soft peaks
- Vanilla Ice Cream: Creamy, cold ice cream provides wonderful temperature and texture contrast
- Cinnamon Whipped Cream: Regular whipped cream with 1/2 teaspoon cinnamon folded in
- Maple Whipped Cream: Add 2 tablespoons pure maple syrup to whipping cream
Complementary Desserts:
- Serve alongside pecan pie for variety at Thanksgiving
- Pair with apple crisp for a fall dessert duo
- Offer with chocolate cake for those who want options
- Include assorted cookies for a full dessert spread
Beverage Pairings:
- Coffee: Hot coffee cuts through the sweetness perfectly
- Spiced Chai Tea: Warm spices complement pumpkin flavors
- Apple Cider: Hot or cold, this is quintessentially autumnal
- Milk: Classic and simple, especially for kids
- Dessert Wine: Late harvest Riesling or Moscato pairs beautifully
- Bourbon or Whiskey: Small sip alongside pie for adults
Garnish Ideas:
- Dust with cinnamon or pumpkin pie spice
- Sprinkle with toasted pecans or walnuts
- Drizzle with caramel sauce
- Add candied ginger pieces
- Top with a cinnamon stick for presentation
- Scatter pomegranate arils for color
- Add a sprig of fresh mint
Plating Suggestions:
- Serve on white plates to showcase the golden color
- Add a small dollop of whipped cream beside the slice
- Drizzle plate with caramel sauce for artistic presentation
- Dust the plate rim with cinnamon for elegant touch
- Serve in vintage dessert plates for rustic charm
Portion Sizes: A standard 9-inch pie serves 8 generous slices. For larger gatherings, consider making two pies or cutting smaller slices to serve 10-12 people.
Serving Temperature: While pumpkin pie is traditionally served cold or cool, experiment with slightly warmed pie (just to room temperature) for a different experience. The spices become more aromatic when not ice-cold.
Holiday Table Presentation: Display the whole pie on a cake stand before cutting for beautiful presentation. Surround with small pumpkins, autumn leaves, or cinnamon sticks for festive styling.
FAQs Section
Q: Can I use fresh pumpkin instead of canned?
A: Absolutely! Use sugar pumpkins (not carving pumpkins). Cut in half, remove seeds, roast cut-side down at 350°F until tender (45-60 minutes). Scoop out flesh and puree until smooth. You’ll need about 2 cups of fresh puree. Note that fresh pumpkin has higher moisture content, so you may need to drain it through cheesecloth to avoid watery pie.
Q: Why did my pumpkin pie crack on top?
A: Cracks form from overbaking or cooling too quickly. The filling expands as it bakes and contracts as it cools—if it’s overbaked, it becomes too firm and splits during cooling. Bake until just the center wobbles, and let the pie cool gradually at room temperature rather than immediately refrigerating. Cracks don’t affect taste, and you can cover them with whipped cream!
Q: Can I make pumpkin pie without sweetened condensed milk?
A: Yes! Substitute with 1 can (12 oz) evaporated milk plus 3/4 cup granulated sugar. Whisk the sugar and evaporated milk together until sugar dissolves before mixing with other ingredients. The texture will be slightly less creamy but still delicious.
Q: How do I know when my pumpkin pie is done baking?
A: The pie is done when the outer edges are set and puffed slightly, but the center 2-3 inches still wobbles like Jello when you gently shake the pan. A knife inserted near (not in) the center should come out mostly clean. The center will continue cooking from residual heat and will set completely as it cools. Don’t wait for the entire pie to be firm or you’ve overbaked it.
Q: Why is my pie crust soggy?
A: Soggy bottom crust results from too much moisture or underbaking. To prevent this: blind bake the crust for 10 minutes before adding filling, ensure your oven is fully preheated, place the pie on the lower oven rack for bottom heat, and don’t add too much filling. Also avoid refrigerating the hot pie immediately as this creates condensation.
Q: Can I make mini pumpkin pies instead of one large pie?
A: Definitely! Use a muffin tin lined with pie crust circles or use individual tart pans. Reduce baking time significantly—start checking after 15-20 minutes at 350°F. Mini pies bake much faster than full-size pies. They’re perfect for parties and portion control!
Q: Do I need to prebake/blind bake the pie crust?
A: It’s optional but recommended. Blind baking (prebaking the crust for 10 minutes before adding filling) ensures a crispy, golden bottom crust. Without it, you might get a slightly soft bottom, though the pie will still taste great. If you’re short on time, you can skip it—just make sure to place the pie on the lowest oven rack for maximum bottom heat.
Q: My pie filling seems thin—did I do something wrong?
A: Pumpkin pie filling looks quite liquid before baking, which is completely normal. It thickens and sets during baking as the eggs cook. If your baked and cooled pie is still too liquid, it was underbaked. Remember it needs to cool for at least 4 hours to fully set. If it’s still runny after proper cooling, the pie wasn’t baked long enough.
Conclusion
There’s something truly magical about pulling a perfectly baked pumpkin pie from the oven—the warm spices filling your kitchen, the golden crust just beginning to turn crispy at the edges, and that smooth, silky filling that promises deliciousness in every bite. This classic homemade pumpkin pie recipe delivers all the comfort and tradition you’re looking for, whether you’re baking for Thanksgiving, a fall potluck, or simply because you’re craving that cozy autumn flavor.
The best part? You now have all the knowledge, tips, and tricks to make pumpkin pie like a pro. From understanding the perfect wobble test to mastering that flaky crust, you’re equipped to create a dessert that’ll have everyone asking for your secret recipe. Remember, the key to a great pumpkin pie is quality ingredients, patience during cooling, and a little love stirred into the filling.
Don’t wait for Thanksgiving to make this recipe—pumpkin pie is perfect for any fall or winter gathering. Try it this weekend and watch it disappear! Your family and friends will be so impressed, they might not believe you made it from scratch.
I’d love to hear how your pumpkin pie turns out! Leave a comment below with your results, any creative variations you tried, or questions you have. Did you make it for Thanksgiving? Did your family love it? Share your experience!
Don’t forget to save this recipe to Pinterest so you can find it again next time you’re craving that perfect slice of pumpkin pie. Pin it to your Thanksgiving desserts board, fall baking collection, or holiday recipes folder—you’ll definitely want this recipe handy!
Happy baking, and enjoy every delicious, spice-filled bite! 🥧🍂