If there’s one recipe that captures the essence of fall in every slice, it’s this classic pumpkin bread. This easy homemade pumpkin bread delivers everything you crave during autumn—incredibly moist texture, warm spices that fill your kitchen with the most amazing aroma, and that perfect balance of sweetness that makes it irresistible for breakfast, snack time, or dessert. Made with real pumpkin puree and a blend of cinnamon, nutmeg, and cloves, each bite tastes like a cozy sweater feels.
This moist pumpkin bread recipe is perfect for so many occasions: weekend brunch with friends, Thanksgiving morning breakfast, holiday gift-giving, bake sales, or simply when you’re craving something comforting with your afternoon coffee. It’s one of those reliable recipes that works every single time—no fussy techniques, no unusual ingredients, just straightforward baking that produces bakery-quality results. Whether you’re an experienced baker or someone just starting out, this foolproof recipe will quickly become your go-to fall favorite. And the best part? It actually tastes better the next day as the flavors meld together, making it ideal for meal prep or making ahead for busy mornings.
History / Background
Pumpkin bread has deep roots in American culinary tradition, though its origins are more recent than you might think. While Native Americans had been using pumpkins in cooking for thousands of years—roasting, boiling, and drying them—pumpkin bread as we know it today emerged in the mid-20th century during the quick bread revolution in American home baking.
Quick breads, which use baking powder or baking soda instead of yeast, became immensely popular in the 1930s-1950s as American home cooks embraced convenience and reliability. Banana bread led the charge during the Great Depression when resourceful homemakers sought ways to use overripe fruit, and soon other vegetable and fruit-based quick breads followed. Zucchini bread, carrot cake, and pumpkin bread all emerged from this era of creative, economical baking.
Pumpkin bread specifically gained traction in the 1950s and 1960s when canned pumpkin puree became widely available in grocery stores. The Libby’s company, which began canning pumpkin in 1929, heavily promoted pumpkin recipes beyond pie, recognizing that Americans’ love of pumpkin could extend to other baked goods. Home economics classes and women’s magazines of the era featured pumpkin bread recipes, often positioned as a way to use leftover canned pumpkin after making Thanksgiving pies.
The recipe evolved over decades, with regional variations appearing across the country. New England versions often included molasses and extra spices, Southern recipes added pecans and sometimes bourbon, and West Coast interpretations incorporated health-conscious additions like whole wheat flour and nuts. What remained constant was the appeal of moist, spiced bread that captured autumn’s essence in an easy-to-make loaf.
Today, pumpkin bread represents more than just a recipe—it’s a seasonal tradition that signals the arrival of fall. From coffee shops to home kitchens, the appearance of pumpkin bread marks the transition from summer to autumn, becoming as emblematic of the season as falling leaves and cozy sweaters.
Why You’ll Love This Recipe
This isn’t just any pumpkin bread—it’s the ultimate version that combines the perfect texture, ideal spice balance, and foolproof technique to create the moistest, most flavorful loaf you’ve ever tasted. The bread stays tender for days thanks to the natural moisture from pumpkin puree and oil, while the spice blend creates complex warmth without overwhelming the pumpkin flavor. Here’s why this recipe deserves a permanent spot in your fall baking collection:
- Incredibly moist texture – Stays perfectly tender for days thanks to pumpkin puree and oil, never dry or crumbly
- Perfect spice balance – Warm cinnamon, nutmeg, and cloves enhance rather than overpower the pumpkin flavor
- One-bowl simplicity – Minimal dishes and straightforward mixing make cleanup a breeze
- Beginner-friendly – No special techniques, no stand mixer required, just simple stirring
- Makes two loaves – Perfect for gifting one and keeping one, or freezing for later
- Customizable base – Easily adapt with mix-ins like chocolate chips, nuts, or dried fruit
- Budget-friendly – Uses affordable pantry staples and inexpensive canned pumpkin
- Freezer-friendly – Makes ahead beautifully for stress-free fall entertaining
- Tastes better with time – Flavors deepen and meld after a day, improving rather than declining
- Versatile serving – Perfect for breakfast, snack, dessert, or gift-giving
Ingredient Notes
Quality ingredients create the best pumpkin bread, but they don’t have to be fancy or expensive. Here’s what you need and why each component matters:
Pumpkin Puree: The star ingredient that provides moisture, flavor, and that beautiful orange color. Always use 100% pure pumpkin puree (not pumpkin pie filling, which contains added sugars and spices). Look for Libby’s or other brands labeled “100% pumpkin.” One 15-ounce can provides exactly what you need. If you want to use fresh pumpkin, roast sugar pumpkins until tender, puree until smooth, and drain excess liquid—though canned is actually more consistent in moisture content.
Vegetable Oil: Creates incredibly moist bread that stays tender for days. Unlike butter-based quick breads that dry out quickly, oil-based breads maintain moisture longer. Use neutral-flavored oils like canola, vegetable, or light olive oil. Melted coconut oil works too, adding subtle coconut flavor. Don’t substitute with applesauce unless you want a different, less rich texture.
Granulated Sugar: Provides sweetness and helps create tender crumb. The recipe uses a moderate amount—enough for sweetness without being cloying.
Brown Sugar: Adds moisture, deeper flavor, and slight molasses notes that complement the spices beautifully. Light or dark brown sugar both work, though dark provides richer flavor.
Eggs: Bind ingredients together and add structure. Use large eggs at room temperature for best incorporation. For egg-free version, substitute with flax eggs (1 tablespoon ground flaxseed + 3 tablespoons water per egg, let sit 5 minutes).
All-Purpose Flour: The foundation of bread structure. Measure by spooning into measuring cups and leveling off—don’t pack it down. For whole wheat version, substitute up to half the flour with whole wheat, though the bread will be denser.
Baking Soda: The leavening agent that makes bread rise. Don’t substitute with baking powder—they work differently. Make sure yours is fresh (under 6 months old) for proper rise.
Salt: Essential for enhancing flavors and balancing sweetness. Don’t skip it—salt makes everything taste better.
Ground Cinnamon: The dominant spice that defines pumpkin bread flavor. Use fresh, fragrant cinnamon for best results—old spices lose potency.
Ground Nutmeg: Adds warm, slightly sweet, complex notes. Freshly grated nutmeg tastes dramatically better than pre-ground, but either works.
Ground Cloves: Provides aromatic warmth and slight sweetness. A little goes a long way—too much tastes medicinal.
Ground Ginger: Optional but recommended for additional warm spice complexity and slight heat that brightens the flavor profile.
Vanilla Extract: Enhances all the other flavors without being identifiable. Use pure vanilla extract, not imitation.
Equipment Needed
Pumpkin bread requires minimal equipment, most of which you likely already own:
- Two 9×5-inch loaf pans – Standard bread loaf pans; metal, glass, or silicone all work
- Large mixing bowl – For combining wet ingredients
- Medium mixing bowl – For whisking together dry ingredients
- Whisk – For combining ingredients smoothly
- Rubber spatula – For folding and scraping down bowl sides
- Measuring cups and spoons – Accurate measurements ensure consistent results
- Can opener – For opening pumpkin puree can
- Toothpick or cake tester – To check doneness
- Cooling rack – Allows air circulation for even cooling
- Parchment paper – Lines pans for easy removal (optional but helpful)
Pumpkin Bread Recipe
- Total Time: 1 hour 20 minutes
- Yield: 2 loaves (24 slices total) 1x
- Diet: Vegetarian
Description
Classic moist pumpkin bread recipe with warm fall spices, perfect pumpkin flavor, and incredibly tender crumb. Easy one-bowl method makes two loaves perfect for sharing or freezing.
Ingredients
Wet Ingredients:
- 1 (15-ounce) can pumpkin puree (about 1¾ cups)
- 4 large eggs, room temperature
- 1 cup vegetable oil
- ⅔ cup water
Dry Ingredients:
- 3 cups granulated sugar
- 3½ cups all-purpose flour
- 2 teaspoons baking soda
- 1½ teaspoons salt
- 1 tablespoon ground cinnamon
- 1 teaspoon ground nutmeg
- ½ teaspoon ground cloves
- ½ teaspoon ground ginger (optional)
- 2 teaspoons vanilla extract
Optional Mix-Ins:
- 1 cup chopped walnuts or pecans
- 1 cup chocolate chips
- ½ cup dried cranberries or raisins
Instructions
- Preheat and Prepare: Preheat your oven to 350°F (175°C). Grease two 9×5-inch loaf pans thoroughly with butter or non-stick spray. For extra insurance against sticking, line the bottom of each pan with a strip of parchment paper.
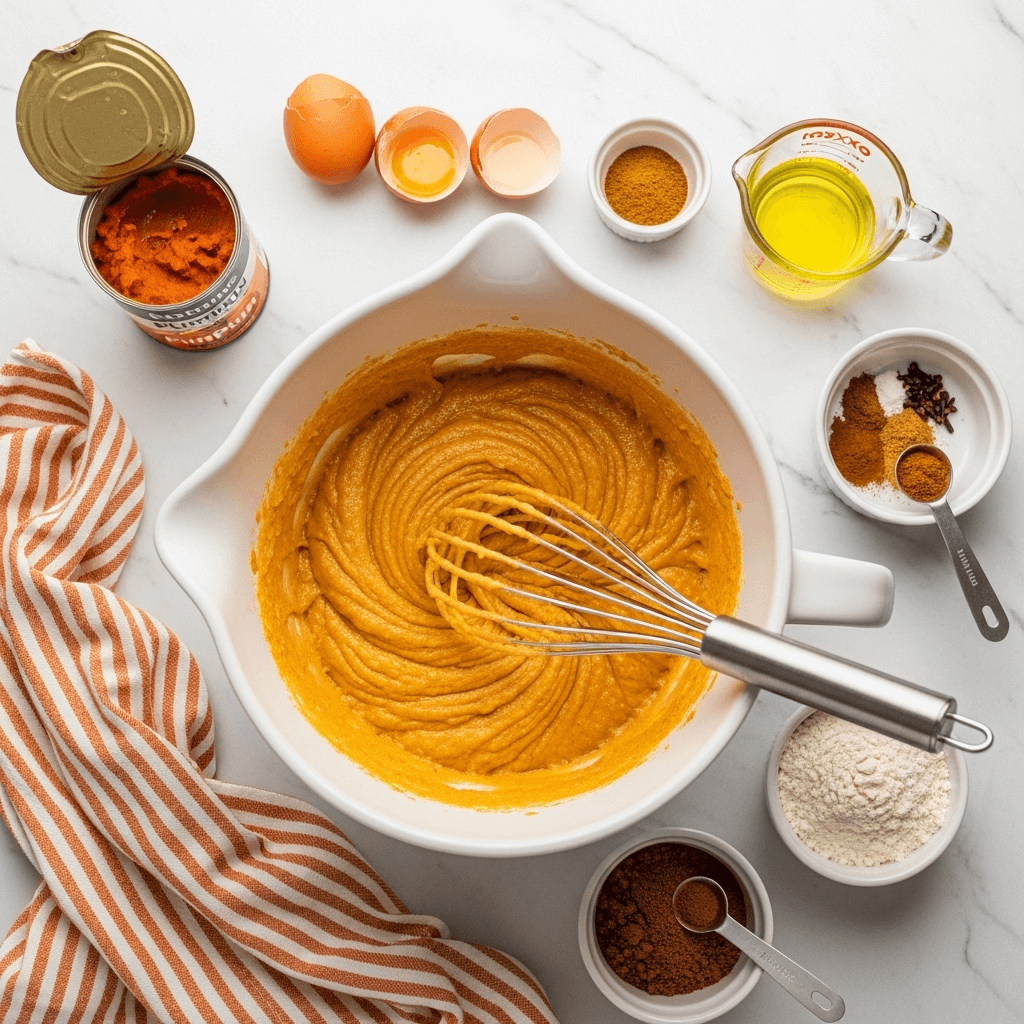
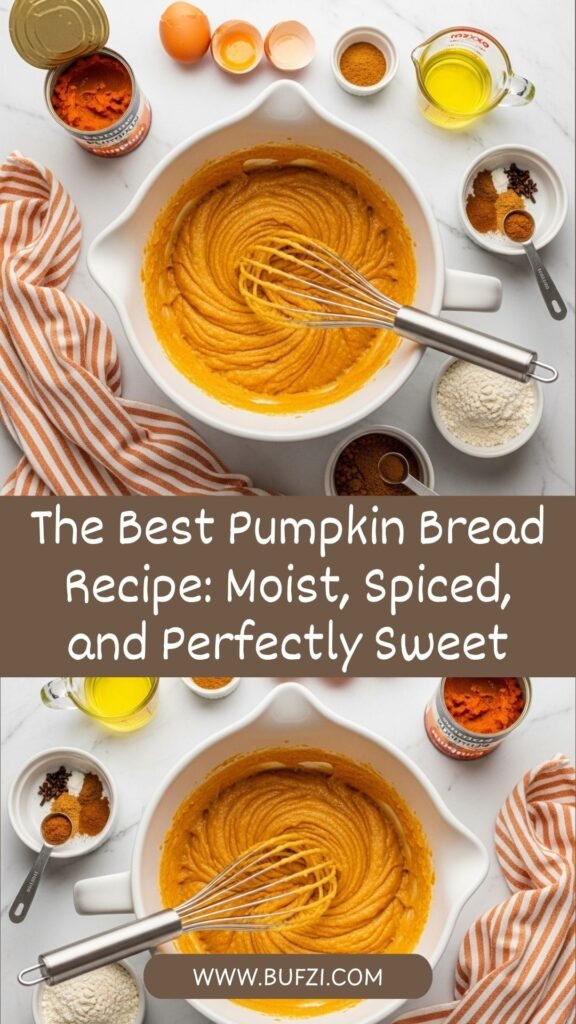
- Mix Wet Ingredients: In a large mixing bowl, whisk together pumpkin puree, eggs, vegetable oil, and water until completely smooth and well combined. The mixture should be uniform in color with no streaks of egg visible.
- Combine Dry Ingredients: In a medium bowl, whisk together granulated sugar, flour, baking soda, salt, cinnamon, nutmeg, cloves, and ginger (if using). Whisking helps distribute the spices and leavening evenly throughout the flour, preventing pockets of spice or baking soda.
- Fold Together: Add the dry ingredients to the wet ingredients. Using a rubber spatula, gently fold the mixture together using broad strokes, scraping from the bottom of the bowl upward. Mix just until no dry flour pockets remain—the batter should be thick, uniform, and slightly lumpy. Don’t overmix or your bread will be tough.
- Add Vanilla and Mix-Ins: Stir in vanilla extract. If using any optional mix-ins like nuts, chocolate chips, or dried fruit, fold them in now, distributing them evenly throughout the batter.
- Divide and Fill Pans: Divide batter evenly between the two prepared loaf pans (about 3½ cups per pan). Use your spatula to smooth the tops, creating a slight indent down the center—this helps the loaves rise evenly rather than doming dramatically.
- Bake: Place pans on the middle oven rack, spacing them apart for even air circulation. Bake for 60-65 minutes, or until a toothpick inserted into the center comes out clean or with just a few moist crumbs (not wet batter). The tops should be deeply golden brown and spring back when gently pressed.
- Cool in Pans: Remove from oven and let loaves cool in pans on a wire rack for 10-15 minutes. This cooling period allows the structure to set, preventing the bread from breaking apart when removed.
- Remove and Cool Completely: Run a thin knife or offset spatula around the edges of each pan to loosen. Carefully invert the loaves onto the wire rack, then flip them right-side up. Let cool completely before slicing—at least 30 minutes. Warm bread is difficult to slice cleanly.
- Slice and Serve: Using a sharp serrated knife, slice into ¾-inch thick pieces. Wipe the knife clean between cuts for the neatest slices.
Notes
- For mini loaves: Divide batter among 6 mini loaf pans and bake for 35-40 minutes.
- For muffins: Fill muffin cups ⅔ full and bake for 18-22 minutes.
- Spice adjustments: Reduce cinnamon to 2 teaspoons if you prefer milder spice flavor.
- Sugar reduction: You can reduce sugar by ½ cup, though bread will be less sweet and slightly denser.
- Doneness test: Bread is done when internal temperature reaches 200-205°F on an instant-read thermometer.
- Gluten-free: Use 1:1 gluten-free baking flour blend; texture will be slightly different but still delicious.
- Prep Time: 15 minutes
- Cook Time: 60-65 minutes
- Category: Dessert
- Method: Baking
- Cuisine: American
Nutrition
- Serving Size: 1 slice (1/12 of one loaf)
- Calories: 245
- Sugar: 25g
- Sodium: 220mg
- Fat: 10g
- Saturated Fat: 1g
- Unsaturated Fat: 9g
- Trans Fat: 0g
- Carbohydrates: 37g
- Fiber: 1g
- Protein: 3g
- Cholesterol: 30mg
Tips & Variations
Flavor Variations:
- Chocolate Chip Pumpkin Bread: Fold in 1½ cups semi-sweet or dark chocolate chips for decadent chocolate-pumpkin combination
- Cream Cheese Swirl: Reserve 1 cup batter. Beat 8 oz softened cream cheese with ⅓ cup sugar and 1 egg. Layer batters in pans and swirl with knife
- Maple Pumpkin: Replace ½ cup sugar with ½ cup pure maple syrup and add 1 teaspoon maple extract
- Chai Spiced: Add 1 teaspoon cardamom and increase ginger to 1 teaspoon for chai-inspired flavor
- Orange Cranberry: Add 2 tablespoons orange zest and fold in 1 cup dried cranberries
- Coconut Pecan: Fold in 1 cup toasted coconut and 1 cup chopped toasted pecans
- Bourbon Spice: Add 2 tablespoons bourbon and increase vanilla to 1 tablespoon
Healthier Modifications:
- Whole Wheat: Replace up to half the all-purpose flour with whole wheat flour
- Reduced Sugar: Cut sugar to 2 cups (will be less sweet, slightly denser)
- Applesauce Swap: Replace half the oil with unsweetened applesauce (will be less moist)
- Greek Yogurt: Add ½ cup Greek yogurt and reduce oil by ¼ cup for tang and protein
- Flax Addition: Add 2 tablespoons ground flaxseed for fiber and nutrition
Topping Ideas:
- Cinnamon Sugar Crust: Before baking, sprinkle tops with cinnamon-sugar mixture
- Streusel Topping: Add crumb topping made from flour, butter, brown sugar, and cinnamon
- Cream Cheese Frosting: Spread cooled slices with sweetened cream cheese frosting
- Pumpkin Seeds: Press raw pepitas into top before baking for crunch
- Glaze: Drizzle cooled bread with maple glaze or vanilla icing
Pro Chef Tips
Room Temperature Matters: While you can get away with cold eggs straight from the fridge, room temperature eggs incorporate more smoothly and create better emulsion with the oil. Set them out 30 minutes before baking, or place in warm water for 5 minutes.
Don’t Overmix the Batter: The moment you combine wet and dry ingredients, gluten development begins. Overmixing creates tough, dense bread with tunnels running through it. Mix just until flour disappears—lumpy batter is fine and actually desirable.
Create a Center Indent: Before baking, use your spatula to create a shallow indent lengthwise down the center of each loaf. This encourages even rising rather than dramatic doming, resulting in more uniform slices.
The Toothpick Test Timing: Start checking doneness at 55 minutes to avoid overbaking. Pumpkin bread continues cooking from residual heat after leaving the oven, so pulling it when the toothpick has a few moist crumbs (not wet batter) yields perfectly moist bread.
Cool Before Slicing: This is non-negotiable for clean slices. Warm bread is structurally fragile and will tear and crumble. The cooling period allows the starches to set and the structure to firm up, enabling neat, even slices.
Toast for Serving: Day-old pumpkin bread is fantastic lightly toasted. The exterior gets slightly crispy while the interior stays moist, and the heat revives the spice aromas. Butter optional but highly recommended.
Freeze Individual Slices: Slice the completely cooled loaf, then wrap individual slices in plastic wrap and store in a freezer bag. Grab single servings for quick breakfasts or snacks—they thaw in minutes at room temperature or in seconds in the microwave.
Common Mistakes to Avoid
Mistake #1: Using Pumpkin Pie Filling Instead of Pure Pumpkin – Pumpkin pie filling contains added sugars, spices, and sometimes thickeners that throw off the recipe’s balance. Always use 100% pure pumpkin puree. Check the label carefully—you want just one ingredient listed: pumpkin.
Mistake #2: Overbaking Until Completely Dry – Many home bakers overbake pumpkin bread, fearing underdone centers. The result is dry, crumbly bread. Pull the bread when a toothpick has moist crumbs, not when it’s completely clean. The residual heat continues cooking it outside the oven.
Mistake #3: Not Greasing Pans Adequately – Pumpkin bread can stick stubbornly to pans, especially in corners. Grease thoroughly with butter or baking spray, paying special attention to corners and edges. Using parchment paper strips on the bottom provides extra insurance.
Mistake #4: Cutting While Still Warm – Warm bread tears and crumbles no matter how sharp your knife is. The structure needs time to set during cooling. Wait at least 30 minutes after removing from pans, or refrigerate for 20 minutes for the cleanest cuts.
Mistake #5: Storing Uncovered or Improperly – Exposed pumpkin bread dries out quickly. Always wrap completely cooled bread tightly in plastic wrap or store in airtight containers. Improper storage is the number one reason bread becomes dry and stale prematurely.
Storage & Meal Prep
Room Temperature Storage: Once completely cooled, wrap pumpkin bread tightly in plastic wrap or aluminum foil, or store in an airtight container. It will stay moist and fresh at room temperature for 3-4 days. The bread actually improves after a day as flavors meld and moisture distributes evenly throughout.
Refrigerator Storage: For longer storage, refrigerate wrapped bread for up to 1 week. Refrigeration can dry out bread slightly, so wrap it extra securely. Bring to room temperature or toast before serving for best flavor and texture.
Preventing Dryness: If your bread seems to be drying out, place a slice of fresh bread or a damp paper towel in the storage container. This adds moisture to the environment and helps keep the pumpkin bread soft.
Slicing Strategy: Slice only what you’ll eat within a day or two. Keeping the loaf whole preserves moisture better than pre-slicing the entire thing. The cut surface exposes more area to air, accelerating drying.
Gift Packaging: For gift-giving, wrap completely cooled loaves tightly in plastic wrap, then wrap again in aluminum foil or place in a decorative bag. Include a card with storage instructions and “best by” date (3-4 days from baking date).
Make-Ahead & Freezer Notes
Bake-Ahead Timeline: Pumpkin bread is an ideal make-ahead recipe since it actually tastes better after a day. Bake up to 3 days before you need it, wrap tightly, and store at room temperature. The flavors deepen and the texture becomes even more tender.
Freezing Whole Loaves: Wrap completely cooled loaves tightly in plastic wrap, then wrap again in aluminum foil or place in freezer bags, removing as much air as possible. Freeze for up to 3 months. To thaw, leave wrapped at room temperature for 3-4 hours or refrigerate overnight.
Freezing Individual Slices: This is the most convenient method for grab-and-go servings. Slice the cooled loaf, wrap each slice individually in plastic wrap, then place all wrapped slices in a freezer bag. Thaw individual slices at room temperature for 20-30 minutes, or microwave for 15-20 seconds.
Batter Freezing: You can freeze the unbaked batter for up to 1 month. Pour into greased loaf pans, wrap tightly, and freeze. Bake from frozen, adding 15-20 minutes to the baking time. This is perfect for having fresh-baked bread with minimal effort.
Refreshing Frozen Bread: For the best taste and texture, refresh thawed pumpkin bread by warming it in a 300°F oven for 10 minutes wrapped in foil, or toast individual slices. This revives the spice aromas and improves texture after freezing.
Serving Suggestions
Pumpkin bread is incredibly versatile and works for multiple occasions throughout the day:
Breakfast Pairings: Serve slices with butter, cream cheese, or mascarpone spread alongside hot coffee, chai tea, or apple cider. Add Greek yogurt and fresh fruit for a more substantial breakfast. Toast slices and top with almond butter and sliced bananas for extra protein.
Brunch Spread: Include pumpkin bread on brunch tables alongside quiche, fresh fruit salad, yogurt parfaits, and scrambled eggs. It provides a sweet element that balances savory dishes.
Afternoon Snack: Pair with afternoon tea, coffee, or hot chocolate. Spread slices with softened butter, cream cheese, or Nutella for an indulgent treat.
Dessert Presentation: Serve slightly warmed with vanilla ice cream or whipped cream for an elegant yet simple dessert. Drizzle with caramel sauce or dust with powdered sugar for special occasions.
Holiday Table: Pumpkin bread fits beautifully on Thanksgiving breakfast spreads or Christmas morning buffets alongside other seasonal favorites like cranberry scones and cinnamon rolls.
Beverage Pairings: Coffee and tea are classics, but try pumpkin bread with spiced cider, chai lattes, eggnog (during holidays), or even a pumpkin beer for adults.
French Toast Transformation: Turn day-old pumpkin bread into extraordinary French toast. Dip thick slices in egg mixture and cook until golden for an indulgent breakfast that tastes like pumpkin pie.
FAQs Section
Q: Can I use fresh pumpkin instead of canned?
A: Yes! Roast sugar pumpkins (not carving pumpkins) until tender, puree until smooth, then drain excess liquid through cheesecloth or a fine-mesh strainer. You need 1¾ cups very thick puree. Note that canned pumpkin is actually more consistent in moisture content, so results may vary slightly with fresh.
Q: Why is my pumpkin bread dense and heavy?
A: This usually results from overmixing the batter or using too much flour. Overmixing develops gluten, creating tough, dense bread. When measuring flour, spoon it into measuring cups and level off—don’t scoop directly from the bag, which packs it down and gives you too much flour.
Q: Can I make this as muffins instead of loaves?
A: Absolutely! Fill standard muffin cups ⅔ full and bake at 350°F for 18-22 minutes until a toothpick comes out clean. This recipe makes about 24 muffins. Mini muffins bake for 12-15 minutes. Muffins are perfect for portion control and grab-and-go breakfasts.
Q: How do I know when pumpkin bread is done?
A: Insert a toothpick or cake tester into the center of the loaf. It should come out clean or with just a few moist crumbs—not wet batter. The bread should be deeply golden brown on top and spring back when gently pressed. Internal temperature should read 200-205°F on an instant-read thermometer.
Q: Can I reduce the sugar in this recipe?
A: You can reduce sugar by up to ½ cup (bringing it down to 2½ cups total) without dramatically affecting texture, though the bread will be less sweet. Reducing more than that affects moisture and texture significantly since sugar provides more than just sweetness—it also contributes to tenderness and browning.
Q: Why does my pumpkin bread have a crack down the middle?
A: The crack is completely normal and actually desirable! It happens because quick breads rise quickly in the oven, causing the top to split. It’s a sign of good rise and proper baking. If you prefer a more even top, create a shallow indent down the center before baking.
Q: Can I make this recipe vegan?
A: Yes! Replace the 4 eggs with flax eggs (4 tablespoons ground flaxseed mixed with 12 tablespoons water, let sit 5 minutes), and ensure you’re using vegan-friendly sugar (some white sugar is processed with bone char). The texture will be slightly different but still delicious.
Conclusion
There you have it—everything you need to create the most delicious, moist, perfectly spiced pumpkin bread that will fill your home with the most incredible fall aromas! This recipe is truly foolproof, delivering consistent, bakery-quality results every single time you make it. Whether this is your first time baking pumpkin bread or you’re a seasoned pro looking for a reliable go-to recipe, this one won’t disappoint.
The beauty of pumpkin bread lies in its versatility and make-ahead friendliness. Bake it on a lazy Sunday afternoon, and you’ll have breakfast treats and snacks ready for the entire week. Make both loaves and freeze one for future enjoyment, or gift one to a friend who’ll appreciate the homemade thoughtfulness. However you choose to enjoy it, this pumpkin bread represents the very best of fall baking.
I’d absolutely love to hear about your pumpkin bread baking adventures! Did you try any of the flavor variations? What’s your favorite way to enjoy it—plain, toasted with butter, or transformed into French toast? Drop a comment below and share your experience—I read every single one and love connecting with fellow baking enthusiasts!
If this recipe brought fall magic to your kitchen, please share it with friends who love pumpkin season as much as you do, and don’t forget to pin it to your favorite Pinterest boards using #PumpkinBreadRecipe. Let’s spread the pumpkin bread love so more home bakers can discover this recipe!
Happy baking, friends! May your pumpkin bread be perfectly moist, beautifully spiced, and absolutely delicious!