
There’s nothing quite like the moment you pull a golden, bubbling peach pie from the oven, filling your entire home with the sweet, aromatic scent of summer. This homemade peach pie recipe captures everything we love about classic American desserts: a buttery, flaky crust cradling tender, juicy peaches sweetened just right and kissed with warm spices. Whether you’re serving it at a summer barbecue, holiday gathering, or Sunday family dinner, this easy peach pie from scratch will have everyone asking for seconds.
What makes this recipe truly special is its simplicity. You don’t need to be an expert baker to create a showstopping dessert that tastes like it came from a farmhouse kitchen. With fresh peaches (or frozen when out of season), basic pantry ingredients, and a foolproof crust technique, you’ll have a gorgeous pie that looks as incredible as it tastes. Serve it warm with a scoop of vanilla ice cream, and you’ve got pure dessert magic on your hands. This classic peach pie with cinnamon is about to become your signature summer dessert!
History / Background
Peach pie holds a treasured place in American culinary history, particularly in the South where peaches have been cultivated for centuries. While peaches actually originated in China over 8,000 years ago, they found their perfect home in the warm, humid climate of the American South after Spanish explorers introduced them in the 16th century.
Georgia famously became known as the “Peach State,” though South Carolina, California, and several other states also produce magnificent peaches. By the 18th and 19th centuries, peach orchards dotted the Southern landscape, and resourceful homemakers began incorporating this abundant fruit into their baking repertoire.
Peach pie emerged as a beloved summer tradition, particularly popular at church socials, county fairs, and family gatherings. Unlike apple pie, which could be made year-round using stored apples, peach pie was a seasonal treasure that marked the height of summer. This scarcity made it all the more special when peach season finally arrived, typically from late May through September depending on the region.
The traditional American peach pie we know today—with its double crust, cinnamon-spiced filling, and lattice top—evolved from European pie-making traditions brought by early settlers. These colonists adapted their recipes to use the fruits available in their new homeland, and the peach pie was born. Over generations, families perfected their techniques, with recipes passed down from grandmother to mother to daughter, each adding their own special touches.
During the Great Depression, peach pie became even more significant as a frugal yet celebratory dessert. A few pounds of peaches and some basic ingredients could feed a crowd, making it perfect for community gatherings. This tradition continued through World War II and beyond, cementing peach pie’s status as an American classic.
Today, peach pie represents nostalgia, summer abundance, and the simple pleasure of homemade dessert. It’s the pie that grandmothers enter into county fair competitions, that appears at Fourth of July celebrations, and that families eagerly anticipate each summer when peaches reach their peak sweetness.
Why You’ll Love This Recipe
This isn’t just another peach pie recipe—this is the peach pie recipe that will have your family declaring you the official pie baker of the household. I’ve spent years perfecting this recipe, testing different peach varieties, adjusting the spices, and fine-tuning the crust until I achieved absolute perfection.
What sets this recipe apart is the balance. The filling isn’t too sweet or too tart, the crust is flaky without being greasy, and the spices enhance rather than overpower the natural peach flavor. You’ll also love how forgiving this recipe is—even if your lattice isn’t perfect or your crimping looks rustic, the pie will still taste absolutely incredible.
Here’s why this recipe will become your go-to:
- Tastes like summer in every bite – Fresh, juicy peaches shine as the star ingredient
- Foolproof flaky crust – My tested technique ensures tender, buttery layers every time
- Perfect sweetness level – Not too sweet, allowing the peach flavor to really shine through
- Works with fresh or frozen peaches – Enjoy peach pie year-round without compromising quality
- Impressive presentation – The beautiful lattice top or decorative vents make it look bakery-worthy
- Crowd-pleaser guaranteed – I’ve never met anyone who doesn’t love homemade peach pie
- Make-ahead friendly – Prepare components ahead for stress-free entertaining
- Budget-friendly – Uses simple, affordable ingredients that don’t break the bank
- Freezer-friendly – Freeze before or after baking for ultimate convenience
- Customizable spices – Adjust the cinnamon, add nutmeg, or experiment with other warming spices
- Perfect for any occasion – Equally at home at a summer picnic or Thanksgiving table
Ingredient Notes
The secret to exceptional peach pie lies in using quality ingredients and understanding what each component contributes. Here’s everything you need to know:
Fresh Peaches – The absolute star of this pie! You’ll need about 6-7 medium peaches (roughly 3 pounds), which yields about 6 cups of sliced fruit. Choose freestone peaches (the flesh easily separates from the pit) that are ripe but still slightly firm. They should smell sweet and give just slightly when gently pressed. Yellow peaches are traditional, but white peaches create an elegant, delicate flavor. If peaches aren’t in season, quality frozen peaches work beautifully—just thaw and drain excess liquid first.
All-Purpose Flour (for crust) – Creates structure in your pie crust. I recommend using unbleached all-purpose flour for the best flavor. Some bakers swear by adding a tablespoon of cornstarch to make the crust extra tender, which is optional but wonderful.
Butter (for crust) – Use unsalted butter so you can control the salt level. The butter must be very cold—straight from the refrigerator or even frozen and grated works perfectly. Cold butter creates those flaky layers we all love. European-style butter with higher fat content makes an even richer crust.
Granulated Sugar – Sweetens the filling to balance the natural tartness of peaches. The amount can be adjusted based on how sweet your peaches are. Taste your peaches first—very sweet peaches need less sugar, while tart ones need more.
Brown Sugar – Adds a subtle caramel depth and moisture to the filling. Light brown sugar is traditional, but dark brown sugar creates a richer, more molasses-forward flavor.
Cornstarch – The secret to a perfectly thickened filling that’s not runny but also not gummy. Cornstarch works better than flour for fruit pies as it creates a clearer, more appealing texture. Tapioca starch is an excellent substitute if you prefer.
Cinnamon – The classic peach pie spice! Use high-quality ground cinnamon for the best flavor. Ceylon cinnamon (also called “true cinnamon”) has a sweeter, more delicate flavor than the more common Cassia cinnamon.
Lemon Juice – Brightens the peach flavor and adds just enough acidity to balance the sweetness. Fresh lemon juice tastes better than bottled. It also prevents the peaches from browning too much.
Vanilla Extract – A small amount enhances all the other flavors without being detectable on its own. Use pure vanilla extract, not imitation, for the best results.
Salt – Essential for the crust and helps balance sweetness in the filling. Even desserts need salt to make flavors pop!
Egg Wash – Beaten egg brushed over the crust creates that gorgeous golden-brown finish. Add a tablespoon of water or milk to thin it slightly for easier application.
Coarse Sugar (optional) – Sprinkling coarse sugar (turbinado or sanding sugar) over the crust before baking adds delightful crunch and sparkle. It’s optional but makes your pie look professionally made.
Equipment Needed
You don’t need a kitchen full of fancy gadgets to make amazing peach pie. Here’s what you’ll actually use:
- 9-inch pie dish – Glass or ceramic works best as it conducts heat evenly and lets you see when the bottom crust is golden. Avoid disposable aluminum pans for your first bake.
- Large mixing bowl – For combining the filling ingredients
- Medium bowl – For mixing the crust
- Pastry cutter or fork – For cutting butter into flour. You can also use two knives or even your fingers.
- Rolling pin – For rolling out the pie dough. A marble rolling pin stays cold, which is helpful.
- Pastry brush – For applying egg wash to the crust
- Sharp knife or pizza cutter – For cutting lattice strips if making a lattice top
- Cutting board – For preparing peaches
- Vegetable peeler or paring knife – For peeling peaches
- Large pot – For blanching peaches to remove skins easily (optional method)
- Measuring cups and spoons – For accurate measurements
- Plastic wrap or wax paper – For wrapping dough while it chills
- Baking sheet – Place under the pie to catch any drips and prevent oven mess
- Aluminum foil or pie crust shield – To prevent edges from over-browning
- Cooling rack – Essential for letting the pie cool properly

Peach Pie Recipe
- Total Time: 2 hours 25 minutes
- Yield: 8 servings 1x
- Diet: Vegetarian
Description
This classic homemade peach pie features a buttery, flaky crust filled with tender, juicy peaches sweetened with cinnamon and warm spices. Perfect for summer gatherings or any time you’re craving a slice of comfort!
Ingredients
For the Pie Crust:
- 2½ cups all-purpose flour
- 1 tablespoon granulated sugar
- 1 teaspoon salt
- 1 cup (2 sticks) unsalted butter, very cold and cut into small cubes
- 6–8 tablespoons ice water
For the Peach Filling:
- 6–7 medium peaches (about 3 pounds or 6 cups sliced)
- ¾ cup granulated sugar (adjust based on peach sweetness)
- ¼ cup light brown sugar, packed
- ¼ cup cornstarch
- 1 teaspoon ground cinnamon
- ¼ teaspoon ground nutmeg (optional)
- ⅛ teaspoon salt
- 2 tablespoons fresh lemon juice
- 1 teaspoon pure vanilla extract
- 2 tablespoons unsalted butter, cut into small pieces
For Assembly:
- 1 egg, beaten with 1 tablespoon water (egg wash)
- 2 tablespoons coarse sugar (turbinado or sanding sugar)
Instructions
- Make the pie crust: In a large bowl, whisk together flour, sugar, and salt. Add the cold butter cubes and use a pastry cutter or your fingertips to work the butter into the flour until the mixture resembles coarse crumbs with some pea-sized butter pieces remaining. This texture is key for flakiness.
- Add ice water: Drizzle in ice water, 1 tablespoon at a time, mixing gently with a fork after each addition. Add just enough water until the dough begins to come together. It should be slightly shaggy but hold together when pressed. Avoid overworking the dough.
- Chill the dough: Divide the dough into two portions (one slightly larger for the bottom crust). Shape each into a flat disk, wrap tightly in plastic wrap, and refrigerate for at least 1 hour or up to 3 days. Chilling is essential for a flaky crust.
- Prepare the peaches: While the dough chills, prepare your filling. To peel peaches easily, score a small X on the bottom of each peach, blanch in boiling water for 30-60 seconds, then transfer to ice water. The skins should slip right off. Alternatively, use a vegetable peeler. Slice peaches into ¼-inch thick slices, discarding the pits.
- Make the filling: In a large bowl, combine sliced peaches, granulated sugar, brown sugar, cornstarch, cinnamon, nutmeg (if using), and salt. Toss gently to coat. Add lemon juice and vanilla extract, then toss again. Let the mixture sit for 15 minutes to allow the peaches to release some juice.
- Roll out bottom crust: Preheat oven to 375°F (190°C). On a lightly floured surface, roll out the larger disk of dough into a 12-inch circle, about ⅛-inch thick. Carefully transfer to a 9-inch pie dish, pressing gently into the bottom and sides. Trim any excess dough, leaving about a 1-inch overhang. Refrigerate while preparing the top.
- Roll out top crust: Roll out the second disk of dough into an 11-inch circle. You can leave it whole for a full top crust with vents, or cut into strips for a lattice top (cut into 10-12 strips, each about ¾-inch wide).
- Fill the pie: Remove the bottom crust from the refrigerator. Pour the peach filling into the crust, distributing evenly. Dot the top of the filling with the 2 tablespoons of butter pieces.
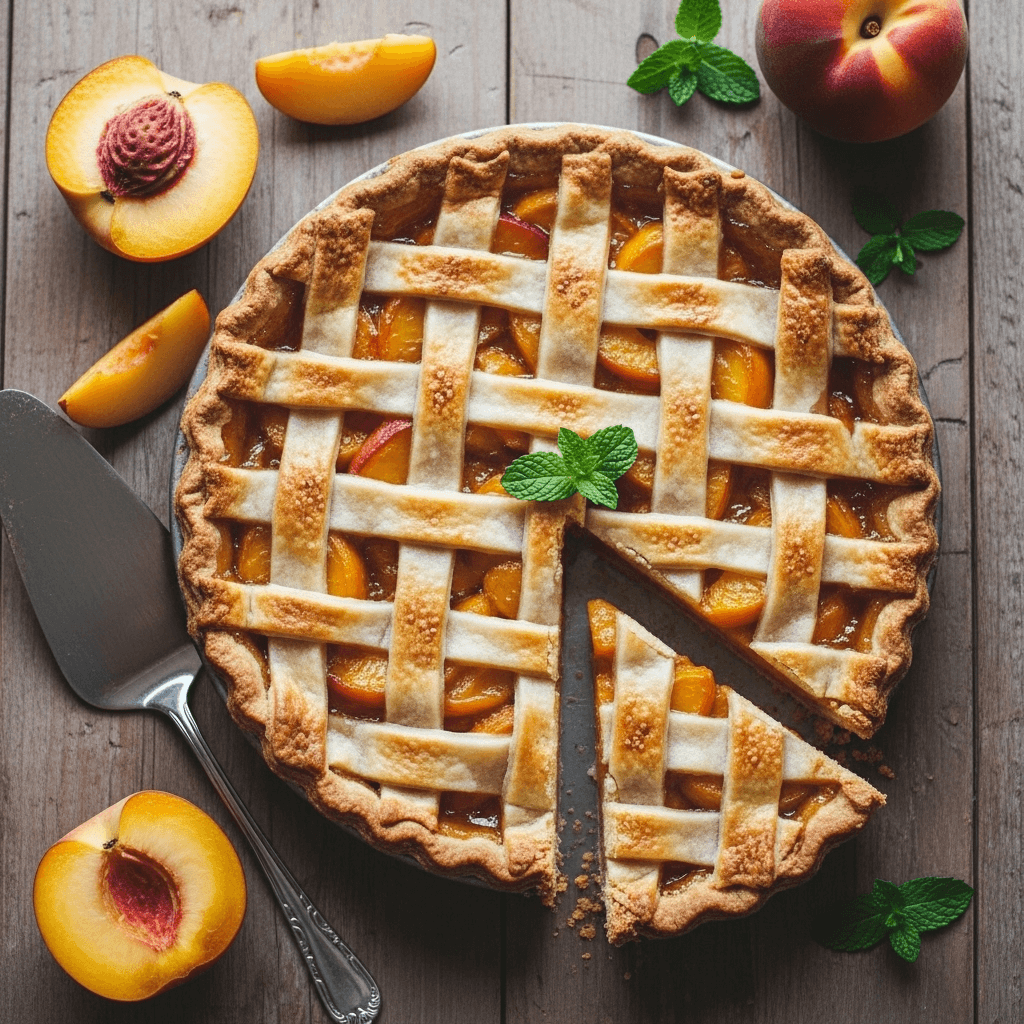
- Add top crust: If making a full top crust, place the rolled dough over the filling, trim to leave a ½-inch overhang, fold the edges under, and crimp to seal. Cut 4-5 small vents in the center. If making a lattice, weave the strips over and under each other in a basket-weave pattern, then trim the edges and crimp to seal.
- Apply egg wash: Brush the entire top crust with egg wash, being careful not to let it pool in any decorative crimps. Sprinkle generously with coarse sugar for a beautiful, sparkly finish.
- Bake the pie: Place the pie on a baking sheet (to catch drips) and bake for 25 minutes. Loosely cover the edges with foil or a pie shield to prevent over-browning. Continue baking for 30-35 more minutes, until the crust is deep golden brown and the filling is bubbling vigorously in the center. Total bake time is 55-60 minutes.
- Cool completely: Transfer the pie to a cooling rack and let it cool for at least 4 hours before slicing. I know this is torture, but it’s essential! The filling needs this time to set properly. Cutting too early results in a runny pie.
- Serve and enjoy: Slice the cooled pie and serve at room temperature or slightly warm. Top with vanilla ice cream, whipped cream, or enjoy it plain. Store any leftovers covered at room temperature for up to 2 days, or refrigerate for up to 5 days.
Notes
- Peach Selection: Choose freestone peaches that are ripe but still slightly firm. Overripe peaches will turn mushy when baked.
- Adjusting Sweetness: Taste your peaches first! Very sweet peaches need only ½-⅔ cup of sugar total, while tart peaches may need the full ¾ cup plus the brown sugar.
- Preventing Soggy Bottom: Blind-baking the bottom crust for 10 minutes before adding filling prevents sogginess, though it’s optional for this recipe.
- Thickening Options: If you prefer tapioca, use 3 tablespoons of quick-cooking tapioca instead of cornstarch. Let the filling sit for 30 minutes before adding to the pie.
- Lattice Help: If lattice weaving feels intimidating, simply lay strips in one direction, then lay strips perpendicular on top without weaving. Still beautiful!
- Make-Ahead: The unbaked pie can be assembled and frozen for up to 3 months. Bake from frozen, adding 15-20 extra minutes to the bake time.
- Prep Time: 30 minutes (plus 1 hour chilling time)
- Cook Time: 55 minutes
- Category: Dessert
- Method: Baking
- Cuisine: American
Nutrition
- Serving Size: 1 slice (⅛ of pie)
- Calories: 445
- Sugar: 32g
- Sodium: 285mg
- Fat: 20g
- Saturated Fat: 12g
- Unsaturated Fat: 7g
- Trans Fat: 0g
- Carbohydrates: 63g
- Fiber: 3g
- Protein: 5g
- Cholesterol: 75mg
Tips & Variations
One of the best things about peach pie is how versatile it is! Here are some wonderful ways to customize this recipe:
Spiced Peach Pie: Add ½ teaspoon ground ginger, ¼ teaspoon cardamom, or a pinch of allspice along with the cinnamon for a more complex spice profile. These warm spices complement peaches beautifully.
Bourbon Peach Pie: Add 2-3 tablespoons of bourbon to the filling along with the vanilla extract. The bourbon enhances the peach flavor and adds sophisticated depth. This is a Southern favorite!
Peach-Blueberry Pie: Replace 2 cups of sliced peaches with fresh blueberries for a gorgeous purple-and-orange filling. Increase cornstarch to ⅓ cup to handle the extra juice from blueberries.
Peach-Raspberry Pie: Substitute 1 cup of sliced peaches with fresh raspberries. The tartness of raspberries creates a delightful contrast with sweet peaches.
Streusel-Topped Peach Pie: Skip the top crust entirely and cover with a crumb topping made from ¾ cup flour, ½ cup brown sugar, ½ cup oats, ½ teaspoon cinnamon, and 6 tablespoons melted butter. Mix until crumbly and sprinkle over the filling.
Healthier Version: Use whole wheat pastry flour for half the all-purpose flour in the crust. Reduce sugar to ½ cup and increase cinnamon to enhance perceived sweetness. Use coconut oil instead of some of the butter.
Gluten-Free Peach Pie: Use your favorite gluten-free flour blend (one that includes xanthan gum) in a 1:1 substitution for the all-purpose flour in the crust. The filling is naturally gluten-free.
Individual Peach Hand Pies: Roll the dough and cut into circles. Place filling on one half, fold over, crimp edges with a fork, and bake for 20-25 minutes. Perfect for picnics!
Brown Butter Crust: Before making the crust, brown half the butter, let it cool completely, then use it along with regular cold butter. This adds incredible nutty depth.
Honey-Sweetened Peach Pie: Replace half the granulated sugar with honey for a more natural sweetness with floral notes that complement peaches perfectly.
Pro Chef Tips
After baking countless pies, I’ve learned professional tricks that elevate homemade peach pie from good to absolutely extraordinary:
Keep everything cold: This is the golden rule of pie crust. Cold butter creates steam pockets when baking, which creates flakiness. Work quickly, and if your dough feels warm at any point, pop it back in the fridge for 15 minutes. Some bakers even chill their flour and mixing bowl!
Don’t skip the resting time: Chilling the dough allows the gluten to relax, making it easier to roll out without shrinking. It also ensures the butter stays cold. Resting the filled, unbaked pie in the refrigerator for 30 minutes before baking helps maintain the crust shape.
Use vodka in the crust: Professional bakers often replace half the ice water with vodka. The alcohol evaporates during baking, leaving the crust extra flaky without making it tough. Since vodka doesn’t develop gluten like water does, you can handle the dough more without compromising texture.
Macerate the peaches: Letting the peach filling sit for 15-30 minutes after mixing draws out juices. You can then pour off excess liquid (drink it or save for cocktails!), which prevents a soggy bottom crust. This technique is called maceration and concentrates the peach flavor.
Coat peaches in sugar first: Toss peaches with sugar before adding the cornstarch. The sugar draws out moisture, then the cornstarch can better absorb that liquid, creating a perfectly thickened filling that’s never gummy.
Use a glass pie dish: Glass conducts heat well and allows you to see the bottom crust to ensure it’s golden brown, not soggy. Metal pans work too but make it harder to judge doneness.
Start with a hot oven: Some bakers start peach pie at 425°F for 15 minutes, then reduce to 375°F for the remaining time. The initial blast of heat helps set the crust and reduces sogginess.
Look for the bubble: The pie is truly done when the filling bubbles vigorously in the center, not just around the edges. Those bubbles indicate the cornstarch has activated and thickened properly. If the filling isn’t bubbling, keep baking—even if the crust looks done, tent with foil and continue.
Cool on a rack: Cooling the pie on a wire rack allows air to circulate underneath, preventing a soggy bottom. Never cool a pie in the pan sitting on a solid surface.
Embrace the “ugly” peach: Slightly bruised or imperfect peaches are often sweeter and work perfectly in pie where appearance doesn’t matter. Save the beautiful peaches for eating fresh and use the seconds for baking.
Blind-bake if needed: For extra insurance against soggy bottoms, blind-bake the bottom crust. Line it with parchment paper, fill with pie weights or dried beans, and bake at 375°F for 15 minutes. Remove weights and bake 5 more minutes. Let cool before adding filling.
Flour under and over: When rolling dough, use the minimum amount of flour possible. Too much flour makes the crust tough. Dust the surface, not the dough itself, and rotate the dough frequently while rolling.
Common Mistakes to Avoid
Even experienced bakers sometimes run into peach pie pitfalls. Here’s how to avoid the most common ones:
Mistake #1: Cutting into the pie too soon. I know the temptation is overwhelming, but cutting into warm pie results in a runny filling that oozes everywhere. The filling needs at least 4 hours to cool and set properly. For best results, bake in the morning and serve in the evening, or bake the day before serving. The pie will slice cleanly and the filling will be perfectly thick and jammy.
Mistake #2: Using overripe peaches. While overripe peaches taste sweet, they turn to mush when baked and release excessive liquid that even cornstarch can’t handle. Choose peaches that are ripe but still have a slight firmness when gently pressed. They should smell fragrant but shouldn’t leave a dent when touched.
Mistake #3: Overworking the pie dough. Every time you touch or work the dough, you develop gluten, which makes the crust tough instead of tender and flaky. Mix just until the dough barely comes together, handle it as little as possible when rolling, and avoid re-rolling scraps more than once. If the dough feels elastic and springs back when rolled, it needs more resting time in the refrigerator.
Mistake #4: Not venting the top crust properly. Steam needs somewhere to escape or it will burst through your beautiful crust in unpredictable places. If using a full top crust, cut generous vents (at least 4-5 slits) in the center. If making a lattice, ensure the weaving isn’t too tight. Proper venting also helps the filling reduce and thicken.
Mistake #5: Skipping the egg wash. Egg wash isn’t just for looks—it creates a barrier that helps prevent the crust from getting soggy and gives you that gorgeous bakery-style golden-brown finish. Don’t skip this step! If you’re vegan or allergic to eggs, brush with milk or cream instead for similar browning.
Mistake #6: Not adjusting for your peaches. All peaches are not created equal! Taste your peaches before making the filling. If they’re very sweet, reduce the sugar. If they’re tart, add a bit more. If they’re very juicy, increase the cornstarch slightly. Baking is chemistry, but with fruit, you need to adapt to what nature gives you.
Mistake #7: Baking without a baking sheet underneath. Fruit pies almost always bubble over, no matter how careful you are. Protect your oven by placing the pie on a rimmed baking sheet before baking. This catches drips and makes cleanup infinitely easier. Line the sheet with parchment paper for even easier cleanup.
Storage & Meal Prep
Peach pie keeps well, making it perfect for baking ahead for gatherings or enjoying throughout the week:
Room Temperature Storage: Freshly baked peach pie can sit at room temperature, loosely covered with foil or plastic wrap, for up to 2 days. This is actually ideal for maintaining the flaky crust texture. In hot or humid weather, refrigerate after the first day to prevent spoilage.
Refrigerator Storage: For longer storage, cover the pie well with plastic wrap or aluminum foil and refrigerate for up to 5 days. The crust may soften slightly in the refrigerator, but the flavor remains excellent. Bring to room temperature before serving, or warm individual slices.
Reheating Instructions: To restore the flaky texture of refrigerated pie, reheat individual slices in a 350°F oven for 10-15 minutes. You can also microwave slices for 20-30 seconds, though this won’t crisp the crust. For a whole pie, cover loosely with foil and warm at 325°F for 20-25 minutes.
Freezing Baked Pie: Peach pie freezes beautifully after baking! Cool the pie completely, wrap tightly in plastic wrap and then aluminum foil, and freeze for up to 3 months. Thaw overnight in the refrigerator, then reheat as directed above. The crust may be slightly less crisp than fresh, but it’s still delicious.
Portion Control: For easy individual servings, slice the cooled pie, wrap slices individually in plastic wrap, and freeze. Grab a slice whenever the craving hits and microwave for 60-90 seconds.
Make-Ahead & Freezer Notes
Peach pie is wonderfully make-ahead friendly, perfect for stress-free entertaining:
Make-Ahead Pie Crust: The dough can be made up to 3 days ahead and kept refrigerated, or frozen for up to 3 months. If freezing, thaw overnight in the refrigerator before rolling. You can also roll out the crust, fit it into the pie pan, and freeze it that way for up to 2 months.
Make-Ahead Filling: Prepare the peach filling up to 1 day ahead and refrigerate in an airtight container. The filling will release some liquid, which is normal. Drain off excess liquid before adding to the pie shell. Give it a quick stir before using.
Freeze Unbaked Pie: This is my favorite make-ahead method! Assemble the entire pie, wrap it well without baking, and freeze for up to 3 months. When ready to bake, place the frozen pie directly in the preheated oven and add 15-20 minutes to the baking time. Cover the edges with foil if they brown too quickly. No thawing necessary!
Partial Make-Ahead: Prepare the crust the day before and refrigerate. The morning of serving, prepare the filling, assemble, and bake. The pie will be perfectly cool by dinnertime.
Blind-Baked Crust: You can blind-bake the bottom crust up to 2 days ahead. Let it cool completely, cover loosely with plastic wrap, and store at room temperature. Fill and bake as directed when ready.
Best Method for Freezing: For unbaked pies, I recommend using a disposable aluminum pie pan if possible, or freeze the pie, then remove it from the pan once solid and wrap well. This frees up your pie dish. When ready to bake, place the frozen pie directly into your regular pie dish.
Serving Suggestions
Peach pie is delicious on its own, but these pairings take it to the next level:
Classic Accompaniments:
- Vanilla ice cream – The absolute classic pairing! The cold, creamy ice cream melting into warm pie is pure bliss.
- Whipped cream – Fresh whipped cream (sweetened with a touch of vanilla) provides a lighter, more delicate accompaniment.
- Vanilla custard or crème anglaise – For an elegant dinner party presentation
- Sharp cheddar cheese – A traditional pairing in some regions! The savory, salty cheese contrasts beautifully with sweet peaches.
Creative Toppings:
- Bourbon-spiked whipped cream for an adult twist
- Cinnamon ice cream to echo the spices in the pie
- Salted caramel sauce drizzled over each slice
- Mascarpone cream sweetened with honey
- Greek yogurt sweetened with maple syrup for a healthier option
- Toasted pecans or sliced almonds for crunch
Beverage Pairings:
- Hot coffee or espresso (the bitterness balances the sweetness)
- Sweet iced tea (perfect Southern pairing)
- Cold milk (classic and comforting)
- Dessert wine like Moscato or late-harvest Riesling
- Bourbon or whiskey (particularly if you made bourbon peach pie)
- Peach iced tea or peach lemonade for a peachy theme
When to Serve:
- Summer barbecues and cookouts
- Fourth of July celebrations
- Labor Day gatherings
- Thanksgiving as an alternative to pumpkin pie
- Birthday parties and anniversaries
- Church potlucks and bake sales
- Weekend family dinners
- Picnics (transport carefully!)
Complete Meal Ideas:
- Grilled chicken or ribs → coleslaw → corn on the cob → peach pie
- Fried chicken → mashed potatoes → green beans → peach pie
- Pulled pork sandwiches → baked beans → potato salad → peach pie
- BBQ brisket → cornbread → collard greens → peach pie
FAQs Section
Q: Can I use frozen peaches instead of fresh?
A: Absolutely! Frozen peaches work beautifully in pie, especially when fresh peaches aren’t in season. You’ll need about 6 cups of frozen peach slices. Thaw them completely, then drain off the excess liquid before using—frozen peaches release more moisture than fresh. You may need to increase the cornstarch by 1 tablespoon to compensate for the extra liquid. Pat the peaches dry with paper towels before tossing with the other filling ingredients for the best results.
Q: How do I prevent a soggy bottom crust?
A: The dreaded soggy bottom! Several techniques help: First, make sure your oven is fully preheated before baking. Second, place the pie on the lowest oven rack so the bottom gets direct heat. Third, use a glass or ceramic pie dish which conducts heat better than metal. Fourth, consider blind-baking the bottom crust for 10-15 minutes before adding the filling. Finally, some bakers brush the bottom crust with a thin layer of egg white before adding the filling, which creates a moisture barrier. Letting the filling macerate and draining excess liquid also helps tremendously.
Q: My peach pie filling is too runny. What went wrong?
A: Runny filling usually comes from one of three issues. First, cutting into the pie before it cooled completely—the filling needs at least 4 hours to set up properly. Second, not baking the pie long enough. The filling must bubble vigorously in the center (not just the edges) for the cornstarch to fully activate. If your crust is browning too fast, tent it with foil and keep baking until those bubbles appear. Third, your peaches released more liquid than expected. Next time, let the filling sit for 30 minutes, drain off excess liquid, or increase cornstarch by 1-2 tablespoons.
Q: Do I have to peel the peaches?
A: While you technically don’t have to peel peaches for pie, I highly recommend it. Peach skins become tough and chewy when baked and can create an unpleasant texture in the otherwise silky filling. The blanching method (boiling for 30-60 seconds, then shocking in ice water) makes peeling incredibly easy—the skins slip right off. If you’re short on time or your peaches are very difficult to peel, you can skip it, but the final texture won’t be quite as refined.