This no bake Oreo cheesecake is the ultimate dessert for when you want something absolutely show-stopping without turning on the oven. Imagine thick, velvety cream cheese filling studded with chunks of chocolate Oreo cookies, all nestled on a buttery Oreo crust that requires zero baking. It’s the kind of dessert that looks like you spent hours in the kitchen but actually comes together in less than 30 minutes of active time.
This easy no bake Oreo cheesecake has become a Pinterest sensation for good reason—it delivers all the rich, creamy decadence of traditional baked cheesecake without the hassle of water baths, precise oven temperatures, or worry about cracks. The cookies-and-cream flavor combination is universally loved by kids and adults alike, making it perfect for birthday parties, potlucks, summer gatherings, or any time you need a crowd-pleasing dessert that won’t heat up your kitchen.
Whether you’re a beginner baker intimidated by traditional cheesecake or an experienced cook looking for a reliable, foolproof dessert recipe, this Oreo cheesecake without baking checks every box. It’s make-ahead friendly, incredibly versatile, and guaranteed to disappear within minutes of serving. Once you see how easy it is to create this bakery-quality dessert at home, you’ll never buy store-bought cheesecake again.
History / Background
No bake cheesecakes represent a brilliant evolution in American dessert-making, born from the desire to enjoy rich, creamy cheesecake without the technical challenges of baking. While traditional cheesecake dates back to ancient Greece, the no bake version is a distinctly modern American innovation that emerged in the mid-20th century as convenience products like cream cheese and gelatin became household staples.
The original baked cheesecake required precise temperature control, water baths to prevent cracking, and considerable baking expertise. Home cooks often struggled with sunken centers, cracked tops, and overcooked edges. As America’s love affair with cheesecake grew—particularly after cream cheese became widely available in the 1920s—food scientists and home economists began developing simplified versions that could be refrigerated instead of baked.
The no bake cheesecake revolution truly took off in the 1950s and 1960s when women’s magazines and product manufacturers published recipes using stabilized whipped cream or gelatin to set the filling. These recipes democratized cheesecake-making, allowing anyone to create impressive desserts without specialized baking skills. Jell-O even introduced a “No Bake Cheesecake” mix in the 1980s that became wildly popular.
The Oreo variation is a more recent innovation that aligns perfectly with America’s obsession with cookies-and-cream flavor combinations. Since Oreo cookies debuted in 1912, they’ve become the best-selling cookie in the United States, with Americans consuming over 450 billion Oreos to date. The pairing of Oreos with cheesecake was inevitable—combining the beloved chocolate sandwich cookie with creamy cheesecake filling creates a flavor profile that appeals across generations.
This particular no bake Oreo cheesecake recipe represents the culmination of decades of recipe development by home cooks, food bloggers, and dessert enthusiasts who’ve perfected the ratios, techniques, and flavors. It’s become a staple at potlucks, church dinners, and family gatherings throughout America, celebrated for its simplicity, reliability, and absolutely irresistible taste.
Why You’ll Love This Recipe
This no bake Oreo cheesecake recipe is about to become your secret weapon for impressive, effortless dessert-making. It delivers everything you could possibly want in a dessert—decadent flavor, beautiful presentation, and simplicity that makes you look like a pastry chef without the stress or skill required for traditional baking.
The genius of this dessert lies in how it takes something that seems complicated and makes it absolutely foolproof. There’s no risk of overbaking, no cracks to worry about, no water baths to manage, and no finicky oven temperatures. You simply mix, spread, chill, and enjoy. The result tastes just as luxurious as baked cheesecake—maybe even better—with a mousse-like texture that melts on your tongue.
Here’s why this easy Oreo cheesecake will become your go-to dessert:
- No oven required – Perfect for summer when you don’t want to heat up the kitchen, or any time you want hassle-free baking
- Ready in 20 minutes active time – The only wait is chilling time, and the refrigerator does all the work
- Beginner-friendly – If you can mix ingredients in a bowl, you can make this cheesecake perfectly
- Make-ahead perfection – Actually tastes better the next day, making it ideal for party planning and stress-free entertaining
- Crowd-pleasing flavor – Everyone loves Oreos and cheesecake, making this a guaranteed hit with all ages
- Budget-friendly luxury – Tastes expensive but uses affordable, readily available ingredients
- Customizable – Easily adapted with different cookie flavors, mix-ins, or toppings
- Impressive presentation – Looks bakery-quality with minimal effort
- No special equipment – Requires only basic kitchen tools you already own
- Stable and sliceable – Cuts into perfect, clean slices that hold their shape beautifully
- Kid-approved – Children love both making and eating this fun, cookie-filled dessert
Ingredient Notes
The beauty of this no bake Oreo cheesecake lies in its short, simple ingredient list. Every component plays a crucial role in creating that perfect creamy, dreamy texture and cookies-and-cream flavor.
Oreo Cookies: The star ingredient that appears in both the crust and the filling. You’ll need about 36 cookies total (one standard 14.3-ounce package). Regular Oreos work perfectly, though you can experiment with different varieties like Golden Oreos, Mint Oreos, or Peanut Butter Oreos for flavor variations. No need to separate the cream filling from the cookies—use them whole for maximum flavor and ease. Generic sandwich cookies work fine if you’re on a budget, though authentic Oreos provide the most recognizable taste.
Cream Cheese: This is the foundation of your cheesecake filling. Use full-fat brick-style cream cheese (not spreadable or whipped varieties) for the best texture and richness. You’ll need 16 ounces (two 8-ounce packages). The cream cheese must be at room temperature for smooth mixing—cold cream cheese will result in lumpy filling. Plan ahead and let it sit on the counter for about 45-60 minutes before starting.
Heavy Whipping Cream: This creates the light, mousse-like texture that makes no bake cheesecake so special. You’ll need 1½ cups of cold heavy cream. The fat content in heavy cream (36-40%) is essential for proper whipping and stability. Half-and-half or light cream won’t work as they don’t contain enough fat to whip into stiff peaks. Keep it refrigerated until you’re ready to whip it.
Powdered Sugar: Also called confectioners’ sugar, this sweetens both the crust and filling while dissolving smoothly without any grittiness. Powdered sugar also contains a small amount of cornstarch that helps stabilize whipped cream. Granulated sugar can technically substitute but may result in slightly grainy texture and less stable whipped cream.
Unsalted Butter: Binds the Oreo crumbs together to create a firm, sliceable crust. Melted butter coats each crumb, and when chilled, it solidifies to hold everything together. Unsalted butter is preferred so you can control the sweetness, but salted butter works if that’s what you have. You’ll need about 5-6 tablespoons (approximately ⅓ cup).
Vanilla Extract: Enhances all the other flavors and adds depth to the cream cheese filling. Pure vanilla extract is preferred over imitation for the best flavor, though either works in a pinch. Just 1-2 teaspoons makes a noticeable difference in the overall taste profile.
Optional Garnishes: While not essential, whipped cream, extra Oreo cookies, chocolate sauce, or chocolate shavings make beautiful finishing touches that elevate your presentation from homemade to bakery-style.
Equipment Needed
One of the best things about this no bake Oreo cheesecake is that it requires only basic kitchen equipment. No fancy baking tools or specialized appliances needed:
- 9-inch Springform Pan – The gold standard for cheesecake because the removable sides make serving easy and professional-looking. If you don’t have one, a 9-inch pie dish or regular cake pan lined with parchment paper works too.
- Food Processor or Blender – For crushing Oreos into fine crumbs quickly and evenly. Alternatively, you can place cookies in a sealed plastic bag and crush with a rolling pin.
- Electric Hand Mixer or Stand Mixer – Essential for whipping the heavy cream to stiff peaks and beating the cream cheese until smooth. While you can whip cream by hand with a whisk, it requires significant arm strength and time.
- Large Mixing Bowls – At least two medium-to-large bowls for preparing the filling components separately.
- Rubber Spatula – For folding ingredients together gently and scraping down bowl sides.
- Measuring Cups and Spoons – For accurate ingredient measurements.
- Offset Spatula or Butter Knife – For smoothing the top of your cheesecake into an even, professional-looking surface.
- Plastic Wrap or Aluminum Foil – To cover the cheesecake while it chills.
- Sharp Knife – For clean slicing when serving. A thin, sharp knife dipped in hot water creates the cleanest cuts.
No Bake Oreo Cheesecake Recipe
- Total Time: 4 hours 20 minutes
- Yield: 12 servings 1x
- Diet: Vegetarian
Description
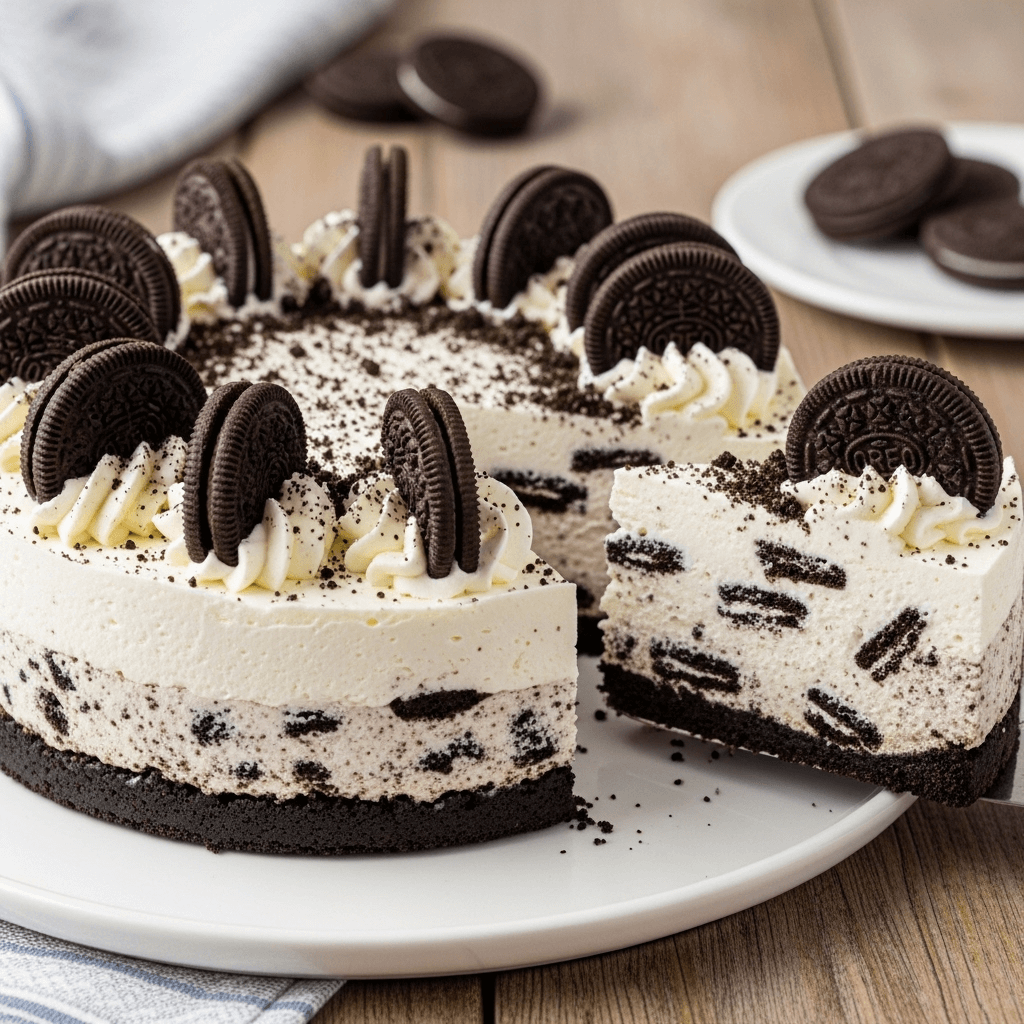
This no bake Oreo cheesecake features a chocolate cookie crust and ultra-creamy filling loaded with crushed Oreos. No oven needed for this easy, make-ahead dessert that’s perfect for any occasion!
Ingredients
For the Oreo Crust:
- 24 Oreo cookies (about 2 cups crumbs)
- 5 tablespoons unsalted butter, melted
For the Cheesecake Filling:
- 16 ounces (2 packages) cream cheese, softened to room temperature
- ¾ cup powdered sugar
- 1 teaspoon vanilla extract
- 1½ cups cold heavy whipping cream
- 12 Oreo cookies, roughly chopped into chunks
For Topping (Optional):
- Whipped cream
- 6–8 whole Oreo cookies
- Chocolate sauce or ganache
- Chocolate shavings
Instructions
- Prepare the springform pan: Line the bottom of a 9-inch springform pan with parchment paper for easy removal. You can also lightly grease the sides with butter or cooking spray.
- Make the Oreo crust: Place 24 Oreo cookies (cream filling and all) in a food processor and pulse until they form fine, even crumbs. You should have about 2 cups of crumbs. Transfer the crumbs to a medium bowl and pour the melted butter over them. Stir with a fork until all the crumbs are evenly moistened and the mixture resembles wet sand.
- Form the crust: Pour the Oreo crumb mixture into the prepared springform pan. Using the bottom of a measuring cup or glass, press the crumbs firmly and evenly across the bottom and about 1 inch up the sides of the pan. Pack it tightly so it holds together well. Place the pan in the refrigerator while you prepare the filling.
- Beat the cream cheese mixture: In a large mixing bowl, beat the softened cream cheese with an electric mixer on medium speed for 2-3 minutes until completely smooth and fluffy with no lumps. Scrape down the sides of the bowl. Add the powdered sugar and vanilla extract, then beat for another 1-2 minutes until well combined and creamy. Set aside.
- Whip the heavy cream: In a separate large, clean bowl, pour the cold heavy whipping cream. Using clean beaters, whip the cream on medium-high speed for 3-4 minutes until stiff peaks form. You’ll know it’s ready when you lift the beaters and the peaks stand straight up without drooping. Don’t overbeat or you’ll end up with butter.
- Fold together: Gently fold about one-third of the whipped cream into the cream cheese mixture using a rubber spatula. Use a folding motion (cutting down through the center, scraping across the bottom, and bringing the spatula up the side) rather than stirring, which deflates the whipped cream. Once mostly incorporated, add the remaining whipped cream and fold gently until no white streaks remain.
- Add Oreo chunks: Roughly chop 12 Oreo cookies into quarters and chunks of various sizes. Reserve a few pieces for topping if desired. Gently fold the Oreo chunks into the cheesecake filling until evenly distributed throughout.
- Assemble the cheesecake: Remove the crust from the refrigerator. Pour the cream cheese filling over the crust and spread it evenly with an offset spatula or the back of a spoon. Smooth the top for a professional finish, or create swirls for a more rustic look.
- Chill thoroughly: Cover the cheesecake with plastic wrap or aluminum foil (press it gently onto the surface to prevent a skin from forming, or tent it to avoid touching the top). Refrigerate for at least 4 hours, but preferably overnight (6-8 hours) for the best texture and easiest slicing. The cheesecake needs this time to set properly.
- Garnish and serve: Before serving, remove the sides of the springform pan by running a thin knife around the edge, then unclasping the ring. Top with additional whipped cream, whole or halved Oreos, drizzled chocolate sauce, or chocolate shavings as desired. Slice with a sharp knife, wiping the blade clean between each cut for the neatest slices.
Notes
- Room temperature cream cheese is crucial for a smooth, lump-free filling. If you forgot to take it out ahead, cut it into cubes and microwave in 10-second bursts, checking between each burst.
- Don’t skip whipping the heavy cream to stiff peaks—under-whipped cream results in a filling that won’t hold its shape and may be too soft.
- Use the folding technique when combining the whipped cream with the cream cheese mixture to maintain the light, airy texture.
- For the cleanest slices, dip your knife in hot water and wipe it clean between each cut.
- This cheesecake must chill for at least 4 hours, but it’s even better after sitting overnight.
- If your crust seems too crumbly and won’t hold together, add another tablespoon of melted butter.
- Prep Time: 20 minutes
- Cook Time: 0 minutes (chill time: 4 hours)
- Category: Dessert
- Method: No-Bake
- Cuisine: American
Nutrition
- Serving Size: 1 slice (1/12 of cheesecake)
- Calories: 425
- Sugar: 28g
- Sodium: 285mg
- Fat: 30g
- Saturated Fat: 17g
- Unsaturated Fat: 11g
- Trans Fat: 0g
- Carbohydrates: 36g
- Fiber: 1g
- Protein: 5g
- Cholesterol: 80mg
Tips & Variations
This no bake Oreo cheesecake is wonderfully versatile and welcomes all kinds of creative customizations. Here are some delicious ways to make it your own:
Different Cookie Varieties: Swap regular Oreos for other flavors to create entirely new taste experiences. Golden Oreos create a vanilla cookies-and-cream version with a lighter crust. Mint Oreos add refreshing mint chocolate flavor. Peanut Butter Oreos create a Reese’s-inspired version. Birthday Cake Oreos make it extra festive for celebrations. Red Velvet Oreos add elegant flavor and color.
Chocolate Lovers’ Version: Fold in ½ cup mini chocolate chips along with the Oreo chunks, drizzle melted chocolate over the top, or create a chocolate ganache layer between the crust and filling for ultimate decadence.
Peanut Butter Oreo Cheesecake: Add ½ cup creamy peanut butter to the cream cheese mixture before folding in the whipped cream. Use regular or Peanut Butter Oreos. Top with Reese’s Peanut Butter Cups.
Lighter Version: Replace half the cream cheese with Greek yogurt or mascarpone for a slightly lighter (but still creamy) filling. Use reduced-fat cream cheese if desired, though the texture will be slightly less rich.
Individual Servings: Make these in mason jars, small glass cups, or a muffin tin lined with cupcake liners for portable, party-perfect portions. Layer crushed Oreos, filling, and more crushed Oreos for a pretty parfait effect.
Strawberry Oreo Cheesecake: Top with fresh strawberry sauce or strawberry pie filling for a classic strawberry cheesecake twist. The fruit adds freshness that balances the richness.
Salted Caramel Version: Drizzle salted caramel sauce between layers and over the top. The sweet-salty combination is absolutely addictive.
Mocha Oreo Cheesecake: Dissolve 1 tablespoon instant espresso powder in 1 tablespoon hot water, cool, and beat into the cream cheese mixture for sophisticated coffee flavor.
Extra Oreo Crunch: Press whole Oreo halves decoratively around the edge of the cheesecake before chilling, or sprinkle crushed Oreos generously over the entire top.
Different Crusts: Try graham cracker crust, chocolate graham crackers, vanilla wafer crust, or even brownie crust for variety.
Pro Chef Tips
Take your no bake Oreo cheesecake from delicious to absolutely professional with these expert techniques:
Temperature matters tremendously: Room temperature cream cheese is non-negotiable for smooth, lump-free filling. Cold cream cheese will never fully incorporate and will leave you with chunks no amount of beating will smooth out. Conversely, your heavy cream must be very cold (straight from the refrigerator) to whip properly. Some bakers even chill their mixing bowl and beaters for the fluffiest whipped cream.
Whip the cream first: Professional bakers often whip the heavy cream first, set it aside, then prepare the cream cheese mixture in the same (unwashed) bowl. This saves time and dishes, and the residual cream left in the bowl won’t hurt the cream cheese mixture.
Don’t over-mix after adding whipped cream: Once you fold the whipped cream into the cream cheese mixture, work gently and efficiently. Over-mixing deflates the air bubbles you worked so hard to create, resulting in a dense, heavy cheesecake instead of light and mousse-like. Stop folding as soon as no white streaks remain.
Vary your Oreo chunk sizes: Instead of uniformly chopping all the Oreos the same size, create a variety of chunk sizes from fine crumbs to quarter-cookies. This creates more interesting texture and ensures every bite has some Oreo in it.
Use a water bath for even temperature: While not strictly necessary, placing your springform pan in a larger pan or on a baking sheet helps insulate the bottom and maintain more consistent temperature in the refrigerator, which can prevent cracking or textural issues.
The knife technique for perfect slices: Fill a tall glass with very hot water. Dip your knife blade in the water for 10 seconds, wipe it completely dry with a towel, then make one cut. Wipe the blade clean, dip in hot water again, dry, and make the next cut. This creates bakery-perfect slices with no dragging or tearing. The hot blade cuts through the cold cheesecake like butter.
Stabilize your whipped cream: For cheesecake that holds up even longer, add 1 tablespoon of powdered gelatin (bloomed in 2 tablespoons cold water, then melted) to the whipped cream. This creates a more stable filling that won’t weep or soften as quickly.
Create clean edges: Before removing the springform pan ring, run a thin knife or offset spatula dipped in hot water around the inside edge of the pan. This releases any filling stuck to the sides and ensures clean removal without tearing.
Common Mistakes to Avoid
Even though this is one of the easier dessert recipes, a few common mistakes can prevent cheesecake perfection:
Using cold cream cheese: This is the number one mistake that ruins the texture of no bake cheesecake. Cold cream cheese will not blend smoothly no matter how long you beat it, leaving you with lumpy filling that’s disappointing to eat. Always bring cream cheese to room temperature—it should be soft enough to easily press your finger into it. If you forgot to take it out ahead, cut it into small cubes and microwave in short 10-second bursts, checking frequently to prevent melting.
Under-whipping or over-whipping the heavy cream: Under-whipped cream won’t have enough structure to hold up the cheesecake filling, resulting in a mixture that’s too soft and won’t slice properly. The cream should form stiff peaks that stand straight up when you lift the beaters. However, over-whipping causes the fat molecules to clump together, and you’ll end up with grainy, butter-like texture. Stop as soon as stiff peaks form—there’s only about 30 seconds between perfect whipped cream and over-whipped.
Not packing the crust firmly: A loosely packed crust will crumble and fall apart when you try to slice the cheesecake. Use the bottom of a flat glass or measuring cup to press down firmly, compacting the crumbs tightly. You should be able to run your finger across it without leaving a significant indent. Think of it like packing sand—you want it solid and compressed.
Not chilling long enough: Patience is crucial with no bake cheesecake. If you try to slice it after just an hour or two, the filling will be too soft and won’t hold its shape. The minimum is 4 hours, but overnight is ideal for the best texture and easiest slicing. Rushing this step is the fastest way to end up with messy, soup-like servings instead of beautiful slices.
Stirring instead of folding: When combining the whipped cream with the cream cheese mixture, vigorous stirring deflates all the air bubbles you created during whipping. Use a gentle folding motion—cutting down through the middle, scraping along the bottom, and bringing the spatula up the side. It should take 30-40 gentle folds to fully incorporate without deflating.
Forgetting to line the pan: While not absolutely necessary, lining the bottom of your springform pan with parchment paper makes removing the cheesecake so much easier. Without it, the first slice is often messy and difficult to remove cleanly. Take 30 seconds to trace and cut a parchment circle—your future self will thank you.
Storage & Meal Prep
This no bake Oreo cheesecake stores beautifully, making it perfect for advance preparation and enjoying throughout the week:
Refrigerator Storage: Keep the cheesecake covered (either in the springform pan with plastic wrap over the top, or transferred to an airtight container) in the refrigerator for up to 5 days. The flavor actually improves over the first 2-3 days as the flavors meld together. After about 4 days, the Oreo chunks begin to soften significantly and lose some of their texture, though the cheesecake is still safe to eat and tastes delicious.
Covering Properly: Use plastic wrap pressed gently directly onto the surface of the cheesecake to prevent it from absorbing refrigerator odors and developing a skin. Alternatively, tent the plastic wrap or foil above the surface if you’ve decorated the top and don’t want to disturb your garnishes. The springform pan sides can stay on during storage for added protection.
Preventing Sogginess: The Oreo crust will naturally soften slightly after a day or two in the refrigerator due to moisture from the filling. This is normal and doesn’t affect the taste—it just becomes less crunchy. If you prefer a crunchier crust, assemble and serve the cheesecake within 24 hours.
Slicing and Storing: If you’ve already sliced the cheesecake, store individual slices in airtight containers with parchment paper between layers to prevent sticking. This is perfect for meal prep or sending leftovers home with guests.
Serving Temperature: No bake cheesecake tastes best served cold, straight from the refrigerator. Let slices sit at room temperature for just 5-10 minutes before serving if you prefer slightly softened texture, but don’t let it sit out too long or it will become too soft.
Food Safety: Never leave this cheesecake at room temperature for more than 2 hours (1 hour if the temperature is above 90°F). The dairy content makes it perishable and prone to bacterial growth in warm conditions. At parties or gatherings, consider keeping the cheesecake on ice or only bringing out slices as needed.
Make-Ahead & Freezer Notes
This cheesecake is actually one of the best make-ahead desserts you can prepare, making it perfect for stress-free entertaining:
Make-Ahead Timeline: You can prepare this entire cheesecake up to 3 days in advance. In fact, it’s better when made a day ahead—the flavors meld together and the texture becomes even more stable and sliceable. Simply prepare as directed, cover well, and refrigerate. Add any toppings or garnishes just before serving for the freshest look.
Freezing Instructions: Yes, this no bake Oreo cheesecake freezes beautifully! To freeze, prepare the cheesecake completely and let it chill in the refrigerator until fully set. Remove the sides of the springform pan. Wrap the entire cheesecake (still on the base or transferred to a cardboard circle) tightly with plastic wrap, then wrap again with aluminum foil. For extra protection, place in a large freezer bag or airtight container. Freeze for up to 2 months.
Freezing Individual Slices: For ultimate convenience, slice the cheesecake and freeze individual portions. Wrap each slice tightly in plastic wrap, then place in freezer bags. This allows you to thaw just what you need without defrosting the entire cheesecake.
Thawing Method: For best results, thaw the frozen cheesecake in the refrigerator overnight (8-12 hours). Never thaw at room temperature as this can cause condensation, weeping, and textural issues. The slow thaw in the refrigerator maintains the best texture. Individual slices thaw in about 2-4 hours in the refrigerator, or can be enjoyed partially frozen for a different but equally delicious ice cream cake-like experience.
Garnishing After Freezing: If you plan to freeze your cheesecake, wait to add whipped cream, chocolate drizzles, or cookie garnishes until after thawing. These toppings don’t freeze as well and are best added fresh just before serving.
Texture After Freezing: The texture may be ever-so-slightly different after freezing—perhaps a tiny bit denser—but it’s minimal and most people won’t even notice. The flavor remains absolutely delicious.
Serving Suggestions
This no bake Oreo cheesecake is a star on its own, but thoughtful accompaniments can elevate your dessert presentation:
Coffee and Beverages: Serve with freshly brewed coffee, espresso, or cappuccino for a classic pairing that cuts through the richness. For non-coffee drinkers, cold milk is perfect (especially for kids), or try iced vanilla lattes, hot chocolate, or even Irish cream liqueur for adult gatherings.
Fresh Berries: Balance the richness with fresh strawberries, raspberries, or blueberries on the side. The tartness of berries provides a refreshing contrast to the sweet, creamy cheesecake. Macerate the berries in a bit of sugar for 30 minutes for an even more elegant presentation.
Chocolate Sauce: Drizzle each slice with warm chocolate ganache, hot fudge sauce, or chocolate syrup just before serving. The combination of warm chocolate and cold cheesecake is simply divine.
Caramel Sauce: Salted caramel sauce adds a sophisticated sweet-salty element that complements the Oreos beautifully. Drizzle it artistically across each slice or pool it on the plate beneath the cheesecake.
Whipped Cream: Dollop fresh whipped cream (sweetened and vanilla-flavored) on each slice for extra indulgence. Pipe it decoratively with a pastry bag for bakery-style presentation.
Ice Cream: Serve a slice with a scoop of vanilla ice cream on the side for an over-the-top dessert experience. Coffee or cookies-and-cream ice cream are also excellent choices.
Crushed Oreos: Sprinkle additional crushed Oreos over each slice just before serving for extra crunch and visual appeal.
Presentation Ideas: Serve on white plates for classic elegance, or try slate serving boards for a modern look. Dust the plate with cocoa powder, add a mint leaf garnish, or create artistic chocolate sauce swirls for restaurant-quality presentation.
Party Serving: For large gatherings, pre-slice the cheesecake and arrange slices on a large platter with garnishes. This makes serving faster and ensures everyone gets a perfect piece.
FAQs Section
Q: Can I make this cheesecake without a springform pan?
A: Absolutely! While a springform pan makes serving easiest and creates the most professional look, you have several alternatives. Use a 9-inch pie dish—the cheesecake will be slightly thinner, and you’ll scoop servings rather than slicing clean pieces, but it tastes just as delicious. You can also use a regular 9-inch cake pan lined with parchment paper that extends up and over the sides (creating “handles” to lift the whole cheesecake out). Another option is making individual cheesecakes in muffin tins lined with cupcake papers, or layering the crust and filling in mason jars or glass cups for a parfait-style presentation. The recipe is very forgiving of different pan types.
Q: Why is my cheesecake filling too runny or not setting?
A: This usually happens for one of several reasons. First, the heavy cream may not have been whipped to stiff peaks—under-whipped cream doesn’t have enough structure to support the filling. Make sure you beat the cream until peaks stand straight up without drooping when you lift the beaters. Second, the cheesecake may simply need more chilling time. While 4 hours is the minimum, some refrigerators run warmer than others, and you may need 6-8 hours or overnight for proper setting. Third, if you overmixed the filling after adding the whipped cream, you may have deflated the air that provides structure. Finally, make sure you used heavy whipping cream (36-40% fat), not half-and-half or light cream, which won’t whip properly.
Q: Can I use Cool Whip instead of heavy whipping cream?
A: Yes, you can substitute Cool Whip or other frozen whipped topping for the heavy whipping cream. Use about 12 ounces (one and a half 8-ounce containers) of thawed Cool Whip. The texture will be slightly different—perhaps a bit lighter and fluffier—and some people find the flavor less rich than real whipped cream. However, it’s a convenient shortcut that works well if you’re in a pinch or prefer the stabilized texture that Cool Whip provides. Simply fold it into the cream cheese mixture just as you would homemade whipped cream.
Q: How do I prevent the crust from being too crumbly or falling apart?
A: A crumbly crust that won’t hold together typically means there isn’t enough butter binding the crumbs. Make sure you’re using the full 5 tablespoons of melted butter, and if your crust still seems dry, add another tablespoon. The mixture should hold together when you squeeze it in your fist—like wet sand at the beach. Also, make sure you’re packing the crust down very firmly using the bottom of a glass or measuring cup. Really press hard to compress it into a solid layer. Finally, giving the crust 10-15 minutes to chill in the refrigerator before adding the filling helps it set and become firmer.
Q: My cream cheese has lumps no matter how much I beat it. What went wrong?
A: The cream cheese was too cold when you started mixing. Cold cream cheese will never become completely smooth and creamy no matter how long you beat it—you’ll just end up with tiny lumps throughout your filling. The cream cheese must be at room temperature (soft enough to easily press your finger into). If you’ve already started and discovered lumpy filling, try this fix: microwave the mixture in 10-second intervals, stirring between each burst, until slightly warmed (not hot).