

When you need an impressive dessert that doesn’t require turning on your oven, this easy no bake cheesecake recipe is your answer. Silky smooth, incredibly creamy, and bursting with that classic tangy cheesecake flavor, this no-bake version delivers all the deliciousness of traditional baked cheesecake without the fuss, stress, or risk of cracks. The buttery graham cracker crust provides the perfect crunchy contrast to the rich, mousse-like filling that sets up beautifully in your refrigerator with no water baths, no precise oven temperatures, and absolutely no worry about whether it’s done or not.
This simple no bake cheesecake is perfect for so many occasions—serve it at summer gatherings when you don’t want to heat up your kitchen, bring it to potlucks where it travels beautifully, make it for birthday celebrations, or prepare it as an elegant dinner party finale. It’s also wonderful for beginner bakers who might be intimidated by traditional cheesecake techniques, busy home cooks who need a make-ahead dessert, or anyone who simply wants to enjoy cheesecake without the hassle. The best part? This recipe comes together in just 20 minutes of active prep time, then your refrigerator does all the work while you relax. You’ll need to plan ahead for the 4-hour chilling time, but that hands-off simplicity means you can make this stunning dessert even on your busiest days.
History / Background
The history of no bake cheesecake is closely tied to the evolution of convenient cooking and the rise of refrigeration in American homes. While traditional baked cheesecake has ancient origins—the Greeks served a baked cheese cake to athletes at the first Olympic games in 776 BCE—the no-bake version is a distinctly modern American creation that emerged in the mid-20th century.
The development of no bake cheesecake coincided with several culinary innovations. First, the widespread adoption of home refrigerators in the 1930s-1950s made chilled desserts practical for everyday families. Second, the invention of cream cheese by William Lawrence in 1872 (and later the popularization of Philadelphia brand cream cheese) provided the perfect base for smooth, rich cheesecakes. Third, the creation of gelatin-stabilized desserts and the discovery that whipped cream could help set and lighten filling textures opened new possibilities for cold-set desserts.
By the 1960s and 1970s, no bake cheesecake recipes began appearing regularly in American cookbooks and magazines as a solution for hot summer days when turning on the oven was unthinkable. These recipes were marketed as foolproof alternatives to notoriously finicky baked cheesecakes, which could crack, sink, or overbake despite a baker’s best efforts. Food companies embraced the trend—Jell-O and Philadelphia cream cheese both published popular no-bake cheesecake recipes that became household staples.
The beauty of no bake cheesecake lies in its democratic simplicity. While baked cheesecake requires careful technique, water baths, and precise timing, no bake versions are nearly impossible to mess up. This accessibility has made it a beloved recipe passed down through generations, adapted for countless flavor variations, and cherished as a reliable crowd-pleaser that looks impressive but secretly requires minimal skill or effort.
Why You’ll Love This Recipe
This creamy no bake cheesecake recipe hits every mark for what makes a dessert truly exceptional—it’s delicious, impressive, easy, and reliable every single time you make it.
- No oven required – Perfect for hot summer days, small kitchens, or when your oven is occupied with other dishes
- Beginner-friendly – No tricky techniques, water baths, or worrying about cracks—virtually foolproof
- Make-ahead perfection – Actually tastes better after chilling overnight, making it ideal for stress-free entertaining
- Incredibly creamy texture – Rivals any baked cheesecake with its smooth, mousse-like consistency
- No cracks or sinking – The challenges that plague baked cheesecakes simply don’t exist here
- Versatile flavor base – Easy to customize with endless topping and flavoring options
- Impressive presentation – Looks bakery-quality and elegant despite being so simple to make
- Feeds a crowd – One recipe serves 10-12 people generously
- Stores beautifully – Keeps well in the refrigerator for up to 5 days
- Kid-approved – The sweet, creamy flavor appeals to all ages
- Budget-friendly – Uses accessible ingredients that cost significantly less than store-bought cheesecake
Ingredient Notes
Cream Cheese: The foundation of your cheesecake filling. You’ll need full-fat brick-style cream cheese (not spreadable or whipped varieties). The cream cheese must be at room temperature—this is crucial for achieving a smooth, lump-free filling. Leave it out for 1-2 hours before making the recipe, or soften carefully in the microwave in 10-second intervals. Philadelphia brand is the gold standard and consistently delivers the best texture and flavor.
Heavy Whipping Cream: Creates that signature light, airy texture that distinguishes this from dense baked cheesecake. The cream must be cold straight from the refrigerator to whip properly. Heavy cream (not light or half-and-half) is essential—it’s the high fat content that allows it to whip into stable peaks.
Powdered Sugar: Sweetens the filling while dissolving easily into the cream cheese for smooth texture. Powdered sugar (also called confectioners’ sugar) contains cornstarch that helps stabilize the filling. Don’t substitute with granulated sugar—it won’t dissolve completely and creates a grainy texture.
Vanilla Extract: Adds depth and rounds out the flavors. Use pure vanilla extract rather than imitation for the best taste. For even more vanilla flavor, add the seeds scraped from half a vanilla bean.
Sour Cream: Provides that characteristic tangy cheesecake flavor and contributes to the creamy texture. Full-fat sour cream works best. Greek yogurt can substitute in a pinch, though the flavor will be slightly different.
Graham Cracker Crumbs: Forms the classic crust base. You’ll need about 1½ cups of crumbs, which equals roughly 10-12 full graham cracker sheets crushed finely. You can buy pre-made crumbs for convenience or pulse whole crackers in a food processor. For gluten-free, use gluten-free graham crackers or cookies.
Butter: Binds the graham cracker crumbs together to form a firm, sliceable crust. Use unsalted butter so you can control the salt level. The butter must be melted and cooled slightly before mixing with crumbs.
Lemon Juice: Just a splash brightens the filling and balances the richness. Fresh lemon juice is best, though bottled works in a pinch for this small amount.
Equipment Needed
- 9-inch springform pan (essential for clean removal)
- Electric mixer (hand mixer or stand mixer with whisk attachment)
- Large mixing bowl
- Medium mixing bowl
- Rubber spatula
- Measuring cups and spoons
- Food processor (optional, for making graham cracker crumbs)
- Microwave-safe bowl (for melting butter)
- Plastic wrap or aluminum foil
- Offset spatula (optional but helpful for smooth top)
Pro Tip: A springform pan is really essential here—it allows you to remove the cheesecake cleanly without having to flip or invert it. If you don’t have one, you can use a regular 9-inch pie dish, but serving will be less elegant.
Print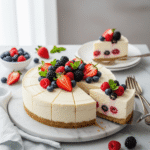
No Bake Cheesecake Recipe
- Total Time: 4 hours 20 minutes (including chilling)
- Yield: 10-12 slices 1x
- Diet: Vegetarian
Description
This easy no bake cheesecake features a buttery graham cracker crust and a silky smooth, creamy filling that requires no oven. Made with cream cheese, whipped cream, and just a touch of tang from sour cream, it’s the perfect make-ahead dessert that’s actually easier and more foolproof than traditional baked cheesecake. Top with fresh berries, fruit sauce, or chocolate for endless variations.
Ingredients
For the Graham Cracker Crust:
- 1½ cups (150g) graham cracker crumbs (about 10–12 full crackers)
- ¼ cup (50g) granulated sugar
- 6 tablespoons (85g) unsalted butter, melted
- Pinch of salt
For the Cheesecake Filling:
- 16 oz (2 packages/450g) cream cheese, at room temperature
- ¾ cup (90g) powdered sugar
- 1 teaspoon vanilla extract
- 1 tablespoon fresh lemon juice
- 1 cup (240ml) heavy whipping cream, cold
- ½ cup (120g) sour cream, at room temperature
Optional Toppings:
- Fresh berries, fruit compote, chocolate ganache, or caramel sauce
Instructions
- Prepare the pan: Line the bottom of a 9-inch springform pan with parchment paper for easiest removal. Lightly spray or grease the sides.
- Make the crust: In a medium bowl, combine graham cracker crumbs, granulated sugar, melted butter, and a pinch of salt. Mix with a fork until the mixture resembles wet sand and holds together when pressed. Pour into the prepared springform pan and press firmly into the bottom and slightly up the sides (about ½ inch). Use the bottom of a measuring cup or glass to pack it down tightly. Refrigerate while you make the filling.
- Beat the cream cheese: In a large bowl using an electric mixer, beat the room temperature cream cheese on medium speed for 2-3 minutes until completely smooth and fluffy with no lumps remaining. Scrape down the bowl frequently.
- Add sugar and flavorings: Add the powdered sugar, vanilla extract, and lemon juice to the cream cheese. Beat on medium speed until smooth and well combined, about 1-2 minutes. Add the sour cream and beat just until incorporated. Set aside.
- Whip the cream: In a separate clean bowl with clean beaters, whip the cold heavy cream on medium-high speed until stiff peaks form, about 3-4 minutes. The cream should hold its shape when you lift the beaters—don’t overbeat or it will become grainy.
- Fold together: Using a rubber spatula, gently fold the whipped cream into the cream cheese mixture in three additions. Use gentle folding motions (cutting down through the center, sweeping across the bottom, and bringing up the sides) to maintain the airiness. Fold just until no white streaks remain and the mixture is uniform.
- Assemble: Pour the filling into the prepared crust, spreading evenly with a spatula. Gently tap the pan on the counter a few times to release air bubbles. Smooth the top with an offset spatula or the back of a spoon.
- Chill: Cover the cheesecake with plastic wrap (don’t let it touch the surface—tent it slightly or spray the plastic wrap with cooking spray first). Refrigerate for at least 4 hours, but preferably overnight (6-8 hours) for the best texture and cleanest slicing.
- Serve: When ready to serve, run a thin knife around the edge of the pan, then carefully release and remove the springform ring. Transfer to a serving plate using the parchment paper base. Slice with a sharp knife, wiping clean between each cut. Top individual slices with your choice of toppings.
Notes
- Room temperature cream cheese is crucial—cold cream cheese creates lumps that are impossible to smooth out.
- Don’t skip the chilling time—the cheesecake needs at least 4 hours to set properly.
- For the cleanest slices, dip your knife in hot water and wipe it clean between each cut.
- This cheesecake actually tastes better after 24 hours in the refrigerator as the flavors meld together.
- If you don’t have a springform pan, you can make this in a 9-inch pie dish, though removal won’t be as clean.
- The filling should be thick but pourable when you add it to the crust—if it seems too thick, you’ve overbeaten the whipped cream.
- Prep Time: 20 minutes
- Cook Time: 0 minutes
- Category: Dessert
- Method: No-Bake
- Cuisine: American
Nutrition
- Serving Size: 1 slice (1/12 of cheesecake)
- Calories: 385
- Sugar: 20g
- Sodium: 240mg
- Fat: 30g
- Saturated Fat: 18g
- Unsaturated Fat: 10g
- Trans Fat: 0g
- Carbohydrates: 25g
- Fiber: 0g
- Protein: 5g
- Cholesterol: 95mg
Tips & Variations
Chocolate no bake cheesecake: Melt 6 oz of semi-sweet chocolate and let cool slightly, then fold into the cream cheese mixture before adding the whipped cream. Use chocolate graham crackers or Oreo crumbs for the crust.
Strawberry cheesecake: Fold ½ cup of strawberry puree into the filling, or create a strawberry swirl by adding dollops of strawberry sauce and swirling with a knife before chilling.
Lemon cheesecake: Add 2 tablespoons of lemon zest and increase lemon juice to 3 tablespoons for bright, citrusy flavor. Top with lemon curd.
Oreo crust variation: Replace graham crackers with 24 Oreo cookies (filling and all), crushed finely. Reduce butter to 4 tablespoons since Oreos already contain fat.
Peanut butter cheesecake: Beat ½ cup of creamy peanut butter into the cream cheese mixture. Use chocolate graham crackers for the crust and drizzle with chocolate ganache.
Lighter version: Use reduced-fat cream cheese (Neufchâtel), light sour cream, and replace ½ cup of the heavy cream with additional light sour cream. The texture will be slightly less rich but still delicious.
Individual portions: Make these in individual jars or small springform pans for perfect portion control and adorable presentation.
Seasonal fruit toppings: Top with whatever fruit is in season—blueberries and raspberries in summer, caramelized apples in fall, citrus in winter, strawberries in spring.
Pro Chef Tips
The room temperature rule: This cannot be stressed enough—room temperature cream cheese is absolutely essential. Cold cream cheese will create lumps no matter how long you beat it. Plan ahead and leave it out for 1-2 hours, or soften carefully in the microwave at 50% power in 10-second bursts, checking after each interval. The cream cheese should be soft enough to leave an indent when pressed but not melted or oily.
Proper whipping cream technique: Your bowl and beaters should be very clean with no trace of grease (even a tiny amount prevents cream from whipping). The cream must be cold—if your kitchen is warm, chill the bowl and beaters in the freezer for 10 minutes first. Stop beating as soon as stiff peaks form; overbeaten cream becomes grainy and eventually turns to butter.
The gentle folding secret: When combining the whipped cream with the cream cheese mixture, use a light touch. Aggressive stirring deflates the whipped cream and creates a dense, heavy filling. Fold in circular motions, turning the bowl as you work. It’s okay if a few tiny streaks remain—they’ll disappear as the cheesecake sets.
Crust pressing technique: Really pack that crust down firmly using the bottom of a flat measuring cup or glass. An insufficiently pressed crust will be crumbly and fall apart when you cut the cheesecake. You want it compact and solid—don’t be shy about applying pressure.
The overnight advantage: While 4 hours is the minimum chilling time, overnight (8-12 hours) produces superior results. The cheesecake becomes firmer for cleaner slicing, and the flavors develop and meld together beautifully. If you have the time, always choose overnight chilling.
Professional slicing technique: For bakery-worthy slices, use a long, thin, sharp knife dipped in very hot water. Wipe the knife completely clean with a damp towel after each cut. This hot knife technique melts through the filling cleanly instead of dragging and creating messy edges.
Stabilizing addition: For even firmer texture that holds up better in warm weather, some bakers add 1 teaspoon of unflavored gelatin bloomed in 2 tablespoons of cold water, then melted and cooled slightly before adding to the cream cheese. This is optional but helpful for summer gatherings or if your cheesecake will be out of refrigeration for a while.
Common Mistakes to Avoid
Using cold cream cheese: This is the number one mistake that ruins no bake cheesecakes. Cold cream cheese creates lumps that are nearly impossible to eliminate, resulting in a grainy, unpleasant texture. No amount of beating will smooth them out once they form. Always plan ahead and soften your cream cheese properly—it should be at room temperature, not cold from the fridge.
Overbeating the whipped cream: When heavy cream is beaten past stiff peaks, it becomes grainy and eventually separates into butter and buttermilk. This ruins the light, airy texture of your filling. Stop beating as soon as the cream holds firm peaks when you lift the beaters. It should look smooth and glossy, not curdled or grainy.
Skipping adequate chilling time: I know it’s tempting to cut into your beautiful cheesecake after just 2 hours, but patience is essential. Insufficient chilling time means the filling won’t be set properly—it will be too soft, won’t slice cleanly, and might even collapse. Always chill for at least 4 hours, preferably overnight. There’s no way to speed this process up, so plan accordingly.
Loose or crumbly crust: This happens when the crust isn’t pressed firmly enough into the pan or doesn’t have enough butter to bind the crumbs together. The mixture should feel like wet sand and hold together when pressed. Really pack it down with significant pressure, using a flat-bottomed glass or measuring cup to create a compact, solid base.
Adding toppings too early: Don’t add wet toppings (fruit compotes, sauces, fresh fruit) until just before serving or they’ll make the top of your cheesecake soggy. The moisture will seep into the filling and create a watery layer. Always add toppings right before slicing, or serve them on the side for guests to add themselves.
Storage & Meal Prep
Refrigerator storage: Store your no bake cheesecake covered in the refrigerator for up to 5 days. Keep it in the springform pan with plastic wrap or aluminum foil covering the top, or transfer to an airtight container after slicing. The cheesecake actually improves with time as the flavors meld—day 2 and 3 are peak deliciousness.
Covering without damage: To cover the cheesecake without disturbing the smooth top, either tent the plastic wrap (don’t let it touch the surface) or spray the plastic wrap with cooking spray before loosely laying it over the top. You can also insert toothpicks around the edge to hold the wrap up above the surface.
Pre-slicing for convenience: For parties or meal prep, you can pre-slice the entire cheesecake, then wrap individual slices in plastic wrap. This makes grabbing a piece easy throughout the week and ensures each slice stays fresh.
Leftover crust tip: If you have extra graham cracker crust mixture, press it into the bottom of muffin tins to make mini cheesecake crusts you can freeze for later use.
Maintaining texture: The cheesecake will firm up further in the refrigerator over time. If it becomes too firm for your liking, let it sit at room temperature for 15-20 minutes before serving to soften slightly.
Make-Ahead & Freezer Notes
Perfect make-ahead dessert: No bake cheesecake is ideal for advance preparation. Make it 1-3 days ahead of when you need it—it actually tastes better after sitting in the refrigerator as the flavors develop. This makes it perfect for stress-free entertaining since all the work is done days before your event.
Freezing whole cheesecake: This cheesecake freezes beautifully for up to 2 months. After chilling until completely set, wrap the entire pan (still in the springform) tightly in plastic wrap, then a layer of aluminum foil. Freeze until solid. To thaw, transfer to the refrigerator 24 hours before serving. Never thaw at room temperature as this creates condensation and a soggy top.
Freezing individual slices: Cut the cheesecake into slices, then freeze individually on a baking sheet until solid (about 2 hours). Wrap each slice tightly in plastic wrap, then place all wrapped slices in a freezer-safe container or bag. This allows you to pull out single servings as needed. Thaw individual slices in the refrigerator for 4-6 hours.
Crust-only make-ahead: You can make and press the crust into the pan up to 2 days in advance. Cover and refrigerate until ready to add the filling. You can also freeze prepared crusts for up to 1 month.
Post-thaw tips: After thawing, the cheesecake may have slight condensation on top. Gently blot with a paper towel before adding toppings. The texture will be nearly identical to fresh—most people can’t tell it was frozen.
Serving Suggestions
This versatile no bake cheesecake pairs beautifully with countless toppings and serves well in many different contexts.
Classic berry topping: Fresh strawberries, blueberries, raspberries, or mixed berries are traditional and beautiful. Arrange them on top just before serving, or make a simple berry compote by cooking berries with a little sugar and lemon juice until syrupy.
Chocolate lovers’ dream: Drizzle with chocolate ganache (equal parts heavy cream and chocolate chips, heated and stirred until smooth), sprinkle with chocolate shavings, or top with chocolate sauce.
Caramel delight: Drizzle with store-bought or homemade caramel sauce and sprinkle with a pinch of sea salt for salted caramel cheesecake. Candied pecans make an excellent addition.
Citrus variations: Top with lemon curd, lime curd, or orange marmalade for bright, tangy contrast to the rich filling.
Stone fruit elegance: In summer, top with fresh sliced peaches, nectarines, or cherries macerated in a little sugar.
Holiday presentation: For Thanksgiving, top with pumpkin spice whipped cream and candied pecans. For Christmas, use cranberry sauce and sugared cranberries. For the Fourth of July, arrange strawberries and blueberries in a flag pattern.
Coffee pairing: This cheesecake is wonderful with coffee or espresso. For fancy presentation, serve a slice with a shot of espresso on the side.
Wine pairing: Pair with dessert wines like late harvest Riesling, Moscato d’Asti, or Port. The sweetness complements the tangy cheesecake beautifully.
FAQs Section
Can I make this without a springform pan?
While a springform pan makes removal easiest, you can use a 9-inch pie dish or even a regular cake pan. Line the bottom with parchment paper with long overhang on two sides to create “handles” for lifting out. The presentation won’t be as clean, but it will taste just as good. You could also simply serve it directly from the dish, scooping rather than slicing.
Why is my cheesecake runny and not setting?
This usually happens for three reasons: insufficient chilling time (it needs at least 4 hours, preferably overnight), overbeaten whipped cream that lost its structure, or cream cheese that was too soft/melted when you started. The fix: refrigerate for several more hours or overnight. If it still won’t set after 12 hours, the whipped cream was likely the issue—unfortunately, there’s no fix for this besides starting over.
Can I use low-fat or fat-free cream cheese?
While you can use reduced-fat cream cheese (Neufchâtel), the texture will be slightly less rich and creamy. Do not use fat-free cream cheese—it contains too much moisture and stabilizers, resulting in a watery, gel-like texture that won’t set properly. For best results, always use full-fat brick-style cream cheese.
How do I prevent lumps in my filling?
Lumps come from cold cream cheese that hasn’t softened properly. The solution is prevention: always bring cream cheese to true room temperature (1-2 hours out of the fridge). If you discover lumps while mixing, you can sometimes fix them by beating on high speed for 2-3 minutes, but it’s much better to avoid them in the first place. Scraping down the bowl frequently while mixing also helps ensure everything is evenly combined.
Can I make this cheesecake vegan?
Yes, though the taste and texture will differ. Use vegan cream cheese (Kite Hill or Tofutti work well), coconut cream (the thick part from a refrigerated can of full-fat coconut milk) in place of heavy cream and sour cream, vegan butter for the crust, and check that your graham crackers are vegan (many contain honey). The result will be softer and coconut-flavored but still delicious.
Why did my cheesecake crack?
Good news—no bake cheesecakes almost never crack! If you see cracks, they likely formed when you were spreading the filling into the crust (surface cracks from spatula work) or from temperature shock (putting a warm filling into a very cold crust). These surface marks don’t affect taste and are easily covered with toppings. Unlike baked cheesecakes, structural cracks from overbaking simply don’t happen with the no-bake method.
How far in advance can I make this?
You can make this cheesecake up to 3 days in advance, though it’s best within 2 days of making for optimal texture. Store it covered in the refrigerator until ready to serve. Add toppings just before serving to prevent sogginess. For longer storage (up to 2 months), freeze the cheesecake following the instructions in the make-ahead section.
Conclusion
This easy no bake cheesecake is proof that impressive desserts don’t have to be complicated or stressful. With its buttery graham cracker crust and silky smooth, tangy-sweet filling, it delivers everything you love about traditional cheesecake without any of the challenges. No worrying about cracks, no water baths, no precise oven temperatures—just simple mixing, patient chilling, and pure deliciousness.
Whether you’re making it for a special celebration, a summer potluck, or just because you’re craving something sweet and indulgent, this recipe never disappoints. The best part? Once you master this basic technique, you can customize it endlessly with different flavors, toppings, and variations, making it a recipe you’ll turn to again and again throughout the years.
I’d love to hear about your no bake cheesecake success! What toppings did you choose? Did you make any flavor variations? How did your family react to this creamy, dreamy dessert? Drop a comment below sharing your experience, and please rate the recipe so other home bakers know what to expect. If this recipe made dessert-making easier and more enjoyable for you, share it on Pinterest—your pins help other food lovers discover how simple and delicious homemade cheesecake can be!
Now go grab that cream cheese, let it come to room temperature (I’m serious—don’t skip this!), and get ready to make the easiest, most impressive cheesecake of your life. Happy chilling, friend! 🍰