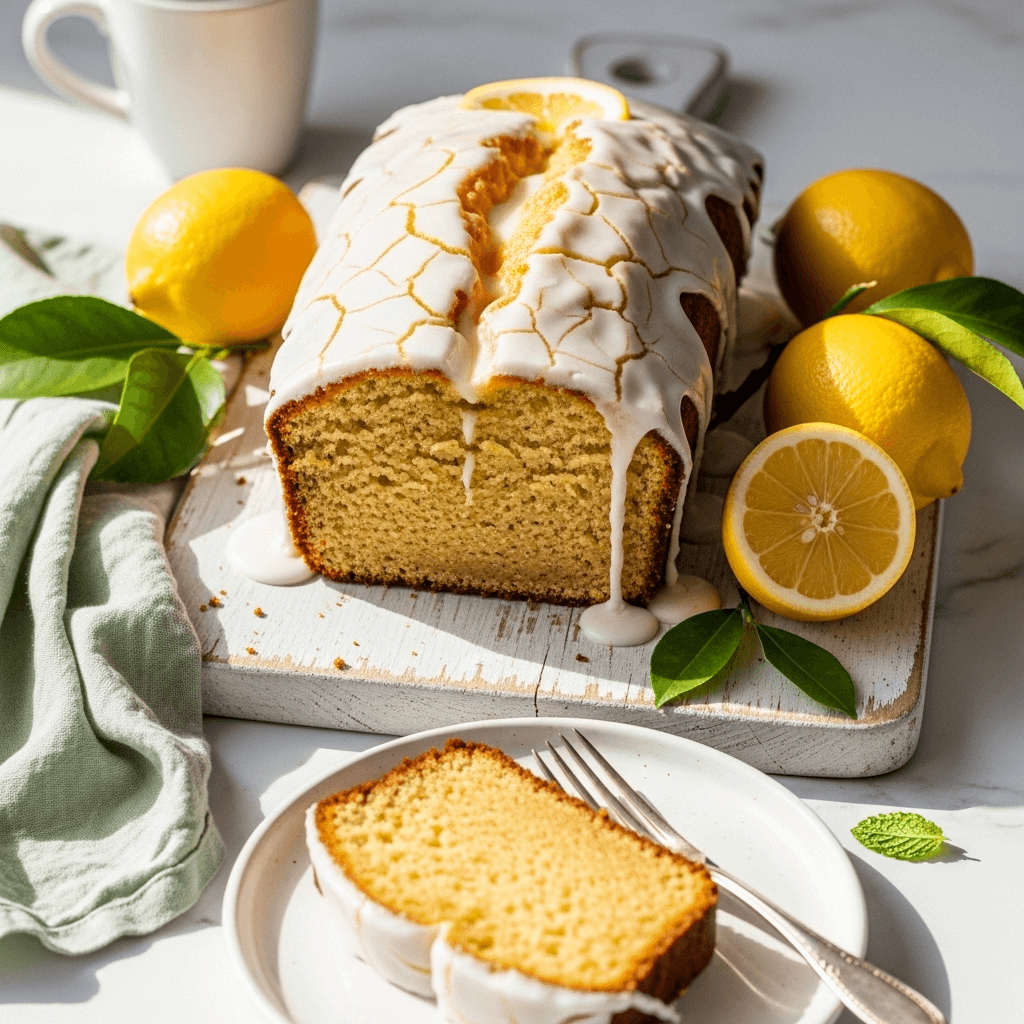

If you’ve ever treated yourself to a slice of that famous Starbucks lemon loaf with your morning coffee, you know exactly how addictive that perfectly moist, tangy-sweet combination can be! Well, I have amazing news: you can make an even better version at home with this lemon loaf recipe that’s become an absolute sensation among home bakers. This gorgeous golden cake delivers that signature dense, tender crumb that melts in your mouth, packed with bright, zesty lemon flavor and crowned with a sweet-tart lemon glaze that soaks into every bite.
Perfect for breakfast with coffee, afternoon tea, weekend brunch, dessert, or simply because you’re craving something citrusy and delicious, this moist lemon loaf is incredibly versatile and ridiculously easy to make. You don’t need any fancy techniques or unusual ingredients—just simple pantry staples and fresh lemons to create bakery-quality results. The best part? While this Starbucks lemon loaf copycat tastes just like the original (some say even better!), it costs a fraction of the price and fills your kitchen with the most incredible citrus aroma. Whether you’re baking for your family, bringing treats to a potluck, or looking for a thoughtful homemade gift, this easy lemon bread recipe delivers every single time with its perfect balance of sweet and tangy, moist and tender, simple and impressive!
History / Background
Lemon-flavored cakes and breads have a long and beloved history in baking traditions around the world. Citrus fruits, particularly lemons, have been cultivated in the Mediterranean region for thousands of years, with evidence suggesting they originated in Asia before spreading westward through trade routes. By the Middle Ages, lemons had become prized ingredients in European cuisine and baking, valued not just for their bright flavor but also for their preservative qualities and perceived health benefits.
The concept of quick breads—loaves leavened with baking powder or baking soda rather than yeast—emerged in the mid-19th century following the invention and commercialization of chemical leavening agents. This revolutionized home baking by making it faster and more reliable than traditional yeast breads. Quick breads became especially popular in America, where recipes for banana bread, zucchini bread, and lemon bread became staples in home kitchens and church cookbooks throughout the 20th century.
However, the modern lemon loaf phenomenon really took off when Starbucks introduced their version in the early 1990s. This wasn’t your grandmother’s lemon tea cake—it was denser, moister, and more intensely lemony than traditional versions, with a generous sweet-tart glaze that became instantly iconic. The Starbucks lemon loaf quickly became one of their most popular bakery items, creating a devoted following of fans who would order it alongside their lattes and cappuccinos.
The popularity of the Starbucks version inspired countless home bakers to recreate it in their own kitchens, leading to an explosion of copycat lemon loaf recipes across the internet. Bakers experimented with ratios, techniques, and ingredients to capture that signature texture and flavor—the perfect pound cake-style density, the pronounced lemon flavor from both zest and juice, and that crucial glazed exterior that’s slightly crisp before giving way to tender, moist crumb.
Today, lemon loaf has secured its place as a beloved modern classic in American baking. It bridges the gap between cake and bread, breakfast and dessert, casual and elegant. The recipe has evolved beyond the coffeehouse original, with home bakers adding their own touches—extra lemon zest, poppy seeds, buttermilk for tang, or layered glazes. Yet the fundamental appeal remains the same: a simple, sunny cake that brings brightness to any day, captures the essence of fresh lemons, and never fails to bring smiles to those who taste it.
Why You’ll Love This Recipe
This lemon loaf is about to become your new favorite thing to bake, and I’m not exaggerating! The combination of ultra-moist texture, intense lemon flavor, and that gorgeous crackly glaze creates something truly special that disappears faster than you can imagine.
Here’s why this recipe will have you coming back again and again:
- Incredibly Moist Texture – Thanks to a secret combination of sour cream and oil, this lemon loaf stays tender and moist for days. No dry, crumbly cake here—every slice is perfectly soft and rich without being heavy.
- Intense Lemon Flavor – This isn’t a subtle hint of lemon; it’s a full citrus celebration! Using both lemon zest and lemon juice in both the batter and the glaze creates layers of bright, tangy flavor that’s balanced beautifully with just the right amount of sweetness.
- Simple Pantry Ingredients – You probably have everything you need already! No unusual ingredients or specialty items required—just basic baking staples and fresh lemons create this extraordinary result.
- Foolproof Recipe – Even if you’re a baking beginner, you can nail this recipe. The method is straightforward with no complicated steps, no finicky techniques, and consistent results every time you make it.
- Better Than Starbucks – I’m completely serious when I say this homemade version rivals (and many say surpasses) the coffeehouse original. Plus, you can control exactly how much glaze you want and customize it to your taste!
- Budget-Friendly – Making this at home costs a fraction of buying individual slices at a coffee shop, and you get an entire loaf that serves 8-10 people. That’s serious bang for your buck!
- Perfect for Any Occasion – Serve it for breakfast, brunch, afternoon tea, dessert, or package it up as a thoughtful gift. It’s equally at home on a casual breakfast table or an elegant dessert spread.
- Keeps Beautifully – Unlike many baked goods that dry out quickly, this lemon loaf actually improves over the first day or two as the glaze soaks in. It stays moist and delicious for up to a week when properly stored.
- Customizable Base Recipe – Once you master this version, you can easily adapt it by adding poppy seeds, blueberries, or swapping in lime or orange for endless variations.
- Instagram-Worthy – That glossy white glaze dripping down the golden sides is absolutely gorgeous and photographs beautifully, making it perfect for sharing on Pinterest and social media!
Ingredient Notes
Understanding your ingredients is the foundation of baking success. Here’s what goes into this perfect lemon loaf and why each component matters!
All-Purpose Flour – The structure of your loaf, providing just the right amount of protein for a tender but sturdy crumb. Measure correctly by spooning flour into your measuring cup and leveling off—never pack it down. Substitution: For a lighter texture, you can replace ¼ cup of the all-purpose flour with cake flour. For gluten-free, use a 1:1 gluten-free baking flour blend.
Granulated Sugar – Sweetens the loaf and helps create that tender texture through tenderizing the gluten. It also contributes to browning and moisture retention. Tip: Don’t reduce the sugar too much or your loaf will be dry and won’t have the proper texture.
Baking Powder – The leavening agent that gives your loaf that perfect rise and light crumb. Make sure yours is fresh (check the expiration date) for best results. Test it: Add a teaspoon to hot water—it should fizz vigorously.
Salt – Essential for balancing sweetness and enhancing all the other flavors, particularly the lemon. Never skip it, even in sweet recipes!
Eggs – Provide structure, richness, and help bind everything together. Room temperature eggs incorporate more easily and create better texture. Tip: If you forgot to take them out ahead, place them in a bowl of warm water for 5-10 minutes.
Sour Cream – The secret weapon for moisture! Full-fat sour cream adds incredible tenderness, moisture, and a subtle tang that complements the lemon beautifully. This is what keeps your loaf moist for days. Substitution: Greek yogurt or buttermilk work well, though sour cream gives the best results.
Vegetable Oil – Unlike butter (which can make cakes dry when cold), oil creates a supremely moist texture that stays tender even when refrigerated. Use a neutral-flavored oil like canola, vegetable, or light olive oil. Substitution: Melted coconut oil works, though it may slightly alter the flavor.
Fresh Lemon Zest – Where the magic happens! Lemon zest contains essential oils that deliver intense, aromatic citrus flavor without adding liquid. Always zest your lemons before juicing them—it’s much easier! Important: Only zest the yellow part; the white pith underneath is bitter.
Fresh Lemon Juice – Provides bright, tangy acidity that balances the sweetness and enhances the lemon flavor. Always use fresh-squeezed, never bottled—the difference is remarkable! Tip: Roll lemons firmly on the counter before juicing to release more juice. You’ll need about 3-4 medium lemons for this recipe.
Vanilla Extract – Enhances and rounds out all the other flavors while adding warmth and depth. Use pure vanilla extract for best results. Substitution: Vanilla bean paste adds beautiful vanilla specks.
Powdered Sugar (for glaze) – Creates a smooth, sweet glaze that hardens slightly into that signature crackly coating while staying slightly sticky. Sifting it prevents lumps in your glaze. No substitution: Granulated sugar won’t dissolve properly for a smooth glaze.
Milk or Lemon Juice (for glaze) – Thins the powdered sugar to the right consistency for glazing. Using lemon juice makes the glaze more intensely lemony, while milk creates a sweeter, milder glaze. Your choice: I love using half of each for the perfect balance!
Equipment Needed
Having the right tools makes baking this lemon loaf easy and enjoyable. Here’s everything you’ll need:
- 9×5-inch Loaf Pan – The standard size for quick breads, creating that perfect loaf shape. Metal pans conduct heat better than glass, giving you better browning, but both work. Important: Greasing and flouring (or using parchment paper) is essential for easy removal.
- Medium Mixing Bowls (2) – One for dry ingredients and one for wet ingredients. Mixing them separately before combining ensures even distribution.
- Whisk – For mixing dry ingredients together thoroughly and breaking up any lumps, as well as whisking the wet ingredients until smooth.
- Rubber Spatula or Wooden Spoon – For folding wet and dry ingredients together gently without overmixing. A rubber spatula is especially good for scraping down bowl sides.
- Electric Mixer (Optional) – While you can make this entirely by hand, an electric mixer makes quick work of combining ingredients smoothly. Either hand mixer or stand mixer works great.
- Microplane or Fine Grater – For zesting lemons. A microplane creates fine, fluffy zest that distributes evenly throughout the batter.
- Citrus Juicer – Makes extracting lemon juice much easier and more efficient. A handheld reamer or manual press juicer works perfectly.
- Measuring Cups and Spoons – Accurate measurements are crucial in baking! Use proper dry measuring cups and liquid measuring cups.
- Parchment Paper (Optional but Recommended) – Lining your loaf pan with parchment paper with overhang on the sides makes removing the loaf foolproof and cleanup easy.
- Cooling Rack – Essential for allowing air circulation around the loaf as it cools, preventing a soggy bottom.
- Toothpick or Cake Tester – For checking doneness. A toothpick inserted in the center should come out with just a few moist crumbs, not wet batter.
- Small Bowl – For mixing the glaze.
- Spoon or Small Whisk – For stirring the glaze until smooth.

Lemon Loaf Recipe
- Total Time: 1 hour 5 minutes
- Yield: 10 slices 1x
- Diet: Vegetarian
Description
Ultra-moist lemon loaf bursting with fresh lemon flavor and topped with a sweet-tart glaze. This easy copycat Starbucks lemon bread recipe delivers bakery-quality results every time with simple ingredients and foolproof instructions. Perfect for breakfast, brunch, or dessert!
Ingredients
For the Lemon Loaf:
- 1½ cups all-purpose flour
- 1 cup granulated sugar
- 1½ teaspoons baking powder
- ½ teaspoon salt
- 3 large eggs, room temperature
- ½ cup sour cream, room temperature
- ½ cup vegetable oil
- Zest of 2 large lemons (about 2 tablespoons)
- 2 tablespoons fresh lemon juice
- 1 teaspoon vanilla extract
For the Lemon Glaze:
- 1½ cups powdered sugar, sifted
- 3–4 tablespoons fresh lemon juice
- 1 tablespoon milk (optional, for sweeter glaze)
- Zest of 1 lemon (optional, for garnish)
Instructions
- Preheat and Prep: Preheat your oven to 350°F (175°C). Grease and flour a 9×5-inch loaf pan thoroughly, or line it with parchment paper leaving overhang on the long sides for easy removal. This step is crucial for preventing sticking!
- Mix Dry Ingredients: In a medium bowl, whisk together the flour, sugar, baking powder, and salt until well combined and no lumps remain. This ensures even distribution of leavening and prevents pockets of baking powder in your finished loaf.
- Combine Wet Ingredients: In a large bowl, whisk together the eggs, sour cream, vegetable oil, lemon zest, lemon juice, and vanilla extract until smooth and well combined. The mixture should be uniform and slightly pale yellow from the lemon zest. Whisk vigorously for about 30 seconds to incorporate some air.
- Combine Wet and Dry: Pour the dry ingredients into the bowl with wet ingredients. Using a rubber spatula, gently fold everything together just until no dry flour streaks remain. The batter will be thick and smooth. Important: Don’t overmix! Stop as soon as everything is incorporated. Overmixing develops gluten and creates a tough, dense loaf.
- Fill the Pan: Pour the batter into your prepared loaf pan and smooth the top with your spatula, spreading it evenly into the corners. The batter will be quite thick—this is normal and creates that perfect dense texture.
- Bake: Place in the preheated oven and bake for 48-55 minutes, until the top is golden brown and a toothpick inserted into the center comes out with just a few moist crumbs (not wet batter). The loaf should spring back lightly when touched, and the edges will start pulling away from the pan slightly.
- Cool Partially: Remove from the oven and let the loaf cool in the pan for about 15 minutes. This allows it to set up and makes it easier to remove without breaking. Don’t skip this cooling time!
- Remove from Pan: After 15 minutes, carefully lift the loaf out using the parchment paper overhang (if you used it) or gently run a knife around the edges and invert onto a cooling rack. Turn it right-side up and let it cool for another 15-20 minutes before glazing. The loaf should still be slightly warm but not hot.
- Make the Glaze: While the loaf cools, whisk together the sifted powdered sugar and lemon juice in a small bowl. Start with 3 tablespoons of lemon juice and add more if needed to reach your desired consistency. The glaze should be thick but pourable—it should flow slowly off the whisk. For a sweeter, milder glaze, replace 1 tablespoon of lemon juice with milk.
- Glaze the Loaf: Place the cooling rack over a baking sheet or parchment paper to catch drips. Pour the glaze over the top of the warm loaf, letting it drip down the sides naturally. Use a spoon or offset spatula to spread it if needed, but the glaze should flow on its own. If desired, sprinkle fresh lemon zest over the wet glaze as garnish.
- Set the Glaze: Let the glazed loaf sit for at least 30 minutes to allow the glaze to set slightly. It will form a beautiful crackly coating that’s slightly tacky to the touch—this is perfect! The glaze will continue to soak into the loaf slightly, making it even more moist and flavorful.
- Slice and Serve: Once the glaze has set, slice with a sharp knife, wiping the blade clean between slices for neat cuts. Serve and enjoy! The loaf can be served immediately or stored for later.
Notes
- Room Temperature Ingredients: Cold eggs and sour cream don’t incorporate as smoothly. Let them sit out for 30-60 minutes before baking, or quick-warm eggs in a bowl of warm water for 5 minutes.
- Fresh Lemon is Key: Never use bottled lemon juice. Fresh lemons provide significantly better flavor and aroma that makes this loaf special.
- Don’t Overbake: The loaf is done when a toothpick comes out with a few moist crumbs. If it comes out completely clean, you’ve slightly overbaked it. Better to err on the side of slightly underdone for maximum moisture.
- Glaze Consistency: If your glaze is too thick, add lemon juice ½ teaspoon at a time. If too thin, add more powdered sugar 1 tablespoon at a time.
- For Extra Lemon Punch: Poke holes all over the warm loaf with a toothpick before glazing so the glaze really soaks in!
- Storage Improves It: This loaf actually tastes better the next day after the glaze has fully soaked in and the flavors have melded.
- Prep Time: 15 minutes
- Cook Time: 50 minutes
- Category: Dessert
- Method: Baking
- Cuisine: American
Nutrition
- Serving Size: 1 slice (1/10 of loaf)
- Calories: 315
- Sugar: 32g
- Sodium: 195mg
- Fat: 13g
- Saturated Fat: 3g
- Unsaturated Fat: 9g
- Trans Fat: 0g
- Carbohydrates: 47g
- Fiber: 1g
- Protein: 4g
- Cholesterol: 60mg
Tips & Variations
Once you’ve mastered the classic version, these creative variations will keep your lemon loaf exciting and help you customize it to your preferences!
Flavor Variations:
- Lemon Poppy Seed: Fold 2 tablespoons of poppy seeds into the batter for that classic bakery combination with delightful texture and nutty flavor.
- Lemon Blueberry: Gently fold 1 cup of fresh or frozen blueberries (tossed in 1 tablespoon flour) into the batter for fruity bursts throughout. Increase baking time by 5-8 minutes.
- Lemon Lavender: Add 1-2 teaspoons of dried culinary lavender to the batter for an elegant, floral twist. Strain the lavender out of the lemon juice before adding, or grind it very finely.
- Meyer Lemon: Substitute Meyer lemons for regular lemons for a sweeter, more floral citrus flavor that’s less tart.
- Lemon Almond: Replace the vanilla with ½ teaspoon almond extract and add ¼ cup toasted sliced almonds to the batter for a sophisticated variation.
Glaze Alternatives:
- Cream Cheese Glaze: Mix 4 oz softened cream cheese with powdered sugar and lemon juice for a tangy, richer topping.
- Double Glaze: After the first glaze sets, apply a second thinner glaze for extra sweetness and moisture.
- Lemon Curd Filling: Slice the cooled loaf horizontally and spread lemon curd in the middle before glazing for an ultra-lemony surprise.
- No-Glaze Option: Skip the glaze entirely and dust with powdered sugar for a lighter, less sweet version that lets the lemon bread flavor shine.
Texture Modifications:
- Extra Moist Version: Replace 2 tablespoons of oil with melted butter, and add an extra tablespoon of sour cream.
- Lighter Texture: Replace ¼ cup all-purpose flour with cake flour for a more delicate, tender crumb.
- Mini Loaves: Divide batter among 3-4 mini loaf pans and reduce baking time to 28-35 minutes for perfect gift-sized portions.
- Muffin Version: Bake in a muffin tin for 18-22 minutes for individual lemon muffins that are perfect for grab-and-go breakfasts.
Add-Ins:
- White Chocolate Chips: Fold in ½ cup white chocolate chips for pockets of creamy sweetness.
- Coconut: Add ½ cup sweetened shredded coconut to the batter and top glaze with toasted coconut for tropical flair.
- Candied Lemon Peel: Top the glazed loaf with thin strips of candied lemon peel for elegant decoration and intense lemon flavor.
Pro Chef Tips
Want bakery-level results every time? These professional techniques will elevate your lemon loaf from good to absolutely phenomenal!
The Zesting Secret: The most flavor comes from lemon zest, not juice! The essential oils in the peel provide that intense, aromatic lemon flavor. Be generous with zest, and make sure you’re only getting the bright yellow part—the white pith underneath is bitter. Use a microplane zester for the finest, fluffiest zest that distributes beautifully throughout the batter.
Temperature Control: Room temperature ingredients are non-negotiable for smooth, even mixing. Cold eggs and sour cream create a lumpy batter that doesn’t incorporate properly and can result in a dense, uneven texture. Plan ahead and leave them on the counter for an hour, or use the warm water bowl trick for eggs. Your batter should be completely smooth and uniform.
The Folding Technique: Once you add the flour, handle the batter as little as possible. Use a rubber spatula and fold gently from the bottom up, rotating the bowl as you go. Mix just until the last streak of flour disappears—no more! Overmixing develops gluten, which creates a tough, chewy texture instead of tender and cake-like. About 15-20 gentle folds should do it.
Oil Over Butter: While butter adds flavor, oil creates superior moisture that lasts for days. Butter solidifies when cold, making cakes dry in the refrigerator, but oil stays liquid, keeping your loaf incredibly moist even when chilled. This is the secret to that signature Starbucks texture!
Sour Cream Makes the Difference: Don’t substitute low-fat or light sour cream—the full-fat version provides richness, moisture, and a subtle tang that makes this loaf special. The fat content is essential for the tender crumb texture.
The Toothpick Test: Start checking for doneness at 48 minutes. Insert a toothpick in the very center of the loaf (not near the edges, which cook faster). You want it to come out with a few moist crumbs clinging to it—if it’s completely clean, you’ve overbaked. If there’s wet batter, give it another 3-5 minutes. Every oven is different, so always rely on visual and textural cues rather than just timing.
Glaze Timing is Critical: Apply the glaze while the loaf is still slightly warm (but not hot). This allows the glaze to soak in slightly while also setting on the surface, creating that dual texture of a slightly crunchy exterior and ultra-moist interior. If the loaf is too hot, the glaze will melt and run off completely. Too cold, and it won’t absorb at all.
The Poke Trick: For even more moisture and lemon flavor, poke holes all over the top of the warm loaf with a toothpick before glazing. The glaze will seep into these channels, creating pockets of sweet lemony goodness throughout. This is especially effective if you want an intensely flavored loaf.
Patience with Slicing: Wait at least 30 minutes after glazing before slicing, or better yet, wait a few hours or overnight. The loaf needs time for the structure to fully set and the glaze to firm up. Cutting too soon will result in messy, crumbly slices. Use a sharp, serrated knife in a gentle sawing motion and wipe it clean between slices for picture-perfect cuts.
Day-Two Magic: This might sound counterintuitive, but lemon loaf actually improves on the second day! The glaze continues to soak in, the flavors meld and intensify, and the texture becomes even more moist and tender. If you’re making this for a special occasion, bake it the day before—your future self will thank you!
Common Mistakes to Avoid
Even a simple recipe can go wrong if you’re not aware of common pitfalls. Here’s what to watch out for to ensure perfect results every time:
Overmixing the Batter: This is the number one mistake that leads to tough, dense lemon bread with tunnels throughout. Once you add the flour to the wet ingredients, gluten begins developing. The more you mix, the more gluten develops, creating a chewy texture instead of tender and cake-like. Mix just until the flour is incorporated with no dry streaks remaining—typically 15-20 gentle folds with a spatula. It’s okay if the batter isn’t perfectly smooth; a few small lumps are fine and will bake out.
Using Bottled Lemon Juice: Bottled lemon juice tastes artificial, flat, and lacks the bright, aromatic quality of fresh lemons. It will make your loaf taste disappointing and chemical-like rather than vibrantly citrusy. Fresh lemons are essential to this recipe—there’s simply no substitute for that just-squeezed flavor and the essential oils in fresh zest.
Skipping the Room Temperature Step: Cold eggs and sour cream don’t emulsify properly with the other ingredients, leading to a curdled-looking batter that bakes up dense and uneven. The ingredients need to be at the same temperature to blend smoothly. This takes minimal planning—just set them out while you gather other ingredients and preheat the oven, and they’ll be ready to go.
Overbaking: A dry lemon loaf is a sad lemon loaf! Many bakers leave their loaf in too long, resulting in a crumbly, dry texture. Remember that the loaf continues cooking slightly from residual heat after you remove it from the oven. Check at 48 minutes, and pull it when a toothpick comes out with moist crumbs (not wet batter, but not bone-dry either). The top should be golden and spring back when lightly touched.
Incorrect Pan Size: Using a different size pan than specified will drastically affect baking time and results. A 9×5-inch pan is standard—if you use an 8×4-inch pan, your loaf will be taller and take longer to bake (possibly up to 10-15 minutes more). If you use a wider pan, it will be flatter and may overbake before you realize it. Stick to the specified size for best results, or adjust timing carefully if substituting.
Not Greasing the Pan Properly: Even with non-stick pans, your loaf can stick if you haven’t greased and floured (or lined with parchment) properly. Pay special attention to the corners and edges where sticking is most common. I highly recommend using parchment paper with overhang on the long sides—it makes removal foolproof and prevents any heartbreaking sticking disasters.
Glaze Too Thin or Too Thick: Glaze consistency matters! Too thin, and it runs right off, leaving just a light coating with no texture. Too thick, and it doesn’t spread smoothly and can look clumpy. Aim for the consistency of thick heavy cream—it should slowly drip off your whisk but not be watery. You can always adjust by adding more powdered sugar (to thicken) or more lemon juice (to thin) one teaspoon at a time.
Storage & Meal Prep
Proper storage keeps your lemon loaf moist and delicious for days! Here’s everything you need to know about keeping it fresh.
Room Temperature Storage: Store your lemon loaf at room temperature in an airtight container or wrapped tightly in plastic wrap for up to 5 days. The glaze acts as a protective barrier that helps seal in moisture. Keep it in a cool, dry place away from direct sunlight. Many people find that it actually tastes better after a day or two as the glaze soaks in and the flavors develop.
Refrigerator Storage: While not necessary, you can refrigerate lemon loaf for up to 1 week if you prefer to store it longer or if your kitchen is very warm. Wrap it tightly in plastic wrap or store in an airtight container. Because this recipe uses oil instead of butter, it stays remarkably moist even when cold—just bring it to room temperature for 20-30 minutes before serving for the best texture and flavor.
Slicing Strategy: For maximum freshness, only slice what you plan to eat and keep the remainder of the loaf whole. Every cut exposes more surface area to air, which speeds up drying. If you do slice the whole loaf, press plastic wrap directly against the cut surface before storing to minimize air exposure.
Individual Wrapping: If you want to grab single servings throughout the week, slice the loaf and wrap each piece individually in plastic wrap. Store the wrapped slices in an airtight container or zip-top bag. This makes it easy to pack in lunches or grab a quick breakfast treat.
Refreshing Day-Old Loaf: If your lemon loaf has dried out slightly after a few days (though it shouldn’t with proper storage), you can refresh it by warming individual slices in the microwave for 10-15 seconds. This softens the texture and brings back some of that just-baked moisture.
Glaze Care: If you notice the glaze becoming sticky in humid weather, you can lightly dust the loaf with powdered sugar to absorb some moisture. In dry climates, the glaze may harden completely—this is normal and doesn’t affect taste, just texture.
Make-Ahead & Freezer Notes
This lemon loaf is perfect for making ahead, and it freezes beautifully! Here’s how to plan for maximum convenience.
Make-Ahead for Events: This loaf is actually better the next day after the glaze has fully soaked in and the flavors have melded. For parties, brunch gatherings, or gifts, bake it 1-2 days ahead and store it covered at room temperature. It will be perfectly moist and flavorful when you’re ready to serve.
Freezing Glazed Loaf: Yes, you can freeze the complete glazed loaf! Let it cool completely and allow the glaze to set fully (at least 2 hours). Wrap it tightly in two layers of plastic wrap, making sure there are no exposed areas, then wrap it in a layer of aluminum foil. Label with the date and freeze for up to 3 months. The glaze freezes well and will look beautiful when thawed.
Freezing Unglazed Loaf: For the freshest glaze flavor, you can also freeze the loaf before glazing. Wrap the completely cooled loaf tightly in plastic wrap and aluminum foil, then freeze for up to 3 months. When ready to serve, thaw it and make fresh glaze to pour over—it will taste like it was just baked!
Freezing Individual Slices: Slice the loaf (glazed or unglazed), then wrap each slice individually in plastic wrap. Place wrapped slices in a freezer-safe zip-top bag or container. This lets you pull out one or two slices at a time for easy grab-and-go treats. Slices can be frozen for up to 3 months.
Proper Thawing Method: Always thaw lemon loaf in the refrigerator for best results. A whole loaf takes 6-8 hours (or overnight), while individual slices need about 2-3 hours. Never thaw at room temperature for extended periods, as this can create condensation and make the exterior sticky.
Quick Thaw for Slices: If you need a frozen slice quickly, you can microwave it for 20-30 seconds (if unglazed) or let it sit at room temperature for 30-45 minutes (if glazed). The microwave method works better for unglazed slices since microwaving can make the glaze very sticky.
Refreshing After Freezing: After thawing, the loaf should taste nearly identical to fresh. If you notice any slight dryness, warm slices for 10-15 seconds in the microwave to restore moisture. You can also add a fresh drizzle of glaze over the top for extra moisture and visual appeal.
Batter Freezing: Unfortunately, you cannot freeze the unbaked batter. The baking powder activates when it comes into contact with liquid, so freezing and thawing would result in a dense loaf that doesn’t rise properly. Always bake first, then freeze.
Glaze Separately: If you’re freezing for long-term storage (2-3 months), consider freezing the loaf unglazed and making fresh glaze when you’re ready to serve. This ensures the brightest, freshest lemon flavor possible.
Serving Suggestions
This versatile lemon loaf works beautifully in so many settings! Here are delicious ways to serve and enjoy it:
Classic Coffee Shop Style: Slice thick, generous pieces and serve alongside your favorite coffee, espresso, latte, or cappuccino. The citrusy brightness cuts through rich coffee perfectly. Add a pat of butter on the side if desired—some people love spreading a little butter on their lemon bread for extra richness.
Elegant Tea Time: This lemon loaf is absolutely perfect for afternoon tea! Serve thin slices on a pretty cake stand or tiered server with hot tea (Earl Grey or English Breakfast pair beautifully), small tea sandwiches, and fresh strawberries. It’s sophisticated enough for a fancy tea party but approachable enough for casual gatherings.
Weekend Brunch Star: Make your brunch spread special by including this lemon loaf alongside scrambled eggs, crispy bacon, fresh fruit salad, yogurt parfaits, and freshly squeezed orange juice. The bright lemon flavor wakes up your palate and complements both sweet and savory breakfast items beautifully.
Dessert Upgrade: Transform simple slices into elegant desserts! Serve warm slices with a scoop of vanilla ice cream or lemon sorbet, a dollop of fresh whipped cream, and fresh berries. Drizzle with raspberry coulis or white chocolate sauce for restaurant-quality presentation.
French Toast Variation: Use day-old lemon loaf slices to make the most incredible French toast! Dip in an egg-milk mixture, cook in butter until golden, and serve with maple syrup and fresh berries for a breakfast that will blow minds.
Beverage Pairings:
- Hot beverages: Coffee, espresso, chai tea, English Breakfast tea, green tea, hot chocolate
- Cold beverages: Iced coffee, lemonade, iced tea (sweetened or unsweetened), sparkling water with lemon
- Adult pairings: Champagne, Prosecco, sweet white wine (Moscato, Riesling), limoncello (for a very lemony experience!)
Topping Ideas:
- Fresh whipped cream with a sprinkle of lemon zest
- Cream cheese frosting for extra richness
- Lemon curd spread between slices for a layered effect
- Fresh berries (strawberries, blueberries, or raspberries)
- Candied lemon slices for elegant decoration
- A dusting of powdered sugar
- Vanilla bean ice cream or gelato
Gift Presentation: Wrap cooled, glazed loaf in clear cellophane tied with a pretty ribbon, or place in a decorative loaf pan wrapped with a bow. Include a recipe card attached to the ribbon. This makes a thoughtful hostess gift, thank-you present, or holiday gift from your kitchen.
Breakfast On-The-Go: Pack individual slices in lunch boxes, wrap in napkins for morning commutes, or enjoy as a quick breakfast with a travel mug of coffee. It’s substantial enough to be satisfying but not heavy, making it perfect for busy mornings.
Special Occasion Centerpiece: Dust the top with powdered sugar, arrange fresh lemon slices around the base, and add edible flowers (like pansies or violas) for a stunning brunch or baby shower centerpiece that’s both beautiful and delicious.
FAQs Section
Q: Why is my lemon loaf dense and heavy instead of light and tender?
A: Dense lemon loaf typically results from overmixing the batter or using old/expired baking powder. Once you add the flour to the wet ingredients, mix gently just until combined—no dry flour streaks should remain, but don’t keep mixing to get a perfectly smooth batter. Overmixing develops gluten, which creates that heavy, tough texture. Also, test your baking powder by adding a teaspoon to hot water—it should fizz vigorously. If it doesn’t, it’s expired and needs replacement. Finally, make sure you’re measuring flour correctly by spooning it into the measuring cup and leveling off, not scooping directly from the bag, which packs in too much flour.
Q: Can I make this recipe dairy-free?
A: Yes, with some substitutions! Replace the sour cream with dairy-free yogurt (like coconut or almond milk yogurt), and use a non-dairy milk in the glaze instead of regular milk. The oil in this recipe is already dairy-free, which makes the conversion easier than butter-based cakes. The texture may be slightly different, but it should still be delicious and moist. Make sure your dairy-free yogurt has a similar fat content to full-fat sour cream for best results.
Q: My glaze is too runny and won’t stay on the loaf. How do I fix it?
A: Your glaze needs more powdered sugar to thicken it up! Add powdered sugar one tablespoon at a time, whisking thoroughly after each addition until you reach the right consistency. The glaze should be thick enough to slowly drip off your whisk—about the consistency of thick honey or heavy cream. If you’ve already poured it on and it ran right off, let the loaf sit for 10 minutes to absorb what did stick, then make a thicker second batch of glaze and apply it over the top. Also make sure you’re applying glaze to a warm (not hot) loaf—it adheres better to a slightly warm surface.
Q: Can I use a different size loaf pan?
A: While a 9×5-inch pan is standard and recommended, you can use an 8×4-inch pan—your loaf will just be taller and will need an additional 8-12 minutes of baking time (check at 60 minutes). Keep a close eye on it and test for doneness with a toothpick. If you use a significantly different size or shape (like a bundt pan or round cake pan), baking times will vary considerably and the results may be unpredictable. For best results, stick with the specified loaf pan size or use mini loaf pans and adjust time to 30-38 minutes.
Q: My loaf cracked on top. Is that normal?
A: Yes! A crack down the center of quick breads and pound cakes is completely normal and actually desirable—it’s a sign that your loaf rose properly in the oven. As the loaf bakes, the center (which takes longest to set) continues rising and pushing upward, creating that characteristic crack. This is not a mistake! The glaze will fill in and cover any cracks, so it will look beautiful when finished. Deep, dramatic cracks can sometimes indicate your oven is too hot, so if it concerns you, verify your oven temperature with an oven thermometer.
Q: How can I make my lemon flavor even stronger?
A: Great question for true lemon lovers! Try these tricks: (1) Add extra lemon zest—go up to 3 tablespoons for maximum citrus punch. (2) Poke holes all over the warm loaf with a toothpick before glazing so the glaze really soaks in. (3) Use only lemon juice (no milk) in your glaze for a tangier coating. (4) Brush the loaf with a simple syrup made from equal parts lemon juice and sugar before adding the glaze. (5) Add ¼ teaspoon lemon extract to the batter along with the vanilla for an extra boost. Any combination of these will intensify that wonderful lemon flavor!
Q: Can I make muffins instead of a loaf?
A: Absolutely! This batter works perfectly for muffins. Fill standard muffin cups about ¾ full (you’ll get 10-12 muffins) and bake at 350°F for 18-22 minutes until golden and a toothpick comes out with moist crumbs. Let them cool slightly, then dip the tops in the lemon glaze or drizzle it over. Lemon muffins are perfect for portion control, freeze beautifully individually, and make grab-and-go breakfasts super convenient!
Q: My loaf sank in the middle after I took it out of the oven. What happened?
A: A sunken center usually means the loaf was underbaked—the structure hadn’t set firmly enough in the middle to support itself. Even though the toothpick might have come out looking clean, the very center was still too wet to hold up. Next time, leave it in the oven for a few more minutes, or check with a toothpick in multiple spots (not just one) to ensure it’s done throughout. Opening the oven door too early or too frequently can also cause sinking, as temperature fluctuations interrupt the rising process. Wait at least 40 minutes before checking on your loaf.
Conclusion
If you’ve been searching for the perfect lemon loaf recipe that delivers bakery-quality results every single time, your search ends here! This moist lemon bread has everything you could want—incredible lemony flavor, that signature tender-yet-dense texture, and a gorgeous glossy glaze that makes every slice irresistible. Best of all, it comes together with simple ingredients you probably already have and techniques that even beginner bakers can master with confidence.
This Starbucks lemon loaf copycat has become an absolute staple in my kitchen, and I know it will in yours too! Whether you’re enjoying a thick slice with your morning coffee, serving it as an elegant dessert with tea, gifting it to someone special, or simply treating yourself to a little homemade happiness, this easy lemon bread recipe never disappoints. The bright, sunny citrus flavor brings joy to any day, and there’s something so satisfying about creating something this delicious with your own hands.
I truly hope this recipe brings as much happiness to your kitchen as it has to mine! The beauty of this lemon loaf is that it’s both special enough for celebrations and simple enough for ordinary weekdays that need a little brightening. Once you make it the first time and taste that perfect combination of sweet, tangy, moist, and tender, you’ll understand why it’s earned such a devoted following among home bakers everywhere.
Ready to bake the best lemon loaf of your life? Save this recipe to your Pinterest boards so you’ll always have it when the craving strikes! I would absolutely LOVE to see your beautiful golden loaves—please snap a photo and share it on social media, tagging me so I can celebrate your baking success! Leave a comment below telling me what you thought—did you try any variations? What occasion did you bake it for? Your feedback, photos, and stories inspire me and help other readers feel confident trying this recipe.
So what are you waiting for? Grab those lemons, preheat your oven, and get ready to fill your home with the most incredible citrusy aroma! Your taste buds are about to thank you for this homemade lemon loaf that proves the very best treats are the ones made in your own kitchen with love. Happy baking