
If you’re looking for a dinner recipe that delivers maximum flavor with minimal effort, this honey garlic chicken is exactly what you need. This easy honey garlic chicken features tender, juicy chicken breasts or thighs coated in a glossy, sweet-and-savory sauce that perfectly balances honey’s natural sweetness with the pungent, aromatic kick of fresh garlic. The sauce caramelizes beautifully as it cooks, creating a sticky, finger-licking coating that clings to every bite of chicken. Unlike heavy, complicated sauces, this one uses just a handful of ingredients you probably already have in your pantry.
This quick honey garlic chicken recipe is perfect for busy weeknights when you need dinner on the table fast, meal prep Sundays when you’re cooking for the week ahead, family dinners where you need something universally loved, or even date nights when you want to impress without spending hours in the kitchen. Ready in just 30 minutes from start to finish, it’s straightforward enough for beginner cooks yet delicious enough to serve to guests. Kids absolutely love the sweet sauce, while adults appreciate the complex garlic flavor and how well it pairs with rice, vegetables, or noodles. Whether you’re feeding two people or a crowd, this versatile recipe scales beautifully and consistently delivers restaurant-quality results that will have everyone asking for seconds and requesting the recipe.
History / Background
Honey garlic sauce as a flavor combination has roots in multiple culinary traditions, making it a truly global favorite. The pairing of honey and garlic appears in ancient cuisines across Asia, the Mediterranean, and the Middle East, where both ingredients have been culinary staples for thousands of years.
In Chinese cuisine, honey-based sauces combined with garlic have been used for centuries, particularly in Cantonese cooking where sweet-savory balance is fundamental. The technique of creating glossy, caramelized sauces that coat proteins is a hallmark of Cantonese restaurant cooking. When Chinese immigrants came to North America, they adapted their traditional recipes to local tastes and available ingredients, creating the Chinese-American cuisine we know today.
Honey garlic chicken as we know it emerged in the mid-to-late 20th century as part of the North American Chinese food phenomenon. It shares DNA with popular dishes like honey garlic pork, honey garlic spare ribs, and various sweet-and-sour preparations. The sauce’s appeal transcends cultural boundaries—it combines the universal love of sweetness with the aromatic complexity of garlic that appears in virtually every world cuisine.
The dish gained particular popularity in the 1980s and 1990s as home cooks sought quick, flavorful dinners that mimicked restaurant takeout. Unlike complex stir-fries requiring specialty ingredients, honey garlic chicken uses pantry staples: honey, soy sauce, garlic, and basic seasonings. This accessibility made it perfect for busy families wanting homemade meals without extensive prep.
Interestingly, honey garlic has also become a popular wing sauce in North American bars and restaurants, showing its versatility beyond just chicken breast preparations. The sauce’s ability to caramelize and create that addictive sticky coating makes it perfect for any protein.
Today, honey garlic chicken represents comfort food fusion at its best—drawing inspiration from Asian cooking techniques while being thoroughly adapted to Western home cooking patterns and ingredient accessibility. It’s become so mainstream that most people don’t think of it as fusion or ethnic food—it’s simply a beloved family dinner that happens to have delicious cross-cultural roots.
Why You’ll Love This Recipe
This honey garlic chicken isn’t just another chicken recipe—it’s the kind of dinner that makes weeknights feel special without requiring special effort. The sauce is absolutely addictive, with that perfect sweet-savory balance that keeps you reaching for just one more bite. The chicken stays incredibly juicy and tender, never dry or overcooked, while the sauce creates a beautiful glossy coating that looks restaurant-quality. Here’s why this recipe will become your new weeknight hero:
- Ready in 30 minutes – Faster than ordering takeout and infinitely more delicious
- One-pan dinner – Everything cooks in a single skillet for easy cleanup
- Kid-approved – The sweet sauce makes this a guaranteed hit with picky eaters
- Budget-friendly – Uses affordable chicken and pantry staples you likely have
- Meal prep perfect – Makes excellent leftovers that reheat beautifully
- Versatile protein – Works with chicken breasts, thighs, wings, or even drumsticks
- Restaurant-quality – Tastes like expensive takeout but costs a fraction
- Customizable spice – Easily adjust from mild to spicy based on preferences
- No exotic ingredients – Simple pantry staples create incredible flavor
- Scales easily – Double or triple for meal prep or feeding a crowd
Ingredient Notes
Understanding your ingredients creates cooking success. Here’s what you need and why each component matters:
Chicken: Boneless, skinless chicken breasts or thighs both work beautifully. Breasts are leaner and cook faster; thighs are juicier and more forgiving. Cut into bite-sized pieces (about 1-inch cubes) for quick, even cooking and maximum sauce coverage. You can also use chicken tenders, wings, or drumsticks—just adjust cooking time accordingly.
Honey: The star sweetener that gives this dish its signature flavor. Use real honey, not pancake syrup or honey-flavored corn syrup. Different honey varieties create subtle flavor variations—clover honey is mild and sweet, while buckwheat honey is darker and more robust. Any pure honey works, so use what you have or prefer.
Soy Sauce: Provides salty, umami depth that balances honey’s sweetness. Regular soy sauce works perfectly; low-sodium gives you better control over saltiness. For gluten-free version, use tamari or coconut aminos. Dark soy sauce adds color but isn’t necessary.
Garlic: Fresh garlic is absolutely crucial for authentic, vibrant flavor. You’ll need 4-6 cloves, minced finely. Pre-minced jarred garlic works in a pinch but lacks the bright, pungent flavor of fresh. Don’t skip or reduce the garlic—it’s half the flavor equation!
Rice Vinegar: Adds tang that cuts through sweetness and brightens the entire sauce. Apple cider vinegar or white wine vinegar can substitute. Don’t use plain white vinegar—it’s too harsh.
Cornstarch: Thickens the sauce to that perfect glossy, clingy consistency. It also creates a light coating on chicken that helps it brown and keeps it juicy. You can substitute with arrowroot powder.
Vegetable Oil: For searing chicken. Use neutral oils with high smoke points like vegetable, canola, or grapeseed oil. Avoid olive oil which can’t handle the high heat needed for proper browning.
Ginger: Fresh grated ginger adds warm, aromatic complexity. It’s optional but highly recommended. Use about 1 teaspoon of freshly grated ginger or ½ teaspoon ground ginger.
Sesame Oil: Just a teaspoon at the end adds nutty, toasted flavor that makes the dish taste more authentic. It’s optional but makes a noticeable difference.
Red Pepper Flakes: Optional for those who like heat. Start with ¼ teaspoon and adjust to taste. The heat balances the sweetness beautifully.
Green Onions and Sesame Seeds: For garnish. They add fresh flavor, visual appeal, and textural contrast to the finished dish.
Equipment Needed
This simple recipe requires minimal equipment you probably already own:
- Large skillet or wok (12-inch) – For cooking chicken and sauce; non-stick or stainless steel both work
- Small mixing bowl – For whisking together sauce ingredients
- Whisk or fork – For mixing sauce smoothly
- Sharp knife and cutting board – For cutting chicken and mincing garlic
- Measuring cups and spoons – For accurate ingredient amounts
- Wooden spoon or silicone spatula – For stirring chicken and sauce
- Tongs or spatula – For flipping chicken pieces
- Small bowl – For coating chicken with cornstarch
- Grater or microplane – For fresh ginger if using
Honey Garlic Chicken Recipe
- Total Time: 30 minutes
- Yield: 4 servings 1x
- Diet: Gluten Free
Description
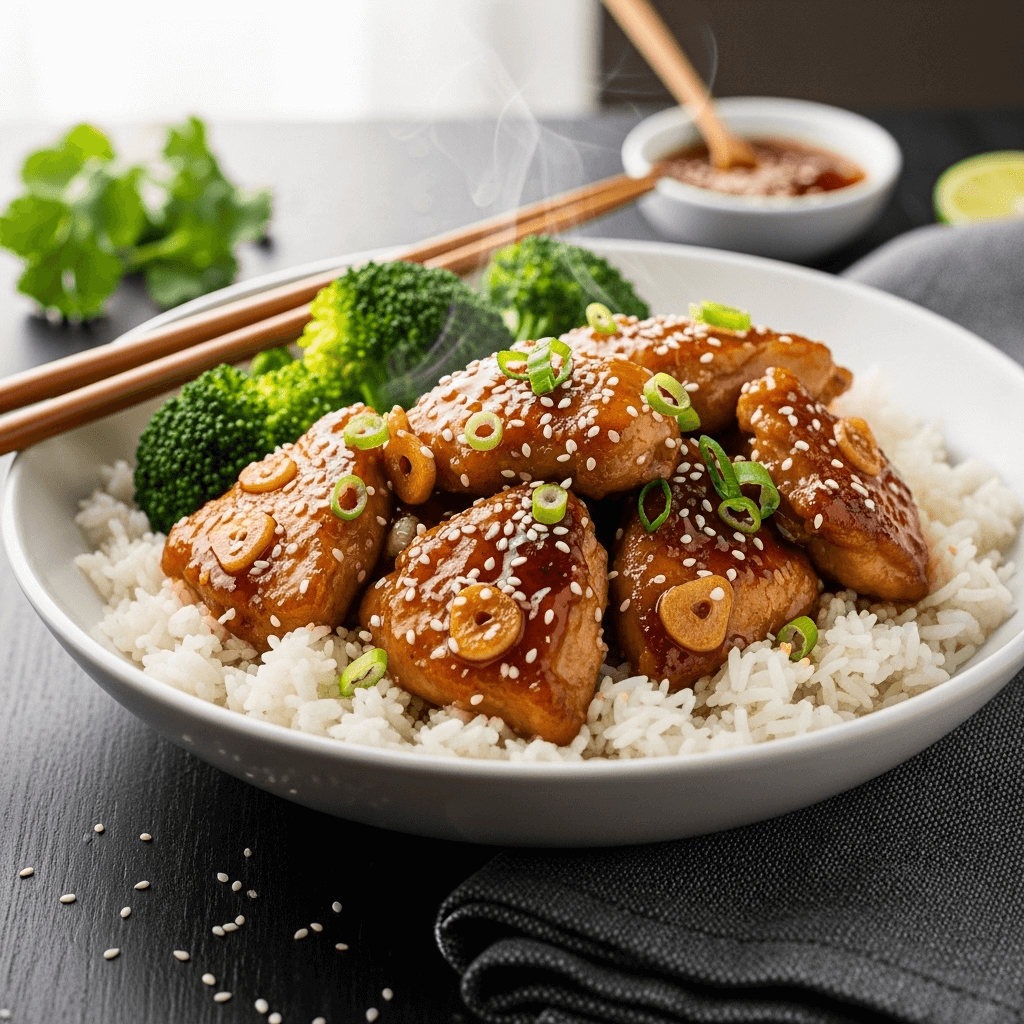
Easy honey garlic chicken with tender chicken pieces coated in a sweet, savory, sticky sauce. This quick 30-minute dinner is better than takeout and perfect for busy weeknights.
Ingredients
For the Chicken:
- 1½ pounds boneless, skinless chicken breasts or thighs, cut into 1-inch pieces
- 3 tablespoons cornstarch
- ¼ teaspoon salt
- ¼ teaspoon black pepper
- 2 tablespoons vegetable oil
For the Honey Garlic Sauce:
- ⅓ cup honey
- ¼ cup soy sauce (or tamari for gluten-free)
- 5–6 cloves garlic, minced
- 2 tablespoons rice vinegar
- 1 teaspoon fresh grated ginger (optional)
- 1 teaspoon sesame oil (optional)
- ¼ teaspoon red pepper flakes (optional, for heat)
- 1 tablespoon water
For Garnish:
- 2 green onions, sliced
- 1 tablespoon sesame seeds
- Fresh cilantro (optional)
Instructions
- Prepare the Chicken: Pat chicken pieces completely dry with paper towels—this is crucial for good browning. Cut into uniform 1-inch pieces so they cook evenly.
- Coat with Cornstarch: In a small bowl, combine cornstarch, salt, and pepper. Add chicken pieces and toss until evenly coated. The cornstarch creates a light coating that helps chicken brown beautifully and keeps it juicy.
- Make the Sauce: In a small bowl, whisk together honey, soy sauce, minced garlic, rice vinegar, ginger (if using), sesame oil (if using), red pepper flakes (if using), and water. Set aside. Having your sauce pre-mixed allows you to add it quickly during cooking.
- Heat the Pan: Heat a large skillet or wok over medium-high heat. Add vegetable oil and swirl to coat the bottom. Let oil get hot—you should see it shimmer slightly.
- Cook the Chicken: Add coated chicken pieces in a single layer, leaving space between pieces. Don’t overcrowd the pan or chicken will steam instead of brown. Cook without moving for 3-4 minutes until golden brown on the bottom.
- Flip and Continue: Flip chicken pieces using tongs or spatula. Cook another 3-4 minutes until second side is golden and chicken is cooked through (internal temperature should reach 165°F). The chicken doesn’t need to be fully cooked yet—it will finish in the sauce.
- Add the Sauce: Reduce heat to medium. Pour the honey garlic sauce over the chicken. Stir to coat all pieces evenly.
- Simmer and Thicken: Let the sauce simmer for 3-5 minutes, stirring frequently, until it thickens and becomes glossy. The sauce will reduce and coat the chicken beautifully. If sauce gets too thick, add a tablespoon of water. If too thin, let it simmer longer.
- Check Doneness: Ensure chicken is fully cooked through—no pink remaining and juices run clear. Cut into a piece to check if needed.
- Garnish and Serve: Remove from heat. Sprinkle with sliced green onions and sesame seeds. Serve immediately over rice, noodles, or with vegetables. The sauce is delicious drizzled over everything!
Notes
- For crispier chicken: Let chicken pieces sit undisturbed for 3-4 minutes before flipping to develop good crust
- Sauce consistency: It thickens as it cools, so don’t overreduce it on the stove
- Batch cooking: If making a double batch, cook chicken in batches to avoid crowding
- Gluten-free: Use tamari or coconut aminos instead of soy sauce
- Spice level: Adjust red pepper flakes to taste, or omit for kid-friendly version
- Storage: Refrigerate leftovers up to 4 days; reheat gently with splash of water
- Prep Time: 10 minutes
- Cook Time: 20 minutes
- Category: Dinner
- Method: Stovetop
- Cuisine: Asian-Inspired
Nutrition
- Serving Size: About 6 oz chicken with sauce
- Calories: 380
- Sugar: 19g
- Sodium: 720mg
- Fat: 12g
- Saturated Fat: 2g
- Unsaturated Fat: 9g
- Trans Fat: 0g
- Carbohydrates: 32g
- Fiber: 0g
- Protein: 38g
- Cholesterol: 110mg
Tips & Variations
Protein Variations:
- Shrimp: Use 1½ pounds large shrimp, cook for just 2-3 minutes per side
- Pork: Use pork tenderloin cut into medallions
- Salmon: Use salmon fillets, cook skin-side down first
- Tofu: Use extra-firm tofu, pressed and cubed, for vegetarian version
- Meatballs: Use frozen meatballs, simmer in sauce until heated through
Sauce Variations:
- Spicy Honey Garlic: Add 1-2 teaspoons sriracha or chili garlic sauce
- Orange Honey Garlic: Add 2 tablespoons orange juice and 1 teaspoon orange zest
- Teriyaki Style: Add 1 tablespoon mirin and reduce honey slightly
- Maple Garlic: Replace honey with pure maple syrup
- Lemon Garlic: Add 2 tablespoons fresh lemon juice for brightness
Vegetable Add-Ins:
- Broccoli florets (add with sauce, cook until tender-crisp)
- Bell pepper strips (sauté with chicken)
- Snap peas or snow peas (add last 2 minutes)
- Sliced mushrooms (cook before chicken, remove and add back)
- Baby corn and water chestnuts for takeout style
Serving Style Options:
- Rice Bowls: Serve over white or brown rice with steamed vegetables
- Noodle Bowls: Toss with lo mein noodles or rice noodles
- Lettuce Wraps: Serve in butter lettuce cups for low-carb option
- Meal Prep: Portion with rice and vegetables for grab-and-go lunches
Pro Chef Tips
Dry Chicken = Better Browning: Moisture is the enemy of a good sear. Pat chicken pieces completely dry with paper towels before coating with cornstarch. Wet chicken steams rather than browns, and you’ll miss out on that delicious caramelization.
Don’t Overcrowd the Pan: Give chicken pieces space! Overcrowding lowers the pan temperature, causing chicken to steam and release moisture instead of browning. Cook in batches if necessary—it’s worth the extra time for properly browned chicken that stays juicy.
Let Chicken Sit Before Flipping: Resist the urge to constantly move chicken around. Let it sit undisturbed for 3-4 minutes to develop a golden crust. You’ll know it’s ready to flip when it releases easily from the pan.
Control the Heat: Medium-high heat for browning chicken, then reduce to medium when adding sauce. Too-high heat burns the garlic and honey; too-low heat won’t reduce the sauce properly. Adjust as needed based on your stove.
Fresh Garlic Makes All the Difference: While jarred minced garlic is convenient, fresh garlic provides that sharp, pungent, aromatic flavor that defines this dish. Take the extra minute to mince fresh garlic—your taste buds will thank you.
Sauce Thickens as It Cools: The cornstarch-thickened sauce continues thickening off the heat. Remove from heat when sauce looks slightly thinner than desired consistency. It will be perfect by serving time.
Save Some Sauce: If serving over rice or noodles, reserve a bit of sauce to drizzle over the entire dish. The extra sauce makes everything more flavorful and creates a more cohesive meal.
Common Mistakes to Avoid
Mistake #1: Using Wet Chicken – Moisture prevents browning and causes chicken to steam instead of sear, resulting in pale, rubbery chicken that lacks flavor. Always pat chicken completely dry with paper towels before coating with cornstarch. This simple step dramatically improves the final texture and appearance.
Mistake #2: Cooking on Too-High Heat – While you need high heat for browning, keeping it too high when adding the sauce burns the honey and garlic, creating bitter, acrid flavors. Once you add sauce, reduce heat to medium and watch carefully. The sauce should bubble gently, not violently.
Mistake #3: Adding Sauce to Raw Chicken – Some cooks add sauce immediately instead of browning chicken first. This creates boiled chicken in sauce rather than caramelized chicken coated in sauce. Always brown chicken first, then add sauce for proper texture and flavor development.
Mistake #4: Overcooking the Chicken – Chicken breast especially dries out quickly. Since chicken continues cooking in the sauce, you don’t need it fully cooked before adding sauce. Pull it from heat when internal temp reaches 160°F—it will reach safe 165°F while finishing in sauce.
Mistake #5: Not Tasting and Adjusting – Honey sweetness varies, garlic intensity varies, and soy sauce saltiness varies by brand. Always taste the sauce before serving and adjust—add more honey for sweetness, soy sauce for saltiness, or vinegar for tang. Your palate is the best judge.
Storage & Meal Prep
Refrigerator Storage: Let chicken cool to room temperature (within 2 hours for food safety), then transfer to airtight containers. Store in refrigerator for up to 4 days. The sauce thickens considerably when cold—this is normal and expected.
Reheating Instructions: Stovetop reheating works best. Place chicken and sauce in a skillet over medium-low heat, add 2-3 tablespoons of water, and heat gently until warmed through, about 5-7 minutes. Microwave works too—heat on 70% power in 1-minute intervals, stirring between, adding water if needed.
Meal Prep Strategy: This recipe is perfect for meal prep. Cook a large batch on Sunday, portion into containers with rice and vegetables, and you have ready-to-go lunches all week. The flavors actually improve after a day as they meld together.
Keeping Chicken Tender: When reheating, add a splash of water or broth to prevent drying out. The liquid refreshes the sauce and keeps chicken moist. Don’t overheat—gentle warming preserves texture.
Separate Storage Option: For optimal texture, store chicken and sauce separately from rice or noodles. Combine when reheating. This prevents rice from absorbing all the sauce and becoming mushy.
Make-Ahead & Freezer Notes
Prep Ahead: Cut chicken and prepare sauce up to 1 day ahead. Store separately in refrigerator. When ready to cook, the actual cooking takes only 20 minutes—perfect for quick weeknight dinners.
Freezing Cooked Chicken: Honey garlic chicken freezes beautifully. Let cool completely, portion into freezer-safe containers with sauce, and freeze for up to 3 months. Leave some headspace for expansion.
Thawing and Reheating: Thaw overnight in refrigerator. Reheat gently on stovetop with added water to restore sauce consistency. You can also microwave from frozen—heat on 50% power, stirring every few minutes, until heated through.
Freezing Raw Marinated Chicken: Place cut chicken and sauce ingredients in a freezer bag, remove air, seal, and freeze. Thaw overnight, then cook as directed. This “dump and cook” method is incredibly convenient for busy nights.
Not Recommended: Freezing with rice or vegetables isn’t ideal—they become mushy upon thawing. Freeze chicken and sauce only, then serve with freshly cooked rice or vegetables for best texture.
Serving Suggestions
Honey garlic chicken is versatile and pairs beautifully with numerous sides and accompaniments:
Rice Options: White rice (jasmine or basmati), brown rice, fried rice, coconut rice, or cauliflower rice for low-carb option. The sauce is absolutely delicious over rice.
Noodle Pairings: Lo mein noodles, rice noodles, udon noodles, or even spaghetti work well. Toss noodles directly in the sauce for maximum flavor.
Vegetable Sides: Steamed broccoli, roasted Brussels sprouts, stir-fried bok choy, sautéed green beans, or Asian-style slaw. The vegetables soak up the extra sauce beautifully.
Asian-Inspired Sides: Egg rolls, spring rolls, pot stickers, edamame, or cucumber salad for a complete takeout-style meal at home.
Fresh Elements: Serve with lime wedges for squeezing, fresh cilantro for garnish, or pickled vegetables for tangy contrast to the sweet sauce.
Beverage Pairings: Iced green tea, lemonade, ginger ale, or for adults, Riesling, Gewürztraminer, or light lager beer complement the sweet-savory flavors.
Make it a Bowl: Create honey garlic chicken bowls with rice, steamed vegetables, sliced avocado, pickled carrots, and extra sauce drizzled over everything.
FAQs Section
Q: Can I use chicken thighs instead of breasts?
A: Absolutely! Chicken thighs are actually preferred by many cooks because they’re more flavorful, juicier, and more forgiving (harder to overcook). They may need an extra minute or two of cooking time. Both boneless and bone-in thighs work—just adjust cooking time for bone-in.
Q: How do I make this less sweet?
A: Reduce honey to ¼ cup and increase soy sauce by 1-2 tablespoons. You can also add an extra tablespoon of rice vinegar to balance sweetness with tang. Taste and adjust until you find your perfect balance.
Q: Can I make this in a slow cooker?
A: Yes! Brown chicken first for best flavor, then transfer to slow cooker with sauce. Cook on low for 3-4 hours or high for 2-3 hours. The sauce won’t be as thick, so mix 1 tablespoon cornstarch with 2 tablespoons water and stir in during the last 30 minutes.
Q: Is this recipe keto-friendly?
A: Not as written due to honey’s sugar content. For keto version, substitute honey with sugar-free honey alternative or use powdered erythritol (about 3 tablespoons). You can also use just 2 tablespoons honey for reduced carbs while maintaining some sweetness.
Q: Why is my sauce not thickening?
A: The cornstarch coating on chicken should thicken sauce, but if it’s still thin, mix 1 teaspoon cornstarch with 1 tablespoon cold water to make a slurry. Stir into simmering sauce and cook for 1-2 minutes until thickened.
Q: Can I use bottled garlic?
A: You can, though fresh garlic tastes significantly better. If using jarred minced garlic, you’ll need about 2 tablespoons. The flavor won’t be quite as bright and pungent, but it works in a pinch for convenience.
Q: How do I prevent burning the garlic?
A: Add garlic to the sauce, not directly to the hot oil. If you’re sautéing garlic first (some variations do this), cook on medium heat for just 30 seconds until fragrant, then immediately add liquids. Garlic burns quickly and becomes bitter.
Conclusion
And there you have it—everything you need to create incredibly delicious, restaurant-quality honey garlic chicken right in your own kitchen! This recipe proves that you don’t need complicated techniques or exotic ingredients to make something truly special. With simple pantry staples, basic cooking methods, and just 30 minutes, you can create a dinner that rivals any takeout and costs a fraction of the price.
The beauty of this honey garlic chicken lies in its versatility and crowd-pleasing appeal. Make it for busy weeknight dinners, meal prep it for easy lunches, serve it to picky kids who love the sweet sauce, or plate it beautifully for date night. However you choose to enjoy it, this reliable recipe delivers consistent, delicious results every single time.
I’d love to hear about your honey garlic chicken adventures! Did you try any of the variations? What sides did your family love with it? Do you prefer chicken breasts or thighs? Drop a comment below and share your experience—I always enjoy connecting with fellow home cooks and hearing your tips and adaptations!
If this recipe saved your weeknight dinner routine or became a new family favorite, please share it with friends who need quick, delicious meal ideas, and don’t forget to pin it to your favorite Pinterest boards using #HoneyGarlicChicken. Let’s help more home cooks discover just how easy it is to make better-than-takeout meals at home!
Happy cooking, and may your chicken always be juicy, your sauce perfectly sticky, and your dinners absolutely delicious!