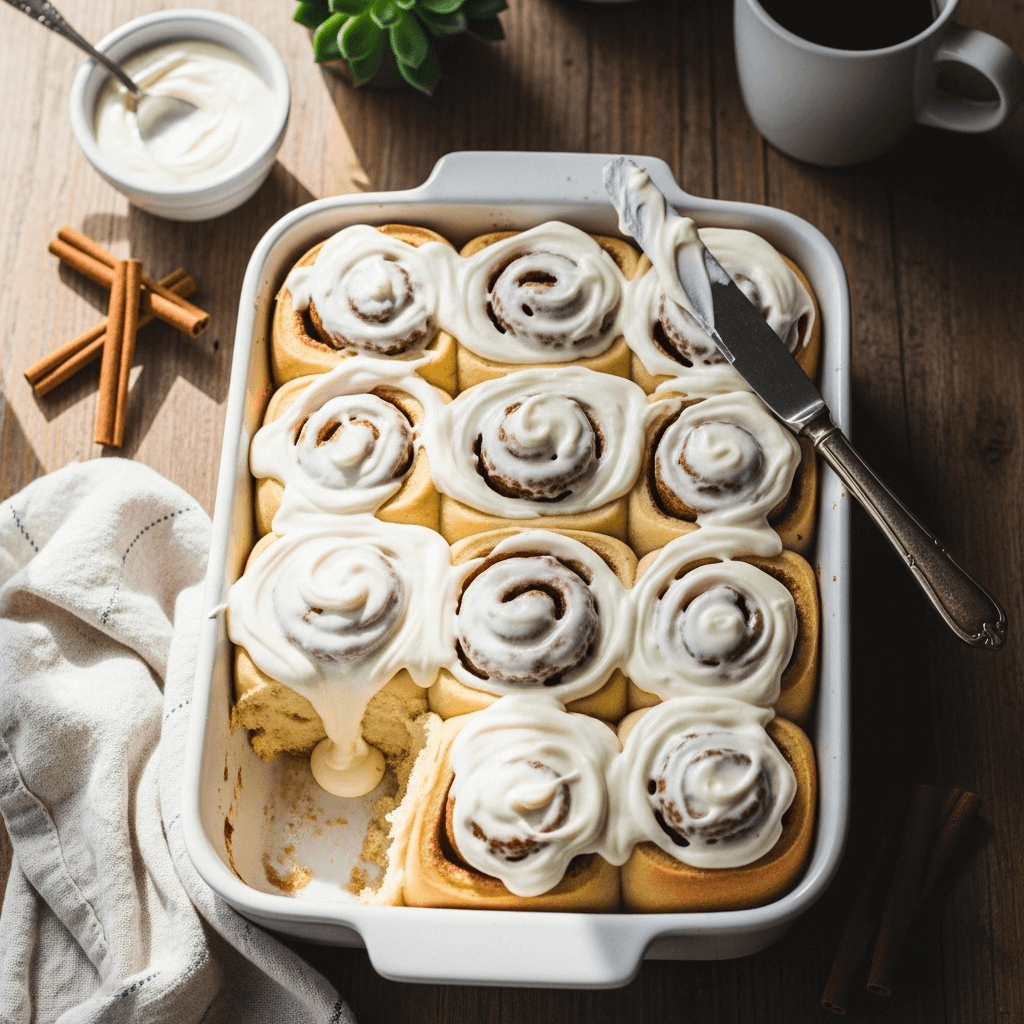
There’s nothing quite like the aroma of freshly baked cinnamon rolls wafting through your home on a lazy weekend morning. These homemade cinnamon rolls are the epitome of comfort baking – soft, pillowy dough swirled with buttery cinnamon sugar and topped with luscious cream cheese frosting. Whether you’re treating your family to a special breakfast, hosting a holiday brunch, or simply craving something indulgent, these easy cinnamon rolls deliver bakery-quality results right from your own kitchen.
Perfect for Christmas morning, Mother’s Day brunch, or any day that deserves a little extra sweetness, this recipe strikes the perfect balance between being achievable for home bakers and impressive enough to wow your guests. The dough is surprisingly forgiving, making it an excellent project for beginner bakers, while the end result rivals anything you’d find at a fancy bakery.
History / Background
Cinnamon rolls, also known as cinnamon buns or cinnamon swirls, have a rich history that spans continents and centuries. While the exact origin is debated, most food historians trace the modern cinnamon roll back to Sweden, where “kanelbullar” (cinnamon buns) have been a beloved tradition since the 1920s. The Swedes love their cinnamon rolls so much that they dedicated an entire day to them – October 4th is officially “Kanelbullens Dag” or Cinnamon Bun Day in Sweden!
However, the concept of sweet, spiced rolled bread dates back even further. Ancient Roman recipes included similar preparations, and during the Middle Ages, expensive spices like cinnamon were prized possessions of the wealthy. When European settlers brought their baking traditions to America, cinnamon rolls evolved into the larger, sweeter, frosting-topped versions we know and love today.
The American-style cinnamon roll became particularly popular in the mid-20th century, especially in the Midwest and South. Cities like Cincinnati became famous for their oversized, gooey cinnamon rolls served in bakeries and diners. Today, whether you prefer the Swedish version with pearl sugar and cardamom, the American classic with cream cheese frosting, or countless regional variations, cinnamon rolls remain one of the most beloved baked treats worldwide.
Why You’ll Love This Recipe
This homemade cinnamon rolls recipe is everything you’ve been dreaming of and more. The dough is enriched with butter, eggs, and milk, creating an incredibly soft and tender texture that stays fresh for days. The generous cinnamon-sugar filling provides the perfect amount of sweetness and spice, while the cream cheese frosting adds a tangy richness that balances everything beautifully.
Here’s why this recipe will become your go-to:
- Foolproof dough – Even if you’re new to yeast baking, this recipe includes detailed instructions that guarantee success
- Make-ahead friendly – Prepare the rolls the night before and bake fresh in the morning
- Bakery-quality results – Soft, fluffy rolls with perfectly gooey centers that rival any bakery
- Customizable – Easy to adapt with different spices, nuts, or frosting variations
- Family favorite – Kids and adults alike go crazy for these sweet treats
- Budget-friendly – Made with simple pantry staples, much cheaper than buying from a bakery
- Perfect for gifting – Wrap up a pan to share with neighbors or bring to potlucks
- Freezer-friendly – Make double batches and freeze for quick treats anytime
Ingredient Notes
Let’s break down the key ingredients that make these cinnamon rolls absolutely irresistible:
All-Purpose Flour – The foundation of your dough. Bread flour can be substituted for an even chewier texture, but all-purpose works perfectly and creates tender rolls.
Active Dry Yeast – This is what makes the dough rise and creates that light, airy texture. Make sure your yeast is fresh (check the expiration date) and proof it in warm milk to ensure it’s active. Instant yeast can also be used and doesn’t require proofing.
Whole Milk – The fat in whole milk creates richer, more tender rolls. You can use 2% milk in a pinch, but avoid skim milk as it won’t provide the same texture.
Granulated Sugar – Feeds the yeast and adds sweetness to the dough. Don’t skip the sugar in the dough itself, as it’s essential for the yeast to work properly.
Butter – Use unsalted butter so you can control the salt level. The butter in the dough adds richness, while melted butter in the filling helps the cinnamon sugar adhere.
Eggs – Provide structure, richness, and that beautiful golden color. Use room temperature eggs for best results.
Cinnamon – The star of the show! Use quality ground cinnamon for the best flavor. Ceylon cinnamon is milder and sweeter, while Cassia cinnamon (most common) is spicier and stronger.
Brown Sugar – The filling uses brown sugar for its deeper molasses flavor and moisture, which creates those iconic gooey pockets.
Cream Cheese – For the frosting, use full-fat brick-style cream cheese (not spreadable), softened to room temperature for smooth, lump-free frosting.
Powdered Sugar – Creates a smooth, sweet frosting that melts perfectly into the warm rolls.
Vanilla Extract – A splash of pure vanilla enhances all the other flavors. Don’t skip it!
Salt – Just a pinch balances the sweetness and enhances the overall flavor profile.
Equipment Needed
Having the right tools makes this recipe even easier:
- Stand mixer with dough hook (or large mixing bowl and wooden spoon for hand mixing)
- Medium saucepan (for warming milk)
- Instant-read thermometer (to check milk temperature – optional but helpful)
- Rolling pin (for rolling out the dough)
- 9×13-inch baking pan (or two 9-inch round pans)
- Pastry brush (for applying melted butter)
- Sharp knife or unflavored dental floss (for cutting rolls)
- Measuring cups and spoons
- Clean kitchen towel (for covering dough while rising)
- Offset spatula (for spreading frosting)
- Mixing bowls (various sizes)
- Parchment paper (optional, for easier cleanup)

Homemade Cinnamon Rolls Recipe
- Total Time: 1 hour 30 minutes
- Yield: 12 large cinnamon rolls 1x
- Diet: Vegetarian
Description
These ultra-soft homemade cinnamon rolls feature a buttery, tender dough swirled with cinnamon-sugar filling and topped with silky cream cheese frosting. Perfect for weekend breakfasts, holiday mornings, or any time you’re craving bakery-quality sweet rolls at home.
Ingredients
For the Dough:
- 1 cup whole milk, warmed to 110°F
- 2¼ teaspoons active dry yeast (1 standard packet)
- ½ cup granulated sugar, divided
- 4 tablespoons unsalted butter, melted
- 2 large eggs, room temperature
- 1 teaspoon salt
- 4 cups all-purpose flour, plus more for dusting
For the Filling:
- 6 tablespoons unsalted butter, melted
- ¾ cup packed light brown sugar
- 2½ tablespoons ground cinnamon
- Pinch of salt
For the Cream Cheese Frosting:
- 4 ounces cream cheese, softened
- 3 tablespoons unsalted butter, softened
- 1½ cups powdered sugar
- 1 teaspoon vanilla extract
- 2–3 tablespoons milk (as needed for consistency)
- Pinch of salt
Instructions
Step 1: Proof the Yeast
Warm the milk to 110°F (it should feel warm but not hot to the touch). Pour into the bowl of your stand mixer. Sprinkle the yeast and 1 tablespoon of the granulated sugar over the milk. Stir gently and let sit for 5-10 minutes until foamy. This means your yeast is active and ready to use.
Step 2: Make the Dough
Add the remaining sugar, melted butter, eggs, and salt to the yeast mixture. Using the dough hook attachment on low speed, mix until combined. Gradually add the flour, one cup at a time, mixing on low speed. Once all flour is incorporated, increase speed to medium-low and knead for 5-7 minutes until the dough is smooth, elastic, and slightly tacky but not sticky. If the dough is too sticky, add flour 1 tablespoon at a time.
Step 3: First Rise
Remove the dough hook and shape the dough into a ball. Lightly grease the bowl with butter or oil, place the dough back in, and turn to coat. Cover with a clean kitchen towel or plastic wrap. Let rise in a warm, draft-free place for 60-90 minutes, until doubled in size.
Step 4: Prepare the Filling
While the dough rises, mix together the brown sugar, cinnamon, and salt in a small bowl. Set aside. Have your melted butter ready.
Step 5: Roll Out the Dough
Once risen, punch down the dough to release air. Turn out onto a lightly floured surface. Roll into a large rectangle, approximately 14×18 inches and about ¼-inch thick. The dough should be an even thickness throughout.
Step 6: Add the Filling
Brush the entire surface of the dough generously with the 6 tablespoons of melted butter, leaving a ½-inch border along one long edge. Sprinkle the cinnamon-sugar mixture evenly over the buttered dough, pressing it lightly into the butter so it adheres.
Step 7: Roll and Cut
Starting from the long edge opposite the border, tightly roll the dough into a log, keeping the roll as even and tight as possible. When you reach the end, pinch the seam to seal. Using a sharp knife or unflavored dental floss, cut the log into 12 equal pieces (about 1.5 inches each). Pro tip: Use dental floss by sliding it under the log, crossing the ends over the top, and pulling through for clean cuts.
Step 8: Second Rise
Grease a 9×13-inch baking pan. Arrange the rolls in the pan, leaving small gaps between them (they’ll expand). Cover with a kitchen towel and let rise for 30-45 minutes until puffy and touching each other.
Step 9: Bake
Preheat your oven to 350°F. Once the rolls have risen, bake for 25-30 minutes until golden brown on top. The internal temperature should reach 190°F. If the tops are browning too quickly, tent with aluminum foil during the last 10 minutes.
Step 10: Make the Frosting
While the rolls bake, prepare the frosting. In a medium bowl, beat together the softened cream cheese and butter until smooth and fluffy. Add the powdered sugar, vanilla, salt, and 2 tablespoons of milk. Beat until smooth and creamy. Add more milk, 1 teaspoon at a time, if needed to reach spreading consistency.
Step 11: Frost and Serve
Remove the rolls from the oven and let cool for 5-10 minutes. While still warm, spread the cream cheese frosting generously over the top. The frosting will melt slightly into the warm rolls, creating an irresistible glaze. Serve warm and enjoy!
Notes
- Temperature Matters: Make sure your milk is between 105-115°F. Too hot will kill the yeast; too cold won’t activate it.
- Dough Consistency: The dough should be soft and slightly tacky but shouldn’t stick to your hands. Adjust flour as needed.
- Even Rolls: For uniform rolls, use a ruler to mark your cutting lines before slicing.
- Overnight Option: After placing rolls in the pan for the second rise, cover tightly with plastic wrap and refrigerate overnight. In the morning, let them sit at room temperature for 30 minutes, then bake as directed.
- Frosting Temperature: For best results, frost the rolls while they’re still warm but not piping hot – this creates the perfect melty consistency.
- Prep Time: 30 minutes
- Cook Time: 25-30 minutes
- Category: Breakfast
- Method: Baking
- Cuisine: American
Nutrition
- Serving Size: 1 cinnamon roll
- Calories: 385
- Sugar: 28g
- Sodium: 245mg
- Fat: 14g
- Saturated Fat: 8.5g
- Unsaturated Fat: 4.5g
- Trans Fat: 0g
- Carbohydrates: 59g
- Fiber: 2g
- Protein: 8g
Tips & Variations
Flavor Variations:
- Maple Pecan: Add ½ cup chopped pecans to the filling and use maple syrup in the frosting instead of vanilla
- Orange Cinnamon: Add 1 tablespoon orange zest to the dough and 2 teaspoons to the frosting
- Chocolate Chip: Sprinkle mini chocolate chips over the cinnamon sugar before rolling
- Apple Pie: Add diced apples and a pinch of nutmeg to the filling
- Pumpkin Spice: Replace 1 tablespoon cinnamon with pumpkin pie spice blend
Healthier Swaps:
- Use half whole wheat flour for more fiber (texture will be slightly denser)
- Reduce sugar in filling by ¼ cup
- Use Greek yogurt frosting instead of cream cheese for more protein
- Substitute coconut sugar for brown sugar for lower glycemic index
Dietary Modifications:
- Dairy-Free: Use almond or oat milk, vegan butter, and dairy-free cream cheese
- Egg-Free: Replace eggs with flax eggs (2 tablespoons ground flaxseed + 6 tablespoons water)
Pro Chef Tips
Tip #1: Perfect Dough Texture
The secret to ultra-soft cinnamon rolls is a slightly wetter dough than you might expect. It should be tacky to the touch but not stick to your hands. Resist adding too much flour during kneading – a slightly sticky dough yields softer rolls.
Tip #2: Create the Ideal Rising Environment
Turn your oven into a proofing box: Heat your oven to 200°F for just 1-2 minutes, then turn it off. Place your covered dough inside – it’s the perfect warm, draft-free environment for rising.
Tip #3: Butter Distribution Matters
Don’t skimp on the melted butter before adding the filling. Brush it all the way to the edges and use a generous hand – this is what creates those gooey, caramelized edges everyone loves.
Tip #4: Tight Rolling Technique
Roll the dough tightly but not so tight that the filling squeezes out. Aim for firm and even pressure as you roll, and periodically check that your roll is staying straight rather than curving to one side.
Tip #5: The Dental Floss Method
For perfectly clean cuts that don’t squash your rolls, use unflavored dental floss. Slide it under the log, cross the ends over the top, and pull through in one swift motion. This gives you bakery-perfect spirals every time.
Tip #6: Don’t Overbake
Cinnamon rolls are best when they’re just golden on top and still soft throughout. They’ll continue cooking slightly after you remove them from the oven, so err on the side of slightly underdone rather than overbaked.
Common Mistakes to Avoid
Mistake #1: Killing the Yeast
Using milk that’s too hot (over 120°F) will kill your yeast, and your rolls won’t rise. Always test the temperature – it should feel like warm bathwater, not hot.
Mistake #2: Not Kneading Enough
Proper kneading develops gluten, which gives your rolls structure and that perfect chewy-soft texture. Knead for the full 5-7 minutes in a stand mixer or 10 minutes by hand.
Mistake #3: Rushing the Rise Time
Patience is key! If your dough hasn’t fully doubled, give it more time. Rushing this step results in dense, heavy rolls instead of light, fluffy ones.
Mistake #4: Cutting Rolls Unevenly
Uneven pieces mean some rolls will be overdone while others are underbaked. Take time to measure and cut uniform pieces.
Mistake #5: Frosting Too Soon
If you frost the rolls straight out of the oven, the frosting will completely melt and disappear. Wait 5-10 minutes for that perfect balance of melty but still spreadable frosting.
Storage & Meal Prep
Room Temperature Storage:
Store cooled, frosted cinnamon rolls in an airtight container at room temperature for up to 2 days. They’ll stay soft and delicious.
Refrigerator Storage:
For longer storage, keep rolls in an airtight container in the refrigerator for up to 5 days. The frosting may harden slightly, but the rolls will stay fresh.
Reheating Instructions:
- Microwave: Heat individual rolls for 15-20 seconds until warm
- Oven: Wrap rolls in foil and warm at 300°F for 10-15 minutes
- Air Fryer: Heat at 300°F for 3-4 minutes for slightly crispy edges
Pro Tip: Add a cup of water to the microwave or oven alongside the rolls to keep them from drying out during reheating.
Make-Ahead & Freezer Notes
Overnight Method (Best for Weekend Mornings):
After cutting and arranging rolls in the pan, cover tightly with plastic wrap and refrigerate overnight (up to 16 hours). In the morning, remove from fridge and let sit at room temperature for 30-45 minutes while your oven preheats. Bake as directed. You’ll have fresh, warm cinnamon rolls with minimal morning effort!
Freeze Unbaked Rolls:
After the first rise, roll, fill, cut, and arrange rolls in a disposable aluminum pan. Cover tightly with plastic wrap and foil, then freeze for up to 2 months. When ready to bake, thaw overnight in the refrigerator, let come to room temperature and rise for 30-45 minutes, then bake as directed.
Freeze Baked Rolls:
Bake rolls completely but don’t frost them. Let cool completely, wrap individually in plastic wrap, then place in a freezer bag. Freeze for up to 3 months. Thaw at room temperature, reheat, then add fresh frosting.
Freeze Frosted Rolls:
You can also freeze fully frosted rolls. Wrap tightly and freeze for up to 2 months. Thaw overnight in the refrigerator or at room temperature for a few hours.
Best Reheating Method for Frozen Rolls:
Microwave individual rolls for 30-45 seconds or warm in a 300°F oven for 15-20 minutes until heated through.
Serving Suggestions
These heavenly cinnamon rolls are perfect on their own, but here are some delicious ways to serve them:
Breakfast & Brunch Pairings:
- Fresh fruit salad with berries and melon
- Crispy bacon or breakfast sausage for a sweet-savory combo
- Scrambled eggs or veggie frittata
- Greek yogurt parfaits with granola
- Fresh-squeezed orange juice or mimosas for adults
Beverages:
- Strong hot coffee – the acidity cuts through the sweetness perfectly
- Chai latte or spiced tea
- Hot chocolate with whipped cream
- Cold milk (a classic pairing!)
- Apple cider (warm or cold)
Special Occasion Serving Ideas:
- Arrange on a tiered cake stand for elegant presentation
- Serve alongside a breakfast charcuterie board
- Create a cinnamon roll bar with different frosting flavors (maple, chocolate, caramel)
- Cut into smaller pieces for party appetizers
- Drizzle with caramel or chocolate sauce for extra decadence
Make It a Meal: Cinnamon rolls are rich and filling, so they work great as the centerpiece of your breakfast or brunch. Add some protein and fresh fruit on the side for a balanced meal that’ll keep everyone satisfied.
FAQs Section
Q: Can I use instant yeast instead of active dry yeast?
A: Absolutely! Instant yeast (also called rapid-rise yeast) can be mixed directly into the dry ingredients without proofing. Use the same amount and skip the proofing step. Your rise times may be slightly shorter.
Q: Why didn’t my dough rise?
A: The most common reasons are dead yeast (check expiration dates), water that was too hot or too cold, or a too-cool environment. Make sure your milk is 105-115°F and let the dough rise in a warm spot (75-80°F is ideal).
Q: Can I make these without a stand mixer?
A: Yes! Mix the ingredients in a large bowl with a wooden spoon, then knead by hand on a floured surface for about 10 minutes. The dough is ready when it’s smooth, elastic, and bounces back when poked.
Q: My rolls turned out dense – what happened?
A: Dense rolls usually result from not enough rising time, too much flour in the dough, or insufficient kneading. Make sure your dough fully doubles during each rise and avoid adding too much flour.
Q: Can I use a different type of frosting?
A: Definitely! Try vanilla buttercream, maple glaze, brown butter frosting, or even a simple powdered sugar glaze. Some people love them with just melted butter on top.
Q: How do I know when the rolls are done baking?
A: The tops should be golden brown, and an instant-read thermometer inserted in the center should read 190°F. They should feel soft but set, not doughy.
Q: Can I add nuts or raisins?
A: Yes! Sprinkle ½ cup chopped pecans or walnuts over the cinnamon sugar filling before rolling. For raisins, soak them in warm water for 10 minutes first, then pat dry before adding to prevent them from burning.
Conclusion
There’s something truly magical about pulling a pan of homemade cinnamon rolls from the oven – the golden, gooey swirls, the intoxicating aroma of cinnamon and butter, and that first warm, frosting-topped bite that makes all the effort worthwhile. This recipe proves that bakery-quality cinnamon rolls are absolutely achievable in your own kitchen, and once you’ve mastered this technique, you’ll never want store-bought again.
Whether you’re making these fluffy cinnamon rolls for a special occasion or just because Tuesday deserves something sweet, this recipe delivers every single time. The overnight option means you can enjoy fresh-baked rolls on busy mornings, and the freezer-friendly nature makes them perfect for meal prep.
I’d love to hear how your cinnamon rolls turn out! Did you try any of the variations? Do you prefer extra frosting or just a light glaze? Leave a comment below and share your experience. And if you loved this recipe, please pin it to your favorite Pinterest board so you can find it again – and help other home bakers discover the joy of homemade cinnamon rolls too!
Happy baking, and may your kitchen always smell like cinnamon and happiness!