

Is there anything more irresistible than the aroma of fresh garlic bread baking in the oven? That intoxicating combination of toasted bread, melted butter, and aromatic garlic is enough to make anyone’s mouth water. This homemade garlic bread recipe delivers exactly what you’re craving: crispy, golden edges, a soft and pillowy interior, and layers of rich, garlicky butter flavor that makes every bite absolutely heavenly.
Unlike the frozen garlic bread from the grocery store, this homemade version takes just minutes to prepare and tastes a thousand times better. We’re talking about real butter (not margarine), fresh garlic (not garlic powder), and quality bread that transforms into something truly spectacular in your oven. The edges get wonderfully crispy and golden while the center stays soft and buttery, creating the perfect textural contrast that makes garlic bread so addictive.
Homemade garlic bread is the ultimate side dish that elevates any meal instantly. It’s the perfect accompaniment to Italian dishes like spaghetti and meatballs, lasagna, chicken parmesan, or any pasta dish swimming in marinara sauce. Serve it alongside a big bowl of soup or salad for a satisfying lunch, or bring it to potlucks and watch it disappear within minutes. It’s also fantastic for mopping up sauce, dipping in olive oil and balsamic vinegar, or simply enjoying on its own as a snack.
This recipe is incredibly versatile and customizable. Make it as garlicky as you want, add your favorite herbs, sprinkle on cheese for extra indulgence, or keep it simple and classic. Whether you’re feeding a crowd at a family dinner, need a quick side for weeknight pasta, or want to impress guests with something that looks and tastes restaurant-quality, this garlic bread delivers every single time.
History / Background
Garlic bread, as we know it today, has an interesting history that spans continents and cultures. While bread with garlic has been enjoyed for centuries across Mediterranean regions, the American-style garlic bread we love today actually has its roots in Italian-American cuisine rather than traditional Italian cooking.
In Italy, the classic preparation is “bruschetta” – grilled bread rubbed with raw garlic cloves and drizzled with olive oil. This simple, rustic dish dates back to ancient Rome when it was called “panis focacius” (hearth bread). However, the butter-laden, herb-filled garlic bread popular in the United States is actually an Italian-American invention that emerged in the early to mid-20th century.
As Italian immigrants settled in America, particularly in cities like New York, Boston, and San Francisco, they adapted their traditional recipes to incorporate ingredients that were readily available and affordable in their new country. Butter was cheaper and more accessible than high-quality olive oil in many parts of America, so it became the fat of choice. The generous application of garlic (often multiple cloves worth) appealed to Americans who loved bold flavors.
The golden age of Italian-American restaurants in the 1950s and 1960s cemented garlic bread’s place in American dining culture. These family-style restaurants began serving complimentary garlic bread before meals, and it quickly became an expected and beloved part of the Italian-American dining experience. The practice of wrapping garlic bread in foil to keep it warm also became standard during this era.
By the 1970s, frozen garlic bread appeared in supermarkets, making this once restaurant-special treat accessible for home cooking. However, while convenient, frozen versions never quite matched the flavor and texture of freshly made garlic bread. Today, homemade garlic bread has experienced a renaissance as home cooks rediscover how easy and infinitely more delicious it is to make from scratch.
Interestingly, if you order “garlic bread” in Italy today, you’ll likely get something much simpler – perhaps bread rubbed with garlic and olive oil. The butter-heavy, herb-loaded version is distinctly Italian-American, representing the beautiful fusion of Old World traditions and New World innovation.
Why You’ll Love This Recipe
This homemade garlic bread recipe has been perfected to deliver maximum flavor with minimal effort. Unlike store-bought versions that can taste artificial or overly processed, this recipe uses real, simple ingredients that you can actually pronounce. The combination of softened butter, fresh garlic, and aromatic herbs creates a flavor-packed spread that soaks into every nook and cranny of the bread, ensuring garlicky goodness in every single bite.
What makes this recipe truly special is the technique. By using softened butter that spreads easily, mixing in fresh minced garlic and herbs, and baking at the perfect temperature, you achieve that coveted combination of crispy, golden edges and a soft, buttery center. The butter mixture gets absorbed by the bread while also creating a golden, crispy crust that adds incredible texture and flavor.
Here’s why this garlic bread will become your new favorite side dish:
- Quick and easy – ready in just 20 minutes from start to finish with minimal hands-on time
- Simple ingredients – uses pantry staples you likely already have on hand
- Infinitely customizable – adjust the garlic level, add cheese, experiment with different herbs
- Budget-friendly – costs a fraction of store-bought garlic bread and tastes exponentially better
- Crowd-pleaser – universally loved by kids and adults alike, perfect for parties and potlucks
- Versatile – works as a side dish, appetizer, snack, or even light meal
- Restaurant-quality results that look and taste professionally made
- No special skills required – even beginner cooks can master this recipe easily
- Make-ahead friendly – can be assembled in advance and baked when needed
- Freezer-friendly – make a double batch and freeze for quick future meals
- Irresistible aroma – your kitchen will smell absolutely amazing while it bakes
- Perfect texture – crispy on the outside, soft and buttery on the inside
Ingredient Notes
The beauty of garlic bread lies in its simplicity. Here’s what you need and why each ingredient matters:
Bread: The foundation of great garlic bread starts with quality bread. Italian bread or French baguette work beautifully because they have the perfect texture – crusty exterior and soft, airy interior. Italian loaves tend to be wider and softer, while French baguettes are longer and have a chewier crust. Both are excellent choices. Avoid pre-sliced sandwich bread as it’s too thin and soft. Ciabatta, sourdough, or artisan white bread also work wonderfully. Choose bread that’s a day old if possible – it absorbs the butter mixture better and holds its shape when baked.
Unsalted Butter: The star ingredient that carries all the flavors. Unsalted butter allows you to control the salt level precisely. It must be softened to room temperature so it spreads easily and mixes smoothly with the garlic and herbs. Don’t use melted butter, as it will soak into the bread too quickly and create soggy spots instead of a nice coating. Never substitute margarine – real butter makes all the difference in flavor and texture.
Fresh Garlic: This is non-negotiable for the best flavor. Fresh garlic cloves, minced finely, provide that pungent, aromatic flavor that defines garlic bread. The amount is adjustable based on your preference – use 4 cloves for moderate garlic flavor, up to 6 for serious garlic lovers. Garlic powder cannot compare to fresh garlic’s complex, vibrant flavor, though it can be used as a last resort (about 1 teaspoon per 4 cloves of fresh).
Fresh Parsley: Adds brightness, color, and fresh herbaceous notes that balance the rich butter and pungent garlic. Flat-leaf (Italian) parsley has better flavor than curly parsley, but either works. If you don’t have fresh parsley, use 1 tablespoon of dried parsley, though fresh is significantly better.
Salt: Enhances all the other flavors. Since we’re using unsalted butter, adding salt is essential. Use fine sea salt or kosher salt, starting with the amount listed and adjusting to taste.
Black Pepper: Adds a subtle bite and depth. Freshly ground black pepper tastes much better than pre-ground.
Optional Add-ins: Grated Parmesan cheese adds savory umami depth, dried Italian seasoning provides extra herb flavor, red pepper flakes add heat, or fresh basil offers a different herbaceous note.
Equipment Needed
You’ll need minimal equipment for this simple recipe:
- Sharp serrated knife for slicing bread cleanly without crushing it
- Cutting board for slicing and prep work
- Small mixing bowl for combining the butter mixture
- Fork or small whisk for mixing butter, garlic, and herbs together
- Butter knife or offset spatula for spreading the garlic butter evenly
- Baking sheet large enough to hold your bread
- Aluminum foil for wrapping the bread during initial baking
- Oven mitts for safe handling of hot bread
Optional but helpful:
- Garlic press for easy mincing
- Pastry brush for spreading butter mixture more evenly
- Parchment paper as an alternative to foil
Garlic Bread Recipe
- Total Time: 20 minutes
- Yield: 8 servings 1x
- Diet: Vegetarian
Description
This homemade garlic bread features crispy, golden edges and a soft, buttery center loaded with fresh garlic and herbs. Made with simple ingredients in just 20 minutes, it’s the perfect side dish for pasta, soup, salads, or any meal that needs a delicious bread accompaniment.
Ingredients
- 1 large loaf Italian bread or French baguette (about 16 inches long)
- ½ cup (1 stick/115g) unsalted butter, softened to room temperature
- 4 to 6 cloves garlic, minced (adjust to taste preference)
- 2 tablespoons fresh parsley, finely chopped
- ¼ teaspoon salt
- ⅛ teaspoon freshly ground black pepper
- ¼ cup grated Parmesan cheese (optional, but recommended)
- ½ teaspoon Italian seasoning (optional)
Instructions
Step 1: Preheat and Prepare
Preheat your oven to 400°F (200°C). Line a large baking sheet with aluminum foil or parchment paper for easy cleanup. Set aside.
Step 2: Slice the Bread
Using a sharp serrated knife, slice the bread in half horizontally, creating a top and bottom half. If using a very long baguette, you can also cut it into smaller sections first (about 8-inch pieces) to make it easier to handle. Place both halves cut-side up on your prepared baking sheet.
Step 3: Make the Garlic Butter
In a small mixing bowl, combine the softened butter, minced garlic, fresh parsley, salt, and black pepper. If using Parmesan cheese and Italian seasoning, add those as well. Mix everything together with a fork until all ingredients are thoroughly combined and evenly distributed throughout the butter. The mixture should be smooth and spreadable.
Step 4: Spread the Garlic Butter
Using a butter knife or offset spatula, generously spread the garlic butter mixture over both cut surfaces of the bread. Make sure to spread it all the way to the edges and distribute it evenly. Don’t be shy with the butter – you want every bite to be flavorful. Press the butter gently into the bread so it soaks in slightly.
Step 5: Wrap and Bake (First Stage)
Place the two halves of bread back together to form a whole loaf. Wrap the entire loaf tightly in aluminum foil, creating a sealed package. Place on the baking sheet and bake in the preheated oven for 10 minutes. This steams the bread inside the foil, allowing the butter to melt and soak into the bread while keeping it soft.
Step 6: Unwrap and Finish (Second Stage)
Carefully remove the baking sheet from the oven (it will be hot!). Unwrap the foil and separate the bread halves again, placing them cut-side up on the baking sheet. Return to the oven, unwrapped, and bake for an additional 5-7 minutes, or until the edges are golden brown and crispy. Watch carefully during this stage as bread can go from golden to burnt quickly.
Step 7: Optional Broiling Step
For extra-crispy, golden tops, turn on your oven’s broiler and broil the bread for 1-2 minutes, watching constantly to prevent burning. The bread should turn a deep golden brown with some darker, crispy edges. This step is optional but highly recommended for the best texture.
Step 8: Slice and Serve
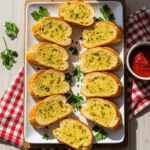
Remove from the oven and let cool for 2-3 minutes. Using a sharp serrated knife, slice the bread into individual pieces (about 1 to 1.5 inches thick). Serve immediately while hot and crispy.
Notes
- Bread freshness: Day-old bread actually works better than completely fresh bread as it absorbs the butter mixture more effectively without becoming soggy.
- Butter temperature: Make sure butter is truly softened (not melted) for the best spreading consistency and even distribution.
- Garlic intensity: Adjust garlic to your preference. Four cloves provide moderate flavor, while six cloves are for true garlic lovers. You can even use up to 8 cloves if you really love garlic.
- Cheese variation: While optional, Parmesan cheese adds wonderful umami flavor. You can also sprinkle mozzarella on top during the last few minutes of baking for cheesy garlic bread.
- Make-ahead: Prepare through Step 4, wrap tightly, and refrigerate for up to 24 hours before baking. Add 2-3 minutes to the wrapped baking time if baking from cold.
- Extra crispy: For maximum crispiness, skip wrapping in foil and bake uncovered at 375°F for 12-15 minutes, watching carefully to prevent burning.
- Prep Time: 10 minutes
- Cook Time: 10 minutes
- Category: Side Dish
- Method: Baking
- Cuisine: Italian
Nutrition
- Serving Size: 1 slice (approximately 2 ounces)
- Calories: 245
- Sugar: 2g
- Sodium: 385mg
- Fat: 14g
- Saturated Fat: 8g
- Unsaturated Fat: 5g
- Trans Fat: 0g
- Carbohydrates: 26g
- Fiber: 1g
- Protein: 6g
- Cholesterol: 35mg
Tips & Variations
Cheesy Garlic Bread:
Sprinkle 1 cup of shredded mozzarella cheese over the buttered bread during the last 3-5 minutes of baking. The cheese will melt and get bubbly and golden. You can also mix shredded cheddar, mozzarella, and Parmesan for a three-cheese version. Add the cheese after unwrapping the foil for best results.
Herb Variations:
Experiment with different fresh herbs beyond parsley. Fresh basil adds a sweet, aromatic flavor perfect for Italian meals. Fresh oregano brings an earthy, robust taste. Chives add a mild onion flavor. Rosemary provides a pine-like, aromatic note (use sparingly as it’s potent). You can also use dried Italian seasoning blend for convenience.
Spicy Garlic Bread:
Add ½ to 1 teaspoon of red pepper flakes to the butter mixture for a kick of heat. You can also brush the bread with chili oil before serving, or add a pinch of cayenne pepper to the butter mixture. For extra heat, use fresh jalapeño slices on top.
Roasted Garlic Bread:
For a milder, sweeter garlic flavor, use roasted garlic instead of raw. Roast whole garlic bulbs at 400°F for 30-40 minutes until soft, then squeeze out the cloves and mash into the butter. Roasted garlic is less pungent and has a sweet, caramelized flavor.
Garlic Knots:
Instead of slicing bread lengthwise, cut the loaf into strips, tie each strip into a knot, brush with garlic butter, and bake at 375°F for 12-15 minutes. These make adorable individual servings perfect for parties.
Vegan Garlic Bread:
Substitute the butter with vegan butter or a mixture of olive oil and vegan margarine. Use nutritional yeast instead of Parmesan cheese for a cheesy flavor. The taste will be different but still delicious.
Garlic Bread with Different Breads:
Try sourdough for tangy flavor, ciabatta for extra-chewy texture, whole wheat for added fiber and nutty taste, or even naan bread or pita for a quick alternative. Each bread type creates a slightly different but equally delicious result.
Garlic Butter Spread for Storage:
Make a large batch of the garlic butter mixture and store it in the refrigerator for up to a week or freeze for up to 3 months. This way, you can make fresh garlic bread anytime by simply spreading it on bread and baking.
Pro Chef Tips
Tip #1: Soften Butter Properly
The difference between softened and melted butter is crucial. Softened butter should be at room temperature (around 65-70°F), where it’s spreadable but still holds its shape. If you press it gently, your finger should leave an indentation without the butter collapsing. Melted butter soaks into bread too quickly, creating uneven results and potentially soggy spots. If you forget to soften butter, cut it into small cubes and let it sit at room temperature for 20-30 minutes. In a pinch, you can microwave it for 5-10 seconds at a time, but be careful not to melt it.
Tip #2: Mince Garlic Finely and Evenly
Large chunks of garlic can burn and taste bitter, while finely minced garlic distributes evenly and infuses the butter with consistent flavor. Use a sharp knife and mince the garlic as finely as possible, or use a garlic press for uniform results. For even better distribution, you can make garlic paste by sprinkling the minced garlic with a pinch of salt and using the flat side of your knife to smash it into a smooth paste. This integrates seamlessly into the butter.
Tip #3: Don’t Skip the Foil-Wrapping Step
Wrapping the bread in foil for the first stage of baking is what creates that perfect tender interior while the butter melts and soaks in. The foil creates a steaming effect that prevents the bread from drying out too quickly. Then, unwrapping it for the final baking stage allows the outside to crisp up beautifully. This two-stage process is the secret to achieving both soft interior and crispy exterior in the same loaf.
Tip #4: Spread Butter to the Very Edges
Many home cooks leave the edges of the bread un-buttered, which results in dry, uninteresting end pieces. Make sure to spread the garlic butter all the way to the edges of the bread. Every single bite should be flavorful. Press the butter into the bread slightly so it begins to absorb rather than just sitting on the surface.
Tip #5: Watch Carefully During the Final Baking
Bread can go from perfectly golden to burnt in less than a minute, especially if you’re using the broiler. Stay near the oven during the final crisping stage and check frequently. Different ovens have hot spots, so you might need to rotate the pan halfway through for even browning. Look for a deep golden color with some darker, caramelized edges for the best flavor and texture.
Tip #6: Rest Before Slicing
Let the bread rest for 2-3 minutes after removing from the oven before slicing. This brief rest allows the butter to settle slightly and makes slicing cleaner and easier. If you slice immediately, the bread may compress and lose its airy texture. Use a sharp serrated knife and saw gently rather than pressing down hard.
Common Mistakes to Avoid
Mistake #1: Using Cold Butter
Cold butter is impossible to spread evenly and will tear the bread as you try to apply it. You’ll end up with thick clumps of butter in some spots and bare bread in others, resulting in uneven flavor and texture. Always allow butter to come to room temperature naturally. If you’re in a hurry, cut it into small pieces to speed up the warming process, but never microwave it to the point of melting.
Mistake #2: Overbaking the First Stage
If you bake the foil-wrapped bread for too long, it becomes dry and loses its soft, pillowy interior texture. The foil stage should only be 10 minutes – just long enough to melt the butter and warm the bread through. The second, unwrapped stage is where you achieve crispiness. Getting the timing right on both stages is key to perfect texture.
Mistake #3: Using Pre-Minced Garlic from a Jar
Jarred minced garlic is convenient, but it has a significantly inferior flavor compared to fresh garlic. It often tastes harsh, slightly bitter, or even metallic. Fresh garlic has a bright, pungent flavor that’s essential for authentic garlic bread taste. Take the extra minute to mince fresh cloves – your taste buds will thank you.
Mistake #4: Not Seasoning the Butter Mixture
Some home cooks forget to add salt to the butter mixture, assuming the bread and butter have enough salt. However, without added salt, the garlic bread tastes flat and one-dimensional. The salt enhances the garlic flavor, brings out the bread’s natural taste, and balances all the ingredients. Always taste your butter mixture before spreading and adjust seasoning.
Mistake #5: Slicing Too Thin or Too Thick
Slices that are too thin become overly crispy and lose the soft interior that makes garlic bread so appealing. They’re also more likely to burn. Slices that are too thick don’t crisp up properly and can be doughy in the center. The sweet spot is about 1 to 1.5 inches thick – substantial enough to have a soft interior but thin enough to get crispy edges.
Storage & Meal Prep
Room Temperature Storage:
Garlic bread is best enjoyed fresh and hot from the oven, but leftover baked garlic bread can be stored at room temperature for up to 1 day if tightly wrapped in aluminum foil or placed in an airtight container. It will lose some of its crispiness but can be revived by reheating.
Refrigerator Storage:
Store baked garlic bread in the refrigerator for up to 3 days. Wrap tightly in aluminum foil or place in an airtight container. Note that refrigeration will make the bread stale faster than room temperature storage, so only refrigerate if you need to extend the shelf life beyond one day. Bring to room temperature before reheating for best results.
Reheating Instructions:
To restore crispiness, reheat garlic bread in a 350°F oven for 8-10 minutes, wrapped loosely in foil. For extra crispiness, unwrap the foil for the last 2-3 minutes. You can also reheat in an air fryer at 350°F for 3-4 minutes for excellent results. Avoid microwaving as it makes the bread tough and chewy rather than crispy. If you must microwave, do so for only 15-20 seconds to warm through, then crisp briefly in a toaster oven.
Meal Prep Strategy:
Garlic bread works beautifully for meal prep. You can prepare the garlic butter mixture up to a week in advance and store it in the refrigerator, then simply spread on bread and bake when needed. This makes weeknight dinners incredibly easy.
Make-Ahead & Freezer Notes
Assembling in Advance:
You can prepare garlic bread completely through Step 4 (spreading the butter mixture), then wrap tightly in plastic wrap and aluminum foil and refrigerate for up to 24 hours before baking. When ready to serve, remove from refrigerator, let sit at room temperature for 10 minutes, then bake as directed, adding 2-3 minutes to the covered baking time since the bread will be cold.
Freezing Unbaked Garlic Bread:
This is the absolute best way to have fresh garlic bread anytime. Prepare the bread through spreading the butter mixture, wrap tightly in plastic wrap and then aluminum foil, and freeze for up to 3 months. Label with the date. To bake from frozen, there’s no need to thaw – simply add 5-7 minutes to the foil-wrapped baking time. The bread comes out tasting freshly made.
Freezing Baked Garlic Bread:
You can also freeze already-baked garlic bread, though the texture won’t be quite as good as freezing it unbaked. Cool completely, wrap tightly in foil, and freeze for up to 2 months. Reheat from frozen at 350°F for 15-20 minutes, wrapped in foil.
Making Garlic Butter in Bulk:
Prepare a large batch of the garlic butter mixture, roll it into a log shape in parchment paper, and freeze. You can slice off portions as needed and spread on bread for instant garlic bread. This garlic butter is also fantastic melted over steak, mixed into mashed potatoes, or tossed with vegetables.
Best Thawing Method:
If you prefer to thaw before baking, transfer frozen prepared garlic bread to the refrigerator and let thaw overnight. Bring to room temperature before baking for even cooking. However, baking from frozen works beautifully and is more convenient.
Serving Suggestions
Garlic bread is incredibly versatile and pairs beautifully with countless dishes:
Classic Italian Pairings:
- Spaghetti and meatballs with marinara sauce
- Lasagna (meat or vegetable)
- Chicken Parmesan or Eggplant Parmesan
- Fettuccine Alfredo or any creamy pasta
- Baked ziti or stuffed shells
- Pizza (yes, garlic bread with pizza is amazing!)
Soups:
Garlic bread is the perfect accompaniment for soaking up delicious broths:
- Creamy tomato soup (the ultimate comfort food combo)
- Minestrone or Italian vegetable soup
- French onion soup
- Creamy chicken and wild rice soup
- Broccoli cheddar soup
- Clam chowder
Salads as a Light Meal:
Pair garlic bread with a substantial salad for a satisfying lunch:
- Classic Caesar salad with romaine and Parmesan
- Caprese salad with fresh mozzarella, tomatoes, and basil
- Italian chopped salad with salami, provolone, and pepperoncini
- Greek salad with feta, olives, and cucumbers
- Antipasto salad with cured meats and marinated vegetables
Protein Dishes:
- Grilled or roasted chicken
- Pan-seared salmon or other fish
- Grilled steak (the garlic butter is perfect for steak drippings!)
- Italian sausage with peppers and onions
- Meatballs in tomato sauce
Appetizer Presentations:
Serve garlic bread as an appetizer by:
- Cutting into small squares and serving with marinara dipping sauce
- Topping with bruschetta mixture
- Serving alongside a cheese and charcuterie board
- Pairing with spinach and artichoke dip
Beverage Pairings:
- Italian red wine like Chianti or Sangiovese
- Crisp white wine like Pinot Grigio
- Sparkling water with lemon
- Iced tea
- Italian soda
FAQs Section
Q: Can I use garlic powder instead of fresh garlic?
While fresh garlic is strongly recommended for the best flavor, you can substitute garlic powder in a pinch. Use about 1 teaspoon of garlic powder per 4 cloves of fresh garlic. However, the flavor won’t be nearly as vibrant and aromatic. Garlic powder has a more concentrated, slightly different flavor that lacks the bright, pungent notes of fresh garlic. If you must use garlic powder, consider adding a tiny bit more than you think you need and mixing it very thoroughly into the softened butter.
Q: Why did my garlic bread come out soggy?
Soggy garlic bread usually results from using melted butter instead of softened butter. Melted butter soaks too deeply into the bread too quickly, creating a greasy, soggy texture. Always use softened (not melted) butter that spreads but doesn’t pour. Another cause can be not baking long enough in the uncovered stage, or wrapping back up in foil after baking. Make sure to bake uncovered for that final 5-7 minutes to achieve crispiness, and serve immediately without wrapping.
Q: Can I make garlic bread without butter?
Yes! For a lighter or dairy-free version, use olive oil instead of butter. Mix olive oil with minced garlic, herbs, and salt, then brush generously onto the bread. The texture will be slightly different – less rich and creamy – but still delicious with a more authentic Italian flavor. You can also use vegan butter for a dairy-free but still buttery option. The key is using enough fat to prevent dryness and carry the garlic flavor.
Q: How do I prevent the garlic from burning?
Garlic burns easily and becomes bitter when overcooked. To prevent this, make sure your garlic is thoroughly mixed into the butter rather than sitting in clumps on the surface. The butter protects the garlic from direct heat. Also, avoid placing the bread too close to the broiler, and watch very carefully during the broiling stage. If you notice the garlic starting to turn dark brown or black, remove immediately. Another trick is to add the garlic to softened butter rather than toasting it separately, which protects it during baking.
Q: What’s the best type of bread to use for garlic bread?
Italian bread and French baguettes are the traditional and most popular choices because they have the ideal texture – crusty outside, soft and airy inside. Italian bread tends to be softer and wider, while French baguettes are crustier and longer. Both work beautifully. Ciabatta is excellent for its open, holey crumb that absorbs butter wonderfully. Sourdough adds tangy flavor. Avoid pre-sliced sandwich bread as it’s too thin and soft to achieve good texture. Choose artisan-style breads with good structure.
Q: Can I add cheese to garlic bread?
Absolutely! Cheesy garlic bread is incredibly popular and delicious. Sprinkle shredded mozzarella, Parmesan, or a blend of Italian cheeses over the buttered bread during the last 3-5 minutes of baking. The cheese will melt, bubble, and turn golden. For the best results, add cheese after the foil-wrapped stage so it gets properly melted and slightly crispy on top. You can also mix grated Parmesan directly into the butter mixture for cheesy flavor throughout.
Q: Why does restaurant garlic bread taste better than mine?
Restaurants often use more butter and garlic than home cooks, and they’re not shy about the salt. They may also use garlic-infused butter that’s been prepared in advance, allowing flavors to meld. Some restaurants add a touch of Parmesan cheese or use a combination of butter and olive oil. The key is being generous with your ingredients – don’t be timid with the butter or garlic. Restaurants also serve garlic bread immediately after baking when it’s at peak crispiness, so timing your serving is important.
Conclusion
There you have it – everything you need to know to make the absolute best homemade garlic bread that will have everyone asking for seconds (and thirds!). This recipe proves that some of the most delicious foods are also the simplest. With just a handful of ingredients and less than 30 minutes, you can create something that tastes restaurant-quality and fills your kitchen with the most irresistible aroma imaginable.
The beauty of this garlic bread recipe is its versatility. Whether you’re serving it alongside a casual weeknight pasta dinner, bringing it to a potluck where you want to impress, or simply making it as a savory snack because you’re craving something buttery and garlicky, it always delivers. The crispy, golden edges combined with the soft, butter-soaked interior create that perfect textural contrast that makes garlic bread so addictive.
Once you experience how easy and delicious homemade garlic bread is, you’ll never want to buy the frozen version again. Plus, making it from scratch means you control exactly what goes into it – real butter, fresh garlic, and quality bread without any preservatives or artificial ingredients.
I hope you love this garlic bread recipe as much as my family does! It’s been our go-to side dish for Italian nights for years, and I can’t count how many times I’ve had to make a second batch because the first disappeared so quickly. Don’t forget to adjust the garlic to your preference – there’s no such thing as too much garlic in my book!
I’d love to hear how your garlic bread turns out! Did you add extra garlic? Try the cheesy variation? Leave a comment below sharing your experience, and if this recipe became a hit in your household, please give it a five-star rating. Don’t forget to save this recipe to your Pinterest boards so you can find it easily whenever that garlic bread craving hits. Share it with your friends who love good food – everyone deserves to know how to make perfect homemade garlic bread! Happy baking! 🧄🍞