Get ready to fall in love with the most irresistibly crispy, golden, and delicious Coconut Shrimp you’ve ever tasted! This restaurant-favorite appetizer features juicy jumbo shrimp coated in a crunchy coconut-panko crust that’s perfectly sweet, savory, and utterly addictive. Each bite delivers that satisfying crunch on the outside while the shrimp inside stays tender and succulent – it’s a textural dream that will have everyone reaching for just one more piece (and then another, and another!).
Coconut Shrimp is that special dish that instantly elevates any occasion. Whether you’re hosting a game day party, planning a tropical-themed dinner, celebrating a special occasion, or just treating yourself to something extraordinary on a regular weeknight, these crispy golden beauties never disappoint. They’re fancy enough to impress dinner guests but easy enough to make any day of the week. Plus, they come together in about 30 minutes, which means you can have restaurant-quality appetizers ready faster than you could order takeout.
What makes this coconut shrimp recipe truly special is the perfect balance of flavors and textures. The sweet coconut pairs beautifully with the naturally sweet shrimp, while the crispy coating provides that satisfying crunch we all crave. Paired with a tangy sweet chili sauce, creamy pineapple dipping sauce, or zesty mango salsa, these shrimp transform into a complete flavor experience that transports you straight to a tropical paradise. Whether you’re serving them as an appetizer, main course, or party snack, one thing is certain – they’ll disappear faster than you can make them!
History / Background
Coconut Shrimp is a beloved dish with fascinating origins that blend Caribbean, Asian, and American culinary influences into one perfectly crispy package. While the exact origins are somewhat debated, most food historians agree that Coconut Shrimp as we know it today emerged in the United States during the 1950s and 1960s, when Tiki culture and Polynesian-themed restaurants were sweeping the nation.
The concept of coating seafood in shredded coconut before frying has roots in various tropical cuisines, particularly in Southeast Asian countries like Thailand, Indonesia, and the Philippines, where coconut has been a dietary staple for thousands of years. In these regions, cooks have long combined fresh seafood with coconut in countless ways, creating dishes that celebrate the natural affinity between the sweet, nutty flavor of coconut and the delicate taste of seafood.
However, the specific preparation we know as “Coconut Shrimp” – breaded, deep-fried shrimp coated with sweetened shredded coconut – became popular in America during the post-World War II era. As American servicemen returned from the Pacific theater, they brought with them a taste for tropical flavors and exotic cuisines. This, combined with the growing affordability of international ingredients and the rise of casual dining chains, created the perfect environment for dishes like Coconut Shrimp to flourish.
The dish gained mainstream popularity in the 1980s and 1990s when casual dining chain restaurants began featuring it as a signature appetizer. Restaurants like Outback Steakhouse and Red Lobster helped popularize Coconut Shrimp across America, making it a menu staple that appealed to diners looking for something a bit different from standard appetizer fare. The combination of sweet coconut, crispy breading, and tender shrimp, typically served with a sweet-spicy dipping sauce, became an instant classic.
Interestingly, while Coconut Shrimp is often associated with Hawaiian or Caribbean cuisine due to its tropical flavors, it’s really more of an American invention inspired by these cultures rather than an authentic dish from any specific region. It represents that wonderful fusion of international influences that characterizes so much of American cuisine – taking inspiration from various culinary traditions and creating something new and uniquely appealing.
Today, Coconut Shrimp has earned its place as a beloved comfort food and party favorite. It appears on appetizer menus at restaurants worldwide, graces the tables of home cooks during special occasions, and has become a Pinterest darling thanks to its photogenic golden appearance and crowd-pleasing appeal. The dish continues to evolve, with modern variations including baked versions, air-fried alternatives, and creative dipping sauce combinations that keep this classic feeling fresh and exciting.
Why You’ll Love This Recipe
This Crispy Coconut Shrimp recipe is about to become your go-to appetizer for every occasion, and once you taste these golden, crunchy beauties, you’ll understand why they’re consistently one of the most popular dishes at restaurants and parties alike. This homemade version rivals anything you’d get at a fancy seafood restaurant, but at a fraction of the cost and with complete control over the ingredients.
Here’s why this coconut shrimp recipe will become your new obsession:
- Restaurant-Quality Results – Achieve that perfect crispy, golden coating and tender, juicy interior that rivals high-end seafood restaurants
- Incredibly Addictive – The combination of sweet coconut, crunchy coating, and succulent shrimp creates a flavor profile that’s literally impossible to resist
- Impressively Easy – Despite looking and tasting gourmet, this recipe uses a simple breading station technique that anyone can master
- Party Perfect – Makes an elegant appetizer that always impresses guests and disappears within minutes
- Budget-Friendly – Costs significantly less than ordering them at a restaurant while serving more people
- Versatile Serving Options – Works as an appetizer, main course, party snack, or even a fun dinner entrée
- Quick Preparation – Ready in about 30 minutes from start to finish, making it doable even on busy days
- Kid-Approved – The mildly sweet flavor and fun finger-food format make these a hit with children of all ages
- Customizable Heat Level – Easy to adjust the spiciness of your dipping sauce to suit your family’s preferences
- Tropical Vibes – Brings vacation feelings to your dinner table any day of the week
- Perfect Texture Contrast – Crispy, crunchy exterior gives way to tender, succulent shrimp – textural perfection
- Great for Meal Prep – Can be breaded ahead of time and fried when needed, perfect for entertaining
- Naturally Gluten-Free Option – Easy to adapt using gluten-free flour and breadcrumbs
- Instagram-Worthy – These golden beauties photograph amazingly and look as good as they taste
- Freezer-Friendly – Make a double batch and freeze some for future cravings
Ingredient Notes
Let’s break down what makes these Coconut Shrimp so incredibly delicious. Understanding your ingredients helps you make smart substitutions and achieve perfect results every time.
Large Shrimp: Use large or jumbo shrimp (16-20 count per pound or 21-25 count) that are peeled and deveined with tails left on for easy handling and presentation. The tails make them perfect finger food and add visual appeal. Fresh or frozen (thawed) shrimp both work beautifully. Substitution: Extra-large or colossal shrimp create even more impressive appetizers, though cooking time may increase slightly. Remove tails if you prefer fork-eating over finger food.
Sweetened Shredded Coconut: The star ingredient that gives these shrimp their signature tropical flavor and texture. Use sweetened coconut (not unsweetened) for the best balance of flavors. The sugar in sweetened coconut caramelizes during frying, creating that beautiful golden color. Substitution: If you only have unsweetened coconut, it will still work but add 1-2 tablespoons of sugar to the coating mixture for proper browning and sweetness.
Panko Breadcrumbs: Japanese-style breadcrumbs are larger and flakier than regular breadcrumbs, creating an extra-crispy coating that stays crunchy longer. They’re essential for achieving that restaurant-quality texture. Substitution: Regular breadcrumbs work in a pinch but won’t be quite as crispy. Crush them slightly for better texture. For gluten-free, use gluten-free panko or crushed rice cereal.
All-Purpose Flour: Creates the base layer in your breading station, helping the egg wash stick to the shrimp. It also provides a barrier that seals in moisture. Season it well for maximum flavor. Substitution: Rice flour or cornstarch work for gluten-free versions and actually create an even crispier coating. Use 1:1 ratio.
Eggs: The binding agent that makes your coconut-panko mixture adhere to the shrimp. Room temperature eggs work best and beat them well for even coating. Substitution: Buttermilk can replace eggs for a tangier flavor and creates good adherence, though the coating won’t be quite as secure.
Cornstarch: Added to the flour mixture to create an ultra-crispy coating. Cornstarch dries out the shrimp surface and creates a light, delicate crunch. It’s a secret weapon for professional-level crispiness. Substitution: If you don’t have cornstarch, use all flour, though the coating won’t be quite as delicate and crispy.
Seasonings (Salt, Pepper, Garlic Powder, Paprika): These create the flavor foundation for your coating. Don’t skip seasoning the flour – this is where much of your savory flavor comes from. Paprika adds color and subtle sweetness. Substitution: Use your favorite seasoning blend – Old Bay, Cajun seasoning, or curry powder all create delicious variations.
Vegetable Oil: For frying, you need an oil with a high smoke point. Vegetable, canola, or peanut oil all work perfectly. You’ll need enough to reach about 2-3 inches depth in your pan for proper frying. Substitution: Coconut oil is thematically perfect and adds extra coconut flavor, though it’s more expensive. For a healthier option, use an air fryer with just a light spray of oil.
Sweet Chili Sauce (for serving): The classic accompaniment to coconut shrimp, this Thai-style sauce provides sweet, tangy, and slightly spicy contrast to the rich coconut coating. Substitution: Orange marmalade mixed with a bit of hot sauce, pineapple-mango salsa, honey-mustard sauce, or sriracha mayo all work beautifully.
Equipment Needed
Having the right tools makes frying these shrimp easier and safer. Here’s everything you’ll need:
- Three Shallow Bowls or Pie Plates – For your breading station (flour, egg, coconut mixture)
- Large Heavy-Bottomed Pot or Deep Skillet – For frying; cast iron works beautifully for even heat distribution
- Candy/Deep-Fry Thermometer – Essential for maintaining proper oil temperature (350°F)
- Paper Towels – For patting shrimp dry and draining fried shrimp
- Wire Cooling Rack – Placed over a baking sheet for draining; keeps shrimp crispy instead of soggy
- Baking Sheet – To hold the cooling rack and catch oil drips
- Tongs or Spider Strainer – For safely lowering shrimp into hot oil and removing them
- Measuring Cups and Spoons – For accurate ingredient portions
- Large Mixing Bowl – For combining coconut and panko
- Fork or Whisk – For beating eggs
- Slotted Spoon – Alternative to tongs for removing shrimp from oil
- Kitchen Scissors – For deveining shrimp if needed
- Small Serving Bowls – For dipping sauces
- Plate or Tray – For holding breaded shrimp before frying
Optional but Helpful:
- Air Fryer – For a lighter, less messy cooking method
- Splatter Screen – Protects you from oil splatter during frying
- Kitchen Timer – To track frying time accurately

Coconut Shrimp Recipe
- Total Time: 30 minutes
- Yield: 4-6 servings (about 20-24 shrimp) 1x
- Diet: Gluten Free
Description
Juicy jumbo shrimp coated in crispy sweetened coconut and golden panko breadcrumbs, fried to perfection and served with sweet chili dipping sauce. This restaurant-quality appetizer is easier to make than you think!
Ingredients
For the Shrimp:
- 1½ pounds large shrimp (16–20 count), peeled and deveined, tails on
- ¾ cup all-purpose flour
- 2 tablespoons cornstarch
- 1 teaspoon salt
- ½ teaspoon black pepper
- ½ teaspoon garlic powder
- ½ teaspoon paprika
- 3 large eggs
- 2 tablespoons water
- 1½ cups sweetened shredded coconut
- 1½ cups panko breadcrumbs
- Vegetable oil for frying (about 3-4 cups)
For Serving:
- 1 cup sweet chili sauce
- Lime wedges
- Fresh cilantro for garnish (optional)
Instructions
Step 1: Prepare the Shrimp
Pat shrimp completely dry with paper towels – this is crucial for proper coating adherence. If shrimp are very large, you can butterfly them by cutting along the back (where they were deveined) about ¾ of the way through, then flattening slightly. This isn’t necessary but creates a larger surface area for coating. Leave tails on for easy handling.
Step 2: Set Up Breading Station
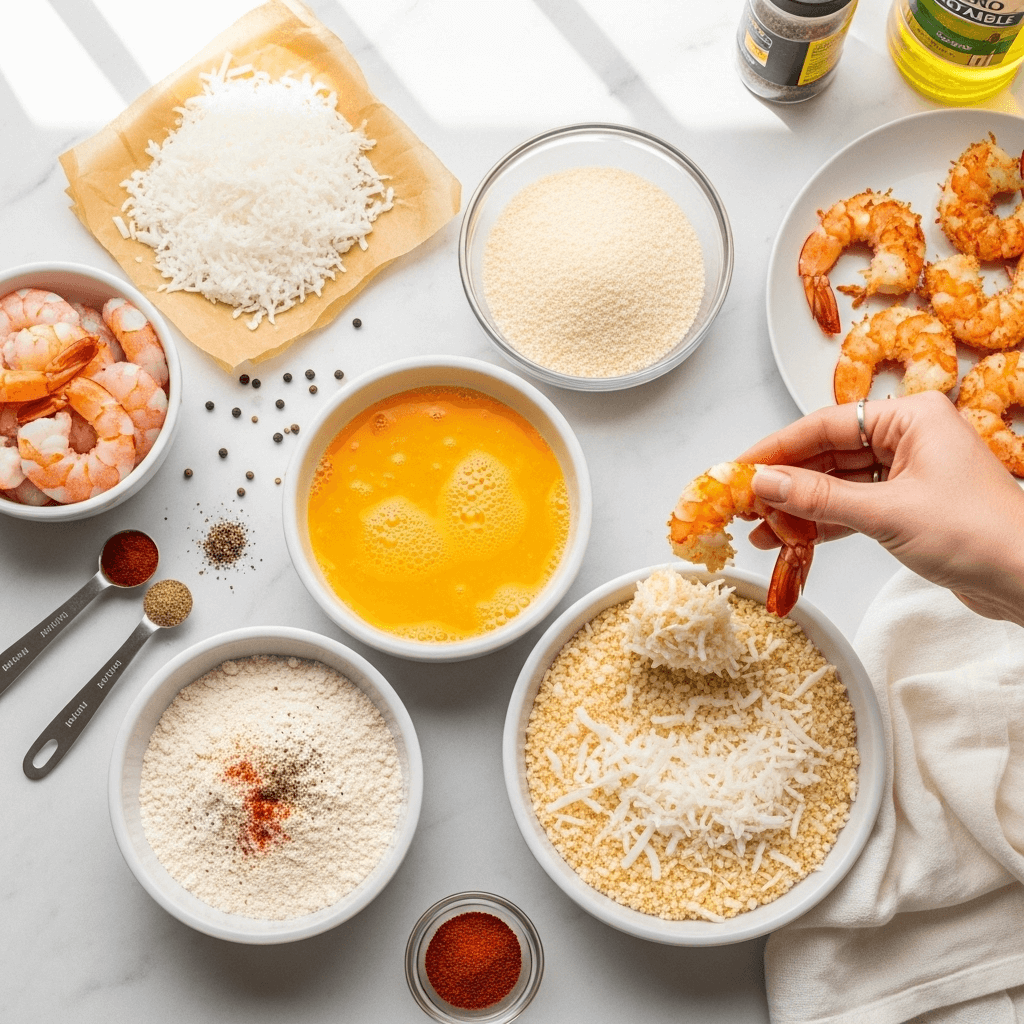
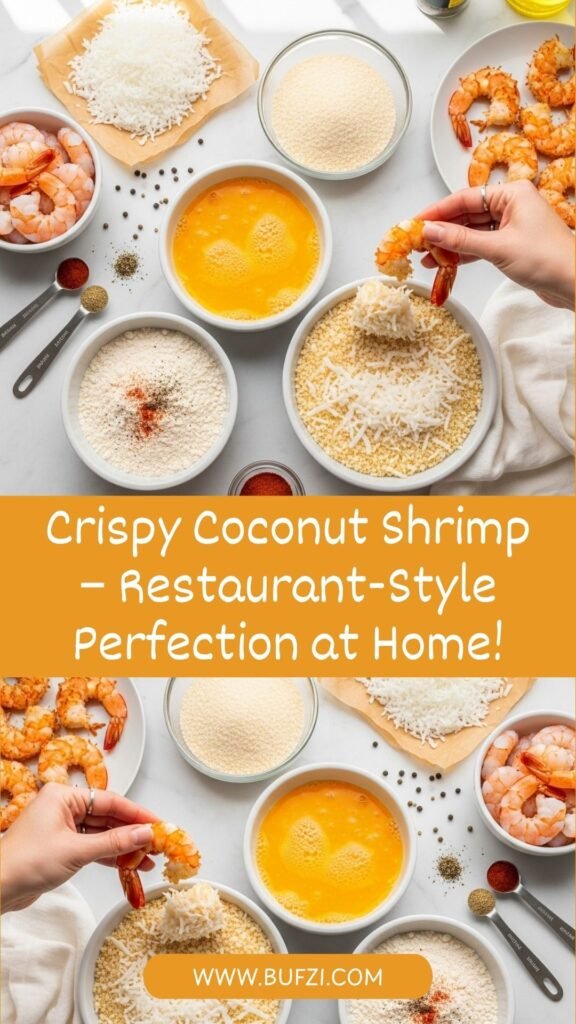
Arrange three shallow bowls or pie plates in a row. In the first bowl, whisk together flour, cornstarch, salt, pepper, garlic powder, and paprika. In the second bowl, beat eggs with 2 tablespoons water until well combined and slightly frothy. In the third bowl, mix together shredded coconut and panko breadcrumbs until evenly distributed.
Step 3: Bread the Shrimp
Working with one shrimp at a time, hold it by the tail. Dredge in the seasoned flour mixture, coating completely and shaking off excess. Dip into the egg mixture, letting excess drip off. Finally, press firmly into the coconut-panko mixture, coating both sides thoroughly and pressing gently to help it adhere. The coating should be generous and stick well. Place breaded shrimp on a clean plate or baking sheet. Repeat with all shrimp.
Step 4: Heat the Oil
Pour vegetable oil into a large heavy-bottomed pot or deep skillet to a depth of 2-3 inches. Heat over medium-high heat to 350°F, using a candy/deep-fry thermometer to monitor temperature. Maintaining proper oil temperature is critical for crispy (not greasy) shrimp. The oil is ready when a pinch of coconut mixture sizzles immediately upon contact.
Step 5: Fry the Shrimp (First Batch)
Working in batches of 4-6 shrimp (don’t overcrowd), carefully lower shrimp into hot oil using tongs or a spider strainer. Fry for 2-3 minutes, flipping halfway through, until coating is deep golden brown and shrimp are pink and cooked through. The coconut should be toasted and crispy, not pale.
Step 6: Drain and Keep Warm
Using tongs or slotted spoon, transfer fried shrimp to a wire rack set over a baking sheet lined with paper towels. This allows oil to drip away while keeping shrimp crispy (don’t place directly on paper towels or the bottom will get soggy). If desired, keep finished shrimp warm in a 200°F oven while you fry remaining batches.
Step 7: Fry Remaining Batches
Allow oil to return to 350°F between batches (this takes about 1-2 minutes). Repeat frying process with remaining shrimp, working in batches to avoid overcrowding, which drops oil temperature and creates soggy results.
Step 8: Serve Immediately
Arrange hot coconut shrimp on a serving platter. Garnish with fresh cilantro if desired and serve immediately with sweet chili sauce in small bowls for dipping. Add lime wedges on the side for squeezing over shrimp. These are best enjoyed hot and fresh from the fryer!
Notes
- Oil Temperature is Critical: Keep oil at 350°F for crispy (not greasy) results. Too cool and shrimp absorb oil; too hot and coating burns before shrimp cook through.
- Don’t Skip Drying: Moisture is the enemy of crispy coating. Pat shrimp very dry before breading.
- Fresh is Best: Coconut shrimp are at their crispiest within 10-15 minutes of frying. Plan timing accordingly.
- Tail Handling: Tails make great handles for dipping and eating, but remove them before breading if preferred.
- Batch Frying: Work in small batches (4-6 shrimp) to maintain oil temperature and ensure even cooking.
- Air Fryer Option: Spray breaded shrimp with oil spray and air fry at 400°F for 8-10 minutes, flipping halfway, for a lighter version.
- Gluten-Free: Use gluten-free flour and gluten-free panko breadcrumbs or crushed rice cereal.
- Prep Time: 20 minutes
- Cook Time: 10 minutes
- Category: Appetizer
- Method: Deep-Frying
- Cuisine: American
Nutrition
- Serving Size: 4-5 shrimp
- Calories: 425
- Sugar: 12g
- Sodium: 685mg
- Fat: 22g
- Saturated Fat: 10g
- Unsaturated Fat: 11g
- Trans Fat: 0g
- Carbohydrates: 35g
- Fiber: 3g
- Protein: 24g
- Cholesterol: 245mg
Tips & Variations
Baked Coconut Shrimp:
For a lighter version, place breaded shrimp on a parchment-lined baking sheet, spray generously with cooking spray, and bake at 425°F for 12-15 minutes, flipping halfway through. They won’t be quite as crispy as fried but still delicious and much healthier.
Air Fryer Coconut Shrimp:
Arrange breaded shrimp in a single layer in your air fryer basket (work in batches), spray with oil, and cook at 400°F for 8-10 minutes, flipping halfway. This method gives you very crispy results with minimal oil.
Extra Crunchy Coating:
Double-bread the shrimp by dipping back in egg and coconut mixture after the first coating. This creates an extra-thick, super-crunchy crust that’s incredibly satisfying.
Spicy Coconut Shrimp:
Add ½-1 teaspoon cayenne pepper or chili powder to the flour mixture for heat. Serve with spicy pineapple salsa or sriracha mayo for extra kick.
Macadamia-Coconut Shrimp:
Replace ½ cup of the coconut with finely chopped macadamia nuts for added richness and crunch. This creates a more luxurious, Hawaiian-style version.
Curry Coconut Shrimp:
Add 1-2 teaspoons curry powder to the flour mixture for an Asian-fusion twist. Pair with mango chutney or cucumber raita for dipping.
Honey-Coconut Shrimp:
Drizzle fried shrimp with warm honey before serving for extra sweetness. You can also add 1 tablespoon honey to your dipping sauce.
Lime-Coconut Shrimp:
Add 1 tablespoon lime zest to the coconut-panko mixture and serve with lime-cilantro dipping sauce for bright, fresh flavors.
Toasted Coconut Version:
Toast the shredded coconut in a dry skillet until lightly golden before mixing with panko. This intensifies the coconut flavor and creates deeper color.
Dipping Sauce Variations:
- Pineapple-Mango Salsa (tropical and fresh)
- Honey-Mustard Sauce (sweet and tangy)
- Sriracha Mayo (spicy and creamy)
- Orange Marmalade with ginger (sweet with a bite)
- Apricot-Jalapeño Sauce (sweet-spicy combo)
Pro Chef Tips
The Double-Dry Technique:
After patting shrimp dry initially, place them on a paper towel-lined plate and refrigerate uncovered for 15-20 minutes before breading. This extra drying step removes surface moisture and creates an even crispier coating. Professional chefs use this technique for the crunchiest results.
Season Every Layer:
Don’t just season the flour – add a pinch of salt to both the egg wash and the coconut-panko mixture too. Layering seasoning throughout creates more complex, well-rounded flavor instead of having it all in one place.
The Press and Rest Method:
After breading each shrimp, press the coating firmly all over, then let the breaded shrimp rest on a wire rack for 10 minutes before frying. This helps the coating set and adhere better, resulting in less coating falling off during frying.
Butterfly for Maximum Crunch:
Professional kitchens often butterfly large shrimp before breading, cutting along the back vein channel about ¾ through and flattening slightly. This creates more surface area for coating and makes the shrimp look larger and more impressive.
Temperature Control is Everything:
Invest in a good deep-fry thermometer and monitor your oil constantly. When oil temperature drops below 325°F, stop adding shrimp and let it come back up to 350°F before continuing. Consistent temperature is the difference between restaurant-quality crispy and disappointing greasy.
The Toothpick Test:
Before frying your first batch, test one shrimp. If the coating is sliding off or not staying crispy, your breading technique needs adjustment. This test shrimp prevents ruining your whole batch.
Work in Assembly Line:
Set up your breading station efficiently with your non-dominant hand for wet ingredients (egg) and dominant hand for dry ingredients (flour and coconut). This keeps one hand clean and prevents your fingers from getting coated in breading.
Fresh Oil Matters:
Use fresh oil for the best flavor and cleanest taste. Old or previously used oil can impart off flavors. If you must reuse oil, strain it first and use within a week for best results.
The Shake and Tap:
After dredging in flour and before dipping in egg, shake off excess flour and tap the shrimp gently on the edge of the bowl. Too much flour creates gummy spots where egg pools instead of coating evenly.
Serve at the Right Temperature:
Coconut shrimp are best enjoyed hot but not scalding – about 140-150°F. Let them rest for 2-3 minutes after frying. This temperature is perfect for eating comfortably while maintaining maximum crispiness.
Common Mistakes to Avoid
Mistake #1: Wet Shrimp
Moisture is the number one enemy of crispy coating. Many home cooks skip properly drying the shrimp, which causes the breading to slide off during frying or creates a soggy, gummy coating. Solution: Pat shrimp completely dry with paper towels, even if they seem dry. For frozen shrimp, thaw completely in the refrigerator overnight and dry thoroughly. Consider the “double-dry” technique mentioned in Pro Tips.
Mistake #2: Overcrowding the Pan
Adding too many shrimp at once drastically drops the oil temperature, resulting in greasy, soggy coating instead of crispy perfection. Overcrowding also makes it hard to flip shrimp and monitor cooking. Solution: Fry only 4-6 shrimp at a time depending on your pan size. Yes, it takes longer, but the results are worth it. Each shrimp needs space for oil to circulate.
Mistake #3: Wrong Oil Temperature
Oil that’s too cool makes shrimp absorb too much oil and become greasy. Oil that’s too hot burns the coconut before the shrimp cook through. Solution: Always use a thermometer and maintain 350°F. Wait for oil to return to temperature between batches. When in doubt, test with one shrimp first.
Mistake #4: Not Pressing the Coating
Gently sprinkling the coconut-panko mixture onto shrimp doesn’t create enough adherence. The coating needs to be firmly pressed on to stay during frying. Solution: After dipping in egg, press each shrimp firmly into the coconut mixture on both sides, using your hands to pat and press the coating all over. Don’t be shy about it.
Mistake #5: Using Unsweetened Coconut
While unsweetened coconut works technically, it won’t brown as beautifully or have that signature sweet flavor that makes coconut shrimp so addictive. Solution: Always use sweetened shredded coconut for authentic results. The sugar caramelizes during frying, creating that gorgeous golden color and subtle sweetness.
Mistake #6: Draining on Paper Towels Directly
Placing fried shrimp flat on paper towels traps steam underneath, making the bottom soggy while the top stays crispy. Solution: Always drain on a wire rack set over paper towels or a baking sheet. This allows air circulation all around, keeping the entire shrimp crispy.
Mistake #7: Serving Too Late
Coconut shrimp lose their crispiness quickly as they cool and steam. Waiting too long to serve means your guests get soggy instead of crispy shrimp. Solution: Plan your frying to finish 5-10 minutes before serving. If making ahead is necessary, reheat in a 400°F oven for 5-7 minutes to restore crispiness, though they’re never quite as good as fresh.
Storage & Meal Prep
Refrigerator Storage:
Store leftover coconut shrimp in an airtight container lined with paper towels (to absorb moisture) in the refrigerator for up to 2 days. Be aware that the coating will soften significantly during storage. These are really best enjoyed fresh, but leftovers can be refreshed.
Reheating for Crispiness:
Never microwave coconut shrimp – the coating becomes soggy and rubbery. Instead, reheat in a 400°F oven on a wire rack over a baking sheet for 7-10 minutes until heated through and coating crisps back up. An air fryer at 375°F for 3-5 minutes also works wonderfully for restoring crispiness.
Breading Ahead:
The best make-ahead strategy is breading the shrimp up to 4 hours in advance. Place breaded (uncooked) shrimp on a parchment-lined baking sheet in a single layer, cover loosely with plastic wrap, and refrigerate. The coating actually adheres better after this resting time. Fry just before serving for optimal freshness and crunch.
Room Temperature Caution:
Never leave cooked shrimp at room temperature for more than 2 hours (or 1 hour if temperature is above 90°F) due to food safety concerns. Shellfish is particularly susceptible to bacterial growth.
Meal Prep Strategy:
If making these for a party, set up your breading station completely in advance – measure and mix all coatings, prepare and dry your shrimp, and have everything ready to go. Then bread all shrimp 1-2 hours before guests arrive and refrigerate. Fry in batches during the party for the freshest results, or fry everything 15-20 minutes before serving time.
Make-Ahead & Freezer Notes
Freezing Breaded Uncooked Shrimp:
This is the absolute best way to make coconut shrimp ahead! Bread the shrimp completely, then arrange them in a single layer on a parchment-lined baking sheet. Freeze until solid (about 2 hours), then transfer to freezer bags, separating layers with parchment paper. Freeze for up to 2 months. When ready to cook, fry directly from frozen, adding 1-2 minutes to the cooking time. The results are nearly identical to fresh.
Freezing Cooked Shrimp:
You can freeze fully cooked coconut shrimp, though they won’t be quite as crispy when reheated. Let them cool completely, then freeze in a single layer before transferring to freezer bags. Freeze for up to 1 month. Reheat from frozen in a 400°F oven for 10-12 minutes.
Thawing Instructions:
If you prefer to thaw breaded uncooked shrimp before frying (though not necessary), transfer them to the refrigerator 2-3 hours before cooking. Never thaw at room temperature. Fry as directed once thawed.
Best Reheating Method:
For frozen cooked shrimp, don’t thaw – reheat directly from frozen in a 400°F oven on a wire rack for 10-15 minutes until hot and crispy. An air fryer works even better: 375°F for 8-10 minutes, no thawing needed.
Party Planning Timeline:
For entertaining, bread shrimp the morning of your event and refrigerate. Or bread and freeze up to 2 months ahead. Fry 15-20 minutes before guests arrive, or set up a frying station and cook batches during the party for ultimate freshness. Everyone loves watching food being made!
Quality Maintenance:
For the best quality, use frozen breaded shrimp within 1 month. The coconut can become rancid over time, and ice crystals can affect texture. Label bags with date and contents clearly.
Serving Suggestions
Coconut Shrimp works beautifully in many contexts. Here are ideas for creating complete meals or party spreads:
Dipping Sauces:
- Sweet Chili Sauce – The classic pairing, sweet with a gentle kick
- Pineapple-Mango Salsa – Fresh, fruity, and tropical
- Orange-Ginger Dipping Sauce – Sweet citrus with warming spice
- Honey-Mustard Sauce – Sweet and tangy with a hint of heat
- Spicy Mayo (Sriracha Mayo) – Creamy with adjustable heat
- Apricot-Jalapeño Sauce – Sweet fruit with spicy pepper balance
- Thai Peanut Sauce – Rich, nutty, and slightly spicy
Side Dishes:
- Coconut Rice – Complements the coconut theme perfectly
- Pineapple Fried Rice – Tropical and colorful
- Asian Cucumber Salad – Cool, refreshing, and light
- Tropical Fruit Salad – Mango, pineapple, and papaya
- Coleslaw – Creamy or vinegar-based for crunch
- Sweet Potato Fries – Another crowd-pleasing fried side
- Grilled Vegetables – Zucchini, bell peppers, and onions
Complete Meal Ideas:
- Tropical Dinner: Coconut shrimp with coconut rice, grilled pineapple, and mango salsa
- Surf and Turf: Pair with grilled steak and asparagus for an elegant dinner
- Party Spread: Serve alongside other appetizers like spring rolls, dumplings, and satay
- Taco Night: Use as taco filling with cabbage slaw, avocado, and chipotle mayo
- Salad Topper: Add to a tropical salad with mixed greens, mango, avocado, and citrus vinaigrette
Beverage Pairings:
- White Wine – Riesling, Gewürztraminer, or Pinot Grigio
- Beer – Light lagers, wheat beers, or fruit-forward IPAs
- Cocktails – Piña colada, mojito, mai tai, or margarita
- Non-Alcoholic – Pineapple juice, coconut water, or tropical punch
FAQs Section
Q: Can I use frozen shrimp for this recipe?
A: Absolutely! Frozen shrimp work perfectly and are often fresher than “fresh” shrimp at the grocery store since they’re frozen right on the boat. The key is proper thawing and drying. Thaw frozen shrimp in the refrigerator overnight or place them in a colander under cold running water for 10-15 minutes. Once thawed, pat them completely dry with paper towels before breading. Excess moisture is the enemy of crispy coating, so this drying step is crucial for success.
Q: Why does my coconut coating fall off during frying?
A: This frustrating problem usually has one of three causes: (1) The shrimp weren’t dried properly before breading, (2) you didn’t press the coating firmly enough onto the shrimp, or (3) the oil temperature was wrong. Make sure shrimp are bone-dry, press the coconut-panko mixture firmly onto each shrimp after dipping in egg, and maintain oil at exactly 350°F. Letting breaded shrimp rest for 10 minutes before frying also helps the coating set and adhere better.
Q: Can I make these in an air fryer?
A: Yes, and they turn out wonderfully crispy with much less oil! Arrange breaded shrimp in a single layer in your air fryer basket (don’t overcrowd – work in batches if needed). Spray both sides generously with cooking oil spray. Air fry at 400°F for 8-10 minutes, flipping halfway through, until golden brown and shrimp are cooked through. The texture won’t be quite as crispy as deep-fried, but it’s a much healthier alternative that still delivers great results.
Q: What’s the best dipping sauce for coconut shrimp?
A: Sweet chili sauce is the classic choice and my personal favorite – it perfectly balances the sweet coconut with tangy, slightly spicy flavors. However, there are many delicious options! Pineapple-mango salsa offers fresh tropical flavors, honey-mustard provides sweet tanginess, sriracha mayo adds creamy heat, and orange marmalade mixed with ginger creates sophisticated sweetness. You can also make a quick sauce by mixing apricot preserves with jalapeño. Try a few different sauces and let guests choose their favorite!
Q: How do I know when the shrimp are done cooking?
A: Shrimp cook very quickly and are done when they turn pink and opaque throughout. For coconut shrimp, the visual cues are easy: the coating should be deep golden brown (not pale yellow), and you should see the pink color of the shrimp through any gaps in the coating. The entire cooking time is only 2-3 minutes per batch. Overcooked shrimp become rubbery and tough, so watch carefully and remove them as soon as they’re golden and the shrimp look pink.
Q: Can I bake these instead of frying?
A: Yes! While they won’t be quite as crispy as fried, baked coconut shrimp are still delicious and much lighter. Preheat your oven to 425°F. Arrange breaded shrimp on a parchment-lined or lightly greased baking sheet in a single layer. Spray generously with cooking spray on both sides. Bake for 12-15 minutes, flipping halfway through, until coating is golden brown and shrimp are pink. For extra crispiness, broil for the last 1-2 minutes while watching carefully to prevent burning.
Q: What size shrimp should I buy?
A: Large or jumbo shrimp work best for this recipe. Look for 16-20 count (16-20 shrimp per pound) or 21-25 count. These sizes are substantial enough to stay juicy during frying while providing a nice shrimp-to-coating ratio. Extra-large or colossal shrimp (under 15 count) are even more impressive but may need an extra minute of cooking time. Avoid small or medium shrimp (over 30 count) as they can overcook quickly and don’t provide the satisfying bite you want.
Q: Why is my coating not getting golden brown?
A: This usually means you’re using unsweetened coconut instead of sweetened. The sugar in sweetened coconut caramelizes during frying, creating that beautiful golden color. If you only have unsweetened, add 2 tablespoons of sugar to the coconut-panko mixture. Also check your oil temperature – if it’s too low (under 325°F), the shrimp will cook through before the coating browns. Maintain 350°F for perfect golden results.
Conclusion
Congratulations – you now have everything you need to make absolutely perfect, restaurant-quality Crispy Coconut Shrimp right in your own kitchen! These golden, crunchy beauties are sure to become one of your most-requested recipes, whether you’re serving them as an elegant appetizer, a fun party snack, or even as a tropical-inspired main course. The combination of sweet coconut, crispy coating, and tender juicy shrimp is simply irresistible, and once you’ve mastered this recipe, you’ll wonder why you ever ordered them at restaurants.
The beauty of homemade coconut shrimp is that you can make them exactly the way you like – adjust the seasonings, choose your favorite dipping sauces, make them in the air fryer for a lighter version, or go all-out with traditional deep-frying for maximum crispiness. Plus, at a fraction of the cost of restaurant versions, you can make generous portions that actually satisfy everyone at your table without breaking the bank.
Whether you’re planning a game day spread, hosting a tropical-themed party, celebrating a special occasion, or just treating yourself to something delicious on a Tuesday night, these coconut shrimp deliver every single time. That first crispy, golden bite dipped in sweet chili sauce is pure magic, and the smiles around your table will be all the proof you need that this recipe is a winner.
Now it’s time to make your own batch of these amazing Crispy Coconut Shrimp! I can’t wait to hear how they turn out for you. Did you try any of the variations? What dipping sauce did you choose? How quickly did they disappear from the platter? Drop a comment below and share your experience – I read every single one and your feedback helps me create even better recipes for you!
Please save this recipe to your Pinterest boards so you can easily find it whenever you’re craving something crispy, tropical, and absolutely delicious! Pin it to your “Appetizer Recipes,” “Seafood Dishes,” “Party Food,” or “Restaurant Copycat Recipes” boards, and share it with friends who would love to learn how to make restaurant-quality coconut shrimp at home. Every pin and share helps other home cooks discover these incredible flavors!
Happy frying, and may your shrimp always be crispy and your coconut perfectly golden!