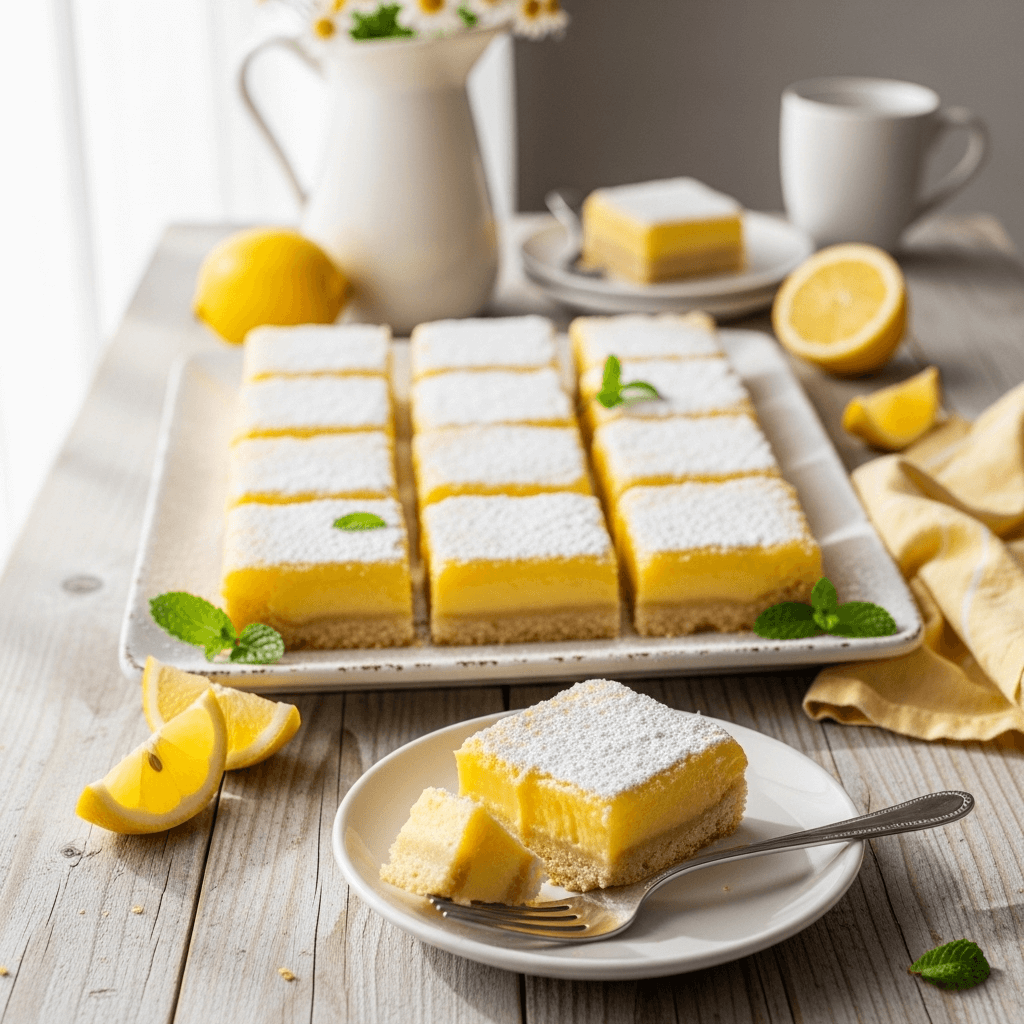

If there’s one dessert that perfectly captures sunshine in a bite, it’s classic lemon bars. These delightful treats feature a buttery shortbread crust topped with a tangy-sweet lemon filling that’s both creamy and refreshing. Whether you’re looking for the perfect potluck dessert, a sweet treat for afternoon tea, or an impressive finale to a dinner party, these easy lemon bars deliver every single time.
What makes this homemade lemon bar recipe truly special is the perfect balance of flavors and textures. The bottom layer is a rich, crumbly shortbread crust that melts in your mouth, while the top layer is a velvety smooth lemon custard that strikes the ideal balance between tart and sweet. That generous dusting of powdered sugar on top? It’s not just pretty – it adds the final touch of sweetness that brings everything together beautifully.
These lemon dessert bars are incredibly versatile. They’re elegant enough for wedding showers and baby showers, casual enough for backyard barbecues, and special enough to become your signature dessert. Best of all, they’re surprisingly simple to make, requiring just basic pantry ingredients and about 15 minutes of hands-on time. Once you taste these bright, sunny bars, you’ll understand why they’ve been a beloved American dessert for generations.
History / Background
The story of lemon bars is a fascinating journey through American baking history. While citrus-based desserts have existed for centuries in various cultures – from British lemon curd to French tarte au citron – the American lemon bar as we know it today is a relatively modern invention that emerged in the mid-20th century.
The exact origin of lemon bars is somewhat mysterious, with several theories about their creation. The most widely accepted story suggests that lemon bars evolved from traditional lemon squares and chess squares that were popular in the American South during the early 1900s. These early versions were often simpler, with a basic pastry crust and a lemon-flavored filling, but they laid the groundwork for what would become the classic lemon bar.
The recipe really took off in the 1960s and 1970s, coinciding with the rise of church cookbooks, community recipe exchanges, and the popularization of home baking across America. Betty Crocker and other major food companies began featuring lemon bar recipes in their publications, and the dessert quickly became a staple at potlucks, bake sales, and family gatherings across the country.
What made lemon bars particularly special during this era was their perceived sophistication. At a time when many American desserts were heavy, chocolate-based, or fruit pies, lemon bars offered something different – a lighter, more refined option that still satisfied the sweet tooth. The combination of a buttery crust (similar to Scottish shortbread) and a custard-like filling (reminiscent of English lemon curd) represented a perfect blend of European baking traditions adapted for American tastes.
California, with its abundant lemon groves, particularly embraced lemon bars as a regional specialty. The dessert became synonymous with sunny California living and fresh, bright flavors. By the 1980s and 1990s, lemon bars had secured their place as one of America’s most beloved bar desserts, right alongside brownies and blondies.
Today, lemon bars remain a timeless classic. They’ve inspired countless variations (lime bars, raspberry lemon bars, lavender lemon bars), but the original recipe continues to be the gold standard – a perfect balance of tart, sweet, buttery, and absolutely delicious.
Why You’ll Love This Recipe
This easy lemon bar recipe is about to become your go-to dessert for every occasion, and here’s why: it delivers impressive, bakery-quality results without requiring any fancy techniques or hard-to-find ingredients. These bars look elegant, taste amazing, and come together with straightforward steps that even beginning bakers can master with confidence.
Here’s what makes this lemon bar recipe absolutely irresistible:
- Perfect balance of flavors – The tangy lemon filling paired with the sweet, buttery crust creates an addictive combination that keeps people coming back for more
- Crowd-pleasing favorite – Universally loved by kids and adults alike; they disappear quickly at any gathering
- Make-ahead friendly – Can be prepared a day or two in advance, making party planning stress-free
- Budget-friendly – Uses simple, inexpensive ingredients you probably already have in your pantry
- Impressive presentation – Looks bakery-quality with minimal effort; perfect for impressing guests
- Easy to transport – Cuts into neat squares that travel well to potlucks, picnics, and parties
- No special equipment – Requires only basic baking tools that every home kitchen already has
- Refreshing flavor – Not overly heavy or rich; the bright citrus notes make these perfect year-round
- Freezer-friendly – Makes excellent use of your freezer space for convenient dessert on demand
- Customizable – Easy to adapt with different citrus fruits or flavor additions
- Consistent results – This foolproof recipe works perfectly every single time
Ingredient Notes
Let’s break down the ingredients that make these classic lemon bars so incredibly delicious, and why each one plays an important role.
For the Shortbread Crust:
All-Purpose Flour: The foundation of your buttery crust, providing structure and that perfect crumbly texture. For a gluten-free version, you can substitute with a 1:1 gluten-free baking flour blend, though the texture will be slightly different.
Butter: Use real, unsalted butter for the best flavor and texture. The butter should be softened but not melted – think room temperature where your finger leaves an indent when pressed. European-style butter with higher fat content creates an even richer crust, but regular butter works beautifully. Don’t substitute with margarine or shortening; butter is essential for authentic shortbread flavor.
Powdered Sugar (for crust): Creates a more tender, melt-in-your-mouth crust compared to granulated sugar. It also helps the crust hold together better. Also called confectioners’ sugar or icing sugar.
Salt: Just a pinch enhances all the other flavors and prevents the crust from tasting flat or one-dimensional.
For the Lemon Filling:
Fresh Lemons: This is where the magic happens! You’ll need both fresh lemon juice and lemon zest. Always use fresh lemons – bottled lemon juice simply cannot compete with the bright, vibrant flavor of fresh-squeezed. You’ll typically need 4-5 medium lemons to get 3/4 cup of juice. Meyer lemons create a slightly sweeter, more floral flavor if you can find them, but regular Eureka or Lisbon lemons work perfectly.
Eggs: Provide structure and richness to the filling, creating that creamy custard-like texture. The eggs should be at room temperature for best results – this helps them incorporate more smoothly and creates a more even texture.
Granulated Sugar: Sweetens the tart lemon juice to create the perfect balance. The amount listed gives you a classic sweet-tart flavor; adjust slightly up or down based on your personal preference and the tartness of your lemons.
Flour (for filling): A small amount of flour helps thicken the filling and gives it structure so it sets properly without being rubbery. This is what makes the difference between a custard-like lemon bar and runny lemon curd.
Lemon Zest: Contains concentrated lemon oils that add incredible depth of flavor and aromatic brightness. Always zest your lemons before juicing them – it’s much easier!
Baking Powder: A tiny amount helps the filling set properly and creates a slightly lighter texture.
Powdered Sugar (for topping): The classic finishing touch that adds sweetness and makes your lemon bars look professionally made. Don’t skip this – it’s iconic!
Equipment Needed
The beauty of this homemade lemon bar recipe is that it requires only basic baking equipment. Here’s what you’ll need:
- 9×13-inch Baking Pan – A standard 9×13-inch metal or glass baking pan is perfect for this recipe. Metal pans tend to brown the crust more evenly, but glass works great too (you may need to adjust baking time slightly).
- Aluminum Foil or Parchment Paper – Essential for lining your pan to make removal easy. I prefer the overhang method where the foil or parchment extends over the sides – this creates “handles” for lifting the entire batch out of the pan for clean cutting.
- Mixing Bowls – You’ll need at least two medium bowls, one for the crust and one for the filling.
- Electric Mixer or Whisk – A hand mixer or stand mixer makes combining the crust ingredients easier, but a good whisk and some elbow grease work perfectly fine.
- Microplane or Box Grater – For zesting the lemons. A Microplane zester gives you fluffy, fine zest that distributes beautifully throughout the filling.
- Citrus Juicer (optional but helpful) – Makes extracting lemon juice much easier and more efficient. A handheld reamer or even a fork will work in a pinch.
- Measuring Cups and Spoons – Accurate measurements are important in baking, so use proper measuring tools.
- Fine-Mesh Sieve or Strainer – For sifting powdered sugar over the finished bars for a professional look.
- Sharp Knife – For cutting clean, precise squares. Wipe the knife between cuts for the neatest edges.
- Cooling Rack – Allows air to circulate under the pan for even cooling.
Classic Lemon Bars Recipe
- Total Time: 65 minutes
- Yield: 16-20 bars 1x
- Diet: Vegetarian
Description
These classic lemon bars feature a buttery shortbread crust topped with a tangy-sweet lemon custard filling and dusted with powdered sugar. This easy lemon bar recipe delivers bakery-quality results with simple ingredients and straightforward steps. Perfect for potlucks, parties, or anytime you’re craving a bright, refreshing dessert that perfectly balances tart and sweet flavors.
Ingredients
For the Shortbread Crust:
- 2 cups (250g) all-purpose flour
- 1/2 cup (60g) powdered sugar
- 1 cup (2 sticks/226g) unsalted butter, softened
- 1/4 teaspoon salt
For the Lemon Filling:
- 4 large eggs, room temperature
- 1 1/2 cups (300g) granulated sugar
- 1/4 cup (30g) all-purpose flour
- 2/3 to 3/4 cup (160-180ml) fresh lemon juice (from 4–5 lemons)
- 2 tablespoons lemon zest (from 2–3 lemons)
- 1/4 teaspoon baking powder
For Topping:
- 2–3 tablespoons powdered sugar, for dusting
Instructions
Step 1: Prepare Your Pan and Preheat Oven
Preheat your oven to 350°F (175°C). Line a 9×13-inch baking pan with aluminum foil or parchment paper, leaving about 2 inches of overhang on the sides – this creates handles that make removing the bars much easier later. Lightly spray or butter the foil/parchment to prevent sticking. Having this overhang is crucial for getting clean cuts and easy removal, so don’t skip this step.
Step 2: Make the Shortbread Crust
In a medium mixing bowl, combine the 2 cups flour, 1/2 cup powdered sugar, and 1/4 teaspoon salt. Cut the softened butter into small cubes and add it to the flour mixture. Using an electric mixer on low speed (or your hands, or a pastry cutter), blend the butter into the dry ingredients until the mixture looks like coarse crumbs and starts to come together. It should be sandy and crumbly but hold together when pressed – think of the texture of wet sand. This usually takes about 2-3 minutes with a mixer.
Step 3: Press and Par-Bake the Crust
Pour the crumbly crust mixture into your prepared pan. Using your hands or the bottom of a flat measuring cup, press the mixture firmly and evenly across the entire bottom of the pan. You want to create a compact, even layer with no gaps or thin spots – press especially well into the corners and edges. The crust should be about 1/4 inch thick. Bake in the preheated oven for 18-20 minutes, until the crust is set and very lightly golden around the edges. It shouldn’t be brown, just lightly colored. This par-baking step is essential – it ensures your crust stays crisp even after adding the wet filling.
Step 4: Prepare the Lemon Filling
While the crust is baking, prepare your lemon filling. First, zest your lemons using a Microplane or fine grater – you need about 2 tablespoons of zest. Then juice the lemons to get 2/3 to 3/4 cup of fresh juice. In a large mixing bowl, whisk together the eggs and granulated sugar until well combined and slightly thickened, about 1 minute. Add the flour and baking powder, whisking until smooth with no lumps. Pour in the fresh lemon juice and lemon zest, and whisk everything together until completely smooth and uniform in color. The mixture should be thin and pourable, similar to a custard base.
Step 5: Pour and Bake
As soon as the crust comes out of the oven (while it’s still hot), give your lemon filling one final quick whisk, then carefully pour it over the hot crust. The hot crust helps the filling set properly. If you see any foam or bubbles on the surface, gently pop them with a toothpick or skim them off – this gives you a smoother finish. Immediately return the pan to the oven and bake for 22-25 minutes. The filling is done when it’s set around the edges but still slightly jiggly in the very center (like perfectly set Jell-O). It should not be liquid or sloshy. The filling will continue to set as it cools, so don’t overbake or it will become rubbery.
Step 6: Cool Completely
Remove the pan from the oven and place it on a cooling rack. Let the lemon bars cool at room temperature for about 30 minutes, then transfer the pan to the refrigerator and chill for at least 2 hours (or overnight for easiest cutting). The bars must be completely cold before cutting, or they’ll be messy and won’t hold their shape.
Step 7: Cut and Serve
Once completely chilled, use the foil or parchment overhang to lift the entire slab of lemon bars out of the pan and place it on a cutting board. Using a large, sharp knife (wipe it clean between each cut for the neatest edges), cut into 16-20 squares depending on your preferred size. Just before serving, dust generously with powdered sugar using a fine-mesh sieve. The powdered sugar adds the perfect finishing touch and classic bakery look.
Notes
- Lemon Juice Amount: The range of 2/3 to 3/4 cup allows you to adjust tartness. Use 2/3 cup for a sweeter bar, 3/4 cup for more tart. Taste your filling before baking if you’re unsure.
- Room Temperature Eggs: This is important! Cold eggs don’t incorporate as smoothly and can cause a less uniform texture. Set eggs out 30 minutes before baking, or place them in warm water for 5 minutes.
- Don’t Skip the Par-Baking: Baking the crust first ensures it stays crisp and doesn’t get soggy from the filling.
- Cooling is Essential: Patience is key! Cutting into warm lemon bars will result in a messy filling that doesn’t hold its shape. Always chill completely.
- Powdered Sugar Timing: Dust with powdered sugar right before serving, not in advance. The sugar will absorb moisture and dissolve if added too early.
- Altitude Adjustments: At high altitude (above 3,000 feet), reduce baking powder to 1/8 teaspoon and increase oven temperature by 15°F.
- Prep Time: 15 minutes
- Cook Time: 50 minutes
- Category: Dessert
- Method: Baking
- Cuisine: American
Nutrition
- Serving Size: 1 bar (based on 16 servings)
- Calories: 245
- Sugar: 24g
- Sodium: 75mg
- Fat: 12g
- Saturated Fat: 7g
- Unsaturated Fat: 4g
- Trans Fat: 0g
- Carbohydrates: 32g
- Fiber: 1g
- Protein: 3g
- Cholesterol: 75mg
Tips & Variations
One of the best things about this lemon bar recipe is how easily it adapts to different flavors and preferences. Here are some delicious ways to customize these bars:
Citrus Variations: Swap all or part of the lemon juice and zest for other citrus fruits. Lime bars are fantastic (use 2 tablespoons lime zest and 3/4 cup lime juice). Orange creates a milder, sweeter bar. Try combinations like lemon-lime, lemon-orange, or lemon-grapefruit for interesting flavor profiles.
Berry Lemon Bars: Add 3/4 cup fresh raspberries, blueberries, or blackberries to the filling just before pouring it over the crust. The berries sink slightly and create beautiful pockets of fruit throughout.
Lavender Lemon Bars: Add 1 tablespoon of culinary lavender to the lemon filling for a sophisticated, floral note. Steep the lavender in the lemon juice for 10 minutes, then strain before using.
Coconut Lemon Bars: Add 1/2 cup sweetened shredded coconut to the crust mixture for a tropical twist. You can also sprinkle toasted coconut on top along with the powdered sugar.
Gluten-Free Version: Substitute the all-purpose flour with a 1:1 gluten-free baking flour blend in both the crust and filling. The texture will be slightly more delicate, but still delicious.
Meyer Lemon Bars: If you can find Meyer lemons, they create a sweeter, more complex flavor with floral notes. You may want to reduce the sugar slightly as Meyer lemons are naturally sweeter.
Lemon Cheesecake Bars: Add 4 ounces of softened cream cheese to the filling, beating it with the eggs and sugar until smooth before adding the other ingredients. This creates a richer, creamier filling.
Reduced Sugar: You can reduce the sugar in the filling by up to 1/4 cup if you prefer a more tart bar. The crust sugar can also be reduced slightly, though too much reduction affects the texture.
Thicker Filling: For extra-tall lemon bars, make 1.5x the filling recipe and increase the baking time by 5-7 minutes. The crust recipe stays the same.
Pro Chef Tips
Want bakery-quality lemon bars with perfectly set filling and crisp crust? These professional techniques will take your bars from good to absolutely spectacular:
Zest Before Juicing: Always zest your lemons before you cut and juice them. Trying to zest a juiced lemon half is frustratingly difficult and you’ll get much less zest. Plus, room temperature whole lemons yield more juice when rolled firmly on the counter before cutting.
Strain Your Filling: For the smoothest, most professional-looking filling, pour your lemon mixture through a fine-mesh strainer before adding it to the crust. This removes any bits of egg white that didn’t fully incorporate and any pulp from the lemon juice, resulting in a silky-smooth top.
Hot Crust, Hot Filling: Pour your lemon filling onto the crust immediately after removing it from the oven, while both the crust and filling are warm/hot. This helps the two layers bond together perfectly and creates a seamless dessert. The heat also helps the filling begin setting immediately at the edges.
The Jiggle Test: Your lemon bars are done when the edges are set but the center still has a slight jiggle, similar to perfectly set Jell-O. It should move as one unit when you gently shake the pan, not slosh around or look liquid. Remember, the filling continues to set as it cools, so slight underbaking is better than overbaking.
Sharp, Clean Cuts: For the most professional-looking bars, use a long, sharp chef’s knife and wipe it completely clean with a damp towel between every single cut. Yes, it’s tedious, but it makes a huge visual difference. For extra-clean cuts, chill the knife in the freezer for a few minutes before cutting.
Perfect Powdered Sugar Application: Use a fine-mesh sieve to dust powdered sugar evenly over the bars. Hold it about 6-8 inches above the surface and gently tap the side. This creates a beautiful, even coating. For an elegant look, place a doily or stencil on top before dusting for a patterned effect.
Butter Quality Matters: Since the crust is essentially shortbread and butter is the star ingredient, using high-quality butter makes a noticeable difference in flavor. European-style butter with higher fat content (like Kerrygold or Plugrá) creates an even richer, more flavorful crust.
Room Temperature Everything: Both your butter (for the crust) and eggs (for the filling) should be at room temperature. Softened butter creams better and creates a more tender crust. Room temperature eggs incorporate more smoothly into the filling, creating a more uniform texture.
Common Mistakes to Avoid
Even experienced bakers can run into issues with lemon bars. Here are the most common problems and how to avoid them:
Soggy Bottom Crust: This happens when you skip the par-baking step or don’t bake the crust long enough. The crust must be fully baked (18-20 minutes, until set and lightly golden) before adding the filling, or it will absorb moisture and become soggy. Always par-bake!
Runny, Unset Filling: If your filling doesn’t set properly, it’s usually because of underbaking, too much liquid, or not enough flour. Make sure you’re measuring accurately – too much lemon juice or not enough flour will prevent proper setting. The filling should bake for 22-25 minutes until it jiggles as one unit but isn’t sloshy. Also ensure you’re using large eggs, not medium or extra-large, as this affects the ratio.
Rubbery or Tough Filling: This is the opposite problem – overbaking. When lemon bars bake too long, the eggs overcook and the filling becomes dense, rubbery, and develops an unpleasant texture. The filling should still have a slight jiggle in the very center when you remove it from the oven. It continues to set as it cools, so err on the side of slight underbaking rather than overbaking.
Crumbly Crust That Falls Apart: Usually caused by not pressing the crust firmly enough into the pan, or by using butter that’s too cold. The crust mixture should be pressed very firmly and evenly – really pack it down with your hands or the bottom of a measuring cup. If your butter was too cold, it won’t incorporate properly and the crust won’t hold together.
Cutting Into Warm Bars: This is probably the most common mistake! If you try to cut lemon bars before they’re completely cold, the filling will be soft and messy, and your bars won’t hold their shape. You’ll end up with jagged edges and squished bars. Always, always chill the bars completely (at least 2 hours, preferably overnight) before cutting. Patience pays off with clean, beautiful squares.
Bitter Filling: Bitterness usually comes from including the white pith when zesting lemons. The colored zest contains delicious essential oils, but the white pith underneath is bitter. Use a light touch when zesting and only remove the colored outer layer. Also, be careful not to scrape any bitter membrane from inside the lemons when juicing.
Powdered Sugar Disappearing: If you dust your lemon bars with powdered sugar too far in advance, the moisture from the filling will cause it to dissolve and disappear, leaving you with wet-looking bars instead of a pretty white coating. Always dust with powdered sugar within a few hours of serving, ideally right before serving for the best appearance.
Storage & Meal Prep
Proper storage is essential for maintaining the quality and food safety of your homemade lemon bars. Here’s everything you need to know:
Refrigerator Storage: Lemon bars must be stored in the refrigerator because of their egg-based custard filling. Cover the pan tightly with plastic wrap or aluminum foil, or transfer cut bars to an airtight container, placing parchment paper between layers to prevent sticking. Properly stored, lemon bars will stay fresh for up to 5 days in the refrigerator. After that, the crust can start becoming soft and the filling may begin to separate.
Room Temperature: While lemon bars taste best slightly chilled or at cool room temperature, they should not be left out for extended periods. They can safely sit at room temperature for up to 2 hours (for serving at a party, for example), but after that, they need to return to the refrigerator to prevent bacterial growth from the eggs.
Freezer Storage: Good news – lemon bars freeze beautifully! Once completely cool, cut them into bars and place them in a single layer on a baking sheet. Freeze until solid (about 2 hours), then transfer to a freezer-safe container or zip-top freezer bag, placing parchment or wax paper between layers. Properly wrapped, frozen lemon bars will maintain their quality for up to 3 months. Do not dust with powdered sugar before freezing – add it after thawing.
Thawing: Remove frozen lemon bars from the freezer and let them thaw in the refrigerator overnight, or at room temperature for 1-2 hours. Never microwave to thaw, as this will make the filling weepy and ruin the texture. Once thawed, dust with fresh powdered sugar before serving.
Serving Temperature: For the best flavor and texture, remove lemon bars from the refrigerator about 15-20 minutes before serving to take the chill off. They’re delicious cold, but slightly cool room temperature allows the flavors to shine through more and the crust to soften just slightly.
Packing for Transport: If you’re taking lemon bars to a potluck or party, layer them in an airtight container with parchment paper between layers. Bring the powdered sugar separately in a small container or zip-top bag, and dust the bars just before serving. Keep them cool during transport – use a cooler with ice packs if it’s warm outside.
Make-Ahead & Freezer Notes
The beauty of this easy lemon bar recipe is that it’s incredibly make-ahead friendly, making it perfect for stress-free entertaining and party planning.
1-2 Days Ahead: Lemon bars actually taste better after sitting in the refrigerator for a day! Make the recipe completely as directed, let cool, cover tightly with plastic wrap, and refrigerate. The flavors meld together beautifully and the bars become easier to cut. Wait to dust with powdered sugar until 1-2 hours before serving.
3-4 Days Ahead: You can make lemon bars up to 4 days in advance, though they’re at their absolute best within the first 2-3 days. After day 3, the crust starts to soften slightly, though they’re still delicious. Store covered in the refrigerator and dust with powdered sugar before serving.
Freezing Baked Bars: As mentioned in the storage section, baked and cooled lemon bars freeze excellently. This is my favorite make-ahead method for parties – make them weeks in advance, freeze, then thaw the day before your event. The quality remains excellent.
Freezing the Crust: You can also freeze just the par-baked crust if you want to break up the work. Bake the crust as directed, let it cool completely, wrap tightly in plastic wrap and foil, and freeze for up to 1 month. When ready to finish, no need to thaw – just prepare the filling and pour it over the frozen crust, then bake as directed (you may need to add 3-5 extra minutes to the baking time).
Can You Freeze the Filling?: While technically possible, I don’t recommend freezing the filling by itself. The eggs and acid don’t freeze as well in their raw state, and you’ll get better results by either freezing the finished bars or making the filling fresh.
Preparing Components: For maximum freshness while still getting ahead, you can prepare the crust mixture and store it covered in the refrigerator for up to 2 days before baking. You can also zest and juice your lemons and store them separately in airtight containers in the refrigerator for up to 2 days. Mix the filling just before baking for the best results.
Best Thawing Method: Always thaw frozen lemon bars in the refrigerator overnight rather than at room temperature. This prevents any condensation from forming on the surface, which would dissolve your powdered sugar coating and make the bars look less appetizing.
Serving Suggestions
These classic lemon bars are wonderfully versatile and pair beautifully with so many different occasions and accompaniments. Here are some perfect serving ideas:
For Afternoon Tea or Coffee: Serve these lemon dessert bars as part of an elegant afternoon tea spread alongside scones, finger sandwiches, and other petit fours. They pair beautifully with Earl Grey tea, chamomile tea, or a robust coffee. Cut them into smaller, daintier squares for tea service.
For Brunch: Lemon bars make a fantastic addition to a brunch buffet. They’re sweet but not too heavy, and the bright citrus flavor is perfect for morning or early afternoon. Serve alongside quiche, fresh fruit salad, yogurt parfaits, and pastries.
For Dessert Tables: Include these bars on your dessert table alongside complementary sweets like sugar cookies, vanilla cake, fruit tart, or berry cobbler. The bright yellow color and classic look make them visually appealing in any spread.
With Fresh Berries: Serve lemon bars with a side of fresh berries – strawberries, raspberries, blackberries, or blueberries all complement the tart-sweet flavor beautifully. A small dollop of lightly sweetened whipped cream is also delicious.
With Ice Cream or Whipped Cream: While not traditional, warming a lemon bar slightly and serving it with a scoop of vanilla ice cream or a dollop of whipped cream creates an indulgent dessert. Lemon sorbet or raspberry sorbet are also excellent pairings.
For Picnics and Barbecues: These bars are perfect for outdoor entertaining because they’re portable, easy to eat, and refreshing on warm days. They provide a nice contrast to heavy grilled foods and savory sides.
Beverage Pairings:
- Tea: Earl Grey, chamomile, mint, or green tea
- Coffee: Medium roast coffee or a cappuccino
- Wine: Moscato, Riesling, Prosecco, or a light Sauvignon Blanc
- Non-alcoholic: Sparkling water with lemon, iced tea, lemonade, or sparkling apple cider
For Special Occasions: Lemon bars are appropriate and beloved at virtually any celebration – baby showers, bridal showers, birthday parties, graduation parties, Easter dinner, Mother’s Day brunch, or summer cookouts. Their bright yellow color is particularly beautiful for spring and summer events.
Plating for Individual Service: For a more elegant presentation, place a lemon bar on a small dessert plate, add a small sprig of fresh mint, a few fresh berries, and maybe a small decorative dollop of whipped cream. Drizzle the plate with a simple berry coulis for restaurant-style plating.
FAQs Section
Q: Can I use bottled lemon juice instead of fresh lemons?
A: While you technically can, I strongly discourage it. Fresh lemon juice is absolutely essential for the bright, vibrant flavor that makes these bars special. Bottled lemon juice tastes flat, slightly bitter, and artificial in comparison. Fresh lemons also provide the zest, which contains essential oils that add incredible depth of flavor. If you want truly delicious lemon bars that taste like sunshine, invest in fresh lemons – it makes all the difference.
Q: Why is my lemon filling not setting properly?
A: There are several possible reasons for runny filling. First, make sure you’re measuring accurately – too much lemon juice or not enough flour will prevent proper setting. Second, the bars might need more baking time. The filling should bake for 22-25 minutes until it’s set around the edges but still slightly jiggly in the very center (it continues to set as it cools). Third, make sure your eggs are large (not medium or extra-large) as this affects the ratio. Finally, always chill the bars completely before cutting – they firm up significantly when cold.
Q: Can I make these in a different size pan?
A: Yes, but you’ll need to adjust the baking times. For an 8×8-inch pan, use half the recipe and bake the crust for 15-18 minutes and the filling for 18-20 minutes. For a 9×9-inch pan, use about 2/3 of the recipe. Larger pans will result in thinner bars, and smaller pans create thicker bars. Just watch for visual doneness cues – the crust should be set and lightly golden, and the filling should be set around edges with a slight jiggle in the center.
Q: How do I prevent the crust from getting soggy?
A: The key is par-baking (pre-baking) the crust before adding the filling. Bake the crust for the full 18-20 minutes until it’s set and lightly golden. This creates a barrier that prevents the moisture from the filling from seeping in. Also, pour the lemon filling onto the hot crust immediately after removing it from the oven – the heat helps create a seal between the layers. Never let the crust cool completely before adding the filling.
Q: Can I reduce the sugar in this recipe?
A: You have some flexibility, but don’t reduce it too much or you’ll affect both flavor and texture. In the filling, you can reduce the sugar by up to 1/4 cup if you prefer a more tart bar, though this will also affect how well the filling sets (sugar helps with structure). The crust needs its sugar for proper texture, but you could reduce it by 1-2 tablespoons if desired. Keep in mind that the tartness of lemons varies, so taste your filling before baking to check the sweet-tart balance.
Q: Why did my lemon bars turn out rubbery or dense?
A: This is almost always caused by overbaking. Lemon bars have a delicate custard filling that can quickly go from perfectly set to rubbery if baked too long. Remove them from the oven when the edges are set but the center still has a slight jiggle – it should move as one unit, not slosh around, but it shouldn’t be completely firm. The filling continues to set as it cools, so slight underbaking is better than overbaking. If you’re at high altitude, you may need to reduce the baking time slightly.
Q: How far in advance can I dust the bars with powdered sugar?
A: Ideally, dust with powdered sugar within 1-2 hours of serving. The moisture from the lemon filling will gradually dissolve the powdered sugar, causing it to disappear or create a wet-looking surface. If you need to prep further in advance, keep the powdered sugar separate and dust just before serving. For transport, bring the powdered sugar in a small container and a sieve, then dust when you arrive.
Q: Can I make these dairy-free or vegan?
A: You can make a dairy-free version by substituting the butter with a plant-based butter alternative (like Earth Balance) in the crust. The bars will still be delicious, though the flavor will be slightly different. However, making them fully vegan is challenging because the eggs are essential for the custard filling’s structure and texture. There are vegan egg substitutes that might work (like flax eggs or commercial egg replacers designed for baking), but I haven’t tested this recipe with them, so results may vary significantly.
Conclusion
And there you have it – everything you need to create perfect, bakery-quality lemon bars right in your own kitchen! These classic lemon dessert bars are one of those magical recipes that manage to be both impressive and approachable, elegant and comforting, sophisticated and simple all at once. With their buttery shortbread crust, tangy-sweet lemon filling, and snowy powdered sugar topping, they’re guaranteed to brighten any table and bring smiles to everyone who takes a bite.
Whether you’re baking these easy lemon bars for a special celebration, bringing them to a potluck, serving them at your next brunch, or simply treating yourself to a homemade sweet on a regular Tuesday afternoon, I hope this recipe becomes one you turn to again and again. The beauty of this recipe lies not just in how delicious it is, but in how reliably it delivers perfect results every single time.
I’d absolutely love to hear how your lemon bars turn out! Did you try any of the variations? Serve them at a special event? Impress your friends and family? Please leave a comment below sharing your experience, any tips you discovered, or questions you might have. And if you loved this recipe, I’d be so grateful if you’d share it with your friends and Pin it to your favorite Pinterest boards so you can find it easily whenever that lemon bar craving hits. There’s nothing quite like the satisfaction of creating something this beautiful and delicious with your own hands – happy baking, and may your kitchen always smell like sunshine and butter!