
There’s nothing quite like the aroma of homemade cinnamon rolls baking in your oven on a lazy weekend morning. These soft, pillowy rolls swirled with buttery cinnamon sugar and topped with rich cream cheese frosting are the ultimate comfort food that brings families together around the breakfast table. Whether you’re celebrating a special occasion like Christmas morning, hosting a brunch with friends, or simply treating yourself to something extraordinary, these homemade cinnamon rolls from scratch are guaranteed to become your new favorite recipe.
Unlike store-bought versions or those from a can, making cinnamon rolls at home allows you to control the quality of ingredients and customize the sweetness to your liking. The dough is surprisingly forgiving for beginners, and the process, while it takes a bit of time, is actually quite simple. The reward? Warm, gooey cinnamon rolls that taste better than any bakery version, and your home will smell absolutely incredible while they bake.
These classic cinnamon rolls are perfect for holiday breakfasts, birthday morning surprises, Sunday brunch spreads, or any time you want to create something special that shows your loved ones you care. They’re also wonderful for bake sales, potlucks, or as thoughtful homemade gifts during the holiday season.
History / Background
The beloved cinnamon roll has a fascinating history that spans continents and centuries. While the exact origin is debated, most food historians trace cinnamon rolls back to Sweden, where they’re known as “kanelbullar.” These Swedish cinnamon buns became so culturally significant that Sweden even celebrates a national Cinnamon Bun Day (Kanelbullens dag) every October 4th.
However, the cinnamon roll’s story begins even earlier. Cinnamon itself was once more valuable than gold, traded along ancient spice routes from Sri Lanka and Indonesia. European bakers in the 18th century began incorporating this precious spice into sweet yeast breads, creating early versions of what we now know as cinnamon rolls.
When Scandinavian immigrants came to America in the 19th and early 20th centuries, they brought their baking traditions with them. These recipes evolved in American kitchens, becoming larger, sweeter, and more indulgent than their European counterparts. The addition of cream cheese frosting is a distinctly American innovation that transformed the cinnamon roll into the decadent treat we know today.
In 1985, the Cinnabon chain opened its first location in Seattle, popularizing the oversized, extra-frosted American-style cinnamon roll in malls across the country. This sparked a cinnamon roll renaissance, inspiring home bakers everywhere to recreate that same bakery-quality experience in their own kitchens.
Today, cinnamon rolls represent comfort, nostalgia, and the joy of homemade baking. They’re a symbol of weekend mornings, family traditions, and the simple pleasure of warm bread fresh from the oven.
Why You’ll Love This Recipe
This homemade cinnamon roll recipe strikes the perfect balance between impressive results and manageable techniques. The dough is enriched with butter, eggs, and milk, creating rolls that are incredibly soft and tender with a beautiful golden color. The cinnamon sugar filling is generous and perfectly spiced, creating those irresistible swirls in every bite. And the cream cheese frosting? It’s smooth, tangy, and sweet—the perfect complement to the warm, spiced rolls.
Here’s why this recipe will become your go-to:
- Bakery-quality results at home – These taste better than anything you can buy, with a soft, fluffy texture that rivals professional bakeries
- Surprisingly beginner-friendly – The dough is forgiving and easy to work with, even if you’re new to yeast baking
- Make-ahead friendly – Prepare the rolls the night before and bake them fresh in the morning for minimal effort on busy days
- Customizable sweetness – Adjust the sugar and frosting to your preference, making them as indulgent or restrained as you like
- Perfect for sharing – Makes 12 generous rolls, ideal for feeding a crowd or gifting to neighbors
- Budget-friendly comfort food – Uses simple, affordable pantry staples to create something truly special
- Freezer-friendly – Make a double batch and freeze half for quick breakfasts anytime
- Creates unforgettable memories – The process of making these rolls together with family becomes a cherished tradition
Ingredient Notes
Understanding your ingredients is key to baking success. Here’s what you’ll need and why each component matters:
All-Purpose Flour – The foundation of your dough. Bread flour can be substituted for a slightly chewier texture, but all-purpose works beautifully for soft, tender rolls. Make sure to measure correctly by spooning flour into your measuring cup and leveling it off.
Active Dry Yeast or Instant Yeast – The magical ingredient that makes your dough rise and creates that wonderful fluffy texture. Active dry yeast needs to be activated in warm liquid first, while instant yeast can be mixed directly into dry ingredients. Both work perfectly.
Whole Milk – Adds richness, flavor, and helps create a tender crumb. The fat content in whole milk makes a noticeable difference. You can substitute with 2% milk in a pinch, but avoid skim milk as it won’t provide the same richness.
Granulated Sugar – Sweetens the dough and feeds the yeast, helping it activate and rise properly. Don’t reduce the sugar in the dough as it serves multiple purposes beyond just sweetness.
Unsalted Butter – Used in the dough, filling, and frosting. Butter adds incredible flavor and creates layers in the filling. Always use unsalted so you can control the salt content. Make sure it’s softened for the dough and melted for the filling.
Eggs – Provide structure, richness, and that beautiful golden color. Use large eggs at room temperature for best results.
Ground Cinnamon – The star of the show! Use fresh, high-quality cinnamon for the best flavor. Ceylon cinnamon is milder and sweeter, while Cassia cinnamon (the most common type) has a stronger, spicier flavor.
Brown Sugar – Creates the gooey, caramelized filling. Light or dark brown sugar both work; dark brown sugar provides a deeper molasses flavor.
Cream Cheese – The base of the frosting. Must be softened to room temperature for smooth, lump-free frosting. Full-fat cream cheese works best.
Powdered Sugar – Creates a smooth, sweet frosting that melts slightly when spread on warm rolls. Don’t substitute granulated sugar as the texture won’t be right.
Vanilla Extract – Enhances all the other flavors. Use pure vanilla extract rather than imitation for the best taste.
Salt – A small amount enhances the sweetness and balances the flavors. Don’t skip it!
Equipment Needed
Having the right tools makes the baking process much smoother. Here’s what you’ll need:
- Stand mixer with dough hook attachment (or large mixing bowl for hand mixing)
- Measuring cups and spoons (for accurate measurements)
- Instant-read thermometer (to check liquid temperature for yeast activation)
- Medium saucepan (for warming milk and butter)
- Large mixing bowls (at least one, preferably two)
- Rolling pin (for rolling out the dough into a rectangle)
- Pastry brush (for spreading melted butter on the dough)
- 9×13-inch baking dish (glass or metal, for baking the rolls)
- Sharp knife or dental floss (for cutting the rolls cleanly)
- Plastic wrap or clean kitchen towel (for covering dough during rising)
- Offset spatula or butter knife (for spreading frosting)
- Cooling rack (optional, for cooling the rolls slightly before frosting)
- Bench scraper (optional but helpful for rolling and portioning dough)

Cinnamon Roll Recipe
- Total Time: 2 hours 40 minutes
- Yield: 12 large cinnamon rolls 1x
- Diet: Vegetarian
Description
Incredibly soft and fluffy homemade cinnamon rolls with a buttery cinnamon sugar filling and tangy cream cheese frosting. These bakery-style rolls are perfect for weekend breakfasts, holidays, or any special occasion. Make them the night before for easy morning baking!
Ingredients
For the Dough:
- 4 cups (500g) all-purpose flour, plus more for dusting
- 2¼ teaspoons (1 packet) active dry yeast or instant yeast
- 1 cup (240ml) whole milk, warmed to 110°F
- ⅓ cup (67g) granulated sugar
- ⅓ cup (76g) unsalted butter, softened
- 2 large eggs, room temperature
- ¾ teaspoon salt
For the Filling:
- ½ cup (113g) unsalted butter, melted
- ¾ cup (150g) light brown sugar, packed
- 2 tablespoons ground cinnamon
- Pinch of salt
For the Cream Cheese Frosting:
- 4 ounces (113g) cream cheese, softened
- 3 tablespoons unsalted butter, softened
- 1½ cups (180g) powdered sugar, sifted
- ½ teaspoon vanilla extract
- Pinch of salt
- 1–2 tablespoons milk (if needed for consistency)
Instructions
Make the Dough:
- Activate the yeast: In the bowl of your stand mixer (or a large mixing bowl), combine the warm milk (110°F) and 1 tablespoon of the sugar. Sprinkle the yeast over the top and let it sit for 5-10 minutes until foamy. This means your yeast is alive and ready to work. If using instant yeast, you can skip this step and add yeast directly to the flour.
- Mix the wet ingredients: Once the yeast is foamy, add the remaining sugar, softened butter, eggs, and salt. Mix on low speed until just combined. The mixture will look lumpy and that’s perfectly fine.
- Add the flour: With the mixer running on low speed (or stirring with a wooden spoon), gradually add the flour one cup at a time. Once all the flour is incorporated, increase speed to medium and knead for 5-7 minutes using the dough hook (or knead by hand on a floured surface for 8-10 minutes). The dough should pull away from the sides of the bowl and be smooth and slightly tacky but not sticky. If it’s too sticky, add 1-2 tablespoons more flour.
- First rise: Shape the dough into a ball and place it in a greased bowl, turning once to coat all sides. Cover with plastic wrap or a damp kitchen towel. Let rise in a warm, draft-free place for 1-1½ hours, or until doubled in size. A turned-off oven with the light on works perfectly.
Prepare the Filling and Assemble:
- Roll out the dough: Once risen, punch down the dough to release air bubbles. Turn it out onto a lightly floured surface and roll it into a large rectangle, approximately 14×18 inches. The dough should be about ¼-inch thick. Try to keep the edges as straight as possible for uniform rolls.
- Add the filling: Brush the melted butter evenly over the entire surface of the dough, leaving a ½-inch border along one long edge. In a small bowl, mix together the brown sugar, cinnamon, and pinch of salt. Sprinkle this mixture evenly over the buttered dough, pressing gently so it adheres.
- Roll it up: Starting from the long edge opposite the unbuttered border, tightly roll up the dough into a log. Roll as tightly as possible without squeezing out the filling. When you reach the end, pinch the seam to seal it closed. Position the roll seam-side down.
- Cut the rolls: Using a sharp serrated knife or unflavored dental floss, cut the log into 12 equal pieces (about 1½ inches each). For the floss method, slide the floss under the log, cross the ends over the top, and pull tight to slice through cleanly without squishing the roll.
- Second rise: Arrange the rolls cut-side up in a greased 9×13-inch baking dish, spacing them slightly apart. They should just barely touch. Cover with plastic wrap or a kitchen towel and let rise for 30-45 minutes until puffy and nearly doubled. They should be touching each other at this point.
Bake and Frost:
- Preheat the oven: About 15 minutes before the rolls finish rising, preheat your oven to 350°F (175°C).
- Bake: Remove the cover and bake for 23-27 minutes, until the tops are golden brown and the center rolls are cooked through. They should spring back lightly when touched. Don’t overbake or they’ll be dry.
- Make the frosting: While the rolls bake, beat together the softened cream cheese and butter in a medium bowl until smooth and creamy, about 2 minutes. Add the powdered sugar, vanilla, and salt, and beat until fluffy, 2-3 minutes. Add milk one tablespoon at a time if the frosting is too thick. You want it spreadable but not runny.
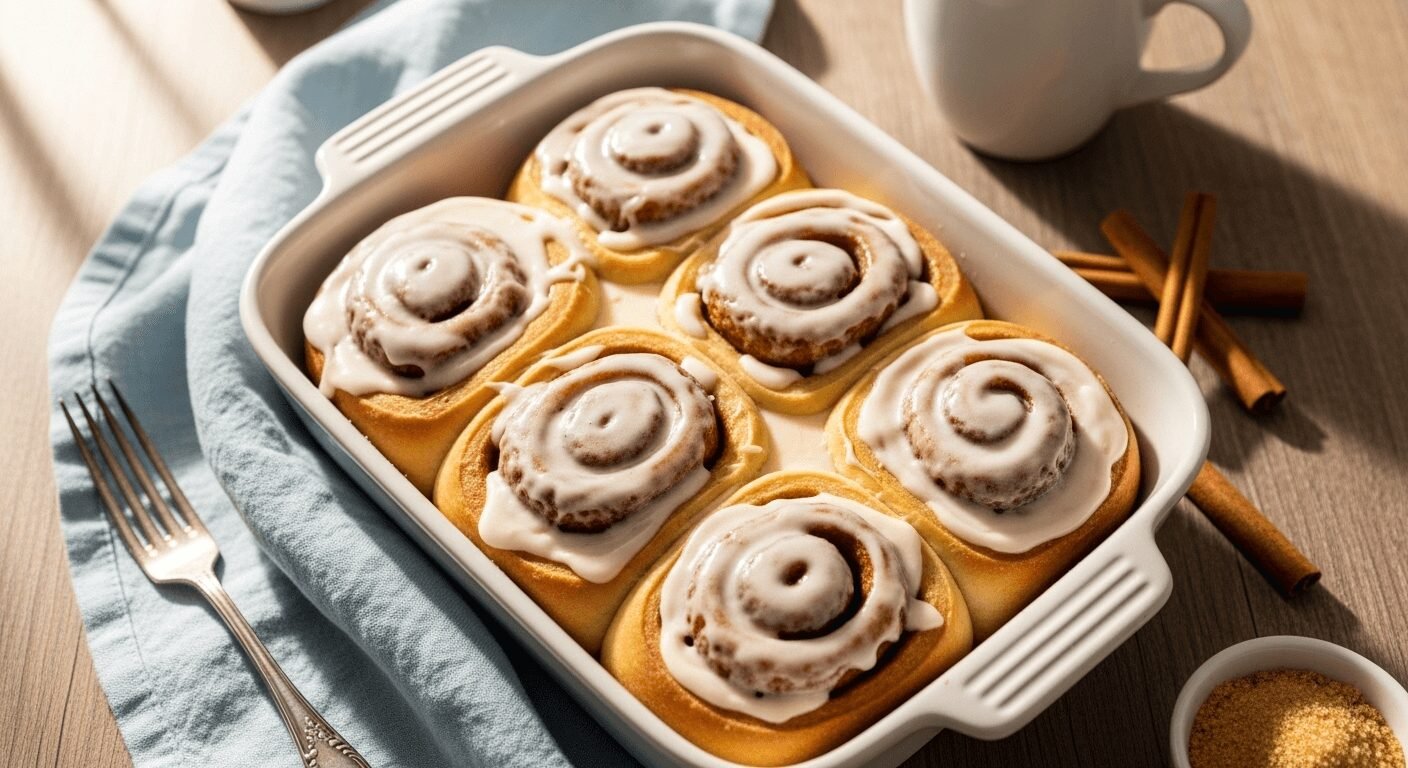
- Frost the rolls: Remove the rolls from the oven and let them cool for just 5-10 minutes. Spread the cream cheese frosting generously over the warm rolls. The frosting will melt slightly into the rolls, creating an irresistible glaze. Serve warm and watch them disappear!
Notes
- Temperature matters: Make sure your milk is between 105-115°F. Too hot will kill the yeast; too cold won’t activate it properly.
- Dough texture: The dough should be soft and slightly tacky after kneading, not sticky. If you can’t handle it easily, add a bit more flour.
- Even cuts: For uniform rolls, measure the log and mark it before cutting. A ruler helps ensure equal portions.
- Overnight option: After placing rolls in the pan (step 9), cover tightly with plastic wrap and refrigerate overnight. In the morning, let them sit at room temperature for 30-45 minutes, then bake as directed.
- Frosting preference: Some prefer to frost only half the batch for less sweetness. You can also use a simple glaze made with powdered sugar and milk instead of cream cheese frosting.
- Checking doneness: The internal temperature should reach 190°F when fully baked.
- Prep Time: 30 minutes
- Cook Time: 1 hour 45 minutes
- Category: Breakfast
- Method: Baking
- Cuisine: American
Nutrition
- Serving Size: 1 roll
- Calories: 385
- Sugar: 28g
- Sodium: 185mg
- Fat: 16g
- Saturated Fat: 10g
- Unsaturated Fat: 5g
- Trans Fat: 0g
- Carbohydrates: 56g
- Fiber: 2g
- Protein: 6g
- Cholesterol: 75mg
Tips & Variations
Flavor Variations:
- Apple Cinnamon Rolls: Add 1 cup finely diced apples (like Granny Smith) mixed with the cinnamon sugar filling. Reduce brown sugar slightly to compensate for apple sweetness.
- Pumpkin Spice Cinnamon Rolls: Replace ½ cup of milk in the dough with pumpkin puree and add 1 teaspoon pumpkin pie spice to the filling along with the cinnamon.
- Orange Rolls: Omit cinnamon and replace with 2 tablespoons orange zest in the filling. Use an orange-flavored glaze instead of cream cheese frosting.
- Chocolate Cinnamon Rolls: Add ½ cup mini chocolate chips to the filling before rolling. Drizzle with chocolate ganache after frosting.
- Maple Pecan Rolls: Replace brown sugar with maple sugar and sprinkle ½ cup chopped pecans over the filling. Use maple frosting instead of cream cheese.
- Caramel Rolls: Pour ½ cup caramel sauce into the bottom of the pan before adding rolls. After baking, invert onto a platter so the caramel is on top.
Dietary Modifications:
- Less Sweet Version: Reduce sugar in the dough to ¼ cup and use only ½ cup brown sugar in the filling. Use half the frosting or opt for a light glaze.
- Whole Wheat: Replace up to 2 cups of all-purpose flour with whole wheat flour for added nutrition. The rolls will be slightly denser.
- Dairy-Free: Use plant-based milk, vegan butter, and dairy-free cream cheese for a completely dairy-free version.
- Reduced Sugar: Use a sugar substitute like monk fruit or erythritol in the filling, though texture may be slightly different.
Pro Chef Tips
Perfect dough every time: The key to soft, fluffy cinnamon rolls is not over-flouring your dough. A slightly sticky dough that’s hard to handle will bake up much softer than a stiff, dry dough. Trust the process and resist adding too much flour.
Create a proofing box: For the best rise, create a warm environment around 75-80°F. Turn your oven on for 1 minute, then turn it off. Place your covered bowl inside with the oven light on. This creates the perfect warm, humid environment for rising.
Tangzhong method for extra softness: For even fluffier rolls, try the tangzhong technique. Cook 3 tablespoons of flour with ½ cup water in a saucepan, stirring constantly until it forms a thick paste (about 150°F). Cool completely, then add to your dough with the wet ingredients. This Asian baking technique creates incredibly soft bread that stays fresh longer.
The windowpane test: To check if your dough is properly kneaded, take a small piece and gently stretch it between your fingers. If it forms a thin, translucent membrane without breaking (like a windowpane), it’s ready. If it tears easily, knead for another 2-3 minutes.
Dental floss cutting method: Professional bakers know that using unflavored dental floss to cut rolls prevents squishing and creates perfectly round spirals. Simply slide the floss under the log, cross the ends, and pull tight.
Underbake slightly: Pull your rolls from the oven when they’re just golden brown on top, even if they seem slightly underdone. They’ll continue cooking in the hot pan as they rest, and this ensures they stay soft and moist rather than dry.
Frost while warm: The residual heat from the rolls will melt the frosting slightly, allowing it to seep into the layers. This creates that iconic gooey texture. However, if you prefer frosting that stays on top, let the rolls cool for 15-20 minutes first.
Brush with butter: For an extra-rich finish, brush the hot rolls with melted butter immediately when they come out of the oven, before frosting. This adds shine and keeps them incredibly soft.
Common Mistakes to Avoid
Using liquid that’s too hot or too cold: Water or milk that’s above 120°F will kill your yeast, preventing the dough from rising. Too cold (below 100°F) and the yeast won’t activate properly. Always use an instant-read thermometer to verify the temperature is between 105-115°F for active dry yeast.
Not allowing enough rise time: Patience is essential! Rushing the rising process results in dense, heavy rolls instead of light, fluffy ones. Your dough should truly double in size during the first rise and the rolls should be puffy and almost touching each other before baking. Rising times vary based on room temperature, so watch the dough, not the clock.
Adding too much flour: This is the number one mistake that leads to dry, tough rolls. When the recipe says the dough should be “slightly sticky,” believe it! It’s better to have dough that’s a bit tacky to handle than to add too much flour. Remember, you can always add more flour, but you can’t take it away.
Rolling the dough too loosely: When you roll up your cinnamon roll log, it should be tight and compact. Loose rolling creates gaps in the spiral and results in rolls that separate and fall apart. Apply gentle, even pressure as you roll to keep everything snug.
Overbaking: Cinnamon rolls can go from perfectly baked to dry in just a few minutes. Start checking at 23 minutes. The tops should be golden brown but the rolls should still feel soft when lightly pressed. Remember, they continue cooking in the hot pan after you remove them from the oven.
Spreading frosting on hot rolls (if you want neat frosting): If you frost rolls straight from the oven, the frosting melts completely and becomes a glaze. While delicious, this isn’t ideal if you want a thick frosting layer that holds its shape. Let rolls cool for 10-15 minutes for the best frosting consistency.
Not measuring ingredients properly: Baking is science! Use the spoon-and-level method for flour (never scoop directly from the bag), and make sure measuring cups are specifically for dry or liquid ingredients as appropriate. Weight measurements are even more accurate if you have a kitchen scale.
Storage & Meal Prep
Room Temperature Storage: Store leftover cinnamon rolls in an airtight container or covered with plastic wrap at room temperature for up to 2 days. The frosting helps keep them moist. Before serving, warm individual rolls in the microwave for 15-20 seconds to recreate that fresh-baked softness.
Refrigerator Storage: For longer storage, keep frosted rolls in an airtight container in the refrigerator for up to 5 days. The cold temperature firms up the frosting and dough, so always reheat before serving. Microwave for 25-30 seconds or warm in a 300°F oven for 5-7 minutes.
Reheating Methods: The microwave is quickest (20-30 seconds per roll), but for the best texture, reheat in a 300°F oven for 8-10 minutes. Cover with foil to prevent the tops from over-browning. You can also reheat unfrosted rolls, then add fresh frosting for that just-made taste.
Keeping Them Moist: If your rolls seem to be drying out, place a slice of apple or bread in the storage container. The moisture will transfer to the rolls. Alternatively, brush unfrosted rolls with a simple syrup (equal parts sugar and water, heated until dissolved) before storing to lock in moisture.
Gifting Tips: Cinnamon rolls make wonderful homemade gifts! Place cooled, unfrosted rolls in a disposable aluminum pan, cover tightly with foil, and attach the frosting in a separate container with reheating instructions. Recipients can warm and frost them for a fresh-baked experience.
Make-Ahead & Freezer Notes
Overnight Cinnamon Rolls: This is a game-changer for holiday mornings! After cutting and arranging the rolls in the pan (step 9), cover the pan tightly with plastic wrap and refrigerate for 8-16 hours. In the morning, remove from the refrigerator and let sit at room temperature for 30-45 minutes while the oven preheats. The rolls will finish rising and come to room temperature. Bake as directed, adding 2-3 minutes to the baking time if needed.
Freezing Unbaked Rolls: After cutting the rolls and arranging them in a disposable aluminum pan, wrap the entire pan tightly with plastic wrap, then with aluminum foil. Label with the date and baking instructions. Freeze for up to 3 months. To bake, remove from freezer the night before and let thaw in the refrigerator overnight. Remove from refrigerator 1 hour before baking to allow final rise, then bake as directed.
Freezing Baked Rolls: Allow baked rolls to cool completely without frosting. Wrap individual rolls tightly in plastic wrap, then place in a freezer-safe bag or container. Freeze for up to 3 months. Thaw overnight in the refrigerator or at room temperature for 2-3 hours. Reheat in a 300°F oven for 10-12 minutes, then frost and serve.
Freezing Just the Dough: After the first rise, punch down the dough, wrap it tightly in plastic wrap, and place in a freezer bag. Freeze for up to 3 months. Thaw overnight in the refrigerator, then proceed with rolling, filling, cutting, and baking as directed in the recipe. This gives you maximum flexibility.
Quick-Freeze Method: Flash freeze unbaked cut rolls on a baking sheet until solid (about 2 hours), then transfer to a freezer bag. This prevents them from sticking together. When ready to bake, arrange frozen rolls in a greased pan, cover, and let thaw and rise at room temperature for 3-4 hours, then bake as directed.
Best Practices: For any freezing method, make sure everything is wrapped airtight to prevent freezer burn. Always label with the date and reheating instructions. The cream cheese frosting can also be frozen separately in an airtight container for up to 3 months. Thaw in the refrigerator overnight and stir well before using.
Serving Suggestions
Cinnamon rolls are delicious on their own, but pairing them with complementary foods creates a complete breakfast or brunch experience that everyone will love.
Breakfast Protein: Balance the sweetness with savory breakfast proteins like crispy bacon strips, maple sausage links, or a fluffy veggie omelet. The salty-sweet combination is irresistible. You could also serve breakfast sandwiches on the side for guests who want something more substantial.
Fresh Fruit: Lighten up the meal with a fresh fruit salad featuring berries, melon, grapes, and citrus segments. The bright, tart flavors cut through the richness of the rolls beautifully. A fruit platter with yogurt dip is another excellent option.
Beverages: Coffee is the classic pairing – the slightly bitter notes complement the sweet rolls perfectly. Offer a variety like regular coffee, flavored creamers, hot chocolate, or chai lattes. For kids, serve cold milk, orange juice, or apple cider (warm in fall/winter). Adults might enjoy mimosas or bellinis for a celebratory brunch.
Breakfast Sides: Round out the meal with hash browns or breakfast potatoes for those wanting something savory, scrambled eggs with cheese, or yogurt parfaits with granola. These sides ensure everyone leaves the table satisfied.
Special Occasion Ideas: For holidays like Christmas or Easter, serve cinnamon rolls alongside a breakfast casserole, quiche, or frittata. Create a beautiful brunch spread with both sweet and savory options, allowing guests to customize their plates.
Afternoon Tea Service: Cinnamon rolls aren’t just for breakfast! Serve them as a dessert or afternoon treat with tea, coffee, or even ice cream. A scoop of vanilla ice cream on a warm cinnamon roll creates an incredible dessert.
Presentation Tips: Arrange rolls on a rustic wooden board or white platter. Garnish with a dusting of cinnamon, a sprig of fresh mint, or fresh berries for a beautiful presentation. For parties, provide small plates, forks, and plenty of napkins.
FAQs Section
Can I use instant yeast instead of active dry yeast?
Yes! Instant yeast and active dry yeast are interchangeable in this recipe. The main difference is that instant yeast can be mixed directly into the dry ingredients without activating it first in warm liquid. If using instant yeast, simply combine it with the flour, then add all the wet ingredients and proceed with the recipe. Your rolls will turn out just as fluffy and delicious. Some bakers actually prefer instant yeast because it’s more reliable and rises slightly faster.
Why didn’t my dough rise?
Several factors can prevent dough from rising properly. Most commonly, the liquid was too hot and killed the yeast (above 120°F), or your yeast was expired or inactive. Always check the expiration date and proof your yeast in warm liquid first to ensure it’s alive (you should see foaming after 5-10 minutes). The rising environment is also crucial – dough needs a warm spot around 75-80°F to rise properly. If your kitchen is cold, try placing the dough in a turned-off oven with just the light on, or near (not on) a warm stovetop.
Can I make these without a stand mixer?
Absolutely! While a stand mixer makes the process easier, these cinnamon rolls can definitely be made by hand. Mix the wet ingredients in a large bowl, add the flour gradually, then turn the dough out onto a floured surface and knead by hand for 8-10 minutes. You’ll know the dough is ready when it’s smooth, elastic, and springs back when poked. It’s a great arm workout and the results are just as delicious. Many bakers actually prefer hand-kneading because you can better feel the dough’s texture.
How do I know when the rolls are fully baked?
Properly baked cinnamon rolls should be golden brown on top and spring back lightly when touched. The center rolls cook last, so focus on those rather than the edge rolls. If you have an instant-read thermometer, the internal temperature should reach about 190°F when fully baked. Visual cues are helpful too – the rolls should look puffed and no longer doughy. If the tops are browning too quickly but the centers aren’t done, tent the pan with aluminum foil for the last 5 minutes of baking.
Can I reduce the sugar to make them less sweet?
You can reduce the sugar in the filling to your taste preference (try ½ cup instead of ¾ cup brown sugar), and you can definitely use less frosting or make a lighter glaze instead. However, be careful about reducing the sugar in the dough itself – it serves multiple purposes including feeding the yeast and helping create the tender texture. The ⅓ cup in the dough is necessary for proper rise and structure. Many people who find bakery cinnamon rolls too sweet love this recipe with just half the frosting.
Why are my cinnamon rolls tough or dense?
Dense, tough cinnamon rolls usually result from using too much flour or not kneading the dough enough. Remember, the dough should be soft and slightly tacky, not stiff and dry. If you added more than a few extra tablespoons of flour during kneading, your rolls may turn out heavy. Another common cause is not allowing enough rise time – the dough should truly double in size during both rises. Finally, overbaking will dry out the rolls and make them tough, so watch the baking time carefully and pull them when they’re just golden brown.
Can I use a bread machine to make the dough?
Yes! Follow your bread machine’s instructions for the dough cycle, adding ingredients in the order recommended by your machine’s manual (usually liquids first, then dry ingredients, with yeast added last). Use the dough setting, which will mix, knead, and complete the first rise for you. Once the cycle is complete, remove the dough, roll it out, add the filling, cut the rolls, complete the second rise, and bake as directed. This hands-off method is perfect for busy bakers.
What’s the best way to reheat leftover cinnamon rolls?
For the best texture, reheat individual rolls in the microwave for 20-30 seconds. This makes them soft and warm without drying them out. If you’re reheating multiple rolls, place them in a covered baking dish and warm in a 300°F oven for 8-10 minutes. You can add a tablespoon of water to the dish before covering to create steam, which helps keep the rolls moist. Avoid reheating in a toaster oven as it can dry them out. If the frosting has been refrigerated and hardened, the gentle heat will soften it beautifully.
Conclusion
There’s truly something magical about homemade cinnamon rolls. Yes, they require a bit of time and patience, but the reward is absolutely worth it – warm, fluffy rolls swirled with cinnamon sugar and topped with cream cheese frosting that will have your family asking you to make them again and again. These aren’t just cinnamon rolls; they’re memories in the making, the aroma that will fill your home and make everyone gather in the kitchen asking “are they ready yet?”
Whether you’re making these classic cinnamon rolls for a special holiday breakfast, a lazy weekend morning, or simply because you deserve something wonderful, you’re creating more than just a recipe – you’re building traditions and sharing love through homemade food. The beauty of this recipe is that once you master the basic technique, you can customize it endlessly with different fillings, frostings, and add-ins to make it your own signature version.
Don’t be intimidated by yeast dough or the multi-step process. Take it one step at a time, trust the process, and know that even if your first batch isn’t perfect, they’ll still be absolutely delicious. Baking is a journey, and every batch teaches you something new.
So grab your apron, clear your counter space, and get ready to bake the best cinnamon rolls you’ve ever tasted. Your kitchen is about to smell incredible, and your family is going to be so impressed with your baking skills!
Ready to bake? Save this recipe to your Pinterest boards so you can find it easily next time.