If you’ve ever wanted to create truly decadent, professional-quality chocolate desserts at home, mastering chocolate ganache is your secret weapon. This luxurious chocolate ganache recipe transforms just two simple ingredients – quality chocolate and heavy cream – into the silkiest, richest, most versatile chocolate topping, filling, or frosting you can imagine. It’s glossy, smooth, and tastes like pure chocolate heaven.
This classic chocolate ganache is incredibly versatile and can be used in countless ways. Pour it warm as a glaze over cakes and bundt cakes for that gorgeous, shiny finish. Let it cool and thicken to use as a spreadable frosting for layer cakes and cupcakes. Whip it until fluffy to create an airy, mousse-like frosting. Chill it completely and roll into truffles for elegant homemade candies. Use it as a dip for fresh strawberries or as a filling for pastries and macarons. The possibilities are truly endless.
What makes this easy chocolate ganache recipe so special is its simplicity combined with its professional results. With just chocolate and cream (and optionally, a touch of butter for extra shine), you can create something that looks and tastes like it came from a fancy bakery. There’s no complicated technique, no tempering required, and no special equipment needed. Just heat, pour, stir, and watch the magic happen as it transforms into silky perfection.
Chocolate ganache is perfect for so many occasions: birthday cakes, wedding cakes, holiday desserts, Valentine’s Day treats, or simply whenever you want to elevate a dessert from good to absolutely spectacular. Once you master this simple technique, you’ll find yourself using ganache on everything because it makes even the simplest cake look and taste extraordinary.
History / Background
Chocolate ganache has a fascinating history rooted in French pastry tradition. The word “ganache” actually has two meanings in French: it refers to this chocolate and cream mixture, but it’s also a playful insult meaning “fool” or “idiot.” According to culinary legend, ganache was created by accident in the 1850s at the famous Parisian patisserie, Siraudin.
The story goes that a young apprentice pastry chef accidentally poured hot cream into a bowl of chopped chocolate instead of the intended ingredient. His master chef scolded him, calling him “ganache” (idiot). However, upon tasting the mixture, they discovered it was absolutely delicious. Rather than discarding the “mistake,” they began using it to fill chocolates and coat cakes, and chocolate ganache was born. While this story may be apocryphal, it’s a charming origin tale for such an elegant creation.
What we do know for certain is that ganache became a staple of French pastry making in the late 19th century, appearing in many classic French desserts. The renowned chocolate house Maison Boissier popularized chocolate ganache truffles in the 1890s, hand-rolling the ganache into balls and coating them in cocoa powder to resemble the prized Périgord truffles they were named after.
Throughout the 20th century, ganache spread beyond France and became essential in professional kitchens worldwide. Pastry chefs appreciated its versatility – the same basic recipe could be adjusted for different uses simply by changing the ratio of chocolate to cream. A 2:1 chocolate-to-cream ratio creates thick ganache for truffles, while 1:1 creates pourable glaze, and various ratios in between serve different purposes.
Today, chocolate ganache represents one of the fundamental techniques in pastry making. Culinary schools teach it as a basic skill, and home bakers have embraced it for its simplicity and impressive results. Despite its French origins and fancy reputation, ganache is remarkably accessible – requiring only two ingredients and five minutes of active work to create something truly special.
Why You’ll Love This Recipe
This chocolate ganache recipe has been perfected to deliver the ideal texture, shine, and flavor every single time. The 1:1 ratio of chocolate to cream creates a versatile ganache that’s fluid enough to pour when warm, spreadable when cooled to room temperature, and pipeable when fully chilled. It’s the Goldilocks ratio that works for multiple applications.
What makes this recipe foolproof is the simple technique that prevents common problems like graininess, separation, or dullness. By chopping the chocolate finely, heating the cream to just the right temperature, and stirring gently in one direction, you’ll achieve that signature glossy, smooth texture that makes ganache so luxurious. No special skills required – just patience and good ingredients.
Here’s why this chocolate ganache recipe will become your go-to:
- Only 2 ingredients – just chocolate and heavy cream for classic ganache
- Ready in 10 minutes – faster than most frostings and so much more elegant
- Incredibly versatile – use as glaze, frosting, filling, or truffle base
- Professional results – looks and tastes like it came from a fancy bakery
- No special equipment – just a bowl, spoon, and saucepan
- Easily customizable – add flavors, liqueurs, or extracts for endless variations
- Impressive but simple – guests will think you’re a pastry chef
- Gluten-free naturally – perfect for those avoiding gluten
- Rich chocolate flavor – tastes like pure, silky chocolate
- Works with any chocolate – dark, milk, or white chocolate all work beautifully
- Temperature flexible – use warm, room temp, or cold depending on application
- Make-ahead friendly – keeps for weeks and reheats perfectly
Ingredient Notes
The beauty of ganache lies in its simplicity. Here’s what you need:
Chocolate: The foundation and star ingredient. Quality matters enormously here since chocolate is the dominant flavor. Use real chocolate (not chocolate chips, which contain stabilizers that prevent smooth melting). Dark chocolate (60-70% cacao) creates classic, sophisticated ganache with deep chocolate flavor. Milk chocolate makes sweeter, creamier ganache perfect for those who prefer milder chocolate. White chocolate creates luxurious white ganache (use a 3:1 chocolate-to-cream ratio as white chocolate is softer). Choose chocolate you’d enjoy eating plain – brands like Ghirardelli, Lindt, Callebaut, or Valrhona work beautifully. Avoid chocolate with added oils or coatings.
Heavy Cream: Also called heavy whipping cream (36-40% fat content). The high fat content is essential for proper emulsification and that silky texture. Half-and-half won’t work as well – the lower fat content creates thinner, less stable ganache. Avoid ultra-pasteurized cream if possible; regular pasteurized cream has better flavor. The cream provides the smooth, creamy texture and mellows the chocolate’s intensity. Make sure the cream is fresh – old cream can curdle when heated.
Optional Add-ins:
- Butter (1-2 tablespoons): Adds extra shine and richness. Not necessary but creates more glossy finish.
- Vanilla extract (½ teaspoon): Enhances chocolate flavor without overpowering.
- Liqueurs: Rum, Kahlua, Grand Marnier, or Frangelico add sophisticated flavor (1-2 tablespoons).
- Espresso powder (½ teaspoon): Intensifies chocolate flavor without tasting like coffee.
- Corn syrup (1 tablespoon): Increases shine and creates smoother texture (professional trick).
- Salt (pinch): Enhances sweetness and chocolate flavor.
Ingredient Ratios for Different Uses:
- Pourable glaze: 1:1 ratio (equal parts chocolate and cream by weight)
- Spreadable frosting: 2:1 ratio (twice as much chocolate as cream)
- Truffle filling: 2:1 or 3:1 ratio (firm enough to roll)
- Whipped ganache: 1:1 ratio (whipped after chilling)
Equipment Needed
You need minimal, basic equipment:
- Heatproof bowl (glass or metal) – for chocolate
- Small saucepan – for heating cream
- Sharp knife and cutting board – for chopping chocolate
- Rubber spatula or wooden spoon – for stirring
- Measuring cup – for accurate measurements
- Kitchen scale (recommended) – for precision (chocolate is best measured by weight)
Optional but helpful:
- Whisk for incorporating ingredients faster
- Fine-mesh strainer for ultra-smooth ganache
- Candy thermometer to check cream temperature
- Stand mixer for whipped ganache
- Piping bag for decorative applications
Chocolate Ganache Recipe
- Total Time: 10 minutes
- Yield: About 2 cups 1x
- Diet: Gluten Free
Description
This silky-smooth chocolate ganache is made with just two ingredients – quality chocolate and heavy cream. It’s incredibly versatile and can be used as a glaze, frosting, filling, or truffle base. Professional results with minimal effort!
Ingredients
Basic Chocolate Ganache (1:1 Ratio):
- 8 ounces (225g) dark, milk, or semi-sweet chocolate, finely chopped
- 1 cup (240ml) heavy cream
- 1 tablespoon unsalted butter (optional, for extra shine)
- ½ teaspoon vanilla extract (optional)
- Pinch of salt (optional)
Instructions
Step 1: Prepare the Chocolate
Finely chop the chocolate into small, uniform pieces (about ¼-inch or smaller). The smaller and more uniform the pieces, the more evenly they’ll melt. Place the chopped chocolate in a heatproof bowl (glass or metal works well). If using butter, add it to the chocolate now.
Step 2: Heat the Cream
Pour the heavy cream into a small saucepan over medium heat. Heat until the cream just begins to simmer – you’ll see small bubbles forming around the edges and steam rising. Don’t let it come to a full, rolling boil. The ideal temperature is around 180-190°F if you’re using a thermometer. Remove from heat immediately once it reaches this point.
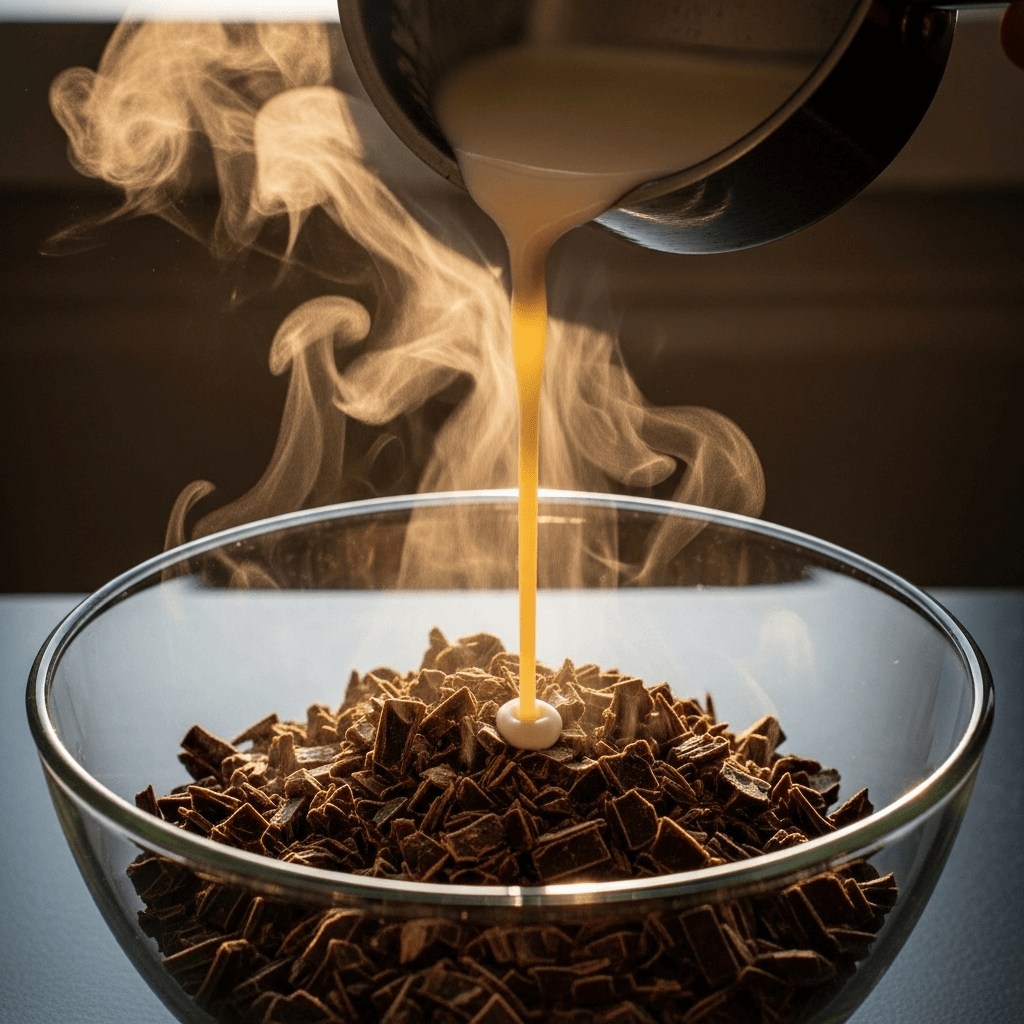
Step 3: Pour and Wait
Pour the hot cream directly over the chopped chocolate. Make sure all the chocolate is submerged beneath the cream. Let it sit undisturbed for 2-3 minutes. This waiting period allows the heat from the cream to gently melt the chocolate without any stirring. Don’t be tempted to stir yet – patience creates smooth ganache.
Step 4: Stir to Combine
After the waiting period, start stirring gently from the center of the bowl, working your way outward in small circles. Use a rubber spatula or wooden spoon and stir slowly and smoothly. The mixture will look separated at first – this is normal. Keep stirring gently and it will come together into a smooth, glossy, emulsified ganache. This takes 1-2 minutes of gentle stirring. Don’t stir vigorously or whisk hard, as this incorporates too much air and creates bubbles.
Step 5: Add Optional Ingredients
Once smooth and glossy, stir in vanilla extract, salt, or any liqueurs if using. Stir gently to incorporate fully without adding air bubbles.
Step 6: Use or Store
Your chocolate ganache is now ready! Use it immediately as a warm glaze by pouring over cakes, let it cool to room temperature (about 1-2 hours) for spreadable frosting consistency, or refrigerate until firm (2-4 hours) for piping, whipping, or rolling into truffles. The ganache will thicken as it cools.
For Whipped Ganache: Let the ganache cool to room temperature, then refrigerate for at least 2 hours until firm. Beat with an electric mixer on medium speed for 1-2 minutes until light, fluffy, and pale in color. Don’t overbeat or it will become grainy.
Notes
- Chocolate quality matters: Use real chocolate bars (not chips), and choose chocolate you’d enjoy eating plain.
- Don’t overheat cream: Boiling cream can cause ganache to separate or become grainy. Just bring to a simmer.
- Patience during stirring: Stir slowly and gently. Vigorous stirring incorporates air bubbles that dull the shine.
- Fixing separated ganache: If ganache looks oily or separated, blend with an immersion blender or whisk in 1-2 tablespoons of warm cream.
- Adjusting thickness: Too thick? Gently warm and stir in more cream. Too thin? Melt in more chopped chocolate.
- Room temperature is key for spreading: Ganache must be at the right temperature for your intended use.
- Prep Time: 5 minutes
- Cook Time: 5 minutes
- Category: Dessert
- Method: Stovetop
- Cuisine: French
Nutrition
- Serving Size: 2 tablespoons
- Calories: 135
- Sugar: 9g
- Sodium: 15mg
- Fat: 10g
- Saturated Fat: 6g
- Unsaturated Fat: 3g
- Trans Fat: 0g
- Carbohydrates: 11g
- Fiber: 1g
- Protein: 1g
- Cholesterol: 20mg
Tips & Variations
White Chocolate Ganache:
Use a 3:1 ratio for white chocolate (12 ounces white chocolate to 4 ounces cream) because white chocolate is softer and contains more cocoa butter. Heat cream to only 170°F (lower than for dark chocolate) to prevent seizing. White chocolate ganache is sweeter and more delicate – perfect for wedding cakes or pairing with berries.
Flavored Ganache Variations:
Create endless flavor combinations by adding extracts, spices, or liqueurs. Try peppermint extract for mint chocolate ganache (divine on brownies), orange zest or Grand Marnier for chocolate orange ganache, instant espresso powder for mocha ganache, or cinnamon and cayenne for Mexican chocolate ganache. Add flavorings after the ganache comes together, stirring gently to incorporate.
Vegan Chocolate Ganache:
Replace heavy cream with full-fat coconut milk (from a can, not the carton) for dairy-free ganache. Use dairy-free dark chocolate. The ratio and method stay the same. The result is just as silky and delicious. Coconut cream also works beautifully and adds subtle coconut flavor that pairs wonderfully with dark chocolate.
Milk Chocolate Ganache:
Use a 2:1 ratio (16 ounces chocolate to 8 ounces cream) for milk chocolate, as it’s softer than dark chocolate. This creates sweeter, creamier ganache that’s less intense – perfect for those who find dark chocolate too bitter. It’s wonderful on cupcakes and kid-friendly desserts.
Chocolate Hazelnut Ganache:
Add 2-3 tablespoons of Nutella or hazelnut paste to the warm ganache along with a splash of Frangelico (hazelnut liqueur). This creates an incredibly rich, nutty ganache perfect for filling cakes or making truffles. Toast some hazelnuts for garnish.
Salted Caramel Chocolate Ganache:
Drizzle 2-3 tablespoons of caramel sauce into the finished ganache and add ½ teaspoon of flaky sea salt. Swirl gently for a marbled effect or incorporate fully. The sweet-salty combination is absolutely addictive and creates a sophisticated flavor profile.
Ganache Drip Cake:
For those trendy drip cakes, use ganache at about 90-95°F. Test on the edge of a chilled cake – it should drip slowly. Too hot and it runs too fast; too cool and it won’t drip. Practice makes perfect! The drips should be irregular for that artisanal look.
Rolled Chocolate Truffles:
Use 2:1 ganache (firm truffle ratio), chill overnight, then scoop with a melon baller or small cookie scoop. Roll quickly between your palms to form balls (work fast as body heat melts them), then roll in cocoa powder, chopped nuts, sprinkles, or tempered chocolate. Refrigerate to set.
Pro Chef Tips
Tip #1: Chop Chocolate Uniformly Small
Professional pastry chefs know that finely and uniformly chopped chocolate is the key to smooth ganache. Large chunks don’t melt completely, while tiny shavings melt too fast. Aim for ¼-inch pieces that are as uniform as possible. Using a sharp knife and chopping on a stable surface prevents chocolate from flying everywhere. Some chefs even use a food processor to pulse chocolate into uniform small pieces, though hand-chopping gives you more control.
Tip #2: Temperature is Everything
The cream should be hot enough to melt the chocolate (180-190°F) but not so hot that it cooks the chocolate proteins and causes graininess or separation. If you don’t have a thermometer, bring cream just to the point where small bubbles form around the edge and steam rises – this is the perfect temperature. Never let it reach a rolling boil. If you accidentally boil it, let it cool for 2-3 minutes before pouring over chocolate.
Tip #3: The Wait-and-Stir Technique
After pouring hot cream over chocolate, resist the urge to stir immediately. Let it sit undisturbed for 2-3 minutes. This allows the chocolate to soften and begin melting from the residual heat. When you finally stir, start from the center and work outward in small, slow circles. This gentle incorporation creates the smoothest emulsion. Vigorous stirring or whisking creates air bubbles that make the ganache dull and foamy instead of glossy and smooth.
Tip #4: Fixing Broken Ganache
Even professionals sometimes get broken, separated, or grainy ganache. Don’t panic – it’s fixable! If your ganache looks oily or separated, use an immersion blender to re-emulsify it (this works remarkably well). Alternatively, warm it slightly and whisk in 1-2 tablespoons of warm cream, one at a time, until smooth. If it’s grainy, it may have been overheated – strain through a fine-mesh sieve to remove any solid bits, then blend with a tablespoon of warm cream.
Tip #5: Use Weight, Not Volume, for Chocolate
Professional bakers always weigh chocolate rather than measuring by volume because chocolate pieces vary dramatically in size and weight. Eight ounces (225g) of finely chopped chocolate occupies different volume than coarsely chopped. A kitchen scale ensures accuracy and consistent results every time. This is especially important when you’re adjusting ratios for different uses or making large batches.
Tip #6: Know Your Ratios for Different Uses
Pastry chefs adjust the chocolate-to-cream ratio depending on the intended use. For pourable glaze, 1:1 (equal parts) is perfect. For spreadable frosting, 2:1 (twice as much chocolate) creates firmer texture. For truffles, 3:1 makes it firm enough to roll. If you know these ratios, you can create exactly the consistency you need for any application. Start with 1:1 and adjust from there based on your needs.
Common Mistakes to Avoid
Mistake #1: Using Chocolate Chips
Chocolate chips contain stabilizers that help them hold their shape during baking – great for cookies, terrible for ganache. These stabilizers prevent the chocolate from melting smoothly, resulting in grainy, thick ganache that never becomes glossy. Always use real chocolate bars, chopped. The few extra minutes of chopping are worth it for smooth, professional results. Look for “chocolate” on the label, not “chocolate-flavored chips” or “melting wafers.”
Mistake #2: Boiling the Cream
Many home bakers bring cream to a full, rolling boil thinking hotter is better. This is too hot and can “cook” the chocolate proteins, causing the ganache to seize, separate, or become grainy. Cream should just reach a simmer – small bubbles around the edge, steam rising, but not violently boiling. If you accidentally boil it, let it cool for a few minutes before pouring over chocolate. The temperature difference is crucial for proper emulsification.
Mistake #3: Stirring Too Soon or Too Vigorously
Impatient stirring before the chocolate has time to melt, or aggressive whisking to “speed things up,” both create problems. Stirring too soon doesn’t allow the heat to penetrate and melt all the chocolate evenly. Vigorous whisking incorporates too much air, creating a foamy, dull ganache instead of glossy, smooth. The key is patience: wait 2-3 minutes, then stir slowly and gently from the center outward. Think of it as coaxing the mixture together, not forcing it.
Mistake #4: Wrong Temperature for Application
Trying to spread cold ganache tears your cake. Pouring warm ganache over cold dessert causes it to set before you can smooth it. Using ganache at the wrong temperature is frustrating and creates messy results. For glaze, use at 90-95°F (warm but not hot). For spreading, let it cool to thick but spreadable room temperature (takes 1-2 hours). For piping or whipping, fully chill (2-4 hours). Patience with temperature makes all the difference.
Mistake #5: Not Storing Properly
Ganache left uncovered in the fridge absorbs odors and forms a skin. Stored at room temperature for too long, it can spoil. Always press plastic wrap directly onto the surface of ganache before refrigerating to prevent skin formation. Store in an airtight container in the fridge for up to 2 weeks. Bring to proper temperature before using – let it sit at room temperature or gently rewarm as needed. Never microwave on high power, which causes separation; use 50% power in short bursts instead.
Storage & Meal Prep
Room Temperature Storage:
Ganache can sit at room temperature for 2-3 days if your kitchen isn’t too warm (above 75°F, it should be refrigerated). Cover with plastic wrap pressed directly onto the surface to prevent skin formation. This is ideal if you’re using it soon and want to avoid the hassle of softening from the fridge. Room temperature ganache is perfect for spreading or reheating for glaze.
Refrigerator Storage:
Store ganache in an airtight container in the refrigerator for up to 2 weeks. Always press plastic wrap or parchment directly onto the surface before covering with a lid to prevent condensation and skin formation. Cold ganache is very firm – let it sit at room temperature for 30-60 minutes to soften before spreading, or gently rewarm for glaze consistency.
Rewarming Ganache:
To bring refrigerated ganache back to glaze consistency, microwave in 15-second intervals at 50% power, stirring between each interval. Alternatively, place the bowl over a pan of barely simmering water (double boiler method) and stir until smooth and warm. For spreading consistency, simply let it sit at room temperature until it reaches the right softness – this takes 30-60 minutes depending on room temperature.
Portion Control:
If you make a large batch, portion it before storing. Store small amounts in separate containers so you only need to warm what you’ll use. This prevents repeatedly warming and cooling the entire batch, which can affect texture. Small portions also warm faster and more evenly.
Make-Ahead & Freezer Notes
Perfect Make-Ahead Dessert Component:
Ganache is ideal for make-ahead baking. Prepare it days before you need it, store properly refrigerated, and bring to the right temperature when ready to use. This breaks up your work and reduces stress when preparing for parties or events. Make ganache up to 2 weeks ahead and store refrigerated until needed.
Freezing Ganache:
Ganache freezes beautifully for up to 3 months! Portion into amounts you’ll actually use (½ cup or 1 cup portions work well), wrap tightly in plastic wrap, then place in a freezer bag or airtight container. Label with the date and type of chocolate used. This is perfect for always having ganache ready for last-minute desserts or unexpected baking projects.
Thawing Frozen Ganache:
Thaw frozen ganache overnight in the refrigerator for best results. Once thawed, bring to room temperature or gently rewarm depending on your intended use. You can also thaw at room temperature for 2-3 hours if you forgot to transfer it to the fridge. The texture and flavor remain perfect after freezing – you won’t be able to tell it was frozen.
Batch Making:
Consider making a large batch and freezing in portions. Ganache is so versatile that having it ready means you can elevate any dessert with minimal effort. Make a double or triple batch, portion, and freeze. Then you always have professional-quality chocolate topping ready whenever inspiration strikes or unexpected guests arrive.
Pre-Made Truffles:
You can also form truffles from ganache, freeze them uncoated, then roll in cocoa powder or dip in tempered chocolate when needed. This is perfect for holiday gift-giving or having elegant desserts ready. Frozen uncoated truffles keep for 3 months and can be finished whenever needed.
Serving Suggestions
Chocolate ganache elevates countless desserts:
Cakes:
Ganache is the classic cake topping and filling:
- Layer cakes (between layers and as frosting)
- Bundt cakes (warm ganache glaze)
- Cheesecakes (ganache topping adds elegance)
- Pound cakes (simple ganache glaze transforms them)
- Chocolate cakes (chocolate on chocolate perfection)
- Vanilla cakes (classic contrast)
Cupcakes:
Ganache makes cupcakes look professional:
- Dip cupcake tops in warm ganache for smooth coating
- Pipe cooled ganache like traditional frosting
- Fill cupcakes with ganache before frosting
- Drizzle with ganache for decorative finish
Pastries and Desserts:
Use ganache in various desserts:
- Eclairs and cream puffs (classic filling or topping)
- Tarts (chocolate ganache tart is elegant)
- Macarons (ganache filling is traditional)
- Brownies (ganache layer makes them extra decadent)
- Cookies (sandwich cookies with ganache)
Fresh Fruit:
Ganache pairs beautifully with fruit:
- Strawberries dipped in ganache
- Banana slices with ganache drizzle
- Raspberries with ganache and whipped cream
- Orange segments with dark chocolate ganache
- Cherries with ganache (chocolate-covered cherry effect)
Other Creative Uses:
- Ice cream topping (warm ganache over cold ice cream)
- Pancake or waffle topping
- Stirred into hot milk for hot chocolate
- Filling for croissants or donuts
- Fondue for dipping cake cubes, fruit, marshmallows
Beverages:
Pair ganache desserts with:
- Coffee or espresso
- Hot chocolate
- Milk (for kids)
- Port or dessert wine
- Champagne or sparkling wine
- Irish cream liqueur
FAQs Section
Q: Can I make ganache with milk chocolate or white chocolate?
Absolutely! Milk chocolate works beautifully but use a 2:1 ratio (twice as much chocolate as cream) because milk chocolate is softer. White chocolate requires a 3:1 ratio and lower temperature cream (170°F instead of 180°F) because it’s even softer and more delicate. Both create delicious, sweet ganache perfect for those who find dark chocolate too intense. The technique stays the same, just adjust ratios.
Q: Why did my ganache separate or look grainy?
Separation usually happens when the cream is too hot (boiled rather than simmered) or when chocolate and cream aren’t properly emulsified. Graininess occurs from overheating or using chocolate chips instead of real chocolate. To fix: use an immersion blender to re-emulsify, or whisk in 1-2 tablespoons of warm cream. For future batches, use real chopped chocolate, don’t boil the cream, and stir gently. If ganache seems beyond repair, strain through a fine-mesh sieve.
Q: How do I make ganache thicker or thinner?
To thicken: Add more chopped chocolate and stir until melted and smooth. Or simply let it cool longer – ganache thickens significantly as it cools. To thin: Gently warm and stir in more cream, one tablespoon at a time, until desired consistency. You can adjust ganache texture at any point by adding more chocolate (thicker) or cream (thinner). This is why starting with the basic 1:1 ratio is smart – you can always adjust from there.
Q: Can I make ganache dairy-free or vegan?
Yes! Replace heavy cream with full-fat coconut milk (the canned kind, not carton) and use dairy-free dark chocolate. The ratio and method stay identical. Coconut cream also works beautifully and creates rich, silky ganache. Some people use almond milk with added coconut oil for richness, though results vary. Coconut milk is the most reliable dairy-free option and produces results nearly identical to traditional ganache.
Q: How long does chocolate ganache last?
Properly stored ganache lasts 2 weeks in the refrigerator and 3 months in the freezer. At room temperature (if your kitchen isn’t too warm), it keeps 2-3 days. Always store with plastic wrap pressed directly on the surface to prevent skin formation and condensation. The high fat content from chocolate and cream preserves it well. If you notice any off smells, mold, or unusual texture, discard it. Otherwise, ganache is quite stable.
Q: What’s the difference between ganache and chocolate frosting?
Ganache is simply chocolate and cream (sometimes with butter), creating a smooth, glossy finish with intense chocolate flavor. Traditional chocolate frosting is butter-based with powdered sugar and cocoa powder, creating a sweeter, fluffier texture. Ganache is denser, richer, and more intensely chocolate. Frosting is lighter and sweeter. Both have their place – ganache for elegant, sophisticated desserts; frosting for traditional cakes and cupcakes.
Q: Can I color white chocolate ganache?
Yes! Use gel food coloring, not liquid, which can cause ganache to seize. Add tiny amounts of gel coloring to white chocolate ganache and stir until evenly colored. Oil-based candy colors also work beautifully. This creates pastel-colored ganache perfect for wedding cakes, baby showers, or spring desserts. Start with less color than you think – you can always add more. Remember that ganache darkens as it cools, so expect the final color to be slightly deeper.
Conclusion
There you have it – everything you need to master the art of silky, luxurious chocolate ganache that will transform your desserts from ordinary to extraordinary! This simple yet elegant chocolate ganache recipe proves that sometimes the most impressive results come from the simplest techniques and the finest ingredients.
The beauty of ganache is how it empowers home bakers to create professional-quality desserts with minimal effort. Just two ingredients and ten minutes of work give you endless possibilities – elegant glazed cakes, decadent frostings, rich truffle fillings, and so much more. Once you master this fundamental technique, you’ll find yourself using ganache constantly because it makes everything it touches more special.
I hope this recipe becomes your secret weapon for spectacular desserts! There’s something deeply satisfying about stirring together chocolate and cream and watching it transform into glossy, smooth perfection. The versatility means you’ll never tire of it – each application creates something different yet equally delicious.
I’d love to hear how your chocolate ganache turns out! What did you use it for? Did you try any flavor variations? Leave a comment below and share your creations. If this recipe helped you create beautiful desserts, please give it a five-star rating and share it with fellow bakers. Don’t forget to save this to your Pinterest boards so you can make perfect ganache whenever you need it. Here’s to chocolate perfection in every bite!