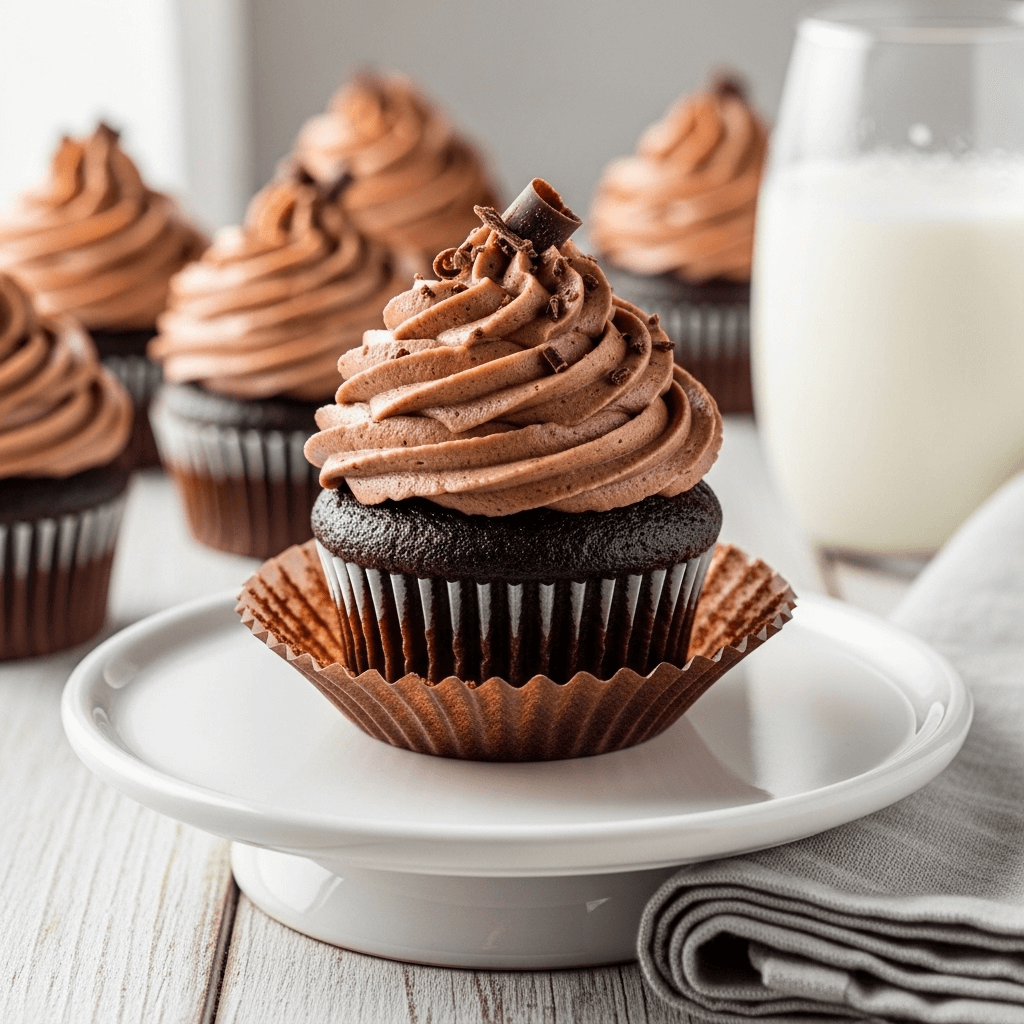
Few desserts bring as much joy as a perfectly baked chocolate cupcake – that tender, moist crumb, rich chocolate flavor, and fluffy frosting that make every bite feel like a celebration. These homemade chocolate cupcakes are the ultimate crowd-pleaser, featuring deep chocolate flavor, incredibly moist texture, and a tender crumb that practically melts in your mouth. They’re the kind of chocolate cupcakes that disappear from the platter before you can even finish frosting the last one.
What makes these easy chocolate cupcakes so special is their foolproof recipe that works every single time. Whether you’re an experienced baker or making cupcakes for the first time, this recipe delivers bakery-quality results with simple ingredients you probably already have in your pantry. These moist chocolate cupcakes are perfect for birthday parties, bake sales, after-school treats, holiday celebrations, or anytime you need a chocolate fix. Top them with your favorite frosting – classic chocolate buttercream, vanilla cream cheese frosting, or even a simple dusting of powdered sugar – and watch them disappear in minutes!
History / Background
Cupcakes have a charming history that dates back to the late 18th century, though they weren’t always called by that name. The term “cupcake” first appeared in American cookbooks in the early 19th century, and it had a dual meaning. Some recipes called “cupcakes” because ingredients were measured in cups rather than weighed (a revolutionary simplification for home bakers), while others were actually baked in cups – teacups, specifically, before muffin tins became standard kitchen equipment.
The earliest cupcakes were actually pound cake recipes scaled down and baked in individual portions. These early versions were quite different from our modern cupcakes – denser, less sweet, and without frosting. Chocolate cupcakes specifically didn’t emerge until chocolate became more widely available and affordable in America during the late 19th century.
The invention of baking powder in the 1850s transformed cupcake baking, creating lighter, fluffier cakes that rose reliably. This was a game-changer for home bakers who previously relied on labor-intensive methods like beating air into eggs for leavening. Chemical leaveners democratized baking, making successful cakes achievable for everyone.
Chocolate cupcakes gained massive popularity in the early 20th century as cocoa powder became a pantry staple and standardized recipes appeared in cookbooks and on product packaging. The Hostess CupCake, introduced in 1919, brought chocolate cupcakes to the masses and created the template for the cream-filled, frosted individual cakes we recognize today.
The cupcake experienced a major renaissance in the late 1990s and early 2000s, transitioning from simple children’s treats to gourmet desserts worthy of upscale bakeries. Shows like “Sex and the City” featuring Magnolia Bakery helped spark “cupcake fever,” and artisan cupcake shops proliferated across America. Today, cupcakes represent both nostalgic comfort and creative culinary expression.
This recipe honors the classic American chocolate cupcake tradition – straightforward, reliable, and absolutely delicious. It’s the kind of recipe that becomes a family favorite, passed down and made for every special occasion.
Why You’ll Love This Recipe
These perfect chocolate cupcakes are about to become your go-to dessert for every celebration and chocolate craving. They strike that ideal balance between being simple enough for beginners yet impressive enough to serve at any party. The best part? They actually taste better than most bakery cupcakes!
Here’s why you’ll fall in love with these chocolate cupcakes:
- Incredibly moist texture – Never dry or crumbly, always tender and perfect
- Rich chocolate flavor – Deep, satisfying chocolate taste in every bite
- Foolproof recipe – Works perfectly every single time, even for beginners
- Simple ingredients – Uses pantry staples you likely already have
- Quick and easy – Ready in under an hour from start to finish
- Perfectly domed tops – Bakery-style appearance without special techniques
- Versatile – Works with any frosting or topping you prefer
- Great for decorating – Smooth tops are perfect for creative frosting designs
- Crowd-pleaser – Loved by kids and adults alike
- Budget-friendly – Makes a dozen cupcakes for just a few dollars
- Freezer-friendly – Make ahead and freeze for up to 3 months
Ingredient Notes
Let’s talk about what makes these moist chocolate cupcakes so incredibly delicious. Each ingredient plays a specific role in creating that perfect texture and rich chocolate flavor.
All-Purpose Flour: Provides structure to the cupcakes. All-purpose flour creates the perfect tender crumb – not too dense, not too delicate. Measure carefully by spooning flour into your measuring cup and leveling it off. Don’t pack it down or you’ll use too much.
Unsweetened Cocoa Powder: The star chocolate ingredient! Use quality cocoa powder for the best flavor – Dutch-process cocoa creates a darker color and milder flavor, while natural cocoa powder has more intense, acidic chocolate notes. Either works beautifully. Don’t substitute hot chocolate mix, which contains sugar and milk powder.
Granulated Sugar: Sweetens the cupcakes and helps create moisture. Sugar also contributes to tender texture and browning. The amount in this recipe creates perfectly sweet cupcakes that aren’t cloying.
Baking Soda and Baking Powder: These leavening agents work together to create light, fluffy cupcakes that rise beautifully. Baking soda reacts with acidic ingredients (cocoa and buttermilk), while baking powder provides additional lift. Make sure both are fresh – expired leaveners create flat, dense cupcakes.
Salt: Essential for enhancing all the other flavors, especially chocolate. A pinch of salt makes chocolate taste more chocolaty and prevents the cupcakes from tasting flat or one-dimensional.
Vegetable Oil: Creates incredibly moist cupcakes that stay soft for days. Oil-based cakes have better moisture retention than butter-based cakes. Use neutral oil like vegetable, canola, or light olive oil. Melted coconut oil also works.
Eggs: Bind ingredients together and add richness and structure. Room temperature eggs incorporate more easily and create better texture. If eggs are cold, place them in warm water for 5 minutes before using.
Vanilla Extract: Enhances the chocolate flavor and adds warmth and depth. Use pure vanilla extract rather than imitation for the best flavor.
Buttermilk: Creates incredibly tender cupcakes with subtle tang that balances sweetness. The acidity in buttermilk reacts with baking soda for extra rise and tender crumb. Make your own by adding 1 tablespoon white vinegar or lemon juice to 1 cup regular milk and letting it sit for 5 minutes.
Hot Coffee or Water: Blooms the cocoa powder, intensifying the chocolate flavor. Don’t worry – your cupcakes won’t taste like coffee! The coffee simply enhances chocolate notes. Use hot water if you prefer, though coffee creates richer flavor.
Equipment Needed
Making perfect chocolate cupcakes requires just basic baking equipment:
- 12-cup muffin tin – Standard size for regular cupcakes
- Cupcake liners – Paper or foil liners prevent sticking and make serving easy
- Large mixing bowl – For combining dry ingredients
- Medium mixing bowl – For mixing wet ingredients
- Whisk – For mixing batter (no electric mixer needed!)
- Measuring cups and spoons – For accurate measurements
- Rubber spatula – For scraping bowls and folding
- Ice cream scoop or ¼ cup measure – For evenly portioning batter
- Wire cooling rack – For cooling cupcakes
- Toothpick or cake tester – For testing doneness
Optional but helpful:
- Stand mixer or hand mixer (makes mixing easier but not necessary)
- Offset spatula (for frosting)
- Piping bags and tips (for decorative frosting)

Chocolate Cupcakes Recipe
- Total Time: 35 minutes
- Yield: 12 cupcakes 1x
- Diet: Vegetarian
Description
These perfect chocolate cupcakes are incredibly moist, rich, and easy to make! With deep chocolate flavor and tender crumb, they’re better than any bakery version. Perfect for birthdays, celebrations, or satisfying any chocolate craving!
Ingredients
For the Chocolate Cupcakes:
- 1 cup (125g) all-purpose flour
- 1 cup (200g) granulated sugar
- ½ cup (45g) unsweetened cocoa powder
- 1 teaspoon baking soda
- ½ teaspoon baking powder
- ½ teaspoon salt
- 1 large egg, room temperature
- ½ cup (120ml) buttermilk, room temperature
- ½ cup (120ml) vegetable oil
- 2 teaspoons vanilla extract
- ½ cup (120ml) hot coffee (or hot water)
For Chocolate Buttercream Frosting (optional):
- 1 cup (2 sticks) unsalted butter, softened
- 3½ cups powdered sugar
- ½ cup unsweetened cocoa powder
- ¼ cup heavy cream
- 2 teaspoons vanilla extract
- Pinch of salt
Instructions
Make the Cupcakes:
- Preheat oven: Preheat your oven to 350°F (175°C). Line a 12-cup muffin tin with cupcake liners.
- Mix dry ingredients: In a large mixing bowl, whisk together flour, sugar, cocoa powder, baking soda, baking powder, and salt until well combined and no lumps remain.
- Mix wet ingredients: In a medium bowl, whisk together the egg, buttermilk, oil, and vanilla extract until smooth and well combined.
- Combine: Pour the wet ingredients into the dry ingredients. Whisk gently until just combined – the batter will be thick at this point. Don’t overmix!
- Add hot liquid: Carefully pour in the hot coffee (or water) while whisking gently. The batter will become very thin and liquid – this is perfect! The thin batter creates incredibly moist cupcakes.
- Fill cupcake liners: Divide the batter evenly among the 12 cupcake liners, filling each about ⅔ full. An ice cream scoop or ¼ cup measure works perfectly for this.
- Bake: Bake for 18-22 minutes, until a toothpick inserted into the center comes out clean or with just a few moist crumbs. The tops should spring back when lightly touched. Don’t overbake!
- Cool: Let cupcakes cool in the pan for 5 minutes, then transfer to a wire cooling rack to cool completely before frosting. This is important – frosting warm cupcakes will cause it to melt!
Notes
- Beat butter: In a large bowl, beat softened butter with an electric mixer on medium speed for 2-3 minutes until light and fluffy.
- Add dry ingredients: Sift in the powdered sugar and cocoa powder. Beat on low speed until combined, then increase to medium-high and beat for 2 minutes.
- Add cream and vanilla: Add heavy cream, vanilla, and salt. Beat on medium-high speed for 3-4 minutes until light, fluffy, and spreadable. If too thick, add more cream 1 tablespoon at a time. If too thin, add more powdered sugar.
- Frost cupcakes: Spread or pipe frosting onto completely cooled cupcakes. Enjoy!
- Prep Time: 15 minutes
- Cook Time: 20 minutes
- Category: Dessert
- Method: Baking
- Cuisine: American
Nutrition
- Serving Size: 1 unfrosted cupcake
- Calories: 195
- Sugar: 18g
- Sodium: 215mg
- Fat: 10g
- Saturated Fat: 1.5g
- Unsaturated Fat: 8g
- Trans Fat: 0g
- Carbohydrates: 26g
- Fiber: 1g
- Protein: 3g
- Cholesterol: 20mg
Tips & Variations
Flavor Variations:
- Double chocolate: Fold in ¾ cup mini chocolate chips to the batter
- Peanut butter chocolate: Top with peanut butter frosting instead
- Mint chocolate: Add ½ teaspoon peppermint extract to batter and frosting
- Mocha: Increase coffee to ¾ cup and add 1 teaspoon instant espresso powder
- Chocolate raspberry: Add raspberry jam filling and raspberry frosting
- S’mores: Top with marshmallow frosting and crushed graham crackers
Frosting Options:
- Vanilla buttercream for classic contrast
- Cream cheese frosting for tangy richness
- Chocolate ganache for ultimate decadence
- Whipped cream for lighter option
- Peanut butter frosting for sweet and salty
- Simple powdered sugar dusting for minimalist approach
Filling Ideas:
- Use a cupcake corer to remove center and fill with:
- Chocolate ganache
- Caramel sauce
- Raspberry or strawberry jam
- Peanut butter
- Cream cheese filling
- Marshmallow fluff
Decoration Ideas:
- Sprinkles (always a crowd-pleaser!)
- Chocolate shavings or curls
- Fresh berries
- Crushed cookies (Oreos, graham crackers)
- Candy pieces (M&Ms, Reese’s)
- Edible flowers for elegant occasions
- Gold leaf for fancy events
Dietary Adaptations:
- Gluten-free: Use 1:1 gluten-free flour blend
- Dairy-free: Use non-dairy milk with vinegar for “buttermilk” and dairy-free butter for frosting
- Vegan: Use flax egg (1 tablespoon ground flaxseed + 3 tablespoons water per egg), non-dairy milk, and vegan butter
- Lower sugar: Reduce sugar to ¾ cup (cupcakes will be less sweet and may brown less)
Pro Chef Tips
Tip #1: Room Temperature Ingredients Create Better Texture
Professional bakers always use room temperature eggs and buttermilk because they emulsify better with other ingredients, creating smoother batter and better texture. Cold ingredients can cause the batter to curdle or not combine properly. Plan ahead and leave eggs and buttermilk on the counter for 30 minutes before baking.
Tip #2: Measure Flour Correctly
The number one cause of dense, dry cupcakes is using too much flour. Never scoop flour directly with your measuring cup – this packs it down and you’ll use 25% more than needed! Instead, fluff the flour with a spoon, spoon it into your measuring cup, then level it off with a straight edge. Better yet, weigh it (1 cup = 125g).
Tip #3: Don’t Fear the Thin Batter
When you add the hot liquid, the batter becomes very thin – almost pourable like heavy cream. New bakers often panic and try to add more flour, but don’t! This thin batter creates the incredibly moist, tender cupcakes. Trust the recipe and pour that thin batter into your liners.
Tip #4: Fill Liners Consistently
For uniformly sized cupcakes that look professional, use an ice cream scoop or ¼ cup measure to portion batter. Fill each liner about ⅔ full. This ensures they all bake at the same rate and rise to the same height, creating that perfect bakery look.
Tip #5: The Toothpick Test Tells All
Cupcakes are done when a toothpick inserted in the center comes out with a few moist crumbs – NOT completely clean. A completely clean toothpick means they’re already overbaked and will be dry. Look for moist crumbs clinging to the toothpick, which indicates perfectly baked cupcakes.
Tip #6: Cool Completely Before Frosting
This seems obvious but it’s worth emphasizing: cupcakes must be completely cool to the touch before frosting. Warm cupcakes will melt frosting, causing it to slide off or become soupy. If you’re in a hurry, place cupcakes in the refrigerator for 15-20 minutes to speed up cooling.
Common Mistakes to Avoid
Mistake #1: Overmixing the Batter
Once you add wet ingredients to dry ingredients, mix just until combined – no more! Overmixing develops gluten in the flour, creating tough, dense, tunneled cupcakes instead of tender ones. Mix until you can’t see dry flour streaks, then stop immediately. A few small lumps are fine.
Mistake #2: Overbaking
This is the most common cause of dry chocolate cupcakes. Overbaked cupcakes lose moisture and become crumbly. Set your timer for the minimum time (18 minutes), then check. Look for tops that spring back when touched and a toothpick that comes out with moist crumbs. Don’t wait for a completely clean toothpick!
Mistake #3: Using Expired Leavening Agents
Baking soda and baking powder lose potency over time. If your cupcakes are flat and dense despite following the recipe, your leaveners are probably expired. Test baking powder by mixing a teaspoon with hot water – it should fizz vigorously. Replace leavening agents every 6 months for best results.
Mistake #4: Opening the Oven Door Too Early
Don’t open the oven door during the first 15 minutes of baking! Opening too early causes temperature fluctuation that can make cupcakes sink in the middle. Resist the temptation to peek – wait until at least 15 minutes have passed before checking.
Mistake #5: Incorrect Oven Temperature
Oven temperatures can be off by 25-50°F, affecting baking results. If your cupcakes consistently overbake or underbake despite following timing, your oven temperature is likely inaccurate. Invest in an oven thermometer (under $10) to know your actual temperature and adjust accordingly.
Storage & Meal Prep
Room Temperature Storage:
Store frosted cupcakes in an airtight container at room temperature for up to 2 days. The frosting helps seal in moisture. Unfrosted cupcakes can sit at room temperature for up to 3 days. Keep them covered to prevent drying out.
Refrigerator Storage:
Cupcakes with buttercream frosting can be refrigerated in an airtight container for up to 5 days. Let come to room temperature for 20-30 minutes before serving for best texture and flavor. Refrigeration can dry out cupcakes slightly, so room temperature storage is better for short-term.
Maintaining Freshness:
To keep cupcakes extra moist, add a slice of bread to your storage container. The cupcakes will absorb moisture from the bread, staying soft longer. Replace the bread slice daily.
Transporting Cupcakes:
Use a cupcake carrier or place them in a single layer in a shallow box. If stacking, use cupcake boxes with inserts. For long trips, refrigerate until just before leaving, then transport in a cooler to prevent frosting from melting.
Make-Ahead & Freezer Notes
Make-Ahead Baking:
Bake cupcakes up to 2 days ahead, let cool completely, and store unfrosted in an airtight container at room temperature. Frost on the day of serving for the freshest presentation. You can also make frosting 1 week ahead and refrigerate it – bring to room temperature and rewhip before using.
Freezing Unfrosted Cupcakes:
Unfrosted cupcakes freeze beautifully for up to 3 months. Let cool completely, wrap individually in plastic wrap, then place in freezer bags. Thaw at room temperature for 1-2 hours before frosting and serving. They’ll taste freshly baked!
Freezing Frosted Cupcakes:
You can freeze frosted cupcakes, though texture may be slightly affected. Flash freeze them unwrapped on a baking sheet until frosting is solid (1-2 hours), then wrap individually and freeze for up to 1 month. Thaw in the refrigerator overnight, then bring to room temperature.
Freezing Just the Frosting:
Buttercream frosting freezes excellently for up to 3 months. Store in an airtight container, thaw overnight in refrigerator, then bring to room temperature and rewhip with a mixer until fluffy before using.
Best Freezing Strategy:
For maximum freshness and flexibility, freeze unfrosted cupcakes. When needed, thaw them and frost fresh. This gives you the convenience of make-ahead baking while maintaining that just-frosted quality.
Serving Suggestions
Chocolate cupcakes are delicious on their own, but here’s how to create a complete dessert experience:
Party Presentation:
- Arrange on a tiered cupcake stand for visual impact
- Create a cupcake “cake” by arranging them in tiers
- Set up a cupcake decorating bar with various toppings
- Use cupcake flags or toppers for themed parties
- Place in decorative paper boxes for party favors
Beverage Pairings:
- Cold milk (the classic companion!)
- Hot coffee or espresso (chocolate and coffee are perfect together)
- Hot chocolate for double chocolate indulgence
- Vanilla milkshake
- Dessert wine like Port or sweet red
- Champagne or sparkling wine for celebrations
Ice Cream Pairings:
- Vanilla ice cream (classic contrast)
- Coffee ice cream (enhances chocolate)
- Mint chocolate chip
- Salted caramel for sweet and salty
- Peanut butter for chocolate-PB lovers
Complete Dessert Table: For parties, create a dessert spread: chocolate cupcakes as the centerpiece, surrounded by cookies, brownies, a fruit platter for balance, and candy dishes with chocolates and mints. Add fresh flowers for elegance.
Special Occasions:
- Birthdays: Top with candles and personalized toppers
- Weddings: Arrange in tiers with elegant floral decorations
- Baby showers: Use pastel-colored frosting and themed toppers
- Holidays: Decorate with seasonal sprinkles and colors
- Graduations: Use school colors in frosting and decorations
FAQs Section
Q: Can I make these cupcakes without buttermilk?
A: Yes! Make your own buttermilk substitute by adding 1 tablespoon white vinegar or lemon juice to ½ cup regular milk. Stir and let sit for 5 minutes until slightly thickened, then use as directed. You can also use plain yogurt thinned with a little milk.
Q: Why are my chocolate cupcakes dense?
A: Common causes include overmixing the batter (develops too much gluten), using too much flour (measure correctly by spooning and leveling), expired leavening agents (test baking powder freshness), or overbaking (makes them dry and dense). Follow measuring and mixing instructions carefully.
Q: Can I use this recipe for a layer cake?
A: Yes! Pour batter into two greased and floured 8-inch round cake pans. Bake at 350°F for 25-30 minutes until a toothpick comes out with moist crumbs. Cool 10 minutes in pans, then turn out onto wire racks to cool completely before frosting.
Q: How do I get the cupcakes to rise with a nice dome?
A: Fill liners ⅔ full (not more), ensure leavening agents are fresh, don’t overmix batter, and bake at the correct temperature (350°F). Oven temperature that’s too low creates flat cupcakes. Also, don’t open the oven door during the first 15 minutes of baking.
Q: Can I make these cupcakes ahead of time?
A: Absolutely! Bake cupcakes up to 2 days ahead and store unfrosted at room temperature, or freeze for up to 3 months. Frost on the day of serving. You can also make frosting up to 1 week ahead and refrigerate, then bring to room temperature and rewhip before using.
Q: Why did my cupcakes sink in the middle?
A: Sinking usually indicates underbaking (test with toothpick), opening the oven door too early (causes temperature drop), overmixing (creates too much air that deflates), or too much leavening agent (rises too fast then collapses). Make sure to follow baking times and don’t disturb them early.
Q: How do I store leftover frosted cupcakes?
A: Store frosted cupcakes in an airtight container at room temperature for up to 2 days, or refrigerate for up to 5 days. Let refrigerated cupcakes come to room temperature for 20-30 minutes before serving for best flavor and texture. The frosting helps seal in moisture and keep cupcakes fresh.
Conclusion
And there you have it – everything you need to make the most perfect, moist, incredibly delicious chocolate cupcakes that will have everyone asking for your recipe! These homemade chocolate cupcakes prove that the best desserts don’t require complicated techniques or professional equipment. Just quality ingredients, proper measuring, and following a few simple steps creates cupcakes that taste better than any bakery version.
The beauty of this easy chocolate cupcakes recipe is its reliability and versatility. Whether you’re baking for a child’s birthday party, bringing treats to a bake sale, celebrating a special occasion, or simply craving chocolate, these cupcakes deliver every single time. Once you master this recipe, you’ll find yourself making it again and again because nothing beats the joy of homemade chocolate cupcakes fresh from your own oven.
Ready to make the best chocolate cupcakes ever? I’d absolutely love to hear how yours turn out! Drop a comment below and let me know what you think, how you decorated them, or what frosting you used. And if these become your new go-to cupcake recipe (and I think they will!), please save this to your Pinterest boards so you can find it easily next time – and help other home bakers discover these amazing cupcakes too! Your pins and shares truly keep this blog going and inspire me to create more delicious recipes for you. Now grab your mixing bowl and get ready to make some seriously incredible chocolate cupcakes!