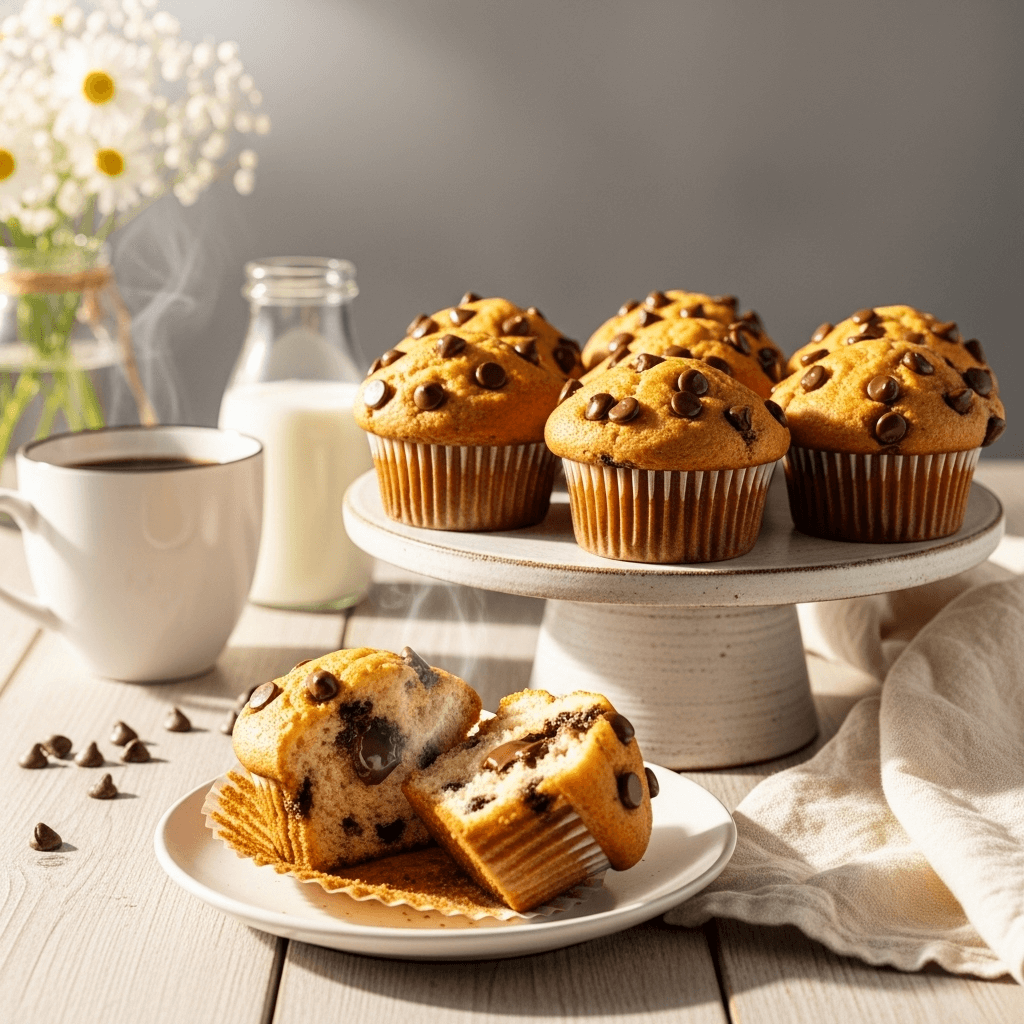

Get ready to bake the most incredible chocolate chip muffins you’ve ever tasted! These bakery-style chocolate chip muffins feature tall, beautifully domed tops, a tender crumb that’s perfectly moist, and generous amounts of melty chocolate chips in every bite. They’re the kind of muffins that make you want to wake up early just to enjoy one warm from the oven with your morning coffee.
Perfect for breakfast, brunch, afternoon snacks, lunchbox treats, or whenever you need a little pick-me-up, these chocolate chip muffins are a crowd-pleaser that never goes out of style. They’re equally at home on your kitchen counter for a casual weekday breakfast or arranged on a pretty platter for a weekend brunch with friends. Kids and adults alike go crazy for these – there’s just something universally appealing about tender muffins studded with pockets of melted chocolate.
What makes these muffins truly special is the combination of technique and ingredients that creates that coveted bakery-style texture. The secret is in the higher oven temperature at the start, which creates steam and causes the muffin tops to rise dramatically into those gorgeous domes. Combined with sour cream for moisture and a touch of vanilla for depth, these easy chocolate chip muffins deliver professional results every single time, even if you’re a beginner baker!
History / Background
Muffins have been part of American breakfast culture since the colonial era, though the sweet, cake-like muffins we know today are quite different from the English muffins that arrived with early settlers. The term “muffin” likely comes from the French word “moufflet,” meaning soft bread, and these portable breakfast treats gained popularity in the United States throughout the 19th century.
Chocolate chip muffins as we know them today emerged in the mid-20th century following the accidental invention of chocolate chip cookies by Ruth Wakefield in 1938. Once chocolate chips became a pantry staple in American homes, creative bakers began incorporating them into all sorts of baked goods, including muffins. The combination was an instant hit – the sweet, tender muffin base provided the perfect vehicle for pockets of melty chocolate.
The rise of coffee shop culture in the 1980s and 1990s brought muffins into the mainstream as a grab-and-go breakfast option. Coffee chains began offering oversized muffins with those distinctive domed tops, and suddenly everyone wanted to recreate these bakery-style beauties at home. The chocolate chip variety became one of the most popular flavors alongside blueberry and banana nut.
What’s interesting is that muffins occupy a unique space in baking culture – they’re technically a quick bread (using baking powder or baking soda for leavening rather than yeast), which makes them faster and more forgiving than many other baked goods. This accessibility is part of why homemade muffins became such a beloved home baking project. They require minimal equipment, come together quickly, and deliver impressive results that make you look like a professional baker.
Today, chocolate chip muffins represent comfort, nostalgia, and the simple pleasure of homemade baking. They’re often one of the first recipes new bakers try, and they remain a favorite even for experienced bakers who appreciate their reliability and universal appeal.
Why You’ll Love This Recipe
These bakery-style chocolate chip muffins are about to become your new favorite weekend baking project – and here’s why. The recipe creates muffins with that perfect tender, moist crumb that doesn’t crumble apart, but isn’t dense or heavy either. They’re just right, with a delicate texture that melts in your mouth and chocolate chips that stay soft and gooey throughout.
Here’s why this recipe will become a household staple:
- Bakery-style tall tops – The high initial heat creates those impressive domed tops that look professionally made
- Super moist texture – Sour cream is the secret ingredient that keeps these muffins tender for days
- Loaded with chocolate – Generous chocolate chips in the batter plus extra on top for maximum chocolate goodness
- Quick and easy – Ready from start to finish in just 35 minutes with simple mixing
- Beginner-friendly – No special techniques or equipment required, perfect for first-time bakers
- Customizable – Easy to adapt with different mix-ins or flavor variations
- Budget-friendly – Uses simple pantry ingredients you probably already have
- Freezer-friendly – Make a double batch and freeze extras for quick breakfasts
- Kid-approved – Even picky eaters love these muffins
- Perfect for gifting – Pack in a pretty box for neighbors, teachers, or friends
The combination of melted butter, sour cream, and the perfect ratio of sugar creates muffins that taste indulgent without being overly sweet. They have enough chocolate to satisfy your cravings but still maintain that classic muffin quality that makes them appropriate for breakfast. Trust me, once you’ve mastered this recipe, you’ll be making these chocolate chip muffins on repeat!
Ingredient Notes
Understanding your ingredients helps you achieve the best results and know when substitutions will work. Let’s break down what goes into these perfect muffins:
All-Purpose Flour – The foundation of your muffins. All-purpose flour provides the right protein content for tender muffins with good structure. Don’t substitute with bread flour (too chewy) or cake flour (too delicate). Measure correctly by spooning flour into measuring cups and leveling off.
Granulated Sugar – Sweetens the muffins and helps create that slightly crispy exterior on the top. The amount here is balanced – enough for sweetness but not so much that they taste like cupcakes.
Baking Powder – The leavening agent that makes muffins rise. Make sure yours is fresh (check the expiration date) or your muffins won’t rise properly. Baking powder loses potency over time.
Salt – Essential for balancing sweetness and enhancing all the other flavors. Never skip the salt in baking – it makes a huge difference even though you won’t taste it directly.
Unsalted Butter – Adds rich flavor and tender texture. Using melted butter instead of creaming it makes this recipe quick and easy. Unsalted lets you control the salt level precisely. Let it cool slightly after melting so it doesn’t cook the eggs when mixing.
Eggs – Provide structure, richness, and help bind everything together. Use large eggs at room temperature for best results. Room temperature eggs incorporate more easily into the batter.
Sour Cream – This is the secret ingredient! Sour cream adds incredible moisture and a subtle tang that enhances flavor. It also contains fat and acid, both of which create tender muffins. You can substitute Greek yogurt if needed, though sour cream gives slightly better results.
Vanilla Extract – Enhances all the other flavors and adds depth. Use pure vanilla extract, not imitation, for the best flavor.
Whole Milk – Adds moisture and helps create the right batter consistency. Whole milk works best, but 2% can be substituted if necessary. Avoid skim milk as it lacks the fat needed for tender muffins.
Semi-Sweet Chocolate Chips – The star of the show! Use good quality chocolate chips for best results. Semi-sweet provides nice balance, but you can use milk chocolate for sweeter muffins or dark chocolate for more intense flavor. Mini chips distribute more evenly while regular chips create bigger pockets of chocolate.
Equipment Needed
You don’t need any special equipment to make these delicious muffins. Here’s what you’ll need:
- Muffin tin – Standard 12-cup muffin pan. Avoid using mini or jumbo pans as cooking times will differ significantly
- Paper muffin liners – Makes cleanup easy and prevents sticking. You can also grease the pan well if you prefer
- Two large mixing bowls – One for dry ingredients, one for wet ingredients
- Whisk – For mixing dry ingredients and beating wet ingredients
- Measuring cups and spoons – Accurate measurements are crucial in baking
- Rubber spatula – For folding the batter gently and scraping bowls
- Ice cream scoop or large spoon – For portioning batter evenly into muffin cups
- Cooling rack – Allows air to circulate around muffins as they cool, preventing soggy bottoms
- Toothpick or cake tester – For checking doneness
- Oven thermometer (optional but helpful) – Ensures your oven temperature is accurate
Perfect Chocolate Chip Muffins
- Total Time: 35 minutes
- Yield: 12 muffins 1x
- Diet: Vegetarian
Description
Bakery-style chocolate chip muffins with tall, domed tops and incredibly moist texture. Loaded with chocolate chips and featuring that perfect tender crumb, these easy homemade muffins are ready in just 35 minutes and taste even better than coffee shop versions!
Ingredients
Dry Ingredients:
- 2 cups all-purpose flour
- ¾ cup granulated sugar
- 2 teaspoons baking powder
- ½ teaspoon salt
Wet Ingredients:
- ½ cup unsalted butter, melted and slightly cooled
- 2 large eggs, room temperature
- ½ cup sour cream, room temperature
- 2 teaspoons vanilla extract
- ½ cup whole milk, room temperature
Mix-ins:
- 1 ½ cups semi-sweet chocolate chips, divided (1 ¼ cups for batter, ¼ cup for topping)
Instructions
- Preheat and prepare: Preheat your oven to 425°F (this high temperature is intentional and creates those tall tops!). Line a 12-cup muffin tin with paper liners or grease each cup generously with butter or cooking spray.
- Mix dry ingredients: In a large bowl, whisk together the flour, sugar, baking powder, and salt until well combined and no lumps remain. This ensures even distribution of leavening agents.
- Combine wet ingredients: In another large bowl, whisk together the melted butter, eggs, sour cream, and vanilla extract until smooth and well combined. Add the milk and whisk again until fully incorporated. The mixture should be smooth and slightly thick.
- Combine wet and dry: Pour the wet ingredients into the bowl with the dry ingredients. Using a rubber spatula, gently fold the mixture together just until no dry flour streaks remain. The batter will be thick and slightly lumpy – this is exactly what you want. Do NOT overmix or your muffins will be tough.
- Add chocolate chips: Reserve ¼ cup of chocolate chips for topping. Fold the remaining 1 ¼ cups of chocolate chips into the batter gently, being careful not to overmix. Fold just until the chips are evenly distributed.
- Fill muffin cups: Using an ice cream scoop or large spoon, divide the batter evenly among the 12 muffin cups. Fill each cup almost to the top (about ¾ to nearly full) for those impressive bakery-style muffins. Sprinkle the reserved chocolate chips on top of each muffin, pressing them lightly into the batter.
- Bake: Place the muffin tin in the preheated 425°F oven and bake for 5 minutes at this high temperature. Without opening the oven door, reduce the temperature to 350°F and continue baking for 13-15 minutes more, or until the muffins are golden brown on top and a toothpick inserted into the center comes out clean or with just a few moist crumbs.
- Cool: Remove the muffin tin from the oven and let the muffins cool in the pan for 5 minutes. This allows them to set properly. Then transfer the muffins to a wire cooling rack. They’re delicious served warm or at room temperature!
Notes
- The initial high heat (425°F) is crucial for creating tall, domed tops. Don’t skip this step!
- Don’t overmix the batter – lumps are okay. Overmixing develops gluten and creates tough, dense muffins.
- Fill muffin cups generously (almost to the top) for bakery-style size and appearance.
- Room temperature ingredients mix together more easily and create better texture.
- Muffins are done when a toothpick comes out clean or with a few moist crumbs (not wet batter).
- For extra tall muffins, chill the batter for 30 minutes before baking.
- Store in an airtight container to maintain moisture.
- Prep Time: 15 minutes
- Cook Time: 20 minutes
- Category: Breakfast
- Method: Baking
- Cuisine: American
Nutrition
- Serving Size: 1 muffin
- Calories: 295
- Sugar: 24g
- Sodium: 180mg
- Fat: 14g
- Saturated Fat: 8g
- Unsaturated Fat: 5g
- Trans Fat: 0g
- Carbohydrates: 39g
- Fiber: 2g
- Protein: 4g
- Cholesterol: 55mg
Tips & Variations
Double Chocolate Muffins: Replace ¼ cup of the flour with unsweetened cocoa powder for rich chocolate muffins studded with chocolate chips.
Jumbo Bakery-Style Muffins: Use a 6-cup jumbo muffin tin and increase baking time to 8 minutes at 425°F, then 18-22 minutes at 350°F.
Mini Chocolate Chip Muffins: Bake in mini muffin tins for 3 minutes at 425°F, then 8-10 minutes at 350°F. Makes about 36 mini muffins, perfect for parties!
Banana Chocolate Chip: Add ½ cup mashed ripe banana to the wet ingredients and reduce milk to ⅓ cup for delicious banana chocolate chip muffins.
Healthier Version: Substitute half the all-purpose flour with whole wheat flour, use Greek yogurt instead of sour cream, and reduce sugar to ½ cup. Add a mashed banana for extra moisture and natural sweetness.
Peanut Butter Chocolate Chip: Swirl 2-3 tablespoons of peanut butter into the batter before baking for amazing PB and chocolate flavor.
Coffee Chocolate Chip: Add 1 tablespoon of instant espresso powder to the dry ingredients for mocha muffins.
Streusel Topping: Make a simple streusel with 3 tablespoons flour, 3 tablespoons brown sugar, 2 tablespoons cold butter, and sprinkle on top before baking.
Triple Chocolate: Use a combination of dark, milk, and white chocolate chips for varied chocolate flavor.
Orange Chocolate: Add 1 tablespoon orange zest to the batter for a delightful citrus-chocolate combination.
Pro Chef Tips
Bring ingredients to room temperature: This might seem fussy, but room temperature eggs, milk, and sour cream blend more easily and create a smoother, more uniform batter that bakes more evenly. Set them out 30-60 minutes before baking.
Don’t overmix the batter: This is the number one mistake people make with muffins. Mix just until the dry ingredients are incorporated – the batter should still be lumpy. Overmixing develops gluten strands, creating tough, dense muffins with tunnels inside instead of that tender, even crumb.
Use the two-temperature technique: Starting at high heat (425°F) creates rapid steam that pushes the muffin tops up into impressive domes. Lowering to 350°F finishes cooking them through without burning the tops. This technique is what makes these truly bakery-style.
Fill cups generously: Don’t be shy! Fill muffin cups almost to the top (about ¾ to nearly full). This creates tall, impressive muffins rather than flat, squat ones. The batter is thick enough that it won’t overflow.
Toss chocolate chips in flour: Reserve a tablespoon of your measured flour and toss the chocolate chips in it before adding to the batter. This prevents them from sinking to the bottom during baking, ensuring even distribution.
Check doneness properly: Insert a toothpick into the center of a muffin. It should come out clean or with a few moist crumbs. If you see wet batter, bake 2-3 minutes more. Be careful not to overbake, which dries out muffins.
Cool in stages: Let muffins cool in the pan for exactly 5 minutes – this allows them to set and makes removal easier. Transfer to a wire rack to finish cooling. Leaving them in the pan too long creates condensation and soggy bottoms.
Melt butter and cool slightly: Melted butter should be warm but not hot when added to eggs. If it’s too hot, it can cook the eggs and create a scrambled texture. Let it sit for 5 minutes after melting.
Measure flour correctly: Spoon flour into measuring cups and level off with a knife. Don’t scoop directly from the bag or pack it down, which adds too much flour and creates dense, dry muffins.
Common Mistakes to Avoid
Mistake 1: Overmixing the batter. This is the most common muffin mistake! When you overmix, you develop too much gluten, which creates tough, dense muffins with tunnel-like holes inside. Mix just until the flour disappears – a few lumps are perfectly fine and actually desirable. Use a gentle folding motion rather than aggressive stirring.
Mistake 2: Using cold ingredients. Cold eggs, milk, and sour cream don’t blend smoothly with melted butter, creating an uneven batter with pockets of unmixed ingredients. This results in muffins with inconsistent texture. Take ingredients out of the fridge 30-60 minutes before baking for best results.
Mistake 3: Skipping the high-heat start. Many people are tempted to bake at 350°F the whole time, but this won’t create those dramatic domed tops. The initial burst of high heat (425°F) is what causes rapid rising. Lower heat from the start creates flat-topped muffins.
Mistake 4: Opening the oven door too early. Resist the urge to peek! Opening the oven in the first 15 minutes releases heat and can cause muffins to collapse. Wait until at least 15 minutes have passed before checking on them.
Mistake 5: Overbaking. Muffins continue cooking slightly after you remove them from the oven (carryover cooking). If you wait until a toothpick is completely clean with zero moisture, your muffins will be dry. Remove them when the toothpick has just a few moist crumbs.
Mistake 6: Using expired baking powder. Old baking powder loses its effectiveness, resulting in dense muffins that don’t rise properly. Test your baking powder by mixing a teaspoon with hot water – it should bubble vigorously. If not, buy fresh.
Mistake 7: Filling muffin cups unevenly. This creates muffins of different sizes that finish baking at different times. Use an ice cream scoop or measure with a ⅓ cup measure to ensure even portions.
Storage & Meal Prep
Room Temperature Storage: Store cooled muffins in an airtight container at room temperature for up to 3 days. Keeping them sealed prevents them from drying out. If your container is large, place a paper towel in the bottom to absorb any excess moisture.
Refrigerator Storage: While not necessary, you can refrigerate muffins in an airtight container for up to 1 week. The sour cream in these muffins means they stay fresh longer than many muffin recipes. Bring to room temperature or warm briefly before serving for best flavor.
Reheating Individual Muffins: Microwave a single muffin for 15-20 seconds to warm it through and soften it slightly. This brings back that fresh-baked texture and makes chocolate chips melty again. Alternatively, warm in a 300°F oven for 5-7 minutes.
Keeping Muffins Fresh: The key to maintaining moisture is proper storage. Always wait until muffins are completely cool before storing (warm muffins create condensation which leads to sogginess). Store with the muffin papers on – they actually help maintain moisture.
Meal Prep Strategy: These muffins are perfect for weekly meal prep. Bake a batch on Sunday and portion into grab-and-go breakfast containers or bags for easy weekday breakfasts. Pair with fruit and yogurt for a complete breakfast.
Reviving Day-Old Muffins: If muffins have dried out slightly, brush the tops lightly with melted butter and warm in a 300°F oven for 5 minutes. This refreshes them beautifully!
Make-Ahead & Freezer Notes
Freezing Baked Muffins: This is the best make-ahead option! Let muffins cool completely, then wrap individually in plastic wrap or aluminum foil. Place wrapped muffins in a freezer-safe bag or container and freeze for up to 3 months. Individually wrapping prevents freezer burn and makes it easy to grab just one or two as needed.
Thawing Frozen Muffins: Remove muffins from the freezer and let thaw at room temperature for 1-2 hours, or microwave from frozen for 30-45 seconds until warmed through. For best results, unwrap and let come to room temperature, then warm in a 300°F oven for 5 minutes.
Freezing Muffin Batter: You can freeze the batter in muffin cups! Line a muffin tin with papers, fill with batter, and freeze until solid (about 2 hours). Pop out the frozen batter muffins and store in freezer bags for up to 2 months. Bake from frozen, adding 3-5 extra minutes to the baking time.
Make-Ahead Dry Mix: Measure and combine all dry ingredients in a large ziplock bag or container. Store at room temperature for up to 2 months. When ready to bake, just add wet ingredients and chocolate chips – cuts prep time in half!
Overnight Batter: For fresh-baked morning muffins, you can prepare the batter the night before and refrigerate it (cover the bowl tightly). In the morning, let it sit at room temperature for 15 minutes, give it a gentle stir, portion into muffin cups, and bake as directed. Add 2-3 extra minutes to baking time since batter will be cold.
Grab-and-Go Breakfast Packs: Freeze muffins with individual portions of cream cheese or butter. Pack in containers or bags for easy breakfast to-go options. Take out the night before and they’ll be thawed by morning.
Best Reheating from Frozen: For the freshest taste, thaw overnight in the refrigerator, then warm uncovered in a 350°F oven for 8-10 minutes. This method restores the slightly crispy tops better than microwaving.
Serving Suggestions
Chocolate chip muffins are delicious on their own, but here are some wonderful ways to serve them:
Classic Coffee Pairing: Serve warm muffins alongside freshly brewed coffee, cappuccino, or a caramel latte. The slight bitterness of coffee perfectly complements the sweet chocolate.
Breakfast Spread: Create a beautiful brunch table with muffins, fresh fruit salad, yogurt parfaits, scrambled eggs, and crispy bacon. Add fresh orange juice and coffee for a complete meal.
With Butter and Jam: Split warm muffins in half and spread with salted butter or your favorite jam. The combination of melty butter and chocolate is heavenly.
Ice Cream Sundae Style: Warm a muffin, split it, and top with vanilla ice cream and hot fudge sauce for an indulgent dessert.
Afternoon Tea: Serve at room temperature with hot tea (Earl Grey or English Breakfast pairs beautifully) for an elegant afternoon snack.
Breakfast Sandwich: Use a muffin as the base for a breakfast sandwich with cream cheese and sliced strawberries for a sweet morning treat.
With Greek Yogurt: Pair with vanilla Greek yogurt and fresh berries for added protein and a balanced breakfast.
Hot Chocolate Station: During fall and winter, serve alongside hot chocolate, whipped cream, and marshmallows for the ultimate cozy treat.
Lunch Box Addition: Pack in kids’ lunch boxes with string cheese, apple slices, and carrot sticks for a balanced lunch.
Beverage Pairings:
- Hot coffee or iced coffee
- Hot chocolate or chocolate milk
- Vanilla or caramel lattes
- Tea (chai, Earl Grey, English Breakfast)
- Cold milk (especially great for kids)
- Fruit smoothies
FAQs Section
Q: Can I use frozen chocolate chips?
A: Yes! You don’t even need to thaw them. Frozen chocolate chips work perfectly fine in this recipe and won’t affect the baking time or results. Some bakers actually prefer using frozen chips because they hold their shape better and create more distinct pockets of chocolate.
Q: My muffins came out flat instead of domed. What happened?
A: Flat muffins are usually caused by one of several issues: starting at too low a temperature (make sure your oven is preheated to 425°F), overmixing the batter (which deflates air bubbles), old or expired baking powder that’s lost its leavening power, or opening the oven door too early. Also ensure you’re filling the muffin cups generously – at least ¾ full.
Q: Can I make these muffins without sour cream?
A: Yes! The best substitute is full-fat Greek yogurt, which provides similar moisture and tang. You can also use regular plain yogurt. In a pinch, you can use an equal amount of milk mixed with a tablespoon of lemon juice or vinegar, though results won’t be quite as tender and moist.
Q: Why do my chocolate chips sink to the bottom?
A: This happens when the batter is too thin or the chips are too heavy. To prevent sinking, toss chocolate chips in a tablespoon of the measured flour before folding them into the batter. The flour coating helps suspend them throughout the muffin. Also make sure your batter is thick (not runny) – it should be scoopable, not pourable.
Q: Can I make these without a muffin tin?
A: You can use a mini loaf pan or regular loaf pan, though baking times will change significantly. For a 9×5-inch loaf pan, bake at 350°F for 45-55 minutes. You won’t get the individual servings or domed tops, but it will still taste delicious as a chocolate chip bread.
Q: How do I know when the muffins are done?
A: Insert a toothpick or cake tester into the center of a muffin. It should come out clean or with just a few moist crumbs (not wet batter). The muffin tops should be golden brown and spring back when lightly pressed. The internal temperature should reach 200-205°F if you have an instant-read thermometer.
Q: Can I reduce the sugar to make these healthier?
A: Yes, but with caveats. You can reduce sugar to ½ cup (from ¾ cup) without drastically affecting texture, though muffins will be less sweet and tops won’t brown as nicely. You could add a mashed banana for natural sweetness and extra moisture. Going lower than ½ cup sugar will significantly impact texture and rise.
Q: Why do my muffins have tunnels inside?
A: Those tunnel-like holes are caused by overmixing the batter. When you mix too vigorously or for too long, you develop gluten strands that create those characteristic tunnels. Mix only until the dry ingredients are just incorporated – the batter should still be lumpy. Use a gentle folding motion rather than stirring.
Conclusion
There you have it – everything you need to know to make absolutely perfect chocolate chip muffins with those gorgeous bakery-style domed tops! These tender, moist muffins loaded with melty chocolate chips are so much better than anything you’d buy at a coffee shop, and now you know all the secrets to making them turn out perfectly every single time.
I love how versatile these muffins are – they work beautifully for weekend brunch, quick weekday breakfasts, after-school snacks, or even dessert. The fact that they freeze so well means you can always have homemade muffins on hand, ready to warm up whenever a craving strikes. And let’s be honest, there’s something deeply satisfying about pulling a pan of golden, chocolate-studded muffins from your oven and filling your home with that amazing bakery smell!
Don’t be intimidated by the two-temperature baking method – it’s actually super simple and makes all the difference in creating those impressive tall tops. Just preheat properly, don’t overmix, and trust the process. Even beginner bakers will have success with this foolproof recipe!
I’d absolutely love to hear how your chocolate chip muffins turn out! Drop a comment below and tell me about your experience – did you try any of the variations? Make them for a special occasion? Did your kids go crazy for them? Share your photos and stories because I genuinely love seeing what you create in your kitchens!
If you enjoyed this recipe, please pin it to your favorite Pinterest board so you can easily find it next time you’re craving fresh-baked muffins. Share it with your friends and family who love to bake – everyone needs a great chocolate chip muffin recipe in their collection! Your support means the world and helps me continue sharing detailed, tested recipes that actually work.
Now go preheat that oven and get baking! Your kitchen is about to smell absolutely incredible, and you’re about to impress everyone with your bakery-quality muffins. Happy baking, friends!