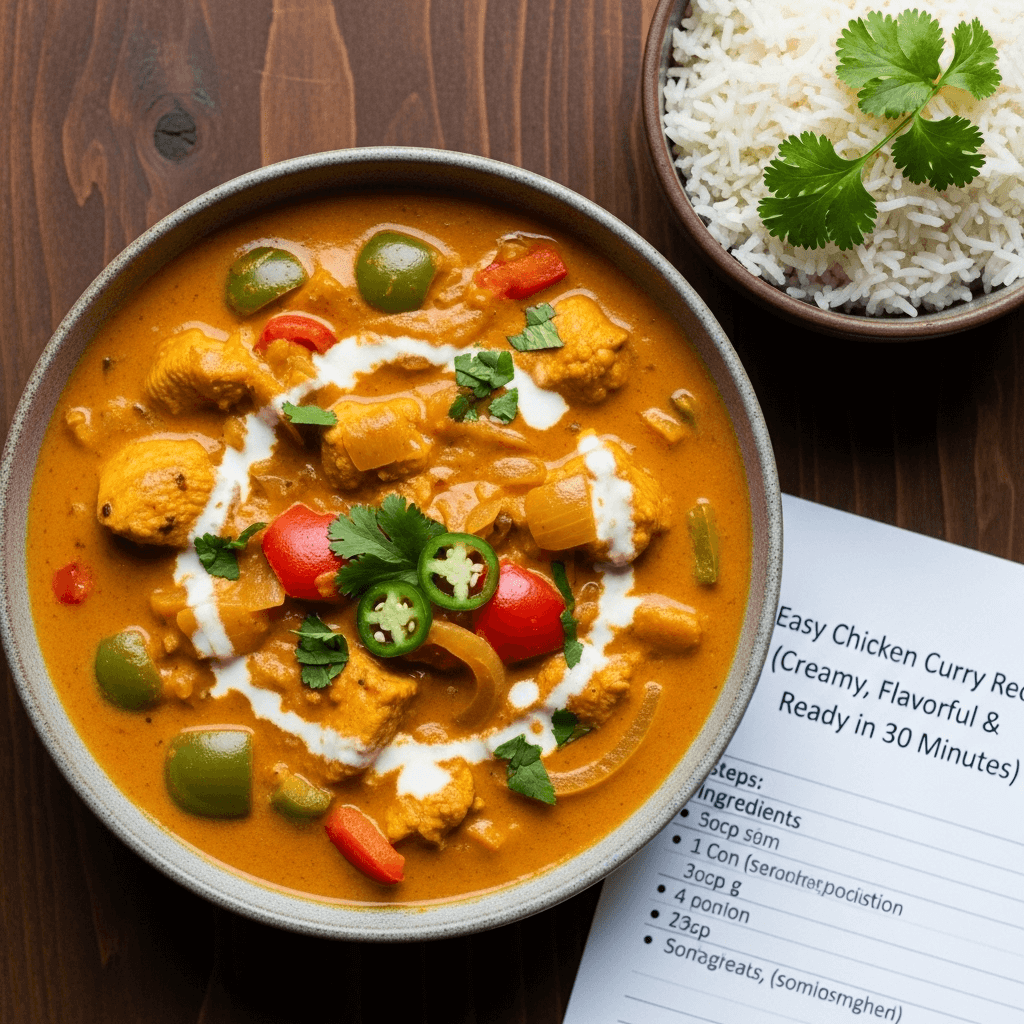
If you’ve been craving restaurant-quality Indian food but thought it was too complicated to make at home, this easy chicken curry recipe is about to change everything. This creamy, aromatic curry features tender chicken pieces simmered in a rich, spiced tomato-coconut sauce that’s bursting with flavor. The best part? It comes together in just 30 minutes using ingredients you can find at any grocery store.
This homemade chicken curry strikes the perfect balance between authentic flavors and weeknight-friendly simplicity. Unlike many curry recipes that require hard-to-find ingredients or lengthy preparation, this version uses common spices and straightforward techniques while still delivering that complex, layered flavor you’d expect from your favorite Indian restaurant.
Whether you’re looking for an easy weeknight dinner that feels special, meal prep inspiration for the week ahead, or an impressive dish to serve guests, this chicken curry recipe checks all the boxes. It’s warming, satisfying, and incredibly versatile—serve it over fluffy basmati rice, with warm naan bread for dipping, or alongside roasted vegetables. Once you master this basic recipe, you’ll find yourself making it again and again, tweaking it to your family’s taste preferences and enjoying the compliments that always follow.
History / Background
Chicken curry, known as “murgh curry” in Hindi, has a fascinating and complex history that spans centuries and continents. Curry itself isn’t a single dish but rather a style of cooking that originated in the Indian subcontinent, where various spiced, sauce-based dishes have been prepared for thousands of years. The word “curry” is believed to derive from the Tamil word “kari,” meaning sauce or gravy.
The history of curry in India dates back to ancient times, with evidence of spice blends being used in cooking as early as 2000 BCE. The Indus Valley Civilization used mortar and pestle to grind spices like cumin, coriander, and turmeric—many of the same spices we use in curry today. Different regions of India developed their own distinct curry styles based on local ingredients, cultural influences, and climate. Northern Indian curries tend to be creamier with yogurt or cream bases, while Southern Indian curries often feature coconut milk and are spicier.
The globalization of curry began during the colonial era when the British East India Company brought Indian cuisine to Britain in the 18th century. British colonizers developed a taste for curry and attempted to recreate it back home, leading to the creation of curry powder—a pre-mixed spice blend that simplified the complex process of toasting and grinding individual spices. While convenient, curry powder can’t quite capture the depth of freshly ground spices, but it made curry accessible to home cooks worldwide.
Chicken curry specifically became popular relatively recently in culinary history terms. Chicken wasn’t traditionally as common in Indian cuisine as lamb, goat, or vegetarian dishes, partly due to economic factors and regional preferences. However, as chicken became more affordable and accessible in the 20th century, chicken curry emerged as one of the most beloved curry variations globally.
Today, chicken curry has countless regional variations across India and has been adapted by cultures around the world. British chicken tikka masala, Thai curries, Japanese curry rice, and Caribbean curries all represent different interpretations of the concept. This recipe draws inspiration from North Indian curry traditions, featuring a creamy tomato-based sauce enriched with coconut milk, aromatic spices, and tender chicken—a combination that’s become beloved worldwide for good reason.
Why You’ll Love This Recipe
This easy chicken curry is about to become one of your most-requested dinner recipes, and here’s why: It delivers authentic, complex flavors without requiring you to hunt down obscure ingredients or spend hours in the kitchen. The sauce is wonderfully creamy and rich, with layers of warm spices that are aromatic without being overwhelming or too spicy for sensitive palates.
What makes this chicken curry recipe truly special is its versatility and accessibility. You can adjust the heat level to suit your family’s preferences, swap in vegetables you have on hand, and customize the creaminess by adjusting the coconut milk. It’s the kind of recipe that makes you feel like a confident cook, even if you’ve never attempted Indian cuisine before.
Here’s what makes this recipe absolutely perfect:
- Quick & Easy – Ready in just 30 minutes from start to finish, perfect for busy weeknights
- One-Pot Wonder – Everything cooks in a single skillet or pot, making cleanup a breeze
- Budget-Friendly – Uses affordable chicken thighs or breasts and pantry-friendly spices
- Restaurant-Quality – Tastes like it came from your favorite Indian restaurant but costs a fraction of the price
- Customizable Heat Level – Easily adjust the spiciness to suit your family’s preferences
- Meal Prep Champion – Actually tastes better the next day, making it perfect for meal prep
- Freezer-Friendly – Doubles easily and freezes beautifully for future quick dinners
- Crowd-Pleaser – Even picky eaters and curry skeptics love this mild, creamy version
- Naturally Gluten-Free – Perfect for gluten-free diets when served with rice
- Packed with Protein – Each serving delivers substantial protein for a satisfying, filling meal
- Impressive Yet Simple – Looks and tastes fancy enough for dinner guests but easy enough for Tuesday night
Ingredient Notes
This easy chicken curry uses everyday ingredients that work together to create incredible depth of flavor. Here’s what you need and why each component matters:
Chicken – Boneless, skinless chicken thighs are ideal for curry because they stay moist and tender during cooking and absorb flavors beautifully. Chicken thighs are more forgiving than breasts and won’t dry out as easily. However, chicken breasts work perfectly fine if you prefer white meat—just watch the cooking time closely to avoid overcooking. Cut the chicken into bite-sized pieces (about 1-1.5 inches) for even cooking and easy eating.
Cooking Oil – Use a neutral oil with a high smoke point like vegetable oil, canola oil, or grapeseed oil. Coconut oil adds a subtle coconut flavor that complements the dish if you have it. Avoid olive oil as its flavor can compete with the spices.
Onion – Yellow or white onion works best. The onion forms the flavor base of the curry and becomes sweet and soft as it cooks. Dice it finely so it essentially melts into the sauce, creating a smooth, thick gravy.
Garlic & Ginger – These aromatics are essential for authentic flavor. Fresh is always best—use about 4 cloves of garlic and 1 tablespoon of freshly grated ginger. In a pinch, jarred minced garlic and ginger paste work, but fresh provides better flavor. For convenience, many stores now sell pre-peeled garlic cloves and fresh ginger paste in tubes.
Tomato Paste – Provides concentrated tomato flavor and helps thicken the sauce. It also adds a slight sweetness that balances the spices. Don’t skip this ingredient—it’s crucial for the sauce’s body and color.
Curry Powder – The star spice blend containing turmeric, coriander, cumin, and other warming spices. Use a good-quality curry powder from the spice aisle. Different brands vary in heat level, so start with the amount listed and adjust to taste.
Garam Masala – A warming spice blend typically containing cinnamon, cardamom, cloves, and black pepper. It adds complexity and depth. Find it in the spice aisle or international section. If you can’t find it, substitute with equal parts cinnamon and cumin.
Ground Cumin – Adds earthy, warm flavor that’s essential to curry. Freshly ground cumin has the best flavor, but pre-ground works perfectly fine.
Turmeric – Provides the characteristic golden color and earthy, slightly bitter notes. It also has anti-inflammatory properties. A little goes a long way.
Cayenne Pepper (Optional) – For heat. Start with ¼ teaspoon for mild curry, increase to ½ teaspoon for medium heat, or omit entirely for a very mild version kids will love.
Coconut Milk – Full-fat coconut milk creates that rich, creamy texture. Use the canned variety (not coconut milk beverage in a carton). Shake the can well before opening to mix the cream that separates. For a lighter version, use light coconut milk or half coconut milk and half chicken broth.
Chicken Broth – Adds savory depth and helps thin the sauce to the perfect consistency. Low-sodium broth is best so you can control the salt level.
Salt & Black Pepper – Essential for bringing out all the flavors. Add gradually and taste as you go.
Fresh Cilantro – For garnish. It adds a fresh, bright finish that cuts through the rich sauce. If you’re in the “cilantro tastes like soap” camp, use fresh parsley or simply omit.
Equipment Needed
You don’t need any special equipment to make this easy chicken curry. Here’s what you’ll need:
- Large Skillet or Deep Sauté Pan – A 12-inch skillet with high sides (at least 2-3 inches) is ideal. This gives you enough room to brown the chicken and simmer the sauce without overflow. Cast iron, stainless steel, or non-stick all work well.
- Sharp Knife and Cutting Board – For cutting chicken and chopping onions, garlic, and ginger.
- Wooden Spoon or Spatula – For stirring and scraping up the flavorful brown bits from the bottom of the pan.
- Measuring Cups and Spoons – For accurate spice measurements, which is important for balanced flavor.
- Garlic Press (Optional) – Makes quick work of mincing garlic, though a knife works fine too.
- Microplane or Grater (Optional) – Perfect for grating fresh ginger, which gives the best texture and flavor.
- Can Opener – For opening the coconut milk can.
- Serving Spoon – For ladling curry over rice or into bowls.

Easy Chicken Curry Recipe
- Total Time: 30 minutes
- Yield: 4-6 servings 1x
- Diet: Gluten Free
Description
This easy chicken curry recipe is creamy, flavorful, and ready in just 30 minutes. Tender chicken simmers in a rich tomato-coconut sauce with aromatic spices for a restaurant-quality meal that’s perfect for weeknight dinners. Serve over basmati rice with naan bread for a complete, satisfying meal.
Ingredients
For the Curry:
- 1.5 lbs (680g) boneless, skinless chicken thighs or breasts, cut into 1-inch pieces
- 2 tablespoons cooking oil (vegetable, canola, or coconut oil)
- 1 large yellow onion, finely diced
- 4 cloves garlic, minced
- 1 tablespoon fresh ginger, grated or minced
- 3 tablespoons tomato paste
- 2 tablespoons curry powder
- 1 tablespoon garam masala
- 1 teaspoon ground cumin
- 1 teaspoon ground turmeric
- ¼–½ teaspoon cayenne pepper (adjust to heat preference)
- 1 can (14 oz/400ml) full-fat coconut milk
- 1 cup (240ml) chicken broth
- 1 teaspoon salt (adjust to taste)
- ½ teaspoon black pepper
- Fresh cilantro, chopped (for garnish)
For Serving:
- Cooked basmati rice
- Warm naan bread
- Lime wedges (optional)
Instructions
- Prep the ingredients: Cut chicken into bite-sized pieces (about 1 inch). Dice the onion finely, mince the garlic, and grate the ginger. Measure out all spices and have everything ready to go—curry comes together quickly once you start cooking.
- Sear the chicken: Heat 1 tablespoon of oil in a large skillet or deep sauté pan over medium-high heat. Season the chicken pieces with a pinch of salt and pepper. Add chicken to the hot pan in a single layer (work in batches if needed to avoid crowding). Cook for 2-3 minutes per side until golden brown. The chicken doesn’t need to be fully cooked through yet. Transfer to a plate and set aside.
- Sauté the aromatics: Reduce heat to medium and add the remaining 1 tablespoon of oil to the same pan. Add the diced onion and cook for 4-5 minutes, stirring occasionally, until softened and starting to turn golden. Add the minced garlic and grated ginger, and cook for 1 minute until fragrant, stirring constantly to prevent burning.
- Add tomato paste and spices: Add the tomato paste to the onion mixture and stir well to combine. Cook for 1-2 minutes to deepen the flavor. Add the curry powder, garam masala, cumin, turmeric, and cayenne pepper. Stir constantly for about 30-60 seconds until the spices are toasted and incredibly fragrant. This step is crucial for developing deep flavor.
- Create the sauce: Pour in the coconut milk and chicken broth, stirring to combine everything smoothly and scraping up any browned bits from the bottom of the pan (that’s flavor!). Stir in the salt and black pepper. Bring the mixture to a gentle simmer.
- Simmer the curry: Return the seared chicken (along with any juices from the plate) to the pan, nestling the pieces into the sauce. Reduce heat to medium-low and simmer uncovered for 10-12 minutes, stirring occasionally, until the chicken is cooked through (internal temperature of 165°F/74°C) and the sauce has thickened to your desired consistency.
- Taste and adjust: Taste the curry and adjust seasoning as needed. Add more salt if it needs it, a squeeze of lime juice for brightness, or a pinch of sugar if it’s too acidic.
- Serve: Garnish with fresh chopped cilantro and serve hot over fluffy basmati rice with warm naan bread on the side. Enjoy!
Notes
- For a thicker curry, simmer longer uncovered to reduce the sauce, or add 1 tablespoon of cornstarch mixed with 2 tablespoons water during the last few minutes
- For a thinner curry, add more chicken broth or coconut milk to reach desired consistency
- Adjust heat level by increasing or decreasing cayenne pepper
- Curry tastes even better the next day as flavors meld and develop
- If you don’t have garam masala, substitute with equal parts ground cinnamon and ground cumin
- For dairy-based curry similar to butter chicken, replace coconut milk with heavy cream or half-and-half
- Add vegetables like bell peppers, peas, or spinach during the last 5 minutes of cooking
- Prep Time: 10 minutes
- Cook Time: 20 minutes
- Category: Dinner
- Method: Stovetop
- Cuisine: Indian
Nutrition
- Serving Size: 1 cup curry (without rice)
- Calories: 385
- Sugar: 5g
- Sodium: 680mg
- Fat: 24g
- Saturated Fat: 15g
- Unsaturated Fat: 7g
- Trans Fat: 0g
- Carbohydrates: 12g
- Fiber: 3g
- Protein: 32g
- Cholesterol: 107mg
Tips & Variations
One of the best things about this chicken curry recipe is how easily you can customize it. Once you master the basic technique, try these delicious variations:
Butter Chicken Style – For a creamier, sweeter curry similar to butter chicken (murgh makhani), replace the coconut milk with 1 cup heavy cream and add 2 tablespoons butter during the last few minutes. Add 1-2 teaspoons sugar or honey to balance the acidity.
Vegetable Chicken Curry – Bulk up the curry with vegetables. Add diced bell peppers, cauliflower florets, or green beans along with the chicken. Stir in frozen peas or fresh spinach during the last 3 minutes of cooking for added nutrition and color.
Thai-Inspired Curry – For a Thai twist, use Thai red curry paste instead of curry powder, add lemongrass and lime leaves if you have them, and finish with a squeeze of lime juice and fresh basil.
Coconut-Free Version – Replace coconut milk with equal parts heavy cream, Greek yogurt (add off heat), or cashew cream for those who don’t like coconut flavor.
Extra Spicy Curry – Increase cayenne to 1 teaspoon, add fresh sliced Thai chilies, or stir in 1-2 teaspoons of sriracha or sambal oelek.
Mild Family-Friendly Curry – Omit the cayenne pepper entirely and use sweet paprika for color without heat. Add a tablespoon of honey or maple syrup for a subtly sweet sauce kids love.
Tikka Masala Style – Add ½ cup tomato sauce along with the coconut milk, increase garam masala to 2 tablespoons, and stir in 2 tablespoons butter at the end.
Slow Cooker Version – After sautéing the onions and spices (steps 3-4), transfer everything to a slow cooker with the raw chicken and liquids. Cook on low for 4-6 hours or high for 2-3 hours.
Instant Pot Version – Use the sauté function for steps 2-4, then add everything else, seal the lid, and pressure cook on high for 8 minutes with natural release.
Lighter Version – Use chicken breasts instead of thighs, light coconut milk, and add an extra ½ cup of chicken broth to maintain sauce consistency.
Protein Swaps – Replace chicken with firm tofu cubes, chickpeas, paneer cheese, shrimp (add for last 5 minutes only), or lamb for completely different takes.
Pro Chef Tips
Take your easy chicken curry from delicious to absolutely restaurant-quality with these professional techniques:
Toast your spices first – For even deeper flavor, toast whole cumin seeds and coriander seeds in the dry pan for 30 seconds before adding oil, then grind them fresh. The difference is remarkable, though pre-ground spices work perfectly well too.
Don’t skip searing the chicken – Browning the chicken creates flavorful fond (those brown bits) on the bottom of the pan that becomes part of your sauce. This step adds significant depth to the final dish. Make sure your pan is properly hot and don’t move the chicken too soon.
Cook onions low and slow – Taking the time to properly cook your onions until they’re golden and sweet (not just translucent) creates a much richer, more complex curry base. This is where patience pays off.
Bloom the spices – Cooking the spices in oil for 30-60 seconds before adding liquids is called “blooming” and it releases their essential oils, creating much more aromatic, flavorful curry. Don’t skip this step, and don’t let them burn.
Use full-fat coconut milk – Light coconut milk just doesn’t provide the same rich, creamy texture. If you’re concerned about fat content, use less coconut milk and more broth, but always use full-fat.
Let it simmer – Don’t rush the simmering step. This is when the chicken absorbs the flavors and the sauce thickens and develops complexity. A gentle simmer is key—if it’s boiling rapidly, reduce the heat.
Rest before serving – If you have time, let the curry sit off the heat for 5-10 minutes before serving. This allows the flavors to settle and blend even more beautifully.
Add fresh elements at the end – A squeeze of fresh lime juice, a handful of fresh cilantro, or a dollop of yogurt added at the very end brightens the entire dish and adds freshness.
Control the consistency – If your curry is too thick, thin it with broth or coconut milk. If it’s too thin, simmer longer uncovered, or add a cornstarch slurry (1 tablespoon cornstarch mixed with 2 tablespoons water).
Season in layers – Add salt at multiple stages (when searing chicken, when cooking onions, and in the final sauce) rather than all at once. This creates more balanced, well-developed seasoning.
Use fresh ginger and garlic – While jarred versions work in a pinch, fresh garlic and ginger provide significantly better, brighter flavor. It’s worth the minimal extra effort.
Common Mistakes to Avoid
Even simple recipes can go wrong. Here are the most common chicken curry mistakes and how to avoid them:
Burning the spices – This is the number one mistake. Once you add the dried spices, they need only 30-60 seconds of cooking before adding the liquids. If they start to smell acrid or look very dark, they’re burned and will make the curry bitter. If this happens, start over with fresh spices.
Using low heat throughout – While you want to simmer gently once the sauce is made, you need medium-high heat to properly sear the chicken and medium heat to cook the onions. Too-low heat from the start results in steamed, pale chicken that hasn’t developed any flavor.
Overcrowding the pan – When searing chicken, overcrowding causes steaming instead of browning. Work in batches if needed to maintain space between pieces. Properly seared chicken has beautiful golden-brown edges.
Skipping the tomato paste – Some people think they can omit this, but tomato paste provides body, color, and umami richness that’s crucial to the sauce. It’s worth keeping a tube in your fridge for recipes like this.
Adding coconut milk to a very hot pan – If your pan is too hot when you add the coconut milk, it can break or separate. Reduce heat to medium before adding liquids for the smoothest sauce.
Not tasting and adjusting – Spice levels vary by brand, and everyone’s preferences differ. Always taste before serving and adjust salt, heat, or acidity with lime juice as needed. This step transforms good curry into great curry.
Using chicken breasts without adjusting cooking time – Chicken breasts cook faster than thighs and can easily become dry and rubbery if overcooked. If using breasts, check for doneness at 8-10 minutes rather than 12.
Storage & Meal Prep
One of the best things about chicken curry is that it stores beautifully and actually tastes even better the next day. Here’s how to store and reheat it properly:
Refrigerator Storage: Let curry cool completely, then transfer to an airtight container and refrigerate for up to 4 days. The flavors will continue to develop and meld during storage, often making day-two curry taste even better than day one. Store the curry separate from rice for best results.
Reheating from Refrigerator: Reheat curry in a saucepan over medium-low heat, stirring occasionally, until heated through (about 5-7 minutes). You may need to add a splash of chicken broth or coconut milk to loosen the sauce, as it thickens when cold. Alternatively, microwave individual portions in 1-minute intervals, stirring between each, until hot.
Texture Changes: The curry sauce will thicken considerably as it sits in the refrigerator. This is completely normal and expected. Simply thin it with a bit of broth, coconut milk, or water when reheating and stir well.
Meal Prep Tips: This curry is ideal for meal prep. Make a big batch on Sunday and portion it into individual containers with rice for grab-and-go lunches throughout the week. The curry will stay fresh for 4 days, making it perfect for Monday through Thursday lunches.
Best Containers: Use glass containers with tight-fitting lids for storing curry, as plastic containers can absorb the turmeric stain and curry scent. If using plastic, choose BPA-free containers you don’t mind getting slightly yellow.
Freezer Containers: For freezing, leave about 1 inch of headspace in containers to allow for expansion. Label containers with the date and contents.
Make-Ahead & Freezer Notes
Chicken curry is exceptionally freezer-friendly, making it perfect for batch cooking and future easy dinners:
Freezing Instructions: Let curry cool completely to room temperature. Transfer to freezer-safe containers or heavy-duty freezer bags, removing as much air as possible. Freeze flat in bags for easier storage and faster thawing. Properly stored, chicken curry maintains excellent quality for up to 3 months in the freezer.
Thawing: The safest method is to thaw curry overnight in the refrigerator. For faster thawing, place the sealed container in a bowl of cold water, changing the water every 30 minutes. You can also reheat from frozen, though it takes longer—place frozen curry in a saucepan over low heat, stirring occasionally and breaking it up as it thaws, until heated through.
Make-Ahead Strategy: You can prepare the curry base (everything through step 5) up to 2 days ahead. Store in the refrigerator, then reheat, add the chicken, and simmer when ready to serve. The chicken can be cut and seasoned up to 24 hours ahead and stored covered in the refrigerator.
Spice Paste Prep: Mix all the spices together ahead of time and store in a small jar. When ready to cook, you can just add your pre-mixed spice blend instead of measuring each spice individually. This homemade curry spice mix keeps for several months in a cool, dark place.
Double Batch Strategy: This recipe doubles or triples easily. Make multiple batches at once and freeze in family-sized or individual portions for quick weeknight dinners. Having homemade curry in the freezer is like having your own personal takeout service.
Rice Freezing: Cooked basmati rice also freezes beautifully. Freeze in individual portions and reheat in the microwave with a damp paper towel over the container to keep it moist. This makes reheating complete curry dinners incredibly fast.
Reheating After Freezing: Reheat thawed curry in a saucepan over medium-low heat, stirring frequently and adding a splash of broth if needed. The texture and flavor will be virtually identical to fresh curry.
Serving Suggestions
Chicken curry is delicious on its own but becomes even better when paired with the right accompaniments:
Rice Options:
- Basmati Rice – The classic pairing. Its fragrant, fluffy texture perfectly complements curry’s creamy sauce
- Jasmine Rice – Slightly stickier than basmati with a subtle floral aroma
- Brown Rice – For a healthier, nuttier option with more fiber
- Coconut Rice – Cook rice in coconut milk for extra richness
- Cauliflower Rice – For a low-carb alternative that still soaks up the sauce
Bread Options:
- Naan Bread – Warm, pillowy naan is perfect for scooping up curry sauce
- Roti or Chapati – Traditional flatbreads that are lighter than naan
- Paratha – Flaky, layered flatbread for a more substantial accompaniment
- Garlic Naan – Adds extra flavor dimension
- Pita Bread – In a pinch, warm pita works well
Vegetable Sides:
- Cucumber Raita – Cool, creamy yogurt sauce with cucumber and mint balances curry’s heat
- Simple Green Salad – Dressed with lemon juice and olive oil for refreshing contrast
- Roasted Vegetables – Cauliflower, bell peppers, or green beans complement curry beautifully
- Saag (Spinach) – Creamed spinach adds nutrition and color
- Pickled Onions – Quick-pickled red onions add tangy crunch
Additional Garnishes & Toppings:
- Fresh cilantro and lime wedges
- Dollop of plain yogurt or Greek yogurt for cooling contrast
- Sliced red onions or scallions
- Toasted cashews or sliced almonds for crunch
- Fresh sliced chilies for heat lovers
- Mango chutney for sweet-savory complexity
Beverage Pairings:
- Mango lassi (sweet yogurt drink) for cooling refreshment
- Chai tea for authentic pairing
- Light beer or crisp white wine (Riesling or Pinot Grigio)
- Sparkling water with lime
Complete Meal Ideas:
- Chicken curry with basmati rice, naan, cucumber raita, and mango chutney
- Curry over brown rice with roasted cauliflower and a simple salad
- Curry with garlic naan, saag paneer, and samosas for an Indian feast
- Low-carb meal with curry over cauliflower rice and roasted vegetables
FAQs Section
Can I use chicken breasts instead of thighs?
Absolutely! Chicken breasts work perfectly well in this curry recipe. The main difference is that breasts are leaner and can dry out more easily, so watch the cooking time carefully. Check for doneness after 8-10 minutes of simmering rather than 12, and make sure the internal temperature reaches 165°F (74°C). Cut breasts into slightly smaller pieces than you would thighs to ensure they cook evenly and stay tender.
What if I don’t have coconut milk?
You have several substitution options. Heavy cream or half-and-half creates a rich, creamy curry similar to butter chicken. Plain Greek yogurt (stir in off heat to prevent curdling) provides tang and creaminess. Cashew cream (blend soaked cashews with water) offers dairy-free creaminess without coconut flavor. You can also simply use all chicken broth for a lighter, broth-based curry, though it won’t be as rich.
How can I make this curry spicier?
Increase the cayenne pepper to ½-1 teaspoon, add 1-2 fresh Thai chilies or serrano peppers (minced) along with the garlic and ginger, stir in red pepper flakes or hot sauce to taste, or use hot curry powder instead of regular curry powder. Always add heat gradually—you can always add more, but you can’t take it away!
Can I make this curry in advance?
Yes! Chicken curry is actually one of the best make-ahead dishes. Prepare it 1-2 days in advance and store covered in the refrigerator. The flavors will deepen and improve as they meld. Reheat gently on the stovetop, adding a splash of broth if needed to loosen the sauce. Many people think curry tastes even better on day two.
What’s the difference between curry powder and garam masala?
Curry powder is a British invention that typically contains turmeric (giving it yellow color), coriander, cumin, fenugreek, and sometimes chili powder. Garam masala is a traditional Indian spice blend meaning “warm spice mix” that usually contains cinnamon, cardamom, cloves, black pepper, and cumin—no turmeric. Both are important in this recipe because they provide different flavor dimensions. You need both for the most authentic, complex flavor.
Why is my curry sauce too thin or too thick?
Curry consistency is easily adjustable. If it’s too thin, simmer uncovered for a few extra minutes to evaporate excess liquid and concentrate flavors. You can also mix 1 tablespoon cornstarch with 2 tablespoons cold water and stir it in during the last few minutes. If it’s too thick, simply add chicken broth or coconut milk a little at a time until you reach your desired consistency. Remember that curry thickens as it cools and when stored.
Can I freeze leftover curry?
Yes! Chicken curry freezes exceptionally well for up to 3 months. Let it cool completely, then transfer to freezer-safe containers or heavy-duty freezer bags, leaving some headspace for expansion. Thaw overnight in the refrigerator before reheating. The texture and flavor remain excellent after freezing, making this perfect for batch cooking.
Conclusion
There’s something incredibly satisfying about making restaurant-quality chicken curry in your own kitchen—and this easy recipe proves you don’t need to be a professional chef or have a pantry full of exotic ingredients to create something absolutely delicious. This creamy, aromatic curry delivers complex, layered flavors that taste like you spent hours perfecting it, when in reality, you’ll be sitting down to dinner in just 30 minutes.
The beauty of this chicken curry recipe is its versatility. Make it as spicy or mild as your family prefers, add whatever vegetables you have on hand, adjust the creaminess to your liking, and serve it however makes you happy. Once you master this basic technique, you’ll have a reliable, impressive recipe in your back pocket that works for busy Tuesday nights and dinner parties alike.
Whether you’re new to cooking Indian food or a curry veteran looking for a reliable weeknight recipe, I think you’re going to love how this turns out. The golden, fragrant sauce, the tender chicken, the way it all comes together so easily—it’s comfort food at its finest, and it happens to be healthy, budget-friendly, and meal prep-friendly too.