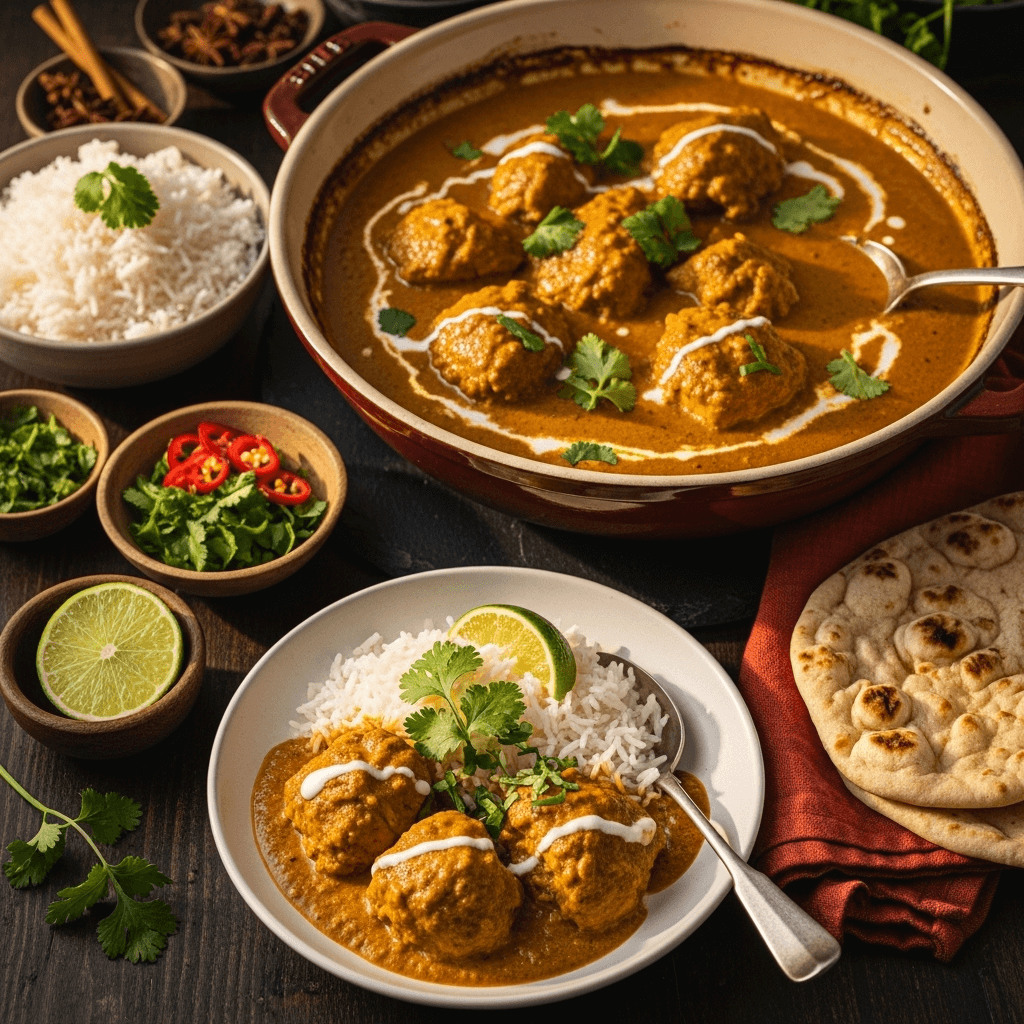

Get ready to discover the most delicious, creamy chicken curry recipe that’s packed with aromatic spices and tender chicken in a rich, velvety sauce! This easy homemade chicken curry brings the authentic flavors of Indian cuisine right to your kitchen, and it’s so much better than takeout. Whether you’re a curry enthusiast or trying it for the first time, this recipe delivers restaurant-quality results with ingredients you can find at any grocery store.
There’s something absolutely comforting about a warm bowl of chicken curry served over fluffy rice. The complex blend of spices, the creamy coconut milk sauce, and the perfectly cooked chicken create layers of flavor that are both exotic and incredibly satisfying. This isn’t overly spicy or intimidating – it’s a beautifully balanced curry that’s approachable for American palates while still delivering authentic taste.
What makes this chicken curry recipe truly special is its versatility and ease. Ready in just 40 minutes, it’s perfect for busy weeknights when you want something more exciting than the usual dinner rotation. Make it for family dinners, meal prep for the week, impress dinner guests, or enjoy a cozy night in with flavors that transport you around the world. Plus, it’s naturally gluten-free, can easily be made dairy-free, and tastes even better the next day!
History / Background
Chicken curry is one of the most beloved dishes in Indian cuisine, though its history is as rich and complex as its flavors. The word “curry” itself comes from the Tamil word “kari,” meaning sauce or gravy. While curry dishes have existed in the Indian subcontinent for thousands of years, the specific combination we know today evolved through centuries of cultural exchange and regional variations.
The roots of curry can be traced back to ancient India, where spices like turmeric, cumin, coriander, and black pepper were cultivated and used in cooking as early as 2500 BCE. The Indus Valley Civilization used mortars and pestles to grind spices, creating the foundation for what would become curry pastes and spice blends. Ancient Indian texts like the Vedas mention various spice combinations used in cooking.
Different regions of India developed their own distinct curry styles. In the north, cream-based curries like butter chicken and korma became popular, influenced by Mughal cuisine. Southern India favored coconut milk-based curries with curry leaves and tamarind. The coastal regions incorporated seafood, while inland areas focused on chicken, lamb, and vegetable curries.
British colonization of India played a significant role in spreading curry worldwide. British officials and merchants developed a taste for Indian food and brought recipes back to England in the 18th and 19th centuries. To make curry more accessible to British cooks, the first commercial curry powder was created – a pre-mixed blend of spices that simplified the cooking process, though it couldn’t match the depth of freshly ground spices.
Chicken curry, specifically, became immensely popular because chicken was more accessible and affordable than other proteins like lamb. It also absorbed spices beautifully and cooked relatively quickly, making it ideal for home cooking. The addition of cream or coconut milk created that luxurious, restaurant-style sauce that Western palates loved.
In the 20th century, Indian immigrants brought their culinary traditions to countries around the world, particularly the UK, US, Canada, and Australia. Indian restaurants proliferated, and chicken curry became one of the most popular dishes globally. In Britain, chicken tikka masala even became so beloved that it’s sometimes called the “national dish.”
Today, chicken curry exists in countless variations – from the mild, creamy butter chicken to fiery vindaloo, from Thai green curry with chicken to Japanese curry rice. Each culture has adapted the dish to local tastes and ingredients. This recipe represents a westernized version that’s accessible to American home cooks while honoring the traditional flavors that make curry so special. It’s proof that great food transcends borders and brings people together!
Why You’ll Love This Recipe
This easy chicken curry recipe is about to revolutionize your weeknight dinner routine! It combines exotic flavors with simple preparation for a meal that feels special but isn’t complicated or time-consuming.
Here’s why this chicken curry will become your new favorite:
- Ready in 40 Minutes – Quick enough for weeknight dinners, impressive enough for guests
- One-Pot Meal – Everything cooks in one pan for easy cleanup
- Incredibly Flavorful – Complex spice blend creates restaurant-quality taste
- Creamy & Comforting – Rich coconut milk sauce is absolutely luxurious
- Better Than Takeout – Fresher, healthier, and costs a fraction of restaurant price
- Naturally Gluten-Free – Perfect for gluten-sensitive diets
- Easy to Customize – Adjust spice level to your preference
- Meal Prep Champion – Tastes even better the next day, perfect for lunch prep
- Budget-Friendly – Uses affordable chicken and pantry spices
- Family-Friendly – Not too spicy, most kids love it
- Freezer-Friendly – Make a double batch and freeze for future meals
- Authentic Flavors – Tastes like your favorite Indian restaurant
Ingredient Notes
Let’s break down the ingredients that create this delicious, aromatic chicken curry. Each component plays an important role in building those complex layers of flavor!
Chicken – Boneless, skinless chicken breasts or thighs work beautifully. You’ll need about 1.5-2 pounds. Thighs are more forgiving and stay juicier, while breasts are leaner. Cut into bite-sized pieces (about 1-inch cubes) for even cooking. For a quicker version, use rotisserie chicken added at the end.
Coconut Milk – Full-fat coconut milk creates that rich, creamy sauce. One 14-ounce can is perfect. Don’t use light coconut milk as it won’t be as creamy. For dairy-based curry, substitute with heavy cream or half-and-half, though the flavor will differ.
Onion – One large onion, diced, forms the flavor base. Onions add sweetness and depth when cooked down. Yellow or white onions work best. Shallots can substitute for a milder flavor.
Garlic and Ginger – Fresh is essential! You’ll need 4 cloves garlic (minced) and 1 tablespoon fresh ginger (grated or minced). These aromatics are fundamental to curry’s authentic flavor. Jarred versions work in a pinch but lack the vibrancy of fresh.
Tomatoes – One 14-ounce can diced tomatoes or 2 cups fresh tomatoes add acidity, sweetness, and body to the sauce. Fire-roasted tomatoes add extra depth. Tomato paste (2 tablespoons) can intensify the flavor.
Curry Powder – The heart of the dish! You’ll need 2-3 tablespoons of quality curry powder. This pre-mixed blend typically contains turmeric, coriander, cumin, and other spices. Brands vary in heat level, so start with less if you’re sensitive to spice.
Garam Masala – This warm spice blend (1 teaspoon) adds depth and authenticity. Find it in the spice aisle or international section. If unavailable, increase curry powder slightly.
Turmeric – ½ teaspoon adds that beautiful golden color and earthy flavor. It’s also incredibly healthy with anti-inflammatory properties.
Oil – Use neutral oil like vegetable, canola, or grapeseed for sautéing. Coconut oil works too and adds subtle coconut flavor.
Optional Add-Ins:
- Bell peppers for vegetables and color
- Peas or spinach for greens
- Potatoes or chickpeas for heartiness
- Chili powder or cayenne for extra heat
- Fresh cilantro for garnish
- Lime or lemon juice for brightness
Equipment Needed
Making this easy chicken curry requires minimal equipment – probably items you already have!
Essential Equipment:
- Large Deep Skillet or Dutch Oven – A 12-inch skillet or 5-quart Dutch oven with lid works perfectly
- Sharp Knife and Cutting Board – For chopping chicken, onions, and aromatics
- Wooden Spoon or Spatula – For stirring
- Measuring Cups and Spoons – For accurate ingredient measurements
- Grater or Microplane – For grating fresh ginger
- Can Opener – For coconut milk and tomatoes
Helpful but Optional:
- Garlic press (easier than mincing by hand)
- Immersion blender (if you prefer ultra-smooth sauce)
- Rice cooker (for perfect rice while curry cooks)
- Serving bowls and ladle
Time-Saving Tip: Use a food processor to quickly chop onions and mince garlic/ginger together!
Print
Chicken Curry Recipe
- Total Time: 45 minutes
- Yield: 4-6 servings 1x
- Diet: Gluten Free
Description
This easy chicken curry recipe features tender chicken in a creamy, aromatic coconut milk sauce with warming spices. Ready in just 45 minutes, it’s better than takeout and perfect for weeknight dinners! Naturally gluten-free and full of authentic Indian flavors. Serve over rice or with naan bread.
Ingredients
For the Curry:
- 1.5–2 pounds boneless, skinless chicken (breasts or thighs), cut into 1-inch pieces
- 2 tablespoons vegetable oil or coconut oil
- 1 large onion, diced
- 4 cloves garlic, minced
- 1 tablespoon fresh ginger, grated or minced
- 2–3 tablespoons curry powder (adjust to taste)
- 1 teaspoon garam masala
- ½ teaspoon turmeric
- ¼ teaspoon cayenne pepper (optional, for heat)
- 1 can (14 oz) diced tomatoes
- 1 can (14 oz) full-fat coconut milk
- 1 tablespoon tomato paste (optional, for depth)
- 1 teaspoon salt (plus more to taste)
- ½ teaspoon black pepper
- 1 tablespoon sugar or honey (optional, balances acidity)
For Serving:
- Cooked basmati rice or naan bread
- Fresh cilantro, chopped
- Lime wedges
Instructions
Step 1: Prep the Ingredients
Cut chicken into bite-sized pieces (about 1 inch). Dice the onion, mince the garlic, and grate the ginger. Having everything ready makes cooking smooth and easy.
Step 2: Sear the Chicken
Heat 1 tablespoon oil in a large deep skillet or Dutch oven over medium-high heat. Add chicken pieces in a single layer (work in batches if needed). Season with salt and pepper. Sear for 2-3 minutes per side until lightly browned. The chicken doesn’t need to be fully cooked yet. Remove chicken to a plate and set aside.
Step 3: Sauté the Aromatics
In the same pan, add remaining 1 tablespoon oil. Reduce heat to medium. Add diced onion and cook for 5-6 minutes, stirring occasionally, until softened and translucent. Add minced garlic and grated ginger. Cook for 1 minute until fragrant, stirring constantly to prevent burning.
Step 4: Bloom the Spices
Add curry powder, garam masala, turmeric, and cayenne (if using) to the onions. Stir constantly for 30-60 seconds until the spices are fragrant and toasted. This step, called “blooming,” releases the essential oils in the spices and intensifies their flavor. Don’t skip it!
Step 5: Add Tomatoes and Create the Sauce
Add diced tomatoes (with their juice) and tomato paste if using. Stir to combine with the spiced onions. Cook for 3-4 minutes, stirring occasionally, until the tomatoes break down slightly and the mixture thickens.
Step 6: Add Coconut Milk
Pour in the coconut milk, stirring well to combine everything into a smooth sauce. Add salt, pepper, and sugar/honey if using. Bring to a gentle simmer.
Step 7: Simmer with Chicken
Return the seared chicken (and any accumulated juices) to the pan. Stir to coat with sauce. Reduce heat to medium-low, cover, and simmer for 15-20 minutes, stirring occasionally, until chicken is cooked through (internal temperature 165°F) and sauce has thickened to your liking. If sauce is too thick, add a splash of water or broth. If too thin, simmer uncovered for a few extra minutes.
Step 8: Taste and Adjust
Taste the curry and adjust seasoning as needed. Add more salt, curry powder for depth, or a squeeze of lime juice for brightness. Remove from heat.
Step 9: Garnish and Serve
Serve hot over steaming basmati rice or with warm naan bread. Garnish with fresh chopped cilantro and lime wedges. Enjoy!
Notes
- Spice Level: Start with 2 tablespoons curry powder and add more to taste. Curry powders vary by brand.
- Coconut Milk: Shake the can before opening to mix the cream and liquid.
- Make It Creamier: Stir in 2-3 tablespoons heavy cream at the end for extra richness.
- Vegetable Additions: Add bell peppers, peas, or spinach during the last 5 minutes of cooking.
- Thicker Sauce: Simmer uncovered longer or add 1 tablespoon cornstarch mixed with water.
- Storage: Refrigerate up to 4 days or freeze up to 3 months.
- Prep Time: 15 minutes
- Cook Time: 30 minutes
- Category: Dinner
- Method: Stovetop
- Cuisine: Indian
Nutrition
- Serving Size: 1 serving (approximately 1½ cups with rice, based on 6 servings)
- Calories: 385
- Sugar: 6g
- Sodium: 685mg
- Fat: 22g
- Saturated Fat: 14g
- Unsaturated Fat: 7g
- Trans Fat: 0g
- Carbohydrates: 18g
- Fiber: 3g
- Protein: 30g
- Cholesterol: 85mg
Tips & Variations
Protein Variations:
- Chicken Thighs: More flavorful and juicier than breasts
- Shrimp Curry: Add raw shrimp in last 5 minutes of cooking
- Vegetarian: Use chickpeas, cauliflower, or paneer cheese
- Lamb Curry: Use lamb chunks, increase cooking time to 45 minutes
Vegetable Add-Ins:
- Bell peppers (add with onions)
- Potatoes (add with tomatoes, need longer cooking)
- Spinach or kale (stir in at end)
- Peas or green beans (add last 5 minutes)
- Cauliflower or broccoli florets
- Chickpeas for extra protein
Spice Level Adjustments:
- Mild: Use 1-2 tablespoons curry powder, omit cayenne
- Medium: Recipe as written
- Hot: Add 1-2 fresh chilies, increase cayenne to ½ teaspoon
- Extra Hot: Add sliced jalapeños or Thai chilies
Sauce Variations:
- Cream-Based: Replace coconut milk with heavy cream
- Tomato-Heavy: Use 2 cans diced tomatoes, reduce coconut milk
- Thai-Style: Add lemongrass, lime leaves, fish sauce
- Butter Chicken Style: Add 3 tablespoons butter at the end
Pro Chef Tips
Tip #1: Toast the Spices
That 30-60 seconds of cooking the spices in oil (called “blooming”) is crucial! It releases their essential oils and intensifies flavors dramatically. Don’t skip this step – it’s what separates good curry from great curry.
Tip #2: Use Fresh Garlic and Ginger
Fresh aromatics make a remarkable difference compared to jarred or powdered versions. The bright, pungent flavors are essential to authentic taste. Grate ginger with a microplane for best results – it distributes more evenly.
Tip #3: Don’t Overcook the Chicken
Since chicken continues cooking in the sauce, sear it just until lightly browned, not fully cooked through. This prevents dry, overcooked chicken. It finishes cooking during the simmer.
Tip #4: Build Layers of Flavor
Each step builds on the last: searing chicken for depth, sautéing onions for sweetness, blooming spices for intensity, simmering for melding. Don’t rush any step!
Tip #5: Adjust Consistency
Curry sauce should coat the back of a spoon but still be pourable. Too thick? Add water or broth. Too thin? Simmer uncovered to reduce, or add cornstarch slurry.
Common Mistakes to Avoid
Mistake #1: Using Light Coconut Milk
Light coconut milk is mostly water and creates thin, watery curry without richness. Solution: Always use full-fat coconut milk. The cream is what makes curry luxurious.
Mistake #2: Not Cooking Onions Long Enough
Raw or undercooked onions taste harsh and don’t provide the sweet base curry needs. Solution: Cook onions for at least 5-6 minutes until soft and translucent before adding other ingredients.
Mistake #3: Skipping the Spice Blooming Step
Adding raw spice powder directly to liquid doesn’t develop full flavor. Solution: Always cook spices in oil for 30-60 seconds until fragrant before adding liquids.
Mistake #4: Overcooking Chicken
Chicken cooked too long becomes dry and stringy. Solution: Sear lightly, then finish cooking in the sauce for 15-20 minutes max. Check internal temp (165°F).
Mistake #5: Not Tasting and Adjusting
Curry needs balance – it might need more salt, acid (lime), sweetness (sugar), or heat. Solution: Always taste before serving and adjust seasoning. This final step makes all the difference.
Storage & Meal Prep
Refrigerator Storage:
Store cooled curry in airtight containers in the refrigerator for up to 4 days. The flavors actually deepen and improve after a day, making leftovers even better! Store rice separately from curry for best texture.
Reheating:
Stovetop: Heat in a saucepan over medium-low, stirring occasionally, adding a splash of water or coconut milk if needed to restore consistency.
Microwave: Heat in microwave-safe bowl, covered, in 1-minute intervals, stirring between each, until hot throughout.
Meal Prep Strategy:
Make a big batch on Sunday! Portion into individual containers with rice for grab-and-go lunches. The curry keeps its flavor and texture beautifully all week.
Make-Ahead & Freezer Notes
Make-Ahead (Up to 2 Days):
Prepare the entire curry, let cool completely, and refrigerate. Reheat when ready to serve. The flavors meld beautifully overnight!
Freezing Curry (Excellent Option):
Chicken curry freezes beautifully for up to 3 months!
- Cool curry completely
- Portion into freezer-safe containers or bags
- Remove excess air, seal tightly
- Label with date and contents
- Freeze flat for easy stacking
Thawing and Reheating:
Thaw overnight in refrigerator. Reheat on stovetop over medium-low, stirring occasionally and adding liquid if needed. Or microwave from frozen (will take longer).
Freezing Tip:
Slightly undercook vegetables if freezing, as they’ll continue cooking when reheated.
Serving Suggestions
Traditional Pairings:
- Basmati rice (white or brown)
- Naan bread or roti
- Garlic naan
- Coconut rice
- Cauliflower rice (low-carb option)
Side Dishes:
- Cucumber raita (yogurt sauce)
- Mango chutney
- Papadum (crispy lentil crackers)
- Samosas
- Indian-style salad (cucumber, tomato, onion)
- Pickled onions
Complete Indian Dinner: Start with vegetable samosas, serve chicken curry with rice and naan, add cucumber raita and mango chutney on the side, finish with mango lassi or chai tea.
Beverage Pairings:
- Mango lassi
- Indian chai tea
- Beer (lager pairs well with curry)
- White wine (Riesling or Gewürztraminer)
- Sparkling water with lime
FAQs Section
Q: Can I make this curry less spicy?
A: Absolutely! Use just 1-2 tablespoons mild curry powder, omit cayenne pepper, and if it’s still too spicy, stir in extra coconut milk or a dollop of yogurt to mellow the heat.
Q: What’s the best chicken to use?
A: Both breasts and thighs work. Thighs stay juicier and more tender, while breasts are leaner. Boneless, skinless is easiest, but bone-in takes longer and adds more flavor.
Q: Can I use chicken breast instead of thighs?
A: Yes! Cut into chunks and watch cooking time carefully – breasts can dry out faster than thighs. Remove from heat as soon as they reach 165°F internal temperature.
Q: How can I make this dairy-free?
A: Good news – the recipe as written using coconut milk is already dairy-free! Just avoid adding cream or yogurt at the end.
Q: Can I use curry paste instead of powder?
A: Yes! Use 2-3 tablespoons Thai curry paste or Indian curry paste. Adjust amount based on brand intensity. Curry paste is more concentrated than powder.
Q: Why is my curry bitter?
A: Usually from burning the spices or garlic. Cook spices for only 30-60 seconds and garlic for 1 minute. If bitter, add a bit more sugar or coconut milk to balance.
Q: How do I thicken curry sauce?
A: Simmer uncovered to reduce liquid, or mix 1 tablespoon cornstarch with 2 tablespoons water and stir into simmering curry. It will thicken in 2-3 minutes.
Conclusion
And there you have it – everything you need to make the most delicious, creamy chicken curry that’ll have everyone asking for seconds! This easy homemade version proves that restaurant-quality curry is absolutely achievable in your own kitchen. With aromatic spices, tender chicken, and that luxurious coconut milk sauce, it’s comfort food that travels the world.
I’d love to hear how your chicken curry turns out! Did you adjust the spice level? What did you serve it with? Is this destined to become a regular in your dinner rotation? Drop a comment below and share your experience. If this recipe wins over your family (and I think it will!), please give it a five-star rating and share it with friends who love flavorful, satisfying dinners.
Don’t forget to pin this recipe to your Pinterest boards so you can find it whenever a curry craving strikes! Here’s to many more bowls of aromatic, delicious chicken curry. Happy cooking!