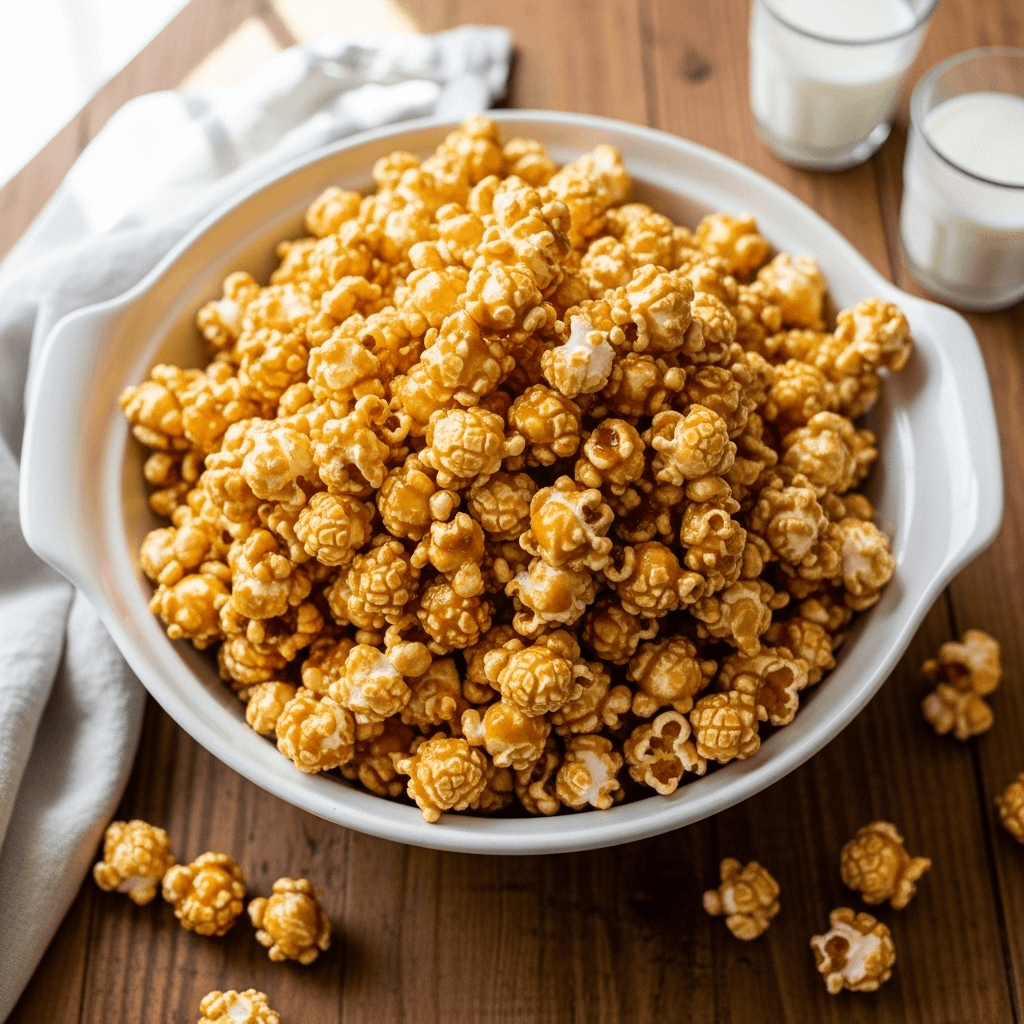
There’s something absolutely magical about homemade caramel popcorn. This sweet, crunchy, buttery treat transforms simple popcorn kernels into an irresistible snack that’s perfect for movie nights, holiday gift-giving, game day gatherings, or simply satisfying your sweet tooth on a cozy evening at home.
Unlike store-bought versions that can taste overly processed or leave an artificial aftertaste, homemade caramel popcorn delivers authentic caramel flavor with the perfect balance of sweetness and saltiness. The buttery caramel coating creates a satisfying crunch that keeps you reaching back into the bowl, bite after delicious bite. Whether you’re planning a family movie marathon, looking for an impressive homemade gift, or simply craving something sweet and salty, this caramel popcorn recipe is your answer.
What makes this recipe truly special is how achievable it is for home cooks of all skill levels. While making caramel might sound intimidating, I’ll walk you through every step with clear instructions and helpful tips that guarantee success. You’ll discover that creating bakery-quality caramel popcorn at home is not only possible but actually quite fun. Plus, making it yourself means you control the ingredients, the sweetness level, and can customize it exactly to your family’s preferences.
History / Background
Caramel popcorn has a rich American heritage that dates back to the late 1800s. The combination of popcorn and caramel became popular during the 1893 World’s Columbian Exposition in Chicago, where a confection called “Cracker Jack” was introduced to fair-goers. This sweet popcorn treat, which included peanuts along with the caramel-coated kernels, became an instant sensation and remains iconic to this day.
However, caramel popcorn’s roots go even deeper into American snacking culture. Popcorn itself has been enjoyed for thousands of years, with evidence of popped corn dating back to ancient civilizations in the Americas. Native Americans were popping corn long before European settlers arrived, using various methods including heating sand and tossing kernels into the hot mixture.
The marriage of caramel and popcorn was a natural evolution as sugar became more accessible and affordable in the late 19th century. Home cooks and confectioners discovered that coating popcorn with caramelized sugar created an addictive treat that was both elegant and humble. The glossy, amber coating transformed everyday popcorn into something special enough for parties, gifts, and celebrations.
Throughout the 20th century, caramel popcorn became deeply woven into American food culture. It appeared at carnivals, movie theaters, holiday gatherings, and sporting events. Regional variations emerged, with some areas preferring a lighter, crispier coating while others favored a chewier, more heavily coated version. The Midwest, particularly Chicago, became known as the caramel popcorn capital, with numerous shops and brands specializing in this beloved treat.
Today, homemade caramel popcorn continues to be a cherished tradition, especially during the fall and winter holiday season. It’s a popular choice for edible gifts, party favors, and festive gatherings. The beauty of making it at home lies in the customization possibilities and the wonderful aroma that fills your kitchen as the butter and sugar caramelize together.
Why You’ll Love This Recipe
This homemade caramel popcorn recipe delivers everything you could want in a sweet snack, combining nostalgic flavors with impressive results that will have everyone asking for your secret. The buttery caramel coating achieves the perfect texture—crispy, crunchy, and absolutely addictive—while the hint of salt balances the sweetness beautifully.
- Budget-Friendly – Made with simple, affordable pantry staples that cost a fraction of gourmet store-bought versions
- Perfect for Gifting – Package it in decorative bags or jars for impressive homemade gifts that friends and family will rave about
- Customizable – Easy to adjust sweetness levels, add mix-ins like nuts or chocolate, or create flavor variations
- Crowd-Pleaser – Appeals to both kids and adults, making it ideal for parties, movie nights, and family gatherings
- Impressive but Easy – Looks and tastes gourmet but requires only basic cooking skills and common ingredients
- Make-Ahead Friendly – Stays fresh and crunchy for days when stored properly, perfect for meal prep or advance party planning
- Fun Family Activity – Kids love helping with this recipe, making it a great weekend baking project
- Better Than Store-Bought – No artificial ingredients, preservatives, or corn syrup—just pure, delicious flavor
Ingredient Notes
Understanding your ingredients is key to caramel popcorn success. Here’s what you’ll need and why each component matters:
Popcorn – Use plain, unsalted, unbuttered popped popcorn as your base. You can pop your own kernels on the stovetop, use an air popper, or microwave plain kernels. About ½ cup of unpopped kernels yields roughly 15 cups of popped corn. Avoid pre-buttered or flavored popcorn as it won’t accept the caramel coating properly.
Brown Sugar – The foundation of your caramel sauce, brown sugar provides rich molasses notes and deep amber color. Light brown sugar works perfectly, though dark brown sugar creates an even more robust flavor. Don’t substitute with white sugar alone, as you’ll lose that characteristic caramel depth.
Butter – Unsalted butter is best as it allows you to control the salt level precisely. The butter adds richness and helps the caramel achieve its glossy, smooth consistency. Don’t use margarine or butter substitutes, as they won’t caramelize properly and can affect the final texture.
Corn Syrup – Light corn syrup prevents crystallization and helps achieve that perfectly smooth, glossy coating. While some recipes skip it, corn syrup ensures your caramel stays pliable and doesn’t become grainy. If you’re avoiding corn syrup, you can substitute with honey or golden syrup, though the flavor will be slightly different.
Baking Soda – This magical ingredient creates tiny air bubbles in the caramel, making it lighter and crunchier rather than sticky and chewy. Don’t skip it! The chemical reaction when baking soda meets the hot caramel is what gives your popcorn that signature crispy coating.
Vanilla Extract – Pure vanilla extract adds warmth and enhances all the other flavors. Use real vanilla extract rather than imitation for the best flavor.
Salt – A pinch of salt in the caramel balances the sweetness and enhances the overall flavor profile. You can also sprinkle a bit of flaky sea salt on top for a gourmet sweet-and-salty finish.
Equipment Needed
Having the right tools makes this recipe smooth and stress-free. Here’s what you’ll need:
- Large roasting pan or two large baking sheets (for spreading popcorn)
- Medium to large saucepan (for making caramel)
- Wooden spoon or heat-resistant silicone spatula
- Measuring cups and spoons
- Candy thermometer (optional but helpful)
- Large mixing bowl or pot (for tossing popcorn with caramel)
- Parchment paper or silicone baking mats
- Oven mitts
- Large spoon or spatula for stirring
- Airtight containers or resealable bags (for storage)

Caramel Popcorn Recipe
- Total Time: 55 minutes
- Yield: 15 cups (about 12 servings) 1x
- Diet: Vegetarian
Description
This homemade caramel popcorn features perfectly popped kernels coated in a buttery, sweet caramel sauce and baked until irresistibly crunchy. The combination of brown sugar, butter, and a hint of vanilla creates an addictive treat that’s perfect for movie nights, gift-giving, or anytime snacking.
Ingredients
- 15 cups popped popcorn (about ½ cup unpopped kernels)
- 1 cup (2 sticks) unsalted butter
- 2 cups packed light brown sugar
- ½ cup light corn syrup
- 1 teaspoon salt
- ½ teaspoon baking soda
- 1 teaspoon pure vanilla extract
Instructions
- Prepare the Popcorn – Preheat your oven to 250°F (120°C). Pop your popcorn using your preferred method and remove any unpopped kernels. Place the popped corn in a large roasting pan or divide between two large baking sheets lined with parchment paper.
- Make the Caramel Sauce – In a medium saucepan over medium heat, melt the butter completely. Add the brown sugar, corn syrup, and salt. Stir continuously until the mixture comes to a boil.
- Boil the Caramel – Once boiling, stop stirring and allow the mixture to boil undisturbed for 4-5 minutes. If using a candy thermometer, it should reach 250°F (hard ball stage). The caramel will darken slightly and thicken.
- Add Baking Soda and Vanilla – Remove the saucepan from heat. Carefully stir in the baking soda and vanilla extract. The mixture will foam up vigorously—this is normal and expected. Stir quickly to incorporate.
- Coat the Popcorn – Immediately pour the hot caramel over the popcorn. Working quickly, use a large spoon or spatula to toss and stir the popcorn, coating as evenly as possible. Don’t worry if it’s not perfectly coated yet.
- Bake – Place the pan(s) in the preheated oven. Bake for 45 minutes, stirring and tossing the popcorn every 15 minutes to ensure even coating and crispness.
- Cool Completely – Remove from the oven and spread the caramel popcorn onto parchment paper or silicone mats. Allow it to cool completely—this is when it becomes truly crunchy. Break apart any large clusters.
- Serve or Store – Once completely cooled, enjoy immediately or store in airtight containers.
Notes
- Remove all unpopped kernels before coating to avoid breaking teeth on hard kernels hidden in caramel.
- The caramel will be extremely hot—exercise caution when pouring and stirring.
- Stirring every 15 minutes during baking is crucial for even coating and preventing burning.
- For extra crunch, you can bake for an additional 5-10 minutes, watching carefully to avoid burning.
- This recipe can easily be doubled for large gatherings or gift-giving.
- Prep Time: 10 minutes
- Cook Time: 45 minutes
- Category: Dessert
- Method: Stovetop, Baking
- Cuisine: American
Nutrition
- Serving Size: 1¼ cups
- Calories: 285
- Sugar: 32g
- Sodium: 290mg
- Fat: 14g
- Saturated Fat: 9g
- Unsaturated Fat: 4g
- Trans Fat: 0g
- Carbohydrates: 40g
- Fiber: 1g
- Protein: 1g
- Cholesterol: 35mg
Tips & Variations
The beauty of homemade caramel popcorn lies in its versatility. Here are some delicious ways to customize this recipe:
Sweet Variations:
- Chocolate Drizzle – After cooling, drizzle melted dark, milk, or white chocolate over the popcorn for an extra decadent treat
- Cinnamon Spice – Add 1 teaspoon of ground cinnamon to the caramel for a warm, spiced version
- Peanut Butter – Stir in ¼ cup of peanut butter along with the vanilla for peanut butter caramel popcorn
- Coffee Caramel – Add 1 tablespoon of instant espresso powder to the caramel for a mocha twist
Add-Ins:
- Mix in 1-2 cups of roasted peanuts, pecans, or cashews before baking
- Add ½ cup of mini chocolate chips after the popcorn has cooled
- Sprinkle with toffee bits or crushed candy canes for holiday versions
- Toss in pretzel pieces for extra salty-sweet crunch
Flavor Adjustments:
- For less sweetness, reduce brown sugar to 1½ cups
- For intense caramel flavor, use all dark brown sugar
- Add ½ teaspoon of maple extract along with vanilla for maple caramel popcorn
- Sprinkle with flaky sea salt immediately after removing from oven
Dietary Modifications:
- Make it vegan by using coconut oil or vegan butter (results may vary slightly)
- For gluten-free, ensure your ingredients are certified gluten-free
- Reduce corn syrup to ⅓ cup if you prefer less sticky sweetness
Pro Chef Tips
Take your caramel popcorn from good to absolutely phenomenal with these professional techniques:
Temperature Matters – Use a candy thermometer for precision. The caramel should reach 250°F (hard ball stage) for the perfect texture. Too low and it will be chewy; too high and it becomes brittle and can burn.
Quality Butter Makes a Difference – European-style butter with higher fat content creates richer, more flavorful caramel. The investment in good butter really shows in the final product.
Don’t Rush the Cooling – Patience is key! Spreading the popcorn in a thin layer and allowing it to cool completely undisturbed ensures maximum crunchiness. Bagging it while still warm creates condensation that makes it soggy.
Prep Your Station – Have all ingredients measured and ready before you start. Caramel making moves quickly, and you don’t want to scramble for ingredients when the mixture is boiling.
The Stirring Schedule – Stirring every 15 minutes during baking isn’t just a suggestion—it’s essential for even caramelization and preventing hot spots that can burn. Set a timer so you don’t forget.
Room Temperature Test – Before storing, make sure the popcorn has reached complete room temperature. It should feel completely dry and crispy, not at all tacky or warm.
Heavy-Bottom Pan – Use a heavy-bottomed saucepan for even heat distribution. Thin pans can create hot spots that cause the caramel to burn in spots while remaining underdone in others.
The Foam Factor – When you add baking soda, the mixture will foam dramatically. Use a pan large enough to accommodate this expansion, and have your stirring spoon ready to incorporate it quickly.
Common Mistakes to Avoid
Even experienced bakers can encounter challenges with caramel popcorn. Here’s how to sidestep the most common pitfalls:
Mistake #1: Skipping the Baking Step – Some people think they can just coat the popcorn and let it cool. The baking process is what transforms the coating from sticky to crunchy. Without it, you’ll have gummy, chewy popcorn instead of crispy perfection.
Mistake #2: Not Removing Unpopped Kernels – Those hard kernels are dental disasters waiting to happen. Take the extra minute to sort through your popcorn before coating. Your teeth (and your dentist) will thank you.
Mistake #3: Overcrowding the Pan – If your popcorn is piled too thick, the pieces in the middle won’t crisp up properly. Use a large roasting pan or two baking sheets to spread it out adequately. Better to use two pans than one overstuffed one.
Mistake #4: Burning the Caramel – Once you stop stirring and let the caramel boil, watch it carefully. If it darkens too much or starts smelling burnt, it’s gone too far. Dark amber is good; dark brown is overdone. Remove from heat immediately if you smell burning.
Mistake #5: Adding Vanilla Too Early – Vanilla contains alcohol that can cause splattering if added while the caramel is still on the heat. Always remove from heat first, then add vanilla and baking soda for safety and best results.
Mistake #6: Storing While Warm – This is the fastest way to ruin perfect caramel popcorn. Even slightly warm popcorn creates moisture in the container, turning your crunchy snack into a sticky mess. Be patient and wait for complete cooling.
Mistake #7: Using Pre-Buttered Popcorn – Microwave butter popcorn or pre-seasoned varieties won’t accept the caramel coating properly. The existing fat and seasonings create a barrier. Always start with plain, unsalted popped corn.
Storage & Meal Prep
Proper storage is the key to keeping your caramel popcorn fresh and crunchy for days.
Room Temperature Storage – Once completely cooled, store caramel popcorn in airtight containers or resealable bags. Mason jars, plastic containers with tight-fitting lids, or heavy-duty zip-top bags all work beautifully. Stored this way, it stays fresh and crunchy for up to 2 weeks.
Avoid Refrigeration – Never refrigerate caramel popcorn! The moisture in the refrigerator will make it soggy and chewy. Room temperature storage in a dry environment is ideal.
Pantry Placement – Keep your containers in a cool, dry place away from heat sources and humidity. A pantry shelf or cupboard works perfectly.
Portion Control – Consider dividing the batch into smaller containers or bags. This prevents the entire batch from being exposed to air repeatedly and helps with portion control (though we know how hard it is to stop eating!).
Reviving Slightly Soft Popcorn – If your popcorn loses some crunch after a few days, spread it on a baking sheet and warm in a 250°F oven for 5-10 minutes. Let it cool completely and it will crisp back up.
Long-Term Storage – For extended storage, you can freeze caramel popcorn for up to 2 months. Use freezer-safe containers or bags, removing as much air as possible. Thaw at room temperature and, if needed, crisp briefly in the oven before serving.
Make-Ahead & Freezer Notes
Caramel popcorn is a fantastic make-ahead treat, perfect for planning ahead for parties, gifts, or simply having a delicious snack ready when cravings strike.
Advance Preparation – You can make caramel popcorn up to 2 weeks in advance. In fact, many people find it actually gets better after a day or two as the flavors meld and the coating settles. Just ensure it’s completely cooled before storing, and keep it in airtight containers at room temperature.
Freezing Instructions – Caramel popcorn freezes exceptionally well. Once completely cooled, portion it into freezer-safe bags or containers, removing as much air as possible. Label with the date and freeze for up to 2-3 months. The caramel coating protects the popcorn from freezer burn quite effectively.
Thawing Method – When you’re ready to enjoy, simply remove the container from the freezer and let it come to room temperature naturally (about 30 minutes). Don’t try to speed up the process with heat, as this can create condensation that makes the popcorn soggy.
Refreshing After Storage – If your caramel popcorn seems to have lost a bit of its crunch after thawing or extended storage, spread it on a parchment-lined baking sheet and place it in a 250°F oven for 5-10 minutes. Allow it to cool completely on the counter, and it will crisp right back up.
Gift-Giving Timeline – If making caramel popcorn for gifts, prepare it 2-5 days before packaging. This gives it time to fully set and develop its best texture. Package it the night before or morning of delivery for optimal freshness.
Batch Cooking – This recipe doubles easily, making it perfect for preparing multiple batches for holiday gift-giving or large parties. You can make several batches over a few days and store them separately until needed.
Serving Suggestions
Caramel popcorn is delicious on its own, but here are some creative ways to serve and enjoy it:
Movie Night – Serve in individual paper bags or large bowls alongside your favorite beverages. Pair with other snacks like cheese and crackers, fresh fruit, or veggie sticks for a balanced spread.
Party Dessert Bar – Create a popcorn bar with bowls of caramel popcorn, chocolate-covered popcorn, and regular buttered popcorn. Add toppings like chocolate chips, M&Ms, nuts, and dried fruit so guests can customize their mix.
Ice Cream Topping – Sprinkle caramel popcorn over vanilla ice cream for an incredible textural contrast. The combination of cold, creamy ice cream and crunchy, sweet popcorn is absolutely divine.
Trail Mix Addition – Combine caramel popcorn with nuts, dried cranberries, dark chocolate chips, and pretzel pieces for a sweet and salty trail mix perfect for road trips or hiking.
Dessert Garnish – Use caramel popcorn as an edible garnish for cakes, cupcakes, or milkshakes. It adds height, texture, and visual interest while tasting amazing.
Beverage Pairings – Enjoy with hot apple cider, hot chocolate, coffee, or cold milk. The sweetness of caramel popcorn pairs wonderfully with both hot and cold beverages.
Sundae Bar – Set out bowls of caramel popcorn alongside other ice cream toppings for a build-your-own sundae station at parties.
Gift Packaging – Layer caramel popcorn in clear cellophane bags tied with ribbon, mason jars decorated with fabric toppers, or decorative tins. Add a personalized tag for a thoughtful homemade gift.
FAQs Section
Can I use microwave popcorn instead of popping my own?
You can, but use only plain, unsalted microwave popcorn without butter. Pre-buttered or flavored varieties won’t accept the caramel coating properly. Freshly popped kernels (air-popped or stovetop) give the best results, but plain microwave popcorn works in a pinch.
Why is my caramel popcorn sticky instead of crunchy?
This usually happens for three reasons: the caramel didn’t reach the proper temperature (should be 250°F), you skipped or shortened the baking time, or you stored it before it completely cooled. Make sure to bake for the full 45 minutes, stirring every 15 minutes, and let it cool completely at room temperature.
Can I make this recipe without corn syrup?
Yes! You can substitute honey or golden syrup (like Lyle’s) in the same amount. Keep in mind that the flavor will be slightly different, and honey-based caramel may crystallize more easily. Corn syrup helps prevent crystallization and creates that perfectly smooth coating, but these substitutes work well.
How do I prevent the caramel from burning?
Use a heavy-bottomed saucepan for even heat distribution, and don’t walk away once the mixture starts boiling. Watch it carefully, and if you smell any burning or it becomes very dark brown (rather than amber), remove it from heat immediately. Medium heat is better than high heat for controlled caramelization.
Can I add nuts to this recipe?
Absolutely! Add 1-2 cups of your favorite nuts (peanuts, pecans, cashews, or almonds) to the popcorn before pouring the caramel over it. Make sure nuts are unsalted, or reduce the salt in the recipe slightly. Roasted nuts work best as they add extra flavor and crunch.
My caramel popcorn has too many big clusters. How can I prevent this?
Some clustering is normal and actually desirable for many people! To minimize it, stir more frequently during the baking process and break apart clusters while the popcorn is still slightly warm (but not hot). You can also spread the popcorn in a thinner layer across more baking sheets.
Is there a way to make this healthier?
You can reduce the butter to ¾ cup and the brown sugar to 1½ cups for a lighter coating. Air-popped corn is already a whole grain with fiber, so the base ingredient is relatively healthy. You could also experiment with coconut sugar instead of brown sugar, though this changes the flavor and texture slightly.
How long does homemade caramel popcorn stay fresh?
When stored properly in airtight containers at room temperature, caramel popcorn stays fresh and crunchy for up to 2 weeks. In the freezer, it lasts 2-3 months. Just make sure it’s completely cooled before storing to prevent sogginess.
Conclusion
There’s truly nothing quite like homemade caramel popcorn—the buttery caramel flavor, the satisfying crunch, and the perfect balance of sweet and salty make it an irresistible treat that brings joy to any occasion. Whether you’re curled up for movie night, preparing thoughtful homemade gifts, or simply indulging in a well-deserved snack, this recipe delivers bakery-quality results right from your own kitchen.
The best part? Once you’ve made it once, you’ll realize how easy it is to whip up batch after batch. You’ll never want to buy the store-bought version again when you can create something this delicious with simple ingredients and a little bit of time. Plus, your kitchen will smell absolutely heavenly while the caramel bubbles and the popcorn bakes to crunchy perfection.
I hope this recipe becomes a favorite in your home, just as it has in mine. There’s something special about sharing homemade treats with the people you love, and caramel popcorn always seems to bring smiles to everyone’s faces. The compliments you’ll receive will make the effort absolutely worthwhile.
Now it’s your turn! Head to your kitchen and make a batch of this incredible caramel popcorn. Don’t forget to take a photo of your finished creation and share it on Pinterest so other home cooks can discover this recipe too. If you try any of the variations or have your own creative twist, I’d love to hear about it in the comments below!
Happy snacking, and enjoy every crunchy, caramel-coated bite!