
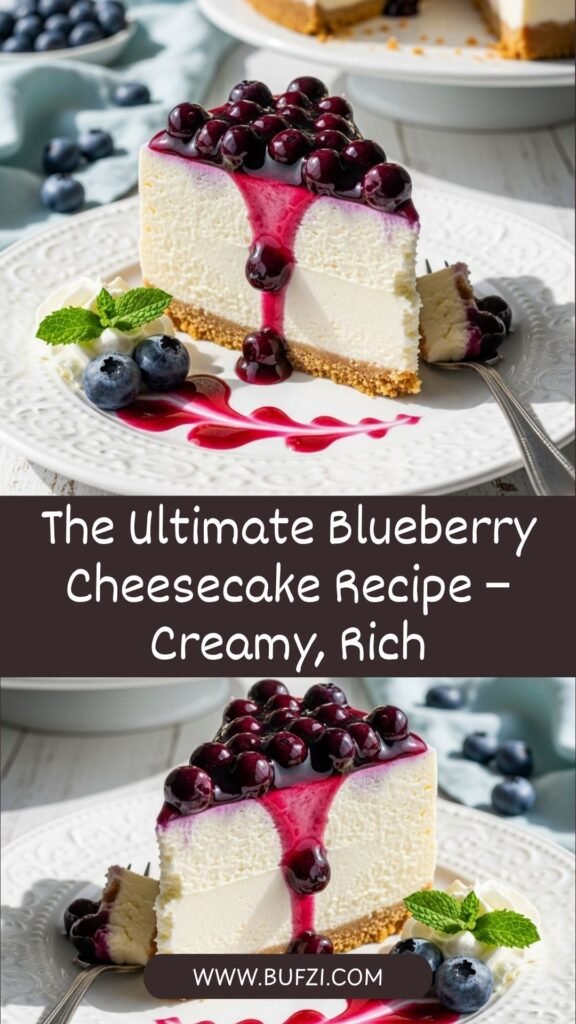
Picture this: a buttery graham cracker crust, velvety smooth cream cheese filling, and a gorgeous crown of fresh blueberry topping that’s bursting with sweet-tart flavor. This homemade blueberry cheesecake is everything a classic cheesecake should be—rich, creamy, and absolutely divine. While it might look like something from a fancy bakery, this recipe breaks down every step so clearly that even beginner bakers can achieve spectacular results.
There’s something truly special about serving a homemade cheesecake. The way it slices into perfect wedges with that signature creamy texture, the gorgeous contrast of purple-blue berries against pristine white filling, and that first bite that melts on your tongue—it’s pure dessert magic. This blueberry cheesecake recipe delivers bakery-quality results without any complicated techniques or special equipment, making it the perfect showstopper for any occasion.
Introduction to Blueberry Cheesecake
Blueberry cheesecake is a timeless dessert that combines the tangy richness of cream cheese with the sweet, fruity freshness of blueberries. This American classic features a crispy graham cracker crust as the foundation, a thick layer of smooth, dense cheesecake filling in the middle, and a vibrant blueberry topping that provides both visual appeal and a burst of fruit flavor.
What makes this particular version special is its perfect balance of textures and flavors. The crust provides just enough crunch without being too hard, the filling is luxuriously creamy without being heavy, and the blueberry topping offers a refreshing contrast that cuts through the richness. Every element works together to create a harmonious dessert experience.
This blueberry cheesecake is incredibly versatile when it comes to serving occasions. It’s the perfect ending to holiday dinners like Thanksgiving, Christmas, and Easter, absolutely stunning for birthday celebrations and baby showers, ideal for summer BBQs and potlucks when blueberries are at their peak, elegant enough for dinner parties and special occasions, and wonderful for making ahead for stress-free entertaining. The combination of make-ahead convenience and impressive presentation makes this recipe a true winner for home bakers.
History & Background of Blueberry Cheesecake
The story of cheesecake begins in ancient Greece, where a simple version made from cheese, honey, and wheat was served to athletes during the first Olympic Games in 776 BC. The Romans later adapted this recipe, spreading it throughout Europe as their empire expanded. However, the cheesecake we know today—rich, dense, and made with cream cheese—is distinctly American.
Modern American cheesecake was born in 1872 when William Lawrence, a New York dairyman, accidentally invented cream cheese while trying to recreate French Neufchâtel. By 1880, cream cheese was being distributed under the Philadelphia Brand name, and it quickly became the foundation for New York-style cheesecake. This style, characterized by its dense, smooth texture and pure flavor, became the gold standard.
The addition of fruit toppings to cheesecake is a natural evolution that likely occurred as bakers sought to add visual appeal and flavor variety. Blueberries, native to North America, were an obvious choice. Indigenous peoples had been eating wild blueberries for thousands of years, and the fruit holds deep cultural significance. The commercial cultivation of blueberries began in New Jersey in the early 1900s, making them more widely available for baking.
Blueberry cheesecake gained particular popularity in the mid-20th century as home baking became increasingly popular in American households. The combination offered the best of both worlds: the sophisticated elegance of traditional cheesecake with the all-American appeal of fresh blueberries. Regional variations emerged, with some preferring blueberries baked into the filling, while others (like this recipe) opted for a fresh topping that maintains the berries’ bright flavor and color.
Today, blueberry cheesecake remains one of the most popular cheesecake variations in the United States. It’s particularly beloved during summer months when fresh blueberries are abundant, though frozen berries make it a year-round possibility. The dessert represents the perfect marriage of old-world baking traditions and New World ingredients, creating something uniquely American that continues to delight generations of dessert lovers.
Why You’ll Love This Blueberry Cheesecake Recipe
This homemade blueberry cheesecake recipe is absolutely worth the effort, and honestly, it’s easier than you might think. While cheesecake has a reputation for being temperamental, this recipe includes all the tips and tricks you need to avoid common pitfalls and achieve perfect results every single time.
The texture of this cheesecake is what dreams are made of—incredibly creamy, smooth, and dense without being heavy. It slices beautifully into clean wedges that hold their shape perfectly on the plate. The graham cracker crust provides just the right amount of buttery crunch, while the blueberry topping adds a gorgeous pop of color and a refreshing fruity note that keeps each bite interesting.
What makes this recipe particularly special is how it looks as good as it tastes. The vibrant purple-blue berries glistening on top of pristine white cheesecake create a stunning visual that’s absolutely Instagram and Pinterest worthy. Your guests will be thoroughly impressed, yet you’ll know just how straightforward the process actually is.
Here’s why you’ll absolutely love this recipe:
- Bakery-Quality Results – Tastes like it came from an upscale bakery but costs a fraction of the price
- Make-Ahead Friendly – Must be made in advance, making it perfect for stress-free entertaining
- Impressive Presentation – Looks absolutely stunning with minimal decorating effort
- Classic Flavor Combination – Timeless taste that appeals to everyone from kids to grandparents
- Detailed Instructions – Step-by-step guidance ensures success even for beginners
- No Special Equipment – Uses basic kitchen tools you already own
- Customizable – Easy to adapt with different berries or flavor variations
- Feeds a Crowd – One cheesecake serves 12-16 people generously
- Stable & Sturdy – Slices cleanly and holds up well for serving
- Fresh Fruit Topping – Blueberries stay bright and flavorful, not baked and mushy
- Perfect Balance – Not overly sweet; the tangy cream cheese balances beautifully with sweet berries
- Keeps Well – Stays fresh in the refrigerator for up to 5 days
Ingredient Notes
Understanding your ingredients is crucial for cheesecake success. Here’s what you’ll need and why each component matters:
Graham Cracker Crumbs – The foundation of your crust. You’ll need about 1½ cups, which equals roughly 10-12 full graham cracker sheets. You can buy pre-made crumbs or make your own by crushing whole crackers (which often tastes fresher). Can substitute with vanilla wafer cookies, digestive biscuits, or Oreo cookies (without filling) for different crust flavors.
Granulated Sugar – Used in both the crust and filling. It sweetens without adding color or strong flavor. The filling needs enough sugar to balance the tangy cream cheese, but not so much that it becomes cloying. Always measure accurately.
Butter – Binds the graham cracker crumbs together and adds rich flavor. Must be melted for the crust. Use unsalted butter so you can control the salt level. For the filling, butter should be softened to room temperature.
Cream Cheese – The star ingredient! You’ll need full-fat cream cheese (not reduced-fat or whipped) at room temperature. This is crucial—cold cream cheese creates lumps that won’t smooth out. Buy the brick-style cream cheese, not the spreadable kind in tubs. Philadelphia is the gold standard, but store brands work fine too.
Sour Cream – Adds tanginess and creates an incredibly smooth, creamy texture. Full-fat sour cream is best. Can substitute with Greek yogurt in a pinch, though the flavor will be slightly different. This ingredient is what gives the cheesecake its signature slight tang.
Large Eggs – Provide structure and help the cheesecake set properly. Room temperature eggs incorporate more easily and create a smoother batter. You’ll need 3-4 eggs depending on the size of your cheesecake. Cold eggs can cause the batter to curdle.
Vanilla Extract – Enhances all the other flavors. Pure vanilla extract tastes significantly better than imitation. A little goes a long way in bringing depth to the filling.
Fresh or Frozen Blueberries – Either works beautifully! Fresh blueberries are ideal during summer when they’re in season and at peak sweetness. Frozen blueberries work year-round—no need to thaw them before making the topping. Look for plump, firm berries without signs of mold.
Lemon Juice – Brightens the blueberry topping and adds a subtle tartness that complements the sweet berries. Fresh lemon juice is always preferable to bottled.
Cornstarch – Thickens the blueberry topping to create that gorgeous, glossy sauce consistency. Just a tablespoon or two creates the perfect texture without making it gummy.
Salt – A pinch enhances all the flavors without making the dessert taste salty. Never skip salt in baking—it’s crucial for balanced flavor.
Equipment Needed
Cheesecake doesn’t require any specialized equipment, but having the right tools makes the process much smoother:
- 9-inch Springform Pan – Essential for cheesecake! The removable bottom and releasing sides make unmolding easy without damaging your beautiful creation. Non-stick or regular both work.
- Heavy-Duty Aluminum Foil – For wrapping the outside of the springform pan to prevent water from seeping in during the water bath. Use heavy-duty to prevent tearing.
- Large Roasting Pan – For the water bath, which ensures even, gentle baking. Must be large enough to hold your springform pan with room around it for water.
- Stand Mixer or Hand Mixer – For beating the cream cheese filling until smooth. A stand mixer is easier, but a hand mixer works fine with a little more effort.
- Large Mixing Bowls – For combining ingredients. You’ll need at least 2-3 bowls of various sizes.
- Measuring Cups and Spoons – Accurate measurements are critical in baking. Use dry measuring cups for dry ingredients and liquid measuring cups for liquids.
- Small Saucepan – For making the blueberry topping on the stovetop.
- Rubber Spatula – For scraping down bowl sides and ensuring everything is fully incorporated.
- Fine-Mesh Sieve (Optional) – For straining the cream cheese mixture if you want ultra-smooth filling.
- Offset Spatula (Optional) – Makes smoothing the top of the cheesecake easier.
- Whisk – For mixing the blueberry topping ingredients.
- Cooling Rack – For cooling the cheesecake gradually.
Blueberry Cheesecake Recipe
- Total Time: 6 hours 40 minutes (includes chilling time)
- Yield: 12-16 servings 1x
- Diet: Vegetarian
Description
This classic blueberry cheesecake features a buttery graham cracker crust, ultra-creamy tangy filling, and a gorgeous homemade blueberry topping. Baked in a water bath for perfectly smooth, crack-free results, this showstopping dessert is easier to make than you think. The recipe includes detailed instructions and pro tips to ensure bakery-quality cheesecake every single time. Perfect for special occasions or whenever you want to impress!
Ingredients
For the Graham Cracker Crust:
- 1½ cups graham cracker crumbs (about 10–12 full crackers)
- ¼ cup granulated sugar
- 6 tablespoons unsalted butter, melted
- Pinch of salt
For the Cream Cheese Filling:
- 32 ounces (4 packages, 8 oz each) cream cheese, softened to room temperature
- 1¼ cups granulated sugar
- 1 cup sour cream, room temperature
- 1 tablespoon pure vanilla extract
- 4 large eggs, room temperature
- ¼ cup all-purpose flour (optional, helps prevent cracks)
- Pinch of salt
For the Blueberry Topping:
- 2 cups fresh or frozen blueberries (about 10 ounces)
- ½ cup granulated sugar
- 2 tablespoons fresh lemon juice
- 2 tablespoons water
- 1 tablespoon cornstarch
- Pinch of salt
Instructions
Prepare for Baking:
- Position your oven rack in the lower third of the oven. Preheat the oven to 350°F (175°C).
- Wrap the outside bottom and sides of a 9-inch springform pan tightly with heavy-duty aluminum foil. This prevents water from seeping in during the water bath. Make sure it’s wrapped securely with no gaps.
- Grease the inside of the springform pan lightly with butter or non-stick spray.
Make the Crust:
- In a medium bowl, combine graham cracker crumbs, sugar, and a pinch of salt. Pour in the melted butter and stir with a fork until the mixture resembles wet sand and holds together when pressed.
- Pour the crumb mixture into the prepared springform pan. Using the bottom of a measuring cup or glass, press the crumbs firmly and evenly into the bottom of the pan. Press some crumbs slightly up the sides (about ½ inch) to create a small edge.
- Bake the crust for 10 minutes. Remove from oven and set aside to cool while you make the filling. Keep the oven on.
Make the Cream Cheese Filling:
- In a large bowl or stand mixer fitted with the paddle attachment, beat the softened cream cheese on medium speed for 2-3 minutes until completely smooth and creamy with no lumps. Scrape down the sides and bottom of the bowl frequently.
- Add the sugar and beat on medium speed for another 2 minutes until well combined and fluffy.
- Add the sour cream and vanilla extract. Beat on low speed until fully incorporated, about 1 minute.
- Add the eggs one at a time, beating on low speed after each addition just until combined. Do not overmix—this incorporates too much air and can cause cracks. Scrape down the bowl after each egg.
- If using flour, sift it over the batter and gently fold it in with a spatula just until no streaks remain.
- Pour the filling over the baked crust in the springform pan. Gently tap the pan on the counter a few times to release any air bubbles. Use a spatula to smooth the top.
Bake the Cheesecake (Water Bath Method):
- Place the foil-wrapped springform pan inside a large roasting pan. Carefully pour hot water into the roasting pan until it reaches halfway up the sides of the springform pan (about 1-1½ inches of water).
- Carefully transfer the roasting pan with both pans to the oven. Bake at 350°F for 55-70 minutes. The cheesecake is done when the edges are set but the center still jiggles slightly (about a 2-inch circle in the middle). It should not look liquid, just slightly wobbly.
- Turn off the oven and crack the oven door open about 1 inch. Let the cheesecake cool in the oven for 1 hour. This gradual cooling helps prevent cracks.
- After 1 hour, remove the cheesecake from the water bath and remove the foil. Place the springform pan on a wire rack and let cool to room temperature, about 2 hours.
- Once at room temperature, cover the top of the pan loosely with plastic wrap or foil (don’t let it touch the surface). Refrigerate for at least 4 hours, preferably overnight. Cheesecake must be completely cold before adding topping or serving.
Make the Blueberry Topping:
- In a medium saucepan, combine the blueberries, sugar, lemon juice, water, and a pinch of salt. Bring to a boil over medium-high heat, stirring occasionally.
- In a small bowl, whisk together the cornstarch with 1 tablespoon of water to create a slurry (smooth paste).
- Once the blueberry mixture is boiling and the berries start to burst (about 3-4 minutes), stir in the cornstarch slurry. Continue cooking, stirring constantly, for 1-2 minutes until the mixture thickens to a glossy, jam-like consistency.
- Remove from heat and let the blueberry topping cool to room temperature. It will thicken more as it cools. You can make this up to 3 days ahead and refrigerate.
Assemble and Serve:
- Once the cheesecake is completely chilled (at least 4 hours), run a thin knife around the edge of the pan to loosen the cheesecake. Release and remove the springform ring.
- Spoon the cooled blueberry topping over the top of the cheesecake, spreading it evenly and letting some drip down the sides for a beautiful presentation.
- Slice with a sharp knife, wiping the blade clean between each cut for neat slices.
- Serve chilled and enjoy!
Notes
- Room Temperature Ingredients Are Critical: This is the #1 rule for smooth, lump-free cheesecake. Take cream cheese, eggs, and sour cream out of the fridge 1-2 hours before baking.
- Don’t Overmix: Once you add the eggs, mix on low speed just until combined. Overmixing incorporates air that can cause cracks and an uneven texture.
- Water Bath is Essential: The steam creates gentle, even heat that prevents cracks and ensures creamy texture. Don’t skip it!
- The Jiggle Test: The center should jiggle like Jell-O when you gently shake the pan. It will firm up as it cools. Overbaking causes cracks and dry texture.
- Patience is Key: Don’t rush the cooling process. Gradual temperature changes prevent cracks.
- Make Ahead: Cheesecake actually tastes better the next day after flavors have melded. Make it 1-2 days ahead.
- Cutting Clean Slices: Dip your knife in hot water and wipe clean between each cut for bakery-perfect slices.
- Prep Time: 30 minutes
- Cook Time: 1 hour 10 minutes
- Category: Dessert
- Method: Baking
- Cuisine: American
Nutrition
- Serving Size: 1 slice (1/12 of cheesecake)
- Calories: 485
- Sugar: 32g
- Sodium: 320mg
- Fat: 31g
- Saturated Fat: 18g
- Unsaturated Fat: 11g
- Trans Fat: 0g
- Carbohydrates: 45g
- Fiber: 1g
- Protein: 8g
- Cholesterol: 145mg
Tips & Variations
Berry Variations:
- Mixed Berry Cheesecake: Use a combination of blueberries, raspberries, blackberries, and strawberries for the topping
- Strawberry Cheesecake: Substitute fresh sliced strawberries for blueberries
- Cherry Cheesecake: Use sweet cherries or cherry pie filling for a classic alternative
- Lemon Blueberry: Add 2 tablespoons lemon zest to the filling and 1 tablespoon to the topping
- Triple Berry: Layer different berry toppings for a rainbow effect
Crust Variations:
- Oreo Crust: Replace graham crackers with 24 Oreo cookies (including filling)
- Vanilla Wafer Crust: Use crushed vanilla wafers for a sweeter, lighter crust
- Gingersnap Crust: Crushed gingersnaps add warm spice notes
- Chocolate Graham Cracker: Use chocolate graham crackers for chocolate lovers
- Gluten-Free: Use gluten-free graham crackers or almond flour mixed with butter
Filling Variations:
- Chocolate Swirl: Swirl ½ cup melted chocolate into the batter before baking
- Lemon Cheesecake: Add ¼ cup lemon juice and 2 tablespoons lemon zest to the filling
- White Chocolate: Melt 4 ounces white chocolate and mix into the filling
- Amaretto: Add 2 tablespoons amaretto liqueur for almond flavor
- Pumpkin Blueberry: Replace ½ cup sour cream with pumpkin puree and add pumpkin spice
Topping Options:
- Whipped Cream: Pipe or dollop sweetened whipped cream around the edge
- Fresh Berries: Arrange fresh berries in a pattern instead of cooked topping
- Chocolate Drizzle: Drizzle melted chocolate over the blueberry topping
- Lemon Curd: Layer lemon curd under the blueberry topping
- Caramel Sauce: Drizzle salted caramel for sweet-salty contrast
Healthier Options:
- Reduced Sugar: Cut sugar in filling to 1 cup (though texture may be slightly different)
- Greek Yogurt: Replace half the sour cream with Greek yogurt
- Neufchâtel: Use Neufchâtel cheese (1/3 less fat) instead of cream cheese for lighter version
- Less Butter: Reduce crust butter to 4 tablespoons and add 2 tablespoons applesauce
Pro Chef Tips
The Room Temperature Rule: This cannot be overstated. Cold ingredients don’t blend smoothly and create lumps that ruin the silky texture. Take everything out 1-2 hours early, or quick-soften cream cheese in the microwave at 50% power in 10-second bursts (be careful not to melt it).
Beat in Stages: Beat the cream cheese alone first until completely smooth before adding anything else. This prevents lumps from forming. Then add sugar and beat until fluffy before adding other wet ingredients. Add eggs last, one at a time, on the lowest speed.
Use the Paddle, Not the Whisk: If using a stand mixer, use the paddle attachment, not the whisk. The paddle incorporates less air, which means fewer cracks. Too much air = cracks as the cheesecake bakes and cools.
Strain for Perfection: For ultra-smooth, professional texture, press the batter through a fine-mesh sieve before pouring into the pan. This catches any tiny lumps and creates bakery-quality smoothness.
Secure That Foil: Double-wrap your springform pan with heavy-duty foil, making sure there are absolutely no gaps or tears. Even a small opening can let water seep in and ruin your crust. Some bakers place the foil-wrapped pan in a large oven bag for extra insurance.
The Toothpick Test Doesn’t Work: Unlike regular cakes, don’t use a toothpick to test cheesecake. The center should still jiggle when you gently shake the pan. It will continue cooking from residual heat and will firm up completely when chilled. An internal temperature of 150-155°F in the center is perfect.
Prevent Cracks with Gradual Cooling: Sudden temperature changes cause cracks. Turn off the oven and let the cheesecake sit in the cooling oven with the door cracked for an hour. Then cool at room temperature before refrigerating. This gradual cooling is key to crack-free perfection.
The Knife Trick: After the cheesecake has cooled in the oven for an hour, run a thin knife around the edge while it’s still warm. This releases the cheesecake from the sides and prevents cracks as it shrinks slightly during cooling.
Chill Overnight: While 4 hours is the minimum, overnight chilling produces the best flavor and texture. The cheesecake firms up perfectly and the flavors meld beautifully.
Perfect Slices Every Time: Use a sharp knife dipped in hot water. Wipe the knife completely clean after each cut. This creates those gorgeous, clean slices you see in bakeries.
Freeze for Easier Cutting: If you’re having trouble getting clean cuts, freeze the cheesecake for 30 minutes before slicing. The firmer texture makes cleaner cuts, then let slices come to refrigerator temperature before serving.
Common Mistakes to Avoid
Using Cold Ingredients: This is the most common mistake that leads to lumpy filling. Cold cream cheese will not blend smoothly no matter how long you beat it. You’ll end up with lumps of cream cheese throughout your batter. Always bring ingredients to room temperature—this takes 1-2 hours, so plan ahead.
Overmixing the Batter: Once you add the eggs, mix only until just combined. Overmixing on high speed incorporates too much air into the batter. As the cheesecake bakes, that air expands and then contracts during cooling, causing unsightly cracks on the surface. Mix eggs in on the lowest speed, just until you see no streaks.
Skipping the Water Bath: Some recipes claim you can skip this step, but the water bath is essential for even, gentle baking. Without it, the edges overcook while the center is still underdone, and you’ll almost certainly get cracks. The steam from the water bath creates a humid environment that keeps the cheesecake moist and prevents the top from drying out and cracking.
Overbaking: Cheesecake continues to cook from residual heat after you remove it from the oven. If you bake it until the center is completely set and firm, it will be overcooked and dry once chilled. The center should still have a gentle jiggle (like Jell-O) when you remove it. Trust the jiggle!
Opening the Oven Door: Resist the urge to constantly check on your cheesecake. Every time you open the door, you release heat and steam, causing temperature fluctuations that can lead to cracks. Check only toward the end of the baking time, and do it quickly.
Rushing the Cooling Process: This causes cracks almost every time. Never take your cheesecake directly from a hot oven into the cold refrigerator. The dramatic temperature change will cause the surface to crack. Always cool gradually: 1 hour in the cooling oven, 2 hours at room temperature, then refrigerate.
Adding Topping Too Soon: Wait until the cheesecake is completely chilled (at least 4 hours, preferably overnight) before adding the blueberry topping. Adding warm topping to a warm cheesecake will make everything soggy and might cause the cheesecake to crack from the added weight and temperature difference.
Storage & Meal Prep
Storing the Cheesecake:
Cover the cheesecake loosely with plastic wrap or aluminum foil (or keep it in the springform pan covered). Store in the refrigerator for up to 5 days. The cheesecake actually tastes better after a day or two as the flavors meld and mature. Make sure it’s well covered to prevent it from absorbing refrigerator odors.
Storing the Blueberry Topping Separately:
If you want maximum freshness, store the blueberry topping separately in an airtight container in the refrigerator for up to 1 week. Add it to individual slices as you serve them. This keeps the cheesecake surface pristine and the topping bright and fresh.
Slice and Store:
You can pre-slice the cheesecake and store individual slices in airtight containers separated by parchment paper. This makes it easy to grab a slice whenever you want one and is perfect for meal prep.
Serving After Storage:
For the best flavor and texture, remove the cheesecake from the refrigerator 20-30 minutes before serving to take the chill off. It should still be cold, but not ice-cold straight from the fridge. This allows the flavors to fully bloom.
Leftover Life:
Properly stored, cheesecake stays fresh for 5-7 days in the refrigerator. After that, it’s still safe to eat but the texture may become slightly weepy or watery, and the crust might soften.
Make-Ahead & Freezer Notes
Making Ahead (Highly Recommended):
Cheesecake is the ultimate make-ahead dessert, and it actually improves with time. Here’s your timeline:
3 Days Ahead: Make the blueberry topping and store in the refrigerator in an airtight container.
1-2 Days Ahead: Bake the cheesecake completely, cool, and refrigerate without topping. This is the ideal timeline as the flavors mature beautifully overnight.
Day of Serving: Add the blueberry topping 2-4 hours before serving. This allows the topping to set slightly but keeps it fresh-looking.
Freezing Baked Cheesecake:
Cheesecake freezes exceptionally well! Here’s how:
Whole Cheesecake:
- Bake and cool the cheesecake completely (without topping)
- Place uncovered in the freezer for 1-2 hours until the surface is firm
- Wrap tightly in plastic wrap, then a layer of aluminum foil
- Place in a large freezer bag for extra protection
- Freeze for up to 3 months
- Thaw overnight in the refrigerator before serving
- Add topping after thawing
Individual Slices:
- Cut the cheesecake into slices
- Wrap each slice individually in plastic wrap
- Place wrapped slices in a freezer bag
- Freeze for up to 3 months
- Thaw individual slices in the refrigerator for 4-6 hours or at room temperature for 1-2 hours
Freezing the Crust:
You can make and bake the crust up to 1 month ahead. Wrap the cooled crust (still in the springform pan) tightly and freeze. No need to thaw before adding the filling—just make the filling and pour it into the frozen crust.
Don’t Freeze the Topping:
The blueberry topping doesn’t freeze well as the berries become mushy and watery when thawed. Always add the topping fresh after thawing the cheesecake.
Thawing Tips:
Always thaw cheesecake in the refrigerator, never at room temperature. Slow thawing preserves texture and prevents condensation from forming on the surface. Remove from the freezer the night before you plan to serve it.
Serving Suggestions
Blueberry cheesecake is spectacular on its own, but here are some ideas to make it even more special:
Plating Ideas:
- Serve each slice on a white plate with a drizzle of blueberry syrup on the plate
- Add a dollop of fresh whipped cream beside the slice
- Garnish with fresh mint leaves for a pop of color
- Dust the plate lightly with powdered sugar
- Add a few fresh blueberries around the slice
- Drizzle with white chocolate or dark chocolate for contrast
Beverage Pairings:
- Coffee: A smooth medium roast or espresso cuts through the richness perfectly
- Tea: Earl Grey, chamomile, or berry herbal teas complement the fruit
- Dessert Wine: Late harvest Riesling, Moscato, or Port
- Champagne: Prosecco or Champagne adds celebratory elegance
- Milk: Classic pairing, especially for kids
- Hot Chocolate: Rich and indulgent for chocolate lovers
Add-Ons & Extras:
- Fresh whipped cream (sweetened with vanilla)
- Vanilla ice cream or gelato on the side
- Extra fresh berries (strawberries, raspberries, blackberries)
- Lemon curd for extra citrus zing
- White chocolate shavings
- Crushed pistachios or sliced almonds for crunch
- Caramel or dulce de leche drizzle
- Mint or basil chiffonade for elegance
Occasion Serving:
- Birthday: Add candles and birthday decorations
- Holidays: Garnish with themed decorations (flag for 4th of July, hearts for Valentine’s)
- Bridal Shower: Pipe rosettes of whipped cream and add edible flowers
- Summer BBQ: Serve with patriotic berries (strawberries, blueberries, whipped cream)
- Dinner Party: Individual mini cheesecakes for elegant plated desserts
Leftover Ideas:
- Crumble leftover slices and layer in parfait glasses with whipped cream and fresh berries
- Blend into a milkshake for an indulgent treat
- Top with a scoop of ice cream for cheesecake à la mode
- Freeze slices and enjoy semi-frozen for a cool summer treat
- Transform into cheesecake pops by freezing on sticks
Frequently Asked Questions
Why did my cheesecake crack?
Cracks in cheesecake usually result from three main causes: overbaking, temperature shock, or too much air in the batter. The cheesecake should still jiggle slightly in the center when you remove it from the oven—it will firm up as it cools. Always use the gradual cooling method (1 hour in the cooling oven with door cracked, then room temperature cooling, then refrigerate). Mix eggs in gently on low speed to avoid incorporating excess air. If your cheesecake does crack, don’t worry! The blueberry topping covers any imperfections beautifully.
Can I make this without a water bath?
While technically possible, a water bath is highly recommended for the best results. The water bath provides gentle, even heat that prevents the edges from overcooking while the center sets, and the steam keeps the top from drying out and cracking. If you absolutely must skip it, reduce the oven temperature to 325°F and place a pan of water on the rack below the cheesecake. However, results won’t be as consistent or smooth.
Can I use a different size pan?
This recipe is designed for a 9-inch springform pan. If you use an 8-inch pan, the cheesecake will be thicker and require 10-15 minutes longer baking time. A 10-inch pan will make a thinner cheesecake that bakes 10-15 minutes faster. Adjust baking time accordingly and always use the jiggle test to check doneness rather than relying on time alone. You can also use a 9×13 pan for bar-style cheesecake, baking for about 45-50 minutes.
Can I use frozen blueberries for the topping?
Absolutely! Frozen blueberries work perfectly for the topping and you don’t need to thaw them first. Simply add them frozen to the saucepan and they’ll release their juices as they cook. The topping might take an extra minute or two to come to a boil, but the results are just as delicious. Frozen blueberries are often more affordable and available year-round, making this recipe accessible in any season.
How do I know when the cheesecake is done baking?
The most reliable test is the jiggle test. Gently shake the pan—the edges should be set and firm, but the center (about 2-3 inches in diameter) should still wobble like Jell-O. It should not look liquid, just jiggly. If you have an instant-read thermometer, the center should read 150-155°F. The cheesecake will continue cooking from residual heat and will firm up completely as it cools. Overbaking is worse than slight underbaking, so err on the side of caution.
Why does my cheesecake have a weird texture or taste?
Several factors can cause texture or taste issues. Using low-fat or whipped cream cheese instead of full-fat brick-style creates grainy texture. Overmixing incorporates too much air, creating a spongy rather than dense, creamy texture. Old or expired ingredients can affect taste—always use fresh cream cheese and eggs. Make sure all ingredients are at room temperature before mixing. If the cheesecake tastes eggy, you may have overmixed the eggs or baked at too high a temperature.
Can I make mini cheesecakes instead?
Yes! This batter makes about 24 regular-sized cupcake cheesecakes or 48 mini cheesecakes. Line muffin tins with paper liners and divide the crust among them (about 1 tablespoon per regular cupcake, 1 teaspoon for mini). Add filling to about ¾ full. Bake regular-sized at 325°F for 18-22 minutes, mini at 15-18 minutes. They don’t need a water bath but place a pan of water on the lower rack. Cool completely and top with a spoonful of blueberry topping.
How long does cheesecake need to chill?
Minimum 4 hours, but overnight (8-12 hours) is ideal. The cheesecake needs this time to fully set and reach the proper firm texture. Cutting into it too early will result in a soft, almost liquid center that won’t hold its shape. The extended chill time also allows the flavors to develop and meld together. Plan to make your cheesecake at least one day before you need to serve it for best results.
Conclusion
This blueberry cheesecake recipe is a true showstopper that’s surprisingly achievable for home bakers of all skill levels. With its buttery graham cracker crust, impossibly creamy filling, and vibrant blueberry topping, it’s the kind of dessert that earns rave reviews and recipe requests every single time you serve it.
The beauty of this recipe lies not just in how spectacular it looks and tastes, but in how straightforward it is to make when you follow the detailed instructions. Yes, it requires some patience for chilling time, but the actual hands-on work is minimal and incredibly rewarding. There’s something deeply satisfying about pulling a perfect, crack-free cheesecake from your own oven—it feels like a true baking triumph.
Whether you’re celebrating a birthday, hosting a holiday dinner, bringing dessert to a potluck, or simply treating yourself because you deserve something special, this blueberry cheesecake delivers. The make-ahead nature means you can prepare it stress-free days in advance, leaving you free to enjoy your event without last-minute baking panic.
I hope you love this recipe as much as I do! Once you make it, you’ll understand why homemade cheesecake is worth every minute. It’s one of those recipes you’ll make again and again, perfecting your technique and maybe adding your own creative twists along the way.
Have you tried this blueberry cheesecake recipe? I’d absolutely love to hear about your experience! Drop a comment below and let me know how it turned out. Did you try any variations? What did your family and friends think? And if you’re feeling generous, please rate this recipe and share your photos—seeing your beautiful creations truly makes my day.
Don’t forget to save this recipe to your Pinterest boards so you can find it easily whenever cheesecake cravings strike. Share it with friends who love to bake, and spread the homemade cheesecake joy! Here’s to creating delicious memories, one perfect slice at a time. Happy baking!