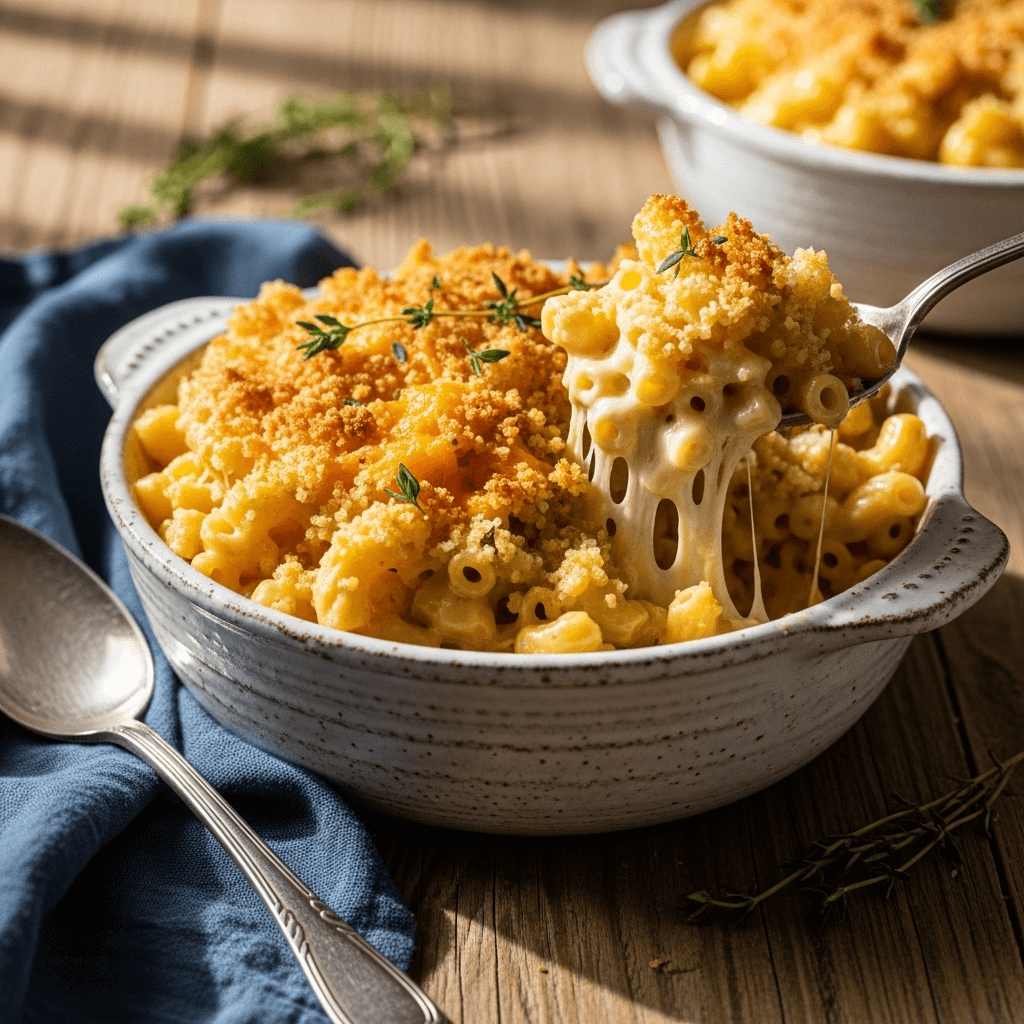

If there’s one dish that epitomizes pure comfort food bliss, it’s a perfectly baked macaroni and cheese. This classic baked mac and cheese recipe delivers everything you crave—tender pasta enveloped in a velvety, ultra-creamy cheese sauce, topped with a golden, crispy breadcrumb crust that adds the perfect textural contrast. Unlike the boxed stuff from your childhood, this homemade version features real cheese, rich butter, and a secret blend of seasonings that create layers of flavor in every single bite.
This baked macaroni and cheese is perfect for Sunday family dinners, holiday gatherings, potluck contributions, or those weeknight evenings when you need something soul-satisfying on the table. It’s equally at home as the star of a weeknight meal or as the most requested side dish at Thanksgiving and Christmas. Whether you’re feeding picky kids, impressing dinner guests, or simply treating yourself to the ultimate comfort food experience, this recipe delivers restaurant-quality results with straightforward, home-cook-friendly techniques. And the best part? It reheats beautifully, making it ideal for meal prep or enjoying leftovers that taste just as good the next day.
History / Background
Macaroni and cheese has a fascinating history that stretches back further than most people realize. While many Americans consider it a quintessential American comfort food, its roots actually trace to Italy, where pasta and cheese have been combined for centuries. The earliest known recipe appears in a 13th-century Italian cookbook called “Liber de Coquina,” which describes pasta layered with grated cheese.
The dish made its way to America through Thomas Jefferson, who encountered macaroni during his travels to France and Italy in the 1780s. So enamored was he with the dish that he brought back a pasta machine and requested his French chef prepare “macaroni pie” at state dinners. Jefferson’s enslaved chef, James Hemings, is credited with creating the first American mac and cheese recipes, and it appeared in Mary Randolph’s “The Virginia Housewife” cookbook in 1824.
Baked macaroni and cheese specifically became popular in the American South, where it evolved into a staple at church suppers, family reunions, and holiday tables. The Depression era saw macaroni and cheese become even more widespread as an affordable, filling meal. When Kraft introduced its boxed mac and cheese in 1937, the dish became a nationwide phenomenon, though traditional baked versions remained treasured family recipes passed down through generations.
Today, baked mac and cheese represents the perfect marriage of nostalgia and gourmet comfort food. While every region and family has their own variation—some prefer a custard-style version with eggs, others like it saucy, and some add ingredients like bacon or lobster—the classic baked version with a crispy top remains the gold standard that brings people together around the dinner table.
Why You’ll Love This Recipe
This isn’t just any baked macaroni and cheese—it’s the ultimate version that combines the best techniques and ingredients to create pure comfort food magic. The cheese sauce is luxuriously creamy without being grainy, the pasta is perfectly cooked, and that golden-brown topping provides an irresistible crunch that makes every bite memorable. Here’s why this recipe deserves a permanent place in your dinner rotation:
- Ultra-creamy texture – A perfectly made roux-based cheese sauce ensures no graininess, just smooth, velvety richness that coats every piece of pasta
- Three-cheese blend – Combining sharp cheddar, gruyere, and cream cheese creates complex flavor and optimal meltability
- Crispy breadcrumb topping – Buttery, golden-brown breadcrumbs add textural contrast and visual appeal
- Family-friendly crowd-pleaser – Universally loved by kids and adults alike, with no weird ingredients or challenging flavors
- Make-ahead friendly – Assemble hours or even a day in advance, then bake when ready to serve
- Feeds a crowd – One dish serves 8-10 people generously, perfect for gatherings and potlucks
- Budget-conscious – Uses affordable pantry staples and readily available ingredients
- Customizable base – Easily adapted with mix-ins, different cheeses, or dietary modifications
- Leftovers are amazing – Reheats beautifully and some say it tastes even better the next day
- No special skills required – Straightforward techniques that even beginner cooks can master successfully
Ingredient Notes
Understanding your ingredients transforms good mac and cheese into extraordinary mac and cheese. Here’s what you need and why each component matters:
Elbow Macaroni: The classic choice for a reason—those little curves hold cheese sauce beautifully. Use regular elbow macaroni, not whole wheat (which can taste grainy) or gluten-free unless needed. Cook it slightly less than al dente since it continues cooking in the oven. Cavatappi, shells, or pipette make excellent alternatives if you want to switch things up.
Sharp Cheddar Cheese: This is your flavor foundation. Sharp or extra-sharp cheddar provides that classic tangy, bold cheese taste we crave. Buy blocks and shred yourself—pre-shredded cheese contains anti-caking agents that prevent smooth melting. Avoid mild cheddar as it lacks depth of flavor.
Gruyere Cheese: This Swiss cheese adds nutty, sophisticated flavor and melts like a dream. It’s worth the splurge for the superior meltability and complex taste. If unavailable, substitute with fontina or additional white cheddar, though you’ll lose some of that special something.
Cream Cheese: The secret weapon for ultra-creamy sauce that stays smooth even after baking. It adds richness and helps prevent the cheese sauce from breaking or becoming grainy. Use full-fat, not low-fat or whipped varieties.
Unsalted Butter: Essential for the roux (flour-butter mixture) that thickens the sauce. Unsalted lets you control salt levels precisely. You’ll also use it for the breadcrumb topping.
All-Purpose Flour: Creates the roux that thickens your cheese sauce to the perfect consistency—not too thin, not too thick. Measure accurately by spooning into your cup and leveling off.
Whole Milk: Provides the liquid base for your sauce. Whole milk is crucial for richness—don’t substitute with skim or low-fat, which will result in thin, less flavorful sauce. For extra decadence, replace one cup of milk with heavy cream.
Seasonings: Salt, black pepper, dry mustard powder, garlic powder, and a pinch of cayenne pepper elevate the cheese flavor. The mustard and cayenne don’t make it spicy—they enhance the cheese taste and add depth.
Panko Breadcrumbs: Japanese-style breadcrumbs create a lighter, crispier topping than regular breadcrumbs. If using regular breadcrumbs, reduce the amount slightly as they’re denser.
Equipment Needed
Having the right tools makes the cooking process smooth and enjoyable. Here’s everything you’ll need for perfect baked mac and cheese:
- Large pot (6-8 quarts) – For boiling pasta with plenty of water
- 9×13-inch baking dish – Standard casserole dish; glass or ceramic works best for even heating
- Large saucepan or Dutch oven (4-5 quarts) – For making the cheese sauce
- Colander – To drain cooked pasta
- Whisk – Essential for creating a smooth, lump-free sauce
- Wooden spoon or rubber spatula – For stirring and folding ingredients together
- Box grater or food processor – To shred cheese blocks (pre-shredded doesn’t melt as well)
- Measuring cups and spoons – Accurate measurements ensure consistent results
- Small mixing bowl – For preparing the breadcrumb topping
- Aluminum foil – To prevent over-browning during initial baking
- Oven mitts – Safety essential for handling hot dishes
Baked Macaroni and Cheese Recipe
- Total Time: 1 hour
- Yield: 8-10 servings 1x
- Diet: Vegetarian
Description
The ultimate creamy baked macaroni and cheese with a rich three-cheese sauce and golden buttery breadcrumb topping. This classic comfort food recipe delivers restaurant-quality results with straightforward homemade techniques.
Ingredients
For the Mac and Cheese:
- 1 pound elbow macaroni
- 6 tablespoons unsalted butter
- ⅓ cup all-purpose flour
- 3 cups whole milk, warmed
- 1 cup heavy cream, warmed
- 3 cups sharp cheddar cheese, shredded (about 12 oz)
- 2 cups gruyere cheese, shredded (about 8 oz)
- 8 oz cream cheese, softened and cubed
- 1 teaspoon salt
- ½ teaspoon black pepper
- 1 teaspoon dry mustard powder
- ½ teaspoon garlic powder
- ¼ teaspoon cayenne pepper (optional)
- ½ teaspoon paprika
For the Topping:
- 1½ cups panko breadcrumbs
- 4 tablespoons unsalted butter, melted
- ½ cup sharp cheddar cheese, shredded
- ¼ teaspoon paprika
- Pinch of salt
Instructions
- Prepare and Preheat: Preheat your oven to 350°F (175°C). Grease a 9×13-inch baking dish with butter or cooking spray and set aside. Bring a large pot of salted water to a rolling boil.
- Cook the Pasta: Add elbow macaroni to boiling water and cook for 6-7 minutes, about 2 minutes less than package directions (it should be slightly underdone). Drain in a colander but don’t rinse—the starch helps the sauce cling to the pasta. Set aside.
- Make the Roux: In a large saucepan or Dutch oven over medium heat, melt 6 tablespoons of butter. Once melted and foaming, add flour and whisk constantly for 2-3 minutes until the mixture is golden and smells slightly nutty. This is your roux—it removes the raw flour taste and creates the thickening base.
- Add Liquids: Slowly pour in the warm milk and cream while whisking constantly to prevent lumps. Continue whisking until the mixture is completely smooth. Increase heat slightly and bring to a gentle simmer, stirring frequently. Cook for 5-7 minutes until the sauce thickens enough to coat the back of a spoon.
- Add Cream Cheese: Reduce heat to low. Add the cubed cream cheese and stir until completely melted and incorporated into the sauce. This creates extra creaminess and helps prevent graininess.
- Melt the Cheeses: Add the shredded cheddar and gruyere one handful at a time, stirring until each addition is fully melted before adding more. Don’t rush this step—gradual addition prevents the cheese from clumping or becoming grainy.
- Season Perfectly: Stir in salt, black pepper, dry mustard, garlic powder, cayenne (if using), and paprika. Taste and adjust seasoning as needed. The sauce should taste slightly over-seasoned at this point since the pasta will dilute the flavor.
- Combine Pasta and Sauce: Add the drained pasta to the cheese sauce and fold everything together with a rubber spatula until every piece of pasta is thoroughly coated. The mixture will seem very saucy—this is correct, as the pasta absorbs liquid during baking.
- Transfer to Baking Dish: Pour the mac and cheese mixture into your prepared baking dish, spreading it evenly with a spatula. Give the dish a gentle shake to distribute everything evenly.
- Prepare the Topping: In a small bowl, combine panko breadcrumbs, melted butter, ½ cup shredded cheddar, paprika, and a pinch of salt. Mix with a fork until the breadcrumbs are evenly coated with butter.
- Add Topping: Sprinkle the breadcrumb mixture evenly over the entire surface of the mac and cheese. Cover the dish loosely with aluminum foil (to prevent the top from browning too quickly).
- Bake: Place in the preheated oven and bake covered for 20 minutes. Remove the foil and continue baking uncovered for another 15-20 minutes, until the top is golden brown and crispy, and the edges are bubbling.
- Rest and Serve: Remove from oven and let rest for 5-10 minutes before serving. This allows the sauce to thicken slightly and makes serving easier. The mac and cheese will be very hot, so be careful!
Notes
- For extra crispy topping: Broil for the last 2-3 minutes of cooking, watching carefully to prevent burning.
- Make it saucier: Add an extra ½ cup of milk to the sauce if you prefer a more liquid consistency.
- Cheese substitutions: You can replace gruyere with fontina, gouda, or extra white cheddar. Each creates a slightly different flavor profile.
- Spice it up: Add diced jalapeños, hot sauce, or increase the cayenne for heat lovers.
- Mix-ins: Fold in cooked bacon, ham, lobster, or roasted vegetables before baking.
- Storage: Leftovers keep for 4-5 days refrigerated in an airtight container.
- Prep Time: 20 minutes
- Cook Time: 40 minutes
- Category: Main Dish
- Method: Baking
- Cuisine: American
Nutrition
- Serving Size: 1 cup (based on 10 servings)
- Calories: 565
- Sugar: 6g
- Sodium: 625mg
- Fat: 35g
- Saturated Fat: 21g
- Unsaturated Fat: 12g
- Trans Fat: 0g
- Carbohydrates: 42g
- Fiber: 2g
- Protein: 22g
- Cholesterol: 105mg
Tips & Variations
Protein Add-Ins:
- Bacon Mac and Cheese: Fold in 8 strips of crispy, crumbled bacon before baking
- Lobster Mac and Cheese: Add 1 pound of cooked lobster meat for an upscale version
- Buffalo Chicken: Mix in 2 cups diced cooked chicken and ¼ cup buffalo sauce
- BBQ Pulled Pork: Stir in leftover pulled pork for a Southern-inspired twist
Vegetable Variations:
- Mix in roasted broccoli, cauliflower, or Brussels sprouts for added nutrition
- Add sautéed mushrooms and caramelized onions for earthy depth
- Fold in roasted red peppers and spinach for color and flavor
- Try roasted butternut squash for a fall-inspired version
Cheese Combinations:
- Italian Style: Use fontina, parmesan, and mozzarella
- Smoky: Add smoked gouda or smoked cheddar to the mix
- Spicy: Include pepper jack cheese and diced green chiles
- Truffle Mac: Add 1-2 teaspoons truffle oil for sophisticated flavor
Dietary Modifications:
- Gluten-Free: Use gluten-free pasta and replace flour with cornstarch or gluten-free flour blend
- Lower Fat: Use 2% milk and reduce butter by half (though richness will be compromised)
- Vegetarian: This recipe is already vegetarian-friendly
Topping Variations:
- Add crushed crackers (Ritz work wonderfully) mixed with breadcrumbs
- Use crushed potato chips for extra crunch and salt
- Try French fried onions for a crunchy, savory topping
- Mix in grated parmesan with the breadcrumbs for more cheese flavor
Pro Chef Tips
Warm Your Dairy: Adding cold milk to hot roux can cause temperature shock and create lumps. Warm milk and cream in the microwave for 1-2 minutes before adding to the roux for the smoothest sauce.
Shred Your Own Cheese: Pre-shredded cheese contains cellulose (an anti-caking agent) that prevents smooth melting and can make your sauce grainy. The extra two minutes to shred your own cheese makes a dramatic difference in texture.
Don’t Overcook the Pasta: Undercooked pasta (about 2 minutes less than package directions) prevents mushy mac and cheese after baking. The pasta continues cooking in the oven, absorbing liquid and reaching perfect tenderness.
Low and Slow for Cheese: Add cheese over low heat and wait for each handful to fully melt before adding more. High heat can cause proteins in cheese to seize up, resulting in a grainy, separated sauce. Patience equals perfection here.
The Foil Trick: Covering the dish for the first part of baking allows the pasta to finish cooking and absorb flavors without the topping burning. Remove the foil for the final 15-20 minutes to achieve that golden, crispy crown.
Season Boldly: Cheese sauce should taste slightly over-seasoned before mixing with pasta. The pasta dilutes the seasoning, and baking mellows flavors further. Don’t be shy with salt—it makes cheese taste more “cheesy.”
The Rest Period Matters: Letting baked mac and cheese sit for 5-10 minutes after coming out of the oven allows the sauce to thicken properly. Cutting into it immediately results in a runny mess, while patience yields perfect, creamy slices.
Common Mistakes to Avoid
Mistake #1: Using Pre-Shredded Cheese – Those convenient bags seem like a time-saver, but the anti-caking coating prevents smooth melting and creates grainy, separated sauce. Always shred from a block for luxurious, creamy results.
Mistake #2: Cooking Pasta to Full Doneness – Fully cooked pasta turns mushy during baking as it continues to absorb liquid. Always undercook by 2 minutes, aiming for firm with a slight bite. It will finish cooking to perfection in the oven.
Mistake #3: Adding Cheese Over High Heat – Cranking up the heat to melt cheese faster backfires badly. High temperatures cause cheese proteins to tighten and separate from fats, resulting in an oily, grainy mess. Always melt cheese over low heat with patience.
Mistake #4: Making the Sauce Too Thick – Your cheese sauce should seem almost too thin before baking—thinner than you think is right. The pasta absorbs substantial liquid during baking, and sauce that seems perfect on the stovetop becomes dry and clumpy in the oven.
Mistake #5: Skipping the Roux – Some recipes skip straight to adding cheese to milk, but this creates thin, watery sauce that separates during baking. The flour-butter roux provides essential structure and ensures your sauce stays creamy and cohesive throughout baking and reheating.
Storage & Meal Prep
Refrigerator Storage: Let baked mac and cheese cool to room temperature (no more than 2 hours after baking), then cover tightly with plastic wrap or transfer to an airtight container. Refrigerate for up to 4-5 days. The sauce will thicken considerably when cold but softens beautifully when reheated.
Reheating Instructions: For best results, reheat in a 350°F oven covered with foil for 20-25 minutes, adding a splash of milk or cream to restore creaminess. For individual portions, microwave on 50% power in 1-minute intervals, stirring between, until heated through. Add a tablespoon of milk if it seems dry.
Preventing Dryness: Mac and cheese continues absorbing liquid even after cooking. When reheating, always add a splash of milk or cream and stir well to restore that creamy consistency. Cover while reheating to prevent moisture loss.
Portion Control: Consider dividing leftovers into individual servings before storing. This makes grab-and-go lunches easy and ensures you only reheat what you’ll eat.
Keeping the Topping Crispy: Store the breadcrumb topping separately if possible, then add fresh topping before reheating for maximum crunch. Alternatively, crisp up the existing topping under the broiler for 1-2 minutes after reheating.
Make-Ahead & Freezer Notes
Assemble in Advance: This recipe is perfect for make-ahead meal planning. Prepare through step 9 (assembled in the baking dish but not baked), cover tightly with plastic wrap and then aluminum foil, and refrigerate for up to 24 hours. When ready to serve, remove from refrigerator 30 minutes before baking, add topping, and bake as directed, adding 5-10 minutes to the covered baking time.
Freezing Unbaked: Assemble the mac and cheese completely (including topping) in a disposable aluminum pan. Wrap tightly with plastic wrap and then two layers of heavy-duty aluminum foil. Freeze for up to 3 months. To bake from frozen, remove plastic wrap, cover with foil, and bake at 350°F for 60-75 minutes covered, then 20-25 minutes uncovered until hot throughout and top is golden.
Freezing Baked Leftovers: Cool completely, portion into freezer-safe containers or wrap tightly in portions. Freeze for up to 2 months. Thaw overnight in refrigerator before reheating. The texture won’t be quite as creamy as fresh, but it’s still delicious and convenient.
Flash Freeze for Portions: Divide cooled mac and cheese into muffin tins and freeze until solid, then pop out and store in freezer bags. These individual portions thaw and reheat quickly for easy weekday lunches.
Best Reheating from Frozen: For unbaked frozen mac and cheese, bake directly from frozen as described above. For already-baked portions, thaw completely in the refrigerator overnight, then reheat in a 350°F oven with a splash of milk until heated through.
Serving Suggestions
Baked mac and cheese is incredibly versatile—serve it as a hearty main dish or as a beloved side that steals the show. Here are perfect pairings to round out your meal:
Protein Pairings: Mac and cheese makes an excellent side for BBQ pulled pork, grilled chicken breasts, meatloaf, baked ham, fried chicken, or beef brisket. The creamy richness complements smoky, savory meats beautifully.
Fresh Vegetable Sides: Balance the richness with crisp, fresh sides like a simple green salad with vinaigrette, roasted Brussels sprouts, steamed broccoli with lemon, honey-glazed carrots, or collard greens. The brightness cuts through the cheese and refreshes your palate.
Southern Soul Food Spread: Serve alongside classic Southern comfort foods like fried chicken, cornbread, coleslaw, baked beans, and sweet tea for an authentic soul food experience that satisfies completely.
Holiday Table: Mac and cheese is a non-negotiable at many Thanksgiving and Christmas dinners. It pairs perfectly with turkey, ham, cranberry sauce, green bean casserole, and dinner rolls.
Build a Comfort Food Bar: Set up a mac and cheese bar with various toppings—crumbled bacon, diced tomatoes, scallions, hot sauce, breadcrumbs, and extra cheese—letting guests customize their portions.
Bread Pairings: Serve with garlic bread, cornbread muffins, buttermilk biscuits, or crusty French bread for sopping up every bit of creamy cheese sauce.
Beverage Suggestions: Pair with sweet tea, lemonade, cold beer, or for adults, a crisp white wine like Chardonnay or Sauvignon Blanc that cuts through the richness.
FAQs Section
Q: Can I make this mac and cheese without gruyere?
A: Absolutely! While gruyere adds wonderful nutty flavor and superior melting qualities, you can substitute with fontina, gouda, white cheddar, or even additional sharp cheddar. Each cheese brings its own character, so experiment to find your favorite combination.
Q: Why is my cheese sauce grainy or separated?
A: Graininess usually results from cooking cheese at too high a temperature or using pre-shredded cheese with anti-caking agents. Always melt cheese over low heat and shred from blocks. Adding a tablespoon of cream cheese can help bring a separated sauce back together.
Q: Can I use a different type of pasta?
A: Yes! While elbow macaroni is traditional, cavatappi (corkscrew), shells, penne, or pipette all work wonderfully. Choose pasta with curves or ridges that hold cheese sauce. Avoid very large or very small pasta shapes.
Q: How do I prevent my mac and cheese from drying out in the oven?
A: Make sure your cheese sauce is quite thin before baking—it will thicken as it cooks. Cover with foil for the first 20 minutes to trap moisture. If making ahead, add an extra ½ cup of milk since refrigeration thickens the sauce further.
Q: Can I make this recipe in a slow cooker?
A: While this recipe is designed for the oven, you can adapt it. Make the cheese sauce on the stovetop, combine with cooked pasta, transfer to a greased slow cooker, and cook on low for 2-3 hours. Add breadcrumb topping during the last 30 minutes with the lid slightly ajar, or broil in an oven-safe dish after slow cooking.
Q: Is it necessary to use both milk and cream?
A: The cream adds extra richness and helps prevent the sauce from breaking during baking. You can use all milk (4 cups total) for a lighter version, though the sauce won’t be quite as luxurious. Don’t use low-fat milk—stick with whole milk at minimum.
Q: How do I know when it’s done baking?
A: Your mac and cheese is done when the edges are bubbling vigorously, the top is golden brown and crispy, and the internal temperature reaches 165°F. If the top is browning too quickly but it’s not hot throughout, cover with foil and continue baking.
Conclusion
There you have it—the ultimate baked macaroni and cheese recipe that delivers everything a comfort food classic should be: creamy, cheesy, satisfying, and topped with that irresistibly crispy golden crust. This isn’t just any mac and cheese; it’s the one that will have your family requesting it for every gathering, the one your friends will ask you to bring to potlucks, and the one you’ll turn to when life calls for serious comfort food.
The beauty of this recipe lies in its versatility and reliability. Whether you’re serving it as a weeknight dinner, a holiday side dish, or preparing it ahead for stress-free entertaining, it consistently delivers restaurant-quality results with ingredients you can find at any grocery store. And once you master the basics, feel free to experiment with the variations and make it your own signature dish.
I’d absolutely love to hear about your baked mac and cheese adventures! Did you try any of the flavor variations? What did your family think? Drop a comment below and share your experience—and don’t forget to snap a photo and pin it to your favorite Pinterest board using #BakedMacAndCheese so other home cooks can discover this recipe too!
If you loved this recipe, please share it with friends who appreciate seriously good comfort food. Happy cooking, and enjoy every creamy, cheesy bite!