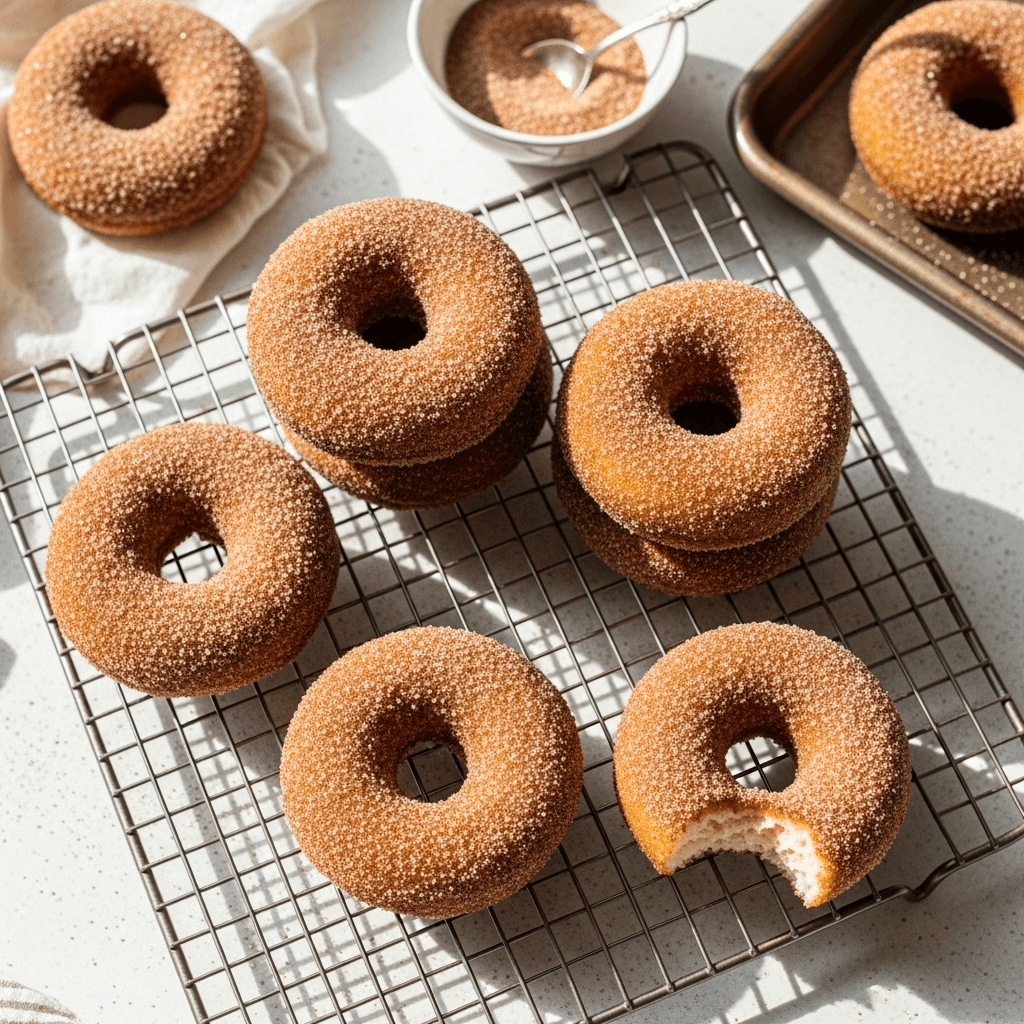
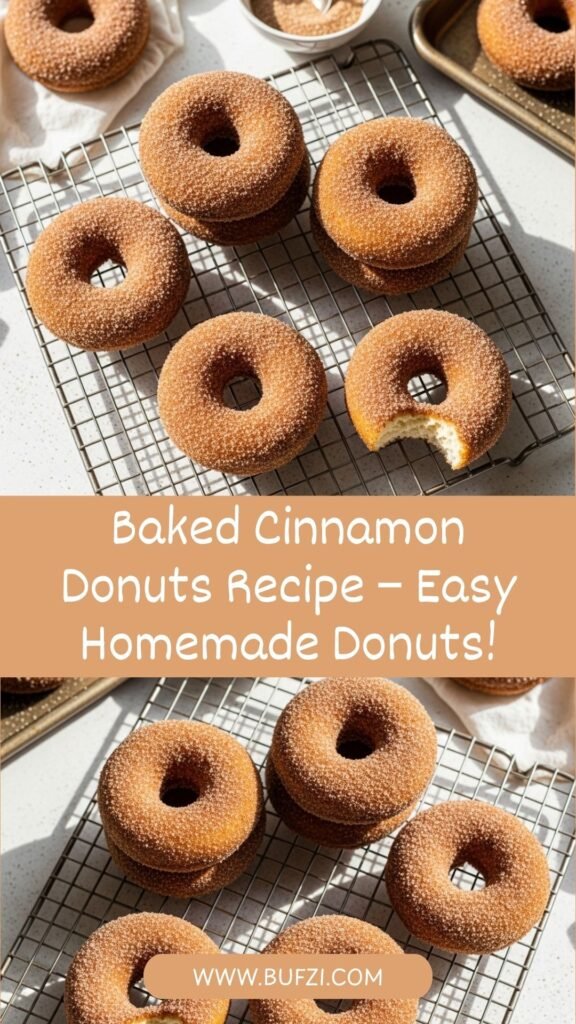
There’s something absolutely magical about biting into a warm, freshly made donut dusted with sweet cinnamon sugar. But here’s the beautiful secret that home bakers everywhere are discovering: you don’t need a deep fryer, gallons of oil, or even professional equipment to make bakery-quality donuts at home! These baked cinnamon donuts are light, fluffy, and incredibly delicious—all while being made in your oven.
Perfect for lazy Sunday mornings, special breakfast treats, brunch gatherings, or even as an afternoon snack with coffee, these easy baked cinnamon sugar donuts come together in under 30 minutes from start to finish. They’re tender on the inside with a slightly crisp exterior, coated generously in melted butter and rolled in the most heavenly cinnamon-sugar mixture. Whether you’re a baking beginner or a seasoned home cook, this homemade baked donut recipe will become your go-to whenever that donut craving hits—without the mess and hassle of deep frying!
History / Background
The donut, as we know it today, has a rich and fascinating history that spans continents and centuries. While fried dough treats have existed in various cultures for thousands of years—from ancient Roman fritters to Dutch “olykoeks” (oil cakes)—the classic American donut emerged in the 19th century. Dutch settlers brought their tradition of fried sweet dough to America, and the treat evolved over time.
The iconic ring shape we associate with donuts today is credited to a New England ship captain named Hanson Gregory, who in 1847 claimed to have punched a hole in the center of the dough with a tin pepper box, creating better and more even cooking. This innovation revolutionized donut making and gave us the classic shape we adore.
However, baked donuts are a more modern creation, born from the desire to enjoy this beloved treat in a healthier, more accessible way. As home baking gained popularity in the late 20th and early 21st centuries, creative bakers began experimenting with oven-baked versions that eliminated the need for deep frying. The invention of specialized donut pans made this even easier, bringing donut-making into home kitchens across America.
Cinnamon sugar donuts specifically have roots in both American bakery culture and the broader tradition of cinnamon-dusted pastries found in European baking. The warm spice blend became synonymous with comfort and nostalgia, reminding many of carnival treats, bakery visits, and childhood memories. Today, baked cinnamon donuts represent the perfect marriage of traditional flavor with modern convenience—allowing home cooks to create bakery-style treats without specialized equipment or intimidating techniques.
Why You’ll Love This Recipe
These baked cinnamon donuts are about to become your new breakfast obsession, and here’s why: they deliver all the flavor and satisfaction of classic fried donuts but with a fraction of the effort and mess. You’ll fall in love with how simple they are to make, yet how impressively delicious they turn out every single time.
Here’s what makes this recipe absolutely irresistible:
- No Deep Frying Required – Skip the hot oil, splatters, and cleanup. These donuts bake beautifully in your oven, making them safer and easier to prepare, especially if you have kids helping in the kitchen.
- Ready in Under 30 Minutes – From mixing the batter to pulling golden donuts from the oven, this recipe is incredibly quick. Perfect for weekend mornings when you want something special without spending hours in the kitchen.
- Simple Pantry Ingredients – You likely have everything you need already! No specialty items or hard-to-find ingredients—just basic baking staples that create extraordinary results.
- Lighter Than Fried Donuts – While still wonderfully indulgent with that buttery cinnamon-sugar coating, baked donuts absorb significantly less fat than their fried counterparts, making them a slightly lighter option.
- Kid-Friendly and Fun to Make – Children love helping coat the donuts in cinnamon sugar, and since there’s no hot oil involved, it’s a safe and enjoyable family baking activity.
- Customizable and Versatile – Once you master the basic recipe, you can easily adapt it with different spices, glazes, or toppings to create endless variations.
- Budget-Friendly Treat – Making donuts at home costs a fraction of what you’d pay at a bakery or donut shop, and you get the joy of serving them warm from the oven.
- Impressive Yet Easy – Your family and friends will think you’ve spent hours on these bakery-style treats, but you’ll know the delicious secret of how simple they really are!
Ingredient Notes
Understanding your ingredients is the key to baking success! Here’s what makes these baked cinnamon donuts so deliciously perfect, along with helpful substitutions and tips.
All-Purpose Flour – The foundation of your donuts, providing structure without making them too dense. For best results, measure flour by spooning it into your measuring cup and leveling it off—never pack it down. Substitution: You can use a 1:1 gluten-free baking flour blend if needed.
Granulated Sugar – Sweetens the donut batter with just the right amount of sweetness. It also helps create a tender crumb texture. Substitution: Organic cane sugar works perfectly as a one-to-one replacement.
Baking Powder – The leavening agent that gives your donuts that light, fluffy rise. Make sure yours is fresh (check the expiration date) for the best lift. No substitution recommended for best results.
Ground Cinnamon – Used both in the batter and the coating, cinnamon is the star flavor here. Use fresh cinnamon for the most aromatic results—the kind that makes your whole kitchen smell like a bakery. Tip: Vietnamese or Ceylon cinnamon varieties offer exceptional flavor.
Salt – Don’t skip this! A pinch of salt enhances all the other flavors and balances the sweetness beautifully.
Milk – Provides moisture and helps create a tender texture. Whole milk gives the richest results, but any milk percentage works. Substitution: Non-dairy milk alternatives like almond, oat, or soy milk work wonderfully for dairy-free donuts.
Egg – Binds the ingredients together and adds richness and structure to the donuts. Use room temperature eggs for better incorporation. Substitution: A flax egg (1 tablespoon ground flaxseed + 3 tablespoons water, let sit 5 minutes) can work for an egg-free version.
Butter – Used both in the batter for richness and melted for coating the finished donuts. The butter coating is essential for helping that cinnamon-sugar mixture stick perfectly. Substitution: Coconut oil or a plant-based butter alternative can be used for dairy-free needs.
Vanilla Extract – Adds warmth and depth of flavor that complements the cinnamon beautifully. Use pure vanilla extract rather than imitation for the best taste.
Cinnamon-Sugar Coating – The magical finishing touch! A simple mixture of granulated sugar and cinnamon transforms these donuts into something extraordinary. The ratio of sugar to cinnamon can be adjusted to your taste preference.
Equipment Needed
Having the right tools makes baking these donuts a breeze! Here’s what you’ll need:
- Donut Pan – A 6-cavity non-stick donut pan is essential for achieving that classic donut shape. If you’re serious about making baked donuts regularly, having two pans speeds up the process considerably.
- Mixing Bowls – You’ll need at least two: one medium-sized bowl for dry ingredients and another for wet ingredients.
- Whisk – For mixing your batter smoothly and eliminating lumps in the dry ingredients.
- Measuring Cups and Spoons – Accurate measurements are crucial in baking, so use proper dry and liquid measuring cups.
- Piping Bag or Zip-Top Bag – For easily filling the donut pan cavities without making a mess. A zip-top bag with the corner snipped off works perfectly if you don’t have a piping bag.
- Cooling Rack – Allows air to circulate around the donuts as they cool, preventing soggy bottoms.
- Small Shallow Bowl – For the cinnamon-sugar coating mixture.
- Pastry Brush or Small Bowl for Melted Butter – For coating the warm donuts before rolling them in cinnamon sugar.
- Spatula or Wooden Spoon – For folding the batter and gentle mixing.
- Oven Mitts – Safety first when handling hot pans!
Baked Cinnamon Donuts Recipe
- Total Time: 30 minutes
- Yield: 12 donuts 1x
- Diet: Vegetarian
Description
Light, fluffy baked cinnamon donuts coated in melted butter and rolled in sweet cinnamon sugar. These easy homemade donuts are ready in under 30 minutes with no deep frying required—perfect for weekend breakfasts or any time you’re craving a bakery-style treat!
Ingredients
For the Donuts:
- 2 cups all-purpose flour
- ¾ cup granulated sugar
- 2 teaspoons baking powder
- 1 teaspoon ground cinnamon
- ½ teaspoon salt
- ¾ cup whole milk, room temperature
- 2 large eggs, room temperature
- 4 tablespoons unsalted butter, melted and slightly cooled
- 1 teaspoon vanilla extract
For the Cinnamon Sugar Coating:
- ½ cup granulated sugar
- 1½ tablespoons ground cinnamon
- 4 tablespoons unsalted butter, melted (for brushing)
Instructions
- Preheat and Prepare: Preheat your oven to 350°F (175°C). Generously spray your donut pan with non-stick cooking spray, making sure to coat both the cavities and the center posts well to ensure easy removal.
- Mix Dry Ingredients: In a large mixing bowl, whisk together the flour, sugar, baking powder, cinnamon, and salt until well combined and no lumps remain. This ensures even distribution of the leavening agent and spices throughout your donuts.
- Combine Wet Ingredients: In a separate medium bowl, whisk together the milk, eggs, melted butter, and vanilla extract until smooth and fully incorporated. Make sure your butter isn’t too hot, or it may scramble the eggs.
- Create the Batter: Pour the wet ingredients into the bowl with the dry ingredients. Gently fold together using a spatula or wooden spoon until just combined. The batter should be smooth but don’t overmix—a few small lumps are okay. Overmixing can lead to tough, dense donuts.
- Fill the Donut Pan: Transfer the batter to a piping bag or large zip-top bag with the corner snipped off. Pipe the batter into the prepared donut pan, filling each cavity about ⅔ full. This allows room for the donuts to rise without overflowing.
- Bake: Place the pan in the preheated oven and bake for 10-12 minutes, or until the donuts are golden brown and spring back when lightly touched. A toothpick inserted into the donut should come out clean or with just a few moist crumbs.
- Cool Slightly: Remove the pan from the oven and let the donuts cool in the pan for about 3-4 minutes. This makes them easier to remove without breaking. Then carefully turn the pan over onto a cooling rack to release the donuts.
- Prepare Cinnamon Sugar: While the donuts are baking or cooling, mix the sugar and cinnamon together in a shallow bowl until well combined.
- Coat the Donuts: While the donuts are still warm (this is important!), brush each donut all over with melted butter, then immediately roll or dip them in the cinnamon-sugar mixture, coating all sides generously. The butter acts as the “glue” that helps the cinnamon sugar stick beautifully.
- Serve: These donuts are best enjoyed warm and fresh! Serve immediately for the most incredible texture and flavor. Any leftovers can be stored in an airtight container.
Notes
- Room Temperature Ingredients: Make sure your eggs and milk are at room temperature for the smoothest batter and best texture.
- Don’t Overfill: Resist the urge to fill the donut cavities more than ⅔ full, or they may bake into muffins rather than donuts with that signature hole in the center.
- Work Quickly: Coat the donuts in cinnamon sugar while they’re still warm for the best adhesion and most delicious results.
- Batter Consistency: The batter should be thick but still pipeable. If it’s too thick, add a tablespoon of milk; if too thin, add a tablespoon of flour.
- Pan Alternatives: If you don’t have a donut pan, you can bake these in a muffin tin for donut muffins (adjust baking time to 14-16 minutes).
- Prep Time: 10 minutes
- Cook Time: 20 minutes
- Category: Breakfast
- Method: Baking
- Cuisine: American
Nutrition
- Serving Size: 1 donut
- Calories: 215
- Sugar: 18g
- Sodium: 135mg
- Fat: 8g
- Saturated Fat: 5g
- Unsaturated Fat: 2.5g
- Trans Fat: 0g
- Carbohydrates: 33g
- Fiber: 1g
- Protein: 3g
- Cholesterol: 50mg
Tips & Variations
One of the best things about this baked cinnamon donut recipe is how easily you can customize it to suit your preferences or dietary needs. Here are some creative variations and helpful tips to make these donuts your own!
Flavor Variations:
- Maple Cinnamon Donuts: Replace ¼ cup of the milk with pure maple syrup and add ½ teaspoon maple extract to the batter for a delicious maple twist.
- Chocolate Chip Donuts: Fold ½ cup mini chocolate chips into the batter before piping into the pan for pockets of melty chocolate goodness.
- Apple Cinnamon: Add ½ cup finely diced apples (peeled) and increase cinnamon to 1½ teaspoons for an apple pie-inspired treat.
- Pumpkin Spice Version: Replace ½ cup milk with pumpkin puree and add ½ teaspoon pumpkin pie spice to the batter for fall-flavored donuts.
- Nutmeg Spice: Add ¼ teaspoon freshly grated nutmeg to both the batter and the coating for extra warmth and complexity.
Coating Alternatives:
- Powdered Sugar: Skip the cinnamon-sugar and dust with plain powdered sugar for a simpler, classic look.
- Vanilla Glaze: Mix 1 cup powdered sugar with 2-3 tablespoons milk and ½ teaspoon vanilla, then dip the donuts for a sweet glazed finish.
- Brown Butter Glaze: Brown the butter first before making your glaze for a nutty, caramelized flavor that’s absolutely divine.
- Chocolate Glaze: Melt chocolate chips with a bit of cream for a decadent chocolate coating.
Dietary Modifications:
- Dairy-Free: Use your favorite non-dairy milk and plant-based butter throughout the recipe.
- Reduced Sugar: You can reduce the sugar in the batter to ½ cup, though the donuts will be less sweet and slightly less tender.
- Whole Wheat: Replace half the all-purpose flour with whole wheat pastry flour for added nutrition and a nuttier flavor.
Texture Tips:
- Extra Fluffy: Separate your eggs and beat the whites to soft peaks, then fold them in last for exceptionally light donuts.
- Buttermilk Version: Replace regular milk with buttermilk and add ¼ teaspoon baking soda for extra tang and tenderness.
- Cake Donut Style: For a denser, more cake-like texture, replace the baking powder with ¾ teaspoon baking soda and use buttermilk instead of regular milk.
Pro Chef Tips
Want to take your baked cinnamon donuts from great to absolutely exceptional? These professional tips will help you achieve bakery-quality results every single time!
Temperature Matters: Always bring your eggs and milk to room temperature before mixing. Cold ingredients don’t emulsify as well and can result in a lumpy batter that produces dense donuts. A quick trick: place eggs in a bowl of warm (not hot) water for 5 minutes.
The Folding Technique: When combining wet and dry ingredients, use a gentle folding motion rather than vigorous stirring. Mix just until no dry flour streaks remain—you should still see some small lumps. Overmixing develops gluten, which creates tough, chewy donuts instead of tender, cake-like ones.
Spray Generously: Don’t be shy with the non-stick spray on your donut pan. Getting into every nook and cranny of those center posts is crucial. For extra insurance, you can lightly flour the pan after spraying for foolproof release.
Perfect Piping: Hold your piping bag or zip-top bag vertically and pipe in a circular motion, starting from the outside edge and working your way toward the center. This ensures even distribution without air pockets that can cause uneven baking.
Visual Doneness Cues: Your donuts are perfectly done when they’re golden brown around the edges, spring back when gently pressed, and just begin to pull away from the sides of the pan. They’ll continue cooking slightly from residual heat, so don’t overbake.
The Warm Coating Rule: This is perhaps the most important tip—coat your donuts with butter and cinnamon sugar while they’re still warm, but not piping hot. The ideal temperature is when you can comfortably hold them but they’re still quite warm to the touch. This is when the butter melts perfectly and the sugar adheres beautifully.
Brush, Don’t Dunk: When applying the melted butter, use a pastry brush for better control and more even coverage. Make sure to get the sides and that inner ring—every surface should have a light coating of butter before hitting the cinnamon sugar.
Quality Cinnamon: Invest in good quality cinnamon. Ceylon cinnamon (also called “true cinnamon”) has a sweeter, more delicate flavor than Cassia cinnamon. Fresh cinnamon makes a remarkable difference in the final flavor.
Double Pan Method: If your donuts are browning too quickly on the bottom, try stacking two baking sheets together or placing your donut pan on a larger baking sheet. This creates an insulating layer and promotes more even baking.
The Touch Test: Instead of relying solely on timing, gently press the top of a donut with your fingertip. If it springs back and doesn’t leave an indentation, it’s done. If your finger leaves a mark, give them another minute or two.
Common Mistakes to Avoid
Even simple recipes can go wrong if you’re not aware of common pitfalls. Here’s what to watch out for when making these baked cinnamon donuts:
Overfilling the Pan Cavities: This is the number one mistake beginners make. When you fill the cavities more than ⅔ full, the batter overflows during baking, eliminating that signature donut hole and creating donut muffins instead. Less is more here—the batter will rise and expand beautifully if you leave adequate room.
Opening the Oven Door Too Early: Resist the urge to peek at your donuts during the first 8 minutes of baking. Opening the oven door causes temperature fluctuations that can make your donuts sink in the middle or bake unevenly. Trust the process and wait until they’re nearly done before checking.
Using Expired Baking Powder: Baking powder loses its potency over time, and old baking powder is the culprit behind flat, dense donuts that don’t rise properly. To test if yours is still good, add a teaspoon to hot water—it should fizz vigorously. If it doesn’t, replace it before baking.
Overmixing the Batter: It’s tempting to mix until the batter is completely smooth, but this is a fast track to tough, rubbery donuts. The gluten in flour develops when mixed, and overdevelopment creates a chewy texture instead of the tender, cake-like crumb you want. Mix just until combined, and don’t worry about a few small lumps.
Letting Donuts Cool Completely Before Coating: The magic of the cinnamon-sugar coating only works when the donuts are warm. If they cool completely, the butter won’t stick properly, and the coating will fall off. Coat them while they’re still warm from the oven for that beautiful, even coverage that stays put.
Not Greasing the Pan Thoroughly: Even with non-stick pans, you need to spray them well—especially those center posts. Donuts that stick and break apart when removing them from the pan is heartbreaking and completely avoidable with proper greasing.
Baking at the Wrong Temperature: Always use an oven thermometer to verify your actual oven temperature. Ovens can be off by 25-50 degrees, which significantly affects baking time and results. Too hot, and the outside browns before the inside cooks; too cool, and you get dense, dry donuts.
Storage & Meal Prep
These baked cinnamon donuts are absolutely best enjoyed fresh from the oven while they’re still warm and tender. However, life gets busy, and sometimes you need to make them ahead or save leftovers. Here’s how to store them properly!
Room Temperature Storage: Store any leftover donuts in an airtight container at room temperature for up to 2 days. Place parchment paper between layers to prevent them from sticking together. The cinnamon-sugar coating will become less crisp over time, but the donuts will still taste delicious.
Maintaining Freshness: To help prevent the donuts from drying out, place a slice of bread in the container with them. The bread will go stale, but it releases just enough moisture to keep the donuts tender.
Refrigeration: While you can refrigerate these donuts for up to 4-5 days in an airtight container, I don’t typically recommend it. Refrigeration tends to dry out baked goods and can make the texture less appealing. If you do refrigerate them, bring them to room temperature before eating, or warm them briefly in the microwave.
Reheating Instructions: To recapture that fresh-baked taste and texture, warm individual donuts in the microwave for 8-10 seconds. Don’t overdo it, or they’ll become tough. Alternatively, place them on a baking sheet and warm in a 300°F oven for about 5 minutes. After reheating, you can brush with a bit more melted butter and re-roll in cinnamon sugar for a fresh coating.
Reviving Day-Old Donuts: If your donuts have become a bit dry after storage, try this trick: lightly mist them with water using a spray bottle, then warm them in a 300°F oven for 3-4 minutes. This adds moisture back and softens them beautifully.
Make-Ahead & Freezer Notes
Planning ahead? These baked cinnamon donuts are wonderfully freezer-friendly, making them perfect for meal prep or having a sweet treat ready whenever the craving strikes!
Freezing Baked Donuts: Allow the donuts to cool completely after coating them in cinnamon sugar. Place them in a single layer on a baking sheet and freeze for about 1-2 hours until solid. Then transfer them to a freezer-safe container or zip-top bag, placing parchment paper between layers. Properly frozen donuts will keep for up to 3 months.
Freezing Uncoated Donuts: For the freshest taste, you can also freeze the donuts before coating them in cinnamon sugar. Bake and cool completely, then freeze as directed above. When ready to serve, thaw and warm them, then coat with fresh melted butter and cinnamon sugar for a just-made taste.
Thawing Instructions: Remove frozen donuts from the freezer and let them thaw at room temperature for about 1-2 hours. For faster thawing, microwave individual donuts for 20-30 seconds, checking frequently to avoid overheating.
Make-Ahead Batter: Unfortunately, donut batter doesn’t hold well in the refrigerator—the baking powder begins activating immediately upon contact with wet ingredients, so you’ll lose that crucial rise if you wait too long. For best results, mix and bake the batter immediately.
Dry Ingredients Prep: What you CAN do ahead of time is measure and combine all your dry ingredients. Store the mixture in an airtight container at room temperature for up to 2 weeks. When you’re ready to bake, just whisk together the wet ingredients and combine! This cuts your active prep time significantly.
Best Reheating Method from Frozen: For the absolute best texture, reheat frozen donuts directly from the freezer. Arrange them on a baking sheet and warm in a 300°F oven for 8-10 minutes until heated through. They’ll taste remarkably fresh, and you can even re-coat them with additional cinnamon sugar if desired.
Portion Control Tip: Freeze donuts individually wrapped in plastic wrap before placing them in a larger container. This way, you can grab just one or two at a time without thawing the entire batch.
Serving Suggestions
These delightful baked cinnamon donuts are incredibly versatile and can be enjoyed in so many wonderful ways! Here are some delicious ideas for serving them:
Classic Breakfast Spread: Serve your warm donuts alongside freshly brewed coffee, espresso, or a creamy latte. The cinnamon pairs beautifully with coffee’s rich, bitter notes. Add some fresh seasonal fruit—like berries or orange slices—and perhaps some crispy bacon or breakfast sausage for a complete morning meal.
Brunch Platter: Create an impressive brunch spread by arranging these donuts on a tiered cake stand or large platter. Serve them with soft scrambled eggs, fresh fruit salad, yogurt parfaits, and your favorite juice or mimosas. Your guests will be thoroughly impressed!
Afternoon Tea or Coffee Break: These donuts make a perfect afternoon pick-me-up. Serve them with hot tea (chai or cinnamon spice tea are especially complementary), hot chocolate, or iced coffee. Add some fresh whipped cream on the side for dipping for an extra-special treat.
Dessert Donuts: Transform these breakfast treats into an elegant dessert by serving them warm with a scoop of vanilla ice cream or whipped cream, a drizzle of caramel sauce, and a sprinkle of toasted pecans or walnuts.
Donut Ice Cream Sandwiches: Slice the donuts in half horizontally and sandwich your favorite ice cream between the layers. Roll the edges in extra cinnamon sugar or mini chocolate chips for a fun frozen treat.
Dunking Delights: Serve a variety of dipping sauces alongside your donuts—try chocolate ganache, vanilla glaze, maple syrup, cream cheese frosting, or even warm apple butter for a seasonal twist.
Kid-Friendly Snack: Pack these donuts in lunch boxes or serve them after school with a cold glass of milk. They’re perfectly portioned for little hands and provide a homemade alternative to store-bought snacks.
Beverage Pairings: Beyond coffee and tea, these cinnamon donuts pair wonderfully with apple cider (especially in fall), hot chocolate with marshmallows, vanilla smoothies, or even a cinnamon-spiced horchata for something unique.
FAQs Section
Q: Can I make these donuts without a donut pan?
A: Absolutely! While a donut pan gives you that classic shape, you can easily make these in a standard muffin tin instead. Fill each cavity about ⅔ full and bake for 14-16 minutes until golden and a toothpick comes out clean. You’ll get delicious donut muffins with the same amazing cinnamon-sugar flavor. Some people also use mini bundt pans for a pretty alternative shape!
Q: Why are my donuts dense instead of light and fluffy?
A: Dense donuts usually result from one of three issues: overmixing the batter (which develops too much gluten), using expired baking powder that’s lost its rising power, or overbaking them. Make sure to mix just until the wet and dry ingredients are combined, check that your baking powder is fresh, and don’t bake past the 12-minute mark. Also ensure your oven temperature is accurate using an oven thermometer.
Q: Can I make these donuts gluten-free?
A: Yes! Simply substitute the all-purpose flour with a 1:1 gluten-free baking flour blend (like Bob’s Red Mill or King Arthur). Make sure your blend contains xanthan gum or add ½ teaspoon separately. The texture will be slightly different but still delicious. Some readers report even better results by letting the gluten-free batter rest for 5 minutes before piping it into the pan.
Q: My cinnamon sugar isn’t sticking to the donuts. What am I doing wrong?
A: The key to perfect cinnamon-sugar adhesion is coating the donuts while they’re still warm—not hot, but definitely warm to the touch. Also, make sure you’re brushing them generously with melted butter first; the butter acts as the “glue” for the sugar mixture. If your donuts have cooled too much, try warming them briefly in the microwave (8-10 seconds) before coating.
Q: Can I reduce the sugar in this recipe?
A: You can reduce the sugar in the donut batter itself to ½ cup if you prefer less sweetness, but keep in mind that sugar doesn’t just add sweetness—it also contributes to tenderness and moisture. Donuts with less sugar may be slightly less tender and will brown less beautifully. The cinnamon-sugar coating is harder to reduce without significantly impacting the overall flavor experience, since it’s the signature element of this recipe.
Q: How do I prevent my donuts from sticking to the pan?
A: Generous greasing is essential! Even with non-stick pans, spray every surface thoroughly with baking spray, paying special attention to those center posts. For extra insurance, you can lightly dust the greased pan with flour, tapping out any excess. Let the donuts cool in the pan for 3-4 minutes before attempting to remove them—this allows them to set up slightly, making them less likely to break apart.
Q: Can I double this recipe?
A: Absolutely! This recipe doubles beautifully. You’ll need two donut pans to bake all the batter at once, or you can bake in batches. If baking in batches, keep the remaining batter at room temperature while the first batch bakes—don’t refrigerate it, as the baking powder will lose effectiveness. The second batch may need an extra minute of baking time since the batter has been sitting longer.
Conclusion
There’s truly nothing quite like the joy of pulling a pan of golden, fragrant donuts from your own oven! These baked cinnamon donuts prove that you don’t need professional equipment, complicated techniques, or deep fryers to create bakery-worthy treats at home. With just a handful of simple pantry ingredients and about 30 minutes of your time, you can fill your kitchen with the most incredible aroma and serve up warm, tender donuts that taste like they came from your favorite local bakery.
Whether you’re making these for a special weekend breakfast, a holiday brunch, a fun baking project with kids, or simply because you’re craving something sweet and comforting, this easy homemade cinnamon sugar donut recipe delivers every single time. The tender, cake-like interior paired with that buttery, cinnamon-kissed coating is pure magic—and knowing you made them yourself makes them taste even better!
I hope you love these baked donuts as much as my family and I do. They’ve become a staple in our home for lazy Sunday mornings and special occasions alike. Once you experience how simple and delicious they are, I have a feeling they’ll become a regular feature in your kitchen too.
Ready to bake? Save this recipe to your favorite Pinterest board so you can find it easily whenever the donut craving strikes! I’d absolutely love to see your beautiful homemade donuts—tag me in your photos on social media or leave a comment below telling me how they turned out. Did you try any of the variations? What’s your favorite way to enjoy them? Your feedback and photos truly make my day and help other home bakers feel confident trying this recipe!
Happy baking, friends! Now go preheat that oven and get ready to enjoy the most delicious homemade baked cinnamon donuts you’ve ever tasted! 🍩