
If you think the only way to get seriously crispy chicken wings is by deep frying, prepare to have your mind blown. These crispy baked chicken wings deliver that restaurant-quality crunch you crave without all the oil, mess, and calories that come with frying. The secret? A simple technique that dries out the skin in the oven, creating wings so crispy they’ll rival anything you’d get at your favorite sports bar.
This easy baked chicken wings recipe is perfect for game day gatherings, family dinners, casual parties, or those nights when you’re craving something indulgent but don’t want to deal with a pot of hot oil. The best part is that you can season these wings any way you like—toss them in classic Buffalo sauce, coat them in sticky sweet Asian glaze, dust them with dry rub, or keep them simple with just salt and pepper. The perfectly crispy base works with literally any flavor profile you can imagine.
Whether you’re feeding a crowd of hungry football fans or meal prepping protein for the week, these oven baked chicken wings are reliable, crowd-pleasing, and surprisingly healthy compared to their fried counterparts. Plus, they free up your hands to actually enjoy the party instead of standing over a fryer. Once you master this simple technique, you’ll never order delivery wings again.
History / Background
Chicken wings have an fascinating American origin story that’s become part of culinary legend. While people have been eating chicken wings throughout history, the Buffalo wing as we know it was born in 1964 at the Anchor Bar in Buffalo, New York. According to the most popular version of the story, Teressa Bellissimo invented Buffalo wings late one Friday night when her son and his friends arrived hungry. With limited options, she deep-fried some chicken wings (which were typically used only for stock at the time), tossed them in her own hot sauce and butter mixture, and served them with celery sticks and blue cheese dressing on the side.
This simple invention became a sensation. What started as an improvised late-night snack transformed into a cultural phenomenon that spread across America throughout the 1970s and 1980s. Wings became synonymous with sports bars, game day parties, and casual dining. The National Chicken Council estimates that Americans consume over 1.4 billion chicken wings during Super Bowl weekend alone—that’s enough wings to circle the Earth three times if laid end to end!
Baking chicken wings, rather than frying them, is a more modern adaptation that gained popularity in the 2000s as home cooks sought healthier alternatives to deep frying. Food bloggers and recipe developers experimented with various techniques—from baking powder methods to high-heat roasting—to recreate that addictive crispiness without submerging wings in oil. The result is wings that are just as satisfying as fried versions but with significantly less fat and calories, and without the hassle of dealing with large amounts of hot oil.
Today, baked chicken wings have become a staple of home cooking, proving that you don’t need a deep fryer to achieve incredible results. They’ve evolved beyond just Buffalo style to include countless flavor variations inspired by cuisines from around the world, from Korean gochujang to Jamaican jerk to honey garlic.
Why You’ll Love This Recipe
These aren’t just any baked chicken wings—they’re genuinely crispy, flavorful, and so easy to make that you’ll wonder why you ever bothered with the frying hassle. This recipe has been tested, tweaked, and perfected to deliver wings that are crispy on the outside, juicy on the inside, and guaranteed to disappear within minutes of hitting the table.
Here’s why these crispy baked chicken wings deserve a permanent spot in your recipe collection:
- Actually crispy, not soggy – The special baking powder technique creates genuinely crunchy skin that rivals fried wings
- Healthier than fried – All the satisfaction with significantly less oil and calories—guilt-free indulgence at its finest
- Zero deep-frying mess – No splattering oil, no lingering smell, no dangerous hot grease to dispose of
- Hands-off cooking – Pop them in the oven and walk away—perfect for when you’re hosting and need to focus on guests
- Perfectly cooked every time – Consistent results without worrying about oil temperature or uneven cooking
- Easily scaled for crowds – Make 2 pounds or 10 pounds with the same easy technique
- Endlessly customizable – Works with any sauce, rub, or seasoning you can dream up
- Budget-friendly – Chicken wings are often on sale, and baking is cheaper than using gallons of oil
- Meal prep friendly – Make a big batch and reheat throughout the week for quick protein-packed meals
- Kid and adult approved – Everyone loves crispy chicken wings, making them perfect for family dinners or parties
- Simple ingredients – No special equipment or obscure ingredients required
Ingredient Notes
The magic of crispy baked chicken wings lies not in complicated ingredients, but in understanding why each component matters and how they work together.
Chicken Wings – You’ll need whole chicken wings, which come with three parts: the drumette (looks like a mini drumstick), the flat (also called the wingette, the middle section), and the tip (the pointy end with little meat). Most people prefer drumettes and flats, so you can buy “party wings” that are already separated and have the tips removed. If you buy whole wings, you’ll need to separate them yourself with kitchen shears or a sharp knife. Figure about 1-1.5 pounds of wings per person for a main course, or about 4-6 wings per person as an appetizer. Fresh or frozen works equally well—just thaw frozen wings completely in the refrigerator overnight before cooking.
Baking Powder – This is the secret weapon for ultra-crispy skin. Baking powder (not baking soda!) raises the pH level of the chicken skin, which helps it brown faster and get crispier. It also draws moisture to the surface where it can evaporate in the oven. Make sure you use aluminum-free baking powder for the best flavor—regular baking powder can sometimes leave a metallic taste. This ingredient is absolutely crucial for achieving restaurant-quality crispiness without frying.
Salt – Essential for seasoning and also helps draw moisture from the skin. Use kosher salt or sea salt for the best flavor and texture. The coarse crystals distribute more evenly than table salt. Salt not only seasons the meat but also helps with the drying process that creates crispy skin.
Pepper – Freshly ground black pepper adds a subtle heat and depth of flavor. You can also use white pepper if you prefer a milder, slightly different flavor profile.
Oil or Cooking Spray – Just a light coating helps the seasonings stick and promotes even browning. You need very little—these aren’t deep fried. Use neutral oils like vegetable, canola, or avocado oil. Olive oil works too, though its lower smoke point means it may smoke slightly at high temperatures.
Optional Seasonings – Garlic powder, onion powder, paprika, cayenne pepper, or any dry seasonings you enjoy. These add extra flavor to the wings before baking. You can also skip these if you plan to toss the wings in sauce afterward.
Sauce (Optional) – Buffalo sauce, barbecue sauce, teriyaki, honey garlic, or whatever your heart desires. The wings are delicious plain, but saucing them takes them to the next level. If using sauce, toss the wings after they’re fully baked and crispy.
Equipment Needed
You don’t need any special equipment to make perfect crispy baked chicken wings. Here’s what you’ll need:
- Large rimmed baking sheet – A standard 18×13-inch half-sheet pan works perfectly. You’ll need two if making a large batch to avoid overcrowding.
- Wire cooling rack – This is optional but highly recommended. Elevating the wings on a rack allows hot air to circulate underneath, promoting even crisping all around. If you don’t have one, you can bake directly on the sheet, but flip the wings halfway through.
- Aluminum foil (optional) – For easier cleanup, though not necessary if you use a rack.
- Large bowl – For tossing wings with seasonings before baking, and for tossing with sauce afterward.
- Paper towels – Crucial for patting wings completely dry before seasoning. This step is non-negotiable for crispy skin.
- Kitchen shears or sharp knife – Only if you’re separating whole wings yourself.
- Meat thermometer – Optional but helpful to ensure wings reach safe internal temperature of 165°F.
- Tongs – For flipping wings (if not using a rack) and tossing with sauce.
- Small saucepan (optional) – For warming sauce if you’re tossing wings after baking.
- Measuring spoons – For accurate seasoning measurements.

Baked Chicken Wings Recipe
- Total Time: 55 minutes
- Yield: 4 servings (about 6-8 wings per person) 1x
- Diet: Gluten Free
Description
These extra crispy baked chicken wings are perfectly golden and crunchy without any deep frying. Using a simple baking powder technique, you’ll achieve restaurant-quality wings right in your oven. Season them your favorite way or toss with any sauce for game day perfection, family dinners, or easy weeknight meals.
Ingredients
For the Wings:
- 3 pounds chicken wings (separated into drumettes and flats, tips removed)
- 1½ tablespoons baking powder (aluminum-free)
- 1 tablespoon kosher salt
- 1 teaspoon black pepper
- 1 teaspoon garlic powder (optional)
- 1 teaspoon paprika (optional)
- ½ teaspoon cayenne pepper (optional, for heat)
- Cooking spray or 1 tablespoon neutral oil
Optional Sauce (choose one or make plain):
- ½ cup Buffalo sauce mixed with 3 tablespoons melted butter
- ¾ cup BBQ sauce
- ½ cup honey mixed with ¼ cup soy sauce and 1 tablespoon sriracha
- ½ cup Asian sweet chili sauce
Instructions
- Prepare the wings: If using frozen wings, thaw completely in the refrigerator overnight. Remove wings from packaging and place in a colander. Rinse under cold water and drain well.
- Dry thoroughly: This is the most important step! Pat wings completely dry with paper towels. Then lay them on a clean kitchen towel or more paper towels for 5-10 minutes to air dry further. The drier the skin, the crispier your wings will be. You can even leave them uncovered in the refrigerator for 1-2 hours if you have time—this dries the skin even more.
- Preheat oven: Set your oven to 425°F (220°C). Position the rack in the upper third of the oven for best browning.
- Prepare baking sheet: Line a large rimmed baking sheet with aluminum foil (for easy cleanup). Place a wire cooling rack on top and spray the rack with cooking spray. If you don’t have a rack, spray the foil directly.
- Season the wings: In a large bowl, combine baking powder, salt, pepper, and any optional seasonings (garlic powder, paprika, cayenne). Add the completely dried wings and toss to coat evenly. Make sure each wing is covered with the baking powder mixture—this is your crispiness insurance.
- Arrange on rack: Place wings on the prepared rack in a single layer with space between each wing. Don’t let them touch or overlap—they need air circulation to crisp up properly. Use a second baking sheet if needed to avoid overcrowding.
- First bake: Place in the preheated oven and bake for 30 minutes without opening the oven door.
- Flip and continue: After 30 minutes, use tongs to flip each wing over. If using a rack, this step is optional but still recommended for maximum crispiness. Return to oven and bake for another 15-20 minutes until wings are deeply golden brown and crispy.
- Check doneness: Wings should reach an internal temperature of 165°F and the skin should be visibly crispy and golden. If they need more time, continue baking in 5-minute increments.
- Rest briefly: Remove from oven and let wings rest on the rack for 5 minutes. This allows the skin to crisp up even more as they cool slightly.
- Sauce (optional): If using sauce, transfer crispy wings to a large clean bowl. Add your sauce of choice and toss gently but thoroughly to coat. If you want to keep some wings plain, separate them before saucing.
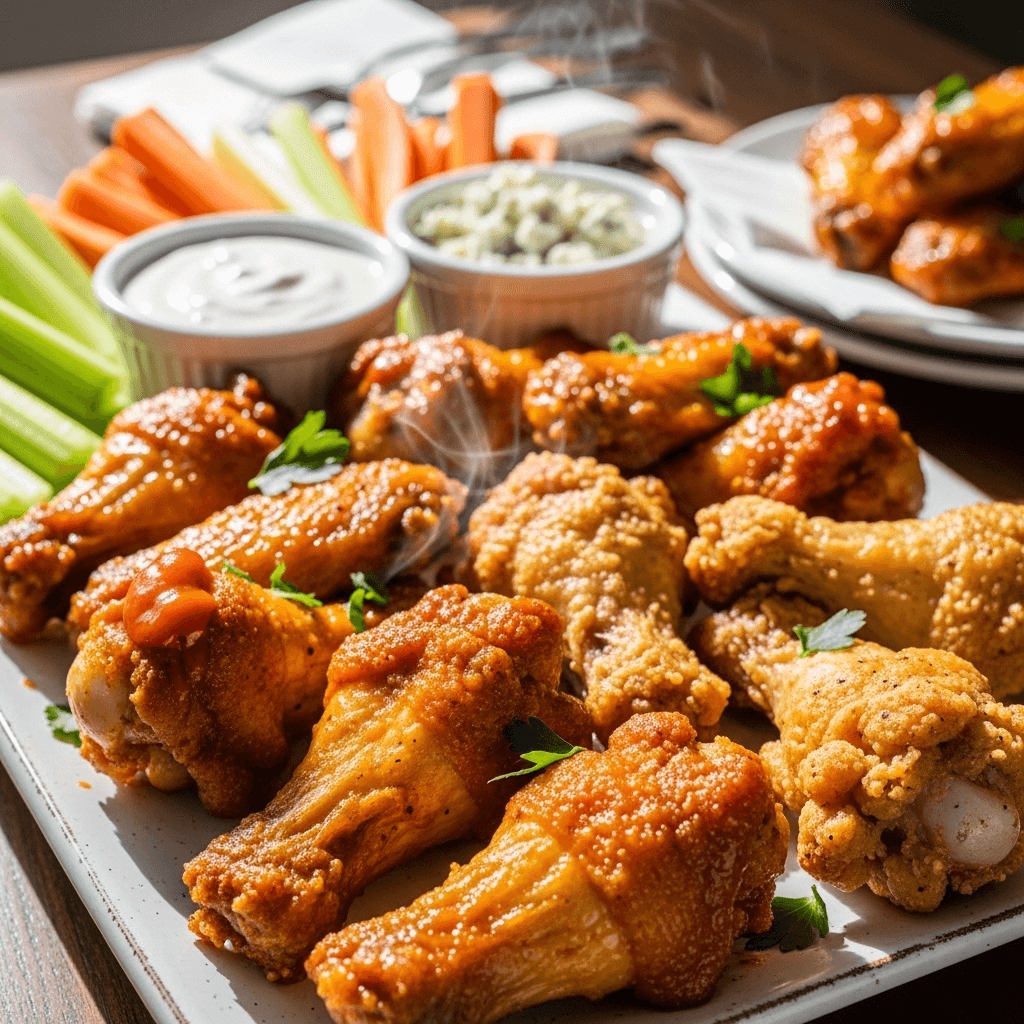
- Serve immediately: Transfer to a serving platter and serve hot with celery sticks, carrot sticks, ranch dressing, or blue cheese dressing on the side.
Notes
- Baking powder vs baking soda: Use baking POWDER, not baking soda. They are not interchangeable. Baking soda will make wings taste metallic and won’t create the same crispy effect.
- Don’t skip drying: The single most important step is thoroughly drying the wings. Moisture is the enemy of crispy skin.
- Overcrowding: Leave space between wings. Crowded wings steam instead of roast, resulting in soggy skin.
- Rack vs no rack: A wire rack elevates wings for air circulation and maximum crispiness. Without a rack, flip wings halfway through cooking.
- Temperature matters: Don’t lower the oven temperature thinking it will prevent burning. The high heat is necessary for crispy skin.
- Sauce timing: Always add sauce AFTER baking, not before. Sauce before baking creates soggy, sticky wings that never crisp up.
- Extra crispy trick: For even crispier wings, after baking, turn on the broiler for 1-2 minutes per side, watching carefully to prevent burning.
- Prep Time: 10 minutes
- Cook Time: 45 minutes
- Category: Appetizer
- Method: Baking
- Cuisine: American
Nutrition
- Serving Size: 6-8 wing pieces (about ¾ pound)
- Calories: 485
- Sugar: 0g
- Sodium: 950mg
- Fat: 32g
- Saturated Fat: 9g
- Unsaturated Fat: 21g
- Trans Fat: 0g
- Carbohydrates: 8g
- Fiber: 0g
- Protein: 46g
- Cholesterol: 165mg
Tips & Variations
The beauty of this crispy baked chicken wings recipe is how incredibly versatile it is. Here are countless ways to customize these wings to match any craving or occasion.
Buffalo Wings: After baking, toss wings with ½ cup Frank’s RedHot sauce mixed with 3 tablespoons melted butter. Serve with celery sticks and blue cheese dressing for the classic experience.
BBQ Wings: Use your favorite barbecue sauce—sweet and tangy, smoky, spicy, or Kansas City-style. Brush on during the last 5 minutes of baking, then toss with more after cooking.
Honey Garlic Wings: Mix ½ cup honey, ¼ cup soy sauce, 3 minced garlic cloves, 1 tablespoon rice vinegar, and 1 teaspoon sesame oil. Toss with baked wings and garnish with sesame seeds and sliced green onions.
Lemon Pepper Wings: Add extra black pepper and lemon zest to the dry seasoning before baking. After baking, toss with melted butter, fresh lemon juice, and more cracked pepper.
Garlic Parmesan Wings: After baking, toss wings with melted butter, minced garlic, and freshly grated parmesan cheese. Add Italian seasoning and fresh parsley.
Asian-Inspired Wings: Toss baked wings with a mixture of soy sauce, honey, ginger, garlic, and sesame oil. Garnish with sesame seeds and cilantro.
Dry Rub Wings: Skip the sauce entirely and season with your favorite dry rub before baking. Try Cajun, jerk seasoning, ranch seasoning, or Old Bay.
Spicy Wings: Add cayenne pepper, chili powder, or hot paprika to the dry seasoning. Or toss finished wings in sriracha mixed with honey and butter.
Teriyaki Wings: Coat baked wings with teriyaki sauce and garnish with sesame seeds. For extra flavor, add grated ginger to the sauce.
Nashville Hot Wings: Brush baked wings with a mixture of cayenne pepper, brown sugar, and melted butter for that Nashville hot chicken experience.
Make them extra crispy: After the initial baking, turn on the broiler for 1-2 minutes per side, watching carefully. This creates an incredibly crunchy exterior.
Healthier version: These are already healthier than fried, but you can reduce salt and serve with healthier dipping options like Greek yogurt ranch or hummus.
Pro Chef Tips
These professional techniques separate good baked wings from absolutely phenomenal ones that rival anything you’d get at a restaurant.
The overnight dry: For the ultimate crispy skin, place seasoned wings on a rack over a baking sheet and refrigerate uncovered for 8-24 hours. The cold, dry air of the refrigerator removes even more moisture from the skin, resulting in maximum crispiness. This is what restaurants do for their wings.
Temperature control: Invest in an oven thermometer. Many ovens run hot or cold, and even a 25-degree difference affects your results. You want a true 425°F for these wings.
Use aluminum-free baking powder: Regular baking powder can leave a slightly metallic taste, especially in larger quantities. Aluminum-free baking powder gives you the crispiness without any off flavors.
Don’t sauce all the wings: Keep some plain so people can enjoy the crispy, well-seasoned wings as-is. Many guests prefer unsauced wings, and you can always serve sauce on the side for dipping.
Double-rack method: If making a huge batch, use two racks stacked in the oven and rotate their positions halfway through cooking. This ensures even heat distribution.
Broiler finish: After baking, hit wings with 1-2 minutes under the broiler. This caramelizes the exterior beautifully and adds an extra layer of crispiness. Watch constantly—broilers work fast.
Let them rest: After removing from oven, let wings sit for 5 minutes before saucing or serving. The resting period allows the skin to set and crisp up even more.
Sauce consistency: If tossing wings in sauce, make sure your sauce isn’t too thin or it will make the wings soggy. Thicker sauces cling better and maintain crispiness longer.
Batch cooking: Don’t try to cook 10 pounds of wings on one pan. Make multiple batches or use multiple pans, ensuring wings aren’t crowded.
Season in layers: Season before baking for baseline flavor, then toss with sauce, then garnish with additional seasonings (like sesame seeds, herbs, or parmesan) for complexity.
Common Mistakes to Avoid
Even with a straightforward recipe like baked chicken wings, there are several common pitfalls that can turn crispy dreams into soggy disappointments.
Not drying the wings thoroughly: This is the #1 mistake. Any moisture on the skin will steam in the oven instead of crisping up. You need to pat wings absolutely dry with paper towels, let them air dry, or even refrigerate them uncovered. Wet wings = soggy skin, no matter what else you do right.
Overcrowding the baking sheet: When wings touch or overlap, they steam rather than roast. Steam creates moisture, moisture creates sogginess. Leave at least ½ inch between wings. If they don’t all fit with proper spacing, use two baking sheets or make two batches.
Using baking soda instead of baking powder: These are not interchangeable! Baking soda will make your wings taste metallic and bitter. You specifically need baking POWDER (which contains baking soda plus acid) for the chemical reaction that creates crispy skin.
Adding sauce before baking: Never, ever put sauce on wings before baking. Wet sauce prevents skin from crisping and you’ll end up with sticky, soggy, disappointing wings. Always bake wings completely, get them crispy, then toss with sauce if desired.
Opening the oven door constantly: Every time you open the oven, you lose heat and release moisture into the air around the wings. Leave the door closed for at least the first 30 minutes to allow proper crisping.
Baking at too low a temperature: Low temperatures steam the wings rather than roast them. You need high heat (425°F or even 450°F) to render the fat, evaporate moisture, and crisp the skin. Don’t be tempted to lower it.
Not using a rack: While not absolutely required, skipping the wire rack means the bottom of your wings sits in rendered fat and moisture, preventing even crisping. If you don’t have a rack, flip wings halfway through cooking.
Taking them out too early: Be patient! Wings need the full 45-50 minutes to get properly crispy. If they look pale and soft at 35 minutes, they need more time. Wait for deep golden brown color and visibly crispy, textured skin.
Storage & Meal Prep
Good news for meal preppers: baked chicken wings store beautifully and reheat remarkably well, maintaining much of their crispy texture if handled correctly.
Refrigerator storage: Let wings cool completely to room temperature. Transfer to an airtight container or zip-top bag, separating layers with parchment paper if stacking. Refrigerate for up to 4 days. Plain wings store better than sauced wings, as sauce can make the skin soggy over time. If possible, store sauce separately and toss just before serving.
Reheating for crispiness: The key to maintaining crispy skin is using dry heat, not the microwave. The best method is returning wings to a 400°F oven on a wire rack for 10-15 minutes until heated through and skin re-crisps. You can also use an air fryer at 375°F for 5-7 minutes. The microwave makes wings rubbery and soggy—avoid if possible.
Meal prep strategy: Make a large batch on Sunday and portion into containers for easy weeknight dinners or lunches. Pair with different vegetables and sides throughout the week for variety. Store unsauced and add different sauces each day for diverse flavors.
Taking to parties: If bringing baked wings to a gathering, transport them in a single layer (don’t stack) and reheat in the host’s oven for 10 minutes before serving. They’ll taste freshly made.
Lunchbox friendly: Cold baked wings make excellent additions to lunch boxes. They’re tasty at room temperature and provide satisfying protein. Pack with veggies and dip for a complete meal.
Make-Ahead & Freezer Notes
Planning ahead for a party or want wings on demand? Here’s everything you need to know about prepping and freezing baked wings.
Make-ahead seasoning: Season wings with the baking powder mixture up to 24 hours before cooking. Store uncovered on a rack in the refrigerator. This extra drying time actually improves crispiness—it’s what I do for special occasions.
Par-baking method: Bake wings for 30 minutes, let cool completely, then refrigerate for up to 2 days. When ready to serve, finish baking at 425°F for 15-20 minutes until crispy and heated through. This is perfect for parties where you want to do prep work ahead.
Freezing uncooked wings: Season wings with baking powder mixture and freeze in a single layer on a baking sheet. Once frozen solid, transfer to freezer bags. They’ll keep for up to 3 months. Bake from frozen, adding 10-15 minutes to cooking time.
Freezing cooked wings: Let fully baked wings cool completely. Freeze in a single layer on a baking sheet, then transfer to freezer bags or containers. Freeze for up to 3 months. This is incredibly convenient for quick meals.
Reheating frozen cooked wings: Place frozen wings on a wire rack over a baking sheet. Bake at 400°F for 20-25 minutes until heated through and crispy. No need to thaw first.
Sauce after reheating: If serving sauced wings, always add sauce after reheating, not before freezing. Sauce can make reheated wings soggy if frozen with it.
Best freezing practice: Flash freeze on a baking sheet first, then transfer to bags. This prevents wings from sticking together in a clump, so you can remove just what you need.
Party prep timeline: For parties, I bake wings 2 days ahead, refrigerate, then reheat for 15 minutes before guests arrive. Or I par-bake wings a day ahead and finish cooking right before serving.
Serving Suggestions
Crispy baked chicken wings are incredibly versatile and pair beautifully with a variety of sides, dips, and beverages. Here’s how to build the perfect wings spread.
Classic accompaniments: Serve wings with celery sticks, carrot sticks, and your choice of ranch dressing or blue cheese dressing for dipping. This classic combination provides cool, crunchy contrast to hot, crispy wings.
Dipping sauces: Beyond ranch and blue cheese, offer variety with honey mustard, garlic aioli, sriracha mayo, tzatziki, BBQ sauce, or sweet chili sauce. Multiple dip options let guests customize their experience.
Game day spread: Create the ultimate game day table with wings as the centerpiece, surrounded by loaded nachos, potato skins, mozzarella sticks, and a vegetable platter. Add chips with various dips and you’ve got a feast.
Vegetable sides: Balance the richness of wings with fresh vegetables. Grilled corn on the cob, coleslaw, cucumber salad, garden salad, or roasted Brussels sprouts all work beautifully.
Potato sides: French fries, sweet potato fries, potato wedges, tater tots, or mashed potatoes make satisfying companions to wings. They soak up extra sauce and provide comforting carbs.
Bread options: Cornbread, garlic bread, dinner rolls, or Texas toast are perfect for mopping up sauce and adding heartiness to the meal.
Beverages: Wings pair perfectly with ice-cold beer (lager, IPA, or pilsner), hard cider, iced tea, lemonade, or cold soda. For cocktails, try margaritas, Moscow mules, or whiskey sours.
Make it a meal: Serve wings over rice, alongside mac and cheese, or with baked beans for a complete dinner rather than just appetizer portions.
Party presentation: Arrange wings on a large platter lined with parchment paper. Place small bowls of sauces and dips in the center, surround with vegetables, and garnish with fresh herbs for an impressive display.
Picnic or potluck: Wings travel well and are great at room temperature. Pack in a disposable aluminum pan with sauce on the side for easy outdoor dining.
FAQs Section
Can I make crispy baked chicken wings without baking powder?
Technically yes, but they won’t be nearly as crispy. Baking powder is the secret ingredient that raises the pH of the skin and helps it crisp up dramatically in the oven. Without it, you’ll get cooked wings with somewhat crispy skin, but not that restaurant-quality crunch. If you absolutely can’t use baking powder, make sure wings are extremely dry, use a wire rack, and bake at 450°F for 45-50 minutes, flipping halfway through. The results will be good but not exceptional.
Why aren’t my baked chicken wings crispy?
The most common reasons are: not drying the wings thoroughly before seasoning, overcrowding the baking sheet so wings steam instead of roast, baking at too low a temperature, using baking soda instead of baking powder, or taking them out before they’re fully cooked. Make sure wings are bone-dry, well-spaced on a rack, baked at 425°F for the full 45-50 minutes, and coated with baking powder. Following these steps guarantees crispy wings.
Can I use frozen chicken wings?
Absolutely! Frozen wings work just as well as fresh. You must thaw them completely in the refrigerator overnight before cooking—never cook from frozen or you’ll end up with rubbery skin and unevenly cooked meat. After thawing, pat them extra dry since frozen wings release more moisture as they thaw. Then proceed with the recipe as written.
What temperature should I bake chicken wings at?
The ideal temperature is 425°F (220°C). This high heat is necessary to render the fat under the skin and evaporate moisture, creating that crispy exterior. Some recipes use 450°F which works too, though there’s slightly more risk of over-browning. Don’t bake lower than 400°F or you’ll get rubbery, steamed wings instead of crispy ones. Always preheat your oven fully before adding wings.
Should I flip chicken wings while baking?
If using a wire rack, flipping is optional but recommended for maximum crispiness on all sides. If baking directly on a foil-lined sheet without a rack, you absolutely must flip wings halfway through (after 30 minutes) so both sides crisp up. Wings sitting in their own rendered fat will never crisp on the bottom without flipping.
How do I know when baked chicken wings are done?
Wings are done when they reach an internal temperature of 165°F (check the thickest part with a meat thermometer), the skin is deeply golden brown and visibly crispy with some darker spots, and the meat easily pulls away from the bone. Timing is typically 45-50 minutes at 425°F. If they still look pale or the skin seems soft, continue baking in 5-minute increments until properly crisped.
Can I sauce chicken wings before baking them?
No! This is a critical mistake. Sauce before baking creates soggy, sticky wings that never develop that crispy skin we’re after. Always bake wings plain (or with dry seasonings only), get them completely crispy, then toss with sauce afterward if desired. The only exception is putting sauce on during the last 2-3 minutes of baking for slight caramelization, but even then, I recommend tossing after baking for better texture.
Conclusion
There you have it—everything you need to make the most incredible, restaurant-quality crispy baked chicken wings right in your home oven! No deep fryer required, no huge mess to clean up, just perfectly golden, genuinely crispy wings that will have everyone asking for your secret technique.
The magic combination of thoroughly dried skin, baking powder, high heat, and proper spacing creates wings so crunchy and delicious that you’ll never miss fried versions. Whether you keep them simple with salt and pepper or toss them in your favorite sauce, these easy baked chicken wings deliver every single time. They’re perfect for game day gatherings, casual family dinners, meal prep, or any occasion that calls for seriously good food.
The best part about mastering this technique is the endless possibilities it opens up. Once you’ve got the basic crispy wing method down, you can experiment with any flavor profile your heart desires. Buffalo, BBQ, honey garlic, lemon pepper, garlic parmesan—they’re all just a quick toss away from this perfect crispy foundation.
So fire up that oven and get ready for some seriously addictive wings! Your friends and family are going to be so impressed when you serve these beauties, and you’ll love how easy they are to prepare.
Pin this crispy baked chicken wings recipe to your Pinterest boards so you can find it whenever that wing craving hits! Trust me, once you make these, you’ll be coming back to this recipe again and again. And when you try them, I absolutely want to hear about it—leave a comment below telling me what sauce you used or what variations you tried. Did you go classic Buffalo? Get adventurous with Asian flavors? Keep them simple with just seasonings? Share your experience!
Now grab those wings and let’s get baking—crispy, delicious perfection is just 55 minutes away!