

There’s something absolutely magical about perfectly baked chicken thighs – golden, crispy skin on the outside paired with incredibly juicy, tender meat on the inside that falls off the bone. This best baked chicken thighs recipe transforms simple, affordable chicken thighs into a stunning main course that tastes restaurant-quality yet requires only basic seasoning and your oven. Whether you’re planning a casual weeknight family dinner, hosting guests for a special meal, or batch cooking for meal prep, this easy baked chicken thighs recipe delivers impressive results every single time.
What makes this baked chicken thighs recipe so special is the foolproof technique that creates perfectly juicy, tender chicken with crispy, golden skin that looks absolutely beautiful on the plate. Unlike dry chicken breast that requires careful attention, baked chicken thighs are nearly impossible to mess up – the higher fat content keeps the meat moist and forgiving throughout cooking. In just 40 minutes from start to finish, you’ll have restaurant-quality baked chicken thighs that cost a fraction of what you’d pay at a restaurant. This simple yet impressive baked chicken thighs recipe has become a family favorite because it’s budget-friendly, healthy, and delivers consistent, delicious results that everyone loves.
History / Background
Chicken thighs have an interesting culinary history that reflects changing attitudes toward different parts of the bird and the evolution of American cooking. For much of the 20th century, chicken breast was considered the most desirable part – lean, white meat that symbolized sophistication and health-consciousness. Chicken thighs were often viewed as inferior or relegated to soups and slow-cooked dishes where the tougher meat could break down.
However, this perspective has shifted dramatically over the past 20 years as home cooks, chefs, and food writers have rediscovered the superior flavor and texture of chicken thighs. Culinary professionals recognized that the higher fat content in thighs creates more flavorful, juicier chicken that’s more forgiving to cook. The meat’s darker color and richer taste make it ideal for various cooking methods, particularly roasting and braising.
The baked chicken thighs trend gained particular momentum in the early 2000s with the rise of food blogs and cooking shows that celebrated real, approachable home cooking. Recipes featuring baked chicken thighs appeared increasingly in mainstream media as people sought better-tasting alternatives to lean chicken breast. The budget-friendly nature of chicken thighs made them attractive during economic downturns, and their superior flavor made them appealing to anyone seeking delicious food.
Today, baked chicken thighs have become beloved in home kitchens and are featured prominently on restaurant menus from casual bistros to upscale establishments. The recipe represents a shift toward embracing traditional cooking methods and animal parts that maximize flavor and minimize waste. Professional chefs often prefer chicken thighs for their reliability and superior taste, making the home cook’s preference for this cut validated by culinary professionals.
The beauty of baked chicken thighs lies in their versatility – equally at home with simple seasoning, complex spice blends, international flavors, or sauce-based preparations. They represent the democratization of good cooking – proving that impressive, delicious meals don’t require expensive ingredients or complicated techniques.
Why You’ll Love This Recipe
This easy baked chicken thighs recipe is the ultimate weeknight dinner solution – foolproof, delicious, and absolutely reliable. I’ve perfected this recipe through countless dinners to bring you the definitive version that delivers juicy, tender, restaurant-quality chicken every single time.
Here’s why this best baked chicken thighs recipe will become your new favorite:
- Juicy, tender meat – Chicken thighs stay moist and delicious, never dry or rubbery like breast meat can be
- Crispy, golden skin – Gorgeous exterior that looks restaurant-quality and tastes amazing
- Ready in just 40 minutes – From oven to dinner table in less time than ordering takeout
- Budget-friendly – Chicken thighs are significantly cheaper than breast, saving money without sacrificing quality
- Minimal prep required – Just season and bake; no complex techniques or special skills needed
- Naturally healthy – High in protein, relatively lean, and packed with flavor
- Makes 4-6 servings – Perfect for family dinners or entertaining
- Freezer-friendly – Bake ahead and freeze for quick future meals
- Naturally customizable – Works with any seasoning, marinade, or sauce you love
- Great for meal prep – Bake in bulk for grab-and-go lunches throughout the week
- One-pan meal – Add vegetables for complete dinner in one baking dish
- Works with any diet – Naturally gluten-free, paleo-friendly, keto-compatible
Ingredient Notes
Creating perfectly baked chicken thighs requires understanding a few key ingredients and making quality choices that maximize flavor and texture.
Chicken Thighs – Six to eight bone-in, skin-on chicken thighs are ideal for this recipe. The bone conducts heat evenly, and the skin crisps beautifully during baking while keeping the meat underneath incredibly moist. Bone-in thighs are more flavorful than boneless – the bone adds depth to the cooking process. Skin-on is essential for achieving that coveted crispy, golden exterior. If you can only find skinless thighs, the recipe still works, though the final presentation won’t be quite as impressive.
Olive Oil – Two tablespoons of good-quality extra virgin olive oil helps the chicken develop that beautiful golden skin while adding richness and flavor. Olive oil also helps seasonings adhere to the chicken. Don’t skip this step – it’s crucial for crispy skin and proper browning.
Salt and Black Pepper – Generous seasoning is essential – chicken needs salt to taste its best. Kosher salt or sea salt gives better flavor control than table salt. Freshly ground black pepper adds complexity that pre-ground pepper can’t match. Don’t be timid with seasoning; properly salted chicken is a game-changer.
Garlic and Lemon – Minced fresh garlic provides aromatic depth, while fresh lemon juice adds brightness and acidity that enhances chicken flavor. Four cloves of garlic and one lemon create the perfect balance of flavors. Fresh ingredients make an enormous difference compared to jarred or powdered alternatives.
Thyme and Rosemary – One teaspoon each of fresh (or ½ teaspoon dried) provides herbaceous flavor that complements chicken beautifully. Fresh herbs create more delicate, complex flavor, though dried herbs work perfectly when fresh aren’t available. These Mediterranean herbs are classic chicken companions for good reason.
Optional Additions:
- Paprika for subtle smoke and color
- Onions and potatoes for one-pan meal
- Chicken broth for added moisture and flavor
- Dijon mustard for tangy depth
- Honey for subtle sweetness
- Hot sauce or cayenne for spice
Substitutions: Use vegetable oil instead of olive oil if preferred, though flavor will differ slightly. Replace fresh herbs with dried (use about half the amount). Substitute lemon with lime for different citrus flavor. Use bone-in, skinless thighs if skin-on aren’t available (though results won’t be quite as crispy). Replace fresh garlic with garlic powder in a pinch (use about ½ teaspoon for each clove).
Equipment Needed
- 13×9-inch baking dish – Metal or glass pans both work; metal conducts heat slightly faster
- Meat thermometer – Essential for knowing when chicken is perfectly cooked (165°F is safe)
- Measuring spoons and cups – For accurate seasoning
- Small bowl – For mixing olive oil, garlic, and seasonings
- Pastry brush – Helpful for coating chicken evenly with oil and seasonings
- Paper towels – For patting chicken dry before cooking
- Cutting board and knife – For mincing garlic and cutting lemon
- Tongs – For handling hot chicken in the oven
- Oven thermometer – Optional but helpful to ensure accurate baking temperature
- Cooling rack – Optional but helpful if you want to rest chicken before serving
- Aluminum foil – Useful if chicken is browning too quickly
Baked Chicken Thighs Recipe
- Total Time: 45 minutes
- Yield: 4-6 servings (about 6-8 chicken thighs) 1x
- Diet: Gluten Free
Description
This best baked chicken thighs recipe delivers juicy, tender chicken with crispy, golden skin using simple ingredients and foolproof technique. Perfectly seasoned with garlic, lemon, and fresh herbs, these easy baked chicken thighs are restaurant-quality yet simple enough for weeknight cooking. Ready in under 45 minutes with minimal prep.
Ingredients
- 6–8 bone-in, skin-on chicken thighs (about 2–2.5 pounds)
- 2 tablespoons extra virgin olive oil
- 4 cloves garlic, minced
- Juice of 1 fresh lemon (about 3 tablespoons)
- 1 teaspoon fresh thyme (or ½ teaspoon dried)
- 1 teaspoon fresh rosemary (or ½ teaspoon dried)
- 1 teaspoon kosher salt
- ½ teaspoon freshly ground black pepper
- ½ teaspoon paprika (optional but recommended)
- Lemon slices for garnish (optional)
Optional Additions for One-Pan Meal:
- 1 pound baby potatoes, halved
- 2 cups baby carrots
- 1 medium red onion, cut into wedges
- ½ cup chicken broth for added moistur
Instructions
- Preheat oven and prepare baking dish. Position an oven rack in the upper-middle position and preheat to 425°F (220°C). This temperature creates the perfect balance – high enough to crisp skin without burning, low enough to cook through without drying out the meat. Line a 13×9-inch baking dish with aluminum foil for easy cleanup, or use it unlined – both work perfectly.
- Prepare the chicken. Remove chicken thighs from packaging and pat completely dry with paper towels. Moisture on the skin prevents proper crisping, so don’t skip this crucial step. Dry skin is essential for achieving that golden, crispy exterior.
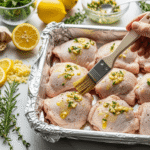
- Create the seasoning mixture. In a small bowl, combine olive oil, minced garlic, lemon juice, thyme, rosemary, paprika, salt, and pepper. Stir until well combined. The mixture should be fragrant and well mixed. This simple seasoning blend is all you need – the quality of ingredients matters more than complexity.
- Arrange chicken in baking dish. Place dried chicken thighs skin-side up in the prepared baking dish, spacing them so they’re not touching. Skin-side up position is crucial – it allows the skin to crisp in direct oven heat. Arrange thighs in a single layer without overlapping.
- Apply seasoning mixture. Using a pastry brush or the back of a spoon, coat each chicken thigh evenly with the olive oil and herb mixture. Make sure to coat both the top and sides of each thigh. Don’t worry about the bottom sides – they’ll cook through and stay moist from their contact with the pan.
- Add optional vegetables if using. If making a one-pan meal, arrange baby potatoes, carrots, and onion wedges around the chicken at this point. Toss vegetables lightly with any remaining seasoning mixture and a drizzle of olive oil. Vegetables should be in single layer, not piled on top of chicken.
- Bake until chicken is golden and cooked through. Bake for 35-40 minutes until the skin is deep golden brown and the thickest part of the chicken (between the bone and skin, not touching bone) reaches an internal temperature of 165°F (74°C) when checked with a meat thermometer. The skin should be crispy and have some browning and caramelization.
- Check for doneness carefully. Use a meat thermometer for accuracy – this is the foolproof way to know when chicken is done. Insert the thermometer into the thickest part of a thigh without touching bone. The temperature should read exactly 165°F (74°C) for food safety.
- Rest before serving. Remove from oven and let chicken rest in the baking dish for 5 minutes before serving. This brief rest allows juices to redistribute throughout the meat, keeping it incredibly juicy when you cut into it. Don’t skip this step – resting makes a noticeable difference in juiciness.
- Garnish and serve. Arrange baked chicken thighs on a serving platter, drizzle with pan juices, and garnish with fresh lemon slices and additional fresh herbs if desired. The pan juices are delicious drizzled over the chicken – don’t waste them. Serve immediately while hot, with your choice of sides.
Notes
- Meat thermometer is key – It guarantees perfectly cooked chicken every time without guessing
- Pat chicken completely dry – This is essential for crispy skin; don’t skip this step
- Skin-side up orientation – This position allows skin to crisp properly in direct oven heat
- Don’t crowd the pan – Thighs should not touch; this allows even cooking and proper crisping
- Upper-middle oven rack – This position is ideal for browning skin while cooking through
- Rest before serving – Five minutes allows juices to redistribute for maximum juiciness
- Make one-pan meal – Add vegetables around chicken for complete dinner
- Leftover potential – Excellent for meal prep; reheat and shred for use in salads, tacos, or sandwiches
- Prep Time: 10 minutes
- Cook Time: 35 minutes
- Category: Dinner
- Method: Baking
- Cuisine: American
Nutrition
- Serving Size: 1 chicken thigh (approximately 5 ounces)
- Calories: 285
- Sugar: 0g
- Sodium: 420mg
- Fat: 18g
- Saturated Fat: 5g
- Unsaturated Fat: 11g
- Trans Fat: 0g
- Carbohydrates: 1g
- Fiber: 0g
- Protein: 32g
- Cholesterol: 105mg
Tips & Variations
Flavor Variations:
- Italian Herb Baked Chicken Thighs: Add 1 teaspoon Italian seasoning and ¼ cup grated Parmesan cheese before baking
- Mediterranean Chicken Thighs: Add ½ cup kalamata olives and ½ cup sun-dried tomatoes with the seasonings
- Spicy Cajun Chicken Thighs: Replace herbs with 1 tablespoon Cajun seasoning for bold, spicy flavor
- Asian-Inspired Baked Chicken Thighs: Use soy sauce, ginger, and sesame oil instead of lemon and herbs
- Honey Garlic Chicken Thighs: Add 2 tablespoons honey to the oil mixture for sweet-savory balance
- Mustard-Glazed Chicken Thighs: Mix 3 tablespoons Dijon mustard into the oil before coating
- Barbecue Baked Chicken Thighs: Coat with barbecue sauce in the last 10 minutes of cooking
One-Pan Meals:
- Roasted Chicken with Root Vegetables: Add potatoes, carrots, and parsnips around the chicken
- Sheet Pan Chicken and Vegetables: Add broccoli, Brussels sprouts, and cauliflower florets
- Greek Baked Chicken: Add olives, feta cheese, cherry tomatoes, and red onion
- Harvest Chicken Dinner: Add sweet potatoes, regular potatoes, and Brussels sprouts
Sauce Variations:
- Pan Gravy: Use pan drippings to make a simple gravy with chicken broth and cornstarch
- Lemon Butter Sauce: Drizzle with melted butter mixed with fresh lemon juice
- Garlic Aioli: Serve with homemade garlic mayonnaise on the side
- Herb Cream Sauce: Toss with heavy cream mixed with fresh herbs
Make-Ahead Strategies:
- Marinate overnight: Prepare chicken with seasonings and refrigerate up to 24 hours before baking
- Partial prep: Mince garlic and make seasoning mixture in advance
- Batch cooking: Bake multiple pans simultaneously for meal prep
Lower-Calorie Versions:
- Skinless chicken thighs: Use boneless, skinless thighs for lower fat (though less flavorful and prone to drying)
- Reduced oil: Use only 1 tablespoon olive oil instead of 2
- Vegetable-heavy: Increase vegetable portions for volume with fewer calories
Pro Chef Tips
Room temperature chicken cooks more evenly – Remove chicken from the refrigerator 15-20 minutes before baking. Room temperature chicken cooks more evenly than cold chicken straight from the fridge, resulting in more consistent doneness throughout.
Pat chicken completely dry – Moisture on skin prevents proper crisping. Use paper towels and really dry the surface. This single step makes an enormous difference in achieving that beautiful golden, crispy exterior.
Use a meat thermometer – This guarantees perfectly cooked chicken every time. Insert the thermometer into the thickest part of the thigh without touching bone. 165°F (74°C) is the safe internal temperature.
Position skin-side up – Skin needs direct oven heat to crisp properly. Arranging chicken skin-side up ensures the skin contacts the oven heat and air circulation, creating that gorgeous crispy exterior.
Don’t crowd the pan – Chicken thighs should not touch in the baking dish. Crowding creates steam instead of proper browning. Space them so heat circulates around each thigh.
Use the upper-middle oven rack – This position is ideal for browning skin while keeping the meat from overcooking. Lower positions may result in undercooked skin or overcooked meat.
Invest in quality olive oil – Good-quality extra virgin olive oil makes a noticeable difference in flavor. Use your best olive oil for this simple recipe where it’s a main ingredient.
Let chicken rest – Five minutes of resting after baking allows juices to redistribute throughout the meat, keeping it incredibly juicy. This crucial step is often skipped but makes a dramatic difference.
Don’t skip the lemon – Fresh lemon juice adds brightness and complexity that enhances chicken flavor significantly. Don’t use bottled lemon juice – fresh makes a huge difference.
Make pan sauce from drippings – The flavorful pan drippings can become a quick sauce. Simply deglaze the hot pan with chicken broth or white wine, scraping up browned bits.
Common Mistakes to Avoid
Skipping the drying step – Wet chicken skin won’t crisp properly. This is crucial – use paper towels and really dry the surface before seasoning and baking.
Crowding the baking dish – If chicken thighs touch, they steam instead of roasting, preventing proper browning and crisping. Leave space between each thigh for air circulation.
Using cold chicken – Cold chicken from the refrigerator cooks unevenly, with the outside overcooked before the inside reaches proper temperature. Let chicken sit at room temperature for 15-20 minutes before baking.
Relying on appearance for doneness – Golden brown chicken might not be cooked through at the bone. Always use a meat thermometer to check internal temperature – the only reliable way to know when chicken is done.
Overcooking – Chicken continues cooking from residual heat after removal from the oven. Remove at exactly 165°F internal temperature, not higher. Overcooked chicken becomes dry, no matter how good your technique.
Using skinless thighs – Skin-on thighs stay juicier and develop that gorgeous crispy exterior. Skinless thighs are drier and less impressive-looking, though still delicious.
Forgetting to rest – Skipping the five-minute rest period means juices run out when you cut into the chicken, making it dry. The brief rest redistributes juices throughout the meat.
Storage & Meal Prep
Storing Leftovers: Keep baked chicken thighs in an airtight container in the refrigerator for up to 4 days. The meat stays moist and delicious throughout this time. Store with or without the skin, depending on preference.
Reheating Instructions: Reheat baked chicken thighs gently in a 350°F oven for about 10-15 minutes until warmed through. Alternatively, reheat on the stovetop over medium heat in a covered skillet with a splash of broth to prevent drying. Avoid microwaving if possible as it can dry out the chicken; if microwaving is necessary, cover and heat gently.
Shredding for Other Uses: Shred cooled chicken for use in salads, tacos, sandwiches, grain bowls, or soups. Shredded baked chicken is incredibly versatile for meal-prep applications.
Shelf Life: Properly stored in the refrigerator, baked chicken thighs maintain best quality for 3-4 days. The meat is still safe to eat for up to 5 days if properly stored in an airtight container.
Freezing: Cool completely, then freeze in airtight containers or freezer bags for up to 3 months. Label with date and contents. Thaw overnight in the refrigerator before reheating.
Meal Prep Strategy: Bake multiple batches on the weekend, cool, portion into containers, and refrigerate or freeze for grab-and-go lunches and dinners throughout the week.
Make-Ahead & Freezer Notes
Can You Make It Ahead? Absolutely! Baked chicken thighs are perfect for advance preparation. You can prepare seasoned, uncooked chicken up to 8 hours ahead in the refrigerator, or marinate overnight for extra flavor. Bake just before serving for best texture.
Freezer-Friendly Details: Baked chicken thighs freeze beautifully for up to 3 months. Cool completely, then freeze in airtight containers or freezer bags with as much air removed as possible. The chicken emerges from freezing tasting just as fresh as when originally baked.
Best Reheating Method: Thaw frozen chicken overnight in the refrigerator, then reheat gently in a 350°F oven for 10-15 minutes until warmed through. Alternatively, reheat on the stovetop over medium heat in a covered skillet with a splash of broth. Avoid high heat or microwave reheating which can dry out the chicken.
Component Freezing: You can freeze the oil and herb mixture separately in ice cube trays for convenient future use. Pop out cubes and coat chicken for a quicker meal-prep process.
Make-Ahead Timeline:
- One month ahead: Bake and freeze chicken fully cooked
- One week ahead: Thaw in refrigerator overnight
- Day before: Prepare seasoning mixture and arrange chicken (refrigerate until baking)
- Day of: Bake fresh or reheat from frozen
Batch Baking: Make multiple pans simultaneously on a weekend. Cool, portion, and freeze for easy grab-and-go meals throughout the month.
Marinate Ahead: Prepare chicken with seasonings in the morning, refrigerate throughout the day, then bake when convenient.
Serving Suggestions
Perfect baked chicken thighs deserve equally delicious accompaniments and serving occasions that complement their rich, savory flavor.
Vegetable Side Dishes:
- Roasted Brussels sprouts with garlic and parmesan
- Seasoned rice pilaf with herbs
- Garlic mashed potatoes
- Roasted root vegetables (potatoes, carrots, parsnips)
- Steamed broccoli with lemon
- Creamed spinach
- Roasted green beans with almonds
- Polenta or creamy polenta
Salad Options:
- Mediterranean salad with olives and feta
- Mixed greens with lemon vinaigrette
- Caprese salad with fresh mozzarella
- Arugula salad with shaved Parmesan
- Roasted vegetable salad
- Coleslaw with vinegar dressing
- Grain salad with quinoa or couscous
Bread Accompaniments:
- Crusty bread for soaking pan juices
- Garlic bread for dipping
- Dinner rolls
- Focaccia bread
- Flatbread
- Garlic knots
- Breadsticks
Beverage Pairings:
- White wine like Sauvignon Blanc or Pinot Grigio
- Light red wine like Pinot Noir
- Rosé wine
- Beer – pilsner or pale ale
- Sparkling water with lemon
- Iced tea
- Herbal tea
Sauce Accompaniments:
- Pan juices drizzled over chicken
- Lemon butter sauce
- Herb cream sauce
- Garlic aioli
- Chimichurri sauce
- Pesto
- Salsa verde
Complete Meal Examples:
- Baked chicken with roasted potatoes and vegetables, fresh salad
- Mediterranean chicken with rice pilaf and Greek salad
- Simple roasted chicken with steamed broccoli and mashed potatoes
- One-pan chicken with root vegetables and crusty bread
Occasion Ideas:
- Weeknight family dinner
- Dinner party entrée
- Holiday meal
- Potluck contribution
- Meal-prep lunch bowls
- Casual entertaining
- Date night at home
- Sunday family gathering
FAQs Section
What’s the difference between chicken thighs and chicken breast? Chicken thighs contain more fat and connective tissue, which keeps them incredibly moist and flavorful during cooking. They’re more forgiving – nearly impossible to dry out. Thighs are darker meat with richer flavor and are significantly cheaper than breast. Breast is leaner but can become dry if overcooked. Many cooks prefer thighs for their superior taste and texture.
Can I use boneless, skinless chicken thighs? You can, though the results won’t be quite as impressive. Boneless, skinless thighs are leaner, more prone to drying out, and won’t develop that beautiful crispy exterior. For the best results, use bone-in, skin-on thighs. If using boneless thighs, reduce baking time by about 5-10 minutes and watch carefully to prevent overcooking.
How do I know when baked chicken thighs are done? Use a meat thermometer and check the thickest part of the thigh (between the bone and skin, without touching bone). The internal temperature should reach exactly 165°F (74°C). This is the most reliable way to know when chicken is safely cooked through. Never rely on color or appearance alone.
Can I make baked chicken thighs on the stovetop instead of baking? Yes! Heat olive oil in an oven-safe skillet over medium-high heat, sear chicken skin-side down for 5-7 minutes until golden, then flip and sear the other side. Transfer the skillet to the oven (or cover and finish cooking on the stovetop over lower heat) until the internal temperature reaches 165°F. Stovetop-started chicken develops extra-crispy skin.
How long do baked chicken thighs stay fresh? Properly stored in an airtight container in the refrigerator, baked chicken thighs stay fresh for 3-4 days. They remain safe to eat for up to 5 days if stored correctly. Frozen chicken thighs maintain quality for up to 3 months.
What if my chicken thighs don’t have crispy skin? Crispy skin requires: completely dry chicken before cooking, skin-side up positioning, upper-middle oven rack placement, and sufficient oven temperature (425°F). If skin isn’t crispy, your chicken was likely wet before cooking or positioned skin-side down. Pat chicken completely dry and position skin-side up facing direct oven heat.
Can I freeze baked chicken thighs? Absolutely! Cool completely, then freeze in airtight containers or freezer bags for up to 3 months. Thaw overnight in the refrigerator before reheating gently in a 350°F oven. Frozen chicken emerges tasting just as fresh as originally baked.
Conclusion
There you have it – the ultimate guide to making the best baked chicken thighs recipe that tastes absolutely restaurant-quality yet requires only simple ingredients and basic technique! This easy baked chicken thighs recipe proves that impressive, restaurant-worthy dinner doesn’t require complicated methods or expensive ingredients. With just bone-in, skin-on chicken thighs, a few pantry staples, and about 45 minutes of your time, you can create juicy, tender, golden-skinned chicken that will make you the dinner hero in your household.
The magic of this baked chicken thighs recipe lies in its beautiful simplicity combined with foolproof results. The combination of quality ingredients, proper technique, and a meat thermometer creates chicken that’s perfectly juicy inside with crispy, gorgeous skin outside – restaurant-quality results that impress family and guests alike. Whether you’re making this for a casual weeknight dinner, batch cooking for meal prep, or entertaining guests, this best baked chicken thighs recipe delivers consistent, delicious results every single time.
I’d absolutely love to hear about your baked chicken thighs experiences! What seasonings or variations do you prefer? Have you tried this recipe with vegetables for a one-pan meal? What’s your favorite side dish to serve alongside these juicy chicken thighs? Drop a comment below and let me know how your cooking turned out and what made this recipe special for your family. And if you loved this recipe, please save it to your favorite Pinterest board so you can find it easily whenever you need a reliable, delicious chicken dinner, and share it with friends and family who deserve to experience perfectly baked chicken thighs!
Happy cooking, and may your kitchen always be filled with the aroma of juicy, golden-skinned baked chicken thighs!