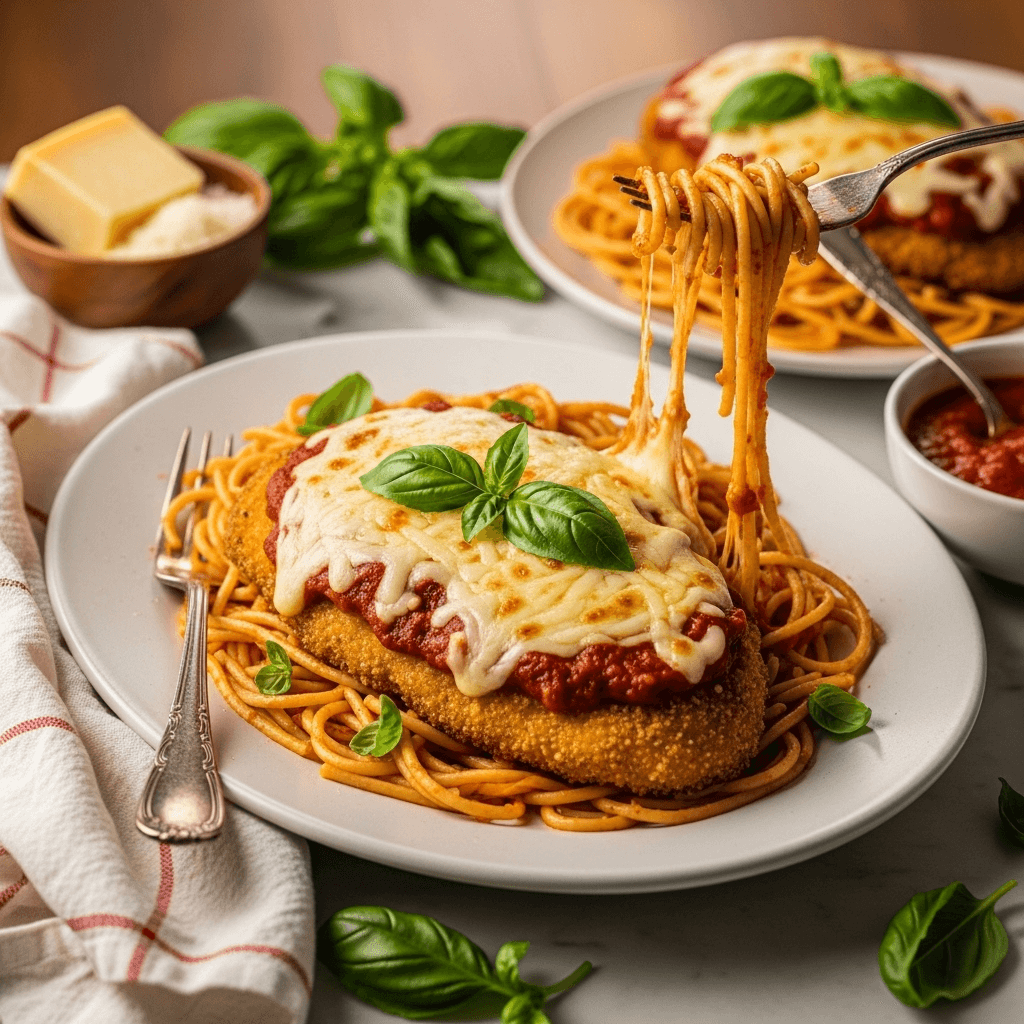
Few dishes deliver comfort and satisfaction quite like chicken parmesan, with its crispy breaded chicken cutlets, savory marinara sauce, and blanket of melted mozzarella and parmesan cheese. This baked chicken parmesan recipe gives you all the classic flavors you crave—tender, juicy chicken with a golden, crunchy coating—but it’s baked in the oven instead of fried, making it healthier and easier to prepare. The result is restaurant-quality Italian-American comfort food that’s perfect for busy weeknight dinners yet impressive enough for company.
This easy baked chicken parmesan is incredibly versatile—serve it over spaghetti for a traditional presentation, alongside garlic bread and salad for a complete meal, or tucked into sub rolls for amazing chicken parm sandwiches. It’s perfect for family dinners when you need something that pleases both kids and adults, date nights when you want to impress without spending hours in the kitchen, or meal prep since it reheats beautifully throughout the week. The best part? This recipe takes about an hour from start to finish, with most of that time being hands-off baking. The active prep work is straightforward and beginner-friendly, requiring no special skills—just a simple breading process and assembling everything in a baking dish. The oven does all the heavy lifting while you relax or prepare your sides.
History / Background
Chicken parmesan, despite its Italian-sounding name, is actually a distinctly Italian-American creation that emerged from the immigrant communities of the northeastern United States in the early-to-mid 20th century. The dish was inspired by traditional Italian recipes like “melanzane alla parmigiana” (eggplant parmesan), which originated in the Campania and Sicily regions of southern Italy. When Italian immigrants arrived in America, they adapted their beloved eggplant parmigiana recipe to include chicken, which was more readily available and affordable in their new country.
The original Italian versions featured breaded and fried eggplant slices layered with tomato sauce, mozzarella, and parmesan cheese. Italian-American cooks applied this same technique to chicken cutlets, creating what became known as “chicken parmigiana” or simply “chicken parm.” The dish gained widespread popularity in Italian-American restaurants throughout the Northeast, particularly in New York and New Jersey, during the 1950s and 1960s.
Interestingly, if you order “pollo alla parmigiana” in Italy today, you’ll often get something quite different from the American version—if you can find it at all, since chicken parmesan remains primarily an Italian-American dish rather than an authentic Italian one. The American version is typically more generous with cheese, uses a thicker breading, and is often served over pasta, while Italian versions (when they exist) tend to be lighter and more refined.
The baked chicken parmesan variation emerged later as health-conscious home cooks sought to reduce the oil and calories associated with traditional frying while still achieving that coveted crispy coating. By using proper oven techniques—high heat, a well-seasoned breading, and sometimes a light spray of oil—home cooks discovered they could create a beautifully crispy, golden exterior without the mess and calories of deep frying. This healthier baked version has become increasingly popular in recent decades and is now just as beloved as the original fried preparation.
Why You’ll Love This Recipe
This crispy baked chicken parmesan recipe delivers everything you want from this classic dish while being easier and healthier than traditional fried versions. It’s the kind of recipe that becomes a regular in your dinner rotation because it’s just that reliable and delicious.
- Healthier than fried – Baked instead of fried means significantly less oil and fewer calories without sacrificing flavor or texture
- Crispy golden coating – Proper technique creates an incredibly crunchy exterior that rivals fried versions
- Juicy, tender chicken – The chicken stays moist and flavorful, never dry or rubbery
- Family-friendly favorite – Both kids and adults love this cheesy, comforting dish
- Restaurant-quality at home – Tastes like your favorite Italian restaurant but costs a fraction of the price
- Easy weeknight dinner – Straightforward prep work and mostly hands-off cooking
- Great for meal prep – Leftovers reheat beautifully for easy lunches throughout the week
- Impressive for guests – Looks elegant and tastes amazing, perfect for casual entertaining
- Customizable – Easy to adjust seasonings, cheese types, or serving styles to your preference
- Less messy than frying – No splattering oil or lingering fried food smell in your kitchen
- Budget-friendly – Uses affordable chicken breasts and simple ingredients
Ingredient Notes
Boneless, Skinless Chicken Breasts: The foundation of your dish. Choose chicken breasts that are similar in size for even cooking. You’ll want to pound them to an even ½-inch thickness—this ensures they cook through at the same rate as the breading crisps up. If your chicken breasts are very large (over 8 ounces each), consider cutting them in half horizontally to create thinner cutlets.
Italian Breadcrumbs: Create that signature crunchy coating. Italian-seasoned breadcrumbs already contain herbs and spices that complement the dish perfectly. Panko breadcrumbs can substitute for extra crunch, though the texture will be slightly different. For gluten-free, use gluten-free breadcrumbs or crushed pork rinds.
Parmesan Cheese: Adds savory, nutty flavor to both the breading and the topping. Always use freshly grated Parmesan cheese from a block rather than the pre-grated kind in a canister—the difference in flavor and melting quality is dramatic. Parmigiano-Reggiano is the gold standard, but any good-quality Parmesan works well.
Mozzarella Cheese: Provides that classic stretchy, melty cheese topping everyone loves. Use whole milk mozzarella for best flavor and texture. Pre-shredded works fine for convenience, but freshly shredded from a block melts more smoothly. Fresh mozzarella can be used but releases more liquid, so pat it very dry first.
Marinara Sauce: The flavorful tomato base. Use your favorite store-bought marinara or homemade sauce—about 2-3 cups total. Quality matters here since the sauce is a major flavor component. Look for sauces with simple ingredients and no added sugar if possible.
Eggs: Act as the “glue” between the flour and breadcrumb layers, helping the coating adhere to the chicken. Room temperature eggs work best. For an egg-free version, buttermilk can work as a substitute.
All-Purpose Flour: The first layer in the breading process, creating a dry surface that helps the egg stick. Season the flour with salt and pepper for added flavor. For gluten-free, use a gluten-free flour blend.
Italian Seasoning: A blend of herbs (typically basil, oregano, thyme, and rosemary) that enhances the Italian flavors throughout the dish. You can make your own blend or use store-bought.
Garlic Powder and Onion Powder: Add depth and savory notes to the breading. These dried seasonings distribute more evenly than fresh garlic or onions would in the coating.
Equipment Needed
- Meat mallet or rolling pin (for pounding chicken)
- Plastic wrap or zip-top bag (for pounding chicken)
- 3 shallow bowls or pie plates (for breading station)
- Large baking sheet with rimmed edges
- Wire cooling rack (optional but recommended)
- Parchment paper or aluminum foil
- 9×13-inch baking dish
- Measuring cups and spoons
- Tongs
- Cooking spray or oil mister
- Instant-read thermometer (optional but helpful)
Pro Tip: Using a wire rack placed on your baking sheet allows air to circulate under the chicken, helping the bottom stay crispy instead of getting soggy. This is a game-changing technique for oven-baked breaded foods.
Print
Baked Chicken Parmesan Recipe
- Total Time: 55 minutes
- Yield: 4 servings 1x
- Diet: Gluten Free
Description
This baked chicken parmesan features tender chicken breasts coated in a crispy, golden breadcrumb crust, topped with marinara sauce and melted mozzarella and parmesan cheese. Baked to perfection in the oven instead of fried, it’s a healthier version of the Italian-American classic that’s perfect served over pasta or with a side salad for an easy weeknight dinner the whole family will love.
Ingredients
For the Chicken:
- 4 boneless, skinless chicken breasts (about 1½–2 pounds total)
- ½ cup all-purpose flour
- 2 large eggs
- 2 tablespoons milk
- 1½ cups Italian breadcrumbs
- ½ cup freshly grated Parmesan cheese, divided
- 1 teaspoon Italian seasoning
- 1 teaspoon garlic powder
- ½ teaspoon onion powder
- 1 teaspoon salt, divided
- ½ teaspoon black pepper, divided
- Cooking spray or olive oil spray
For Assembly:
- 2 cups marinara sauce
- 1½ cups shredded mozzarella cheese
- Fresh basil leaves for garnish (optional)
- Cooked pasta for serving (optional)
Instructions
- Prep and preheat: Preheat your oven to 425°F (220°C). Line a large baking sheet with parchment paper or aluminum foil. If using a wire rack, place it on the lined baking sheet and spray with cooking spray. Also spray a 9×13-inch baking dish with cooking spray and set aside.
- Pound the chicken: Place chicken breasts between two sheets of plastic wrap or in a large zip-top bag. Using a meat mallet or rolling pin, gently pound to an even ½-inch thickness. This ensures even cooking and tender texture. Pat the chicken dry with paper towels and season both sides lightly with ½ teaspoon salt and ¼ teaspoon pepper.
- Set up breading station: Arrange three shallow bowls or pie plates in a row. In the first bowl, add the flour seasoned with ¼ teaspoon salt and ¼ teaspoon pepper. In the second bowl, whisk together eggs and milk until well combined. In the third bowl, combine breadcrumbs, ¼ cup of the Parmesan cheese, Italian seasoning, garlic powder, onion powder, and remaining ¼ teaspoon salt. Mix well.
- Bread the chicken: Working with one piece at a time, coat the chicken in flour, shaking off excess. Dip into the egg mixture, letting excess drip off. Finally, press into the breadcrumb mixture, coating both sides thoroughly and pressing gently so the coating adheres. Place breaded chicken on the prepared baking sheet or wire rack. Repeat with remaining chicken pieces.
- Spray and bake: Generously spray the tops of the breaded chicken with cooking spray or olive oil spray—this is crucial for achieving a golden, crispy coating. Bake for 20-25 minutes, flipping halfway through and spraying the other side, until the chicken is golden brown and registers 165°F on an instant-read thermometer.
- Add sauce and cheese: Remove the baking sheet from the oven. Carefully transfer the chicken pieces to the prepared 9×13-inch baking dish. Spoon marinara sauce over each piece of chicken (about ½ cup per piece). Top with shredded mozzarella and the remaining ¼ cup of Parmesan cheese.
- Final bake: Return to the oven and bake for 8-10 minutes, until the cheese is melted, bubbly, and lightly golden. For extra browning, you can broil for 1-2 minutes at the end, watching carefully to prevent burning.
- Serve: Remove from oven and let rest for 3-5 minutes. Garnish with fresh basil leaves if desired. Serve over cooked pasta, with garlic bread, or however you prefer.
Notes
- Pounding chicken to even thickness is crucial for even cooking—don’t skip this step.
- The cooking spray on the breaded chicken is essential for crispiness—don’t skip or use too little.
- Don’t overcrowd the baking sheet—give chicken pieces space for even browning.
- If your chicken breasts are very large (10+ ounces), cut them in half horizontally before pounding.
- For extra crispy coating, let the breaded chicken rest for 10 minutes before baking to allow the coating to set.
- Check internal temperature—chicken is done when it reaches 165°F in the thickest part.
- You can prepare the chicken through step 5, then add sauce and cheese just before serving for crispier coating.
- Prep Time: 20 minutes
- Cook Time: 35 minutes
- Category: Dinner
- Method: Baking
- Cuisine: American
Nutrition
- Serving Size: 1 chicken breast with sauce and cheese
- Calories: 485
- Sugar: 6g
- Sodium: 1240mg
- Fat: 18g
- Saturated Fat: 8g
- Unsaturated Fat: 8g
- Trans Fat: 0g
- Carbohydrates: 32g
- Fiber: 3g
- Protein: 48g
- Cholesterol: 185mg
Tips & Variations
Extra crispy version: Double-bread the chicken by repeating the egg and breadcrumb steps twice. This creates an extra-thick, super crunchy coating.
Spicy chicken parm: Add ½ teaspoon red pepper flakes to the breadcrumb mixture and use spicy marinara sauce (arrabbiata) for a kick.
Four-cheese variation: Use a combination of mozzarella, provolone, fontina, and Parmesan for a more complex cheese flavor.
Herb-enhanced: Add 2 tablespoons of fresh chopped parsley or basil to the breadcrumb mixture for extra herb flavor.
Panko substitute: Replace Italian breadcrumbs with panko breadcrumbs mixed with 1 tablespoon of Italian seasoning for extra-crispy texture.
Lighter option: Use chicken cutlets (naturally thinner) instead of breasts, reduce cheese by half, and use reduced-fat mozzarella.
Keto-friendly: Replace breadcrumbs with a mixture of almond flour, Parmesan, and pork rind crumbs for a low-carb coating.
Make it a parmigiana bake: Layer the chicken in a baking dish with extra sauce and mozzarella slices between layers for a more casserole-style dish.
Chicken parm subs: Use smaller chicken cutlets or slice the finished chicken, place in hoagie rolls with extra sauce and cheese for delicious sandwiches.
Pro Chef Tips
The pounding technique matters: When pounding chicken, use gentle, even strokes from the center outward. Don’t smash aggressively—you want to thin the meat, not tear it. Consistent thickness (½ inch throughout) is more important than making it super thin. This ensures the breading crisps at the same rate the chicken cooks through.
Proper breading hand technique: Use one hand for wet ingredients (egg) and one hand for dry (flour and breadcrumbs). This “wet hand, dry hand” method prevents your fingers from getting completely coated in gunk and makes the process much cleaner and more efficient.
Let the breading set: After breading all your chicken, let it rest for 10-15 minutes before baking. This allows the coating to adhere better and helps prevent it from falling off during cooking. The breading will also crisp up better after this rest period.
Oil spray is non-negotiable: Many people skip the oil spray thinking “baked” means no oil, but this is a mistake. The light coating of oil is what creates that golden, crispy exterior. Without it, the breading stays pale and soft. Don’t be shy—give it a good spray.
Flip at the right time: Wait until the chicken has baked for at least 15 minutes before flipping. If you try to flip too early, the coating may stick to the pan or rack. When it’s ready, it will release easily.
Sauce timing strategy: For maximum crispiness, some chefs bake the chicken completely, then add just the sauce and cheese for the final 8-10 minutes. This keeps the breading crispier since it’s not sitting under sauce for as long. It’s an optional technique but worth trying if crispy coating is your priority.
Carryover cooking: Remember that chicken will continue cooking for a few minutes after you remove it from the oven due to residual heat. Pull it when it reaches 162-163°F, and it will coast up to the safe 165°F temperature while resting.
Common Mistakes to Avoid
Not pounding chicken to even thickness: This is the most common mistake. Thick chicken takes longer to cook through, meaning the breading burns before the inside is done, or you end up with dried-out thin parts and undercooked thick parts. Always pound to a uniform ½-inch thickness—it takes 2 minutes and makes all the difference.
Skipping the oil spray: Without a light coating of oil, your breading will never achieve that golden, crispy texture—it will stay pale and somewhat soggy. The oil is essential for browning and crisping. Spray generously before baking and after flipping.
Adding sauce too early: If you put the marinara sauce on before the chicken has fully cooked and crisped, you’ll end up with soggy breading. Always bake the breaded chicken first until it’s golden and crispy (20-25 minutes), then add sauce and cheese for just the final 8-10 minutes.
Overcrowding the pan: When chicken pieces touch each other or are too close together, they steam instead of getting crispy. Leave at least 1 inch between pieces for proper air circulation and even browning. Use two baking sheets if necessary.
Overcooking the chicken: Chicken breasts dry out quickly when overcooked. Use an instant-read thermometer and remove them at exactly 165°F internal temperature. Better yet, pull them at 162-163°F since they’ll continue cooking while resting. Dry, tough chicken ruins even the best breading and sauce.
Storage & Meal Prep
Refrigerator storage: Store leftover chicken parmesan in an airtight container in the refrigerator for up to 4 days. Keep the chicken separate from any pasta if possible—the moisture from the pasta can make the breading soggy over time.
Reheating for best results: For crispy results, reheat in the oven at 350°F for 12-15 minutes until warmed through. Place on a wire rack over a baking sheet for all-around heat circulation. Microwave reheating works in a pinch (2-3 minutes) but won’t maintain the crispy coating—it’s fine for lunch at work but not ideal if you care about texture.
Freezer storage: Baked chicken parmesan freezes well for up to 3 months. Cool completely first, then wrap each piece individually in plastic wrap, followed by aluminum foil. Place wrapped pieces in a freezer bag, removing as much air as possible.
Reheating from frozen: You can reheat from frozen (no thawing needed) in a 350°F oven for 30-35 minutes, covered with foil for the first 20 minutes, then uncovered to crisp up. Or thaw overnight in the refrigerator and reheat for 15-20 minutes at 350°F.
Meal prep strategy: Make a double batch on Sunday for easy weeknight meals. Store components separately (breaded chicken, sauce, cheese) and assemble just before reheating for optimal texture.
Make-Ahead & Freezer Notes
Bread ahead: You can bread the chicken up to 24 hours in advance. Place breaded (but unbaked) chicken on a baking sheet, cover tightly with plastic wrap, and refrigerate until ready to bake. Let sit at room temperature for 15 minutes before baking. This actually helps the coating adhere better.
Freeze unbaked: For ultimate convenience, bread the chicken and freeze it unbaked. Place breaded chicken on a baking sheet and freeze until solid (2-3 hours), then transfer to freezer bags with parchment paper between pieces. Bake from frozen at 425°F for 30-35 minutes, then add sauce and cheese.
Complete and freeze: You can also fully bake, sauce, and cheese the chicken, let it cool completely, then freeze. This is ideal for grab-and-go meals—just reheat one portion at a time as needed.
Sauce prep: Make your marinara sauce ahead and store in the refrigerator for up to 5 days or freeze for up to 3 months. Having homemade sauce ready to go makes this recipe even faster.
Assembly line efficiency: If making a large batch for freezing, set up an assembly line and bread multiple chicken breasts at once. It’s much more efficient to do all the breading in one session.
Serving Suggestions
This versatile baked chicken parm pairs beautifully with a variety of sides and creates a complete Italian-inspired meal.
Classic pasta pairing: Serve over spaghetti, linguine, or penne pasta tossed with marinara sauce or simple garlic and olive oil. This is the traditional presentation and what most people expect.
Lighter options: Serve over zucchini noodles, spaghetti squash, or cauliflower rice for a lower-carb meal that’s still satisfying.
Bread sides: Garlic bread, garlic knots, or warm Italian bread with butter are perfect for soaking up extra sauce.
Salad pairings: A crisp Caesar salad, Italian chopped salad, or simple mixed greens with balsamic vinaigrette balance the richness perfectly.
Vegetable sides: Roasted broccoli, sautéed spinach with garlic, roasted asparagus, or Italian green beans (with tomatoes and garlic) round out the meal beautifully.
Sandwich style: Place the chicken parm in a toasted hoagie roll or sub roll with extra mozzarella for an incredible sandwich. Add some arugula for freshness.
Wine pairing: Serve with Chianti, Sangiovese, or any medium-bodied Italian red wine. For white wine lovers, a crisp Pinot Grigio works well.
Make it a feast: Create an Italian dinner party with this as the main course, preceded by antipasto platter and caprese salad, and finished with tiramisu or gelato.
FAQs Section
Can I use chicken thighs instead of breasts?
Absolutely! Boneless, skinless chicken thighs work wonderfully and actually stay more moist than breasts. Pound them to even thickness just like breasts. The cooking time remains the same. Thighs have slightly more fat, so they’re very forgiving and harder to dry out.
Why isn’t my breading crispy?
The most common reasons are: not using enough cooking spray (be generous), baking at too low a temperature (make sure your oven is fully preheated to 425°F), overcrowding the pan (chicken needs space for air circulation), or adding sauce too early (bake chicken fully first, then add sauce only for final minutes).
Can I make this without eggs?
Yes! Use buttermilk as a substitute for the egg wash—dip floured chicken in buttermilk before coating with breadcrumbs. The breading won’t be quite as thick but will still adhere well. Some people also use mayonnaise thinned with a little milk as an egg substitute that works surprisingly well.
How do I know when the chicken is fully cooked?
The most reliable method is using an instant-read thermometer—chicken is safe at 165°F internal temperature in the thickest part. Visual cues include: clear (not pink) juices when pierced, no pink color in the meat, and firm texture when pressed. If you don’t have a thermometer, cut into the thickest part of one piece to check.
Can I air fry instead of baking?
Yes! Preheat your air fryer to 400°F. Spray the basket and breaded chicken well with oil spray. Air fry for 10-12 minutes, flipping halfway through, until golden and cooked through. Then transfer to a baking dish, add sauce and cheese, and either air fry for 3-4 more minutes or place under the broiler until cheese melts.
What’s the difference between chicken parmesan and chicken parmigiana?
They’re the same dish—”parmigiana” is the Italian name, while “parmesan” is the Americanized version. Some purists insist on using “parmigiana,” but both names refer to breaded chicken cutlets topped with tomato sauce and melted cheese.
Why does my breading fall off?
This usually happens because: the chicken wasn’t dried properly before breading (moisture prevents adhesion), you didn’t press the breading firmly enough onto the chicken, the breading didn’t rest before baking (give it 10 minutes to set), or you tried to flip the chicken before it had properly crisped and released from the pan (wait until 15-20 minutes of baking).
Conclusion
This baked chicken parmesan proves that you don’t need a deep fryer or restaurant kitchen to create incredibly crispy, cheesy, satisfying Italian comfort food at home. With its golden breaded coating, tender juicy chicken, tangy marinara sauce, and blanket of melted cheese, this recipe delivers everything you crave from the classic dish—but it’s healthier, easier, and less messy than traditional fried versions. It’s the kind of recipe that earns a permanent spot in your dinner rotation because it’s reliable, crowd-pleasing, and genuinely delicious every single time.
Whether you’re making it for a busy weeknight family dinner, meal prepping for the week ahead, or serving it to guests who think you spent hours in the kitchen, this easy chicken parm recipe never disappoints. The best part? Once you master the basic technique, you can customize it endlessly with different seasonings, cheeses, and serving styles to keep things interesting.
I’d love to hear about your chicken parmesan success! Did you serve it over pasta or make it into sandwiches? Did you try any of the variations? How did your family react to this crispy, cheesy goodness? Drop a comment below sharing your experience, and please rate the recipe so other home cooks know what to expect. If this recipe made Italian night easier and more delicious, share it on Pinterest—your pins help other food lovers discover how simple and amazing homemade chicken parm can be!
Now go preheat that oven and get ready to make the best baked chicken parmesan you’ve ever tasted. Happy cooking, friend!