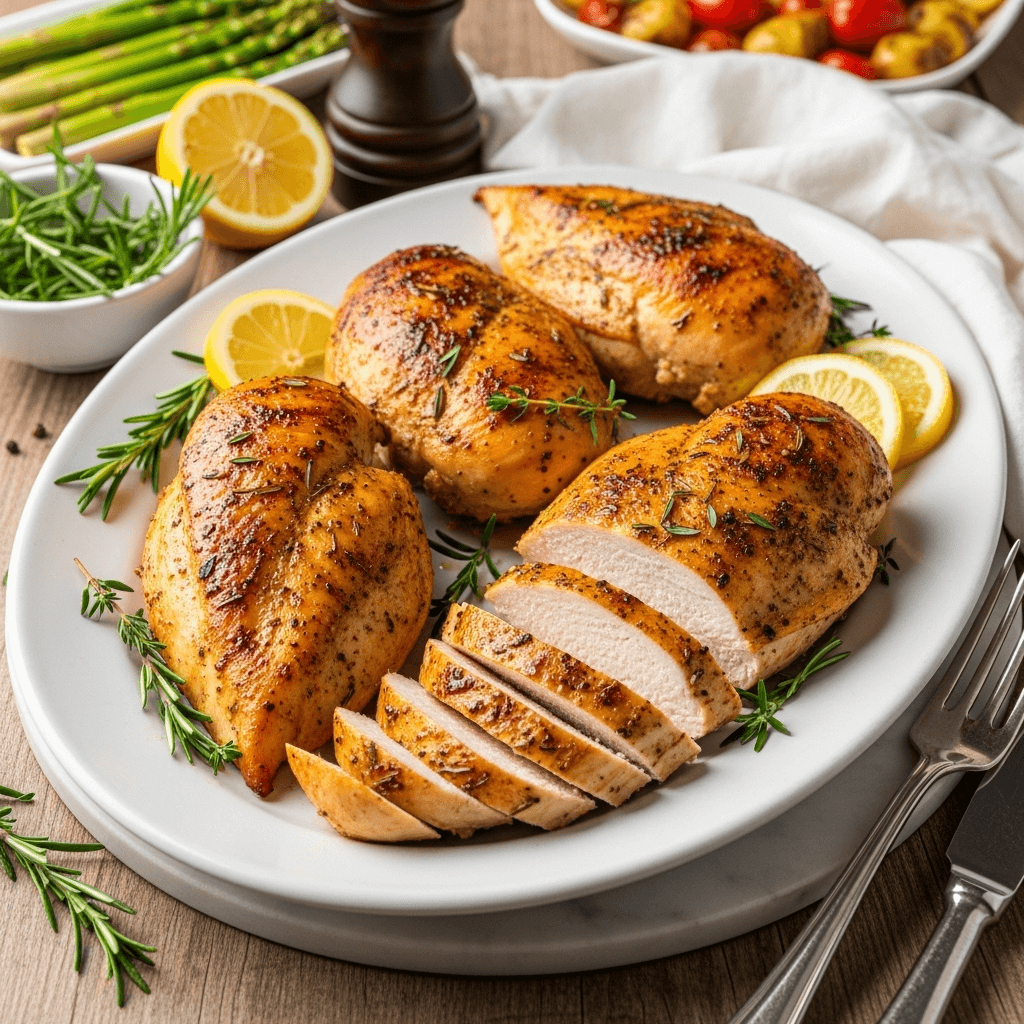
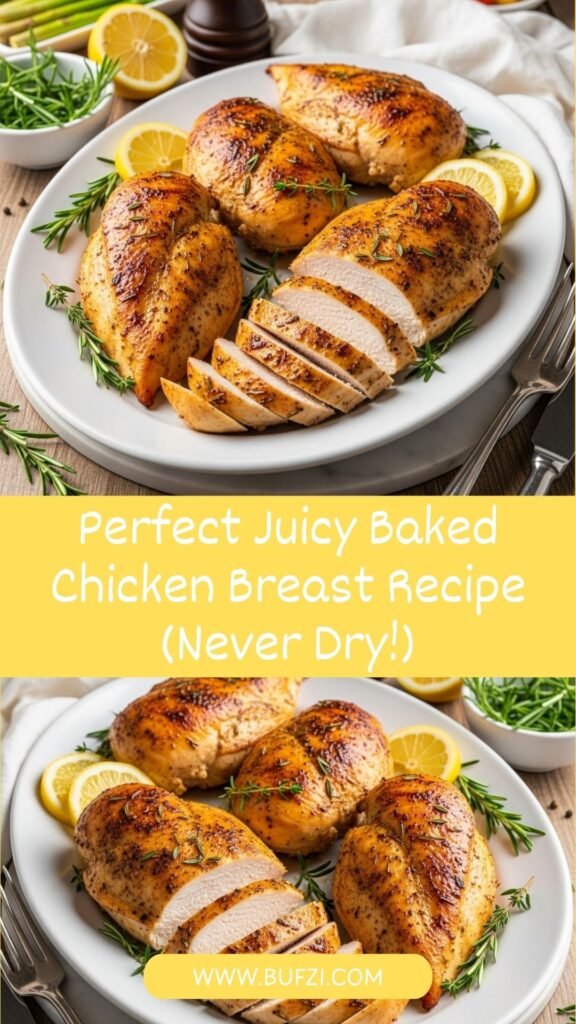
If you’ve ever struggled with dry, flavorless baked chicken breast, this recipe is about to change everything! This foolproof method for juicy baked chicken breast delivers perfectly tender, moist chicken with a beautiful golden exterior every single time. No more sad, rubbery chicken dinners—just succulent, flavorful chicken that the whole family will actually look forward to eating.
Baked chicken breast is the ultimate versatile protein that every home cook needs to master. It’s the foundation of countless meals, from simple weeknight dinners to meal prep for the week ahead. Whether you’re slicing it for salads, serving it alongside roasted vegetables, or using it in sandwiches and wraps, this recipe ensures your chicken comes out perfect every time.
What makes this baked chicken breast recipe truly special is the simple technique that guarantees juicy results. By combining the right temperature, proper seasoning, and a couple of key tricks, you’ll achieve restaurant-quality chicken that’s tender, flavorful, and never dry. Perfect for busy weeknights, meal prep Sundays, healthy eating, family dinners, or anytime you need reliable, delicious protein that goes with everything!
History / Background
Chicken breast has become a cornerstone of American home cooking, though its journey to dinner plate dominance is relatively recent. For much of culinary history, chicken was considered a luxury item, and when it was served, the dark meat (thighs and legs) was actually preferred for its richer flavor and more forgiving texture.
The rise of chicken breast as the go-to protein began in earnest in the 1970s and 1980s as health consciousness swept across America. Nutritionists and doctors began emphasizing lean protein and low-fat diets, and chicken breast—being naturally lean with less fat than dark meat—became the poster child for healthy eating. The fitness movement of the 1980s further cemented boneless, skinless chicken breast as the protein of choice for health-conscious Americans.
This shift was also made possible by advances in chicken farming and processing. The poultry industry developed methods to raise chickens more efficiently and process them into convenient, boneless, skinless cuts that required minimal preparation. By the 1990s, chicken breast had become more affordable and accessible than ever before, appearing in grocery stores pre-packaged and ready to cook.
However, this convenience came with a challenge: chicken breast is notoriously easy to overcook. Unlike dark meat with its higher fat content that stays moist even when overcooked, lean chicken breast quickly becomes dry and stringy when exposed to too much heat. Home cooks everywhere struggled with the same problem—how to cook this healthy, versatile protein without turning it into cardboard.
The quest for juicy baked chicken breast has led to countless techniques over the decades. Some cooks swear by brining (soaking in salt water), others marinate for hours, and some pound the chicken to even thickness. French chefs introduced Americans to “paillard” (thin, pounded cutlets), while Southern cooks often opted for coating chicken in breadcrumbs or simply frying it to maintain moisture.
The baking method became increasingly popular as a hands-off, healthier alternative to frying. Modern recipes have refined the technique, discovering that the key lies in proper temperature control, not overcooking, and allowing the chicken to rest after baking. What was once considered difficult—moist baked chicken breast—is now achievable for any home cook with the right method.
Today, baked chicken breast remains a staple in American kitchens because it checks all the boxes: it’s affordable, healthy, quick to prepare, and incredibly versatile. Mastering this simple technique opens up endless meal possibilities and ensures you always have delicious protein ready for whatever dish you’re craving.
Why You’ll Love This Recipe
This isn’t just another baked chicken recipe—it’s been specifically developed to solve the number one problem everyone faces: dry chicken breast. Through careful testing and the right combination of techniques, this recipe delivers consistently juicy, flavorful chicken that’s perfectly cooked through without being overdone.
Here’s why this recipe will become your go-to:
- Always Juicy & Tender – Never dry or rubbery, guaranteed perfectly moist chicken every time
- Simple & Foolproof – Easy technique that works even for beginner cooks
- Ready in 30 Minutes – From prep to plate in half an hour for busy weeknights
- Healthy & Lean – High protein, low carb, and naturally gluten-free
- Minimal Ingredients – Uses basic pantry seasonings you already have
- Incredibly Versatile – Use in countless recipes or serve as a simple main dish
- Perfect for Meal Prep – Makes excellent leftovers for the entire week
- Budget-Friendly – Chicken breast is affordable and feeds a family easily
- No Fancy Equipment – Just a baking dish and your oven
- Customizable Flavors – Easy to adapt with different seasonings and marinades
- Hands-Off Cooking – Bake it and forget it while you prep sides
- Kid-Approved – Mild, familiar flavor that even picky eaters enjoy
Ingredient Notes
The beauty of this recipe is its simplicity. Here’s what you need and why each ingredient matters:
Boneless, Skinless Chicken Breasts – The star of the show! Look for chicken breasts that are similar in size so they cook evenly. If you have very large breasts (over 8 ounces each), consider butterflying or pounding them to even thickness. Four chicken breasts typically weigh about 1.5-2 pounds total and serve 4 people. Organic or free-range chicken will have better flavor but any quality chicken breast works.
Olive Oil – Helps the seasonings stick to the chicken and promotes browning while keeping the exterior from drying out. Extra virgin olive oil adds the best flavor, but regular olive oil or avocado oil work too. The oil creates a seal that locks in moisture during baking.
Salt – Essential for flavoring the chicken throughout, not just on the surface. Salt also helps the chicken retain moisture during cooking. Use kosher salt or sea salt for best results. Don’t skip the salt or your chicken will taste bland!
Black Pepper – Adds a subtle heat and depth of flavor. Freshly ground black pepper tastes significantly better than pre-ground, but either works. Adjust the amount based on your heat preference.
Garlic Powder – Provides savory, aromatic flavor without the hassle of mincing fresh garlic (which can burn during high-heat baking). Garlic powder distributes evenly across the chicken for consistent flavor in every bite.
Paprika – Adds a beautiful color and subtle sweet, smoky flavor. Regular paprika works great, or use smoked paprika for deeper flavor. The paprika also helps create that appealing golden-brown color on the chicken.
Onion Powder – Enhances the savory notes and adds complexity without overpowering. Like garlic powder, onion powder distributes evenly and won’t burn the way fresh onion might.
Dried Herbs (Optional) – Italian seasoning, dried thyme, oregano, or rosemary add extra flavor dimension. These are optional but recommended if you want more complex flavor.
Optional Add-Ins:
- Lemon juice or zest – Adds brightness and helps tenderize
- Honey or brown sugar – A touch of sweetness balances flavors
- Hot sauce or cayenne – For spicy kick
- Fresh herbs – Chopped parsley, thyme, or rosemary for garnish
Substitutions:
- Chicken: Turkey breast cutlets work similarly
- Oil: Avocado oil, melted butter, or neutral cooking oil
- Seasonings: Use any spice blend you prefer (Cajun, Italian, ranch seasoning)
Equipment Needed
You need minimal equipment to make perfect baked chicken breast:
- Baking dish or sheet pan – A 9×13-inch baking dish or rimmed baking sheet works perfectly
- Meat thermometer – The single most important tool for perfect chicken (ensures 165°F internal temp)
- Small bowl – For mixing the seasoning blend
- Paper towels – For patting chicken dry before seasoning
- Tongs or spatula – For flipping chicken if desired
- Aluminum foil – Optional, for tenting while resting
Pro tip: A meat thermometer is truly essential for perfect chicken. It’s the only reliable way to know when your chicken is cooked through without overcooking it. Digital instant-read thermometers are inexpensive and will change your cooking game!
Print
Baked Chicken Breast Recipe
- Total Time: 27 minutes
- Yield: 4 servings 1x
- Diet: Gluten Free
Description
This perfect juicy baked chicken breast recipe delivers tender, moist chicken with a golden exterior every single time. Simple seasoning and foolproof technique ensure never-dry chicken that’s ready in just 30 minutes. Perfect for weeknight dinners, meal prep, or any time you need reliable, delicious protein!
Ingredients
- 4 boneless, skinless chicken breasts (about 6–8 oz each)
- 2 tablespoons olive oil
- 1 teaspoon salt
- 1/2 teaspoon black pepper
- 1 teaspoon garlic powder
- 1 teaspoon paprika
- 1/2 teaspoon onion powder
- 1/2 teaspoon dried thyme or Italian seasoning (optional)
Instructions
- Preheat oven: Preheat your oven to 425°F (220°C). This high temperature is key for juicy chicken with a nice exterior. Let the oven fully preheat—don’t rush this step!
- Prepare chicken: Remove chicken from refrigerator and let it sit at room temperature for 10-15 minutes (this helps it cook more evenly). Pat chicken breasts completely dry with paper towels—this is crucial for proper browning and seasoning adhesion. If your chicken breasts are very thick (more than 1.5 inches), butterfly them or gently pound to even thickness using a meat mallet.
- Mix seasonings: In a small bowl, combine salt, black pepper, garlic powder, paprika, onion powder, and dried herbs if using. Mix well to create your seasoning blend.
- Season chicken: Place chicken breasts in your baking dish or on a sheet pan. Drizzle olive oil over both sides of each chicken breast, then rub to coat evenly. Sprinkle the seasoning blend generously over both sides of the chicken, pressing gently so the seasonings adhere. Make sure every surface is well-seasoned.
- Arrange for baking: Arrange chicken breasts in the baking dish with some space between them (don’t crowd). This allows hot air to circulate and promotes even cooking.
- Bake: Place the baking dish in the preheated oven and bake for 18-22 minutes, depending on thickness. DO NOT overbake! Chicken is done when an instant-read thermometer inserted into the thickest part reads 165°F (74°C). Smaller breasts (6 oz) will take closer to 18 minutes; larger ones (8 oz) closer to 22-24 minutes.
- Rest: This is critical! Remove chicken from oven when it reaches 165°F and immediately tent loosely with aluminum foil. Let rest for 5 minutes before slicing. During resting, the internal temperature will rise slightly and juices will redistribute throughout the meat, ensuring every bite is juicy.
- Serve: Slice and serve immediately, or let cool completely for meal prep. Enjoy your perfectly juicy baked chicken breast!
Notes
- Meat thermometer is essential: This is the only reliable way to know when chicken is done without overcooking.
- Even thickness matters: If breasts are uneven, pound thicker parts or butterfly them for uniform cooking.
- Don’t skip drying: Patting chicken dry ensures better browning and seasoning adhesion.
- High heat is key: 425°F creates a golden exterior while keeping interior moist.
- Rest before cutting: Resting redistributes juices—don’t skip this step!
- Size adjustments: Smaller chicken breasts (under 6 oz) need only 15-18 minutes. Check early!
- Fresh herbs: Add fresh herbs after baking for brighter flavor.
- Prep Time: 5 minutes
- Cook Time: 22 minutes
- Category: Main Dish
- Method: Baking
- Cuisine: American
Nutrition
- Serving Size: 1 chicken breast (about 6 oz cooked)
- Calories: 245
- Sugar: 0g
- Sodium: 650mg
- Fat: 9g
- Saturated Fat: 2g
- Unsaturated Fat: 7g
- Trans Fat: 0g
- Carbohydrates: 1g
- Fiber: 0g
- Protein: 38g
- Cholesterol: 110mg
Tips & Variations
Make this baked chicken breast recipe your own with these creative variations:
Flavor Variations:
- Lemon Herb Chicken – Add 2 tablespoons lemon juice and fresh thyme, rosemary, and parsley
- Cajun Baked Chicken – Replace seasonings with 2 tablespoons Cajun spice blend
- Italian Chicken – Use Italian seasoning, add parmesan cheese on top
- Ranch Chicken – Coat with ranch seasoning mix before baking
- BBQ Chicken – Brush with BBQ sauce during last 5 minutes of baking
- Honey Garlic Chicken – Mix honey, soy sauce, and minced garlic; brush on before baking
- Mediterranean Chicken – Add oregano, lemon zest, and finish with feta cheese
Preparation Styles:
- Stuffed Chicken Breast – Butterfly and stuff with spinach, cheese, or sun-dried tomatoes
- Breaded Chicken – Coat in breadcrumbs or panko before baking (add 5-7 minutes cook time)
- Pounded Thin – Pound to 1/2 inch thickness for quicker cooking (12-15 minutes)
- Marinated Chicken – Marinate in Italian dressing or teriyaki for 2-24 hours before baking
Cooking Method Variations:
- Pan-Seared Then Baked – Sear in skillet 2 minutes per side, then finish in oven
- One-Pan with Vegetables – Add potatoes, broccoli, or bell peppers around chicken
- Slow Cooker – Cook on low 4-6 hours for super tender chicken
- Air Fryer – Cook at 380°F for 12-15 minutes
Pro Chef Tips
Elevate your baked chicken from good to absolutely perfect with these professional techniques:
The Room Temperature Rule: Always let your chicken sit at room temperature for 10-15 minutes before baking. Cold chicken straight from the fridge takes longer to cook through, which means the exterior overcooks while waiting for the center to reach temperature. Room temperature chicken cooks more evenly and quickly.
Dry Surface = Better Browning: Pat your chicken completely dry with paper towels before seasoning. Moisture on the surface creates steam during baking, which prevents browning and makes seasonings slide off. A dry surface allows the Maillard reaction (browning) to occur, creating better flavor and appearance.
The High-Heat Method: Baking at 425°F might seem hot, but it’s the secret to juicy chicken breast. High heat quickly sears the exterior, creating a “crust” that seals in juices, while the short cooking time prevents the interior from drying out. Lower temperatures require longer cooking, which dries out lean chicken breast.
Pound for Even Cooking: Chicken breasts are naturally thicker on one end. If you don’t even them out, the thin end will be overcooked and dry by the time the thick end reaches 165°F. Gently pound the thick end with a meat mallet (place chicken in a ziplock bag first) to create uniform thickness. This is one of the most important steps for consistently juicy results.
The 165°F Rule (But Remove at 160°F): Chicken is safe to eat at 165°F, but here’s a pro secret: remove it from the oven when it reaches 160-162°F. During the 5-minute rest, carryover cooking will bring it to 165°F. This prevents overcooking from oven heat and results in more tender, juicy chicken.
Don’t Skip Resting: When you cut into chicken immediately after cooking, all the juices run out onto your cutting board instead of staying in the meat. Resting allows the muscle fibers to relax and reabsorb moisture. Those 5 minutes of patience make a huge difference—your chicken will be noticeably juicier.
Oil is Essential: Don’t try to make “no-oil” baked chicken if you want juicy results. The oil serves multiple purposes: it helps seasonings adhere, promotes browning, and creates a barrier that helps retain moisture. Two tablespoons for four chicken breasts is minimal fat that makes a maximal difference.
Seasoning Generously: Chicken breast is naturally mild and needs adequate seasoning. Don’t be shy—season both sides generously. The seasoning only penetrates the surface, so what seems like a lot is actually just right. Under-seasoned chicken tastes bland no matter how perfectly it’s cooked.
The Toothpick Test Doesn’t Work: Unlike cake, you can’t test chicken doneness with a toothpick. The only reliable method is a meat thermometer. Invest in a digital instant-read thermometer—it’s inexpensive and will transform your chicken (and all meat) cooking forever.
Common Mistakes to Avoid
Don’t let these common pitfalls ruin your baked chicken breast:
Overcooking: This is the number one mistake! Chicken breast has very little fat, so even a few extra minutes in the oven turns it from juicy to dry and stringy. Always use a meat thermometer and remove chicken at 165°F (or even 160°F if you’re resting it). Remember that chicken continues cooking from residual heat after you remove it from the oven, so pulling it at the exact right moment is crucial.
Not Using a Meat Thermometer: Guessing when chicken is done by time alone is unreliable because chicken breasts vary significantly in size and thickness. What takes 18 minutes for one breast might take 24 for another. A meat thermometer eliminates all guesswork and is the only way to guarantee perfectly cooked chicken every single time. This $10-15 tool will change your cooking!
Cooking Cold Chicken: Placing refrigerator-cold chicken directly into the oven causes uneven cooking. The exterior overcooks while the center is still cold and raw. Always let chicken sit at room temperature for 10-15 minutes before baking. This simple step ensures more even, quicker cooking.
Not Pounding to Even Thickness: Chicken breasts are naturally thicker on one end, which means uneven cooking—the thin end dries out while the thick end is still undercooked. Take 30 seconds to gently pound the thick end so the whole breast is uniform thickness. This is one of the easiest ways to dramatically improve your results.
Baking at Too Low Temperature: Many people bake chicken at 350°F or 375°F thinking lower and slower is better, but for chicken breast, higher heat (425°F) actually produces juicier results. The high temperature quickly develops a flavorful crust that seals in moisture, and the shorter cooking time prevents drying. Lower temperatures require longer cooking, which dries out lean chicken breast.
Skipping the Rest: Cutting into chicken immediately after removing from the oven causes all the delicious juices to run out onto your cutting board. Just 5 minutes of resting allows the juices to redistribute throughout the meat. This step requires no effort—just patience—and makes a huge difference in juiciness.
Crowding the Pan: Packing chicken breasts tightly together prevents hot air from circulating around them, causing uneven cooking and steaming instead of roasting. Leave at least an inch of space between each breast. If you’re cooking a large batch, use two pans or cook in batches.
Storage & Meal Prep
Baked chicken breast is perfect for meal prep and stores beautifully:
Refrigerator Storage: Let chicken cool completely to room temperature, then transfer to airtight containers and refrigerate within 2 hours of cooking. Properly stored, cooked chicken breast keeps for 3-4 days in the refrigerator. Store whole breasts or slice them—both work equally well.
Keeping Chicken Moist During Storage: To prevent refrigerated chicken from drying out, store it with a little moisture. Add a tablespoon of chicken broth or olive oil to the container, or store chicken with sauce. You can also wrap individual breasts in slightly damp paper towels before sealing in containers.
Meal Prep Strategy: Baked chicken breast is meal prep gold! Cook a large batch on Sunday and use it throughout the week in different ways: slice for salads, cube for pasta, shred for tacos, or serve whole with different sides each night. Portion into individual containers with your planned sides for grab-and-go lunches.
Reheating Methods:
- Microwave: Place chicken in a microwave-safe dish, add 1 tablespoon of water or broth, cover with a damp paper towel, and microwave for 1-2 minutes until heated through.
- Oven: Wrap chicken in foil with a splash of broth and reheat at 350°F for 10-15 minutes.
- Stovetop: Slice chicken and reheat in a skillet with a little oil or butter over medium heat.
- In Sauce: The best reheating method! Add chicken to pasta sauce, curry, or soup where it will reheat gently while absorbing flavor.
Food Safety: Always refrigerate cooked chicken within 2 hours of cooking (1 hour if room temperature is above 90°F). Reheat to 165°F for food safety. Discard any chicken that’s been refrigerated longer than 4 days.
Make-Ahead & Freezer Notes
Perfect for advance preparation and long-term storage:
Freezing Cooked Chicken: Baked chicken breast freezes beautifully! Let chicken cool completely, then wrap individual breasts tightly in plastic wrap, then aluminum foil (double wrapping prevents freezer burn). Alternatively, place in freezer-safe bags with air pressed out. Label with date and freeze for up to 3 months.
Freezing Tips: For easiest use, slice or cube chicken before freezing so you can thaw only what you need. Freeze flat in bags for easier stacking and quicker thawing. Separate pieces with parchment paper if stacking so they don’t freeze together.
Thawing: The safest method is thawing overnight in the refrigerator. For quicker thawing, seal chicken in a waterproof bag and submerge in cold water, changing water every 30 minutes. Never thaw at room temperature. You can also reheat from frozen—just add extra time.
Freezing Uncooked Seasoned Chicken: You can season raw chicken, place in freezer bags, and freeze for up to 3 months. Thaw in refrigerator overnight, then bake as directed. This makes weeknight dinners even easier—just pull from freezer to fridge in the morning!
Make-Ahead Marinating: Marinate chicken in your chosen marinade in a ziplock bag and freeze. As it thaws, it marinates! This is incredibly convenient for meal planning.
Best Uses for Frozen Chicken: Frozen then thawed chicken works best in recipes with sauce (pasta, stir-fries, casseroles) rather than served plain, as the texture can be slightly less firm than fresh.
Serving Suggestions
Transform your baked chicken breast into complete, satisfying meals:
Classic Side Dishes:
- Roasted vegetables (broccoli, Brussels sprouts, carrots, asparagus)
- Mashed potatoes or roasted baby potatoes
- Rice pilaf or wild rice
- Steamed green beans with almonds
- Caesar salad or mixed green salad
- Garlic bread or dinner rolls
- Mac and cheese
- Coleslaw
Healthy Pairings:
- Quinoa or cauliflower rice
- Roasted sweet potatoes
- Sautéed spinach or kale
- Zucchini noodles
- Mediterranean cucumber salad
- Roasted Brussels sprouts with balsamic
- Fresh fruit salad
Turn Chicken Into Different Meals:
- Chicken Caesar Salad – Slice and serve over romaine with Caesar dressing
- Chicken Pasta – Cube and toss with pasta and marinara or Alfredo sauce
- Chicken Tacos – Shred and serve in tortillas with toppings
- Chicken Sandwich – Slice and layer on bread with lettuce, tomato, mayo
- Chicken Bowl – Serve over rice with vegetables and sauce
- Chicken Wrap – Slice and wrap in tortilla with hummus and veggies
- Chicken Pizza – Dice and use as pizza topping
Sauce Ideas:
- Mushroom cream sauce
- Lemon butter sauce
- BBQ sauce
- Honey mustard
- Buffalo sauce
- Pesto
- Teriyaki glaze
Beverage Pairings:
- White wine (Chardonnay, Sauvignon Blanc)
- Iced tea
- Lemonade
- Sparkling water with lemon
FAQs Section
How do I know when chicken is done without a thermometer?
While a meat thermometer is strongly recommended, you can check doneness by cutting into the thickest part of the chicken—the meat should be opaque white throughout with no pink remaining, and juices should run clear, not pink. The texture should be firm but not hard. However, this method requires cutting into the chicken (releasing juices) and is less reliable than a thermometer. For consistently perfect results, invest in an instant-read thermometer—they’re inexpensive ($10-15) and eliminate all guesswork.
Why is my baked chicken breast always dry?
Dry chicken breast usually results from overcooking. Because chicken breast is so lean with minimal fat, even a few extra minutes in the oven dries it out. Other causes include: baking at too low a temperature for too long, not pounding to even thickness (causing uneven cooking), cooking straight from the refrigerator (cold centers take longer), or cutting immediately without resting. Follow this recipe’s method—high heat (425°F), proper thickness, room temperature start, and 5-minute rest—for juicy results every time.
Can I bake frozen chicken breast?
Yes, but it requires significantly longer cooking time (50-75% longer) and won’t brown as nicely. Frozen chicken also tends to release more moisture during cooking, potentially making it less flavorful. For best results, thaw chicken in the refrigerator overnight. If you must cook from frozen, increase oven temperature to 425°F and bake for 30-40 minutes (depending on size), checking internal temperature frequently. The texture won’t be quite as good as thawed chicken.
What temperature should I bake chicken breast?
For juicy baked chicken breast, 425°F (220°C) is ideal. This high temperature quickly develops a flavorful golden exterior while the short cooking time keeps the interior moist. Lower temperatures (350-375°F) require longer cooking times, which dry out lean chicken breast. Some recipes suggest even higher temperatures (450°F), which also works but requires very close monitoring to prevent overcooking.
How long does it take to bake chicken breast?
At 425°F, chicken breasts take 18-24 minutes depending on thickness and size. Small breasts (5-6 oz) need about 18 minutes, medium (6-8 oz) need 20-22 minutes, and large (8-10 oz) need 22-24 minutes. Always use a meat thermometer to check for 165°F internal temperature rather than relying solely on time, as chicken sizes vary significantly. Thicker pieces take longer than thinner ones.
Should I cover chicken when baking?
No, don’t cover chicken breast while baking if you want a golden, slightly crispy exterior. Covering causes steaming rather than roasting, which prevents browning and can make the chicken texture rubbery. However, you should tent chicken loosely with foil during the 5-minute rest after baking to keep it warm while juices redistribute.
Can I use bone-in or skin-on chicken breast?
Yes, but cooking times will be significantly longer. Bone-in, skin-on breasts need 35-45 minutes at 425°F to reach 165°F internal temperature. The bone conducts heat slowly, extending cooking time. Skin-on chicken will have a crispy skin and more flavor but also more fat and calories. For this recipe specifically designed for boneless, skinless breasts, stick with that for the stated cooking times. If using bone-in, increase time and monitor temperature carefully.
Conclusion
And there you have it—everything you need to make perfectly juicy, tender baked chicken breast that’s never dry! This simple recipe proves that with the right technique and a few key tips, even the leanest protein can be absolutely delicious. No more sad, flavorless chicken dinners—just reliably moist, flavorful chicken that you’ll actually crave.
The beauty of mastering this easy baked chicken breast recipe is how it opens up endless meal possibilities. Whether you’re meal prepping for the week, making a quick weeknight dinner, or building the foundation for countless other recipes, you’ll always have perfect chicken ready to go. It’s healthy, budget-friendly, versatile, and family-approved!
I hope this recipe transforms the way you cook chicken breast! Once you master this foolproof method, you’ll wonder why you ever struggled with dry chicken in the first place.
Now it’s your turn to get cooking! When you make this juicy baked chicken breast, I’d love to hear how it turned out. What seasonings did you use? How are you serving it? Drop a comment below and share your experience!
Don’t forget to pin this recipe to your favorite Pinterest board so you’ll always have it ready when you need perfect chicken! Share it with your friends who are tired of dry chicken, and if you make it, snap a photo and tag me on social media—I love seeing your delicious dinners!
Happy cooking, and may your chicken always be juicy and never dry! 🍗