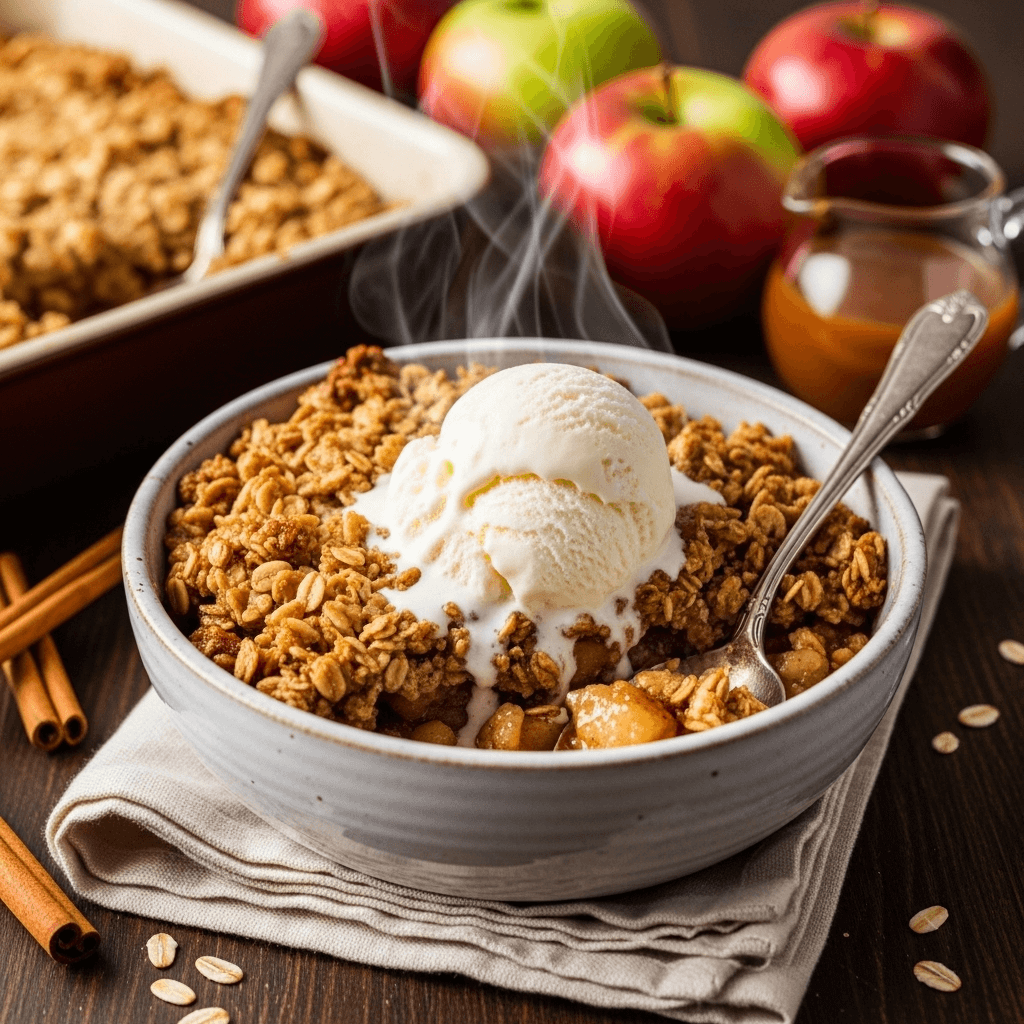
There’s nothing quite like the aroma of a homemade apple crisp bubbling away in the oven—sweet cinnamon-spiced apples topped with a golden, buttery oat crumble that’s impossibly crispy and tender at the same time. This easy apple crisp recipe is the ultimate fall dessert that brings comfort and warmth to any table, whether you’re hosting Thanksgiving dinner, celebrating a cozy autumn evening, or simply craving something sweet and satisfying.
This classic American dessert is incredibly simple to make, requiring no fancy techniques or complicated steps. Unlike apple pie with its finicky crust, apple crisp is forgiving, beginner-friendly, and always delivers spectacular results. The combination of tender, caramelized apples with a crunchy, buttery topping creates the perfect textural contrast that keeps everyone coming back for seconds. Serve it warm with a scoop of vanilla ice cream or a dollop of whipped cream, and you’ve got a dessert that will have your family and friends raving.
Whether you’re making this for a holiday gathering, weekend family dinner, potluck, or just because you picked up too many apples at the orchard, this homemade apple crisp is about to become your go-to fall dessert. It’s the kind of recipe you’ll make again and again, year after year.
History / Background
Apple crisp has deep roots in American culinary history, though its exact origins are somewhat debated among food historians. What we do know is that fruit crisps, crumbles, and similar desserts have been enjoyed for centuries across various cultures, with each region putting its own spin on the basic concept of fruit topped with a streusel-like topping.
The apple crisp as we know it today became particularly popular in America during the 1920s and 1930s. During this era, home economists and cookbook authors began promoting simpler, more economical desserts that didn’t require the butter-heavy pastry crusts of traditional pies. Apple crisp fit the bill perfectly—it used fewer ingredients, required less skill, and could be made quickly without the intimidation factor of rolling out pie dough.
The dessert gained even more traction during World War II when rationing made butter and flour precious commodities. Cooks discovered that they could stretch their ingredients further by making a crisp topping rather than a full double-crust pie. The addition of oats to the topping—which became a signature element of American apple crisp—provided texture, flavor, and additional nutrition while reducing the amount of expensive flour needed.
Regional variations emerged across the United States. In New England, apple crisp often features maple syrup in the topping. Midwestern versions might include pecans or walnuts. Southern recipes sometimes incorporate a touch of bourbon or whiskey. The Pacific Northwest adds hazelnuts, celebrating their local crop.
The terms “crisp,” “crumble,” and “Betty” are often used interchangeably, though technically there are subtle differences. A crisp typically includes oats in the topping, while a crumble uses only flour, butter, and sugar. An Apple Brown Betty layers the fruit with breadcrumbs. Regardless of the name, these rustic fruit desserts share a common goal: showcasing delicious seasonal fruit in the simplest, most comforting way possible.
Today, apple crisp remains a beloved American classic, particularly cherished during autumn when fresh apples are abundant at farmers’ markets and orchards. It represents everything we love about homestyle baking—simple ingredients, minimal fuss, and maximum flavor.
Why You’ll Love This Recipe
This easy apple crisp recipe is about to earn a permanent spot in your dessert rotation, and here’s exactly why: it combines the cozy flavors of fall with foolproof simplicity that works every single time. You don’t need to be an experienced baker to create a dessert that looks and tastes like it came from a fancy bakery. The recipe uses straightforward ingredients you probably already have in your pantry, comes together in minutes, and fills your home with the most incredible cinnamon-apple aroma.
Here’s what makes this apple crisp absolutely irresistible:
- Incredibly Easy – No pie crust to roll, no complicated techniques, just mix and bake
- Ready in Under an Hour – From start to finish, you’ll have warm dessert on the table in 55 minutes
- Perfectly Balanced – Tender, spiced apples topped with crispy, buttery, golden oat topping
- Uses Simple Ingredients – Pantry staples and fresh apples are all you need
- Crowd-Pleasing – Loved by kids and adults alike, a guaranteed hit at any gathering
- Versatile – Easily customizable with different fruits, nuts, or spices
- Budget-Friendly – Costs a fraction of bakery desserts or fancy pies
- Make-Ahead Friendly – Prep in advance and bake when ready, or bake and reheat
- Naturally Comforting – The ultimate cozy dessert for fall and winter gatherings
- Freezer-Friendly – Make a double batch and freeze one for later
- Perfect for Beginners – Foolproof recipe that works even for first-time bakers
Ingredient Notes
Let’s break down what goes into this amazing homemade apple crisp and why each ingredient matters.
For the Apple Filling:
Apples – The star of the show! You’ll want about 6-7 medium apples (roughly 3 pounds). The best apples for baking are varieties that hold their shape and provide a nice balance of sweet and tart. Granny Smith apples are classic for their tartness and firm texture. Honeycrisp adds sweetness and stays crisp. For the best flavor, use a mix of two varieties—try Granny Smith with Honeycrisp, or Golden Delicious with Braeburn. Avoid Red Delicious as they become mushy and lack flavor when baked.
Granulated Sugar – Sweetens the apples and creates a delicious syrupy sauce as they cook. The amount can be adjusted based on how sweet your apples are and your personal preference.
All-Purpose Flour – Just a couple tablespoons thicken the apple juices as they release during baking, preventing a watery dessert.
Ground Cinnamon – The quintessential warm spice that defines apple desserts. It adds warmth and depth to the filling.
Ground Nutmeg – A small amount adds complexity and enhances the apple flavor without overwhelming it.
Lemon Juice – Brightens the flavor of the apples and prevents browning. It also balances the sweetness with a touch of acidity.
Vanilla Extract – Enhances all the other flavors and adds aromatic depth.
For the Crisp Topping:
Old-Fashioned Rolled Oats – These create the signature texture of apple crisp. Use old-fashioned oats, not quick oats or steel-cut oats. Quick oats become mushy, while steel-cut oats stay too hard.
All-Purpose Flour – Helps bind the topping together and creates structure.
Brown Sugar – Packed brown sugar adds moisture, caramel notes, and helps create that irresistible golden crust. Light or dark brown sugar both work; dark has a stronger molasses flavor.
Ground Cinnamon – More cinnamon in the topping reinforces the warm spice flavor.
Salt – A pinch enhances sweetness and balances all the flavors.
Unsalted Butter – Cold butter is cut into the dry ingredients to create a crumbly, streusel-like texture. As it melts during baking, it creates crispy, golden clusters. Use cold butter straight from the fridge for the best texture.
Equipment Needed
You don’t need any special equipment to make this delicious apple crisp! Here’s what you’ll need:
- 9×13-inch Baking Dish – This size is perfect for serving a crowd. You can also use a 9×9-inch square pan for a thicker crisp, or an 8×11-inch pan
- Large Mixing Bowl – For tossing the apple filling
- Medium Mixing Bowl – For making the crisp topping
- Vegetable Peeler or Paring Knife – For peeling the apples
- Apple Corer or Sharp Knife – For removing cores and slicing apples
- Cutting Board – For prep work
- Measuring Cups and Spoons – For accurate measurements
- Wooden Spoon or Rubber Spatula – For mixing
- Pastry Cutter or Fork – For cutting butter into the topping mixture (you can also use your fingers)
- Aluminum Foil – To cover the dish if the topping browns too quickly
- Oven Mitts – For safe handling of hot dishes

Easy Apple Crisp Recipe
- Total Time: 60 minutes
- Yield: 12 servings 1x
- Diet: Vegetarian
Description
This easy homemade apple crisp features tender, cinnamon-spiced apples topped with a buttery, golden oat crumble. Perfect for fall gatherings, Thanksgiving, or any time you’re craving a warm, comforting dessert. Serve with vanilla ice cream for the ultimate treat!
Ingredients
For the Apple Filling:
- 6–7 medium apples (about 3 pounds), peeled, cored, and sliced 1/4-inch thick
- 1/2 cup granulated sugar
- 2 tablespoons all-purpose flour
- 1 teaspoon ground cinnamon
- 1/4 teaspoon ground nutmeg
- 2 tablespoons fresh lemon juice
- 1 teaspoon vanilla extract
For the Crisp Topping:
- 1 1/2 cups old-fashioned rolled oats
- 1 cup all-purpose flour
- 1 cup packed light brown sugar
- 1 teaspoon ground cinnamon
- 1/2 teaspoon salt
- 3/4 cup (1 1/2 sticks) cold unsalted butter, cut into small cubes
Instructions
- Preheat your oven to 350°F (175°C). Lightly grease a 9×13-inch baking dish with butter or cooking spray. Set aside while you prepare the filling and topping.
- Prepare the apple filling. Peel, core, and slice the apples into 1/4-inch thick slices. Place them in a large mixing bowl. Add the granulated sugar, flour, cinnamon, nutmeg, lemon juice, and vanilla extract. Toss everything together until the apples are evenly coated. The mixture will seem dry at first, but the apples will release juice as they bake.
- Transfer apples to baking dish. Pour the apple mixture into your prepared baking dish, spreading it out into an even layer. Use a spatula to distribute the apples uniformly so they cook evenly.
- Make the crisp topping. In a medium bowl, combine the oats, flour, brown sugar, cinnamon, and salt. Stir with a fork until well mixed. Add the cold butter cubes to the mixture.
- Cut in the butter. Using a pastry cutter, two forks, or your fingertips, work the butter into the dry ingredients until the mixture resembles coarse crumbs with some pea-sized butter pieces remaining. The mixture should clump together when squeezed but still be crumbly. Don’t overmix—you want distinct buttery pieces that will create crispy clusters.
- Add topping to apples. Sprinkle the crisp topping evenly over the apples, covering them completely. Don’t press it down—just let it sit loosely on top. This ensures maximum crispiness.
- Bake. Place the baking dish on the middle oven rack and bake for 45-50 minutes, until the topping is golden brown and crispy, and the apple filling is bubbling around the edges. If the topping starts browning too quickly (before 35 minutes), loosely cover the dish with aluminum foil for the remaining baking time.
- Cool slightly. Remove from the oven and let the apple crisp cool for at least 15-20 minutes before serving. This allows the filling to thicken slightly and makes it easier to scoop.
- Serve and enjoy! Serve warm with vanilla ice cream, whipped cream, or a drizzle of caramel sauce. The contrast between warm apple crisp and cold ice cream is absolutely heavenly!
Notes
- Apple Varieties: For best results, use a combination of tart and sweet apples. Good choices include Granny Smith, Honeycrisp, Braeburn, Gala, or Golden Delicious.
- Butter Temperature: Make sure your butter is cold for the best crumbly topping texture. If the butter is too warm, the topping will become greasy instead of crispy.
- Don’t Skip Lemon Juice: Even if you don’t taste it directly, lemon juice brightens the apple flavor and prevents browning.
- Adjust Sweetness: If your apples are very tart, add an extra 2-3 tablespoons of sugar to the filling. If they’re very sweet, reduce sugar by 2 tablespoons.
- Checking Doneness: The crisp is done when the topping is deep golden brown and you can see the filling bubbling at the edges.
- Preventing Soggy Topping: Don’t cover the crisp with foil immediately after baking, as trapped steam will soften the topping.
- Prep Time: 20 minutes
- Cook Time: 40 minutes
- Category: Dessert
- Method: Baking
- Cuisine: American
Nutrition
- Serving Size: 1/12 of recipe
- Calories: 285
- Sugar: 32g
- Sodium: 105mg
- Fat: 12g
- Saturated Fat: 7g
- Unsaturated Fat: 4g
- Trans Fat: 0g
- Carbohydrates: 44g
- Fiber: 3g
- Protein: 3g
- Cholesterol: 30mg
Tips & Variations
One of the best things about apple crisp is how adaptable it is! Here are some delicious ways to make this recipe your own:
Mixed Fruit Crisp – Replace 2-3 apples with pears for an apple-pear crisp. You can also add 1 cup of fresh or frozen cranberries for a tart pop of flavor and beautiful color.
Add Nuts – Fold 1/2 cup of chopped pecans, walnuts, or almonds into the topping for extra crunch and nutty flavor.
Caramel Apple Crisp – Drizzle 1/2 cup of caramel sauce over the apples before adding the topping, or serve with extra caramel sauce.
Maple Apple Crisp – Replace the brown sugar in the topping with 3/4 cup maple sugar, and add 2 tablespoons of maple syrup to the apple filling for a New England twist.
Spiced Up Version – Add 1/4 teaspoon of ground ginger and 1/8 teaspoon of ground cloves to the filling for a more complex spice profile.
Gluten-Free Apple Crisp – Use certified gluten-free oats and substitute the all-purpose flour with almond flour or gluten-free 1:1 baking flour.
Reduced Sugar – Cut the sugar in half in both the filling and topping. The dessert will be less sweet but still delicious, letting the natural apple flavor shine.
Coconut Crisp – Add 1/2 cup of shredded coconut to the topping mixture for tropical flair.
Apple Bourbon Crisp – Add 2 tablespoons of bourbon to the apple filling for an adult version with depth.
Individual Servings – Divide the filling and topping among 6-8 ramekins or small baking dishes. Reduce baking time to 30-35 minutes.
Pro Chef Tips
Want to take your apple crisp from good to absolutely spectacular? Here are some professional techniques:
Use a Mix of Apple Varieties – Different apples have different sugar levels, acidity, and textures. Combining two or three varieties creates more complex flavor and better texture. Try pairing a tart apple (Granny Smith) with a sweet one (Honeycrisp) and a third that holds its shape well (Braeburn).
Slice Apples Uniformly – Consistent 1/4-inch slices ensure even cooking. Too thick and they won’t soften properly; too thin and they’ll turn mushy. Use a mandoline if you have one for perfectly uniform slices.
Don’t Skimp on the Lemon Juice – This is crucial! Lemon juice doesn’t just prevent browning—it enhances the apple flavor and balances the sweetness, making the dessert taste more vibrant and less cloying.
Keep That Butter Cold – Room temperature butter creates a greasy, dense topping. Cold butter creates those desirable crispy clusters and a more textured topping. Some chefs even freeze their butter cubes for 10 minutes before incorporating.
Create Texture Variation – When cutting in the butter, leave some larger pea-sized pieces. These create extra-crispy golden clusters while smaller pieces provide overall structure.
Don’t Overmix the Topping – Stop as soon as the butter is incorporated. Overmixing develops gluten and creates a dense, tough topping instead of a light, crumbly one.
Pre-Bake Option for Crispier Apples – For apples that maintain more bite, pre-bake the apple filling (covered with foil) for 15 minutes before adding the topping. Then add topping and bake uncovered for 30-35 minutes.
Rotate Halfway – For even browning, rotate your baking dish 180 degrees halfway through baking time.
The Cooling Period Matters – Resist cutting into it immediately! Letting the crisp rest for 15-20 minutes allows the juices to thicken properly, making for neater servings and better texture.
Common Mistakes to Avoid
Even with a simple recipe, a few pitfalls can prevent your apple crisp from reaching perfection. Here’s what to watch out for:
Using the Wrong Apples – Soft apples like Red Delicious or McIntosh turn to mush when baked, creating an applesauce-like texture instead of tender apple slices. Stick with firm baking apples that hold their shape. Mealy or grainy apples will also produce disappointing results.
Watery Filling – This happens when you skip the flour in the filling or use apples that release too much moisture. Always include the thickening flour, and if your apples seem particularly juicy, add an extra tablespoon. Letting the finished crisp cool for at least 15 minutes also allows the filling to set.
Soggy Topping – Several factors cause this: using warm butter instead of cold, overmixing the topping, or covering the hot crisp immediately after baking. The topping should be loose and crumbly when added, and the dish should cool uncovered to maintain crispiness.
Topping Burns Before Apples Cook – If your topping is browning too fast (before 35 minutes), your oven temperature is too high or the rack position is too close to the heating element. Loosely tent with foil and continue baking until the filling bubbles.
Unevenly Cooked Apples – This results from inconsistent slicing or uneven distribution in the pan. Take time to slice apples uniformly and spread them evenly in the dish. Don’t pile them higher in the center.
Storage & Meal Prep
Apple crisp keeps beautifully, making it perfect for preparing ahead or enjoying leftovers.
Room Temperature Storage – If you plan to eat the apple crisp within 24 hours, you can cover it loosely with foil or plastic wrap and keep it at room temperature. However, for best quality and food safety, refrigeration is recommended.
Refrigerator Storage – Once cooled completely, cover the baking dish tightly with plastic wrap or aluminum foil. Store in the refrigerator for up to 5 days. The topping will soften slightly in the fridge, but it crisps back up when reheated.
Reheating Instructions:
- Oven Method (Best for Crispiness): Preheat oven to 350°F. Remove plastic wrap and cover loosely with foil. Bake for 15-20 minutes until warmed through, then remove foil and bake 5 more minutes to re-crisp the topping.
- Microwave Method (Quickest): Place a single serving in a microwave-safe bowl and heat for 45-60 seconds. The topping won’t be crispy, but it’s fine for a quick fix.
- Individual Portions: Reheat single servings in the oven at 350°F for 10-12 minutes for best results.
Make-Ahead & Freezer Notes
Apple crisp is one of the best make-ahead desserts, perfect for holiday planning or busy schedules!
Prepare Ahead (Unbaked):
- Prepare the apple filling and crisp topping as directed
- Assemble in the baking dish but don’t bake
- Cover tightly with plastic wrap, then aluminum foil
- Refrigerate for up to 24 hours
- When ready to bake, remove from fridge while oven preheats
- Bake as directed, adding 5-10 minutes to the baking time if going straight from cold
Freezing Unbaked Apple Crisp:
- Assemble the crisp in a freezer-safe, oven-safe baking dish
- Cover tightly with plastic wrap, then wrap entire dish in aluminum foil
- Label with date and freeze for up to 3 months
- To bake: Remove from freezer and let thaw overnight in refrigerator, OR bake from frozen (add 15-20 minutes to baking time and cover with foil for first 30 minutes to prevent over-browning)
Freezing Baked Apple Crisp:
- Let the apple crisp cool completely
- Cover the baking dish tightly with plastic wrap and then aluminum foil, or portion into individual airtight containers
- Freeze for up to 3 months
- Thaw overnight in the refrigerator
- Reheat in a 350°F oven for 20-25 minutes until heated through
Best Practices:
- Freezing works best when using firm baking apples that hold their texture
- Individual portions thaw and reheat faster—consider portioning before freezing
- The topping may lose some crispiness when frozen; recrisp by baking uncovered for the last 5-10 minutes of reheating
Serving Suggestions
Apple crisp is delicious on its own, but these accompaniments take it to the next level!
Classic Pairings:
- Vanilla ice cream (the absolute classic—warm crisp with cold ice cream is perfection)
- Freshly whipped cream
- Crème fraîche
- Vanilla Greek yogurt for a lighter option
- Caramel sauce drizzle
- Salted caramel ice cream
Beverage Pairings:
- Hot apple cider
- Spiced chai latte
- Strong coffee or espresso
- Hot chocolate with cinnamon
- Dessert wine like late-harvest Riesling
- Bourbon or whiskey for adults
Complete Dessert Presentation:
- Serve in individual bowls with a generous scoop of ice cream
- Drizzle with warm caramel sauce
- Sprinkle with chopped toasted pecans
- Add a dollop of whipped cream and a cinnamon stick garnish
- Dust with powdered sugar for an elegant touch
Brunch Option:
- Serve slightly warm with vanilla yogurt and granola for a sophisticated breakfast
- Pair with strong coffee and fresh fruit salad
Holiday Dessert Table:
- Serve alongside pumpkin pie and pecan pie for variety
- Offer both vanilla ice cream and cinnamon ice cream
- Set out caramel and chocolate sauce for guests to customize
FAQs Section
Do I have to peel the apples? While you technically can leave the peels on, peeling is strongly recommended for the best texture. Apple peels don’t soften as much as the flesh during baking and can create an unpleasant chewy texture in the finished dessert. Peeling also allows the cinnamon and sugar to better penetrate the fruit.
Can I use quick oats instead of old-fashioned oats? It’s not recommended. Quick oats are more finely cut and will absorb too much butter, creating a mushy, dense topping rather than the crispy, textured topping we want. Old-fashioned rolled oats are essential for proper texture. Steel-cut oats won’t work either as they stay too hard.
Why is my apple crisp watery? A watery crisp usually happens for a few reasons: skipping the flour in the apple mixture, using overly juicy apples, or cutting into it too soon. Make sure to include the 2 tablespoons of flour with the apples—this thickens the juices. Also, let the crisp cool for at least 15 minutes after baking to allow the filling to set up properly.
Can I make this in a different size pan? Absolutely! Use an 8×8-inch or 9×9-inch square pan for a thicker apple crisp (baking time may increase by 5-10 minutes). For a thinner crisp with more topping-to-filling ratio, use a larger shallow dish. Just ensure apples are in a relatively even layer and watch for doneness cues rather than strictly following time.
What’s the difference between apple crisp, apple crumble, and apple cobbler? Great question! Apple crisp contains oats in the topping, creating a crispy, textured top layer. Apple crumble has a topping made only of flour, butter, and sugar (no oats), resulting in a more sandy texture. Apple cobbler is topped with biscuit dough or cake batter rather than a streusel-type topping. All three are delicious but distinctly different!
How do I know when the apple crisp is done? Your apple crisp is ready when the topping is deep golden brown and crispy, and you can see the apple filling actively bubbling around the edges of the pan. If you gently press the center with the back of a spoon, the apples should feel tender. If the topping is brown but filling isn’t bubbling, cover with foil and continue baking.
Can I reduce the sugar? Yes! This recipe is moderately sweet, so you can reduce the sugar if you prefer. Start by reducing the filling sugar by 2-3 tablespoons and the topping sugar by 1/4 cup. Keep in mind that the sweetness will depend on your apple variety—tart apples need more sugar while sweet apples need less.
Do I need to thaw frozen apples before using them? If using frozen pre-sliced apples, do not thaw them first. Add an extra tablespoon of flour to the filling to absorb additional moisture, and add 10-15 minutes to the baking time. The texture won’t be quite as perfect as fresh apples, but it’s a convenient option when fresh aren’t available.
Conclusion
And there you have it—everything you need to create the most incredible, comforting, utterly delicious homemade apple crisp! This easy recipe proves that you don’t need complicated techniques or professional training to make a dessert that rivals anything you’d find at a fancy bakery or restaurant. With simple pantry ingredients, fresh apples, and about an hour of your time, you can fill your home with the irresistible aroma of cinnamon-spiced apples and create a dessert that brings smiles to everyone around your table.
This easy apple crisp recipe is perfect for celebrating fall, impressing holiday guests, or simply treating yourself and your family to something special on a cozy evening. The combination of tender, sweet-tart apples and buttery, crispy topping is pure comfort food magic. Whether you serve it warm with vanilla ice cream melting on top or enjoy it for breakfast the next day with Greek yogurt, every bite is absolutely heavenly.
Don’t forget that this recipe is incredibly flexible—experiment with different apple varieties, add your favorite nuts, try the variations suggested, or create your own signature twist. Make it yours!
Ready to experience the best homemade apple crisp you’ve ever tasted? Gather your ingredients this weekend and let your kitchen fill with the warm, comforting scent of baking apples and cinnamon. Your family will be asking you to make this again and again!
Pin this easy apple crisp recipe to your Pinterest boards so you can find it whenever apple season rolls around. Share it with friends who love simple, delicious desserts—everyone deserves to have this foolproof recipe in their collection. And after you make it, I’d love to hear how it turned out! Leave a comment below and let me know what apples you used and how you served it.
Happy baking!