
If there’s one dessert that embodies Italian elegance and indulgence, it’s tiramisu. This classic Italian tiramisu recipe delivers layers of coffee-soaked ladyfinger cookies, rich mascarpone cream, and a dusting of cocoa powder that create an absolutely divine dessert experience. The name literally translates to “pick me up” in Italian, referring to the energizing combination of espresso and cocoa—and one bite will definitely lift your spirits! Unlike heavy, overly sweet desserts, authentic tiramisu offers a perfect balance of bitter coffee, sweet cream, and delicate sponge cake texture.
This easy tiramisu recipe is perfect for special occasions like dinner parties, Italian-themed meals, holiday celebrations, birthday dinners, or anytime you want to impress guests with something that looks and tastes incredibly sophisticated but is surprisingly simple to make. There’s no baking required, making it accessible even if you’re intimidated by complex desserts. The make-ahead nature means you can prepare it the day before your event, letting the flavors meld beautifully while you focus on other dishes. Whether you’re serving it at an elegant dinner party or bringing it to a family gathering, this show-stopping dessert never fails to receive rave reviews and requests for the recipe.
History / Background
Tiramisu is a relatively modern Italian dessert, despite feeling like an ancient classic. The origins are somewhat contested, but most food historians agree that tiramisu was invented in the Veneto region of northeastern Italy in the 1960s or early 1970s. The most widely accepted story credits Roberto Linguanotto, a pastry chef at the restaurant Le Beccherie in Treviso, with creating the dessert in 1969. According to legend, he accidentally dropped mascarpone cheese into a bowl of sugar and eggs, tasted the mixture, and was inspired to create a new dessert.
The name “tiramisu” comes from the Venetian phrase “tirème su,” meaning “pick me up” or “lift me up,” referencing both the energizing effects of the coffee and sugar, and the mood-lifting deliciousness of the dessert itself. Some romantic versions of the story suggest it was created as an aphrodisiac or energy-boosting treat, though these tales are likely more legend than fact.
The original recipe featured simple ingredients: ladyfinger cookies (savoiardi), espresso, mascarpone cheese, eggs, sugar, and cocoa powder. No alcohol was included in the earliest versions, though many modern recipes incorporate Marsala wine, coffee liqueur, or rum. The dessert gained popularity throughout Italy in the 1980s and exploded internationally in the 1990s, becoming one of the most beloved Italian desserts worldwide.
Interestingly, tiramisu’s rise to fame coincided with the broader international appreciation for Italian cuisine. As Italian restaurants proliferated globally, tiramisu became a menu staple, though many versions strayed significantly from the authentic preparation. Traditional Italian tiramisu uses raw eggs (pasteurized for safety concerns in modern recipes), genuine Italian mascarpone, and strong espresso—not just any coffee.
Today, tiramisu represents the pinnacle of Italian dolce (dessert), embodying the Italian philosophy of creating extraordinary flavor from simple, quality ingredients. It’s become so iconic that World Tiramisu Day is celebrated on March 21st each year, honoring this relatively young dessert that has captured hearts worldwide.
Why You’ll Love This Recipe
This authentic tiramisu recipe stays true to Italian tradition while incorporating modern food safety practices, delivering that unmistakable creamy, coffee-infused flavor that makes tiramisu so irresistible. The mascarpone cream is luxuriously smooth, the coffee-soaked ladyfingers provide perfect texture contrast, and the cocoa powder topping adds beautiful presentation and slight bitterness that balances the sweetness. Here’s why this recipe will become your signature dessert:
- No baking required – Entirely assembled, no oven needed, perfect for summer or when your oven is busy
- Make-ahead friendly – Actually requires refrigeration time, so you make it in advance stress-free
- Impressive presentation – Looks professionally made and restaurant-quality with minimal effort
- Authentic Italian flavor – Uses traditional ingredients and methods for genuine taste
- Perfect balance – Not too sweet, with coffee bitterness balancing rich cream
- Crowd-pleaser – Universally loved by guests, even those who don’t typically like coffee
- Customizable alcohol – Adjust or omit liqueur based on preferences and audience
- Serves a crowd – One dish feeds 12-15 people generously
- Better with time – Tastes even better the next day as flavors meld
- Special occasion worthy – Elegant enough for the fanciest celebrations yet approachable to make
Ingredient Notes
Quality ingredients are absolutely essential for authentic tiramisu since there’s nowhere for inferior products to hide. Here’s what you need and why each component matters:
Mascarpone Cheese: The heart and soul of tiramisu. This Italian cream cheese is richer, smoother, and less tangy than American cream cheese. It has a buttery, slightly sweet flavor and velvety texture that’s irreplaceable. Buy Italian-imported mascarpone (BelGioioso is widely available in the US) for best results. Don’t substitute with cream cheese—the texture and flavor are completely different and won’t deliver authentic tiramisu.
Egg Yolks and Egg Whites: Traditional tiramisu uses raw eggs separated into yolks and whites. Yolks are beaten with sugar to create the rich, custard-like base, while whites are whipped to stiff peaks and folded in for airiness. For food safety, use pasteurized eggs or pasteurized egg products. Some recipes use only yolks for a denser cream, but including whipped whites creates lighter, more authentic texture.
Granulated Sugar: Sweetens both the egg yolk mixture and egg whites. The amount is moderate—tiramisu shouldn’t be cloyingly sweet since the coffee provides bitter balance.
Heavy Whipping Cream: Some traditional recipes omit this, but including a small amount of whipped cream makes the mascarpone mixture lighter and easier to spread. Use heavy cream with at least 36% fat for proper whipping.
Espresso or Strong Coffee: Absolutely crucial for authentic flavor. Use real espresso (brewed from an espresso machine or Moka pot) or very strong brewed coffee. Instant espresso powder dissolved in hot water works in a pinch. The coffee should be bold and slightly bitter—weak coffee produces weak tiramisu.
Coffee Liqueur or Marsala Wine: Traditional recipes use Marsala (sweet Italian fortified wine), while modern versions often include Kahlúa, Tia Maria, or dark rum. The alcohol enhances flavor and adds complexity. It’s optional and can be omitted for alcohol-free version, though you’ll lose some depth.
Ladyfinger Cookies (Savoiardi): Italian-style ladyfingers are essential—they’re drier and more porous than soft American ladyfingers, allowing them to absorb coffee perfectly without disintegrating. Look for Savoiardi in the Italian section or specialty stores. They’re crisp when dry but soften beautifully when soaked.
Unsweetened Cocoa Powder: For dusting the top. Use high-quality Dutch-process cocoa for the deepest, least acidic flavor. Must be unsweetened—sweetened cocoa powder will make it too sweet.
Vanilla Extract: A small amount enhances all the other flavors without being identifiable. Use pure vanilla extract for best taste.
Equipment Needed
Tiramisu requires minimal equipment, making it accessible even for kitchens without specialty tools:
- 9×13-inch baking dish or similar – Glass, ceramic, or disposable aluminum pan all work; this is your serving dish
- Large mixing bowls (2-3) – For separating egg components and mixing mascarpone mixture
- Electric mixer or stand mixer – Essential for whipping egg whites to stiff peaks and beating egg yolks
- Whisk – For mixing and folding ingredients gently
- Rubber spatula – For folding and scraping bowl sides
- Shallow bowl or pie plate – For dipping ladyfingers in coffee mixture
- Fine-mesh sieve or sifter – For dusting cocoa powder evenly on top
- Measuring cups and spoons – Accurate measurements ensure proper consistency
- Plastic wrap or aluminum foil – To cover dish during refrigeration
- Espresso maker or coffee maker – For brewing strong coffee

Italian Tiramisu Recipe
- Total Time: 4 hours 30 minutes
- Yield: 12-15 servings 1x
- Diet: Vegetarian
Description
Authentic Italian tiramisu with layers of espresso-soaked ladyfingers and rich mascarpone cream. This classic no-bake dessert is elegant, make-ahead friendly, and absolutely irresistible with its perfect balance of coffee and sweet cream.
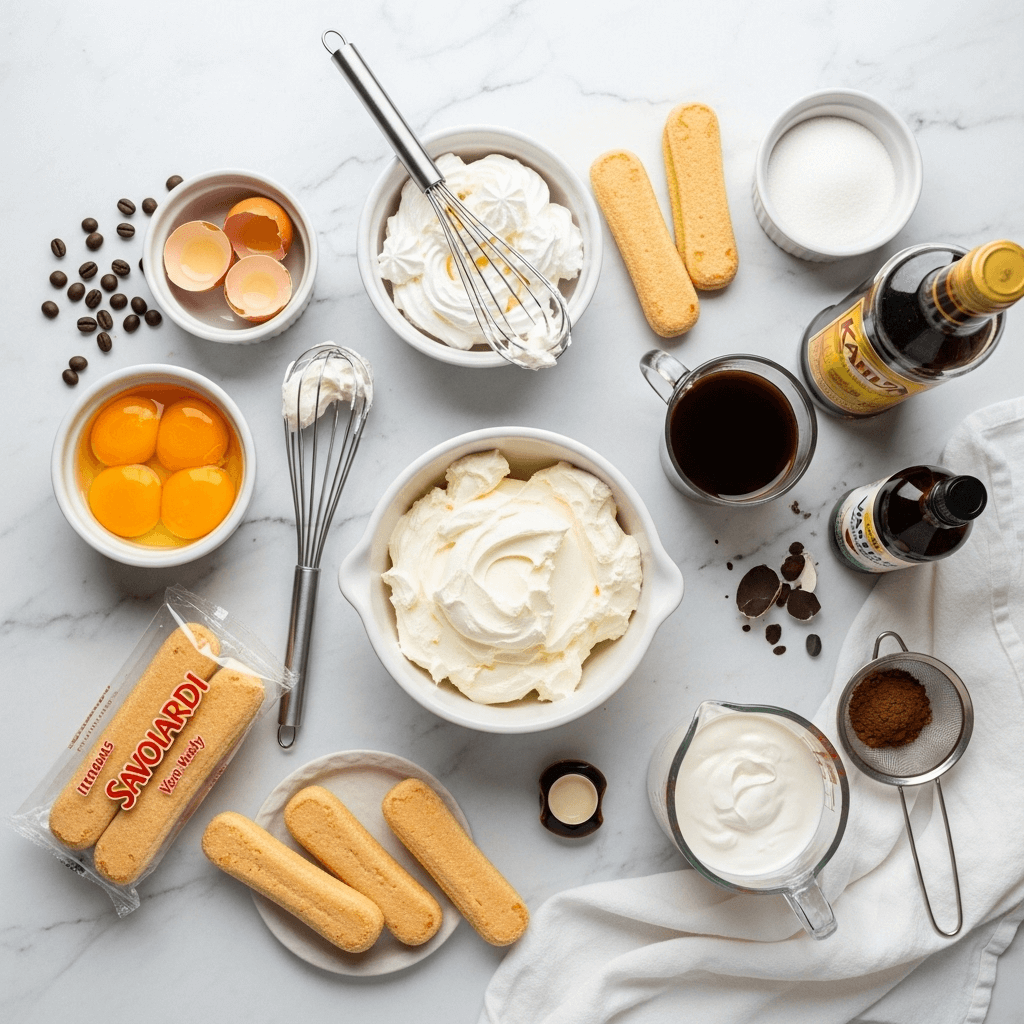
Ingredients
For the Mascarpone Cream:
- 6 large egg yolks (pasteurized recommended)
- ¾ cup granulated sugar, divided
- 1½ cups (12 oz) mascarpone cheese, room temperature
- 2 cups heavy whipping cream, cold
- 1 teaspoon pure vanilla extract
- 3 large egg whites (pasteurized recommended)
- Pinch of salt
For the Coffee Mixture:
- 2 cups strong espresso or very strong coffee, cooled to room temperature
- 3 tablespoons coffee liqueur (Kahlúa) or Marsala wine (optional)
- 2 tablespoons granulated sugar
For Assembly:
- 40–48 Italian ladyfinger cookies (Savoiardi), about 2 packages
- ¼ cup unsweetened cocoa powder, for dusting
- Dark chocolate shavings for garnish (optional)
Instructions
- Brew the Coffee: Prepare 2 cups of strong espresso or coffee and let it cool to room temperature. Stir in coffee liqueur (if using) and 2 tablespoons sugar until dissolved. Pour into a shallow bowl or pie plate for easy dipping. Set aside.
- Beat Egg Yolks and Sugar: In a large bowl using an electric mixer, beat egg yolks with ½ cup sugar on medium-high speed for 3-4 minutes until thick, pale yellow, and ribbony. When you lift the beaters, the mixture should fall in thick ribbons that hold their shape briefly. This creates the custard-like base.
- Add Mascarpone: Reduce mixer speed to low. Add room-temperature mascarpone cheese and vanilla extract. Beat until just combined and smooth, about 1 minute. Don’t overmix or the mascarpone can become grainy. Scrape down bowl sides. Set aside.
- Whip the Cream: In a separate clean bowl with clean beaters, whip cold heavy cream on medium-high speed until stiff peaks form, about 3-4 minutes. The cream should hold its shape firmly when beaters are lifted.
- Fold Cream into Mascarpone: Gently fold the whipped cream into the mascarpone mixture using a rubber spatula. Use broad, sweeping motions from the bottom up, rotating the bowl as you fold. Continue until no white streaks remain but don’t overmix—you want to maintain airiness.
- Whip Egg Whites: In another clean bowl with clean beaters, beat egg whites with a pinch of salt on medium speed until foamy. Gradually add remaining ¼ cup sugar while beating, then increase to high speed. Beat until stiff, glossy peaks form, about 3-4 minutes.
- Fold in Egg Whites: Gently fold the beaten egg whites into the mascarpone mixture using the same gentle folding technique. The mixture should be light, airy, and voluminous. This step creates authentic tiramisu’s signature fluffy texture.
- Dip Ladyfingers – First Layer: Working with one ladyfinger at a time, quickly dip both sides in the coffee mixture for about 1-2 seconds total. Don’t oversoak or they’ll disintegrate. The cookies should be moistened but still hold their shape. Arrange dipped ladyfingers in a single layer in your 9×13-inch dish, placing them side by side. You should fit about 20-24 cookies in the first layer.
- Add First Cream Layer: Spread half of the mascarpone cream mixture over the ladyfinger layer, smoothing it evenly with a spatula to cover completely. The layer should be generous and spread all the way to the edges.
- Create Second Layer: Dip remaining ladyfingers in coffee mixture using the same quick-dipping technique. Arrange them in a second layer over the cream, creating another complete layer. You may need to trim cookies to fit or arrange them in different directions.
- Add Final Cream Layer: Spread remaining mascarpone cream over the second ladyfinger layer, smoothing the top and making it as even as possible. This is your presentation layer, so take time to make it smooth and beautiful.
- Dust with Cocoa: Using a fine-mesh sieve, generously dust the entire top with unsweetened cocoa powder, creating an even layer. Add chocolate shavings if desired.
- Refrigerate: Cover tightly with plastic wrap (don’t let it touch the cocoa surface) or aluminum foil. Refrigerate for at least 4-6 hours, but preferably overnight. This chilling time is essential—it allows flavors to meld and the ladyfingers to soften completely while absorbing the cream.
- Serve: Cut into squares and serve chilled. For cleanest cuts, wipe knife clean between each slice.
Notes
- Pasteurized eggs: For food safety, especially if serving to children, elderly, or pregnant women, use pasteurized eggs or pasteurized egg products.
- Alcohol-free version: Omit liqueur and add 1 extra tablespoon sugar to coffee mixture.
- Coffee strength: The stronger the coffee, the more pronounced the flavor. Weak coffee produces bland tiramisu.
- Don’t oversoak: Ladyfingers should be dipped quickly—2 seconds total. Oversoaking makes them mushy.
- Room temperature mascarpone: Cold mascarpone doesn’t blend smoothly. Let it sit out 30 minutes before using.
- Make ahead: Best made 12-24 hours in advance. Flavors improve with time.
- Storage: Keeps covered in refrigerator for 3-4 days.
- Prep Time: 30 minutes
- Cook Time: 4-6 hours (or overnight)
- Category: Dessert
- Method: No-Bake
- Cuisine: Italian
Nutrition
- Serving Size: 1 piece (based on 12 servings)
- Calories: 385
- Sugar: 24g
- Sodium: 95mg
- Fat: 24g
- Saturated Fat: 14g
- Unsaturated Fat: 9g
- Trans Fat: 0g
- Carbohydrates: 34g
- Fiber: 1g
- Protein: 8g
- Cholesterol: 195mg
Tips & Variations
Flavor Variations:
- Chocolate Tiramisu: Add 2 tablespoons cocoa powder to the mascarpone mixture and layer with chocolate shavings
- Amaretto Tiramisu: Replace coffee liqueur with amaretto for almond-flavored variation
- Baileys Tiramisu: Use Irish cream liqueur instead of Kahlúa for creamy, whiskey notes
- Nutella Tiramisu: Spread thin layer of Nutella between the cream layers
- Berry Tiramisu: Add fresh raspberry or strawberry layer between the cream
- Lemon Tiramisu: Replace coffee with lemon syrup and add lemon zest to cream for summer version
- Pumpkin Spice: Add pumpkin spice to cream and use spiced coffee for fall twist
Presentation Options:
- Individual Portions: Assemble in wine glasses, mason jars, or individual serving dishes for elegant presentation
- Tiramisu Cake: Create tall layered version in springform pan for birthday cake alternative
- Tiramisu Cups: Layer in clear plastic cups for easy serving at parties
- Heart-Shaped: Use heart-shaped pan for Valentine’s Day or anniversaries
Dietary Modifications:
- Egg-Free: Use prepared pastry cream instead of egg-based cream (texture will differ)
- Alcohol-Free: Omit liqueur completely or use alcohol-free coffee flavoring
- Reduced Sugar: Cut sugar by ¼ cup (will be less sweet but still delicious)
- Gluten-Free: Use gluten-free ladyfingers (harder to find but available online)
Coffee Alternatives:
- Use chai tea instead of coffee for chai tiramisu
- Try matcha green tea for Japanese-inspired version
- Replace with hot chocolate for mocha tiramisu
Pro Chef Tips
Room Temperature Mascarpone is Crucial: Cold mascarpone straight from the fridge is stiff and difficult to blend smoothly, often resulting in lumpy cream. Let it sit at room temperature for 30 minutes before using. It should be soft and spreadable but not warm or separated.
Don’t Skip the Egg Whites: While some simplified recipes omit whipped egg whites, they’re essential for authentic, light-as-air texture. The egg yolk mixture alone creates dense cream; the whipped whites provide that signature cloudlike consistency that makes tiramisu special.
Quick Dip, Don’t Soak: The most common mistake is over-soaking ladyfingers. They should be quickly dipped (1-2 seconds per side) so they’re flavored but still hold structure. Over-soaked cookies become soggy, mushy, and can make the entire dessert watery. When in doubt, under-soak rather than over-soak.
Fold, Don’t Stir: When combining whipped cream and egg whites into the mascarpone mixture, use gentle folding motions—not vigorous stirring. Folding preserves the air you worked hard to incorporate, keeping the cream light and fluffy. Stirring deflates everything, resulting in dense cream.
Coffee Must Be Strong: Weak coffee creates bland tiramisu. Use espresso or coffee brewed at twice the normal strength. The coffee flavor should be prominent and slightly bitter to balance the sweet cream. If using instant coffee, use twice the recommended amount.
Chill Thoroughly: Tiramisu needs minimum 4 hours chilling, but overnight is ideal. During this time, the ladyfingers fully absorb the cream and coffee, flavors meld and deepen, and the texture transforms from separate components into cohesive dessert. Rushing this step yields inferior results.
Dust Cocoa Just Before Serving: While you can dust cocoa before refrigerating, the moisture from the cream can make it absorb and disappear. For the most dramatic presentation, dust with cocoa right before serving for that fresh, powdery appearance.
Common Mistakes to Avoid
Mistake #1: Using American-Style Ladyfingers – Soft, cake-like American ladyfingers disintegrate when dipped in coffee and become mushy. You must use Italian Savoiardi ladyfingers, which are dry, crisp, and porous. They absorb liquid without falling apart and provide the proper texture. Check the international or Italian section of your grocery store.
Mistake #2: Over-Soaking the Ladyfingers – This is the number one reason homemade tiramisu fails. Ladyfingers should be dipped quickly—literally 1-2 seconds total, just long enough to moisten them. They’ll continue absorbing moisture from the cream during chilling. Over-soaked cookies create soggy, mushy, watery tiramisu that lacks structure.
Mistake #3: Using Cold or Grainy Mascarpone – Cold mascarpone doesn’t blend smoothly and can curdle when beaten. Always bring it to room temperature before using. If your mascarpone is grainy after mixing, you’ve either used cold cheese or overmixed it. The solution is gentle mixing and proper temperature.
Mistake #4: Deflating the Whipped Components – After you’ve carefully whipped cream and egg whites to stiff peaks, rough stirring deflates all that incorporated air. Use gentle folding motions with a rubber spatula, not vigorous stirring with a whisk or mixer. The mixture should remain voluminous and light.
Mistake #5: Not Chilling Long Enough – Tiramisu needs time for the magic to happen. Without adequate chilling, the layers don’t set properly, the cookies don’t fully soften and absorb flavors, and the dessert can be messy to serve. Plan to make it at least 6 hours before serving, but ideally the day before.
Storage & Meal Prep
Refrigerator Storage: Tiramisu must be kept refrigerated at all times due to the egg and dairy content. Cover tightly with plastic wrap or aluminum foil to prevent it from absorbing refrigerator odors and to keep the top from drying out. Properly stored, tiramisu keeps for 3-4 days in the refrigerator. The flavor actually improves during the first 24-48 hours as components continue melding.
Serving Temperature: Always serve tiramisu cold, directly from the refrigerator. The contrast between cold, creamy filling and room temperature fork creates part of the sensory experience. Never let it sit at room temperature for extended periods—it can become too soft and separate.
Preventing Sogginess: If you notice excess liquid pooling at the bottom after storage, you likely over-soaked the ladyfingers. While you can’t fix it after assembly, you can prevent liquid from making the bottom layer soggy by ensuring your coffee mixture is completely cool before dipping and by using the quick-dip method.
Dusting Cocoa for Storage: If you dust cocoa before refrigerating, moisture from the cream can cause it to absorb into the surface and disappear. For best visual appeal, dust with cocoa right before serving, or plan to add a fresh layer before presenting.
Portion Control: Cut only the portions you plan to serve, leaving the rest intact. Cut edges dry out faster than the whole dessert, so leaving it whole preserves moisture better.
Make-Ahead & Freezer Notes
Ideal Make-Ahead Dessert: Tiramisu is actually better when made in advance—it’s not just convenient, it’s preferable. Make it 12-24 hours before serving for peak flavor and texture. The chilling time allows the ladyfingers to fully soften and absorb the cream, while flavors meld and deepen beautifully.
Make-Ahead Timeline: You can make tiramisu up to 2 days in advance for optimal results, or up to 3 days if necessary. Beyond that, the ladyfingers can become too soft and the cream may begin to separate slightly, though it’s still safe to eat within 4 days.
Freezing Tiramisu: While not ideal, tiramisu can be frozen for up to 1 month if wrapped extremely well. Wrap the entire dish tightly in plastic wrap, then aluminum foil, or freeze individual portions in airtight containers. Note that the texture changes upon freezing—the cream may become slightly grainy and the ladyfingers can become softer.
Thawing Instructions: Transfer frozen tiramisu to the refrigerator and let it thaw slowly overnight—never thaw at room temperature. Once thawed, the texture won’t be quite as perfect as fresh, but it’s still delicious. Dust with fresh cocoa powder after thawing for better appearance.
Components Separately: For maximum flexibility, you can prepare the mascarpone cream up to 1 day ahead and refrigerate it covered. Brew the coffee mixture and refrigerate separately. Assemble just before the chilling period begins. This gives you a head start while ensuring optimal texture.
Serving Suggestions
Tiramisu is a complete dessert on its own, but here are ways to enhance the experience or create a full Italian dessert course:
Beverage Pairings: Serve with espresso, cappuccino, or strong Italian coffee to complement the coffee flavors in the dessert. For evening entertaining, pair with dessert wine like Vin Santo, Moscato d’Asti, or sweet Marsala. A small glass of amaretto or Frangelico liqueur makes an elegant digestif alongside tiramisu.
Plating Presentation: For dinner parties, plate individual squares on white dessert plates, dust with additional cocoa, add a coffee bean or two for garnish, and include a small dollop of whipped cream or fresh berries on the side for color contrast.
Italian Dessert Table: Include tiramisu on a dessert spread alongside other Italian sweets like cannoli, biscotti, panna cotta, or gelato. Add fresh strawberries or raspberries for color and to cut through richness.
After Dinner Course: In Italian tradition, serve tiramisu as part of “dolce” after the main meal, accompanied by espresso or digestif. It’s the perfect conclusion to Italian feasts featuring pasta, osso buco, or chicken piccata.
Garnish Options: Beyond cocoa powder, garnish with chocolate shavings, chocolate-covered espresso beans, fresh mint leaves, or a drizzle of chocolate sauce for extra elegance.
Complementary Sides: Fresh berries (strawberries, raspberries, blackberries) provide tart contrast to rich sweetness. A small scoop of vanilla gelato or whipped cream on the side adds textural variety.
Special Occasions: Tiramisu is perfect for birthdays (add a candle!), Valentine’s Day (cut into heart shapes), Christmas dinner, New Year’s celebrations, or any time you want an impressive make-ahead dessert.
FAQs Section
Q: Can I make tiramisu without raw eggs?
A: Yes! Use pasteurized eggs, which are heat-treated to kill bacteria while still raw. Alternatively, make cooked egg custard by heating egg yolks with sugar over a double boiler until they reach 160°F, then cooling before mixing with mascarpone. Some recipes use prepared pastry cream instead. The texture will differ slightly but will still be delicious.
Q: What can I substitute for mascarpone cheese?
A: Ideally, nothing—mascarpone’s unique texture and flavor are essential for authentic tiramisu. In a pinch, you can blend 8 oz cream cheese with ¼ cup heavy cream and 2 tablespoons sour cream, though the flavor won’t be quite the same. The texture will be tangier and less buttery than true mascarpone.
Q: Can I make tiramisu without alcohol?
A: Absolutely! Simply omit the coffee liqueur or Marsala wine. The tiramisu will still be delicious—the alcohol adds depth but isn’t essential. You can add an extra tablespoon of sugar to the coffee mixture to compensate for the sweetness loss, or add a teaspoon of vanilla extract for extra flavor dimension.
Q: Why is my tiramisu runny or watery?
A: The most common causes are over-soaking ladyfingers (they release water), not whipping cream or egg whites to stiff enough peaks (insufficient structure), or using coffee that wasn’t fully cooled (heat causes cream to thin). Make sure all components are cold except mascarpone, whip to proper consistency, and dip ladyfingers quickly.
Q: Can I use instant coffee instead of espresso?
A: Yes, though the flavor won’t be quite as robust. Use instant espresso powder if available (richer than regular instant coffee). Dissolve 3-4 tablespoons instant espresso powder in 2 cups hot water, then cool completely before using. The coffee should taste strong and slightly bitter—weak coffee creates bland tiramisu.
Q: How do I know if my egg whites are beaten properly?
A: Properly beaten egg whites form stiff, glossy peaks that stand straight up when you lift the beaters. When you turn the bowl upside down, they shouldn’t slide or fall out (don’t actually do this over the floor!). Underbeaten whites are foamy but loose; overbeaten whites become dry, grainy, and dull rather than glossy.
Q: Can I make tiramisu in individual servings?
A: Yes! Assemble in wine glasses, mason jars, or small dessert cups using the same layering method—ladyfinger pieces, cream, ladyfingers, cream, cocoa. Individual servings are elegant for dinner parties and easier to serve. You’ll get 8-10 generous individual servings from this recipe.
Conclusion
And there you have it—everything you need to create absolutely stunning, authentically Italian tiramisu that rivals any restaurant version! This classic dessert proves that you don’t need complicated techniques or obscure ingredients to make something truly spectacular. With quality mascarpone, strong coffee, and a little patience during the chilling process, you can create a dessert that will have everyone asking for your secret recipe.
The beauty of tiramisu lies not just in its delicious flavor, but in its make-ahead convenience and wow-factor presentation. It’s the ultimate dinner party dessert—you make it the day before, refrigerate it, and simply dust with cocoa and serve when ready. No last-minute stress, no complicated plating, just pure Italian elegance that tastes as amazing as it looks.
I’d absolutely love to hear about your tiramisu-making experience! Did you try any of the flavor variations? What occasion did you serve it for? How did your guests react? Drop a comment below and share your story—I always enjoy hearing from fellow home cooks and learning about your creations!
If this recipe helped you create an impressive dessert that wowed your family and friends, please share it with others who love Italian food, and don’t forget to pin it to your favorite Pinterest boards using #TiramisuRecipe. Let’s spread the tiramisu love so more home cooks can discover just how achievable this elegant dessert really is!
Happy baking (well, assembling!), and may your tiramisu always be perfectly creamy, beautifully layered, and absolutely delicious!