

If you’ve ever bitten into a dry, rubbery grilled chicken breast and wondered why anyone bothers, this recipe is about to change everything for you. These perfectly grilled chicken breasts are juicy, tender, and bursting with flavor – the kind that make you actually look forward to chicken for dinner. With a simple marinade and a few key techniques, you’ll achieve restaurant-quality grilled chicken that’s golden on the outside, perfectly cooked on the inside, and never, ever dry.
Grilled chicken breast is one of the most versatile proteins you can master in the kitchen. It’s the foundation for countless meals – slice it over fresh salads, stuff it into wraps and sandwiches, dice it for meal prep bowls, serve it as an elegant dinner entrée, or keep it simple with your favorite sides. It’s naturally lean and healthy, making it perfect for anyone watching their diet, but this recipe proves that healthy doesn’t have to mean boring or tasteless.
What makes this grilled chicken breast recipe truly special is the combination of a flavorful marinade that tenderizes the meat and proper grilling techniques that lock in moisture. You’ll learn the secrets professional chefs use to prevent dry chicken – from pounding the breasts to even thickness to knowing exactly when they’re done without overcooking. Whether you’re firing up your outdoor grill for summer barbecues, using your indoor grill pan year-round, or even adapting this for your oven, these chicken breasts will turn out perfect every single time. Say goodbye to dry, flavorless chicken and hello to juicy, delicious grilled perfection!
History / Background
While grilling meat over open flames is one of humanity’s oldest cooking methods dating back to our earliest ancestors, the specific practice of grilling chicken breasts as we know it today is a relatively modern American phenomenon that emerged in the latter half of the 20th century.
Historically, chicken wasn’t always the dietary staple it is today. In early American history and throughout much of the world, chicken was considered a special-occasion food, not an everyday meal. The phrase “a chicken in every pot” used during the 1928 presidential campaign reflected this – it was a promise of prosperity because chicken represented luxury and abundance. Most chickens were kept for egg production, and only older birds past their laying prime were eaten, resulting in tougher meat that required long, slow cooking methods like braising or stewing.
The rise of modern chicken farming in the 1940s and 1950s changed everything. New breeding techniques and factory farming methods made chicken dramatically more affordable and available. As chicken became accessible to everyday Americans, home cooks began experimenting with different preparation methods. The post-World War II era also saw the explosion of outdoor cooking culture, with backyard grilling becoming a symbol of American suburban life.
Grilled chicken breast specifically became popular in the 1980s and 1990s when Americans began focusing more intensely on health and fitness. As dietary guidelines started recommending lean proteins and lower fat intake, boneless, skinless chicken breast emerged as the poster child for healthy eating. Its lean protein content, versatility, and mild flavor made it the perfect blank canvas for various marinades and seasonings from cultures around the world.
The challenge, of course, has always been keeping chicken breast moist during grilling. Unlike fattier cuts or dark meat, lean breast meat easily becomes dry and tough when overcooked. This led to the development of various techniques – brining, marinades, pounding to even thickness, and careful temperature monitoring – that home cooks and chefs use today to achieve perfectly juicy results.
Interestingly, while grilled chicken breast is quintessentially American in its current form, the technique draws from grilling traditions worldwide. Mediterranean cultures have long marinated chicken in olive oil, lemon, and herbs before grilling. Asian cuisines developed complex marinades with soy sauce, ginger, and sesame oil. Latin American countries contributed citrus-based marinades and spice rubs. American grilled chicken breast has become a delicious melting pot of these global influences.
Today, grilled chicken breast remains one of the most popular dishes in American home cooking. It’s the reliable weeknight dinner, the meal prep champion, the diet staple, and the backyard barbecue favorite. Mastering this seemingly simple dish is a rite of passage for home cooks, and when done right, it proves that healthy food can be absolutely delicious.
Why You’ll Love This Recipe
This perfect grilled chicken breast recipe is about to become your go-to for healthy, delicious dinners that everyone actually wants to eat. Forget everything you know about dry, flavorless chicken – this recipe delivers tender, juicy results every single time with minimal effort and maximum flavor.
Here’s why this recipe will revolutionize your chicken game:
- Guaranteed Juicy Results – Special techniques ensure your chicken stays moist and tender, never dry or rubbery
- Simple Flavor-Packed Marinade – Just a few pantry ingredients create incredible taste without complicated prep
- Quick and Easy – From start to finish, including marinating time, you can have dinner ready in 30 minutes
- Perfect for Meal Prep – Grill a batch on Sunday and enjoy all week in salads, wraps, bowls, and sandwiches
- Healthy and Clean Eating – High in protein, low in fat and carbs, naturally gluten-free and keto-friendly
- Budget-Friendly – Chicken breast is affordable and this recipe stretches your grocery budget beautifully
- Versatile Base Recipe – Use it as-is or customize with your favorite herbs, spices, and flavor profiles
- Kid-Approved – Mild seasoning that even picky eaters love, making family dinners stress-free
- Works Year-Round – Grill outdoors in summer or use a grill pan indoors during any season
- Restaurant-Quality at Home – Achieve that perfect golden crust and professional presentation
- Naturally Low-Carb – Perfect for keto, paleo, Whole30, and other low-carb diets
- Great for Entertaining – Impressive enough for dinner guests but easy enough for weeknights
- Minimal Cleanup – Less mess than pan-frying, and the grill does most of the work
- Customizable for Any Cuisine – Change the marinade seasonings to match Italian, Mexican, Asian, or Mediterranean meals
- Consistently Perfect – Follow these techniques and you’ll never serve dry chicken again
Ingredient Notes
Understanding your ingredients and techniques is the key to perfectly grilled chicken. Let me explain why each component matters and offer helpful substitutions.
Boneless, Skinless Chicken Breasts: Choose breasts that are similar in size (about 6-8 oz each) for even cooking. Organic or free-range chicken has better flavor and texture if your budget allows. Look for chicken with a pinkish color, not gray or slimy. Substitution: Chicken thighs work wonderfully and stay even more moist, though they have more fat and calories. Cooking time increases by 2-3 minutes.
Olive Oil: Forms the base of your marinade, helping seasonings stick to the chicken while adding moisture and preventing sticking to the grill. Extra virgin olive oil adds the best flavor. Substitution: Avocado oil (higher smoke point, neutral flavor), vegetable oil, or melted coconut oil all work. For Asian-inspired marinades, use sesame oil.
Lemon Juice: Provides acidity that tenderizes the chicken while adding bright, fresh flavor. Fresh-squeezed is always best but bottled works in a pinch. The acid helps break down tough muscle fibers. Substitution: Lime juice, orange juice, apple cider vinegar, or balsamic vinegar all work (use the same amount).
Garlic: Fresh minced garlic adds aromatic, savory depth to your marinade. It infuses the chicken with flavor during marinating. Substitution: 1 teaspoon garlic powder per 3 cloves fresh garlic works, though fresh has more complex flavor.
Dried Herbs (Oregano, Basil, Thyme): These Mediterranean herbs create classic, universally appealing flavor. Dried herbs work better in marinades than fresh as they’re more concentrated. Substitution: Italian seasoning (combines these herbs), herbes de Provence, or your favorite dried herb blend.
Paprika: Adds subtle sweetness, beautiful color, and helps create that gorgeous golden-brown crust. Smoked paprika adds extra depth. Substitution: Chili powder for heat, cumin for earthiness, or omit if you don’t have it.
Salt and Black Pepper: Essential for bringing out all the other flavors and seasoning the meat properly. Don’t skimp here – proper seasoning is crucial. Substitution: Sea salt, kosher salt, or flavored salts work. Use freshly ground black pepper for best flavor.
Honey (Optional): A touch of sweetness balances the acidity and helps create beautiful caramelization on the grill. It’s optional but recommended. Substitution: Maple syrup, brown sugar, or agave nectar work equally well.
Dijon Mustard (Optional): Acts as an emulsifier to help the marinade coat the chicken evenly while adding tangy depth. Substitution: Whole grain mustard, yellow mustard, or simply omit.
Equipment Needed
Having the right equipment makes grilling chicken breasts easier and ensures consistent results. Here’s what you’ll need:
- Outdoor Gas or Charcoal Grill – For authentic grilled flavor and beautiful grill marks
- Indoor Grill Pan – Alternative to outdoor grill; works on stovetop year-round
- Large Resealable Plastic Bag or Bowl – For marinating chicken
- Meat Mallet or Rolling Pin – For pounding chicken to even thickness
- Plastic Wrap or Parchment Paper – To cover chicken while pounding
- Instant-Read Meat Thermometer – Essential for knowing exactly when chicken is done (165°F)
- Long-Handled Tongs – For safely flipping chicken on hot grill
- Basting Brush – For oiling the grill grates
- Cutting Board – For slicing chicken after resting
- Sharp Knife – For checking doneness and slicing
- Plate or Tray – For resting chicken after grilling
- Measuring Cups and Spoons – For marinade ingredients
- Whisk or Fork – For mixing marinade
Optional but Helpful:
- Grill Brush – For cleaning grill grates before cooking
- Kitchen Timer – To track cooking time accurately
- Aluminum Foil – For tenting chicken while resting
Grilled Chicken Breast Recipe
- Total Time: 32 minutes
- Yield: 4 servings 1x
- Diet: Gluten Free
Description
These perfectly grilled chicken breasts are juicy, tender, and full of flavor thanks to a simple marinade and foolproof grilling techniques. Never dry or rubbery – just delicious grilled chicken every time.
Ingredients
For the Chicken:
- 4 boneless, skinless chicken breasts (about 6–8 oz each)
For the Marinade:
- ¼ cup olive oil
- 2 tablespoons fresh lemon juice
- 3 cloves garlic, minced
- 1 teaspoon dried oregano
- 1 teaspoon dried basil
- ½ teaspoon dried thyme
- 1 teaspoon paprika
- 1 teaspoon salt
- ½ teaspoon black pepper
- 1 tablespoon honey (optional, for caramelization)
- 1 teaspoon Dijon mustard (optional, for depth)
Instructions
Step 1: Pound Chicken to Even Thickness
Place chicken breasts between two sheets of plastic wrap or parchment paper. Using a meat mallet or rolling pin, gently pound each breast to an even ¾-inch thickness throughout. This is the single most important step for juicy grilled chicken – even thickness ensures even cooking. Focus on the thicker end until the whole breast is uniform.
Step 2: Prepare Marinade
In a small bowl, whisk together olive oil, lemon juice, minced garlic, oregano, basil, thyme, paprika, salt, pepper, honey (if using), and Dijon mustard (if using) until well combined and emulsified.
Step 3: Marinate Chicken
Place pounded chicken breasts in a large resealable plastic bag or shallow bowl. Pour marinade over chicken, turning to coat all sides evenly. Seal bag (removing excess air) or cover bowl. Marinate in refrigerator for at least 15 minutes, or up to 4 hours for deeper flavor. Don’t marinate longer than 4 hours or the acid will start to “cook” the chicken and make it mushy.
Step 4: Preheat Grill
Preheat your outdoor grill to medium-high heat (about 400-450°F). If using a gas grill, preheat all burners for 10-15 minutes with the lid closed. For charcoal, coals should be covered with white ash. If using an indoor grill pan, heat over medium-high heat until a drop of water sizzles immediately.
Step 5: Clean and Oil Grill Grates
Use a grill brush to clean the grates thoroughly. Fold a paper towel, dip it in vegetable oil, and using tongs, carefully oil the grill grates to prevent sticking. This is crucial for getting those beautiful grill marks and preventing the chicken from tearing.
Step 6: Grill Chicken (First Side)
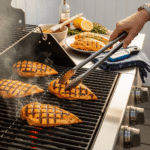
Remove chicken from marinade, letting excess drip off. Place chicken on the hot, oiled grill at a 45-degree angle to the grates. Close the lid and grill for 5-6 minutes without moving or peeking. The chicken should develop golden-brown grill marks and release easily from the grates when ready to flip.
Step 7: Flip and Grill Second Side
Using tongs, flip chicken breasts over. Close the lid and grill for an additional 5-6 minutes, until internal temperature reaches 165°F in the thickest part when tested with an instant-read thermometer. The chicken should be golden brown with beautiful grill marks, and juices should run clear when pierced.
Step 8: Rest Before Serving
Transfer grilled chicken to a clean plate or cutting board. Tent loosely with aluminum foil and let rest for 5 minutes. This resting period allows juices to redistribute throughout the meat, ensuring every bite is moist and flavorful. Don’t skip this step!
Step 9: Slice and Serve
After resting, slice chicken against the grain for the most tender texture, or serve whole. Enjoy hot with your favorite sides!
Notes
- Even Thickness is Crucial: Pounding chicken to uniform thickness is the #1 secret to juicy grilled chicken. Don’t skip this step!
- Don’t Overcook: Remove chicken at exactly 165°F. Carryover cooking during resting will bring it to 165°F+ safely.
- Grill Lid Down: Keep the lid closed while grilling to maintain consistent heat and cook evenly.
- No Peeking: Resist the urge to flip chicken multiple times. Flip only once for best results and grill marks.
- Indoor Option: Use a grill pan over medium-high heat. Cook same times, but you’ll need good ventilation.
- Marinade Time: Minimum 15 minutes, maximum 4 hours. Longer than 4 hours makes chicken mushy.
- Visual Cues: Chicken is done when juices run clear, meat is no longer pink, and it feels firm to touch.
- Prep Time: 10 minutes (plus 15 minutes marinating)
- Cook Time: 22 minutes
- Category: Dinner
- Method: Grilling
- Cuisine: American
Nutrition
- Serving Size: 1 chicken breast (about 6 oz cooked)
- Calories: 285
- Sugar: 2g
- Sodium: 685mg
- Fat: 15g
- Saturated Fat: 2g
- Unsaturated Fat: 12g
- Trans Fat: 0g
- Carbohydrates: 3g
- Fiber: 0g
- Protein: 35g
- Cholesterol: 125mg
Tips & Variations
Italian-Style Grilled Chicken:
Use Italian seasoning, add 2 tablespoons balsamic vinegar to marinade, and top finished chicken with fresh mozzarella, tomatoes, and basil for a Caprese-style presentation.
Mexican-Style Grilled Chicken:
Replace herbs with 1 tablespoon chili powder, 1 teaspoon cumin, ½ teaspoon cayenne, and add lime juice instead of lemon. Serve with guacamole, salsa, and tortillas for fajitas.
Asian-Inspired Grilled Chicken:
Use soy sauce instead of lemon juice, add 1 tablespoon fresh grated ginger, 1 teaspoon sesame oil, and a pinch of red pepper flakes. Garnish with sesame seeds and green onions.
BBQ Grilled Chicken:
Marinate in your favorite BBQ sauce mixed with a bit of oil. Brush with additional sauce during the last 2 minutes of grilling for a sticky, caramelized finish.
Greek-Style Grilled Chicken:
Add 1 teaspoon dried oregano, use lemon juice, and serve with tzatziki sauce, cucumbers, tomatoes, and pita bread.
Spicy Cajun Grilled Chicken:
Replace herbs with 2 tablespoons Cajun seasoning and add a pinch of cayenne for heat. Perfect for blackened chicken style.
Teriyaki Grilled Chicken:
Marinate in teriyaki sauce mixed with pineapple juice. Brush with additional teriyaki during grilling for a glossy finish.
Herb-Crusted Version:
After marinating, press chicken into a mixture of fresh chopped herbs (parsley, cilantro, basil) before grilling for an herb-crusted exterior.
Lemon Pepper Grilled Chicken:
Double the lemon juice and black pepper, add lemon zest, and finish with a squeeze of fresh lemon after grilling.
Stuffed Grilled Chicken:
Butterfly thick chicken breasts, stuff with spinach and feta or sun-dried tomatoes and mozzarella, secure with toothpicks, and grill, adding 3-4 minutes to cooking time.
Pro Chef Tips
The Pound-It-Even Principle:
Professional chefs know that even thickness is more important than the perfect marinade. A chicken breast that’s 1 inch thick on one end and ½ inch on the other will always cook unevenly – the thin part dries out before the thick part finishes. Pound to exactly ¾ inch throughout for foolproof results every time.
The Dry-Before-You-Grill Rule:
Before placing chicken on the grill, pat it dry with paper towels even after marinating. Excess moisture creates steam instead of sear, preventing those beautiful golden grill marks and caramelization. Dry chicken = better browning and more flavor development.
The Two-Zone Fire Technique:
Set up your grill with direct heat on one side and indirect heat (no flame) on the other. Start chicken over direct heat to sear and get grill marks (2-3 minutes per side), then move to indirect heat to finish cooking through. This prevents burning while ensuring doneness.
The Touch Test for Doneness:
While a thermometer is most reliable, professional chefs also use the touch test. Press the chicken with your finger – if it feels like the fleshy part of your palm below your thumb when you touch your thumb to your middle finger, it’s done. Practice this alongside thermometer checks to develop the skill.
The Rest-Equals-Juice Formula:
Resting chicken for 5 minutes after grilling isn’t optional – it’s essential. During cooking, heat drives juices to the center. Resting allows them to redistribute evenly throughout the meat. Cut immediately and those juices run onto your cutting board instead of staying in the meat.
The Marinade-to-Baste Trick:
Reserve 2-3 tablespoons of your marinade before adding raw chicken. Use this clean marinade to baste chicken during the last minute of grilling for an extra flavor boost. Never use marinade that touched raw chicken unless you boil it first.
The Grill-Mark Strategy:
For picture-perfect diamond grill marks, place chicken at a 45-degree angle to the grates. After 3 minutes, rotate it 90 degrees (without flipping) and cook 2-3 more minutes. Then flip and repeat on the other side. This creates professional-looking crosshatch marks.
The Lid-Down Method:
Always grill with the lid closed to maintain consistent heat and create an oven-like environment. Opening the lid frequently causes temperature fluctuations that lead to uneven cooking. Close it and resist the urge to peek!
The Oil-the-Chicken Method:
Instead of oiling the grill grates (which can cause flare-ups), lightly brush oil directly onto the chicken before placing it on the grill. This provides a protective barrier and helps prevent sticking just as effectively.
The Carryover Cooking Concept:
Remove chicken from the grill when it reaches 160-162°F, not 165°F. During the 5-minute rest, carryover cooking will bring it to 165°F perfectly. Pulling it off at exactly 165°F results in overcooked, dry chicken by the time you serve it.
Common Mistakes to Avoid
Mistake #1: Grilling Chicken Straight from the Refrigerator
Cold chicken hits the hot grill and the outside cooks too fast before the inside warms up, resulting in burnt exterior and raw interior. Solution: Let chicken sit at room temperature for 20-30 minutes before grilling (but don’t leave it out longer than that for food safety). Room temperature chicken cooks more evenly.
Mistake #2: Not Preheating the Grill Long Enough
A lukewarm grill won’t create proper searing or grill marks, and chicken is more likely to stick. Solution: Preheat your grill for at least 10-15 minutes with the lid closed until it reaches 400-450°F. The grates should be smoking hot before chicken touches them.
Mistake #3: Flipping Chicken Too Early or Too Often
Moving chicken before it develops a crust causes it to stick and tear, and constant flipping prevents proper browning and grill marks. Solution: Place chicken on the grill and don’t touch it for 5-6 minutes. It will release easily when ready. Flip only once during cooking.
Mistake #4: Overcooking from Fear of Undercooking
Worried about food safety, many people overcook chicken well past 165°F, resulting in dry, tough meat. Solution: Use an instant-read thermometer and remove chicken at exactly 165°F (or even 160°F accounting for carryover cooking). Trust the temperature, not the clock or your gut feeling.
Mistake #5: Cutting into Chicken Immediately
Slicing hot-off-the-grill chicken causes all the juices to run out onto your cutting board instead of staying in the meat. Solution: Always let grilled chicken rest for 5 minutes under foil before cutting. This simple step makes a dramatic difference in juiciness.
Mistake #6: Using High Heat the Entire Time
Grilling over high heat the whole time burns the outside before the inside cooks through. Solution: Use medium-high heat (400-425°F), not blazing high heat. Or use the two-zone method mentioned in Pro Tips – sear over high heat, then finish over indirect heat.
Mistake #7: Not Cleaning the Grill Grates
Dirty grill grates cause sticking, off flavors, and prevent proper grill marks. Solution: Always clean grates with a grill brush before cooking, then oil them lightly. This creates a non-stick surface that releases chicken easily and creates beautiful marks.
Storage & Meal Prep
Refrigerator Storage:
Store cooked grilled chicken in an airtight container in the refrigerator for up to 4 days. Let chicken cool to room temperature before storing (but don’t leave out longer than 2 hours). Slice or keep whole depending on how you’ll use it later.
Best Reheating Methods:
For juiciest results, reheat gently. Microwave: Place chicken on a microwave-safe plate, cover with a damp paper towel, and heat on 50% power in 30-second intervals until warmed through. Oven: Wrap in foil and reheat at 350°F for 10-15 minutes. Skillet: Add a splash of chicken broth and reheat over medium-low heat, covered.
Meal Prep Strategy:
Grilled chicken breast is perfect for meal prep! Grill 4-8 breasts on Sunday, let cool, then slice or dice and divide into meal prep containers. Use throughout the week in different ways to avoid boredom: Monday – chicken salad, Wednesday – chicken tacos, Friday – chicken pasta.
Storing for Different Uses:
If meal prepping, consider storing chicken in different forms: some whole breasts for reheating and serving with sides, some sliced for salads and sandwiches, and some diced for bowls and wraps. This variety makes meal prep more interesting.
Preventing Dryness During Storage:
Store chicken with a small amount of marinade, chicken broth, or olive oil to help maintain moisture. Don’t store completely dry as it will dry out further in the refrigerator.
Individual Portions:
Package individual servings with your planned sides for grab-and-go meals. Label containers with dates and contents for easy tracking.
Make-Ahead & Freezer Notes
Marinating Ahead:
Marinate chicken up to 4 hours before grilling for maximum flavor. Don’t marinate longer as the acid will start breaking down the proteins too much, creating mushy texture. For best results, marinate 1-2 hours.
Freezing Marinated Raw Chicken:
Place raw chicken and marinade in a freezer bag, remove air, and freeze flat for up to 3 months. When ready to cook, thaw in refrigerator overnight – the chicken marinates as it thaws! Then grill as directed. This is incredibly convenient for quick dinners.
Freezing Cooked Grilled Chicken:
Let cooked chicken cool completely, then wrap tightly in plastic wrap and aluminum foil, or place in freezer bags. Freeze for up to 3 months. This is perfect for always having protein ready for quick meals.
Best Thawing Method:
Transfer frozen chicken to the refrigerator 24 hours before you plan to cook or eat it. Slow thawing in the fridge maintains the best texture and is safest. Never thaw chicken at room temperature.
Reheating from Frozen:
For cooked frozen chicken, you can reheat directly from frozen. Microwave on 30% power, flipping occasionally, until hot throughout (about 5-7 minutes), or bake wrapped in foil at 350°F for 25-30 minutes.
Flash-Freezing Technique:
To freeze multiple pieces without them sticking together, place cooked chicken breasts on a parchment-lined baking sheet and freeze until solid (about 2 hours), then transfer to a freezer bag. This lets you remove just what you need.
Quality Maintenance:
For best quality, use frozen cooked chicken within 2-3 months and frozen raw marinated chicken within 3 months. Label everything with dates and contents.
Serving Suggestions
Grilled chicken breast is incredibly versatile. Here are delicious ways to enjoy it:
Classic Dinner Plates:
- With Roasted Vegetables – Broccoli, asparagus, bell peppers, and zucchini
- Over Rice – White rice, brown rice, wild rice, or cauliflower rice
- With Mashed Potatoes – Creamy mashed potatoes or roasted fingerlings
- Alongside Pasta – Serve with your favorite pasta and marinara or Alfredo sauce
- With Quinoa – Protein-packed quinoa makes a healthy base
Salads:
- Caesar Salad – Sliced grilled chicken over crisp romaine
- Greek Salad – With cucumbers, tomatoes, olives, and feta
- Cobb Salad – With bacon, egg, avocado, and blue cheese
- Strawberry Spinach Salad – With candied pecans and balsamic vinaigrette
- Asian Chicken Salad – With mandarin oranges, almonds, and sesame dressing
Sandwiches & Wraps:
- Grilled Chicken Sandwich – On ciabatta with lettuce, tomato, and mayo
- Chicken Caesar Wrap – In a tortilla with Caesar dressing and Parmesan
- Chicken Panini – Pressed with mozzarella and pesto
- Chicken Pita Pocket – With hummus, cucumbers, and tomatoes
- Buffalo Chicken Wrap – Tossed in buffalo sauce with ranch
Bowls:
- Burrito Bowl – With rice, beans, salsa, guacamole, and cheese
- Mediterranean Bowl – With quinoa, hummus, cucumbers, and tzatziki
- Asian Bowl – With rice, edamame, carrots, and teriyaki sauce
- Power Bowl – With sweet potato, kale, and tahini dressing
Side Dish Pairings:
- Grilled Corn on the Cob – Perfect summer side
- Caprese Salad – Fresh mozzarella, tomatoes, basil
- Garlic Bread – For Italian-style meals
- Coleslaw – Creamy or vinegar-based
- Baked Beans – Classic BBQ pairing
- Fresh Fruit – Watermelon, grapes, or berries
Beverage Pairings:
- White Wine – Chardonnay, Sauvignon Blanc, Pinot Grigio
- Beer – Light lagers, wheat beers, or IPAs
- Iced Tea – Sweet or unsweetened
- Lemonade – Perfect for summer grilling
FAQs Section
Q: How do I know when grilled chicken is done without a thermometer?
A: While a thermometer is most reliable (165°F), you can check visually and by touch. Cut into the thickest part – the meat should be white throughout with no pink, and juices should run clear, not pink. Press the chicken with your finger – it should feel firm and spring back, not soft or squishy. However, for food safety and best results, I strongly recommend using an instant-read thermometer.
Q: Why is my grilled chicken always dry?
A: Dry chicken usually results from overcooking. Remove chicken from the grill at exactly 165°F – any higher and it dries out quickly. Also ensure you’re: (1) pounding to even thickness so it cooks uniformly, (2) using a marinade to add moisture, and (3) letting it rest before cutting so juices redistribute. Follow these steps and you’ll never have dry chicken again.
Q: Can I grill chicken breast without marinating?
A: Yes, though marinating adds flavor and helps keep chicken moist. If skipping the marinade, generously season chicken with salt, pepper, and your favorite spices, then brush with olive oil before grilling. The results won’t be quite as flavorful or juicy, but proper cooking technique (even thickness, correct temperature, resting) will still give you good chicken.
Q: What’s the best internal temperature for grilled chicken?
A: The USDA recommends 165°F for food safety, and that’s your target. However, due to carryover cooking (temperature continues rising after removing from heat), you can pull chicken off the grill at 160-162°F, tent with foil, and let it rest for 5 minutes. It will reach 165°F during resting while staying juicier than if you wait until it hits 165°F on the grill.
Q: How long should I marinate chicken before grilling?
A: Minimum 15 minutes to add flavor, but 1-2 hours is ideal for maximum flavor and tenderness. You can marinate up to 4 hours, but no longer – extended marinating (especially with acidic marinades) starts to break down the proteins too much, creating mushy texture. If you need to prep further ahead, freeze chicken in the marinade and let it marinate as it thaws in the refrigerator.
Q: Can I use frozen chicken breasts?
A: Yes, but always thaw completely before grilling. Thaw in the refrigerator overnight (never at room temperature). Pat thawed chicken very dry before marinating. Frozen chicken that’s not fully thawed won’t cook evenly and will be rubbery. For best results, use fresh or properly thawed chicken.
Q: How do I get good grill marks on my chicken?
A: Great grill marks require: (1) A very hot, clean grill preheated to 400-450°F, (2) Dry chicken – pat it dry even after marinating, (3) Oiled grill grates or oiled chicken to prevent sticking, (4) Placing chicken at a 45-degree angle to the grates, and (5) Not moving or flipping the chicken for at least 5 minutes. Patience is key – let the chicken develop a crust before attempting to move it.
Q: What if I don’t have an outdoor grill?
A: No problem! Use an indoor grill pan over medium-high heat on your stovetop. Heat the pan until very hot (water should sizzle immediately), oil the pan lightly, and cook chicken using the same timing. You’ll get grill marks and delicious flavor. Alternatively, bake in the oven at 425°F for 20-25 minutes, or use a broiler for a charred effect. An air fryer also works great at 400°F for 12-15 minutes, flipping halfway.
Conclusion
You’ve just learned everything you need to know to make absolutely perfect grilled chicken breast every single time! No more dry, flavorless, rubbery chicken – just juicy, tender, golden-brown perfection that rivals any restaurant. These simple techniques – pounding to even thickness, using a flavorful marinade, proper grill temperature, and letting it rest – will transform your chicken game forever and make you the grilling hero of your household.
The beauty of mastering grilled chicken breast is how it opens up endless meal possibilities. Whether you’re meal prepping for healthy lunches all week, throwing together a quick weeknight dinner with whatever sides you have on hand, hosting a summer barbecue, or creating elaborate salad bowls and wraps, perfectly grilled chicken is your secret weapon. It’s healthy, versatile, budget-friendly, and when done right, absolutely delicious.
I truly hope this comprehensive guide has given you the confidence to grill chicken without fear of drying it out. Remember, the key is even thickness, proper temperature (both grill and internal), and patience to let it rest. Follow these principles and you’ll never serve disappointing chicken again. Your family and friends will be asking you to make this recipe over and over!
Now it’s time to fire up that grill! I’d love to hear how your grilled chicken turns out. Did you try any of the flavor variations? What sides did you serve with it? How did your family react to juicy chicken for a change? Drop a comment below and share your grilling success story – your feedback helps other home cooks feel inspired to try this recipe!
Please save this recipe to your Pinterest boards so you can easily find it whenever you’re planning to grill! Pin it to your “Grilling Recipes,” “Healthy Dinners,” “Meal Prep Ideas,” “Chicken Recipes,” or “Summer BBQ” boards, and share it with friends who need to learn the secret to juicy grilled chicken. Every save and share helps other home cooks discover these game-changing techniques!
Happy grilling, and may your chicken always be perfectly juicy and never dry! 🔥🍗