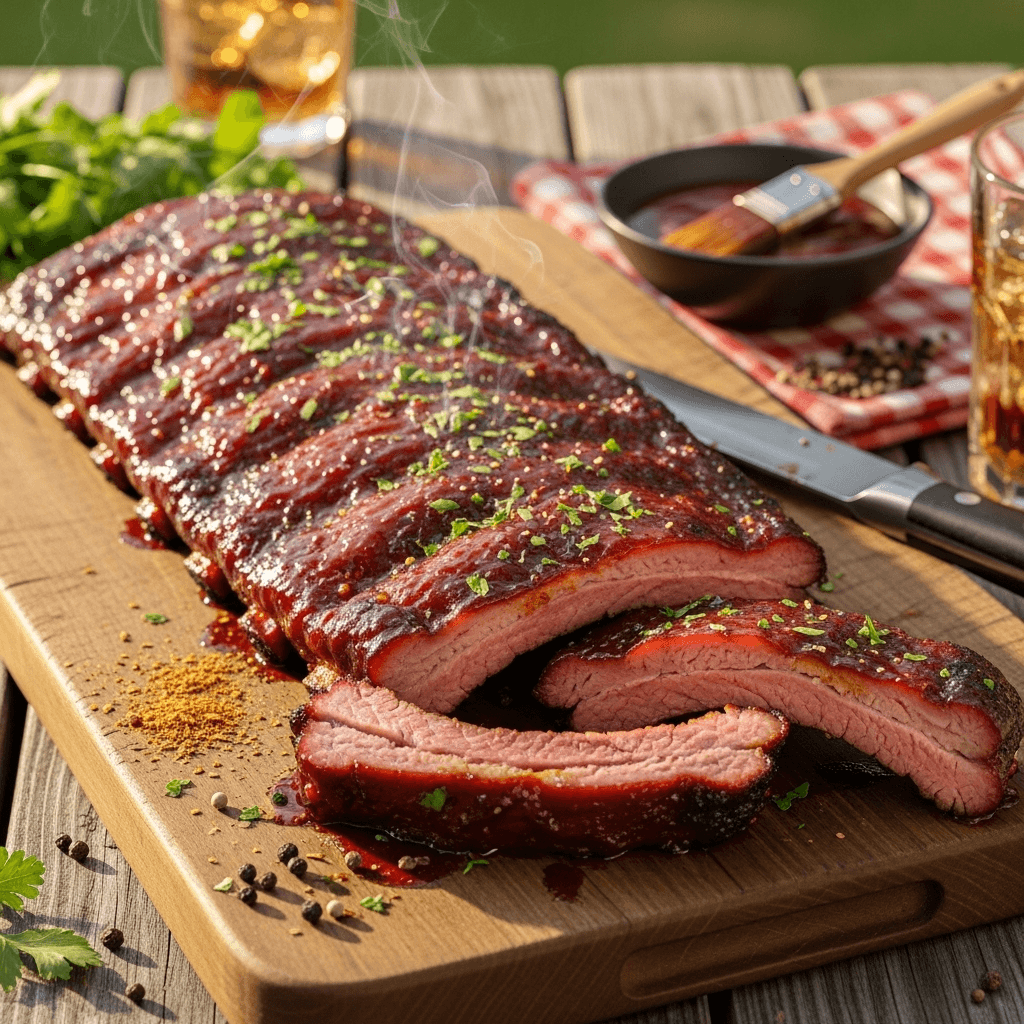

If you’ve been dreaming of making restaurant-quality BBQ ribs at home, this fall-off-the-bone BBQ ribs recipe is about to become your new favorite! These tender, juicy ribs feature a flavorful dry rub, are cooked low and slow until the meat practically melts off the bone, and are finished with a sticky-sweet BBQ glaze that caramelizes into pure perfection. Whether you’re firing up the grill or using your oven, this foolproof method delivers amazing results every single time.
BBQ ribs are the ultimate crowd-pleaser that turns any meal into a celebration. They’re perfect for summer cookouts, game day gatherings, Fourth of July parties, Father’s Day feasts, or any time you want to impress your family and friends with your grilling skills. The combination of smoky, savory, sweet, and tangy flavors with that perfect tender texture makes these ribs absolutely irresistible. While they may seem intimidating, this recipe breaks everything down into simple, manageable steps that even beginners can follow. Get ready to serve up ribs so good, people will think you’ve been smoking meat for years!
History / Background
BBQ ribs hold a special place in American culinary history, with roots deeply embedded in Southern barbecue culture. The tradition of slow-cooking ribs over smoke and fire dates back centuries, influenced by a blend of Native American, African, and European cooking techniques that merged in the American South.
The word “barbecue” itself comes from the Taino word “barbacoa,” which Spanish explorers encountered in the Caribbean. Native Americans had been slow-cooking meat over wooden frames for generations. When African slaves were brought to the American South, they brought their own knowledge of seasoning and slow-cooking tougher cuts of meat. European settlers contributed their meat preservation and smoking techniques. This melding of cultures created what we now know as American barbecue.
Pork ribs became particularly popular in the South because pigs were easy to raise and could forage for themselves, making them accessible to people of all economic backgrounds. During slavery and post-Civil War era, less desirable cuts of meat like ribs were often given to or purchased by African Americans. Through skill, patience, and creativity with seasonings, these humble cuts were transformed into something extraordinary – tender, flavorful BBQ that became a source of pride and celebration.
Different regions developed their own distinct BBQ styles. Memphis became famous for dry-rubbed ribs served with sauce on the side. Kansas City developed thick, tomato-based sweet sauces. The Carolinas preferred vinegar-based sauces. Texas focused on beef ribs with simple salt and pepper rubs. Each style reflects local ingredients, cultural influences, and generations of perfected techniques.
The rise of BBQ restaurants in the mid-20th century, many started by African American pitmasters, helped spread regional BBQ styles across America. Legendary spots like Arthur Bryant’s in Kansas City, Rendezvous in Memphis, and countless mom-and-pop joints became destinations where people would travel miles for exceptional ribs.
Today, BBQ ribs represent more than just food – they’re a symbol of American culinary heritage, patience, and the art of transforming simple ingredients into something spectacular. Whether you’re cooking competitively, running a BBQ joint, or making ribs in your backyard, you’re participating in a tradition that spans centuries and brings people together in celebration.
Why You’ll Love This Recipe
This BBQ ribs recipe takes all the guesswork out of making perfect ribs at home, giving you consistently tender, flavorful results that rival your favorite BBQ restaurant. Whether you’re a first-timer or a seasoned griller, this method sets you up for success.
Here’s why this recipe is a winner:
- Foolproof tender results – The low and slow cooking method guarantees fall-off-the-bone tenderness every time
- Flexible cooking methods – Make these in the oven, on the grill, or even in a slow cooker with equally delicious results
- Amazing flavor layers – Dry rub + slow cooking + BBQ glaze creates complex, restaurant-quality taste
- Perfect for entertaining – Impressive enough for special occasions but straightforward enough for casual cookouts
- Customizable to your taste – Easily adjust the spice level, sweetness, and BBQ sauce style to your preference
- Feeds a hungry crowd – One rack serves 3-4 people, and the recipe easily doubles or triples
- Make-ahead friendly – Can be prepped a day ahead, and leftovers reheat beautifully
- No special equipment required – You don’t need a fancy smoker to achieve amazing results
- Budget-friendly for the wow factor – Ribs are economical considering how impressive they are
- Fun to make and eat – There’s something primal and satisfying about eating ribs with your hands
- Universal crowd-pleaser – Kids and adults alike can’t resist tender, saucy ribs
Ingredient Notes
Let’s break down what makes these BBQ ribs so incredibly delicious. Quality ingredients and the right preparation make all the difference.
Baby Back Ribs or Spare Ribs: You’ll need 2 full racks (about 4-5 lbs total). Baby back ribs are smaller, more tender, and leaner – they cook faster and are more expensive. Spare ribs (or St. Louis style ribs, which are trimmed spare ribs) are larger, meatier, fattier, and have more flavor. Both are excellent choices. Look for ribs with good meat coverage and avoid racks that look dried out.
Brown Sugar: Forms the base of the dry rub, adding sweetness and helping create that beautiful caramelized crust. Light or dark brown sugar both work – dark has deeper molasses flavor.
Paprika: Provides color, mild sweetness, and subtle pepper flavor. Use regular or sweet paprika, not hot paprika (unless you want extra heat). Smoked paprika adds an extra smoky dimension if you’re cooking in the oven.
Chili Powder: Adds warmth and depth without excessive heat. This is different from pure ground chili pepper – it’s a blend that includes cumin and other spices.
Garlic Powder and Onion Powder: These provide savory depth and umami. Use powder, not garlic/onion salt, so you can control sodium levels separately.
Black Pepper: Freshly ground black pepper is ideal for the best flavor and aroma in your dry rub.
Cayenne Pepper: Controls the heat level. Start with 1/2 teaspoon for mild heat, increase to 1 teaspoon for medium, or omit entirely for no heat.
Cumin: Adds earthy, warming notes that complement the other spices beautifully.
Salt: Essential for seasoning and drawing out moisture to help the rub adhere and penetrate the meat. Use regular table salt, kosher salt (reduce by half if using), or sea salt.
BBQ Sauce: You’ll need about 1.5-2 cups of your favorite BBQ sauce for glazing. Use a thick, quality sauce – Sweet Baby Ray’s, KC Masterpiece, or homemade all work great. Choose tomato-based, vinegar-based, or mustard-based depending on your regional preference.
Apple Cider Vinegar: A few tablespoons in a spray bottle helps keep ribs moist during cooking and adds tangy flavor. Apple juice works too.
Optional Liquid Smoke: If cooking in the oven, a few drops of liquid smoke in your spritz or added to the sauce gives authentic smoky flavor.
Equipment Needed
Here’s what you’ll need to make perfect BBQ ribs:
- Rimmed baking sheet or roasting pan – For oven cooking
- Aluminum foil – For wrapping ribs during part of cooking
- Sharp knife – For removing membrane and trimming
- Paper towels – For gripping and removing the membrane
- Small mixing bowl – For combining dry rub spices
- Basting brush – For applying BBQ sauce
- Spray bottle – For spritzing ribs with apple cider vinegar mixture (optional but recommended)
- Tongs – For handling hot ribs
- Meat thermometer – To check doneness (optional but helpful)
- Cutting board – For cutting ribs after cooking
- Grill (optional) – Gas or charcoal grill if cooking outdoors
- Slow cooker (optional) – If using the slow cooker method

BBQ Ribs Recipe
- Total Time: 3 hours 15 minutes
- Yield: 6-8 servings (2 racks) 1x
- Diet: Vegetarian
Description
These fall-off-the-bone BBQ ribs feature a flavorful dry rub and are cooked low and slow until incredibly tender, then glazed with sticky BBQ sauce. Perfect for any occasion!
Ingredients
For the Dry Rub:
- 1/4 cup brown sugar (light or dark)
- 2 tablespoons paprika (smoked paprika for extra smoky flavor)
- 1 tablespoon chili powder
- 1 tablespoon garlic powder
- 1 tablespoon onion powder
- 1 tablespoon black pepper, freshly ground
- 1/2 to 1 teaspoon cayenne pepper (adjust for heat preference)
- 1 tablespoon ground cumin
- 1 tablespoon salt
For the Ribs:
- 2 racks baby back ribs or spare ribs (4–5 lbs total)
- 1.5 to 2 cups BBQ sauce (your favorite brand or homemade)
- 1/2 cup apple cider vinegar or apple juice (for spritzing)
- 2–3 drops liquid smoke (optional, for oven method)
Instructions
Step 1: Prepare the Ribs
Remove the ribs from packaging and pat dry with paper towels. Place the rack bone-side up on a cutting board. You’ll notice a thin, shiny membrane covering the bone side – this needs to be removed. Using a butter knife or your fingers, loosen one corner of the membrane, then grip it with a paper towel and pull it off in one piece. This step is crucial for tender ribs and allows seasonings to penetrate. Trim any excess fat if desired.
Step 2: Make the Dry Rub
In a small bowl, combine the brown sugar, paprika, chili powder, garlic powder, onion powder, black pepper, cayenne pepper, cumin, and salt. Mix thoroughly until all spices are evenly distributed and any sugar lumps are broken up. This makes about 3/4 cup of rub.
Step 3: Season the Ribs
Generously apply the dry rub to both sides of each rack, using your hands to massage it into the meat. Make sure to coat evenly, pressing the rub into all surfaces. You want a nice, thick coating. If time allows, let the seasoned ribs sit at room temperature for 30 minutes, or wrap and refrigerate for up to 24 hours (bring to room temp 30 minutes before cooking). The longer it sits, the more flavor penetrates.
Step 4: Preheat Your Oven (or Grill)
Preheat your oven to 275°F (135°C). For low and slow cooking, lower temperatures yield more tender results. Line a large rimmed baking sheet or roasting pan with aluminum foil for easy cleanup. If grilling, set up for indirect heat at 275°F.
Step 5: Initial Cooking Phase
Place the seasoned ribs meat-side up on the prepared baking sheet. If the racks are too long, you can cut them in half. Mix the apple cider vinegar with 1/2 cup water in a spray bottle (add liquid smoke if using). Cover the ribs tightly with another sheet of aluminum foil, creating a sealed packet. This creates a steaming environment. Place in the oven and cook for 2 hours. If using a spray bottle, open the foil and spritz the ribs every 45 minutes (optional).
Step 6: Check for Tenderness
After 2 hours, carefully remove the foil (watch for hot steam!). The ribs should be getting tender – the meat should have pulled back from the bones about 1/4 inch. If a knife inserts easily and the meat is starting to become very tender, they’re ready for the next step. If not quite there yet, re-cover and cook another 30 minutes.
Step 7: Apply BBQ Sauce – First Layer
Remove the foil completely. Brush a generous layer of BBQ sauce over both sides of the ribs. Return to the oven uncovered. Increase temperature to 350°F (175°C). Cook for 20 minutes.
Step 8: Second Sauce Layer and Caramelize
Remove ribs and apply another generous layer of BBQ sauce. Return to oven and cook for another 10-15 minutes, until the sauce is sticky, caramelized, and has a beautiful glaze. Watch carefully to prevent burning. For extra caramelization, you can broil for 2-3 minutes at the very end, watching constantly.
Step 9: Rest and Serve
Remove ribs from oven and let rest for 5-10 minutes – this allows juices to redistribute. The ribs should be tender enough that the meat pulls away from the bone easily but doesn’t completely fall off (that’s actually overcooked). Cut between the bones into individual ribs using a sharp knife. Serve with extra BBQ sauce on the side.
Optional Grill Method:
After the 2-hour covered oven phase, transfer ribs to a preheated grill over medium heat (or medium-high direct heat). Brush with sauce and grill 5 minutes per side, adding more sauce and repeating until caramelized, about 15-20 minutes total.
Notes
- Removing the membrane is crucial for tender ribs and flavor penetration
- The 3-2-1 method (3 hrs smoke, 2 hrs wrapped, 1 hr sauced) is a popular variation for smoking
- Ribs are done when they bend easily and meat pulls back from bones, usually at 190-203°F internal temp
- Don’t apply sauce too early or it will burn – wait until the last 30-40 minutes
- For spicier ribs, increase cayenne or add hot sauce to your BBQ glaze
- Ribs can be cooked entirely in a slow cooker on low for 6-8 hours, then finished under the broiler with sauce
- Make extra dry rub and store in an airtight container for up to 6 months
- Prep Time: 15 minutes
- Cook Time: 3 hours
- Category: Main Dish
- Method: Baking
- Cuisine: American
Nutrition
- Serving Size: 4-5 ribs (1/6 of recipe)
- Calories: 625
- Sugar: 22g
- Sodium: 1,240mg
- Fat: 42g
- Saturated Fat: 15g
- Unsaturated Fat: 24g
- Trans Fat: 0g
- Carbohydrates: 26g
- Fiber: 1g
- Protein: 35g
- Cholesterol: 165mg
Tips & Variations
Regional BBQ Sauce Styles:
- Kansas City Style: Use thick, sweet tomato-based sauce with molasses
- Memphis Style: Serve dry-rubbed without sauce, or sauce on the side
- Carolina Style: Use tangy vinegar-based sauce with mustard or ketchup
- Texas Style: Keep it simple with just salt, pepper, and maybe a thin mop sauce
- Alabama White Sauce: Unique mayo-based white BBQ sauce
Dry Rub Variations:
- Spicy BBQ Rub: Double the cayenne and add 1 tablespoon hot chili powder
- Sweet & Smoky: Increase brown sugar to 1/3 cup and use smoked paprika
- Coffee Rub: Add 2 tablespoons finely ground coffee for depth
- Herb Blend: Mix in dried thyme, oregano, and rosemary
- Asian-Inspired: Add ginger powder, five-spice, and sesame seeds
Cooking Method Variations:
- Slow Cooker Ribs: Season ribs, place in slow cooker (cut to fit), cook on low 6-8 hours, then broil with sauce
- Instant Pot Ribs: Pressure cook seasoned ribs for 25 minutes, natural release, then broil with sauce
- Smoked Ribs: Use smoker at 225-250°F with hickory or apple wood for 5-6 hours
- Air Fryer Finish: After slow cooking, finish in air fryer at 400°F for crispy edges
Flavor Boosts:
- Inject ribs with apple juice or beer before seasoning
- Add bacon fat to your dry rub for extra richness
- Brush with honey-butter mixture before final sauce layer
- Add bourbon or whiskey to your BBQ sauce
- Finish with a sprinkle of fresh herbs like cilantro or parsley
Pro Chef Tips
The Membrane Must Go: Professional pitmasters never skip removing that thin membrane on the bone side. It acts as a barrier preventing smoke, rub, and moisture from penetrating the meat. It also becomes chewy and unpleasant when cooked. Use a paper towel for better grip – it’s slippery! Start at one corner, loosen with a knife, grab firmly with the towel, and pull steadily. It should come off in one satisfying sheet.
Low and Slow is the Secret: The magic temperature range for perfect ribs is 225-275°F. At these temperatures, the connective tissues (collagen) slowly break down into gelatin, creating that fall-off-the-bone tenderness. Higher temperatures cook ribs faster but leave them tough and chewy. Lower temperatures take forever. That 275°F sweet spot gives you tender ribs in 3-3.5 hours without drying them out.
The Bend Test Knows Best: Forget relying solely on time or temperature. The best way to check if ribs are done is the bend test. Using tongs, pick up the rack from one end. If it bends easily and the meat on top starts to crack but doesn’t completely fall apart, they’re perfect. If they’re too stiff, they need more time. If they completely fall apart, you’ve gone too far (but they’ll still taste good!).
Sauce Timing Matters Tremendously: This is where many home cooks go wrong. BBQ sauce contains sugar, which caramelizes quickly but also burns easily. If you slather on sauce too early, it will char and turn bitter before the ribs are tender. Always wait until the last 30-40 minutes of cooking to apply sauce, and build it up in layers. The first layer sets, the second layer glazes, and you get that perfect sticky-sweet coating without burning.
Rest Before Cutting: Just like a steak, ribs benefit from resting. When you pull them from heat, tent loosely with foil and let them rest 5-10 minutes. This allows the meat fibers to relax and juices to redistribute instead of running all over your cutting board. The result? Juicier, more flavorful ribs in every bite.
Common Mistakes to Avoid
Cooking at Too High Temperature: The biggest mistake beginners make is trying to rush ribs. Cooking at 350°F or higher might seem faster, but it toughens the meat. Ribs need time at lower temperatures (225-275°F) for collagen to break down properly. High heat cooks the outside quickly while leaving the inside tough. Be patient – low and slow always wins with ribs.
Not Removing the Membrane: That silvery membrane on the bone side isn’t just unpleasant to eat – it prevents your rub and smoke from penetrating the meat. Many first-timers skip this step because they don’t know about it or find it tedious. It only takes 2 minutes and makes a massive difference in texture and flavor. Always remove it.
Applying Sauce Too Early: BBQ sauce is loaded with sugar, which burns easily. Brushing sauce on at the beginning or middle of cooking results in a black, bitter, charred mess instead of a beautiful caramelized glaze. Always wait until the ribs are nearly done (last 30-40 minutes) before adding sauce. Build your glaze in layers for best results.
Overcooking Until They Fall Apart: While “fall-off-the-bone” sounds ideal, ribs that literally fall off the bone are actually overcooked. Perfectly cooked ribs should require a gentle pull to separate meat from bone. When meat falls off with no effort, you’ve cooked too long and lost the ideal texture. Use the bend test and aim for tender but not mushy.
Skipping the Rest Period: Cutting into ribs immediately after cooking causes all those delicious juices to run out, leaving you with drier meat. Just 5-10 minutes of resting allows muscle fibers to relax and juices to redistribute throughout the meat. It’s worth the wait for juicier, more flavorful results.
Storage & Meal Prep
BBQ ribs are great for making ahead and actually reheat quite well when done properly.
Refrigerator Storage:
Allow cooked ribs to cool to room temperature (within 2 hours of cooking). Wrap tightly in aluminum foil or place in an airtight container. Store in the refrigerator for up to 4 days. For best results, store sauce separately and add fresh sauce when reheating.
Reheating Instructions:
The best way to reheat ribs is in the oven. Preheat to 250°F, place ribs in a baking dish with a few tablespoons of water or apple juice, cover tightly with foil, and heat for 20-30 minutes until warmed through. Remove foil, brush with fresh BBQ sauce, and broil 2-3 minutes to re-caramelize. You can also reheat on the grill over indirect heat, which adds nice char.
Microwave Reheating:
For quick individual portions, wrap ribs in a damp paper towel and microwave on 50% power in 1-minute intervals until hot. Finish under the broiler with fresh sauce for 2 minutes if desired to restore some texture.
Preventing Dryness:
Ribs can dry out when reheating. Always add a little liquid (water, broth, or apple juice) when reheating and keep covered most of the time to trap steam. A fresh coat of BBQ sauce after reheating helps restore moisture and flavor.
Make-Ahead & Freezer Notes
Make-Ahead Strategy:
You can prepare the dry rub up to 6 months ahead and store in an airtight container. Season the ribs up to 24 hours before cooking – actually, this improves flavor as the rub penetrates deeper. Store covered in the refrigerator, then bring to room temp 30 minutes before cooking. You can also cook ribs completely up to 2 days ahead, refrigerate, then reheat and apply fresh sauce before serving.
Partial Cook Method:
For entertaining, cook ribs through the covered phase (first 2 hours), cool, and refrigerate for up to 2 days. When ready to serve, bring to room temp, apply sauce, and finish in a hot oven or on the grill for 20-30 minutes. This gives you tender ribs with fresh-glazed flavor without the wait.
Freezing Cooked Ribs:
Cooked ribs freeze beautifully for up to 3 months. Let cool completely, wrap individual racks or portions tightly in plastic wrap, then in aluminum foil, and place in freezer bags. Label with date. Freeze with or without sauce – if freezing with sauce, use less than you normally would and plan to add fresh sauce when reheating.
Freezing Uncooked Seasoned Ribs:
You can also season raw ribs with dry rub and freeze for up to 3 months. Wrap well to prevent freezer burn. Thaw overnight in refrigerator before cooking. The rub will have penetrated deeply during thawing, giving excellent flavor.
Thawing and Reheating:
Thaw frozen ribs overnight in the refrigerator. Reheat as described in the storage section – low and slow in the oven with added moisture and fresh sauce. They’ll taste almost as good as fresh!
Serving Suggestions
BBQ ribs are the star of any meal, but these classic sides complete the feast!
Classic BBQ Sides:
- Coleslaw: Creamy or vinegar-based, provides cool, crunchy contrast
- Mac and Cheese: Creamy, comforting, and everyone’s favorite
- Baked Beans: Sweet and savory beans are BBQ essential
- Cornbread: Slightly sweet cornbread or corn muffins
- Potato Salad: Classic mayonnaise-based or mustard potato salad
- French Fries or Onion Rings: Crispy and satisfying
Vegetable Sides:
- Grilled Corn on the Cob: Brushed with butter and sprinkled with herbs
- Collard Greens: Southern-style with ham hock or bacon
- Green Beans: Fresh or slow-cooked Southern style
- Grilled Vegetables: Zucchini, peppers, and onions
- Cucumber Salad: Light, refreshing, vinegar-based
Bread Options:
- Texas Toast: Thick, buttery garlic bread
- Dinner Rolls: Soft, fluffy rolls for soaking up sauce
- Biscuits: Buttermilk biscuits are perfect with BBQ
- Cornbread Muffins: Individual portions of sweet cornbread
Complete BBQ Spread:
- Start with chips and dip or deviled eggs
- Main: BBQ ribs with extra sauce
- Sides: Coleslaw, mac and cheese, baked beans
- Bread: Cornbread or dinner rolls
- Dessert: Peach cobbler, banana pudding, or apple pie
- Drinks: Sweet tea, lemonade, or cold beer
Beverage Pairings:
- Beer: Light lagers, IPAs, or amber ales
- Sweet Tea: Classic Southern accompaniment
- Lemonade: Fresh squeezed or strawberry lemonade
- Soft Drinks: Classic Coke or root beer
- Wine: If wine is your thing, try Zinfandel or Shiraz
FAQs Section
Q: What’s the difference between baby back ribs and spare ribs?
A: Baby back ribs come from higher on the pig’s back near the spine. They’re smaller, more tender, leaner, cook faster (2.5-3 hours), and are more expensive. Spare ribs come from the belly area below baby backs. They’re larger, meatier, fattier, have more connective tissue (which means more flavor when cooked properly), take longer to cook (3-4 hours), and are more economical. Both are delicious – baby backs are more tender, spare ribs have more flavor.
Q: Do I really need to cook ribs for 3 hours?
A: Yes, low and slow is essential for tender ribs! The connective tissue (collagen) in ribs needs time at lower temperatures (225-275°F) to break down into gelatin, which creates that tender, fall-off-the-bone texture. Cooking at higher temperatures for less time will give you tough, chewy ribs. You can use a pressure cooker or Instant Pot to speed things up (25-30 minutes), but traditional low and slow gives the best texture and allows smoke flavor to develop.
Q: Can I make these without a grill?
A: Absolutely! The oven method in this recipe produces excellent results. For extra smoky flavor without a grill, use smoked paprika in your rub and add a few drops of liquid smoke to your spritzing liquid or BBQ sauce. You can also finish the sauced ribs under the broiler for 2-3 minutes to get some charring and caramelization similar to grilling.
Q: How do I know when ribs are done?
A: Use the bend test: pick up the rack from one end with tongs. If it bends easily and the meat on top cracks but doesn’t fall apart, they’re perfect. You can also check if the meat has pulled back from the bones about 1/4 to 1/2 inch. Internal temperature should be 190-203°F for tender ribs. If a toothpick or skewer slides in with little resistance, they’re done.
Q: Why did my ribs turn out tough?
A: Tough ribs usually result from cooking at too high a temperature, not cooking long enough, or both. Ribs need 2.5-4 hours at 225-275°F to become tender. Higher temperatures cook the outside quickly but don’t give collagen time to break down. Also, make sure you removed the membrane on the bone side – leaving it on can make ribs seem tougher.
Q: Can I use a different BBQ sauce?
A: Yes! Use any style you prefer – sweet Kansas City style, tangy Carolina vinegar-based, spicy Texas mop sauce, or even Asian-inspired sauces. You can also make your own BBQ sauce. Just remember to apply it only in the last 30-40 minutes to prevent burning. Some people prefer Memphis-style dry rub ribs with no sauce at all – serve sauce on the side for dipping.
Q: Should ribs fall off the bone?
A: Actually, no! Despite the popular phrase “fall-off-the-bone,” competition BBQ judges would mark that as overcooked. Perfectly cooked ribs should require a gentle bite or pull to separate the meat from bone – think “bite-off-the-bone” rather than “fall-off-the-bone.” Meat that falls off with zero resistance means you’ve gone too far, though it will still taste good.
Conclusion
There you have it – everything you need to make absolutely incredible, fall-off-the-bone BBQ ribs that will have everyone asking for your secret! These ribs prove that you don’t need fancy equipment or professional pitmaster skills to create restaurant-quality BBQ right in your own backyard or kitchen. With a flavorful dry rub, low and slow cooking, and a sticky-sweet BBQ glaze, you’ll be serving up ribs that are tender, juicy, and bursting with flavor.
The beauty of this BBQ ribs recipe is its flexibility and reliability. Whether you’re cooking in the oven, on the grill, or even in a slow cooker, this method delivers consistent results every time. Once you master the basics, you can experiment with different rubs, sauces, and regional styles to make these ribs your own signature dish. Your friends and family will be blown away, and you’ll become the go-to person for BBQ at every gathering!
I’d love to hear how your BBQ ribs turn out! Drop a comment below and let me know what dry rub variations you tried, how you served them, or any questions you have. Did you make them for a special occasion? What sides did you pair them with? And if this recipe helped you create finger-licking-good ribs at home, please share it on Pinterest so other home cooks can discover it too! Save it to your favorite grilling and BBQ recipe boards for easy access whenever you’re ready to fire up some ribs. Now grab those racks, mix up that rub, and get ready to serve the best BBQ ribs your crew has ever tasted! Happy grilling!