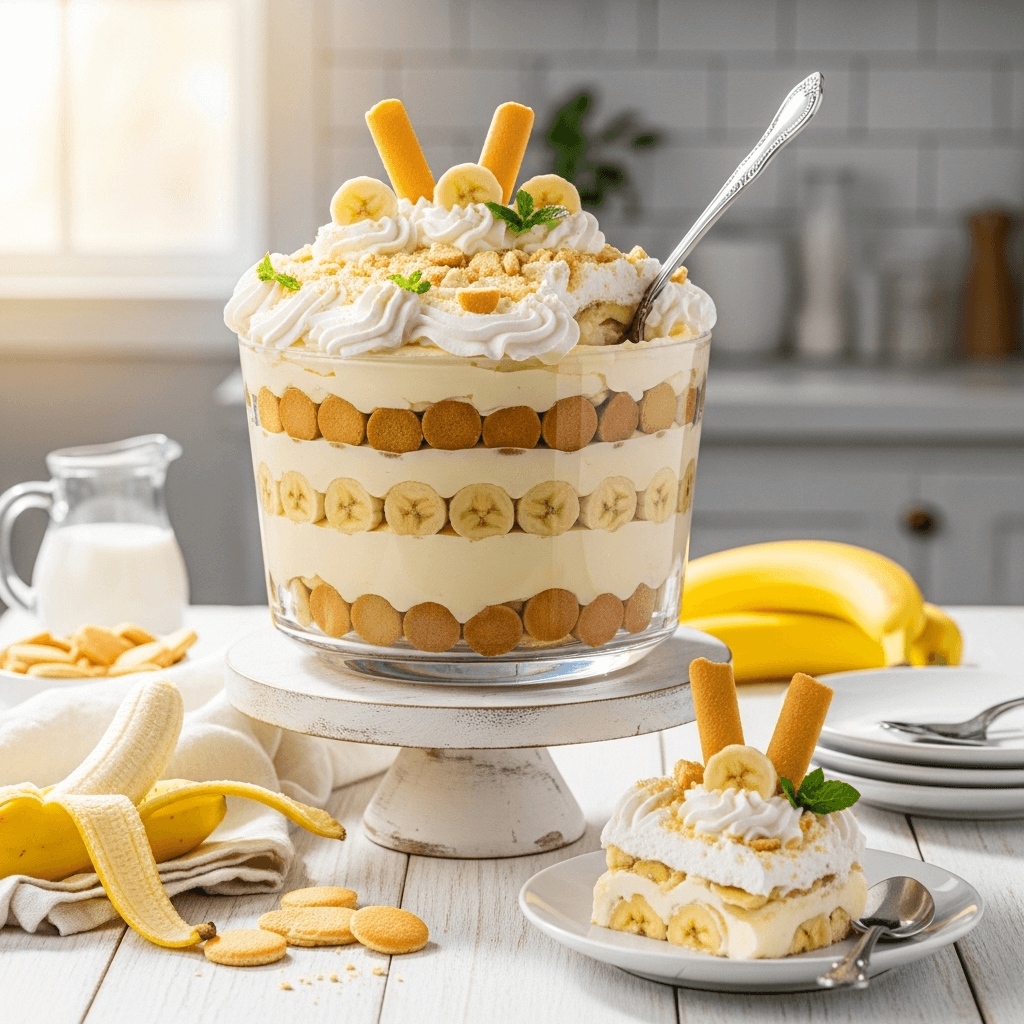

There’s nothing quite like a bowl of old-fashioned banana pudding to bring comfort and joy to your table. This classic Southern dessert features layers of creamy vanilla pudding, fresh ripe bananas, and crispy vanilla wafers, all topped with billowy whipped cream or fluffy meringue. It’s the kind of dessert that evokes childhood memories, Sunday dinners at grandma’s house, and warm summer gatherings with family and friends.
This homemade banana pudding recipe is everything you want in a crowd-pleasing dessert—rich and creamy yet light and refreshing, easy to make yet impressively delicious, and perfect for feeding a crowd without breaking the bank. Whether you’re bringing it to a potluck, serving it at a family reunion, or simply treating yourself to a nostalgic dessert, this banana pudding delivers pure comfort in every spoonful.
Introduction to Banana Pudding
Banana pudding is an iconic American dessert that’s particularly beloved in the Southern United States. This no-bake (or sometimes baked) layered dessert combines silky smooth vanilla pudding with sliced fresh bananas and vanilla wafer cookies, creating a perfect harmony of textures and flavors. The cookies soften as they absorb moisture from the pudding, creating a cake-like texture that’s utterly irresistible.
What makes banana pudding so special is its beautiful simplicity. There’s no fancy technique required, no complicated steps—just straightforward layering that creates something far greater than the sum of its parts. The creamy pudding provides richness, the bananas add natural sweetness and freshness, the vanilla wafers contribute a gentle crunch that softens into something magical, and the whipped cream or meringue topping adds lightness and elegance.
This dessert is incredibly versatile for serving occasions. It’s perfect for summer BBQs and picnics when you need something that travels well, holiday gatherings like Easter, Mother’s Day, and family reunions, church potlucks and covered dish dinners where it always disappears first, casual weeknight desserts when you’re craving comfort food, and birthday parties for both kids and adults who love classic flavors. The make-ahead nature and ability to feed a crowd make banana pudding a true lifesaver for busy hosts.
History & Background of Banana Pudding
The origins of banana pudding trace back to the late 19th century, coinciding with two important developments: the widespread availability of bananas in the United States and the invention of vanilla wafers. Bananas were introduced to American consumers at the 1876 Philadelphia Centennial Exhibition, where they were sold wrapped in foil for 10 cents each—a luxury item at the time.
By the 1880s, improved transportation and refrigeration made bananas more affordable and accessible across the country. Around the same time, the National Biscuit Company (Nabisco) introduced Vanilla Wafers in 1898, creating the perfect cookie for layering in desserts. These two developments set the stage for banana pudding’s creation.
The first published banana pudding recipes appeared in cookbooks in the early 1900s. However, the dessert truly became an American classic in 1940 when Nabisco printed a banana pudding recipe on the back of their Vanilla Wafers box. This recipe became the standard that countless families followed, cementing banana pudding’s place in American culinary tradition.
The dessert became particularly beloved in the Southern United States, where it became a staple at church suppers, family gatherings, and community events. Southern cooks embraced banana pudding, and over time, it became deeply woven into the region’s food culture. The debate between meringue-topped versus whipped cream-topped versions remains friendly but passionate in many Southern kitchens.
Interestingly, banana pudding has historical significance beyond just being delicious. During World War II, when ingredients were rationed, banana pudding recipes were adapted to use available substitutes, showing the dessert’s adaptability and importance to American home cooks. After the war, as prosperity returned, banana pudding reclaimed its traditional form and became even more popular.
Today, banana pudding remains a beloved classic that bridges generations. While some cooks make everything from scratch and others use convenient shortcuts like instant pudding, the essence remains the same—a comforting, delicious dessert that brings people together and evokes memories of home, family, and simpler times.
Why You’ll Love This Banana Pudding Recipe
This homemade banana pudding recipe strikes the perfect balance between traditional flavor and modern convenience. While it uses some time-saving shortcuts, it still delivers that rich, creamy, from-scratch taste that makes banana pudding so irresistible. The pudding is smooth and luxurious, the bananas stay fresh and sweet, and the vanilla wafers achieve that perfect soft-yet-slightly-textured consistency.
What sets this recipe apart is how it guides you through preventing common banana pudding pitfalls—brown bananas, watery pudding, and soggy cookies. You’ll learn the techniques that ensure your banana pudding looks as gorgeous as it tastes, with bright yellow bananas, perfectly layered components, and a stunning presentation that’s worthy of any celebration.
The beauty of this banana pudding is its flexibility. You can make it in a large trifle dish for impressive presentation, individual serving cups for parties and potlucks, a 9×13 pan for family gatherings, or even mason jars for picnics and gifts. However you choose to assemble it, you’re guaranteed a dessert that disappears quickly and earns rave reviews.
Here’s why you’ll absolutely love this recipe:
- Quick & Easy – Ready in just 30 minutes with simple assembly, no baking required
- Make-Ahead Perfect – Tastes even better after chilling, ideal for preparing the day before
- Crowd-Pleaser – Universally loved by kids and adults alike, with familiar comfort food appeal
- Budget-Friendly – Uses affordable, readily available ingredients
- No Special Skills Required – Perfect for beginner cooks, no baking or technical skills needed
- Gorgeous Presentation – Looks stunning in a trifle dish or glass bowl, shows off beautiful layers
- Feeds a Crowd – One batch easily serves 12-15 people
- Nostalgic Comfort – Evokes warm memories and creates new ones
- Versatile Serving – Works for casual family dinners or elegant entertaining
- Customizable – Easy to adapt with different toppings, flavors, or dietary modifications
- Stable & Portable – Travels well to potlucks, picnics, and parties
- Classic Southern Tradition – Authentic taste that honors the beloved original
Ingredient Notes
Each ingredient plays an important role in creating the perfect banana pudding. Here’s what you need and why:
Vanilla Wafer Cookies – The classic choice and essential to traditional banana pudding. Nabisco Nilla Wafers are the gold standard, but store brands work perfectly too. You’ll need about one 11-ounce box. The cookies soften as they absorb moisture from the pudding, creating a cake-like texture. Can substitute with graham crackers or shortbread cookies, though the flavor will be different.
Ripe Bananas – Choose bananas that are yellow with just a few brown spots—perfectly ripe but not overripe. You’ll need 4-6 medium bananas depending on size and your desired banana-to-pudding ratio. The bananas provide natural sweetness and that signature banana pudding flavor. Fresher bananas stay prettier longer without browning quickly.
Whole Milk – Creates a rich, creamy pudding base. Whole milk (not reduced-fat) is essential for the best texture and flavor. You’ll need about 3-4 cups depending on whether you’re using instant or cook-and-serve pudding. Can use 2% milk if needed, but the pudding will be slightly thinner.
Instant Vanilla Pudding Mix – The convenient shortcut that doesn’t sacrifice flavor. You’ll need two 3.4-ounce boxes. Instant pudding sets quickly and creates a smooth, stable base. Can also use cook-and-serve pudding for a more traditional from-scratch approach, or make homemade custard if you prefer.
Sweetened Condensed Milk – The secret ingredient that makes this banana pudding extra creamy and luxurious! One 14-ounce can adds richness, sweetness, and that signature silky texture. This is what elevates the pudding from good to absolutely incredible. Cannot easily substitute—this is a key ingredient.
Heavy Whipping Cream – For making homemade whipped cream topping. You’ll need 2 cups of cold heavy cream. Must be very cold for proper whipping. Creates light, fluffy topping that’s far superior to store-bought. Can substitute with Cool Whip for convenience, though homemade tastes better.
Powdered Sugar – Sweetens the whipped cream without adding graininess. About ¼ cup is perfect. Powdered sugar dissolves easily and creates smooth, stable whipped cream. Can substitute with granulated sugar in a pinch, though it won’t dissolve as easily.
Pure Vanilla Extract – Enhances all the flavors in both the pudding and whipped cream. Use pure extract, not imitation, for best flavor. About 2 teaspoons total throughout the recipe.
Cream Cheese (Optional) – Some versions include softened cream cheese beaten into the pudding for extra richness and tang. This is optional but delicious—adds a slight cheesecake flavor. Use 8 ounces softened cream cheese if including.
Lemon Juice (Optional) – A tablespoon of lemon juice tossed with sliced bananas helps prevent browning. This is optional but helpful if you’re making the dessert more than a few hours ahead.
Equipment Needed
Banana pudding requires only basic kitchen equipment that you likely already own:
- Large Mixing Bowl – For preparing the pudding mixture and whipping cream
- Medium Mixing Bowl – For additional prep work
- Electric Mixer (Hand or Stand) – Essential for whipping cream to stiff peaks; hand mixer works perfectly
- Whisk – For mixing the pudding if not using a mixer
- Rubber Spatula – For folding ingredients together and scraping bowls
- Sharp Knife and Cutting Board – For slicing bananas
- Measuring Cups and Spoons – For accurate measurements
- Large Serving Dish – Options include:
- Glass trifle bowl (shows off beautiful layers)
- 9×13-inch baking dish (classic family-style)
- Large glass bowl (simple and effective)
- Individual serving cups or mason jars (perfect for parties)
- Plastic Wrap or Aluminum Foil – For covering the dish while chilling
- Serving Spoon – For dishing out portions
Banana Pudding Recipe
- Total Time: 4 hours 25 minutes (includes chilling time)
- Yield: 12-15 servings 1x
- Diet: Vegetarian
Description
This classic Southern banana pudding recipe features layers of creamy vanilla pudding, fresh bananas, and vanilla wafer cookies, all topped with fluffy homemade whipped cream. Easy to make with simple ingredients, this nostalgic dessert is perfect for potlucks, family gatherings, and special occasions. The pudding is rich and smooth, the bananas stay fresh, and the cookies soften to cake-like perfection. A beloved comfort food dessert that everyone adores!
Ingredients
For the Pudding Layer:
- 2 boxes (3.4 oz each) instant vanilla pudding mix
- 3 cups whole milk, cold
- 1 can (14 oz) sweetened condensed milk
- 8 oz cream cheese, softened to room temperature (optional but recommended)
- 1 teaspoon pure vanilla extract
- 1 cup sour cream or Greek yogurt (optional, adds tang and creaminess)
For Assembly:
- 1 box (11 oz) vanilla wafer cookies (about 60–70 cookies)
- 4–6 ripe but firm bananas, sliced into ¼-inch rounds
- 1 tablespoon fresh lemon juice (optional, prevents browning)
For the Whipped Cream Topping:
- 2 cups heavy whipping cream, very cold
- ¼ cup powdered sugar
- 1 teaspoon pure vanilla extract
For Garnish (Optional):
- Crushed vanilla wafers
- Banana slices
- Additional whole vanilla wafers
Instructions
Prepare the Pudding Base:
- If using cream cheese, place the softened cream cheese in a large mixing bowl. Beat with an electric mixer on medium speed for 1-2 minutes until smooth and creamy with no lumps.
- Add the sweetened condensed milk to the cream cheese (if using) and beat until fully combined and smooth, about 1 minute.
- Add the cold whole milk and instant vanilla pudding mix to the bowl. Beat on medium speed for 2 minutes until the mixture thickens and becomes smooth and creamy. The pudding will start to set quickly.
- If using sour cream or Greek yogurt, fold it in gently with a spatula until fully incorporated. This adds extra creaminess and a subtle tang.
- Add the vanilla extract and stir to combine. Set aside while you prepare the other components. The pudding will continue to thicken as it sits.
Prepare the Bananas:
- Slice the bananas into ¼-inch thick rounds just before assembling. If making ahead, toss the banana slices gently with lemon juice in a bowl to prevent browning. Set aside.
Assemble the Banana Pudding:
- Choose your serving dish—a trifle bowl, 9×13 pan, large glass bowl, or individual cups all work beautifully.
- First Layer: Spread a thin layer of pudding (about ¾ cup) on the bottom of your dish. This prevents the bottom cookies from getting too soggy.
- Second Layer: Arrange a layer of vanilla wafer cookies over the pudding. You can stand them up around the edges for visual appeal in a trifle bowl, or lay them flat in rows. Slightly overlap the cookies to create a complete layer.
- Third Layer: Arrange a layer of banana slices over the cookies, covering them completely. Use about one-third of your sliced bananas.
- Fourth Layer: Spread about one-third of the remaining pudding over the banana layer, covering the bananas completely to prevent browning.
- Repeat Layers: Continue layering cookies, bananas, and pudding two more times, ending with a layer of pudding on top. Make sure the top layer of pudding completely covers any bananas to keep them from turning brown.
- Cover the dish tightly with plastic wrap, pressing it directly onto the surface of the pudding to prevent a skin from forming. Refrigerate for at least 4 hours, or preferably overnight. This allows the cookies to soften and the flavors to meld.
Make the Whipped Cream Topping:
- About 30 minutes before serving, make the whipped cream. Make sure your heavy cream is very cold—you can even chill your bowl and beaters for 10 minutes in the freezer for best results.
- Pour the cold heavy whipping cream into a large, chilled bowl. Beat with an electric mixer on medium-high speed until the cream starts to thicken, about 1-2 minutes.
- Add the powdered sugar and vanilla extract. Continue beating on high speed until stiff peaks form, about 2-3 more minutes. The whipped cream should hold its shape when you lift the beaters. Be careful not to overbeat or it will become grainy.
Final Assembly:
- Remove the banana pudding from the refrigerator and remove the plastic wrap.
- Spread or pipe the whipped cream over the top of the chilled pudding, creating an even layer or decorative swirls.
- Garnish with crushed vanilla wafers, additional banana slices, and whole vanilla wafers arranged decoratively on top if desired.
- Serve immediately, or refrigerate for up to 2 hours before serving. The whipped cream is best enjoyed fresh.
- Scoop into bowls or plates, making sure each serving has all the delicious layers.
Notes
- Prevent Browning: The best way to keep bananas from turning brown is to completely cover them with pudding and assemble the dessert close to serving time. Adding lemon juice helps but isn’t foolproof.
- Cookie Texture: The cookies will soften as they sit in the pudding—this is exactly what you want! Don’t worry if they seem too crunchy when first assembled. After 4+ hours, they’ll achieve that perfect cake-like texture.
- Make-Ahead Timing: Assemble the pudding (without whipped cream) up to 24 hours ahead. Add the whipped cream topping just before serving for the freshest look and taste.
- Instant vs. Cook-and-Serve Pudding: Instant pudding is faster and easier. Cook-and-serve pudding creates a more traditional, slightly denser texture but requires cooking on the stovetop.
- Serving Size: This recipe feeds 12-15 people with generous servings. Double the recipe for larger crowds.
- Sweetness Level: If you find it too sweet, reduce the sweetened condensed milk to ¾ can or omit the cream cheese.
- Prep Time: 20 minutes
- Cook Time: 4 hours 20 minutes (includes chilling time)
- Category: Dessert
- Method: No-Bake
- Cuisine: American
Nutrition
- Serving Size: 1 cup (1/12 of recipe)
- Calories: 425
- Sugar: 42g
- Sodium: 285mg
- Fat: 21g
- Saturated Fat: 12g
- Unsaturated Fat: 7g
- Trans Fat: 0g
- Carbohydrates: 54g
- Fiber: 2g
- Protein: 7g
- Cholesterol: 65mg
Tips & Variations
Flavor Variations:
- Chocolate Banana Pudding: Use chocolate pudding mix instead of vanilla, or layer in chocolate chips
- Peanut Butter Banana Pudding: Add ½ cup creamy peanut butter to the pudding mixture; top with chocolate drizzle
- Strawberry Banana Pudding: Layer sliced strawberries along with the bananas
- Coconut Banana Pudding: Add ½ cup coconut cream to pudding; top with toasted coconut
- Caramel Banana Pudding: Drizzle caramel sauce between layers and over the top
- Banana Cream Pie Pudding: Use a graham cracker crust base in a pie dish
- Banana Pudding Cheesecake: Add an entire 8 oz cream cheese and reduce milk slightly for ultra-creamy texture
Cookie Variations:
- Chessmen Cookies: Use Pepperidge Farm Chessmen for a buttery, elegant twist
- Graham Crackers: Creates a different but delicious flavor profile
- Shortbread Cookies: Rich and buttery alternative to vanilla wafers
- Gingersnaps: Adds warm spice notes that complement bananas beautifully
- Chocolate Wafers: For chocolate lovers who want a different take
Topping Variations:
- Meringue Topping: Traditional Southern style—beat egg whites with sugar until stiff, spread over pudding, and bake until golden
- Cool Whip: Convenient shortcut if you don’t want to make whipped cream
- Cream Cheese Whipped Cream: Beat softened cream cheese into whipped cream for stability
- Chocolate Shavings: Sprinkle dark chocolate shavings over whipped cream
- Toffee Bits: Add crushed toffee or Heath bars for crunch
- Nuts: Chopped pecans or walnuts add Southern flair and texture
Healthier Options:
- Sugar-Free: Use sugar-free pudding mix and sugar-free whipped cream
- Lower Fat: Use 2% milk, low-fat cream cheese, and light whipped topping
- Greek Yogurt: Replace some pudding with vanilla Greek yogurt for protein
- Reduced Sugar: Cut sweetened condensed milk in half or use a lower-sugar version
Presentation Ideas:
- Trifle Bowl: Classic presentation that shows off all the beautiful layers
- Mason Jars: Individual servings perfect for picnics, parties, or gifts
- Parfait Glasses: Elegant single servings for dinner parties
- 9×13 Pan: Family-style, easy to transport to potlucks
- Bundt Pan: Create a ring mold for stunning presentation
- Pie Dish: With a cookie crust base for banana cream pie-style presentation
Pro Chef Tips
Room Temperature Cream Cheese is Essential: If using cream cheese in your pudding, it absolutely must be fully softened to room temperature. Cold cream cheese will form lumps that won’t smooth out, ruining the texture. Take it out of the fridge 2-3 hours before making the pudding, or soften it in the microwave in 10-second bursts at 50% power.
Assemble Close to Serving Time: While banana pudding can be made ahead, the bananas will eventually brown even when covered with pudding. For the prettiest presentation, assemble no more than 24 hours before serving. If you must make it earlier, add an extra layer of pudding over the bananas and add fresh banana slices to the top just before serving.
Use Ripe But Firm Bananas: Choose bananas that are yellow with minimal brown spots. They should be ripe enough to be sweet and flavorful but firm enough to hold their shape when sliced. Overripe bananas will turn to mush and brown very quickly. Underripe bananas lack flavor and can be too firm.
Don’t Skip the Chilling Time: The magic happens during the refrigeration period. The cookies need at least 4 hours (preferably overnight) to soften and achieve that perfect cake-like texture that makes banana pudding so special. Rushing this step means crunchy cookies that haven’t absorbed the pudding properly.
Layer Strategically for Visual Appeal: In a clear trifle bowl, arrange cookies vertically around the edges so they’re visible through the glass. This creates a beautiful presentation. Make your layers even and level for the most professional look. Use a spatula to smooth each layer before adding the next.
Prevent Whipped Cream Deflation: Make whipped cream just before serving, and don’t overbeat it. Once stiff peaks form, stop immediately. Overbeaten cream becomes grainy and can eventually turn to butter. For extra stability, add 1 tablespoon of cream cheese or 1 teaspoon of unflavored gelatin to the cream.
Cover the Surface: When refrigerating, press plastic wrap directly onto the surface of the pudding to prevent a skin from forming and to keep the top layer of pudding from drying out. Remove carefully before adding whipped cream.
Slice Bananas Uniformly: Use a sharp knife and cut banana slices to a consistent ¼-inch thickness. This ensures even distribution and attractive layers. Too thick and you’ll have fewer layers; too thin and they’ll turn to mush.
Beat Pudding Properly: When mixing instant pudding, beat it vigorously for the full 2 minutes. This incorporates air and creates a lighter, fluffier texture. Don’t just stir gently—you want to really whip it.
Warm Weather Considerations: If serving banana pudding at an outdoor event in warm weather, keep it in a cooler until ready to serve. The whipped cream will deflate and the pudding can become watery in heat. Consider using Cool Whip instead of homemade whipped cream for better stability.
Common Mistakes to Avoid
Adding Whipped Cream Too Early: One of the biggest mistakes is topping the banana pudding with whipped cream hours before serving. Homemade whipped cream will weep and deflate over time, creating a watery, unattractive mess. Always add whipped cream within 1-2 hours of serving, or better yet, right before bringing it to the table. If you need longer stability, use stabilized whipped cream with gelatin or substitute Cool Whip.
Not Covering Bananas Completely: Any banana slices exposed to air will turn brown quickly, ruining the visual appeal of your dessert. Every single banana slice must be completely covered with pudding. Don’t leave gaps, and make sure your top layer is entirely pudding (not bananas) unless you’re adding them as garnish right before serving.
Using Instant Pudding Incorrectly: Instant pudding needs to be mixed vigorously for the full time specified to achieve proper thickness. Don’t just stir it gently—use an electric mixer and beat for 2 full minutes. Also, instant pudding needs cold milk to set properly. Room temperature milk won’t activate the thickening agents correctly.
Overripe or Underripe Bananas: Bananas that are too ripe (completely brown or mushy) will disintegrate and turn brown immediately, creating an unappealing gray color and mushy texture. Bananas that are too green lack sweetness and flavor. Choose yellow bananas with just a few small brown spots—perfectly ripe but still firm.
Skipping Refrigeration Time: Banana pudding needs a minimum of 4 hours to chill for the cookies to soften properly. Many people make the mistake of serving it too soon, resulting in crunchy cookies that don’t have that signature cake-like texture. The flavors also need time to meld together. Patience is essential!
Too Much or Too Little Pudding: The ratio of pudding to cookies and bananas matters. Too much pudding and the dessert becomes soupy with floating ingredients. Too little and the cookies won’t soften properly. Aim for visible layers with enough pudding to coat everything thoroughly without drowning the other components.
Storage & Meal Prep
Storing Banana Pudding:
Cover the dish tightly with plastic wrap or transfer to an airtight container. Store in the refrigerator for up to 3 days. The banana pudding is best within the first 24-48 hours when the bananas are freshest and the cookies have the ideal texture. After 3 days, the bananas will darken significantly and the texture may become watery.
Extending Freshness:
To keep banana pudding fresh longer, store it with plastic wrap pressed directly against the surface to minimize air exposure. Keep it in the coldest part of your refrigerator (usually the back, not the door). Some people add a layer of additional whipped cream or Cool Whip over the entire surface to seal it from air.
Storing Components Separately:
For maximum freshness when making ahead, store the pudding mixture in one container, keep cookies in their package, and slice bananas fresh when ready to assemble. This method gives you the freshest possible result but requires last-minute assembly.
Leftover Tips:
Banana pudding doesn’t typically last long because it’s so delicious, but if you do have leftovers, they’re best eaten within 2-3 days. The texture changes over time as the cookies continue to absorb moisture and the bananas continue to brown. It’s still safe to eat but won’t look as pretty.
Portable Storage:
If transporting banana pudding to a potluck or party, keep it covered and insulated in a cooler with ice packs, especially in warm weather. The whipped cream and pudding are temperature-sensitive and can spoil or separate if left at room temperature for extended periods.
Make-Ahead & Freezer Notes
Make-Ahead Timeline:
2-3 Days Ahead:
Prepare the pudding mixture and store it in an airtight container in the refrigerator. Do not assemble the layers yet.
1 Day Ahead:
This is the ideal make-ahead timing. Assemble the entire banana pudding with all layers (except the whipped cream topping). Cover tightly with plastic wrap pressed against the surface and refrigerate overnight. The cookies will soften perfectly and the flavors will meld. Add whipped cream just before serving.
4-6 Hours Ahead:
Assemble completely and refrigerate. This is the minimum time needed for proper texture but works beautifully. Add whipped cream 1-2 hours before serving.
Just Before Serving:
Make the whipped cream and add it to the top. Garnish with crushed cookies and fresh banana slices. This ensures the freshest, most beautiful presentation.
Freezing Banana Pudding:
Freezing banana pudding is not recommended for several reasons:
- Bananas turn brown and mushy when frozen and thawed
- The pudding texture becomes watery and separates
- Whipped cream deflates and becomes watery
- Cookies become excessively soggy
- The overall texture is compromised and unappetizing
However, if you must freeze it (perhaps to avoid waste), here’s how:
- Assemble without the whipped cream topping
- Cover tightly with plastic wrap and aluminum foil
- Freeze for up to 1 month
- Thaw overnight in the refrigerator
- Expect significant texture changes and browning
- Add fresh whipped cream and garnish before serving to improve appearance
Better Alternative:
Instead of freezing assembled banana pudding, freeze the pudding mixture alone (without bananas or cookies). Thaw it in the refrigerator, then assemble fresh with new cookies and bananas. This produces much better results.
Component Freezing:
The pudding base (without bananas) can be frozen for up to 2 months. Thaw in the refrigerator overnight, stir well, and assemble fresh. Vanilla wafers and whipped cream should not be frozen.
Serving Suggestions
Banana pudding is delicious on its own, but here are ways to make it even more special:
Presentation Ideas:
- Serve in individual mason jars tied with twine for a rustic, portable presentation
- Layer in clear parfait glasses to show off the beautiful layers at dinner parties
- Use a trifle bowl for stunning centerpiece presentation
- Garnish each serving with a fresh banana slice, whole vanilla wafer, and mint sprig
- Dust the top with cinnamon or cocoa powder for visual interest
- Drizzle with caramel or chocolate sauce just before serving
- Add a side of fresh berries for color and freshness
Beverage Pairings:
- Coffee: A smooth medium roast balances the sweetness perfectly
- Sweet Tea: Classic Southern pairing, especially at BBQs and picnics
- Cold Milk: Traditional and comforting, especially for kids
- Hot Tea: Chamomile or vanilla chai complement the flavors
- Dessert Wine: Moscato, late harvest Riesling, or cream sherry for elegant occasions
- Bourbon: A small pour for adults at evening gatherings (very Southern!)
Complementary Desserts:
- Lemon bars for a tart contrast
- Chocolate chip cookies for variety
- Fresh fruit salad for a lighter option
- Pound cake or angel food cake for texture variety
- Pecan pie for a full Southern dessert spread
Occasion-Specific Serving:
- BBQs & Picnics: Serve in individual cups with spoons for easy eating
- Potlucks: Bring in a 9×13 pan with serving spoon and small plates
- Family Dinners: Serve in a large bowl and let everyone help themselves
- Holidays: Present in an elegant trifle bowl as a beautiful centerpiece
- Kids’ Parties: Make mini versions in small cups with fun straws
Add-Ons & Extras:
- Crumbled bacon on top for sweet-and-salty appeal (sounds crazy but it’s delicious!)
- Crushed peanuts or pecans for extra crunch
- Chocolate chips or chunks scattered throughout layers
- Fresh strawberries or raspberries added to layers
- Dulce de leche drizzled between layers
- Coconut flakes toasted and sprinkled on top
- Mini chocolate chips in the whipped cream
Southern Dinner Menu:
Banana pudding is perfect after a traditional Southern meal:
- Fried chicken or BBQ ribs
- Collard greens or green beans
- Mac and cheese
- Cornbread
- Banana pudding for dessert
Frequently Asked Questions
Can I use cook-and-serve pudding instead of instant?
Yes! Cook-and-serve pudding creates a more traditional, slightly denser texture that some people prefer. Follow the package directions to cook the pudding on the stovetop with milk, then let it cool to room temperature before assembling. You can skip the sweetened condensed milk if using cook-and-serve pudding, or add it for extra richness. The cooking process takes longer, but many people feel the result is worth it for that authentic, old-fashioned taste.
How do I keep bananas from turning brown?
While there’s no perfect solution, you can minimize browning by: (1) using ripe but firm bananas, not overripe ones; (2) tossing sliced bananas in lemon juice or pineapple juice before layering; (3) completely covering all banana slices with pudding so none are exposed to air; (4) pressing plastic wrap directly onto the pudding surface when storing; and (5) assembling the dessert no more than 24 hours before serving. Some browning is natural and inevitable, but these steps will keep your bananas looking fresh for the first day or two. For the prettiest presentation, add a layer of fresh banana slices as garnish just before serving.
Can I make this without sweetened condensed milk?
Yes, though the texture will be slightly different. The sweetened condensed milk adds incredible creaminess and richness that makes this version special. If you need to omit it, increase the regular milk to 4 cups and add 2-3 extra tablespoons of sugar to the pudding mix. Some recipes use all milk and skip the condensed milk entirely—they’re still delicious, just less rich and creamy. You could also substitute with evaporated milk plus sugar, though it won’t be quite the same.
Should I use meringue or whipped cream on top?
This is the great banana pudding debate! Both are traditional and delicious. Meringue is the classic Southern approach—it’s baked until golden and provides a stable, sweet topping that doesn’t deflate. Whipped cream is lighter, fluffier, and easier to make without baking. This recipe uses whipped cream for simplicity, but you can absolutely make meringue instead. Beat 4 egg whites with ½ cup sugar until stiff peaks form, spread over the pudding, and bake at 350°F for 10-15 minutes until golden brown.
How long does banana pudding need to sit before serving?
Banana pudding needs a minimum of 4 hours in the refrigerator for the cookies to soften properly and achieve that perfect cake-like texture. However, overnight (8-12 hours) is ideal. This allows the cookies to fully absorb moisture from the pudding, the flavors to meld beautifully, and everything to chill thoroughly. Don’t rush this step—the waiting period is essential to the final texture and taste. Plan to make your banana pudding the day before you need it for the best results.
Can I make this in individual servings?
Absolutely! Individual servings are perfect for parties, potlucks, and portion control. Use clear cups, mason jars, or parfait glasses to show off the pretty layers. Layer the ingredients in the same order (pudding, cookies, bananas, repeat), just in smaller portions. Individual servings are also great for grab-and-go desserts or gifts. They’re easier to transport than a large dish and look more elegant for entertaining. Mini versions also chill faster—they’ll be ready in about 3 hours instead of 4+.
What’s the best way to serve banana pudding at a potluck?
Transport banana pudding in the dish you plan to serve it in, covered tightly with plastic wrap or foil. Keep it in a cooler with ice packs if it’s warm outside or if the drive is longer than 30 minutes. Bring the dish out just before serving time. If you’re adding whipped cream topping, consider bringing it in a separate container and adding it when you arrive, or use stabilized whipped cream or Cool Whip for better travel stability. Individual servings in cups with lids are even easier to transport without mess.
Can I make banana pudding ahead for a party?
Yes! Banana pudding is an excellent make-ahead dessert. Assemble the entire dessert (without whipped cream topping) up to 24 hours before your party. Cover tightly and refrigerate. About 30 minutes to 1 hour before serving, make the whipped cream and add it to the top. Garnish with crushed cookies and fresh banana slices right before bringing it to the table. This timeline ensures maximum freshness while eliminating last-minute stress. The dessert actually improves as it sits, making it perfect for entertaining.
Conclusion
This classic Southern banana pudding recipe is comfort food at its finest—creamy, nostalgic, and absolutely irresistible. With its layers of smooth vanilla pudding, fresh bananas, softened vanilla wafers, and fluffy whipped cream, it’s a dessert that brings smiles to faces and warmth to hearts. Whether you’re continuing a family tradition or starting a new one, this banana pudding delivers on every level.
The beauty of this recipe is how it combines simplicity with spectacular results. You don’t need fancy equipment, special skills, or hours of work to create something that looks and tastes amazing. Just a few basic ingredients, some easy layering, and patience while it chills, and you’ve got a showstopping dessert that feeds a crowd and earns rave reviews every single time.
Banana pudding is more than just a dessert—it’s a connection to Southern heritage, childhood memories, and the simple pleasure of gathering around the table with people you love. It’s the dessert that disappears first at potlucks, the one everyone requests for special occasions, and the recipe you’ll make again and again throughout your life.
I hope this recipe becomes one of your go-to desserts for celebrations, gatherings, and those moments when you need a little comfort and sweetness in your life. Once you taste homemade banana pudding made with love, you’ll understand why it’s been beloved for generations.
Have you tried this banana pudding recipe yet? I’d love to hear all about your experience! Drop a comment below and tell me how it turned out. Did you use meringue or whipped cream on top? Did you make any creative variations? What did your family think? Please rate this recipe and share your photos—I absolutely love seeing your beautiful creations and hearing your stories.
Don’t forget to save this recipe to your Pinterest boards so you’ll always have it handy when banana pudding cravings strike (and they will!). Share it with friends and family who love classic Southern desserts, and help spread the joy of homemade banana pudding. Here’s to creating delicious memories and keeping wonderful traditions alive, one creamy, dreamy spoonful at a time. Happy cooking! 🍌