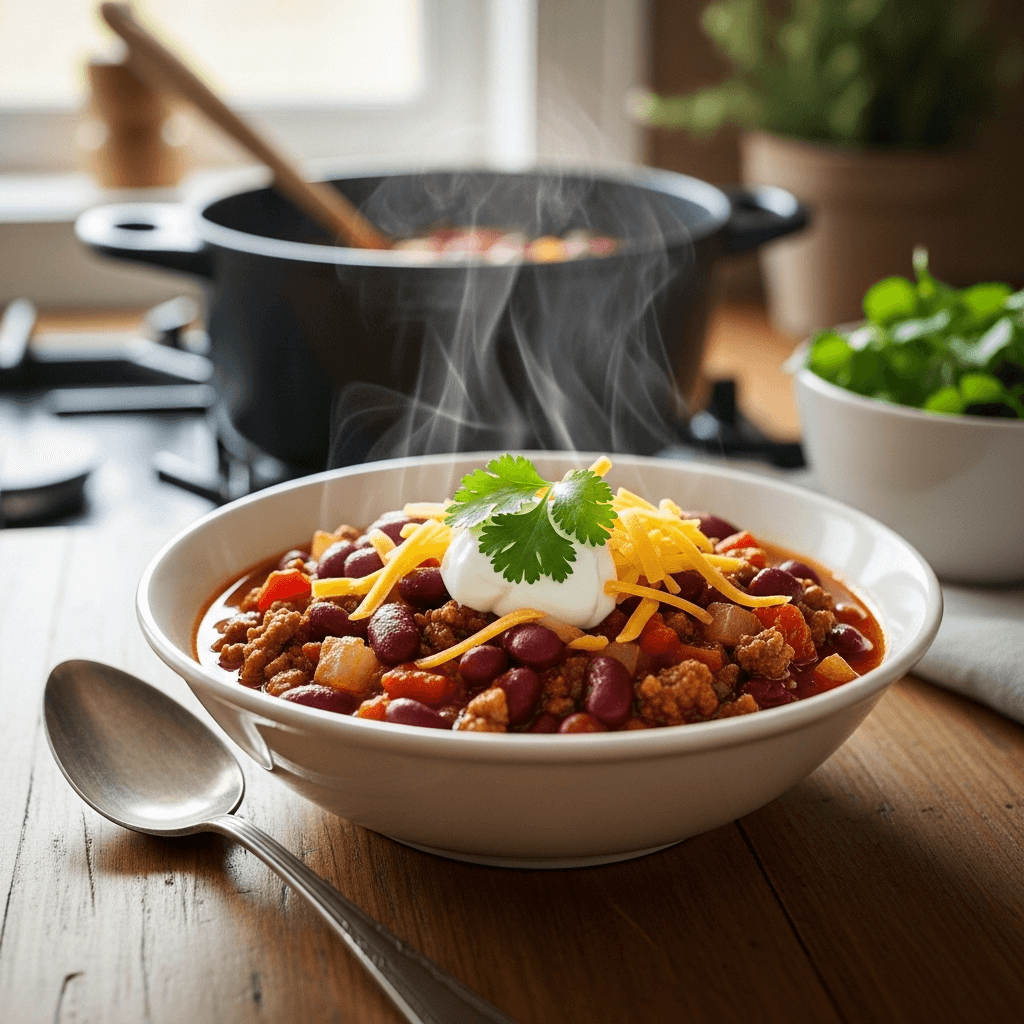

There’s nothing quite like a big bowl of homemade chili to warm your soul and satisfy your hunger. This classic American comfort food brings together tender ground beef, savory beans, tomatoes, and a perfect blend of spices that create layers of rich, complex flavor in every single bite. Whether you’re feeding a crowd on game day, meal prepping for the week ahead, or just craving something hearty on a chilly evening, this homemade chili recipe delivers every single time.
What makes this chili recipe so special is its perfect balance – it’s not too spicy, not too mild, and it’s loaded with just the right amount of beans and meat. This is the kind of chili that becomes a family favorite, the recipe you turn to again and again, and the dish everyone requests you bring to potlucks and gatherings. It’s incredibly versatile, budget-friendly, and actually tastes even better the next day. Serve it for casual weeknight dinners, Super Bowl parties, fall gatherings, or anytime you need a comforting one-pot meal that feeds a crowd without breaking the bank.
History / Background
Chili has a fascinating and hotly debated history that reflects America’s diverse culinary heritage. While many people associate chili with Mexican cuisine due to its use of chili peppers, the dish as we know it today is actually an American invention with deep roots in Texas. The exact origin story is contested, but most food historians agree that chili con carne (chili with meat) emerged in San Antonio, Texas, in the mid-1800s.
One popular theory credits “Chili Queens” – women who sold bowls of spicy meat stew from makeshift stands in San Antonio’s Military Plaza during the 1880s. These entrepreneurial women would simmer large pots of beef, chili peppers, and spices, serving the hearty stew to workers, cowboys, and travelers. Their chili became so famous that tourists would specifically visit San Antonio to taste it, helping spread the dish’s popularity across America.
Another origin story suggests that chili was created by poor Texan and Mexican families who needed to stretch tough, inexpensive cuts of meat. By simmering the meat for hours with chili peppers and spices, they could create a flavorful, filling meal that fed many people affordably. The addition of beans came later and remains controversial – traditional Texas chili purists insist that authentic chili contains no beans whatsoever, while most Americans today embrace beans as an essential component.
By the early 1900s, chili had become so beloved that “chili parlors” sprang up across the country. The first canned chili appeared in the 1900s, making it even more accessible. In 1977, Texas officially declared chili its state dish, cementing its place in American culinary history. Today, chili cook-offs are serious business, with competitions held nationwide and passionate debates about what constitutes “authentic” chili.
This recipe represents what most Americans think of when they crave chili – a hearty, bean-filled version that’s accessible, delicious, and perfect for feeding families and crowds. While Texas purists might argue about the beans, this style of chili has become a beloved American classic in its own right.
Why You’ll Love This Recipe
This homemade chili recipe is about to become your new cold-weather obsession. It’s the kind of recipe that makes your house smell absolutely incredible while it’s cooking, and tastes even better than it smells. The best part? It’s surprisingly easy to make, requires just one pot, and the longer it simmers, the better it gets.
Here’s why this chili will win your heart:
- Pure comfort in a bowl – Warm, hearty, and satisfying with every spoonful
- One-pot simplicity – Everything cooks together in a single pot for easy cleanup
- Budget-friendly – Feeds 8-10 people for less than most takeout meals
- Tastes better the next day – The flavors develop and deepen overnight
- Perfect for meal prep – Make a big batch and enjoy it all week long
- Crowd-pleaser – Everyone from kids to adults loves a good bowl of chili
- Customizable spice level – Adjust the heat to match your family’s preferences
- Freezer-friendly – Portion and freeze for quick future meals
- Versatile serving options – Serve as soup, over rice, on hot dogs, or with endless toppings
- Game day champion – The ultimate food for football watching and casual gatherings
- Naturally gluten-free – Perfect for those avoiding gluten without sacrificing flavor
Ingredient Notes
Let’s talk about what goes into making the best homemade chili. Each ingredient plays an important role in building those rich, complex flavors that make this dish so crave-worthy.
Ground Beef: The protein foundation of this chili. I recommend 80/20 ground beef (80% lean, 20% fat) for the best flavor and texture. The fat adds richness without making the chili greasy. You can substitute ground turkey, chicken, or even plant-based meat if you prefer. For even more flavor, use ground chuck or a combination of ground beef and Italian sausage.
Onions and Garlic: These aromatics form the flavor base of the chili. Yellow or white onions work best, diced into small pieces. Fresh garlic is essential – don’t use garlic powder here. The onions become sweet as they cook, while garlic adds depth and savory notes that permeate the entire dish.
Bell Peppers: Add sweetness, texture, and nutrition. I use a combination of red and green bell peppers for the best flavor and visual appeal. Red peppers are sweeter, while green peppers add a slightly vegetal note. You can use all of one color if that’s what you have on hand.
Canned Tomatoes: The tomato base creates the chili’s signature texture and tangy flavor. Diced tomatoes add texture, while tomato sauce creates a smooth base. Fire-roasted tomatoes add a subtle smoky note that takes your chili to the next level. Always use quality canned tomatoes – it makes a difference.
Tomato Paste: This concentrated tomato product adds depth, umami, and helps thicken the chili. Cooking the tomato paste for a minute before adding liquids enhances its flavor and eliminates any metallic taste.
Beans: I use a combination of kidney beans and pinto beans for the best texture and appearance. Both are traditional in chili and hold up well to long cooking. Drain and rinse canned beans to remove excess sodium and the starchy liquid. Black beans also work beautifully if you prefer them.
Chili Powder: The star seasoning! This blend typically contains dried ground chili peppers, cumin, garlic powder, and oregano. It’s what gives chili its distinctive flavor. Use a quality chili powder for the best results – cheap brands can taste dusty and flat.
Cumin: Essential for authentic chili flavor. This warm, earthy spice is what makes chili taste like chili. Don’t skip it! Ground cumin works perfectly, though you can toast whole cumin seeds and grind them yourself for even more flavor.
Other Spices: Paprika adds color and mild pepper flavor, oregano brings herbal notes, and optional cayenne pepper provides extra heat. These supporting spices create complexity and depth.
Beef Broth: Adds savory depth and creates the perfect consistency. You can use chicken broth or even water in a pinch, but beef broth adds richness that really elevates the dish.
Optional Flavor Boosters: A tablespoon of cocoa powder or a square of dark chocolate adds incredible depth (trust me!), while a splash of beer or coffee enhances the savory notes. A teaspoon of sugar can balance acidity from the tomatoes.
Equipment Needed
Making great chili doesn’t require fancy equipment – just a few kitchen essentials:
- Large heavy-bottomed pot or Dutch oven (at least 6-quart capacity) – Essential for even heat distribution and preventing burning
- Wooden spoon or sturdy spatula – For breaking up meat and stirring
- Sharp knife – For chopping vegetables
- Cutting board – For prep work
- Can opener – For opening canned tomatoes and beans
- Measuring cups and spoons – For accurate seasoning
- Colander – For draining and rinsing beans
- Ladle – For serving
- Storage containers – For leftovers and meal prep
Optional but helpful:
- Slow cooker or Instant Pot (for alternative cooking methods)
- Immersion blender (if you like partially blended chili for thicker consistency)
Chili Recipe
- Total Time: 1 hour 45 minutes
- Yield: 8-10 servings 1x
- Diet: Gluten Free
Description
This classic homemade chili is rich, hearty, and packed with perfectly seasoned ground beef, beans, tomatoes, and spices. It’s the ultimate comfort food that’s easy to make, budget-friendly, and tastes even better the next day. Perfect for game day, meal prep, or cozy family dinners!
Ingredients
- 2 pounds ground beef (80/20)
- 1 large yellow onion, diced
- 1 red bell pepper, diced
- 1 green bell pepper, diced
- 4 cloves garlic, minced
- 3 tablespoons chili powder
- 2 teaspoons ground cumin
- 1 teaspoon paprika
- 1 teaspoon dried oregano
- ½ teaspoon cayenne pepper (optional, adjust to taste)
- 1 teaspoon salt (plus more to taste)
- ½ teaspoon black pepper
- 3 tablespoons tomato paste
- 1 can (28 ounces) crushed tomatoes
- 1 can (14.5 ounces) diced tomatoes with juices
- 1 can (15 ounces) tomato sauce
- 2 cups beef broth
- 1 can (15 ounces) kidney beans, drained and rinsed
- 1 can (15 ounces) pinto beans, drained and rinsed
- 1 tablespoon cocoa powder (optional but recommended)
- 1 tablespoon Worcestershire sauce
- 1 bay leaf
For Serving:
- Shredded cheddar cheese
- Sour cream
- Diced onions
- Sliced jalapeños
- Fresh cilantro
- Tortilla chips or cornbread
- Lime wedges
Instructions
- Brown the beef: Heat a large Dutch oven or heavy pot over medium-high heat. Add the ground beef and cook for 8-10 minutes, breaking it apart with a wooden spoon as it browns. Continue cooking until the meat is deeply browned with crispy bits forming on the bottom of the pot. Don’t drain the fat yet – those crispy bits (fond) will add tremendous flavor. Once browned, use a slotted spoon to remove the beef to a plate, leaving about 2 tablespoons of fat in the pot.
- Sauté the vegetables: Reduce heat to medium. Add the diced onion and bell peppers to the pot. Cook for 6-8 minutes, stirring occasionally, until the vegetables are softened and the onions are translucent. Add the minced garlic and cook for 1 minute more, stirring constantly, until fragrant.
- Bloom the spices: Add the chili powder, cumin, paprika, oregano, cayenne pepper (if using), salt, and black pepper to the vegetables. Stir constantly for about 1 minute until the spices are fragrant and coating the vegetables. This blooming technique releases the essential oils in the spices and intensifies their flavor.
- Add tomato paste: Stir in the tomato paste and cook for 1-2 minutes, stirring frequently. The tomato paste should darken slightly and become more fragrant. This step removes any metallic taste and adds depth to your chili.
- Return beef and add liquids: Add the browned beef back to the pot along with any accumulated juices. Pour in the crushed tomatoes, diced tomatoes with their juices, tomato sauce, and beef broth. Stir in the Worcestershire sauce, cocoa powder (if using), and add the bay leaf.
- Add the beans: Stir in the drained and rinsed kidney beans and pinto beans. Mix everything together thoroughly until well combined.
- Simmer: Bring the chili to a boil over medium-high heat, then reduce the heat to low. Cover partially with a lid (leave it slightly ajar to allow steam to escape) and simmer for at least 1 hour, stirring every 15-20 minutes to prevent sticking. The longer it simmers, the better the flavors develop. For the absolute best chili, simmer for 2-3 hours.
- Adjust seasoning: After simmering, remove the bay leaf. Taste the chili and adjust the seasoning as needed. Add more salt, chili powder, or cayenne pepper to match your preferences. If the chili seems too thick, add a splash of beef broth or water. If it’s too thin, simmer uncovered for 10-15 minutes to thicken.
- Rest before serving: Turn off the heat and let the chili rest for 10 minutes before serving. This allows the flavors to settle and the chili to thicken slightly.
- Serve and enjoy: Ladle the hot chili into bowls and top with your favorite toppings – shredded cheese, sour cream, diced onions, jalapeños, cilantro, and serve with tortilla chips or cornbread on the side.
Notes
- Better the next day: Chili tastes even better after sitting overnight as the flavors continue to develop and meld together.
- Cocoa powder secret: Don’t skip the cocoa powder! It adds incredible depth and richness without making the chili taste like chocolate. It’s a game-changer.
- Spice level: This recipe creates a medium heat chili. For mild, reduce or omit cayenne pepper. For spicy, add more cayenne or diced jalapeños.
- Bean options: Use any combination of beans you prefer – black beans, white beans, or even chickpeas work well.
- No-bean chili: For traditional Texas-style chili, simply omit the beans and increase the beef to 3 pounds.
- Thickening tip: If your chili is too thin, mash some of the beans against the side of the pot or use an immersion blender to partially blend the chili.
- Slow cooker option: Brown the beef and sauté vegetables as directed, then transfer everything to a slow cooker. Cook on low for 6-8 hours or high for 3-4 hours.
- Prep Time: 15 minutes
- Cook Time: 1 hour 30 minutes
- Category: Soup
- Method: Stovetop
- Cuisine: American
Nutrition
- Serving Size: 1½ cups
- Calories: 385
- Sugar: 8g
- Sodium: 925mg
- Fat: 16g
- Saturated Fat: 6g
- Unsaturated Fat: 8g
- Trans Fat: 0.5g
- Carbohydrates: 32g
- Fiber: 9g
- Protein: 30g
- Cholesterol: 70mg
Tips & Variations
Meat Variations:
- Ground turkey chili: Substitute ground turkey for a leaner option (add 1 tablespoon oil when browning)
- Beef and sausage combo: Use 1 pound ground beef and 1 pound Italian sausage for extra flavor
- Vegetarian chili: Omit meat and double the beans, or use plant-based ground meat
- Chicken chili: Use ground or diced chicken breast with white beans
- Brisket chili: Use chopped smoked brisket instead of ground beef for incredible smoky flavor
- Three-meat chili: Combine ground beef, ground pork, and Italian sausage
Spice and Flavor Adjustments:
- White chicken chili: Use chicken, white beans, green chilis, and white broth for a different take
- Cincinnati-style chili: Add cinnamon, allspice, and serve over spaghetti with cheese
- Smoky chili: Add chipotle peppers in adobo sauce and smoked paprika
- Beer chili: Replace 1 cup beef broth with dark beer
- Coffee chili: Add ½ cup strong brewed coffee for depth
- Green chili: Use tomatillos, green chilis, and white beans for a verde version
Bean Options:
- Mix in black beans, navy beans, or cannellini beans
- Add a can of refried beans for extra thickness and creaminess
- Use dried beans soaked overnight and cooked (adjust cooking time accordingly)
- No-bean chili for purists – increase meat to 3 pounds
Veggie Boost:
- Add diced zucchini, corn kernels, or mushrooms
- Stir in fresh or frozen spinach during the last 10 minutes
- Add diced sweet potato or butternut squash for sweetness and nutrition
Toppings Bar: Set up a chili bar with various toppings: shredded cheese (cheddar, Monterey Jack, pepper jack), sour cream, Greek yogurt, diced avocado, diced red onion, sliced green onions, pickled jalapeños, fresh cilantro, lime wedges, crushed tortilla chips, oyster crackers, and hot sauce.
Pro Chef Tips
Tip #1: Brown the Meat Properly
Don’t just cook the ground beef until it’s no longer pink – actually brown it until it develops crispy, caramelized bits. This creates fond (the brown bits stuck to the bottom of the pot) which is packed with flavor. Let the meat sit undisturbed for 2-3 minutes at a time to develop that crust, then break it up and repeat. This step alone will dramatically improve your chili’s depth of flavor.
Tip #2: Toast Your Spices
Blooming your spices (cooking them briefly in the hot pot with the vegetables) is crucial. This technique releases their essential oils and removes any raw, dusty taste. Never add spices to liquid – always toast them in fat first. You’ll know they’re ready when you can smell them strongly, usually after about 60 seconds of stirring.
Tip #3: The Cocoa Powder Isn’t Crazy
Professional chefs often add unsweetened cocoa powder or dark chocolate to chili because it adds incredible depth, richness, and enhances the meaty flavors without making it taste like chocolate. It works the same way espresso powder enhances chocolate desserts. Start with just a tablespoon – it’s magic.
Tip #4: Low and Slow Wins
While you can technically serve chili after 30 minutes of simmering, the best chili simmers for at least 2-3 hours. This extended cooking time allows flavors to marry, meat to become tender, and the sauce to develop complexity. If you have time, make it a day ahead – chili truly tastes better the next day as the flavors continue to develop in the refrigerator.
Tip #5: Salt at the End
While you should season throughout cooking, save your final salt adjustment for the very end. The chili will reduce and concentrate as it simmers, and canned ingredients like tomatoes, beans, and broth contain sodium. Taste and adjust at the end to avoid over-salting.
Tip #6: Control Thickness Like a Pro
For thicker chili, simmer uncovered during the last 20-30 minutes to evaporate excess liquid. You can also mash some beans against the side of the pot or use an immersion blender to partially puree the chili, which naturally thickens it. For thinner chili, simply add more broth or water until you reach your desired consistency.
Tip #7: The Resting Period Matters
After cooking, let the chili rest off the heat for 10-15 minutes before serving. This resting time allows the starches to absorb liquid, the chili to thicken slightly, and the flavors to harmonize. You’ll notice a significant improvement in texture and taste.
Common Mistakes to Avoid
Mistake #1: Not Browning the Meat Enough
Simply cooking ground beef until it’s no longer pink results in gray, bland meat. Take the extra time to really brown it until you see caramelized, crispy bits forming. This creates the foundation for deep, rich flavor. Don’t rush this step, and don’t overcrowd the pan – if necessary, brown the meat in batches.
Mistake #2: Adding Spices Too Early or Too Late
Spices need to be bloomed in oil with the aromatics before adding liquids. If you add them too early (with raw meat) or too late (after adding liquids), they won’t develop their full flavor potential. The sweet spot is right after sautéing the onions and peppers, before adding tomato paste.
Mistake #3: Not Draining and Rinsing the Beans
The liquid in canned beans is starchy and can make your chili taste gummy and overly thick. It also contains excess sodium. Always drain and rinse your beans under cold water before adding them to the pot. This simple step makes a noticeable difference in the final texture.
Mistake #4: Boiling Instead of Simmering
Chili should gently bubble, not boil vigorously. Boiling too hard can make the meat tough, cause beans to fall apart, and prevent flavors from developing properly. Keep the heat low enough that you see occasional bubbles breaking the surface, but not a rolling boil. Patience is key!
Mistake #5: Using Low-Quality Chili Powder
Chili powder is the star ingredient, so quality matters. Old, stale, or cheap chili powder can taste dusty, bitter, or flat. Invest in quality chili powder from a spice company or make your own by combining ground dried chilis with cumin, garlic powder, and oregano. Check the date on your spice jars – if it’s over a year old, replace it.
Mistake #6: Serving Immediately
The worst mistake is serving chili the moment it’s done cooking. While it’s technically edible, it’s not at its best. Let it rest for at least 10-15 minutes after cooking, or better yet, refrigerate overnight. Chili is one of those magical dishes that genuinely tastes better the next day.
Storage & Meal Prep
Refrigerator Storage:
Store leftover chili in airtight containers in the refrigerator for up to 5 days. The chili actually improves in flavor as it sits, making it perfect for meal prep. Make sure the chili has cooled to room temperature before refrigerating, but don’t leave it out for more than 2 hours for food safety.
Reheating Instructions:
Reheat chili on the stovetop over medium-low heat, stirring occasionally and adding a splash of water or broth if it’s thickened too much. You can also microwave individual portions in 2-minute intervals, stirring between each, until heated through. For best results, reheat gently rather than at high temperature to prevent the meat from becoming tough.
Portion Control:
Chili is perfect for meal prep! Portion it into individual serving containers with tight-fitting lids. This makes grab-and-go lunches easy and helps with portion control. Each container can go straight from fridge to microwave for a quick, satisfying meal.
Thickening After Storage:
Chili often thickens significantly after refrigeration as the starches absorb liquid. This is normal and actually desirable for many people. If you prefer it thinner, simply add beef broth, water, or even a splash of beer when reheating until you reach your preferred consistency.
Make-Ahead & Freezer Notes
Make-Ahead Instructions:
Chili is the ultimate make-ahead meal! In fact, it tastes significantly better when made a day ahead. Prepare the entire recipe, let it cool completely, then refrigerate overnight. The next day, gently reheat and enjoy improved, more developed flavors. You can make it up to 3 days ahead and refrigerate.
Freezing Instructions:
This chili freezes beautifully for up to 3 months. Let the chili cool completely, then portion it into freezer-safe containers or heavy-duty freezer bags. Leave about an inch of headspace in containers to allow for expansion. For bags, lay them flat in the freezer for easy stacking once frozen. Label each container with the date and contents.
Thawing Guidelines:
The best method is to thaw frozen chili overnight in the refrigerator. For faster thawing, place the sealed container or bag in a bowl of cold water, changing the water every 30 minutes until thawed (usually 2-3 hours). You can also reheat directly from frozen, though it takes longer.
Reheating From Frozen:
To reheat frozen chili, transfer it to a pot and heat over medium-low, stirring occasionally. Add a little water or broth as it thaws and heats to prevent sticking. It will take about 20-30 minutes to heat through from frozen. You can also microwave frozen chili in 3-minute intervals, stirring between each, until hot.
Batch Cooking:
Double or even triple this recipe for serious meal prep! Freeze in various sized portions – quart containers for family dinners, pint containers for couple’s meals, or individual portions for quick lunches. Having homemade chili in the freezer is like having a restaurant-quality meal ready whenever you need it.
Freezing Tips:
While fully cooked chili with beans freezes well, beans can sometimes become slightly mushy after freezing. If you’re particular about texture, consider freezing the chili without beans, then adding freshly cooked or canned beans when reheating.
Serving Suggestions
Chili is incredibly versatile and can be served in so many delicious ways beyond just a bowl with toppings. Here’s how to make your chili shine:
Classic Bowl Service:
Ladle hot chili into bowls and set up a toppings bar with shredded cheese, sour cream, diced onions, sliced jalapeños, fresh cilantro, tortilla chips, and lime wedges. Let everyone customize their perfect bowl.
Bread Pairings:
Serve with warm cornbread (sweet or savory), jalapeño cheddar cornbread muffins, crusty bread, dinner rolls, or garlic bread. The bread is perfect for sopping up every last drop of that flavorful sauce.
Over Starches:
Serve chili over rice, baked potatoes, sweet potatoes, French fries (chili cheese fries!), or even polenta for a hearty, filling meal. These bases stretch the chili further and add different textures.
Chili Dogs and Nachos:
Use your homemade chili to top hot dogs for delicious chili dogs, or pour it over tortilla chips with cheese for loaded chili nachos. Both are perfect for game day watching!
Side Salads:
Balance the richness of chili with a fresh, crisp side salad. Mexican street corn salad, coleslaw, simple green salad with vinaigrette, or a chopped salad with avocado all work beautifully.
Creative Uses:
Get creative with leftovers! Use chili as a topping for baked potatoes, stuff it into peppers or zucchini boats, make chili mac and cheese, use it as taco filling, stuff it into quesadillas, or pour it over hash browns for a breakfast hash.
Beverage Pairings:
Ice-cold beer (especially lagers or Mexican beers with lime), iced tea, lemonade, or soda pair perfectly with chili. For adults, margaritas or whiskey cocktails complement the bold flavors beautifully.
Complete Chili Night Spread:
Create a full chili bar for entertaining: chili in a slow cooker set to “warm,” various toppings in individual bowls, cornbread, tortilla chips, a simple salad, and brownies or cookies for dessert.
FAQs Section
Q: Can I make chili without beans?
A: Absolutely! Traditional Texas-style chili contains no beans at all. Simply omit the beans and increase the ground beef to 3 pounds. You may need to add an extra cup of beef broth since you won’t have the beans to bulk up the volume. Cook the same way and enjoy authentic Texas chili.
Q: How can I make my chili thicker?
A: There are several ways to thicken chili: 1) Simmer uncovered for the last 20-30 minutes to evaporate excess liquid, 2) Mash some of the beans against the side of the pot, 3) Use an immersion blender to partially puree the chili, 4) Mix 2 tablespoons of cornmeal or masa harina with water to make a slurry and stir it in, or 5) Add a small amount of tomato paste. Each method works well and adds slightly different characteristics.
Q: My chili is too spicy – how can I fix it?
A: If your chili is too spicy, add more beans, tomatoes, or broth to dilute the heat. You can also add a spoonful of sugar or honey to balance the spice, or stir in sour cream or heavy cream which mellows heat. Serving with plenty of sour cream, cheese, and cornbread on the side also helps. Next time, reduce or omit the cayenne pepper and use mild chili powder.
Q: Can I use dried beans instead of canned?
A: Yes! Using dried beans is more economical and results in better texture. Soak 1 cup of dried kidney beans and 1 cup of dried pinto beans overnight, then cook them separately until tender before adding to the chili. Add them during the last 30 minutes of simmering. Keep in mind this adds significantly to prep time, so plan accordingly.
Q: How do I make chili in a slow cooker?
A: Brown the meat and sauté the vegetables on the stovetop as directed in steps 1-4, then transfer everything (including all remaining ingredients) to your slow cooker. Cook on low for 6-8 hours or high for 3-4 hours. The long, slow cooking develops fantastic flavor. Add beans during the last hour if using dried beans, or during the last 30 minutes if using canned.
Q: Why does my chili taste bland?
A: Bland chili usually needs more salt, more time, or both. Salt is essential for bringing out flavors – taste and adjust at the end. Also, chili needs adequate simmering time (at least 1 hour, preferably 2-3) for flavors to develop and meld. Finally, make sure your spices are fresh and that you bloomed them properly in the pot before adding liquids. Old spices taste flat and dusty.
Q: Can I make this recipe in an Instant Pot?
A: Yes! Use the sauté function to brown the meat and vegetables as directed, then add all remaining ingredients. Close the lid, set to high pressure, and cook for 20 minutes. Allow natural pressure release for 10 minutes, then quick release any remaining pressure. The chili will be done, though it won’t have quite the same depth as long-simmered stovetop chili. For best results, let it sit on “warm” for an hour after pressure cooking.
Conclusion
And there you have it – the ultimate guide to making incredible homemade chili that’ll have your family begging for seconds and your friends asking for the recipe! This classic American comfort food proves that sometimes the simplest dishes, made with care and good ingredients, are the most satisfying. The best part about this chili recipe is how forgiving and flexible it is – once you master the basics, you can adjust and customize it to match your family’s preferences perfectly.
Remember, great chili is all about building layers of flavor, giving it adequate time to simmer, and not being afraid to adjust the seasonings to your taste. Whether you serve it on game day, prep it for easy weeknight dinners, or freeze batches for future meals, this homemade chili will quickly become a staple in your cooking rotation.
So grab your biggest pot, round up those ingredients, and get ready to fill your kitchen with the most amazing aromas. Your perfect bowl of chili is waiting!
Ready to make the best chili ever? I’d absolutely love to hear how yours turns out! Drop a comment below and let me know what you think, any tweaks you made, or your favorite way to serve it. And if you loved this recipe, please save it to your Pinterest boards so you can find it easily next time (and help other home cooks discover it too!). Your pins and shares really help keep this blog going and inspire me to create more delicious recipes for you. Now go make that chili and enjoy every hearty, flavorful spoonful!