
If you’re looking for a foolproof way to prepare juicy, flavorful chicken that’s perfect for busy weeknights or Sunday family dinners, this easy oven baked chicken recipe is exactly what you need. There’s something wonderfully satisfying about pulling a pan of golden-brown, perfectly seasoned chicken from the oven – the aroma fills your kitchen, and the tender, juicy results speak for themselves.
This simple oven baked chicken is incredibly versatile and fits seamlessly into any meal plan. Whether you’re serving it alongside roasted vegetables for a wholesome dinner, slicing it for salads and sandwiches throughout the week, or presenting it as the star of a special occasion meal, this recipe delivers consistent, delicious results every single time. The best part? It requires minimal prep work and uses straightforward ingredients you likely already have in your pantry.
What sets this recipe apart is the combination of a flavorful seasoning blend and the proper baking technique that ensures your chicken stays moist and tender on the inside while developing a beautiful, slightly crispy exterior. No more dry, bland chicken – just perfectly cooked, restaurant-quality results that’ll have your family asking for seconds!
History / Background
Baked chicken has been a cornerstone of American home cooking for generations, though the practice of cooking chicken in ovens dates back centuries across various cultures. In medieval Europe, whole chickens were roasted in wood-fired ovens and brick hearths, often reserved for special occasions and Sunday dinners when families could afford poultry.
The method of oven baking chicken pieces, rather than roasting whole birds, became increasingly popular in America throughout the 20th century, particularly after World War II when kitchen technology advanced and more homes had reliable electric and gas ovens. This cooking method aligned perfectly with the mid-century emphasis on convenient, no-fuss family meals that didn’t require constant attention or specialized skills.
The beauty of baked chicken lies in its universal appeal and adaptability. From Southern-style seasoned baked chicken with paprika and garlic powder to herb-crusted European variations with rosemary and thyme, every region has developed its own take on this simple preparation method. In the American South, oven fried chicken became a lighter alternative to traditional deep-fried versions, while Mediterranean cultures incorporated olive oil, lemon, and oregano into their baked chicken recipes.
Today, oven baked chicken remains one of the most searched and prepared recipes in American households. It’s become the go-to solution for meal preppers, busy parents, and anyone looking for a reliable, healthy protein option that doesn’t sacrifice flavor. The technique has stood the test of time because it’s virtually foolproof, budget-friendly, and endlessly customizable to suit different taste preferences and dietary needs.
Why You’ll Love This Recipe
This isn’t just another chicken recipe – it’s the one you’ll return to week after week when you need reliable, delicious results without any fuss. This easy oven baked chicken combines simplicity with incredible flavor, making it perfect for both beginners and experienced home cooks who appreciate a no-fail recipe.
Here’s why this recipe will become your go-to chicken dinner:
- Incredibly Simple – Just season and bake! No complicated techniques or hard-to-find ingredients required
- Consistently Juicy & Tender – The baking method locks in moisture, preventing dry, overcooked chicken
- Minimal Prep Time – Ready for the oven in just 10 minutes with basic seasoning
- Hands-Off Cooking – Once it’s in the oven, you’re free to prepare sides or relax
- Budget-Friendly – Uses affordable chicken pieces and pantry staple seasonings
- Meal Prep Champion – Makes perfect leftovers for salads, wraps, and quick lunches
- Versatile & Customizable – Easily adapt seasonings to match any cuisine or flavor profile
- Family-Friendly – Even picky eaters love this tender, flavorful chicken
- Healthier Option – Baked rather than fried, with lean protein and no heavy sauces
- Perfect for Any Occasion – Works for casual weeknight dinners or dressed-up entertaining
Ingredient Notes
Let’s break down the simple ingredients that create this perfectly seasoned, juicy oven baked chicken. Each component plays an important role in building flavor and ensuring tender results.
Chicken Pieces – This recipe works beautifully with any cut: bone-in, skin-on chicken breasts, thighs, drumsticks, or a combination. Bone-in, skin-on pieces are ideal because the bones help retain moisture while the skin crisps up beautifully and adds tremendous flavor. Chicken thighs are the most forgiving and stay juiciest, while breasts offer leaner meat. You can also use boneless, skinless pieces, though you’ll need to reduce cooking time and watch carefully to prevent drying out.
Olive Oil – A good quality olive oil helps the seasonings adhere to the chicken while promoting browning and adding richness. It also keeps the skin from sticking to the pan. You can substitute with avocado oil, melted butter, or even melted coconut oil depending on your preference. About 2-3 tablespoons is sufficient for coating 3-4 pounds of chicken.
Garlic Powder – Provides that essential savory, aromatic flavor that pairs perfectly with chicken. Fresh minced garlic can burn during the long baking time, so garlic powder is actually preferable here. It distributes evenly and creates consistent flavor throughout.
Paprika – Adds a beautiful golden-red color and mild, sweet pepper flavor. I recommend using regular sweet paprika for a classic taste, but you can use smoked paprika for a deeper, smokier flavor profile. Hungarian paprika offers the most vibrant color and rich taste.
Onion Powder – Contributes sweetness and depth of flavor that complements the garlic perfectly. Like garlic powder, it distributes evenly and won’t burn like fresh onions might.
Dried Herbs – A combination of dried thyme, oregano, or Italian seasoning adds complexity and an herby, aromatic quality. Feel free to use whatever dried herbs you have on hand or prefer – rosemary, basil, and parsley all work wonderfully.
Salt and Black Pepper – Essential for bringing out all the other flavors. Don’t skimp on salt – chicken needs adequate seasoning. Freshly ground black pepper adds a subtle heat and aromatics that pre-ground pepper can’t match.
Optional Add-ins – Lemon zest, cayenne pepper for heat, or a touch of brown sugar for caramelization can elevate this basic recipe even further.
Equipment Needed
Having the right tools makes preparing this oven baked chicken even easier. Here’s what you’ll need:
- Large Baking Dish or Sheet Pan – A 9×13-inch baking dish works perfectly, or use a rimmed sheet pan (half-sheet size). Make sure it’s large enough that chicken pieces aren’t crowded.
- Measuring Spoons – For accurate seasoning measurements
- Small Bowl – For mixing your spice blend together before applying
- Pastry Brush or Paper Towels – For brushing oil onto the chicken evenly
- Meat Thermometer – This is crucial! The most reliable way to ensure perfectly cooked chicken is checking internal temperature
- Tongs – For flipping chicken pieces if desired, and for removing them from the pan safely
- Aluminum Foil or Parchment Paper – Optional, but lining your pan makes cleanup incredibly easy
- Wire Rack – Optional but helpful if you want extra-crispy skin; elevating the chicken allows air to circulate underneath
Optional but helpful:
- Kitchen timer to track baking time
- Basting brush if you want to baste with pan juices halfway through
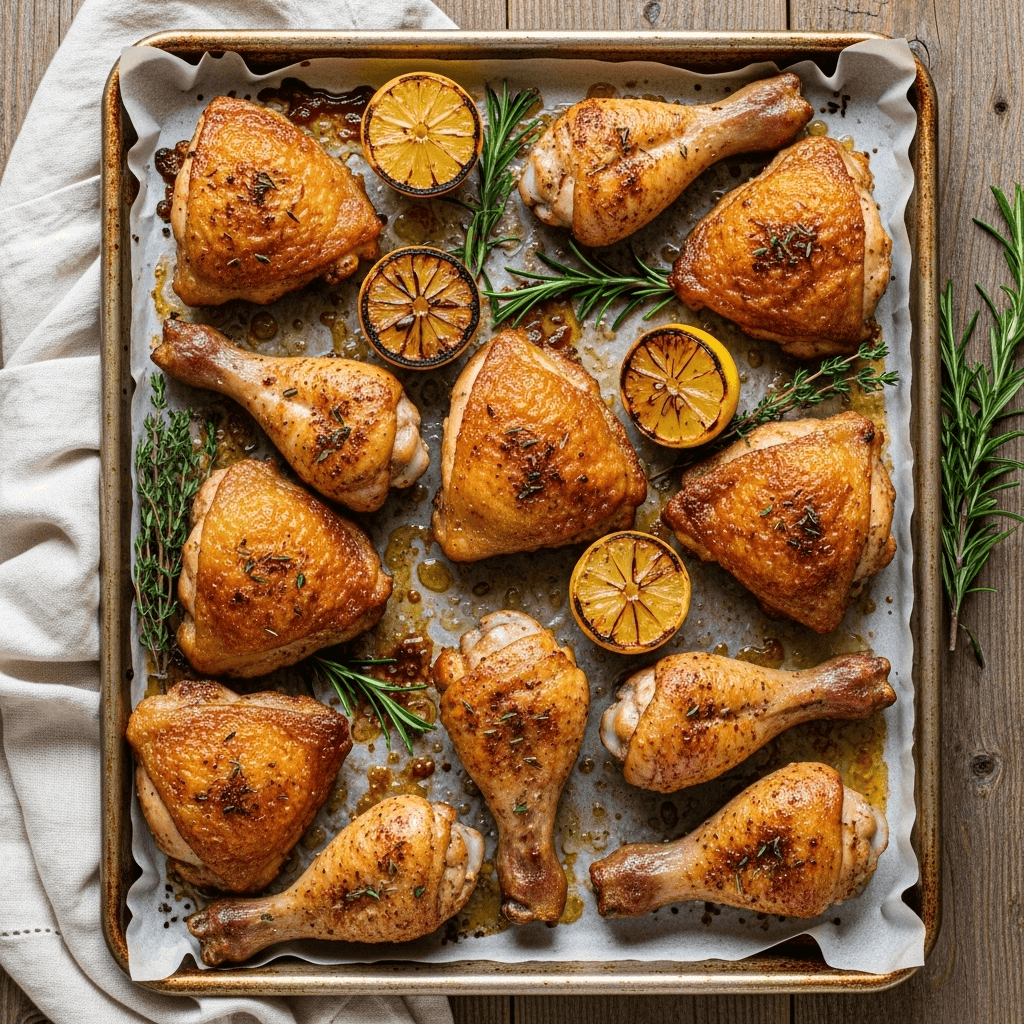
Juicy Oven Baked Chicken Recipe
- Total Time: 55 minutes
- Yield: 4-6 servings 1x
- Diet: Gluten Free
Description
This easy oven baked chicken recipe delivers perfectly juicy, tender chicken with a flavorful golden-brown exterior every single time. With just a handful of simple seasonings and a straightforward baking method, you’ll have a delicious, healthy dinner ready in under an hour. Perfect for busy weeknights or meal prep!
Ingredients
- 3–4 pounds bone-in, skin-on chicken pieces (breasts, thighs, drumsticks, or mixed)
- 3 tablespoons olive oil
- 1 ½ teaspoons salt
- 1 teaspoon black pepper, freshly ground
- 1 ½ teaspoons garlic powder
- 1 ½ teaspoons paprika
- 1 teaspoon onion powder
- 1 teaspoon dried thyme or Italian seasoning
- ½ teaspoon dried oregano
- Optional: ½ teaspoon cayenne pepper for heat
- Optional: 1 lemon, sliced for garnish and extra flavor
Instructions
Step 1: Preheat and Prepare
Preheat your oven to 425°F (220°C). Line a large baking dish or rimmed sheet pan with aluminum foil or parchment paper for easy cleanup. If using a wire rack, place it inside the pan now.
Step 2: Pat Chicken Dry
Remove chicken from packaging and pat each piece completely dry with paper towels. This is crucial for achieving crispy skin! Any moisture on the surface will steam rather than brown. Arrange chicken pieces in your prepared pan, leaving space between each piece so they’re not touching.
Step 3: Mix the Seasoning Blend
In a small bowl, combine the salt, black pepper, garlic powder, paprika, onion powder, thyme, and oregano. Mix thoroughly to create an even spice blend. This ensures every piece of chicken gets uniform seasoning.
Step 4: Season the Chicken
Drizzle the olive oil over all the chicken pieces, then use your hands or a pastry brush to coat each piece evenly on all sides. Sprinkle the seasoning blend generously over the chicken, making sure to season both sides. Use your hands to rub the seasonings into the meat, ensuring complete coverage.
Step 5: Arrange for Baking
Position the chicken pieces skin-side up in the pan. If desired, tuck lemon slices around and between the chicken pieces for added flavor and a beautiful presentation.
Step 6: Bake
Place the pan in the preheated oven on the center rack. Bake for 40-50 minutes, depending on the size of your chicken pieces. Drumsticks and thighs typically take 40-45 minutes, while larger bone-in breasts may need the full 50 minutes or slightly longer.
Step 7: Check for Doneness
The chicken is done when the internal temperature reaches 165°F (74°C) when measured with a meat thermometer inserted into the thickest part without touching bone. The skin should be golden brown and crispy, and juices should run clear when pierced.
Step 8: Rest and Serve
Remove the pan from the oven and let the chicken rest for 5-10 minutes before serving. This allows the juices to redistribute throughout the meat, ensuring maximum juiciness. Transfer to a serving platter and enjoy!
Notes
- Temperature is Key: Always use a meat thermometer to ensure chicken reaches 165°F internally. This guarantees food safety and perfect doneness.
- Don’t Crowd the Pan: Leaving space between chicken pieces allows hot air to circulate, promoting even cooking and crispier skin.
- Adjust Time for Boneless: If using boneless, skinless chicken breasts or thighs, reduce cooking time to 20-30 minutes and check temperature early to prevent overcooking.
- For Extra Crispy Skin: Place chicken under the broiler for the last 2-3 minutes of cooking, watching carefully to prevent burning.
- Seasoning Flexibility: Feel free to adjust spices to your taste. This recipe is very forgiving and adapts well to different flavor profiles.
- Prep Time: 10 minutes
- Cook Time: 45 minutes
- Category: Main Dish
- Method: Baking
- Cuisine: American
Nutrition
- Serving Size: 4-5 oz cooked
- Calories: 285
- Sugar: 0g
- Sodium: 495mg
- Fat: 18g
- Saturated Fat: 4.5g
- Unsaturated Fat: 12g
- Trans Fat: 0g
- Carbohydrates: 1g
- Fiber: 0g
- Protein: 28g
- Cholesterol: 105mg
Tips & Variations
Flavor Variations:
- Lemon Herb Chicken: Add 2 tablespoons of fresh lemon juice, lemon zest, and increase herbs like rosemary and thyme for a bright, Mediterranean flavor
- Spicy Cajun Style: Use Cajun seasoning blend instead of the herb mixture, and add extra cayenne for serious heat
- BBQ Baked Chicken: Brush with your favorite BBQ sauce during the last 15 minutes of baking
- Honey Garlic: Drizzle with a mixture of honey, soy sauce, and minced garlic before baking for a sweet-savory glaze
- Italian Herb: Use Italian seasoning, add fresh or dried basil, and serve with marinara sauce
- Ranch Seasoned: Replace the spice blend with dry ranch seasoning mix for kid-friendly flavor
- Asian-Inspired: Season with ginger, five-spice powder, and sesame oil, then garnish with sesame seeds and green onions
Cooking Method Adjustments:
- Extra Crispy Skin: After baking, broil on high for 2-3 minutes, watching carefully
- Slow and Low: Bake at 375°F for a longer time (about 50-60 minutes) for even more tender, fall-off-the-bone results
- Marinated Version: Marinate chicken in the seasoning mixture with oil for 2-8 hours before baking for deeper flavor penetration
Dietary Modifications:
- Keto/Low-Carb: This recipe is already perfect as-is – high protein, high fat, virtually zero carbs
- Paleo: Use ghee or avocado oil instead of olive oil
- Whole30 Compliant: Ensure all spices have no added sugar
- Lower Fat: Use skinless chicken and reduce oil to 1 tablespoon for a leaner version
Pro Chef Tips
Tip #1: Always Pat Dry Thoroughly
This is the single most important step for crispy skin. Moisture is the enemy of browning. Use plenty of paper towels and press firmly to remove all surface moisture. For extra-crispy skin, you can even refrigerate the seasoned chicken uncovered for 1-2 hours before baking to dry the skin further.
Tip #2: Season Generously
Chicken needs more seasoning than you think! The meat under the skin needs flavor too. Don’t be shy with salt – it’s essential for bringing out all the other flavors. Professional chefs use about ¾ teaspoon of salt per pound of meat.
Tip #3: High Heat for Crispy Skin
Starting with a 425°F oven ensures the skin renders its fat and crisps up beautifully while the meat cooks through. Lower temperatures result in rubbery skin. If your chicken is browning too quickly, you can tent it loosely with foil.
Tip #4: Use a Meat Thermometer
This is non-negotiable for perfect results. Guessing doneness by time alone leads to either undercooked (unsafe) or overcooked (dry) chicken. Insert the thermometer into the thickest part of the meat without touching bone. Dark meat (thighs, drumsticks) can even go to 175-180°F for more tender, fall-apart texture.
Tip #5: Let It Rest
Just like steak, chicken needs to rest after cooking. This allows the juices that have been driven to the center during cooking to redistribute throughout the meat. Cutting immediately causes all those flavorful juices to run out onto your cutting board instead of staying in the meat.
Tip #6: Room Temperature Chicken Cooks More Evenly
Take chicken out of the refrigerator 20-30 minutes before baking (but no longer for food safety). Cold chicken straight from the fridge will take longer to cook and may result in overcooked exteriors before the inside reaches temperature.
Tip #7: Don’t Skip the Oil
Even though the chicken has skin (which contains fat), adding oil helps the seasonings adhere and promotes more even browning. It also prevents sticking and adds flavor.
Common Mistakes to Avoid
Mistake #1: Overcrowding the Pan
When chicken pieces touch or overlap, they steam instead of roast, resulting in soggy, pale skin and uneven cooking. Solution: Use a larger pan or bake in batches. Leave at least an inch of space between pieces for proper air circulation and browning.
Mistake #2: Not Checking Internal Temperature
Relying solely on cooking time is unreliable because chicken pieces vary in size and thickness. Undercooking poses health risks, while overcooking results in dry, tough meat. Solution: Invest in an instant-read meat thermometer and always check multiple pieces, especially the thickest ones.
Mistake #3: Opening the Oven Door Repeatedly
Every time you open the oven, the temperature drops significantly, extending cooking time and affecting results. Solution: Use your oven light and window to check progress. Only open the door when it’s time to check temperature near the end of cooking.
Mistake #4: Using Wet or Frozen Chicken
Baking frozen chicken leads to rubbery texture and uneven cooking. Wet chicken won’t brown properly. Solution: Always thaw chicken completely in the refrigerator (never at room temperature), and thoroughly pat dry before seasoning.
Mistake #5: Cutting Into Chicken to Check Doneness
Cutting or piercing the chicken repeatedly releases all the precious juices, leaving you with dry meat. Solution: Use a meat thermometer inserted from the side rather than cutting the meat open. Check temperature in the thickest part of each piece.
Storage & Meal Prep
Refrigerator Storage:
Store leftover oven baked chicken in an airtight container in the refrigerator for up to 4 days. For best results, let the chicken cool to room temperature first (within 2 hours of cooking), then refrigerate. Store chicken pieces whole rather than shredded or chopped to maintain maximum moisture.
Reheating Methods:
- Oven (Best Method): Preheat oven to 350°F. Place chicken in a baking dish, add 2-3 tablespoons of chicken broth or water, cover with foil, and heat for 15-20 minutes until warmed through. Remove foil for the last 5 minutes to re-crisp the skin.
- Microwave (Quick Method): Place chicken on a microwave-safe plate, cover with a damp paper towel, and heat in 30-second intervals until warm. This method won’t maintain crispy skin but works well if you’re using the chicken in salads or wraps.
- Stovetop: Cut chicken into smaller pieces, add to a skillet with a splash of broth or water, cover, and warm over medium-low heat, turning occasionally.
- Air Fryer: Reheat at 375°F for 3-5 minutes for crispy skin and moist meat.
Meal Prep Tips:
This oven baked chicken is perfect for weekly meal prep! Cook a large batch on Sunday and use throughout the week in different ways:
- Slice for salads and grain bowls
- Shred for tacos, quesadillas, or chicken salad
- Dice for pasta dishes or stir-fries
- Serve whole with different sides each night
Store prepared chicken in individual portion containers for grab-and-go lunches. Keep the chicken separate from wet ingredients (like salad dressing) until ready to eat to maintain the best texture.
Make-Ahead & Freezer Notes
Make-Ahead Preparation:
You can season the chicken up to 24 hours in advance, which actually enhances the flavor as the seasonings have time to penetrate the meat.
- Pat chicken dry and season as directed in the recipe
- Place in a covered container or zip-top bag
- Refrigerate until ready to bake
- Add 5-10 minutes to the baking time since the chicken will be cold from the fridge
For even deeper flavor, try a dry brine: season the chicken with salt, cover, and refrigerate overnight. Add the remaining spices just before baking.
Freezing Raw Seasoned Chicken:
This is excellent for future quick meals!
- Season chicken pieces as directed
- Place in a single layer on a parchment-lined baking sheet
- Freeze until solid (about 2 hours)
- Transfer to freezer-safe bags, removing as much air as possible
- Label with date and freeze for up to 3 months
- To cook: Thaw overnight in refrigerator, then bake as directed
Freezing Cooked Chicken:
Cooked oven baked chicken freezes beautifully for up to 3 months.
- Let chicken cool completely
- Wrap individual pieces tightly in plastic wrap or aluminum foil
- Place wrapped pieces in a freezer-safe container or bag
- Label with date and contents
- Freeze for up to 3 months
Thawing and Reheating from Frozen:
Always thaw in the refrigerator overnight for food safety. Never thaw at room temperature. Once thawed, reheat using any of the methods described in the Storage section above. If you’re short on time, you can reheat from frozen in the oven at 350°F for 30-40 minutes until heated through, though the texture won’t be quite as good as properly thawed chicken.
Serving Suggestions
This versatile oven baked chicken pairs beautifully with countless sides and complements various meal styles. Here are some delicious serving ideas:
Classic Comfort Food Pairings:
- Creamy mashed potatoes and green beans almondine
- Buttered egg noodles with roasted asparagus
- Baked mac and cheese with a fresh garden salad
- Roasted root vegetables (carrots, parsnips, sweet potatoes)
- Garlic bread and Caesar salad
- Rice pilaf with sautéed spinach
Lighter, Healthier Options:
- Cauliflower rice with roasted broccoli
- Quinoa salad with Mediterranean vegetables
- Zucchini noodles with marinara sauce
- Large mixed green salad with balsamic vinaigrette
- Roasted Brussels sprouts and butternut squash
- Steamed green beans with lemon and almonds
Southern-Style Comfort:
- Collard greens and cornbread
- Black-eyed peas and coleslaw
- Biscuits with honey butter
- Fried okra and tomato salad
- Creamed corn and candied yams
International Flavors:
- Spanish rice and refried beans
- Greek salad with tzatziki sauce
- Roasted vegetables with balsamic glaze
- Asian slaw and fried rice
- Caprese salad with crusty Italian bread
Complete Meal Ideas: For a balanced dinner plate, aim for the classic trio: protein (your chicken), starch (potato, rice, or bread), and vegetable (green salad or roasted veggies).
Leftover Transformations:
- Chicken Caesar wraps for lunch
- Chopped salad with grilled vegetables
- Chicken and rice soup
- BBQ chicken pizza
- Chicken quesadillas or tacos
- Chicken pasta salad
Beverage Pairings:
- White wine like Chardonnay or Pinot Grigio
- Light red wine like Pinot Noir
- Iced tea (sweet or unsweet)
- Lemonade for a fresh, bright contrast
- Sparkling water with lemon
FAQs Section
Q: What temperature should I bake chicken at for the best results?
A: For juicy chicken with crispy skin, 425°F (220°C) is ideal. This high temperature renders the fat in the skin while keeping the meat moist. If you prefer a slower method for more tender, fall-off-the-bone results, you can bake at 375°F (190°C) for about 10-15 minutes longer. Avoid temperatures below 350°F as the chicken will take too long to cook and may dry out.
Q: How do I know when the chicken is fully cooked?
A: The only reliable way is using a meat thermometer. Insert it into the thickest part of the meat without touching bone. Chicken is safe to eat at 165°F (74°C). For dark meat (thighs and drumsticks), you can go up to 175-180°F for even more tender results without drying out. Visual cues include clear juices (not pink) and meat that’s no longer pink near the bone.
Q: Should I use bone-in or boneless chicken?
A: Both work, but bone-in, skin-on pieces stay juicier and have more flavor. The bones act as a heat conductor, helping cook the meat evenly while keeping it moist. If using boneless, skinless pieces, reduce cooking time to 20-30 minutes and be extra careful not to overcook, as they dry out much faster.
Q: Why is my chicken skin not crispy?
A: The most common reasons are: (1) not patting the chicken dry before seasoning, (2) overcrowding the pan causing steaming, (3) baking at too low a temperature, or (4) too much moisture in the pan. Solutions: Always thoroughly dry chicken, leave space between pieces, bake at 425°F, and consider using a wire rack to elevate the chicken for air circulation on all sides.
Q: Can I use frozen chicken?
A: You must thaw frozen chicken completely before baking for even cooking and food safety. Thaw in the refrigerator overnight (24 hours for a package of chicken pieces). Never thaw at room temperature as this creates unsafe bacterial growth. In a pinch, you can thaw in cold water, changing the water every 30 minutes, but refrigerator thawing is safest.
Q: How can I prevent the chicken from drying out?
A: Several techniques help: (1) Don’t overcook – use a thermometer and remove from oven at 165°F, (2) Don’t skip the oil – it helps keep meat moist, (3) Let chicken rest 5-10 minutes after baking so juices redistribute, (4) Consider bone-in, skin-on pieces which stay juicier than boneless, (5) Don’t repeatedly open the oven door, which extends cooking time and can lead to drying.
Q: What’s the difference between baking and roasting chicken?
A: The terms are often used interchangeably, but technically roasting refers to cooking at higher temperatures (usually 400°F+) without liquid, often uncovered, to achieve browning and crispy skin. Baking can be at any temperature and may include covering or adding liquid. This recipe uses both terms but follows a roasting technique at high heat for crispy, golden results.
Q: Can I add vegetables to the pan with the chicken?
A: Absolutely! Hardy vegetables like potatoes, carrots, onions, and Brussels sprouts work great. Cut them into similar sizes, toss with oil and seasonings, and arrange around the chicken. They’ll cook in the flavorful chicken drippings. Just note that some vegetables (like broccoli or asparagus) cook faster and should be added halfway through the chicken’s cooking time.
Conclusion
And there you have it – the ultimate guide to making perfectly juicy, flavorful oven baked chicken that’ll become your go-to dinner solution! This recipe proves that simple ingredients and straightforward techniques can create absolutely delicious results that rival any restaurant. The beauty of this dish lies not just in how easy it is to prepare, but in how incredibly versatile and reliable it is for any occasion.
Whether you’re a beginner just learning your way around the kitchen or an experienced cook looking for a dependable weeknight dinner, this oven baked chicken delivers every single time. The crispy, golden-brown skin, the tender and juicy meat, and the aromatic seasoning blend create a combination that’s simply irresistible. Plus, the leftovers (if you have any!) transform into countless delicious meals throughout the week.
I’d absolutely love to hear how your oven baked chicken turns out! Did you try any of the flavor variations? What sides did you serve it with? Drop a comment below and share your experience – I read every single one and love hearing from you. If this recipe becomes a regular in your dinner rotation (and I think it will!), please give it a five-star rating and share it with your friends and family who could use a reliable chicken recipe in their lives.
Don’t forget to save this recipe to your Pinterest boards so you can easily find it whenever you need a quick, delicious dinner solution. Happy cooking, and here’s to many more perfectly baked chicken dinners! 🍗✨