
Welcome to the ultimate chocolate chip cookie recipe that delivers bakery-quality results every single time! These classic chocolate chip cookies are everything you dream about—soft and chewy centers, slightly crispy golden edges, and loaded with melty chocolate chips in every bite. This easy chocolate chip cookie recipe uses simple pantry ingredients and straightforward techniques to create cookies that taste like they came from a fancy bakery, but they’re made right in your own kitchen.
These homemade chocolate chip cookies are perfect for so many occasions: after-school snacks, lunchbox treats, holiday cookie exchanges, bake sales, Sunday family dinners, or just because you’re craving something sweet and comforting. There’s something magical about the aroma of chocolate chip cookies baking in your oven—it instantly makes your house feel like home.
Whether you’re a baking beginner or a seasoned pro, this foolproof chocolate chip cookie recipe will become your go-to. The dough comes together in one bowl in about 10 minutes, and you can bake them immediately or refrigerate the dough for even better flavor and texture. These cookies stay soft for days (if they last that long!), freeze beautifully, and are always a crowd-pleaser. Once you taste these perfectly chewy chocolate chip cookies, you’ll never use another recipe again!
History / Background
The chocolate chip cookie has one of the most beloved origin stories in American culinary history. In 1938, Ruth Graves Wakefield, owner of the Toll House Inn in Whitman, Massachusetts, was making her regular Butter Drop Do cookies when she decided to add chopped pieces of a Nestlé semi-sweet chocolate bar to the dough. She expected the chocolate to melt and disperse throughout the cookies, creating chocolate cookies. Instead, the chocolate pieces held their shape, softening to a deliciously gooey consistency.
The result was an instant sensation! Her “Toll House Crunch Cookie” became wildly popular with her inn’s guests, who came from all over to taste this innovative treat. The recipe was published in a Boston newspaper and in Ruth Wakefield’s cookbook “Tried and True.” As word spread, sales of Nestlé chocolate bars skyrocketed in the Massachusetts area.
Nestlé quickly realized what was happening and struck a deal with Ruth Wakefield: they would print her recipe on every package of their chocolate bars in exchange for a lifetime supply of chocolate. In 1939, Nestlé began scoring their chocolate bars to make them easier to break into chunks, and eventually created chocolate “morsels” or chips specifically for baking. The iconic yellow bag of Nestlé Toll House chocolate chips was born, forever changing American baking.
During World War II, soldiers from Massachusetts who were stationed overseas received Toll House cookies in care packages from home. They shared them with fellow soldiers, spreading the popularity nationwide and even internationally. By the 1940s and 1950s, chocolate chip cookies had become an American icon.
The chocolate chip cookie has since become the most popular cookie in America, with variations appearing in bakeries, homes, and restaurants across the country. From crispy to chewy, thin to thick, with add-ins like nuts, oats, or different types of chocolate—the humble chocolate chip cookie has inspired endless creativity. Despite all the variations, that classic combination of brown sugar, butter, vanilla, and chocolate chips remains timeless.
Today, chocolate chip cookies represent comfort, nostalgia, and home. They’re the cookie kids learn to bake first, the treat that welcomes new neighbors, and the dessert that always satisfies. Ruth Wakefield’s happy accident has become one of the most beloved foods in American culture!
Why You’ll Love This Recipe
These homemade chocolate chip cookies are absolutely irresistible! Every bite delivers that perfect combination of soft, chewy texture with slightly crispy edges and pockets of melted chocolate that will make you close your eyes and sigh with happiness. This easy chocolate chip cookie recipe is the result of years of testing to achieve absolute cookie perfection.
Here’s why these chocolate chip cookies will become your forever recipe:
- Perfectly Soft & Chewy – That ideal texture everyone craves with tender centers that stay soft for days
- Foolproof Recipe – Clear instructions that work every time, even for beginner bakers
- Simple Ingredients – Uses basic pantry staples you probably already have
- Quick to Make – Dough comes together in 10 minutes with minimal effort
- No Chilling Required – Bake immediately or chill for even better flavor—your choice!
- Loaded with Chocolate – Generous amounts of chocolate chips in every single bite
- Bakery-Quality Results – Taste and look like expensive bakery cookies
- Kid-Friendly Activity – Fun to make with children who love helping in the kitchen
- Freezer-Friendly – Freeze dough or baked cookies for future treats
- Customizable – Easy to adapt with your favorite add-ins or chocolate varieties
- Always a Crowd-Pleaser – Universally loved by kids and adults alike
- Budget-Friendly – Makes a generous batch without breaking the bank
Whether you’re baking these soft chocolate chip cookies for a special occasion or just a Tuesday afternoon, they deliver pure joy. The smell alone is worth making them, but that first warm, gooey bite? That’s what cookie dreams are made of!
Ingredient Notes
Let’s break down what makes these the best chocolate chip cookies. Understanding your ingredients helps you achieve perfect results!
All-Purpose Flour – The foundation of your cookies. All-purpose flour has the ideal protein content (around 10-12%) for cookies that are tender but hold their shape. Measure correctly by spooning flour into your measuring cup and leveling off—don’t pack it down. You’ll need 2¼ cups. Substitution: For gluten-free, use a 1:1 gluten-free flour blend with xanthan gum.
Baking Soda – The leavening agent that makes cookies rise and spread. Just 1 teaspoon creates the perfect texture. Baking soda also helps achieve those beautiful golden-brown edges. Make sure yours is fresh (test by adding a pinch to vinegar—it should bubble vigorously).
Salt – Essential! Salt enhances all the other flavors and balances the sweetness. Use 1 teaspoon of fine sea salt or table salt. Don’t skip this—it makes a huge difference in flavor depth.
Butter – Unsalted butter provides richness, flavor, and helps create that tender texture. You’ll need 1 cup (2 sticks), softened to room temperature. Room temp butter creams properly with sugar, incorporating air for lighter cookies. Substitution: For dairy-free, use vegan butter sticks (not margarine in tubs).
Granulated Sugar – White sugar adds sweetness and helps cookies spread. You’ll need ¾ cup. It also contributes to those slightly crispy edges we love.
Brown Sugar – This is the secret to soft, chewy cookies! Brown sugar contains molasses, which adds moisture, chewiness, and deep caramel flavor. Use 1 cup of packed brown sugar (light or dark—dark has more molasses flavor). The moisture in brown sugar is what keeps cookies soft and chewy for days.
Eggs – Two large eggs add structure, moisture, and richness. They bind everything together and create tender texture. Use room temperature eggs for best incorporation. Substitution: For egg-free cookies, use flax eggs (2 tablespoons ground flaxseed + 5 tablespoons water, let sit 5 minutes).
Vanilla Extract – Pure vanilla extract is non-negotiable! You’ll need 2 teaspoons. Vanilla enhances all the other flavors and adds that classic cookie aroma. Don’t use imitation vanilla—real extract makes a noticeable difference.
Chocolate Chips – The star of the show! Use 2 cups of semi-sweet chocolate chips for classic flavor. Quality matters here—better chocolate = better cookies. Options: Semi-sweet (traditional), milk chocolate (sweeter), dark chocolate (more sophisticated), or a combination. You can also chop chocolate bars for irregular chunks with different melting patterns.
Optional Add-Ins: Chopped nuts (walnuts, pecans), sea salt flakes on top, espresso powder (1 teaspoon enhances chocolate), or oats for texture.
Equipment Needed
You don’t need any fancy equipment to make amazing chocolate chip cookies—just some basic baking tools!
- Mixing Bowls – One large bowl for mixing dough, one medium bowl for dry ingredients
- Electric Mixer – Stand mixer or hand mixer makes creaming butter and sugar easier (you can also mix by hand with a wooden spoon, though it takes more effort)
- Measuring Cups and Spoons – For accurate ingredient measurements
- Whisk – For mixing dry ingredients together
- Rubber Spatula – For scraping down bowl and folding in chocolate chips
- Baking Sheets – Two large baking sheets (rimmed or flat)
- Parchment Paper or Silicone Baking Mats – Prevents sticking and makes cleanup easy
- Cookie Scoop – Optional but highly recommended for uniform cookies (I use a 3-tablespoon/1.5-ounce scoop)
- Wire Cooling Rack – For cooling cookies after baking
- Oven Thermometer – Optional but helpful to ensure accurate oven temperature
Nice to Have:
- Kitchen scale for measuring flour by weight (more accurate)
- Timer to prevent overbaking
Chocolate Chip Cookie Recipe
- Total Time: 25 minutes
- Yield: 24 cookies 1x
- Diet: Vegetarian
Description
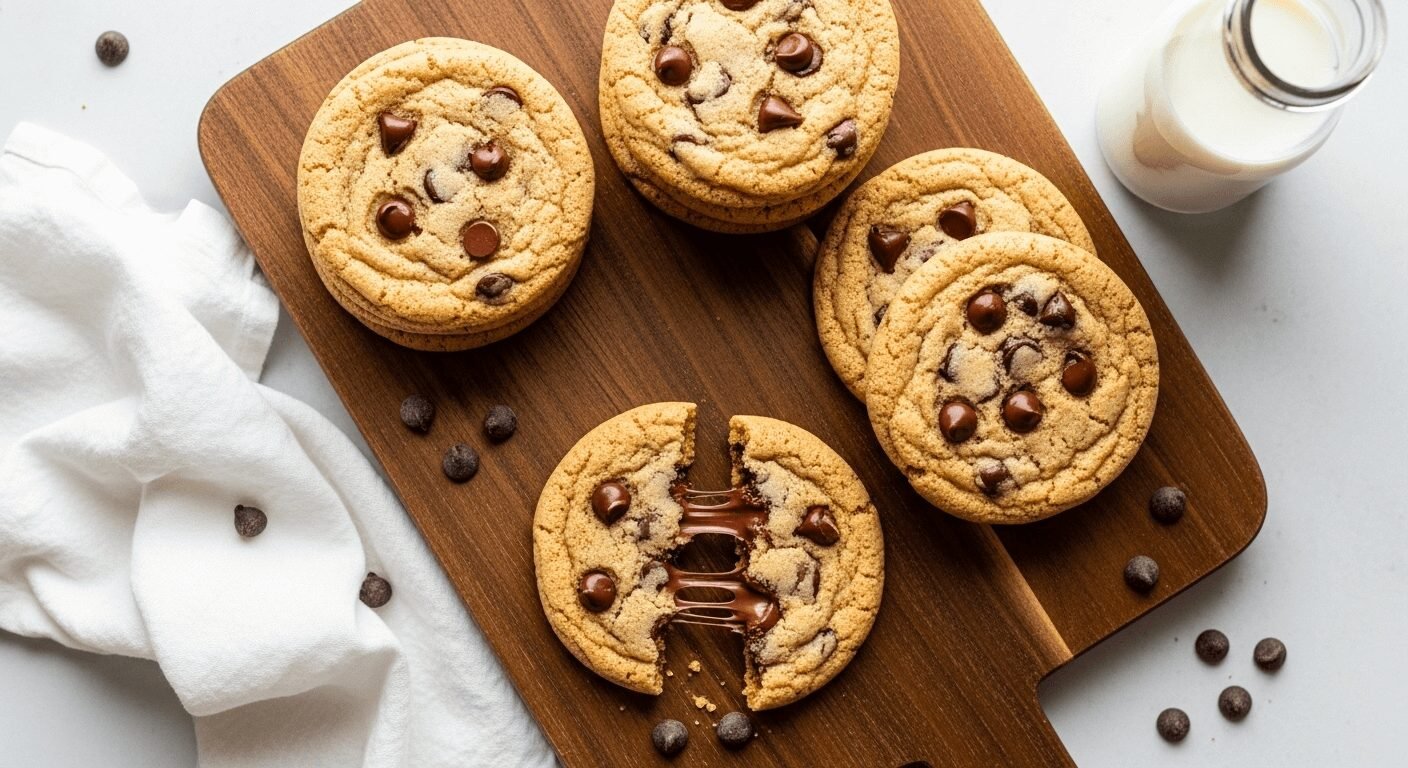
These classic homemade chocolate chip cookies are soft, chewy, and loaded with chocolate chips. With crispy golden edges and a tender center, they’re the perfect treat for any occasion and stay deliciously soft for days.
Ingredients
- 2¼ cups (280g) all-purpose flour
- 1 teaspoon baking soda
- 1 teaspoon fine sea salt
- 1 cup (2 sticks/226g) unsalted butter, softened to room temperature
- ¾ cup (150g) granulated sugar
- ¾ cup (165g) light brown sugar, packed
- 2 large eggs, room temperature
- 2 teaspoons pure vanilla extract
- 2 cups (340g) semi-sweet chocolate chips
Instructions
- Preheat and prepare: Preheat your oven to 375°F (190°C). Line two baking sheets with parchment paper and set aside.
- Mix dry ingredients: In a medium bowl, whisk together the flour, baking soda, and salt until well combined. Set this bowl aside.
- Cream butter and sugars: In a large mixing bowl, using an electric mixer on medium speed, beat the softened butter, granulated sugar, and brown sugar together for 2-3 minutes until the mixture is light, fluffy, and pale in color. This creaming process incorporates air and is crucial for texture.
- Add eggs and vanilla: Add the eggs one at a time, beating well after each addition and scraping down the sides of the bowl as needed. Mix in the vanilla extract until fully incorporated.
- Combine wet and dry: With the mixer on low speed, gradually add the flour mixture to the butter mixture, mixing just until no flour streaks remain. Be careful not to overmix, as this can result in tough cookies.
- Fold in chocolate chips: Using a rubber spatula, gently fold in the chocolate chips until they’re evenly distributed throughout the dough.
- Portion the dough: Using a 1.5-tablespoon cookie scoop or two spoons, drop rounded balls of dough onto the prepared baking sheets, spacing them about 2 inches apart to allow for spreading.
- Bake: Bake for 9-11 minutes, or until the edges are golden brown but the centers still look slightly underdone and soft. The cookies will continue cooking on the hot baking sheet after you remove them from the oven.
- Cool: Let the cookies cool on the baking sheet for 5 minutes, then transfer them to a wire cooling rack. This resting time allows them to set properly and achieve that perfect chewy texture.
- Serve: Enjoy warm with a cold glass of milk, or store in an airtight container once completely cooled.
Notes
- Room temperature ingredients matter: Make sure your butter and eggs are at room temperature for proper incorporation and texture.
- Don’t overbake: Slightly underdone cookies = perfectly chewy results. They’ll look a bit puffy and soft when you take them out, but they’ll firm up as they cool.
- Chill the dough (optional): For thicker cookies with less spread, refrigerate the dough for 30 minutes before baking.
- Customize your chocolate: Feel free to use a combination of chocolate chips, chunks, or different chocolate types for variety.
- Baking one sheet at a time: For the most even baking, bake one sheet at a time on the center oven rack.
- Prep Time: 15 minutes
- Cook Time: 10 minutes
- Category: Dessert
- Method: Baking
- Cuisine: American
Nutrition
- Serving Size: 1 cookie
- Calories: 185
- Sugar: 16g
- Sodium: 145mg
- Fat: 9g
- Saturated Fat: 5.5g
- Unsaturated Fat: 3g
- Trans Fat: 0g
- Carbohydrates: 25g
- Fiber: 1g
- Protein: 2g
- Cholesterol: 30mg
Tips & Variations
Extra Thick Cookies: Chill dough for 24-48 hours before baking, and use cold dough balls straight from the fridge. This creates taller, thicker cookies with less spread.
Crispy Chocolate Chip Cookies: Bake 2-3 minutes longer until edges are deeply golden and centers are set. Let cool completely for maximum crispiness.
Brown Butter Cookies: Brown the butter before adding it to the recipe (cool to room temp first). This adds incredible nutty, caramel notes to the cookies.
Double Chocolate: Replace ¼ cup flour with ¼ cup cocoa powder for chocolate chocolate chip cookies. Add white chocolate chips along with semi-sweet for variety.
Oatmeal Chocolate Chip: Replace ½ cup flour with ½ cup old-fashioned oats for added texture and chewiness.
Kitchen Sink Cookies: Add ½ cup each of chopped nuts, coconut flakes, and toffee bits along with the chocolate chips for loaded cookies.
Salted Caramel: Add ½ cup caramel bits and sprinkle with flaky sea salt before baking.
Peanut Butter Chocolate Chip: Add ½ cup creamy peanut butter with the butter and reduce flour by 2 tablespoons.
Espresso Enhancement: Add 1-2 teaspoons instant espresso powder to the dry ingredients—it intensifies chocolate flavor without making cookies taste like coffee.
Healthier Version: Replace half the butter with coconut oil, use coconut sugar instead of white sugar, and add chia seeds or ground flaxseed for nutrition boost.
Pro Chef Tips
Browned Butter Magic: Professional bakers often brown the butter before making cookies. Melt butter in a saucepan over medium heat, swirling occasionally, until it turns golden brown and smells nutty (5-7 minutes). Let it cool to room temperature, then proceed with the recipe. This adds incredible depth and complexity—like caramelized, nutty notes that elevate ordinary cookies to extraordinary.
The 24-Hour Rule: Here’s a secret from bakeries: chilling cookie dough for 24-48 hours dramatically improves flavor and texture. During this time, the flour fully hydrates, flavors meld and deepen, and the dough firms up for less spreading and thicker cookies. If you have the patience, this step is worth it!
Temperature is Everything: Ovens vary wildly in actual temperature. Invest in an oven thermometer ($10-15) to ensure your oven is truly at 375°F. Too hot and cookies burn on the bottom and spread too thin; too cool and they don’t spread enough and stay pale. Accurate temperature = consistent results.
The Underbake Technique: Professional bakers always slightly underbake cookies. The centers should look puffy and barely set when you remove them—they’ll continue cooking from residual heat. Overbaked cookies become hard and dry as they cool. When in doubt, take them out a minute early rather than leaving them in a minute too long.
Quality Chocolate Matters: Don’t skimp on chocolate chips! Store-brand chips often contain less cocoa butter and more fillers, resulting in less melty, less flavorful chocolate. Splurge on quality brands like Ghirardelli, Guittard, or chopped chocolate bars. Your taste buds will thank you.
The Flaky Salt Finish: Just before baking, sprinkle each cookie with a tiny pinch of flaky sea salt (like Maldon or fleur de sel). The salt crystals provide bursts of flavor that perfectly complement the sweet chocolate and make the cookies taste more complex and sophisticated.
Uniform Sizing: Use a cookie scoop to ensure all cookies are the same size. This isn’t just for aesthetics—uniform cookies bake evenly, so none are overdone while others are underdone. A 3-tablespoon (1.5 ounce) scoop is the perfect size.
Common Mistakes to Avoid
Using Cold Butter: Cold butter won’t cream properly with sugar, resulting in dense, flat cookies that spread too much. Butter should be softened to room temperature (around 65-70°F)—it should give slightly when pressed but not be greasy or melted. If you forgot to take it out ahead, cut it into small pieces and let it sit for 15-20 minutes.
Overmixing the Dough: Once you add flour, mix only until it’s just incorporated. Overmixing develops gluten, which creates tough, cake-like cookies instead of tender, chewy ones. Stop mixing the second the flour disappears—a few small streaks are fine and will incorporate when you fold in the chocolate chips.
Overbaking: This is the most common mistake! Cookies continue baking on the hot pan after removing from the oven. They should look slightly underdone in the center when you take them out—puffy with golden edges but soft-looking centers. If they look fully baked in the oven, they’ll be overbaked and dry once cooled.
Measuring Flour Incorrectly: Scooping flour directly from the bag compacts it, giving you way too much flour (sometimes 25% more than intended!). This makes cookies dry and cake-like. Always spoon flour into your measuring cup and level it off, or better yet, weigh it (2¼ cups = 280 grams).
Not Spacing Cookies Properly: Cookies spread during baking, so they need space. Place dough balls at least 2-3 inches apart on the baking sheet. Crowded cookies will bake into each other, creating misshapen blobs instead of individual perfect cookies.
Baking on Hot Pans: Placing dough on pans that are still warm from the previous batch causes immediate spreading, resulting in thin, crispy cookies. Always use cool pans, or have multiple baking sheets rotating so you’re always using a cool one.
Storage & Meal Prep
Room Temperature Storage: Store baked cookies in an airtight container at room temperature for up to 1 week. Layer cookies between sheets of parchment paper to prevent sticking. Adding a slice of bread to the container helps maintain softness—the cookies absorb moisture from the bread, keeping them chewy!
Keeping Cookies Soft: If your cookies start to dry out, place a damp paper towel in the container overnight (don’t let it touch the cookies directly). The moisture will revive them. You can also microwave a cookie for 8-10 seconds to refresh it.
Refrigerator Storage: While not necessary, you can refrigerate cookies for up to 2 weeks in an airtight container. Let them come to room temperature before serving, or warm briefly in the microwave for that fresh-baked taste.
Portioning for Gifts: These cookies make wonderful gifts! Arrange them in decorative tins, cellophane bags tied with ribbon, or mason jars. They ship well if wrapped carefully and stay fresh for several days.
Cookie Dough Storage: Unbaked cookie dough can be refrigerated for up to 5 days. In fact, chilled dough makes even better cookies! Just let it sit at room temperature for 10-15 minutes before scooping if it’s too firm.
Make-Ahead & Freezer Notes
Freezing Baked Cookies: Fully cooled cookies freeze beautifully for up to 3 months! Place them in a single layer on a baking sheet and freeze until solid (about 1 hour), then transfer to freezer bags or containers. This prevents them from sticking together. Thaw at room temperature for 30 minutes, or microwave for 15-20 seconds for warm cookies anytime.
Freezing Cookie Dough: This is a game-changer! Scoop dough into balls, place on a parchment-lined baking sheet, and freeze until solid (2-3 hours). Transfer frozen dough balls to freezer bags and store for up to 3 months. Bake directly from frozen—just add 1-2 extra minutes to the baking time. This means you can have freshly baked cookies anytime with zero effort!
Slice-and-Bake Method: Shape dough into 2-inch diameter logs, wrap tightly in plastic wrap, then aluminum foil. Freeze for up to 3 months. When ready to bake, let thaw slightly for 10 minutes, slice into ½-inch rounds, and bake as directed. Perfect for having fresh cookies quickly!
Chilling for Better Cookies: As mentioned, chilling dough for 24-72 hours significantly improves flavor and texture. The dough becomes more flavorful, develops deeper color, and creates thicker cookies with less spread. If you have time, always chill your dough!
Pre-Portioned Convenience: On meal prep Sunday, mix up a batch of dough, portion it into balls, and refrigerate or freeze. Then you can bake just 2-3 cookies whenever you want a fresh treat without making an entire batch.
Thawing Tips: Frozen baked cookies thaw quickly at room temperature (20-30 minutes). For that fresh-baked taste, warm thawed cookies in a 300°F oven for 5 minutes, or microwave for 10-15 seconds.
Serving Suggestions
Classic Pairings: Serve warm chocolate chip cookies with a tall glass of cold milk—it’s iconic for a reason! The milk cuts through the sweetness and complements the chocolate perfectly.
Ice Cream Sandwiches: Use two cookies to sandwich your favorite ice cream flavor. Vanilla is classic, but mint chip, coffee, or cookie dough ice cream are amazing too. Roll the edges in mini chocolate chips or sprinkles!
Coffee or Tea Time: These cookies pair beautifully with hot coffee, tea, or hot chocolate. The warmth of the beverage melts the chocolate slightly—heaven!
Dessert Upgrade: Serve warm cookies topped with a scoop of vanilla ice cream and drizzle with chocolate or caramel sauce for an elegant dessert.
Cookie Crumble: Crumble cookies over yogurt parfaits, smoothie bowls, or ice cream sundaes for added texture and flavor.
S’mores Variation: Make s’mores using these cookies instead of graham crackers! Sandwich a toasted marshmallow between two cookies for next-level s’mores.
Cookie Milkshake: Blend cookies into vanilla milkshakes for the ultimate indulgence.
With Fresh Fruit: Balance the sweetness by serving with fresh berries—strawberries, raspberries, or sliced peaches pair wonderfully.
Party Presentation: Stack cookies on a cake stand or tiered platter for beautiful party presentation. Tie a few in cellophane bags with ribbon for party favors.
Breakfast Treat: While not an everyday breakfast, cookies with a cup of coffee make special weekend mornings feel indulgent!
FAQs Section
Why are my chocolate chip cookies flat and spreading too much?
Several culprits can cause excessive spreading: 1) Butter was too warm/melted instead of just softened, 2) Too much sugar or butter in the recipe, 3) Not enough flour (measure correctly!), 4) Oven temperature too low, or 5) Baking on warm pans. Solutions: Ensure butter is properly softened (not melted), measure flour correctly by spooning and leveling, chill dough for 30+ minutes before baking, and always use cool baking sheets.
How do I make cookies stay soft and chewy?
The secret to soft cookies is: 1) Using more brown sugar than white sugar (brown sugar’s molasses keeps cookies moist), 2) Not overbaking—take them out when centers still look slightly underdone, 3) Storing in airtight containers, and 4) Adding a slice of bread to your storage container to maintain moisture. Also, slightly under-measuring flour (or weighing it) prevents dry cookies.
Can I make these cookies without a mixer?
Absolutely! You can make these entirely by hand with a wooden spoon or sturdy spatula. The creaming step will take more elbow grease and time (about 5-7 minutes of vigorous stirring), but it’s completely doable. Make sure your butter is properly softened to make mixing easier. The cookies will turn out just as delicious!
Why do my cookies turn out cake-like instead of chewy?
Cake-like cookies usually result from: 1) Too much flour (measure correctly!), 2) Too much leavening (baking soda or baking powder), 3) Not enough fat (butter), 4) Overmixing after adding flour, or 5) Using all white sugar instead of including brown sugar. Brown sugar’s moisture content is key to chewy texture. Make sure you’re measuring flour by spooning and leveling, not packing.
Do I really need to chill the dough?
No, you can bake immediately and still get delicious cookies! However, chilling dough (even for just 30 minutes, but ideally 24-72 hours) improves flavor, creates thicker cookies with less spread, develops deeper color, and enhances texture. If you’re in a hurry, skip it. If you want the absolute best cookies, chill overnight.
Can I use salted butter instead of unsalted?
Yes, but reduce the added salt in the recipe to ½ teaspoon instead of 1 teaspoon. Unsalted butter is preferred because it allows you to control exactly how much salt is in your cookies. Different brands of salted butter have varying salt levels, which can make your cookies too salty.
What’s the difference between using chocolate chips vs. chopped chocolate bars?
Chocolate chips contain stabilizers that help them hold their shape during baking, creating distinct chips. Chopped chocolate bars melt more during baking, creating pockets of gooey, melty chocolate with irregular chunks of varying sizes. Both are delicious! For the best of both worlds, use half chips and half chopped bar chocolate for varied textures and melting patterns.
Conclusion
Congratulations—you now have everything you need to make absolutely perfect, bakery-quality chocolate chip cookies in your own kitchen! These soft and chewy chocolate chip cookies truly are the ultimate recipe: simple enough for beginners, reliable enough for experienced bakers, and delicious enough to make everyone ask for seconds (and the recipe!).
The beauty of this easy chocolate chip cookie recipe is its versatility and foolproof nature. Whether you bake them immediately for instant gratification or chill the dough overnight for even better results, whether you follow the recipe exactly or add your own creative variations, these cookies always deliver that perfect combination of crispy edges, chewy centers, and melty chocolate that makes chocolate chip cookies the most beloved cookie in America.
I’d absolutely love to hear about your cookie baking adventures! Did you try any variations? How quickly did they disappear in your house? Did you discover any new favorite add-ins? Leave a comment below and share your experience! And if this recipe helped you create cookie magic, please pin it to Pinterest so other home bakers can discover the joy of perfect homemade chocolate chip cookies too. Your pins help support this blog and inspire me to keep creating recipes that bring sweetness to your life!
Now grab that mixing bowl, preheat that oven, and get ready to make the best chocolate chip cookies you’ve ever tasted. Your kitchen is about to smell amazing, and your taste buds are in for a treat. Happy baking! 🍪