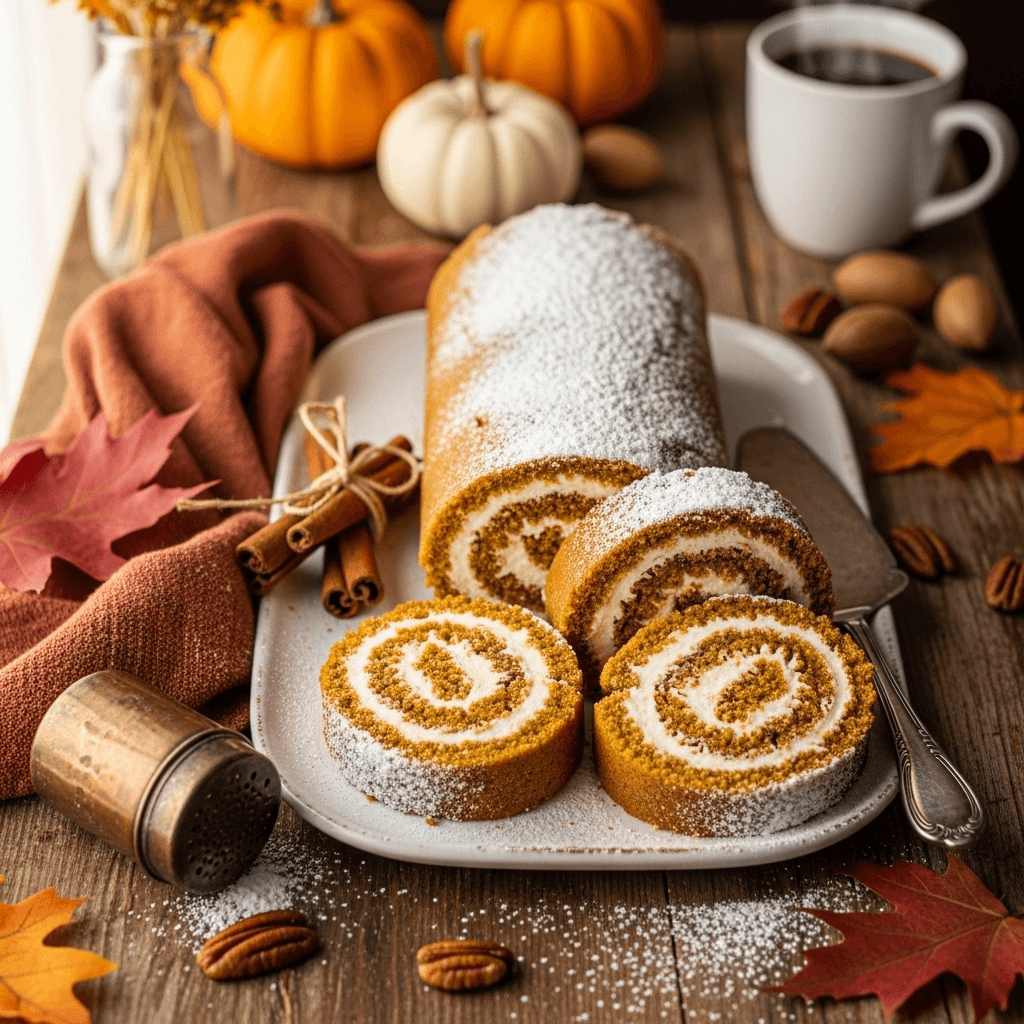

If you’re looking for a show-stopping fall dessert that tastes as incredible as it looks, this pumpkin roll recipe is exactly what you need. Imagine a moist, spiced pumpkin cake rolled around a luscious cream cheese filling, dusted with powdered sugar, and sliced to reveal those gorgeous swirls. It’s the dessert that makes everyone at your Thanksgiving table stop mid-conversation to ask for the recipe.
This pumpkin roll cake combines all the warm spices of fall – cinnamon, ginger, nutmeg, and cloves – in a tender, flexible cake that’s rolled while still warm around a sweet, tangy cream cheese frosting. The result is a dessert that’s lighter than traditional pumpkin pie but just as satisfying, with a beautiful presentation that makes it perfect for holiday gatherings, potlucks, or any time you want to impress your guests without spending hours in the kitchen.
What makes this easy pumpkin roll recipe so special is that it looks incredibly difficult but is actually quite manageable for home bakers. Yes, there’s a rolling technique involved, but I’ll walk you through every step with foolproof tips that guarantee success. Whether you’re serving it at Thanksgiving dinner, bringing it to a fall party, or making it for a cozy weekend dessert, this cream cheese pumpkin roll will become one of your most requested recipes. Let’s create some pumpkin magic together!
History / Background
The pumpkin roll has a fascinating place in American dessert history, though its exact origins are somewhat mysterious. While Swiss rolls and jelly rolls have been around since the 19th century in Europe, the pumpkin roll as we know it today is distinctly American, born from our love of pumpkin spice and the creativity of home bakers.
The rolled cake technique itself dates back centuries, but the pumpkin version really gained popularity in the United States during the 1970s and 1980s. Food companies began promoting pumpkin recipes heavily during this era, and the pumpkin roll emerged as a sophisticated alternative to traditional pumpkin pie. Libby’s, the famous canned pumpkin brand, is often credited with popularizing the modern pumpkin roll recipe through their promotional materials and recipe cards.
The dessert quickly became a Thanksgiving and holiday season staple, particularly in the Midwest and Northeast regions of the United States. Its appeal lies in its perfect balance of flavors and textures – the spiced cake provides warmth and moisture, while the cream cheese filling adds richness and tang that cuts through the sweetness.
What’s interesting about the pumpkin roll is how it represents American ingenuity in the kitchen. Home bakers took a classic European technique (the rolled sponge cake) and adapted it with ingredients that were abundant and beloved in America – pumpkin, cream cheese, and warm fall spices. The result is a dessert that feels both elegant and homey, fancy enough for special occasions but comforting enough for family gatherings.
Today, the pumpkin roll has achieved iconic status in American fall baking. It’s the dessert that signals the arrival of autumn just as surely as the first fallen leaves. Social media and Pinterest have only increased its popularity, with thousands of home bakers sharing their beautifully swirled creations every fall season.
Why You’ll Love This Recipe
This isn’t just another pumpkin dessert – this is THE pumpkin roll recipe that will make you look like a professional baker while being surprisingly straightforward to make. I’ve made this recipe countless times, tweaking and perfecting it until it’s absolutely foolproof, and I’m excited to share all my secrets with you.
Here’s why this recipe is absolutely irresistible:
- Easier than it looks – The rolling technique seems intimidating but is actually simple with the right method and timing
- Perfectly spiced – The ideal balance of cinnamon, ginger, nutmeg, and cloves creates authentic pumpkin spice flavor without overwhelming
- Moist and tender – This cake stays soft for days and never dries out thanks to the pumpkin and proper technique
- Cream cheese perfection – The filling is sweet, tangy, and incredibly creamy, complementing the spiced cake beautifully
- Make-ahead friendly – Can be made 2-3 days in advance, making holiday meal prep so much easier
- Freezer-friendly – Freezes beautifully for up to 3 months, perfect for planning ahead
- Impressive presentation – Those spiral swirls look bakery-professional and wow every single guest
- Lighter than pumpkin pie – Offers all the fall flavors without the heavy feeling of traditional pie
- Perfect portion control – Easy to slice into neat portions, and one roll serves 10-12 people
- Budget-friendly – Uses simple pantry ingredients and costs less than most store-bought fancy desserts
- Universally loved – Even people who claim they don’t like pumpkin go back for seconds of this cake
Ingredient Notes
Understanding your ingredients is crucial for pumpkin roll success. Here’s what you need and why each component matters:
Pumpkin Puree – Use 100% pure pumpkin puree (not pumpkin pie filling, which has added spices and sugar). Libby’s is my preferred brand because it has a consistent texture and moisture level. Make sure to use canned pumpkin, not fresh – the moisture content in fresh pumpkin varies too much and can make your cake soggy or too dry.
Eggs – You’ll need three large eggs at room temperature. They provide structure and help the cake rise while keeping it tender. Room temperature eggs incorporate better into the batter, creating a more uniform texture.
Granulated Sugar – Sweetens the cake and helps create a tender crumb. The sugar also contributes to the cake’s flexibility, which is essential for rolling without cracking.
All-Purpose Flour – Provides structure without making the cake tough. I recommend spooning and leveling your flour for the most accurate measurement. Cake flour can make the roll too delicate and prone to tearing.
Baking Powder & Baking Soda – The dynamic duo that makes your cake rise properly. Fresh leavening agents (less than 6 months old) are crucial for the right texture.
Spices (Cinnamon, Ginger, Nutmeg, Cloves) – These warm spices create that classic pumpkin spice flavor we all crave. Don’t skimp or substitute with generic pumpkin pie spice – the individual spices in proper proportions make all the difference.
Salt – Enhances all the other flavors and prevents the cake from tasting flat or one-dimensional.
Cream Cheese – The star of the filling! Use full-fat cream cheese (not low-fat or whipped), and make sure it’s softened to room temperature for smooth, lump-free filling. Philadelphia brand works wonderfully.
Butter – Adds richness to the filling and helps it spread smoothly. Unsalted butter at room temperature is essential.
Powdered Sugar – Sweetens the filling without the grittiness of granulated sugar, and also creates that beautiful dusting on the outside of the roll.
Vanilla Extract – Use pure vanilla extract in the filling for the best flavor. Imitation vanilla works in a pinch but lacks depth.
Equipment Needed
Having the right tools makes rolling a pumpkin roll so much easier. Here’s what you’ll need:
- 15×10-inch jelly roll pan (rimmed baking sheet) – This specific size is important for the right cake thickness
- Parchment paper – Essential for preventing sticking and helping with the rolling process
- Large mixing bowls (at least two)
- Electric mixer (hand or stand mixer) – Beating eggs properly is crucial
- Whisk for mixing dry ingredients
- Rubber spatula for folding and scraping
- Clean kitchen towel (not terry cloth – use a flour sack towel or smooth dish towel)
- Measuring cups and spoons – Accurate measurements are critical in baking
- Fine mesh sifter for dusting powdered sugar
- Offset spatula for spreading the filling
- Plastic wrap for wrapping the finished roll
- Sharp serrated knife for clean slicing

Pumpkin Roll Recipe
- Total Time: 2 hours 40 minutes (includes chilling)
- Yield: 10-12 slices 1x
- Diet: Vegetarian
Description
This easy pumpkin roll features a moist, spiced pumpkin cake rolled around a sweet cream cheese filling. It’s the perfect make-ahead fall dessert that looks impressive but is surprisingly simple to make. The tender cake stays soft for days, making it ideal for Thanksgiving or any autumn celebration.
Ingredients
For the Pumpkin Cake:
- ¾ cup all-purpose flour
- 1 teaspoon baking powder
- ½ teaspoon baking soda
- ½ teaspoon salt
- 1 teaspoon ground cinnamon
- 1 teaspoon ground ginger
- ½ teaspoon ground nutmeg
- ¼ teaspoon ground cloves
- 3 large eggs, room temperature
- 1 cup granulated sugar
- ⅔ cup pure pumpkin puree (not pumpkin pie filling)
- 1 teaspoon vanilla extract
- Powdered sugar for dusting
For the Cream Cheese Filling:
- 8 ounces (1 package) cream cheese, softened to room temperature
- 6 tablespoons unsalted butter, softened to room temperature
- 1 cup powdered sugar, sifted
- 1 teaspoon vanilla extract
- Pinch of salt
Instructions
- Prepare the pan: Preheat your oven to 350°F (175°C). Line a 15×10-inch jelly roll pan with parchment paper, letting it hang over the edges by about 1 inch on each side. Lightly spray the parchment with non-stick cooking spray. This double preparation ensures easy removal.
- Mix dry ingredients: In a medium bowl, whisk together the flour, baking powder, baking soda, salt, cinnamon, ginger, nutmeg, and cloves. Set aside. This distributes the spices evenly throughout your cake.
- Beat eggs and sugar: In a large bowl using an electric mixer, beat the eggs on high speed for about 3-4 minutes until they’re thick, pale yellow, and have increased in volume significantly. Gradually add the granulated sugar while continuing to beat. This step incorporates air that helps the cake rise and creates the right texture.
- Add pumpkin mixture: Beat in the pumpkin puree and vanilla extract on medium speed until fully combined and smooth. The mixture should be uniform in color with no streaks.
- Fold in dry ingredients: Using a rubber spatula, gently fold the flour mixture into the wet ingredients. Fold just until no streaks of flour remain – don’t overmix or your cake will be tough. The batter should be smooth and slightly thick.
- Bake: Pour the batter into your prepared pan and spread it evenly to all corners using an offset spatula. Make sure the thickness is uniform. Bake for 13-15 minutes, until the top springs back when lightly touched and a toothpick inserted in the center comes out clean. Don’t overbake or the cake will crack when rolled.
- Prepare the rolling towel: While the cake bakes, lay out a clean kitchen towel (not terry cloth) on your counter and generously dust it with powdered sugar. Use about ¼ cup of powdered sugar and spread it over an area slightly larger than your pan size.
- Roll the hot cake: The moment the cake comes out of the oven, run a knife around the edges to loosen it. Flip the hot cake onto the prepared towel and carefully peel off the parchment paper. Starting from the short end, roll the cake up with the towel inside (the towel will be rolled up inside the cake). This creates the “memory” that prevents cracking when you add the filling later.
- Cool completely: Place the rolled cake (still in the towel) on a wire rack seam-side down and let it cool completely to room temperature, about 1 hour. Don’t rush this step – trying to fill a warm cake will melt your filling.
- Make the filling: While the cake cools, beat the softened cream cheese and butter together with an electric mixer on medium-high speed for 2-3 minutes until light and fluffy. Add the powdered sugar, vanilla, and salt, then beat for another 2 minutes until smooth and creamy. If the filling seems too soft, refrigerate it for 15-20 minutes to firm up slightly.
- Unroll and fill: Once the cake is completely cool, carefully unroll it (it will want to stay in a curl shape – that’s perfect). Spread the cream cheese filling evenly over the entire surface of the cake, leaving about a ½-inch border around the edges. Use an offset spatula for the smoothest application.
- Re-roll: Starting from the same short end, gently roll the cake back up (this time without the towel). Roll slowly and evenly, using the edge of the filling as your guide. If a small crack appears, don’t panic – you’ll dust it with powdered sugar later and no one will notice.
- Chill: Wrap the pumpkin roll tightly in plastic wrap and refrigerate seam-side down for at least 1-2 hours before slicing. This firms up the filling and makes slicing much cleaner.
- Serve: Before serving, dust the entire roll generously with powdered sugar. Use a sharp serrated knife and clean it between each slice for the prettiest presentation. Slice into 10-12 pieces.
Notes
- Room temperature matters – Make sure your eggs, cream cheese, and butter are at room temperature for the best texture.
- Don’t overbake – An overbaked cake will crack when rolled. Check at 13 minutes.
- Roll while hot – This is crucial! The cake must be hot when you do the initial roll to set the shape.
- Smooth kitchen towel – Don’t use terry cloth or towels with texture, as they’ll leave imprints on your cake.
- Chilling is essential – The pumpkin roll must be chilled before slicing or it will be messy.
- Clean your knife – Wipe the knife clean between each slice for perfect swirls.
- Prep Time: 25 minutes
- Cook Time: 15 minutes
- Category: Dessert
- Method: Baking
- Cuisine: American
Nutrition
- Serving Size: 1 slice (1/10 of roll)
- Calories: 285
- Sugar: 28g
- Sodium: 245mg
- Fat: 13g
- Saturated Fat: 8g
- Unsaturated Fat: 4g
- Trans Fat: 0g
- Carbohydrates: 38g
- Fiber: 1g
- Protein: 4g
- Cholesterol: 85mg
Tips & Variations
This pumpkin roll recipe is wonderfully versatile and can be customized to suit different tastes and dietary needs:
Flavor Variations:
- Maple Pecan Pumpkin Roll: Add ½ teaspoon maple extract to the filling and sprinkle ½ cup finely chopped toasted pecans over the filling before rolling.
- Chocolate Chip Addition: Fold ½ cup mini chocolate chips into the cream cheese filling for a fun twist kids especially love.
- Spiced Rum Pumpkin Roll: Add 1-2 tablespoons of dark rum to the filling for an adults-only version with deeper flavor.
- Ginger Cream Cheese: Add ¼ cup finely chopped crystallized ginger to the filling for extra ginger punch.
Dietary Modifications:
- Gluten-Free: Replace the all-purpose flour with a 1:1 gluten-free baking blend. The texture will be slightly different but still delicious.
- Lower Sugar: You can reduce the sugar in the cake by up to ¼ cup, though it may affect the texture slightly. Don’t reduce the filling sugar or it will be too soft.
- Dairy-Free Filling: Use dairy-free cream cheese and vegan butter for the filling. Make sure they’re at room temperature for smooth blending.
Decoration Ideas:
- Drizzle with caramel sauce before serving for an elegant touch
- Sprinkle chopped candied pecans or walnuts on top
- Pipe rosettes of leftover cream cheese filling on top
- Add a small marzipan pumpkin decoration for each slice
- Create a “naked” look by leaving some areas without powdered sugar
Pro Chef Tips
After making dozens of pumpkin rolls, I’ve learned these professional techniques that make all the difference:
The Perfect Roll Temperature: Timing is everything with pumpkin rolls. The cake must be rolled while it’s still hot from the oven – this is when it’s most pliable. If you wait even 5 minutes, it will start to cool and set, making cracks more likely. Have your powdered sugar-dusted towel ready before the cake comes out of the oven.
Egg Beating is Critical: When you beat the eggs, you’re incorporating air that acts as the primary leavening agent in this cake. Beat them for the full 3-4 minutes until they’re thick and pale. If you lift the beaters, the eggs should fall in thick ribbons that sit on the surface for a moment before sinking back in. Under-beaten eggs result in a dense, heavy cake that will crack.
The Towel Roll Technique: When rolling the hot cake in the towel, start from a short end and roll firmly but gently. You want it snug enough to create a shape memory but not so tight that you compress the cake. Think “firm hug” not “death grip.” The cake will be very warm and flexible – trust the process!
Filling Consistency Matters: Your cream cheese filling should be spreadable but not runny. If it’s too soft (which can happen in warm kitchens), refrigerate it for 15-20 minutes before spreading. If it’s too cold and stiff, let it sit at room temperature for a few minutes. The perfect consistency is like thick frosting that spreads smoothly without tearing the cake.
The Unroll-and-Fill Moment: When you unroll the cooled cake to add filling, it will naturally want to curl back up – this is exactly what you want! This “memory” means it will roll back up beautifully around the filling. Don’t fight it or try to flatten it completely. Work relatively quickly once unrolled so the cake doesn’t have time to dry out.
Slicing Like a Pro: A sharp serrated knife is essential for clean slices. Warm the knife under hot water, dry it completely, then make one smooth cut. Clean the knife between every single slice, warming it again if needed. This prevents the filling from smearing and creates those gorgeous clean swirls. Cut with a gentle sawing motion rather than pressing down.
Powdered Sugar Dusting Hack: Use a fine mesh sieve to dust powdered sugar over the roll just before serving rather than hours ahead. This keeps the sugar looking fresh and white instead of absorbing moisture and becoming translucent. For extra elegance, create a stencil pattern with parchment paper.
Common Mistakes to Avoid
Even experienced bakers can run into issues with pumpkin rolls. Here’s how to avoid the most common pitfalls:
Cracking When Rolling – The #1 Problem: This happens for several reasons: overbaking the cake (check at 13 minutes), not rolling while still hot, using a cake that’s too thick or thin, or not creating the initial roll with the towel. The solution is timing and temperature. Your cake should still be steaming hot when you flip it onto the towel and roll it up. If you see small cracks, don’t panic – a generous dusting of powdered sugar covers minor imperfections beautifully.
Soggy or Sticky Cake: This usually happens when you use pumpkin pie filling instead of pure pumpkin puree (pie filling has added moisture), when you overmix the batter (which breaks down the structure), or when you don’t bake it long enough. Always use 100% pure pumpkin and mix just until the flour disappears. The cake should spring back when touched and pull slightly from the edges of the pan when done.
Filling Oozes Out the Sides: This means you either used too much filling, spread it too close to the edges, or the filling was too soft when you rolled the cake. Leave a good ½-inch border when spreading filling, and make sure your filling is the consistency of thick frosting. If it’s runny, refrigerate it briefly. You can also pipe a thicker line of filling down the center and less near the edges.
Cake Sticks to the Pan or Towel: Always line your pan with parchment paper AND spray it with cooking spray. For the towel, use enough powdered sugar – don’t be stingy! The powdered sugar creates a non-stick barrier. Also, make sure you’re using a smooth kitchen towel (flour sack towels work great), not a textured terry cloth towel which can stick and leave imprints.
Lumpy Cream Cheese Filling: This happens when your cream cheese or butter isn’t fully softened to room temperature. Cold dairy doesn’t blend smoothly and will create lumps that won’t beat out. Set these ingredients out at least 2 hours before making the filling. If you forgot and they’re still cold, don’t microwave them to soften (which creates uneven melting), instead cube them small and beat longer.
Storage & Meal Prep
Proper storage keeps your pumpkin roll fresh, moist, and delicious for days:
Refrigerator Storage: Wrap the pumpkin roll tightly in plastic wrap, making sure all exposed areas are covered to prevent drying out. Store in the refrigerator for up to 4 days. The filling contains cream cheese, so refrigeration is mandatory. Before serving, let it sit at room temperature for about 10-15 minutes to take the chill off, which allows the flavors to shine through better.
Keeping it Moist: The biggest enemy of leftover pumpkin roll is dry edges where it’s been sliced. Press a piece of plastic wrap directly against the cut end before wrapping the entire roll. This creates a moisture barrier and keeps the cake from drying out. Some people even brush the cut end with a tiny bit of simple syrup for extra insurance.
Individual Slice Storage: If you’ve already sliced the entire roll, wrap each slice individually in plastic wrap and store in an airtight container. This is perfect for grab-and-go desserts or lunch box treats. Individual slices keep well for 3-4 days in the refrigerator.
Signs of Freshness: Fresh pumpkin roll should feel soft and slightly springy when gently pressed. The cake should be moist but not soggy, and the filling should be creamy, not separated or weepy. If you notice any off odors or the cream cheese filling looks watery, it’s time to discard it.
Make-Ahead & Freezer Notes
Pumpkin roll is one of the best make-ahead desserts, perfect for stress-free holiday entertaining:
Make-Ahead for Parties: You can make the entire pumpkin roll 2-3 days before you need it. In fact, many bakers say it tastes even better after a day or two in the refrigerator because the flavors meld together beautifully. Just wrap it well and keep it chilled. Dust with fresh powdered sugar right before serving for the prettiest presentation.
Freezing Instructions: Pumpkin roll freezes exceptionally well! After rolling and chilling, wrap the roll tightly in plastic wrap (two layers for extra protection), then wrap again in aluminum foil or place in a freezer-safe zip-top bag. Label with the date. Freeze for up to 3 months for best quality, though it can last longer.
Thawing Method: Transfer the frozen pumpkin roll to the refrigerator and let it thaw slowly overnight, still wrapped. This gradual thaw prevents condensation from forming on the cake surface, which would make it soggy. Once thawed, unwrap, dust with fresh powdered sugar, and slice. Never thaw at room temperature or in the microwave.
Freezing Individual Slices: You can also slice the roll first, then wrap individual slices in plastic wrap and store them in a freezer container with parchment between layers. Individual slices thaw in about 30 minutes at room temperature, making them perfect for when you want just one serving.
Holiday Prep Timeline: For Thanksgiving or Christmas, bake the pumpkin roll up to 1 month ahead and freeze it. Thaw it in the refrigerator the night before your event, then dust with powdered sugar the day of serving. This frees up precious oven space and reduces holiday stress significantly.
Quality After Freezing: Properly frozen and thawed pumpkin roll tastes virtually identical to fresh. The cream cheese filling stays creamy, and the cake remains moist. I honestly can’t tell the difference, which is why I always make extra to freeze for impromptu gatherings or late-night dessert cravings.
Serving Suggestions
While pumpkin roll is absolutely delicious on its own, these accompaniments take it to the next level:
Classic Pairings:
- Hot coffee or espresso – The slight bitterness balances the sweet filling perfectly
- Spiced chai tea – The warming spices complement the pumpkin beautifully
- Hot apple cider – Creates a cozy fall flavor combination
- Vanilla ice cream – A small scoop alongside each slice adds creamy contrast
- Whipped cream – A dollop of freshly whipped cream (maybe with a touch of cinnamon) is simple elegance
Sauce Drizzles: Elevate your presentation with a simple sauce. Try warm caramel sauce drizzled over each slice, salted caramel for a sweet-salty combination, chocolate ganache for chocolate lovers, maple cream (maple syrup mixed with heavy cream), or butterscotch sauce for extra richness.
Holiday Dessert Spreads: Pumpkin roll looks stunning as part of a larger dessert table. Pair it with pecan pie for variety, apple crisp for a contrast in textures, mini pumpkin cheesecakes for committed pumpkin fans, chocolate truffles for chocolate lovers in the crowd, or a cheese board with fruit for guests who want something less sweet.
Coffee Bar Addition: Set up a fall coffee bar and serve sliced pumpkin roll alongside it. Include hot coffee, flavored syrups (vanilla, caramel, pumpkin), whipped cream, cinnamon sticks, and the pumpkin roll. Guests love this interactive dessert experience.
Individual Plating: For a restaurant-style presentation, place one slice on a white plate, drizzle with caramel, add a small quenelle of vanilla ice cream, garnish with a cinnamon stick, dust with extra powdered sugar, and add a small sprig of fresh mint for color.
FAQs Section
Can I use pumpkin pie filling instead of pumpkin puree?
No, you must use 100% pure pumpkin puree, not pumpkin pie filling. Pie filling contains added sugar, spices, and thickeners that will throw off the recipe’s balance and make your cake too wet. It won’t bake properly and the texture will be all wrong. Look for cans labeled “100% Pure Pumpkin” or “Pumpkin Puree” with pumpkin as the only ingredient.
Why did my pumpkin roll crack when I rolled it?
Cracking usually happens because: the cake was overbaked (bake only 13-15 minutes), you didn’t roll it while it was still hot, you rolled it too tightly, or the eggs weren’t beaten enough. The most common culprit is overbaking. Your cake should feel soft and springy, not dry or firm. The second most common issue is letting the cake cool too much before the initial roll – it must be steaming hot from the oven.
Can I make mini pumpkin rolls?
Absolutely! Spread the same batter on a half-sheet pan (18×13 inches) for a thinner cake, bake for only 8-10 minutes, then cut into smaller rectangles once baked. Roll each section separately for individual mini rolls. These are adorable for parties and make portion control easier. You can also make this recipe in two 9×13-inch pans for slightly smaller rolls.
Do I have to use a specific type of kitchen towel?
You need a smooth, lint-free kitchen towel. Flour sack towels work perfectly, as do smooth dish towels. Avoid terry cloth towels or anything with a textured or looped surface, as these will stick to your cake and leave imprints. Some bakers even use a smooth, thin cotton pillowcase if they don’t have the right towel. Make sure whatever you use is clean and odor-free.
How do I know when the cake is done baking?
Look for these signs: the top should spring back when lightly touched with your finger, the cake should be pulling away slightly from the edges of the pan, and a toothpick inserted in the center should come out clean or with just a crumb or two. The cake should look set and dry on top but not deeply browned. Start checking at 13 minutes to avoid overbaking.
Can I make the filling with Cool Whip instead of cream cheese?
While some recipes use whipped topping, I don’t recommend it for this recipe. Cool Whip creates a lighter, fluffier filling that doesn’t have the structure or tang of cream cheese. The cream cheese filling is crucial for the authentic pumpkin roll taste and texture. If you need a stabilized whipped cream filling, that’s a different recipe entirely.
The powdered sugar on my towel is making the outside sticky – is this normal?
The powdered sugar will absorb some moisture from the cake and create a slightly sticky surface initially. This is completely normal and actually helps the final dusting of powdered sugar stick beautifully. Once the roll is fully chilled and you dust it again before serving, you’ll have a perfect, non-sticky coating. Just make sure you’re using enough powdered sugar on the towel (about ¼ cup generously spread).
Conclusion
Congratulations! You now have all the knowledge and tips you need to create a show-stopping pumpkin roll that will have everyone asking for your secret. This recipe has been my go-to fall dessert for years, and I’m so excited for you to experience the joy of slicing into that beautiful swirl and seeing everyone’s faces light up.
The beauty of this pumpkin roll recipe is that while it looks incredibly impressive and difficult, it’s actually quite manageable once you understand the techniques. Yes, there’s a learning curve with the rolling, but even if your first attempt isn’t picture-perfect, it will still taste absolutely incredible. And with each pumpkin roll you make, you’ll get more confident and your technique will improve.
Remember, the keys to success are: don’t overbake the cake, roll it while it’s hot, let it cool completely before filling, and chill it thoroughly before slicing. Follow those golden rules, and you’ll have a pumpkin roll that rivals any bakery.
This dessert is perfect for Thanksgiving, but don’t wait for the holidays to make it. It’s wonderful for fall birthday parties, weekend baking projects, or anytime you want to treat yourself and your loved ones to something special. The make-ahead and freezer-friendly nature means you can always have one on hand for unexpected guests or dessert emergencies.
I’d love to see your beautiful pumpkin roll creations! After you make this recipe, please share your photos on Pinterest and tag me so I can celebrate your baking success with you. Did you try any of the variations? What did you serve it with? Leave a comment below sharing your experience – I read every single one and love hearing from fellow bakers.
Don’t forget to pin this pumpkin roll recipe to your fall baking board so you can find it easily when the craving strikes. And please share it with friends and family who love autumn desserts – they’ll thank you when they taste this incredible cake!
Happy baking, and may your pumpkin rolls be perfectly swirled and utterly delicious!