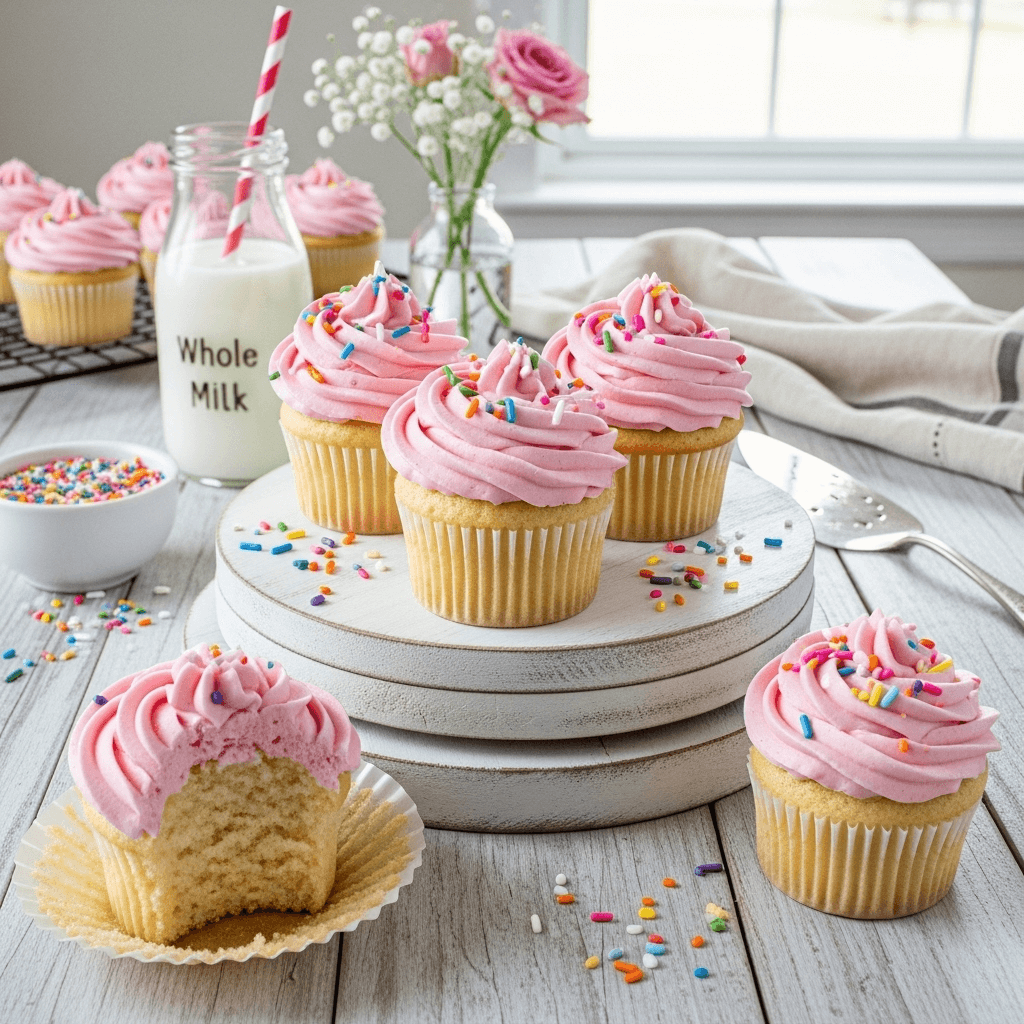

There’s something undeniably joyful about perfect homemade cupcakes—those tender, fluffy little cakes with their signature domed tops, just waiting to be crowned with swirls of frosting. This easy cupcake recipe creates bakery-quality results with simple pantry ingredients and straightforward techniques that even beginner bakers can master. No fancy equipment, no complicated steps, just perfectly moist, delicious cupcakes every single time.
What makes these vanilla cupcakes so special is their incredibly tender crumb and delicate, buttery flavor that serves as the perfect canvas for any frosting or decoration you can imagine. They’re sturdy enough to hold up to generous frosting yet so soft they practically melt in your mouth. Unlike store-bought cupcakes that can taste artificial or dry out quickly, these homemade cupcakes stay moist for days and taste like pure comfort.
Perfect for birthday parties, school celebrations, baby showers, office treats, bake sales, holiday gatherings, or simply because it’s Tuesday and you deserve something sweet, these simple cupcakes are always a hit. Kids love decorating them, adults appreciate the nostalgic flavor, and everyone asks for seconds. Whether you’re baking for a crowd or just treating your family, this foolproof vanilla cupcake recipe delivers bakery-worthy results without the bakery price tag or stress.
History / Background
Cupcakes have a fascinating history that reflects changing American baking culture and domestic life. The first known reference to “cup cake” appeared in Amelia Simmons’ 1796 cookbook “American Cookery,” making it one of America’s earliest original recipes. However, these early “cup cakes” weren’t the individual cakes we know today—the name referred to cakes whose ingredients were measured by the cup rather than weighed, a revolutionary simplification of baking at the time when scales weren’t common in households.
The cupcake as we recognize it—individual-sized cakes baked in cups or molds—gained popularity in the early 19th century. The term evolved to describe both the measurement method and the baking vessel. Early recipes appeared in cookbooks throughout the 1800s, sometimes called “Number Cakes” (referring to the simple ratio: 1 cup butter, 2 cups sugar, 3 cups flour, 4 eggs, 1 cup milk, 1 spoon soda) or “1234 cakes.”
The invention of the muffin tin in the mid-1800s revolutionized cupcake baking, making it easier to create uniform, individual portions. Before this innovation, bakers used individual pottery cups, ramekins, or even hollowed-out citrus rinds as molds. The standardization of baking tools and the publication of precise recipes made cupcakes increasingly accessible to home bakers.
Cupcakes experienced several waves of popularity throughout the 20th century. During World War I and II, their individual portion sizes appealed to rationing sensibilities—less waste, easier to share, and perfect for packing in soldiers’ care packages. The post-war era saw the rise of convenience baking with boxed cake mixes, making cupcakes even easier to prepare.
The modern cupcake renaissance began in the early 2000s, when cupcakes transformed from children’s party fare into trendy, artisanal desserts. Specialty cupcake bakeries opened in major cities, food blogs showcased elaborate decorating techniques, and cupcakes became the dessert of choice for weddings and upscale events. Shows like “Cupcake Wars” further cemented their cultural status.
Today’s easy cupcake recipe represents the perfect marriage of tradition and modern convenience—honoring those original simple American recipes while incorporating generations of baking knowledge to create the most reliable, delicious results possible. They’re a testament to how some recipes truly stand the test of time.
Why You’ll Love This Recipe
This isn’t just another cupcake recipe—this is the one you’ll make again and again because it works perfectly every single time. The cupcakes are incredibly moist with a fine, tender crumb that melts on your tongue, and the flavor is pure, classic vanilla that everyone loves.
Here’s why these homemade cupcakes will become your go-to recipe:
- Foolproof & Beginner-Friendly – Clear instructions and simple techniques guarantee success, even if you’ve never baked before
- Perfectly Moist – Special technique creates cupcakes that stay soft and tender for days, never dry or crumbly
- Light & Fluffy Texture – Proper mixing method produces that coveted bakery-style light, airy crumb
- One-Bowl Method – Minimal dishes and straightforward mixing mean less cleanup and stress
- Budget-Friendly – Uses affordable pantry staples you probably already have on hand
- Ready in 30 Minutes – From mixing bowl to cooling rack, these come together quickly for last-minute occasions
- Customizable – Easily adapted to any flavor, filling, or frosting combination you can imagine
- Makes Perfect Portion Sizes – Individual servings mean no cutting, serving, or mess
- Freezer-Friendly – Make ahead and freeze for emergency desserts or future parties
- Kid-Approved – The mild vanilla flavor appeals even to picky eaters, making them perfect for children’s events
Ingredient Notes
Understanding your ingredients is the foundation of successful baking. Let’s break down each component and why it matters for perfect cupcakes.
All-Purpose Flour – The structure-builder of your cupcakes. All-purpose flour has the right protein content (10-12%) to create tender yet stable cupcakes. Measure correctly by spooning flour into measuring cups and leveling off—scooping directly from the bag packs too much flour, creating dense, dry cupcakes. For gluten-free, use a 1:1 gluten-free baking flour blend designed for cakes.
Granulated Sugar – Sweetens and tenderizes while helping create that golden-brown exterior. Sugar also retains moisture, keeping cupcakes soft for days. Don’t reduce the sugar significantly or your cupcakes will be dense and dry—sugar plays structural roles beyond just sweetness.
Butter – Use unsalted butter so you can control salt levels. Butter should be softened to room temperature (about 65-68°F)—it should yield to gentle pressure but not be greasy or melted. Proper butter temperature is crucial for incorporating air during creaming, which creates light, fluffy texture. In a pinch, vegetable oil can substitute (use ¾ the amount), but you’ll lose some flavor.
Eggs – Provide structure, moisture, and richness. Use large eggs at room temperature—cold eggs don’t incorporate as smoothly and can cause butter to seize. Room temperature eggs blend seamlessly into batter, creating better emulsion and texture. To quickly warm eggs, place them (in shells) in warm water for 5 minutes.
Milk – Adds moisture and tenderness. Whole milk provides the best flavor and texture, but 2% works well too. Buttermilk can substitute for tangier, more tender cupcakes (add ¼ teaspoon baking soda if using buttermilk). Dairy-free milks like almond or oat milk work fine—choose unsweetened varieties.
Vanilla Extract – Pure vanilla extract is worth the investment for best flavor. Imitation vanilla tastes artificial and harsh in delicate cakes. Use a full tablespoon for noticeable vanilla flavor that enhances rather than competes with other ingredients.
Baking Powder – The leavening agent that makes cupcakes rise and creates that light, fluffy texture. Make sure yours is fresh (check expiration date)—old baking powder won’t provide proper lift. Baking powder loses potency over time, especially if exposed to moisture.
Salt – Essential for balancing sweetness and enhancing all other flavors. Don’t skip it! Even sweet baked goods need salt to taste their best.
Optional Add-Ins – Sour cream or Greek yogurt (2-3 tablespoons) creates extra-moist cupcakes. A tablespoon of vegetable oil in addition to butter adds moisture. Almond extract (½ teaspoon) complements vanilla beautifully.
Equipment Needed
Having the right tools makes baking these easy cupcakes straightforward and stress-free:
- 12-Cup Muffin/Cupcake Pan – Standard size (not mini or jumbo). Metal pans conduct heat better than silicone for even baking and proper browning.
- Paper Cupcake Liners – Standard size to fit your pan. Choose regular foil-lined liners for best presentation, or fun patterned paper liners for parties.
- Mixing Bowls – At least two medium bowls (one for dry ingredients, one for wet). Glass or metal work equally well.
- Electric Mixer – Stand mixer or hand mixer makes creaming butter and sugar much easier. You can mix by hand with a wooden spoon, but it requires significant effort.
- Measuring Cups and Spoons – Dry measuring cups for flour and sugar, liquid measuring cup for milk. Accuracy matters in baking!
- Rubber Spatula – For scraping bowl sides and folding ingredients gently.
- Whisk – For combining dry ingredients and ensuring even distribution of leavening agents.
- Ice Cream Scoop or ¼ Cup Measure – For portioning batter evenly into cupcake liners.
- Cooling Rack – Allows air circulation under cupcakes for even cooling and prevents soggy bottoms.
- Toothpick or Cake Tester – For testing doneness without relying solely on visual cues.
Best Easy Cupcake Recipe
- Total Time: 28 minutes
- Yield: 12 cupcakes 1x
- Diet: Vegetarian
Description
Perfect, fluffy vanilla cupcakes with a tender crumb and delicious buttery flavor. This easy recipe uses simple ingredients and foolproof techniques to create bakery-quality cupcakes that stay moist for days. The ideal base for any frosting or decoration.
Ingredients
For the Cupcakes:
- 1½ cups all-purpose flour
- 1¼ teaspoons baking powder
- ½ teaspoon salt
- ½ cup unsalted butter, softened to room temperature
- 1 cup granulated sugar
- 2 large eggs, room temperature
- 2 teaspoons vanilla extract
- ½ cup whole milk, room temperature
For the Frosting (Optional):
- 1 cup unsalted butter, softened
- 3–4 cups powdered sugar
- 2–3 tablespoons heavy cream or milk
- 1 teaspoon vanilla extract
- Pinch of salt
- Food coloring (optional)
- Sprinkles for decoration (optional)
Instructions
- Preheat and Prepare: Preheat your oven to 350°F (175°C). Line a 12-cup muffin pan with paper cupcake liners. This prevents sticking and makes for easy cleanup and prettier presentation.
- Mix Dry Ingredients: In a medium bowl, whisk together the flour, baking powder, and salt until well combined. Whisking aerates the flour and ensures the leavening agent is evenly distributed throughout. Set this bowl aside—you’ll add it to the wet ingredients later.
- Cream Butter and Sugar: In a large mixing bowl, using an electric mixer on medium-high speed, beat the softened butter for about 1 minute until smooth and creamy. Add the sugar and continue beating for 3-4 minutes until the mixture is light, fluffy, and pale in color. This creaming process incorporates air, which creates lighter cupcakes. Stop occasionally to scrape down the bowl sides with a rubber spatula.
- Add Eggs and Vanilla: Reduce mixer speed to medium. Add eggs one at a time, beating well after each addition (about 30 seconds per egg). The mixture may look slightly curdled after the first egg—this is normal and will smooth out. Add the vanilla extract and beat until just combined. Scrape down the bowl sides to ensure everything is incorporated evenly.
- Alternate Dry and Wet Ingredients: With the mixer on low speed, add the flour mixture in three additions, alternating with the milk in two additions. Begin and end with flour: Add ⅓ of flour, mix just until incorporated, add ½ of milk, mix briefly, add another ⅓ of flour, remaining milk, and finally the last ⅓ of flour. Mix each addition only until you can’t see streaks of flour or milk—overmixing develops gluten and creates tough, dense cupcakes. The batter should be smooth and thick but pourable.
- Fill Cupcake Liners: Using an ice cream scoop or ¼ cup measure, divide batter evenly among the 12 cupcake liners. Each should be about ⅔ full—this allows room for rising without overflowing. Filling evenly ensures all cupcakes bake and brown at the same rate. Tap the pan gently on the counter once or twice to release any large air bubbles.
- Bake: Place the pan on the center rack of your preheated oven. Bake for 18-20 minutes, or until a toothpick inserted into the center of a cupcake comes out clean or with just a few moist crumbs (not wet batter). The tops should be golden and spring back lightly when touched. Don’t open the oven door for the first 15 minutes or cupcakes may sink. Oven temperatures vary, so start checking at 18 minutes.
- Cool: Remove the pan from the oven and let cupcakes cool in the pan for 5 minutes. This resting period allows them to set and makes them easier to remove without breaking. After 5 minutes, carefully transfer cupcakes to a wire cooling rack. Let them cool completely before frosting—frosting warm cupcakes causes melting and sliding.
- Frost and Decorate (Optional): Once completely cool, frost with your favorite buttercream, cream cheese frosting, or chocolate ganache. Pipe with a pastry bag fitted with decorative tips for professional results, or simply spread with an offset spatula. Add sprinkles, edible pearls, or other decorations immediately after frosting while it’s still soft.
Notes
- Room Temperature Ingredients: This is crucial! Cold ingredients don’t mix smoothly and can cause lumpy batter or dense texture.
- Don’t Overmix: Mix only until ingredients are just combined. Overmixing develops gluten, creating tough, dense cupcakes with tunnels.
- Even Filling: Use a cookie scoop or measuring cup to ensure all cupcakes are the same size for even baking.
- Oven Variations: Ovens vary significantly. Start checking at 18 minutes and bake just until done—overbaking creates dry cupcakes.
- Storage: Store unfrosted cupcakes in an airtight container at room temperature for 3 days or refrigerate frosted cupcakes for up to 5 days.
- Prep Time: 10 minutes
- Cook Time: 18 minutes
- Category: Dessert
- Method: Baking
- Cuisine: American
Nutrition
- Serving Size: 1 cupcake (without frosting)
- Calories: 195
- Sugar: 17g
- Sodium: 140mg
- Fat: 9g
- Saturated Fat: 5g
- Unsaturated Fat: 3g
- Trans Fat: 0g
- Carbohydrates: 27g
- Fiber: 0g
- Protein: 3g
- Cholesterol: 55mg
Tips & Variations
The beauty of this simple cupcake recipe is its versatility. Here are delicious ways to customize it:
Chocolate Cupcakes – Replace ½ cup flour with ½ cup unsweetened cocoa powder for rich chocolate cupcakes. Increase sugar by 2 tablespoons and add ½ teaspoon instant espresso powder to enhance chocolate flavor.
Funfetti Cupcakes – Gently fold ½ cup rainbow sprinkles into the finished batter just before filling liners. Use gel food coloring in batter for pastel colors if desired. Kids absolutely love these!
Lemon Cupcakes – Replace vanilla with 1 tablespoon lemon zest and 1 teaspoon lemon extract. Add 2 tablespoons fresh lemon juice (reduce milk by 2 tablespoons to compensate). Top with lemon buttercream for pure citrus bliss.
Almond Cupcakes – Replace 1 teaspoon vanilla extract with 1 teaspoon almond extract for delicate, bakery-style almond flavor. Be careful not to use more—almond extract is potent.
Filled Cupcakes – After cupcakes cool, use a cupcake corer or paring knife to cut out the center. Fill with jam, lemon curd, chocolate ganache, or pastry cream, then frost normally. The surprise center delights everyone!
Extra Moist Cupcakes – Add 2-3 tablespoons sour cream or Greek yogurt to the batter for incredibly tender, moist cupcakes that stay fresh even longer.
Mini Cupcakes – Use mini cupcake pans and bake for only 10-12 minutes. This recipe makes about 36 mini cupcakes—perfect for parties.
Vegan Cupcakes – Replace butter with vegan butter, use non-dairy milk, and substitute eggs with flax eggs (2 tablespoons ground flaxseed mixed with 6 tablespoons water, let sit 5 minutes). Results are surprisingly good!
Pro Chef Tips
Want to take your homemade cupcakes from good to absolutely bakery-perfect? These professional techniques make all the difference:
Room Temperature is Non-Negotiable – All dairy and eggs must be at room temperature (65-72°F). Cold ingredients don’t emulsify properly, creating dense, uneven texture. Plan ahead and remove from refrigerator 30-60 minutes before baking. Quick fix: place eggs in warm water for 5 minutes, microwave milk for 15-20 seconds.
Cream Butter and Sugar Properly – Don’t rush this step! Beat for a full 3-4 minutes until the mixture is light, fluffy, and pale yellow. This incorporates air that expands during baking, creating lighter cupcakes. Under-creaming produces dense, heavy results.
Measure Flour Correctly – The number one cause of dry cupcakes is too much flour. Never scoop directly from the bag! Spoon flour into measuring cups and level with a knife. Even better, weigh flour (1½ cups = 180 grams) for perfect accuracy every time.
Don’t Overmix After Adding Flour – Gluten development is the enemy of tender cupcakes. Mix only until you can’t see dry flour streaks. Some small lumps are fine—they’ll disappear during baking. Overmixing creates tough, dense, chewy cupcakes with tunnels.
Fill Liners Consistently – Use a cookie scoop or measuring cup (¼ cup per cupcake) to ensure all cupcakes are identical. Even filling means even baking, even browning, and uniform appearance. It also ensures you have exactly 12 cupcakes, not 11 large ones and 1 tiny one.
Don’t Overbake – Cupcakes continue cooking from residual heat after removing from oven. Bake just until a toothpick comes out with a few moist crumbs. Completely clean toothpick means overbaked, dry cupcakes. Better to slightly underbake than overbake.
Cool Completely Before Frosting – This seems obvious but bears repeating. Even slightly warm cupcakes will melt frosting, causing it to slide off or become soupy. Wait at least 45-60 minutes for complete cooling.
Invest in Quality Vanilla – Since vanilla is a primary flavor, using real vanilla extract versus imitation makes a noticeable difference. If possible, use Madagascar Bourbon vanilla for rich, classic flavor.
Rotate Your Pan – If your oven has hot spots, rotate the pan 180 degrees halfway through baking for more even results. Only do this after the first 12 minutes once cupcakes have set—opening too early can cause sinking.
Common Mistakes to Avoid
Even experienced bakers make mistakes with cupcakes. Here are the most common pitfalls and how to avoid them:
Using Cold Ingredients – This is the number one mistake! Cold butter won’t cream properly with sugar, cold eggs can cause butter to seize and curdle the batter, and cold milk doesn’t incorporate smoothly. Always bring ingredients to room temperature before starting. This single change dramatically improves texture.
Overmixing the Batter – Once flour is added, every stroke develops gluten. Overmixed batter creates dense, tough, chewy cupcakes with long tunnels through the center. Mix gently on low speed and stop as soon as flour is incorporated. A few small lumps are perfectly fine and will bake out.
Incorrect Oven Temperature – Baking at too high a temperature causes cupcakes to dome excessively, crack, or brown too quickly while staying raw inside. Too low and they won’t rise properly or develop that golden top. Always preheat fully and use an oven thermometer to verify accuracy—most ovens run 25°F off.
Overbaking – Dry cupcakes are almost always the result of overbaking. Start checking at the minimum time. Cupcakes are done when a toothpick comes out with moist crumbs, not completely clean. Remember they continue cooking in the pan after removal from oven.
Opening the Oven Door Too Early – Cupcakes need steady heat to rise properly. Opening the door in the first 15 minutes releases heat and can cause them to sink in the center. If you must check, do it quickly after the 15-minute mark.
Uneven Batter Distribution – Some cupcakes turn out huge while others are tiny because batter wasn’t divided evenly. Use a cookie scoop or ¼ cup measure to ensure uniformity. This also ensures even baking time.
Storage & Meal Prep
Cupcakes are one of the best make-ahead desserts because they store beautifully and maintain freshness for days.
Room Temperature Storage (Unfrosted) – Store completely cooled, unfrosted cupcakes in an airtight container at room temperature for up to 3 days. They’ll stay moist and fresh. Place paper towels in the bottom of the container to absorb any excess moisture.
Refrigerator Storage (Frosted) – Cupcakes with buttercream frosting can sit at room temperature for 1-2 days. For longer storage or if using cream cheese frosting or fresh fruit, refrigerate in an airtight container for up to 5 days. Bring to room temperature 30 minutes before serving for best texture and flavor.
Preventing Frosting Damage – To store frosted cupcakes without smudging decorations, insert toothpicks around the top of each cupcake to create “tent poles,” then cover container. The toothpicks hold the lid up, protecting your beautiful swirls.
Reviving Stale Cupcakes – If cupcakes dry out slightly, brush tops lightly with simple syrup (equal parts sugar and water, heated until dissolved) before frosting. This adds moisture back and refreshes them beautifully.
Batch Baking – This recipe easily doubles for larger batches. Bake in shifts if you don’t have multiple pans, keeping remaining batter at room temperature, covered, for up to 30 minutes while the first batch bakes.
Make-Ahead & Freezer Notes
Cupcakes are incredibly freezer-friendly, making them perfect for advance preparation and emergency desserts.
Freezing Unfrosted Cupcakes (Best Method) – Let cupcakes cool completely. Wrap each individually in plastic wrap, then place in a freezer-safe bag or container. Freeze for up to 3 months. This is the preferred method because unfrosted cupcakes freeze and thaw perfectly with no texture changes. Thaw at room temperature for 1-2 hours, then frost as desired.
Freezing Frosted Cupcakes – Freeze frosted cupcakes uncovered on a baking sheet until frosting is solid (1-2 hours), then wrap individually and store in containers. Freeze for up to 2 months. Buttercream freezes well; avoid freezing whipped cream or cream cheese frostings. Thaw in the refrigerator overnight or at room temperature for 2-3 hours.
Freezing Batter – Cupcake batter doesn’t freeze well. The leavening agents lose effectiveness, resulting in dense cupcakes that don’t rise properly. Always bake fresh or freeze baked cupcakes.
Make-Ahead Strategy – For parties, bake cupcakes 1-2 days ahead, store airtight at room temperature, and frost the day of the event. For ultimate freshness, bake and freeze up to a month ahead, thaw the night before, and frost morning of your event.
Thawing Best Practices – Always thaw cupcakes at room temperature, never in the microwave which creates tough, rubbery texture. Keep wrapped during thawing to prevent condensation from making tops soggy.
Serving Suggestions
While cupcakes are delicious on their own, the right presentation and pairings elevate them to special occasion status:
Frosting Options:
- Classic Vanilla Buttercream – Creamy, sweet, and traditional
- Chocolate Buttercream – Rich and indulgent for chocolate lovers
- Cream Cheese Frosting – Tangy and perfect for red velvet or carrot cake variations
- Swiss Meringue Buttercream – Silky, less sweet, sophisticated
- Whipped Cream – Light and airy for summer parties
- Chocolate Ganache – Decadent and glossy
Decoration Ideas:
- Rainbow sprinkles for birthdays
- Edible flowers for elegant garden parties
- Fresh berries for summer celebrations
- Crushed cookies or candy for themed parties
- Gold leaf or luster dust for weddings
- Fondant shapes for custom designs
Beverage Pairings:
- Cold milk (classic and perfect!)
- Hot coffee or latte for adult parties
- Champagne or prosecco for celebrations
- Hot chocolate for cozy winter gatherings
- Iced tea for summer events
- Fruit punch for children’s parties
Occasion Ideas:
- Birthday Parties – Use colorful frosting and birthday-themed decorations
- Baby Showers – Pastel frosting with delicate pearl decorations
- Weddings – Elegant white frosting with fresh flowers or gold accents
- Holidays – Theme decorations for Halloween, Christmas, Easter, Valentine’s Day
- Bake Sales – Simple frosting in various colors attracts buyers
- Thank You Gifts – Package in pretty boxes with ribbons
Presentation Tips:
- Arrange on a tiered cupcake stand for elegant display
- Use decorative paper liners that match your party theme
- Pipe frosting with a large star tip for professional appearance
- Create a cupcake bar where guests customize their own with various toppings
FAQs Section
Q: Why did my cupcakes sink in the middle?
A: Sunken centers typically result from one of three issues: opening the oven door too early in baking (before they set), using too much leavening agent, or underbaking. The structure needs time to set before the oven door opens. Also ensure your baking powder is fresh—old leavening creates instability. Bake until a toothpick comes out clean and tops spring back when touched.
Q: Can I make cupcakes without an electric mixer?
A: Yes, though it requires more effort! Cream butter and sugar vigorously with a wooden spoon for 5-7 minutes until light and fluffy. Add eggs one at a time, beating well. Alternate dry and wet ingredients as directed, mixing gently. The texture won’t be quite as light as mixer-made cupcakes, but they’ll still be delicious.
Q: How do I get flat cupcake tops instead of domed ones?
A: Some doming is normal and actually desirable, but excessive doming results from too much leavening or oven temperature that’s too high. Reduce oven temperature by 25°F and bake slightly longer. Fill liners only ⅔ full, not more. Some bakers use “bake even strips” around pans to promote flat tops, but slight doming is traditional for cupcakes.
Q: Can I make these cupcakes in advance?
A: Absolutely! Unfrosted cupcakes stay fresh at room temperature for 3 days or freeze beautifully for up to 3 months. For parties, I recommend baking 1-2 days ahead, storing airtight at room temperature, and frosting the day of the event. This gives you stress-free prep with maximum freshness.
Q: Why are my cupcakes dry?
A: Dry cupcakes usually result from too much flour (measure correctly by spooning and leveling), overbaking (remove when a toothpick has moist crumbs, not completely clean), or overmixing the batter after adding flour. Also ensure all ingredients are at room temperature for proper emulsification. Using enough sugar and not reducing it helps retain moisture.
Q: Can I use oil instead of butter?
A: Yes, though results will be different. Use ¾ cup vegetable or canola oil in place of the butter (skip the creaming step). Oil creates very moist cupcakes but sacrifices some flavor—butter provides superior taste. Oil-based cupcakes also have a slightly different, more uniform texture.
Q: How do I prevent cupcake liners from peeling away?
A: This frustrating issue usually stems from underbaking (cupcakes haven’t set properly) or storing in the refrigerator (moisture condenses between cake and liner). Bake fully and store at room temperature when possible. Bringing refrigerated cupcakes to room temperature before serving helps too. Higher quality, foil-lined liners also adhere better than cheap paper ones.
Conclusion
There you have it—everything you need to make the most perfect, fluffy, bakery-quality cupcakes right in your own kitchen! This easy cupcake recipe proves that homemade really does taste better, and with simple ingredients and straightforward techniques, anyone can create these delicious little treats. The tender, moist crumb and classic vanilla flavor provide the perfect canvas for any frosting, decoration, or occasion you can imagine.
Whether you’re baking for a birthday party, special celebration, bake sale, or simply because you deserve something sweet, these simple cupcakes deliver every single time. They’re the kind of recipe that becomes a family favorite, requested again and again, and eventually passed down to the next generation of bakers.
I’d absolutely love to hear how your cupcakes turned out! What frosting did you choose? How did you decorate them? Drop a comment below sharing your experience, photos, and any creative variations you tried. Don’t forget to rate the recipe if these cupcakes brought joy to your kitchen! If you found this recipe helpful, please share it on Pinterest so other home bakers can discover the secret to perfect homemade cupcakes too.
Here’s to sweet moments, beautiful celebrations, and the simple pleasure of homemade treats that bring smiles to everyone who tastes them!