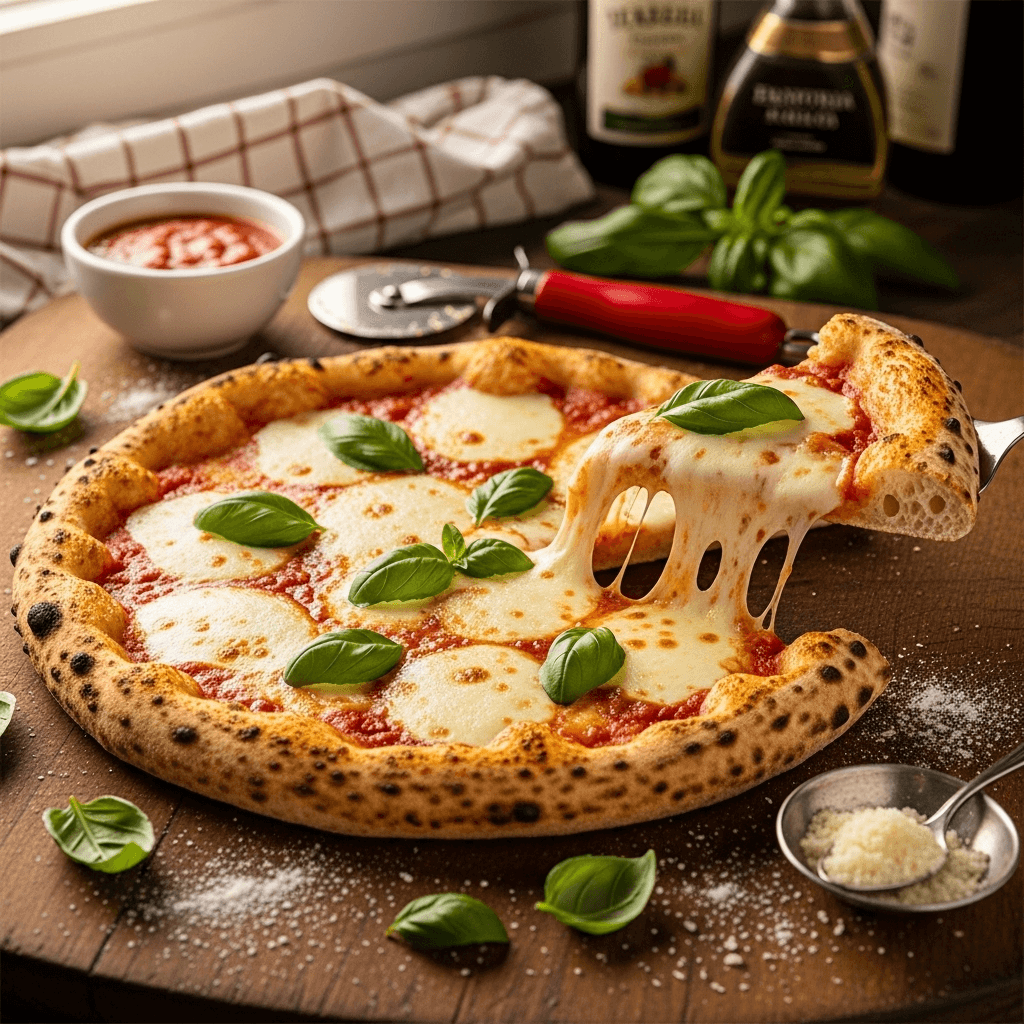

There’s something absolutely magical about pulling a perfectly golden, bubbling homemade pizza out of your own oven. This easy homemade pizza recipe delivers authentic pizzeria-quality results right in your home kitchen – we’re talking crispy-on-the-outside, chewy-on-the-inside crust, perfectly melted cheese, and that irresistible aroma that fills your entire house. Whether you’re planning a fun Friday night pizza party, looking for a budget-friendly family dinner, or wanting to impress guests with your culinary skills, this recipe is your ticket to pizza perfection.
This homemade pizza dough recipe is incredibly versatile and surprisingly simple to master. You can customize it with your favorite toppings – from classic margherita to loaded pepperoni, veggie supreme, or even creative combinations like BBQ chicken. It’s perfect for casual weeknight dinners, weekend gatherings, game day celebrations, or whenever that pizza craving hits. Best of all, making pizza from scratch costs a fraction of delivery prices and tastes infinitely better than anything that comes in a cardboard box.
History / Background
Pizza has an incredibly rich and fascinating history that spans centuries and continents. While flatbreads with toppings have existed in various cultures for thousands of years, the pizza we know and love today originated in Naples, Italy, in the late 18th and early 19th centuries.
In ancient times, Greeks, Egyptians, and Romans all enjoyed flatbreads topped with oils and herbs. However, the modern pizza story truly begins in Naples, where it started as food for the working poor. Street vendors would sell flatbreads topped with simple, inexpensive ingredients like tomatoes, cheese, oil, garlic, and anchovies. These early pizzas were sold by street vendors and eaten for breakfast, lunch, and dinner by Naples’ poorest residents.
The iconic Margherita pizza has its own legendary origin story. In 1889, King Umberto I and Queen Margherita visited Naples. The story goes that the queen, tired of fancy French cuisine, asked to try the local peasant food. Pizza maker Raffaele Esposito created a special pizza featuring the colors of the Italian flag: red tomatoes, white mozzarella, and green basil. The queen loved it so much that Esposito named it “Pizza Margherita” in her honor – though historians debate whether this tale is entirely true.
Italian immigrants brought pizza to America in the late 19th and early 20th centuries, particularly to cities like New York, Chicago, and Philadelphia. Initially, it remained primarily within Italian communities. The first pizzeria in America, G. Lombardi’s, opened in New York City in 1905. Pizza’s popularity exploded after World War II when American soldiers returning from Italy craved the dish they’d enjoyed overseas.
The post-war era saw pizza transform from ethnic food to mainstream American cuisine. Regional styles developed – New York’s thin, foldable slices; Chicago’s deep-dish masterpieces; Detroit’s rectangular, crispy-edged pies; and California’s gourmet, ingredient-forward approach. Today, Americans consume approximately 3 billion pizzas annually, making it one of the most beloved foods in the country.
Making pizza at home has become increasingly popular as people discover it’s not only achievable but also incredibly fun and rewarding. The rise of home pizza ovens, quality ingredients becoming more accessible, and the desire for fresher, healthier options have turned homemade pizza into a beloved tradition for families across America.
Why You’ll Love This Recipe
This homemade pizza recipe is about to change your dinner game forever, and here’s exactly why you’ll fall in love with it. You’re getting authentic Italian-style pizza with a perfectly crispy crust and tender interior, all without expensive equipment or complicated techniques. This recipe produces results that rival your favorite pizzeria, and once you taste the difference, delivery pizza will never quite measure up again.
Here’s what makes this recipe absolutely incredible:
- Restaurant-Quality Results at Home – Achieve that coveted crispy-yet-chewy crust with perfectly charred edges
- Budget-Friendly – Make multiple pizzas for less than the cost of a single delivery pie
- Simple Ingredients – Uses basic pantry staples you probably already have
- Fun for the Whole Family – Kids love helping stretch dough and choose toppings
- Completely Customizable – Create any flavor combination you can imagine
- No Special Equipment Required – Just your regular oven and a baking sheet or pizza stone
- Healthier Than Takeout – Control exactly what goes into your pizza, from dough to toppings
- Impressive Yet Easy – Looks and tastes like you spent hours, but it’s surprisingly simple
- Make-Ahead Friendly – Dough can be prepared days in advance or frozen for months
- Perfect for Entertaining – Host pizza-making parties where everyone creates their own masterpiece
- Freezer-Friendly – Make multiple pizzas and freeze for quick future meals
- Therapeutic and Fun – There’s something incredibly satisfying about working with dough
Ingredient Notes
Let’s break down each ingredient in this homemade pizza dough recipe so you understand exactly what creates that perfect crust and delicious flavor.
All-Purpose Flour or Bread Flour – The foundation of your pizza dough. All-purpose flour works perfectly fine and creates a tender, slightly softer crust. Bread flour has higher protein content (around 12-14%) which develops more gluten, resulting in a chewier, more authentic pizzeria-style crust with better structure. I prefer bread flour for the best texture, but all-purpose absolutely works! Substitution: You can use up to 25% whole wheat flour for a nuttier, healthier crust, though it will be denser.
Active Dry Yeast or Instant Yeast – The magic ingredient that makes dough rise and develop flavor. Active dry yeast needs to be dissolved in warm water first (proofing), while instant yeast can be mixed directly with flour. Both work beautifully in this recipe. Make sure your yeast is fresh – check the expiration date! Pro tip: Store yeast in the freezer to extend its shelf life.
Warm Water – Activates the yeast and brings the dough together. Temperature is crucial: aim for 105-110°F. Too hot kills the yeast; too cold won’t activate it properly. If you don’t have a thermometer, the water should feel warm but comfortable when you dip your finger in it – like a baby’s bathwater.
Sugar or Honey – Feeds the yeast, helping it activate and creating a better rise. It also adds a subtle sweetness that balances the savory toppings and helps with browning. Just a small amount makes a big difference in flavor development.
Olive Oil – Adds richness, flavor, and helps create a tender crumb. It also makes the dough easier to work with and prevents it from drying out. Extra virgin olive oil provides the best flavor, though regular olive oil works too.
Salt – Essential for flavor! Salt also strengthens the gluten structure and controls yeast activity. Never skip it – pizza dough without salt tastes flat and bland.
Pizza Sauce – Use store-bought marinara or pizza sauce for convenience, or make your own with crushed tomatoes, garlic, Italian herbs, and olive oil. San Marzano tomatoes are ideal for authentic Italian flavor. Substitution: Pesto, white sauce, BBQ sauce, or even olive oil and garlic make excellent alternatives.
Mozzarella Cheese – The classic pizza cheese! Low-moisture, whole-milk mozzarella (shredded or sliced) melts beautifully and browns nicely. Fresh mozzarella works too but releases more moisture, so pat it dry first. For best results, shred your own cheese – pre-shredded contains anti-caking agents that affect melting.
Toppings – This is where you make it your own! Pepperoni, Italian sausage, mushrooms, bell peppers, onions, olives, fresh basil, arugula – the possibilities are endless. Remember: less is more. Overloading causes soggy pizza.
Equipment Needed
You don’t need fancy pizza-making equipment to create amazing homemade pizza! Here’s everything you’ll need:
- Large Mixing Bowl – For combining and mixing dough ingredients
- Measuring Cups and Spoons – Accurate measurements ensure consistent results
- Wooden Spoon or Dough Whisk – For initial mixing before kneading
- Kitchen Scale (optional but recommended) – Weighing ingredients is more accurate than volume measurements
- Clean Work Surface – Counter or large cutting board for kneading dough
- Plastic Wrap or Damp Kitchen Towel – To cover dough while rising
- Rolling Pin (optional) – Some prefer hand-stretching, others like rolling
- Pizza Stone or Baking Sheet – Pizza stones create the crispiest crust but aren’t necessary; a baking sheet works great
- Parchment Paper – Makes transferring pizza easier and prevents sticking
- Pizza Cutter or Sharp Knife – For slicing your finished masterpiece
- Oven Mitts – For safely handling hot pans
- Pastry Brush (optional) – For brushing crust with olive oil or garlic butter
- Pizza Peel (optional) – Nice to have if using a pizza stone, but not essential

Best Homemade Pizza Recipe
- Total Time: 1 hour 30 minutes
- Yield: 2 large pizzas (12-14 inches) or 4 personal pizzas 1x
- Diet: Vegetarian
Description
The ultimate homemade pizza recipe with a crispy, chewy crust that rivals your favorite pizzeria. This easy pizza dough comes together with simple ingredients and can be customized with any toppings you love.
Ingredients
For the Pizza Dough:
- 3 1/2 to 4 cups bread flour or all-purpose flour (plus extra for dusting)
- 2 1/4 teaspoons active dry yeast (1 standard packet)
- 1 tablespoon granulated sugar or honey
- 2 teaspoons salt
- 2 tablespoons olive oil (plus more for coating bowl)
- 1 1/2 cups warm water (105-110°F)
For Assembly:
- 1 cup pizza sauce or marinara sauce
- 2 1/2 to 3 cups shredded mozzarella cheese (low-moisture, whole milk)
- Your choice of toppings (pepperoni, vegetables, meats, etc.)
- 2 tablespoons olive oil (for brushing crust)
- Fresh basil leaves (optional, for garnish)
- Grated Parmesan cheese (optional)
- Red pepper flakes (optional)
Instructions
- Activate the yeast: In a large mixing bowl, combine the warm water, sugar (or honey), and yeast. Stir gently and let sit for 5-10 minutes until foamy and bubbly. This proves your yeast is alive and active. If it doesn’t foam, your water was too hot or your yeast is dead – start over with fresh yeast.
- Make the dough: Add the olive oil and salt to the yeast mixture. Gradually add 3 1/2 cups of flour, one cup at a time, stirring with a wooden spoon until a shaggy dough forms. The dough should start pulling away from the sides of the bowl. If it’s too sticky, add more flour a tablespoon at a time (up to 1/2 cup more).
- Knead the dough: Turn the dough out onto a lightly floured surface. Knead for 8-10 minutes until smooth, elastic, and slightly tacky but not sticky. The dough should bounce back when poked. This kneading develops gluten, which creates structure and chewiness. You can also use a stand mixer with a dough hook on medium-low speed for 5-7 minutes.
- First rise: Lightly oil a large bowl with olive oil. Shape the dough into a ball and place it in the bowl, turning to coat all sides with oil (this prevents drying). Cover with plastic wrap or a damp kitchen towel. Let rise in a warm, draft-free spot for 1-2 hours until doubled in size. Ideal temperature is 75-80°F. If your kitchen is cold, place the bowl in your oven with just the light on.
- Prepare for baking: About 30 minutes before you’re ready to bake, preheat your oven to its highest setting (typically 475-500°F). If using a pizza stone, place it in the oven while preheating. If using a baking sheet, you can preheat it or not – both work.
- Divide and shape: Punch down the risen dough to release air bubbles. Turn it out onto a lightly floured surface and divide it into 2 equal portions for large pizzas or 4 portions for personal pizzas. Shape each portion into a smooth ball.
- Roll or stretch the dough: Let the dough balls rest for 10 minutes (this relaxes the gluten and makes stretching easier). Working with one ball at a time, flatten it with your hands, then either roll with a rolling pin or hand-stretch into your desired shape (12-14 inches for large pizzas, 8-10 inches for personal). Leave the edges slightly thicker for a nice crust. If dough springs back, let it rest for 5 more minutes.
- Transfer to pan: If using parchment paper, place stretched dough on it, then transfer to a baking sheet or pizza peel. If baking directly on a sheet, lightly oil or flour it first.
- Add toppings: Spread 1/2 cup pizza sauce evenly over each large pizza (less for personal pizzas), leaving a 1/2-inch border for the crust. Sprinkle with cheese (about 1 1/4 cups per large pizza), then add your desired toppings. Don’t overload – too many toppings create soggy pizza.
- Bake: Transfer pizza to the preheated oven (if using a stone, slide the parchment paper onto it). Bake for 12-15 minutes for large pizzas (10-12 minutes for personal pizzas) until the crust is golden brown and the cheese is bubbly and slightly browned. The bottom should be crispy and lightly charred.
- Finish and serve: Remove from oven and let cool for 2-3 minutes. Brush the crust edges with olive oil or garlic butter if desired. Garnish with fresh basil, Parmesan cheese, or red pepper flakes. Slice and serve immediately while hot!
Notes
- Flour measurement: For most accurate results, weigh flour (480-500g total). Spooning flour into measuring cups rather than scoking prevents using too much.
- Dough too sticky? Add flour gradually, just until dough is manageable. Too much flour makes tough, dry pizza.
- Cold fermentation: For even better flavor, refrigerate dough after the first rise for 24-72 hours. Bring to room temperature before shaping.
- Crispy crust secret: Pre-bake the crust for 3-4 minutes before adding toppings for extra crispiness.
- No pizza stone? No problem! An upside-down baking sheet on the lowest oven rack works similarly.
- Storing dough: Refrigerate up to 3 days or freeze up to 3 months.
- Prep Time: 15 minutes (plus 1-2 hours rising time)
- Cook Time: 12-15 minutes
- Category: Dinner
- Method: Baking
- Cuisine: Italian
Nutrition
- Serving Size: 2 slices (1/4 of large pizza with cheese and pepperoni)
- Calories: 420
- Sugar: 4g
- Sodium: 890mg
- Fat: 16g
- Saturated Fat: 7g
- Unsaturated Fat: 8g
- Trans Fat: 0g
- Carbohydrates: 48g
- Fiber: 2g
- Protein: 18g
- Cholesterol: 35mg
Tips & Variations
The beauty of homemade pizza is the endless customization possibilities! Here are some delicious ways to make this recipe your own:
Classic Margherita – Use San Marzano tomato sauce, fresh mozzarella (patted dry), fresh basil leaves, and a drizzle of extra virgin olive oil. Add the basil after baking for the most vibrant flavor and color.
Pepperoni Perfection – Layer sliced pepperoni under and over the cheese for maximum flavor. The pepperoni under the cheese stays tender; the ones on top get crispy and slightly charred.
Veggie Supreme – Load up with bell peppers, red onions, mushrooms, black olives, and fresh tomatoes. Pre-cook high-moisture vegetables like mushrooms and bell peppers briefly to prevent soggy pizza.
Meat Lovers – Combine pepperoni, Italian sausage, bacon, and ground beef for an ultra-hearty pizza. Cook meats before adding to pizza for best results.
BBQ Chicken Pizza – Use BBQ sauce instead of marinara, top with cooked shredded chicken, red onions, cilantro, and a mix of mozzarella and cheddar cheese.
White Pizza – Skip the tomato sauce and use a ricotta-garlic mixture as the base, topped with mozzarella, spinach, and artichoke hearts.
Hawaiian Pizza – Pineapple and ham (or Canadian bacon) with mozzarella. Add the pineapple after baking for less moisture, or roast it first for caramelized sweetness.
Breakfast Pizza – Top with scrambled eggs, bacon, cheese, and drizzle with hollandaise or top with arugula after baking.
Buffalo Chicken – Toss cooked chicken in buffalo sauce, top pizza with it along with mozzarella and blue cheese crumbles. Drizzle with ranch after baking.
Mediterranean Style – Feta cheese, kalamata olives, sun-dried tomatoes, artichokes, and spinach with a garlic-olive oil base.
Whole Wheat Crust – Replace up to half the flour with whole wheat flour for added nutrition and nutty flavor.
Gluten-Free Option – Use a cup-for-cup gluten-free flour blend designed for yeast breads. The texture will be slightly different but still delicious.
Pro Chef Tips
Want pizzeria-quality results? These professional techniques will elevate your homemade pizza to the next level:
Temperature is Everything – The hotter your oven, the better your pizza. Professional pizza ovens reach 800°F or higher. Your home oven can’t match that, but maxing it out (475-500°F) gets you closer to that authentic char and crispy crust. Preheat for at least 30 minutes to ensure even, thorough heating.
The Bench Rest is Crucial – After dividing your dough, let those balls rest for 10-15 minutes before stretching. This relaxation period allows the gluten to relax, making the dough much easier to stretch without springing back. Skipping this step leads to frustration and tears (in the dough and possibly your eyes!).
Hand-Stretching Over Rolling – Professional pizza makers rarely use rolling pins. Hand-stretching creates a lighter, airier crust with those characteristic air bubbles in the cornicione (the puffy edge). Start by pressing the dough flat with your fingers, then gently stretch from the center outward, rotating as you go. Let gravity help by draping the dough over your knuckles and rotating.
Less Sauce, More Flavor – The number one mistake home cooks make is using too much sauce, which creates a soggy mess. A thin, even layer (about 1/2 cup for a 12-14 inch pizza) is perfect. The sauce should barely cover the dough surface.
Cheese Strategies – Shred your own cheese from a block for superior melting and browning. Pre-shredded cheese contains anti-caking agents that prevent optimal melting. For the best texture, use low-moisture mozzarella. If using fresh mozzarella, pat it very dry and tear into small pieces rather than slicing.
The Topping Order Matters – For most pizzas, the order is: sauce, cheese, then toppings. This protects toppings from burning. However, for delicate ingredients like fresh basil or arugula, add them after baking. For extra-crispy pepperoni, place some under the cheese and some on top.
Strategic Topping Placement – Less is more when it comes to toppings! Overloading creates steam that makes the crust soggy. Leave space between toppings for even cooking and maintain that crucial crust-to-topping ratio.
Parbake for Perfection – For an extra-crispy crust, pre-bake the stretched dough for 3-4 minutes before adding toppings. This sets the structure and prevents sogginess, especially important for high-moisture toppings.
The Pizza Stone Secret – If using a pizza stone, place it on the lowest oven rack and preheat for at least 30-45 minutes. The extended preheating ensures the stone is thoroughly heated, creating that instant blast of heat that produces the crispiest bottom. An upside-down baking sheet on the lower rack works similarly if you don’t have a stone.
Cornmeal for Easy Transfer – Dust your pizza peel or parchment paper with cornmeal before placing your dough. The cornmeal acts like little ball bearings, making the pizza slide off easily. It also adds a pleasant crunch to the bottom of the crust.
The Rotate and Monitor Technique – Rotate your pizza 180 degrees halfway through baking for even browning, as most ovens have hot spots. Watch closely during the final minutes – pizza can go from perfect to burnt quickly.
Cool Slightly Before Slicing – Let your pizza rest for 2-3 minutes after removing from the oven. This brief rest allows the cheese to set slightly, making cleaner slices. Cutting immediately causes all the cheese to slide off in a molten mess.
Common Mistakes to Avoid
Even experienced home cooks make these pizza pitfalls. Here’s how to avoid them and ensure perfect results every time:
Using Water That’s Too Hot or Too Cold – Water temperature is critical for yeast activation. Too hot (above 120°F) kills the yeast, resulting in dense, flat dough that won’t rise. Too cold (below 100°F) and the yeast won’t activate properly, leading to slow or minimal rising. Aim for 105-110°F – it should feel warm but comfortable on your wrist, like baby bathwater.
Not Kneading Long Enough – Proper kneading develops gluten, which gives your crust structure and that desirable chewy texture. Under-kneaded dough tears easily, doesn’t stretch well, and produces a dense, crumbly crust. Knead by hand for 8-10 minutes or with a stand mixer for 5-7 minutes until the dough is smooth, elastic, and springs back when poked. Think of it as a workout for your dough!
Overloading with Toppings – This is the number one mistake that ruins homemade pizza! Too many toppings prevent proper heat circulation, trap moisture, and create a soggy, undercooked mess. The dough can’t crisp up under all that weight, and toppings don’t cook evenly. Stick to 3-4 toppings maximum, use them sparingly, and remember that pizzerias keep it simple for good reason.
Not Preheating the Oven Long Enough – Your oven needs time to reach and stabilize at its maximum temperature. The heating element cycling on and off doesn’t mean it’s fully preheated. For best results, preheat for at least 30 minutes, or 45 minutes if using a pizza stone. This ensures every surface is thoroughly heated, creating that blast of heat that makes the crust puff and crisp properly.
Skipping the Dough Rest Period – Gluten is like a rubber band – it needs time to relax. If you try to shape dough immediately after kneading or dividing, it fights back and springs into a smaller shape. That 10-15 minute rest after portioning makes the dough cooperative and easy to stretch to your desired size. Be patient – this small wait makes a huge difference!
Using Too Much Sauce – Excess sauce equals soggy pizza. A thin, even layer is all you need – about 1/4 to 1/3 cup for a 12-14 inch pizza. The sauce should lightly cover the dough surface, not puddle. You should still see some dough through the sauce. Remember, you can always add extra sauce for dipping!
Not Properly Preparing High-Moisture Ingredients – Vegetables like mushrooms, zucchini, fresh tomatoes, and even fresh mozzarella contain lots of water. When heated, this water releases onto your pizza, creating sogginess. Sauté mushrooms and other vegetables first to remove excess moisture, pat fresh mozzarella very dry with paper towels, and consider roasting wet vegetables before using them as pizza toppings.
Storage & Meal Prep
Homemade pizza and its components store beautifully, making it perfect for meal prep and planned leftovers!
Storing Pizza Dough:
- Refrigerator: After the first rise, punch down dough, shape into a ball, and place in an oiled container or oiled plastic bag. It will keep for 3-4 days and actually develops better flavor with cold fermentation. Bring to room temperature (about 30 minutes) before shaping.
- Freezer: After the first rise, divide dough into portions, wrap each tightly in plastic wrap, then place in freezer bags. Freeze for up to 3 months. Thaw in the refrigerator overnight, then bring to room temperature before using.
Storing Cooked Pizza:
- Refrigerator: Let pizza cool completely, then store in an airtight container or wrap tightly in aluminum foil. It will keep for 3-4 days. For best results, place parchment paper between slices to prevent sticking.
- Freezer: Wrap individual slices or whole pizzas tightly in plastic wrap, then aluminum foil, or use freezer bags. Freeze for up to 2 months. Frozen pizza reheats surprisingly well!
Best Reheating Methods:
Oven Method (Best for Crispy Crust):
- Preheat oven to 375°F
- Place pizza directly on the oven rack or on a baking sheet
- Heat for 8-10 minutes until cheese melts and crust crisps
Skillet Method (Best Overall):
- Heat a non-stick skillet over medium heat
- Place pizza slice in the pan, cover with a lid
- Heat for 3-4 minutes until the bottom crisps and cheese melts
- The lid traps heat to melt cheese while the direct heat crisps the crust – genius!
Air Fryer Method (Quick and Crispy):
- Preheat air fryer to 350°F
- Place pizza slice in basket (don’t overlap)
- Heat for 3-4 minutes until crispy and hot
Microwave (Fastest but Soggiest):
- Place a cup of water in the microwave alongside your pizza
- Heat for 30-60 seconds
- The water creates steam that prevents the crust from getting too tough, though it won’t be crispy
Make-Ahead & Freezer Notes
Planning ahead? This homemade pizza recipe is incredibly freezer-friendly and perfect for meal prep!
Make-Ahead Dough (Best Option): The beauty of pizza dough is that it actually gets better with time! After the initial rise, you can refrigerate the dough for up to 4 days. This slow, cold fermentation develops more complex flavors and creates an even better crust texture. Many pizzerias use this technique. Simply punch down the dough, place it in an oiled container, cover tightly, and refrigerate. The dough will continue rising slowly in the fridge. When ready to use, bring it to room temperature for 30-60 minutes before shaping.
Freezing Unbaked Pizza Dough: This is perfect for future pizza nights! After the first rise, divide and shape dough into balls. Wrap each ball tightly in plastic wrap, then place in freezer bags, removing as much air as possible. Label with the date. Freeze for up to 3 months. To use, transfer to the refrigerator to thaw overnight, then bring to room temperature before stretching. The dough may need a bit more time to come to room temperature than fresh dough.
Freezing Parbaked Crusts: For the ultimate convenience, make par-baked pizza crusts! Stretch your dough, place on a baking sheet, and bake at 450°F for just 4-5 minutes until it’s set but not browned. Let cool completely, then wrap tightly in plastic wrap and freeze for up to 3 months. To use, top the frozen crust and bake as directed, adding 3-4 minutes to the cooking time. This method is genius for busy weeknights!
Freezing Fully Assembled Unbaked Pizzas: You can assemble entire pizzas and freeze them for bake-when-ready convenience! Top your stretched dough with sauce, cheese, and toppings, then flash-freeze on a baking sheet for 2-3 hours until solid. Wrap tightly in plastic wrap, then aluminum foil. Freeze for up to 2 months. Bake directly from frozen at 450°F for 15-18 minutes. The crust won’t be quite as crispy as fresh, but it’s incredibly convenient.
Freezing Baked Pizza: Already-baked pizza freezes well too! Cool completely, wrap individual slices or whole pizzas tightly in plastic wrap, then aluminum foil or freezer bags. Freeze for up to 2 months. Reheat using the methods mentioned in the storage section, adding a few extra minutes for frozen pizza.
Best Thawing Method: For all frozen dough, the refrigerator thaw is best. Transfer from freezer to fridge the night before you plan to use it. This slow thaw preserves texture and prevents a temperature shock that can affect the dough’s structure.
Serving Suggestions
While pizza is absolutely a complete meal on its own, the right accompaniments can elevate your pizza night into something truly special. Here are my favorite sides and pairings:
Fresh Salads:
- Classic Caesar salad with crispy romaine and homemade croutons
- Simple arugula salad with lemon vinaigrette and shaved Parmesan
- Caprese salad with tomatoes, fresh mozzarella, and basil
- Italian chopped salad with pepperoncini, salami, and olives
- Greek salad with feta, cucumbers, and red wine vinaigrette
Appetizers and Sides:
- Garlic knots made from leftover pizza dough
- Bruschetta with fresh tomatoes and basil
- Mozzarella sticks or fried mozzarella
- Roasted garlic hummus with vegetables
- Italian antipasto platter with cured meats and cheeses
- Roasted vegetables (zucchini, bell peppers, eggplant)
- Crispy seasoned potato wedges or fries
Dipping Sauces:
- Extra marinara sauce for crust dipping
- Garlic butter sauce with herbs
- Ranch dressing (surprisingly perfect with pizza!)
- Hot honey for a sweet-spicy kick
- Balsamic glaze for drizzling
- Pesto for extra flavor
Beverage Pairings:
- Italian red wine (Chianti, Sangiovese, or Barbera)
- Cold beer (lagers, pilsners, or IPAs all work beautifully)
- Italian soda or sparkling water with lemon
- Classic Coca-Cola (a surprisingly traditional pairing)
- Fresh lemonade for kids and non-drinkers
- Iced tea with lemon
Complete Pizza Night Spread: For entertaining or family pizza night, set up a complete Italian feast: start with an antipasto platter while pizzas bake, serve pizza with a fresh green salad, offer multiple dipping sauces, and finish with tiramisu or gelato for dessert. Don’t forget crushed red pepper flakes, dried oregano, and grated Parmesan on the table for customization!
Pizza Party Setup: Host a make-your-own-pizza party where everyone creates their own personal pizza. Provide bowled toppings, different sauces, and let guests customize. It’s interactive, fun, and ensures everyone gets exactly what they want!
FAQs Section
Can I make pizza dough without a stand mixer? Absolutely! This recipe is completely achievable by hand. Mix ingredients in a large bowl with a wooden spoon until combined, then turn out onto a floured surface and knead by hand for 8-10 minutes. It’s a bit of an arm workout, but it’s therapeutic, and the results are just as good. Many traditional pizzerias still make dough by hand. The key is kneading until the dough is smooth, elastic, and bounces back when poked. Hand-kneading actually gives you better control and feel for the dough’s texture.
How do I know when my pizza is done baking? Look for multiple signs: the crust should be golden brown with some darker spots (char), the cheese should be bubbly and starting to brown in places, and the edges (cornicione) should be puffed and golden. Most importantly, check the bottom of the crust – lift the pizza with a spatula and peek underneath. It should be golden brown and firm, not pale or soft. For a 475-500°F oven, this typically takes 12-15 minutes. If the top is browning too quickly but the bottom isn’t done, move the pizza to a lower rack.
Can I use instant yeast instead of active dry yeast? Yes! Instant yeast and active dry yeast are interchangeable in this recipe with one small difference. Instant yeast can be mixed directly into the flour without proofing in water first, which saves about 10 minutes. If using instant yeast, combine it with the flour and other dry ingredients, then add the warm water. The amounts are the same (2 1/4 teaspoons or one packet). Both produce excellent results, so use whichever you have on hand.
Why is my pizza crust tough and chewy instead of light and airy? Several factors cause tough crust. Most commonly, it’s using too much flour – either measuring incorrectly or adding too much while kneading. Flour measurements should be made by spooning flour into the measuring cup and leveling off, not scoking directly from the bag. Overkneading can also develop too much gluten, though this is less common with hand kneading. Finally, rolling the dough too thin or with too much pressure can compress all the air pockets. Try hand-stretching instead of rolling, and be gentle with the dough.
Can I make this pizza dough gluten-free? Yes, but you’ll need to use a specific gluten-free flour blend designed for yeast breads, not just any gluten-free flour. Look for blends that contain xanthan gum or guar gum, which help mimic gluten’s structure. Cup4Cup, King Arthur Measure for Measure, or Bob’s Red Mill 1-to-1 Baking Flour work well. The texture will be slightly different – a bit more dense and less chewy – but still delicious. You may need to add 2-3 tablespoons more water as gluten-free flours absorb liquid differently. The dough will be softer and stickier than regular dough.
What’s the best way to reheat leftover pizza? The skillet method is hands-down the best! Heat a non-stick skillet over medium heat, place your pizza slice in the pan, cover with a lid, and heat for 3-4 minutes. The bottom gets crispy from direct contact with the pan while the lid traps heat to melt the cheese perfectly. It’s faster than the oven and produces better results than the microwave, which makes pizza soggy. If reheating multiple slices, the oven method at 375°F for 8-10 minutes works great too.
How can I get my pizza crust crispier? There are several tricks for extra-crispy crust! First, bake at the highest temperature your oven allows (475-500°F). Second, use a pizza stone or steel preheated for at least 30-45 minutes – this creates instant bottom heat. Third, try par-baking the crust for 3-4 minutes before adding toppings. Fourth, brush the crust edges with olive oil before baking. Fifth, use bread flour instead of all-purpose for better structure. Finally, don’t overload with toppings or sauce, as excess moisture creates sogginess. Some people even bake pizza directly on the oven rack for maximum crispiness!
Can I prepare the dough the night before? Absolutely, and many argue it actually improves the flavor! After the initial rise, punch down the dough, shape it into a ball, place in an oiled container or bowl, cover tightly with plastic wrap, and refrigerate overnight (or up to 3-4 days). The cold fermentation develops more complex, tangy flavors similar to sourdough. When ready to use, remove from the refrigerator and let it come to room temperature for 30-60 minutes before shaping. The dough should feel relaxed and easy to stretch. This make-ahead method is perfect for stress-free entertaining or weeknight dinners.
Conclusion
Congratulations – you now have all the secrets to making incredible homemade pizza that rivals your favorite pizzeria! This recipe transforms simple pantry ingredients into golden, crispy, perfectly chewy pizza that will have everyone asking for seconds. Whether you’re making classic pepperoni, experimenting with gourmet toppings, or hosting a make-your-own-pizza party, you’ve got the skills and knowledge to create pizza perfection every single time.
The beauty of mastering homemade pizza is that it opens up endless possibilities. You can customize every aspect to your family’s preferences, control exactly what goes into your food, and save money while creating something truly special. Plus, there’s something incredibly satisfying about pulling your own bubbling, golden pizza from the oven – it’s cooking magic that never gets old!
I absolutely love hearing about your pizza-making adventures! What toppings did you choose? Did you try any of the variations? How did your family react to homemade pizza night? Drop a comment below and share your experience – I read every single one and love seeing your creative topping combinations!
If you loved this homemade pizza recipe, please give it a 5-star rating and share your results! Your feedback helps other home cooks discover this recipe and know what to expect.
Don’t forget to PIN this recipe to your Pinterest boards so you can find it easily whenever that pizza craving strikes! Save it to your “Dinner Recipes,” “Italian Food,” or “Family Favorites” boards and share it with friends who love homemade cooking.
Tag me in your pizza photos on social media – I absolutely love seeing your beautiful creations and hearing about your experiences. There’s nothing that makes me happier than knowing this recipe brought joy to your dinner table!
Now get in that kitchen and make some pizza magic happen! Your family is going to love you for it. Happy pizza making! 🍕