

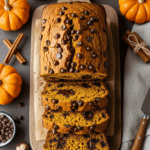
There’s something absolutely magical about the combination of warm pumpkin spice and melty chocolate chips baked into a tender, moist loaf of bread. This pumpkin chocolate chip bread recipe is fall baking at its finest – it’s everything you love about pumpkin bread elevated with sweet pockets of chocolate throughout. Each slice delivers that perfect balance of cozy autumn spices, rich pumpkin flavor, and indulgent chocolate that makes this quick bread absolutely irresistible.
This easy pumpkin chocolate chip bread is incredibly moist, perfectly spiced, and studded with chocolate chips in every bite. The pumpkin keeps the bread tender and adds natural sweetness along with that gorgeous golden-orange color we associate with fall. The chocolate chips melt slightly during baking, creating little pockets of gooey chocolate that complement the warm spices beautifully. It’s not too sweet, not too heavy – just perfectly balanced comfort food that tastes like autumn in bread form.
What makes this pumpkin bread with chocolate chips so beloved is its versatility and convenience. It’s perfect for weekend breakfast or brunch when you want something special but not too fussy. Slice it for afternoon snacks with coffee or tea. Wrap slices individually for lunchbox treats or breakfast on-the-go. Bring it to potlucks, bake sales, or holiday gatherings where it’s always a hit. Toast a slice and spread with butter for an even more indulgent treat. This bread works for so many occasions and everyone loves it.
The beauty of this recipe is how it delivers bakery-quality results with pantry staples and simple mixing techniques. There’s no fancy equipment required, no complicated steps, and the prep work takes just minutes. Mix everything together, pour into a pan, and let your oven work its magic. About an hour later, your kitchen will smell amazing and you’ll have a gorgeous loaf of homemade pumpkin chocolate chip bread that looks and tastes like you spent hours making it.
History / Background
Pumpkin bread itself has deep roots in American baking tradition, particularly in New England where pumpkins were (and still are) abundant. Native Americans taught early colonists to cook with pumpkin, which was plentiful, nutritious, and stored well through winter. However, the sweet, spiced pumpkin quick bread we know today is a relatively modern creation that gained popularity in the mid-20th century.
The rise of canned pumpkin puree in the 1920s and 1930s revolutionized pumpkin baking. Before this convenient product, home bakers had to cook and puree their own pumpkins – a time-consuming process that made pumpkin recipes less appealing for everyday baking. Canned pumpkin changed everything, making pumpkin desserts and breads accessible year-round with minimal effort.
Pumpkin bread as we know it really took off in the 1960s and 1970s during the quick bread and banana bread boom. Home bakers discovered that pumpkin’s moisture and natural sweetness made it perfect for tender, flavorful quick breads. Recipes began appearing in community cookbooks, on the backs of canned pumpkin labels, and in women’s magazines. The warm spices – cinnamon, nutmeg, ginger, cloves – became synonymous with fall baking.
The addition of chocolate chips to pumpkin bread is a more recent innovation, likely emerging in the 1980s and 1990s as chocolate chips became a staple baking ingredient that home cooks began adding to everything. The combination of pumpkin spice and chocolate might seem unusual at first, but it’s actually brilliant. The warm, earthy spices complement chocolate beautifully, similar to how Mexican hot chocolate incorporates cinnamon and spices. The slight bitterness of chocolate balances pumpkin’s sweetness, creating complex, sophisticated flavor.
Today, pumpkin chocolate chip bread has become a fall baking classic in its own right. Coffee shops and bakeries feature it seasonally, and home bakers wait eagerly for September to arrive so they can start baking it. It represents the perfect marriage of tradition (classic pumpkin bread) and innovation (chocolate chips), creating something that feels both nostalgic and exciting. The recipe has been passed down, shared online, and adapted countless times, but the basic concept remains the same: moist pumpkin bread made even better with chocolate.
Why You’ll Love This Recipe
This pumpkin chocolate chip bread recipe has been tested and perfected to deliver the moistest, most flavorful loaf every single time. What sets it apart is the ideal ratio of pumpkin to flour (enough for moisture and flavor without being dense), the balanced spice blend that’s warm but not overwhelming, and the generous chocolate chips that are distributed throughout rather than all sinking to the bottom.
The texture is absolutely perfect – tender and moist with a delicate crumb that isn’t too heavy or cake-like. It slices beautifully without crumbling, holds together well for wrapping or transporting, and stays fresh for days thanks to the moisture from the pumpkin. The top develops a lovely golden crust while the interior stays soft and tender. Each bite delivers pumpkin flavor, warm spices, and melty chocolate in perfect harmony.
Here’s why this pumpkin chocolate chip bread will become your fall favorite:
- Super moist and tender – stays fresh for days without drying out
- Easy one-bowl recipe – minimal cleanup and simple mixing method
- Ready in about an hour – quick enough for weekend baking
- Uses canned pumpkin – convenient and available year-round
- Perfect spice balance – warm and cozy without being overpowering
- Chocolate in every bite – generously studded with chocolate chips
- Kid-approved – children love the chocolate and mild pumpkin flavor
- Great for gifting – makes beautiful homemade gifts for neighbors and friends
- Freezer-friendly – make ahead and freeze for later enjoyment
- Budget-friendly – uses affordable pantry ingredients
- Versatile – works for breakfast, snack, dessert, or brunch
- Customizable – easy to adjust chocolate amount or add nuts, spices, etc.
Ingredient Notes
Understanding your ingredients ensures the best pumpkin chocolate chip bread:
Pumpkin Puree: Use pure pumpkin puree (not pumpkin pie filling, which contains added sugar and spices). Look for 100% pure pumpkin on the label. One standard 15-ounce can provides exactly what you need. The pumpkin adds moisture, natural sweetness, beautiful color, and that signature fall flavor. Don’t substitute with fresh pumpkin unless you’ve cooked and pureed it yourself – canned is actually more consistent and convenient.
All-Purpose Flour: Provides structure to the bread. Measure correctly by spooning flour into your measuring cup and leveling off, not scooping directly from the bag (which packs it and results in dry bread). All-purpose flour creates the perfect tender crumb. You can substitute up to half with whole wheat flour for more fiber, though the texture will be slightly denser.
Granulated Sugar: Sweetens the bread and helps create tender texture. The amount balances the earthy pumpkin and spices without making it overly sweet. Brown sugar can replace some or all of the granulated sugar for deeper molasses flavor and extra moisture.
Vegetable Oil or Melted Butter: Fat creates moisture and tender crumb. Oil keeps the bread extra moist and extends its freshness. Melted butter adds richer flavor. Many bakers use a combination – half oil, half butter – for the best of both worlds. Avoid using all solid shortening or cold butter as these don’t incorporate as well into quick breads.
Eggs: Bind ingredients together, add richness, and help the bread rise. Large eggs are standard. Room temperature eggs incorporate more easily, but cold eggs work fine too. For egg-free version, use flax eggs (1 tablespoon ground flaxseed mixed with 3 tablespoons water per egg, let sit 5 minutes).
Pumpkin Pie Spice: The signature flavor blend of cinnamon, nutmeg, ginger, cloves, and sometimes allspice. You can buy pre-mixed or make your own blend. If you don’t have pumpkin pie spice, use 2 teaspoons cinnamon plus ½ teaspoon each of nutmeg and ginger. The spices provide that cozy, warm flavor we associate with fall baking.
Baking Soda and Baking Powder: Work together to create proper rise and tender texture. Don’t skip either one or substitute one for the other – both are needed in the precise amounts listed. Make sure they’re fresh (less than 6 months old) for best results.
Salt: Enhances all other flavors and balances sweetness. Don’t omit – even sweet breads need salt to taste their best.
Chocolate Chips: Semi-sweet chocolate chips are classic and provide nice contrast to the sweet pumpkin. Dark chocolate chips create more sophisticated, less sweet bread. Milk chocolate chips make it sweeter and kid-friendly. Mini chocolate chips distribute more evenly throughout. You need about 1 to 1½ cups – use more if you really love chocolate!
Optional Add-ins: Chopped walnuts or pecans (½ cup) add crunch and nutty flavor. A tablespoon of vanilla extract enhances overall flavor. Orange zest adds bright citrus notes that complement pumpkin beautifully.
Equipment Needed
You’ll need basic baking equipment:
- 9×5 inch loaf pan – standard size for this recipe
- Large mixing bowl – for wet ingredients
- Medium mixing bowl – for dry ingredients
- Whisk – for mixing ingredients smoothly
- Rubber spatula – for folding and scraping
- Measuring cups and spoons – for accurate measurements
- Cooling rack – for cooling the bread properly
Optional but helpful:
- Electric mixer for easier mixing (though not necessary)
- Parchment paper for easier bread removal
- Kitchen scale for most accurate measurements
- Toothpick or cake tester for checking doneness
Pumpkin Chocolate Chip Bread Recipe
- Total Time: 1 hour 15 minutes
- Yield: 1 loaf (12 slices) 1x
- Diet: Vegetarian
Description
This incredibly moist pumpkin chocolate chip bread is loaded with warm fall spices and chocolate chips in every bite. It’s easy to make with one bowl, stays fresh for days, and is perfect for breakfast, snacks, or dessert. The ultimate fall baking recipe!
Ingredients
Dry Ingredients:
- 1¾ cups (220g) all-purpose flour
- 1 teaspoon baking soda
- ½ teaspoon baking powder
- 2 teaspoons pumpkin pie spice
- ½ teaspoon salt
Wet Ingredients:
- 1 cup (200g) granulated sugar
- ½ cup (120ml) vegetable oil or melted butter
- 2 large eggs, room temperature
- 1 cup (240g) pumpkin puree (not pumpkin pie filling)
- ¼ cup (60ml) water or milk
- 1 teaspoon vanilla extract
Add-ins:
- 1 to 1½ cups (175-260g) chocolate chips (semi-sweet, dark, or milk chocolate)
- ½ cup (60g) chopped walnuts or pecans (optional)
Instructions
Step 1: Preheat and Prepare Pan
Preheat your oven to 350°F (175°C). Grease a 9×5 inch loaf pan with butter or non-stick spray, or line with parchment paper for easy removal. Set aside.
Step 2: Mix Dry Ingredients
In a medium bowl, whisk together the flour, baking soda, baking powder, pumpkin pie spice, and salt until well combined. This ensures even distribution of leavening agents and spices throughout the bread. Set aside.
Step 3: Mix Wet Ingredients
In a large mixing bowl, whisk together the sugar and oil (or melted butter) until well combined. Add the eggs and whisk until smooth and slightly thick. Stir in the pumpkin puree, water (or milk), and vanilla extract. Whisk until completely smooth with no lumps. The mixture should be uniform in color and texture.
Step 4: Combine Wet and Dry
Pour the dry ingredients into the wet ingredients. Using a rubber spatula or wooden spoon, gently fold together just until combined. Don’t overmix – it’s okay if a few small flour streaks remain. Overmixing develops gluten and creates tough, dense bread. Stop mixing as soon as you no longer see large pockets of flour.
Step 5: Add Chocolate Chips
Reserve about 2 tablespoons of chocolate chips for topping. Fold the remaining chocolate chips (and nuts if using) into the batter with just a few strokes. Again, don’t overmix – just fold until evenly distributed throughout.
Step 6: Pour into Pan and Top
Pour the batter into your prepared loaf pan and smooth the top with a spatula. Sprinkle the reserved chocolate chips over the top for a prettier presentation. The batter will be thick – this is correct.
Step 7: Bake
Bake in the preheated oven for 55-65 minutes, or until a toothpick inserted into the center comes out clean or with just a few moist crumbs (not wet batter). The top should be golden brown and spring back when lightly pressed. If the top is browning too quickly, loosely tent with aluminum foil after 40 minutes.
Step 8: Cool
Remove from the oven and let the bread cool in the pan on a wire rack for 15-20 minutes. Then carefully remove from the pan and let cool completely on the wire rack before slicing. Warm bread is delicious but slices more cleanly when cooled.
Notes
- Don’t overmix: Mix just until ingredients are combined. Overmixing creates dense, tough bread.
- Check doneness: Oven temperatures vary. Start checking at 55 minutes. Bread is done when a toothpick comes out clean or with a few moist crumbs.
- Pumpkin puree vs. pie filling: Make sure to use pure pumpkin puree, not pumpkin pie filling which contains added sugar and spices.
- Room temperature ingredients: For best results, use room temperature eggs and let melted butter cool slightly before mixing.
- Chocolate distribution: Toss chocolate chips in a tablespoon of flour before adding to prevent them from sinking to the bottom.
- Storage: This bread actually tastes better the next day after flavors have melded. Store tightly wrapped at room temperature.
- Prep Time: 15 minutes
- Cook Time: 55-60 minutes
- Category: Dessert
- Method: Baking
- Cuisine: American
Nutrition
- Serving Size: 1 slice (1/12 of loaf)
- Calories: 285
- Sugar: 22g
- Sodium: 220mg
- Fat: 13g
- Saturated Fat: 3g
- Unsaturated Fat: 9g
- Trans Fat: 0g
- Carbohydrates: 40g
- Fiber: 2g
- Protein: 4g
- Cholesterol: 30mg
Tips & Variations
Double Chocolate Pumpkin Bread:
Add ¼ cup of unsweetened cocoa powder to the dry ingredients and reduce flour by ¼ cup. This creates rich, chocolatey pumpkin bread that’s absolutely decadent. Use dark chocolate chips for intense chocolate lovers.
Pumpkin Cream Cheese Swirl Bread:
Make a cream cheese filling by beating 8 oz softened cream cheese with ¼ cup sugar and 1 egg. Pour half the pumpkin batter into the pan, add dollops of cream cheese mixture, top with remaining pumpkin batter, then swirl with a knife. This creates gorgeous marbling and extra richness.
Maple Pecan Pumpkin Bread:
Replace half the sugar with maple syrup and add ½ cup chopped pecans along with the chocolate chips (or instead of them). Add ½ teaspoon of maple extract for even more maple flavor. The maple and pumpkin combination is heavenly.
Healthier Pumpkin Bread:
Replace half the all-purpose flour with whole wheat flour, reduce sugar to ¾ cup, use coconut oil instead of vegetable oil, and reduce chocolate chips to ½ cup. Add ¼ cup of ground flaxseed for extra fiber. It won’t be quite as tender but still delicious and more nutritious.
Pumpkin Chocolate Chip Muffins:
Use the same batter to make muffins instead of a loaf. Fill muffin cups ¾ full and bake at 350°F for 18-22 minutes. Makes about 18 standard muffins. These are perfect for grab-and-go breakfast or lunchbox treats.
Spiced Rum Pumpkin Bread:
Add 2 tablespoons of dark rum to the wet ingredients for sophisticated, adult-friendly bread. The rum enhances the warm spices beautifully. This version is perfect for holiday gifting or special occasions.
Pumpkin White Chocolate Chip Bread:
Use white chocolate chips instead of semi-sweet for sweeter, more delicate flavor. Add ½ teaspoon of almond extract and ½ cup of dried cranberries for a festive variation perfect for holiday baking.
Pro Chef Tips
Tip #1: Don’t Overmix the Batter
The number one mistake in quick bread baking is overmixing. Once you add flour to wet ingredients, gluten begins developing. The more you mix, the more gluten forms, resulting in dense, tough, tunnel-filled bread. Mix just until you can’t see large pockets of dry flour – a few small streaks are fine. Use a folding motion with a spatula rather than stirring vigorously. The batter should look slightly lumpy, not smooth. This gentle touch creates tender, moist bread with perfect crumb structure.
Tip #2: Test for Doneness Properly
Visual cues aren’t always reliable for quick breads since the chocolate chips can make it look underdone. Always use the toothpick test: insert a wooden toothpick or cake tester into the center of the loaf. It should come out clean or with just a few moist crumbs – not wet batter. If you hit a chocolate chip, test a different spot. Start checking at 55 minutes but don’t be surprised if it needs the full hour. Ovens vary significantly, so rely on the toothpick, not just time.
Tip #3: Let It Cool Completely Before Slicing
This requires patience, but it’s crucial for clean slices and proper texture. Hot or warm bread is still setting and will crumble or compress when sliced. Let it cool in the pan for 15-20 minutes (this continues the cooking process gently), then remove from the pan and cool completely on a rack before slicing. If you can’t wait, at least let it cool for 30-40 minutes. The bread actually tastes better after cooling anyway as flavors develop.
Tip #4: Measure Flour Correctly
Too much flour is the second most common quick bread mistake, creating dry, dense results. Never scoop flour directly from the bag with your measuring cup – this packs it and can add 20-30% more flour than intended. Instead, fluff the flour in its container, spoon it gently into your measuring cup, and level off with a knife. Better yet, use a kitchen scale: 1¾ cups flour should weigh 220 grams. Proper flour measurement makes an enormous difference.
Tip #5: Prevent Chocolate Chips from Sinking
Chocolate chips often sink to the bottom of quick breads because the batter is relatively thin. To prevent this, toss your chocolate chips in a tablespoon of flour (from your measured flour) before folding them into the batter. The flour coating helps suspend them throughout the batter. Also, reserve some chips to press into the top before baking – these definitely won’t sink and make the bread look prettier.
Tip #6: Use the Right Pan Size
This recipe is formulated for a standard 9×5 inch loaf pan. Using a different size affects baking time and texture. Smaller pans require longer baking and may overflow; larger pans create flatter, drier bread. If you must use 8×4 inch pans, make two loaves and reduce baking time to 40-45 minutes. For 9×13 inch pan, baking time drops to about 35-40 minutes and you get more of a cake texture.
Common Mistakes to Avoid
Mistake #1: Using Pumpkin Pie Filling Instead of Pure Pumpkin
Pumpkin pie filling contains added sugar, spices, and sometimes thickeners. Using it instead of pure pumpkin makes your bread overly sweet, incorrectly spiced, and potentially gummy. Always check the label – you want 100% pure pumpkin puree with no other ingredients listed. The only thing in the can should be pumpkin. This mistake can’t be fixed once made, so double-check before opening the can.
Mistake #2: Opening the Oven Door Too Often
Every time you open the oven door, you lose heat and create temperature fluctuations that affect how the bread rises and bakes. Resist the urge to check constantly. Set a timer for 55 minutes and don’t open the oven until then. You can look through the oven window, but don’t open the door. This is especially important in the first 40 minutes when the bread is rising and setting its structure.
Mistake #3: Not Greasing the Pan Adequately
Even with non-stick pans, quick breads can stick stubbornly, especially with the chocolate chips creating hot spots. Grease your pan thoroughly with butter or non-stick spray, making sure to get into the corners. Or use parchment paper: cut a strip that fits the length of the pan with overhang on both short sides (this creates handles for easy removal). Proper greasing saves frustration and keeps your beautiful loaf intact.
Mistake #4: Slicing While Still Warm
I know it’s tempting – your kitchen smells amazing and you want to taste it immediately. But slicing warm quick bread almost always results in crumbly, compressed slices that don’t look pretty. The bread needs time to finish setting and cooling completely. Warm bread is also harder to slice cleanly. If you absolutely must eat it warm, slice very carefully with a serrated knife using a gentle sawing motion. But it’s genuinely better cooled.
Mistake #5: Storing Incorrectly
Quick breads dry out quickly when stored improperly. Don’t leave it unwrapped on the counter or in a loosely covered container. Once completely cooled, wrap tightly in plastic wrap or aluminum foil, or place in an airtight container. Proper wrapping keeps it moist for days. At room temperature, it stays fresh for 3-4 days; refrigerated, up to a week; frozen, up to 3 months.
Storage & Meal Prep
Room Temperature Storage:
Once completely cooled, wrap the pumpkin chocolate chip bread tightly in plastic wrap or aluminum foil. Store at room temperature for up to 4 days. The bread actually tastes better on day two after the flavors have melded and the texture has set. Keep it in a cool, dry place away from direct sunlight. If your kitchen is very warm (above 75°F), consider refrigerating to prevent mold.
Refrigerator Storage:
For longer storage, refrigerate the wrapped bread for up to 1 week. The cool temperature slows mold growth significantly. The bread may become slightly firmer when cold but returns to proper texture at room temperature. Let slices sit out for 10-15 minutes before eating, or warm briefly. Refrigeration is especially good in humid climates where mold develops faster.
Slicing and Individual Wrapping:
For meal prep, slice the entire loaf and wrap individual slices in plastic wrap or parchment paper. Stack in a container or freezer bag. This makes it easy to grab a slice for breakfast or snack without unwrapping the entire loaf. Individual slices also toast perfectly straight from the fridge or freezer.
Reheating:
Pumpkin chocolate chip bread is delicious at room temperature, but warming it enhances the chocolate and brings out the spices. Microwave individual slices for 10-15 seconds to warm through. For crispy edges and melty chocolate, toast slices in a toaster or toaster oven. Warming also makes it taste freshly baked. Add butter while warm for extra indulgence.
Make-Ahead & Freezer Notes
Baking Ahead:
This bread is actually better made a day ahead, making it perfect for meal prep or holiday baking. Bake it, let it cool completely, wrap tightly, and store at room temperature overnight. The flavors develop and deepen, the texture sets perfectly, and it’s ready to serve or gift the next day. This advance baking also spreads out your kitchen time for busy entertaining.
Freezing Whole Loaf:
Pumpkin chocolate chip bread freezes beautifully for up to 3 months. Let it cool completely, wrap tightly in plastic wrap, then wrap again in aluminum foil or place in a freezer bag. Label with the date. Freeze whole or sliced – whatever suits your needs. Double wrapping prevents freezer burn and keeps the bread moist and delicious.
Freezing Individual Slices:
Slice the bread, wrap individual slices in plastic wrap, and place all wrapped slices in a freezer bag. This is perfect for grab-and-go breakfast or packing lunches. Pull out a slice in the morning and by lunchtime it’s thawed. Or toast directly from frozen – add a minute or two to regular toasting time.
Thawing Instructions:
Thaw the whole loaf at room temperature for 2-3 hours (still wrapped to retain moisture) or overnight in the refrigerator. Individual slices thaw in 20-30 minutes at room temperature. You can also microwave frozen slices on 50% power for 30-45 seconds, checking frequently. The bread tastes just as good as fresh after proper thawing.
Freezing Unbaked Batter:
You can also freeze the batter itself in a greased loaf pan. Wrap tightly with plastic wrap and foil. Freeze for up to 2 months. Bake directly from frozen at 350°F for 75-85 minutes. The bread won’t rise quite as high, but it’s a convenient option for having fresh-baked bread anytime.
Serving Suggestions
Pumpkin chocolate chip bread is versatile and pairs with many accompaniments:
Breakfast Options:
Serve this moist pumpkin bread for breakfast alongside:
- Hot coffee or espresso (the perfect pairing)
- Chai tea latte with complementary spices
- Orange juice or apple cider
- Greek yogurt and fresh berries
- Scrambled eggs for a complete breakfast
Spreads and Toppings:
Enhance slices with delicious toppings:
- Butter (salted or honey butter) while warm
- Cream cheese (plain or cinnamon cream cheese)
- Nut butters (almond, peanut, or cashew butter)
- Nutella or cookie butter for double chocolate
- Maple syrup drizzle
Afternoon Tea or Coffee:
Perfect for cozy afternoon breaks:
- Slice and serve with hot tea or coffee
- Pair with whipped cream or ice cream as dessert
- Toast and spread with mascarpone
- Serve with pumpkin spice latte for ultimate fall experience
Holiday and Special Occasions:
This bread fits many celebrations:
- Thanksgiving breakfast or dessert
- Halloween treats (festive and seasonal)
- Christmas morning breakfast
- Fall brunch gatherings
- Hostess gift (bake in mini loaf pans)
Make It Fancy:
Transform into elegant dessert:
- Top with vanilla ice cream and caramel sauce
- Serve with whipped cream and cinnamon
- Make bread pudding with cubed pumpkin bread
- Create French toast with thick slices
- Layer with cream cheese frosting for trifle
Beverages:
Complement with these drinks:
- Pumpkin spice latte or coffee
- Hot chocolate or mocha
- Chai tea or spiced tea
- Apple cider (hot or cold)
- Milk (regular, almond, or oat)
FAQs Section
Q: Can I use fresh pumpkin instead of canned?
Yes, but canned is actually easier and more consistent. If using fresh pumpkin, you’ll need to cook, puree, and drain it to the right consistency – too watery and your bread will be gummy. Roast or steam pumpkin chunks until very soft, puree until smooth, then strain through cheesecloth to remove excess liquid. You want the consistency of canned pumpkin. Most bakers find canned more reliable since moisture content is standardized.
Q: Why did my chocolate chips sink to the bottom?
Chocolate chips sink when the batter is too thin or when chips are added without any coating. To prevent sinking: toss chocolate chips in a tablespoon of flour (taken from your measured flour) before folding into batter. This light coating helps suspend them. Also make sure your batter is properly thick – if it’s too thin and runny, chips will sink regardless. Using mini chocolate chips instead of regular also helps as they’re lighter.
Q: Can I make this recipe into muffins instead?
Absolutely! This recipe makes about 18 standard muffins or 12 jumbo muffins. Fill muffin cups about ¾ full. Bake standard muffins at 350°F for 18-22 minutes, jumbo muffins for 22-25 minutes. Test doneness with a toothpick – it should come out clean or with a few crumbs. Muffins are perfect for portion control, easier sharing, and faster eating. They also freeze beautifully individually wrapped.
Q: My bread has a crack on top – did I do something wrong?
No! A crack down the center of quick bread is actually a sign of proper baking. It’s called “blooming” and happens as the batter rises and expands in the oven. The top sets first, then the interior continues expanding, creating the characteristic crack. This is desirable and means your leavening agents worked correctly. A smooth top might indicate under-leavening. Embrace the crack – it’s beautiful!
Q: Can I reduce the sugar in this recipe?
You can reduce sugar slightly (by up to ¼ cup) without dramatically affecting texture, though the bread will be less sweet and might not brown as nicely. Sugar doesn’t just sweeten – it also tenderizes, adds moisture, and helps with browning. Reducing it too much affects these qualities. If watching sugar intake, reduce to ¾ cup and increase spices slightly to compensate for flavor. Or use half regular sugar and half coconut sugar for lower glycemic option.
Q: Is there a difference between pumpkin puree and pumpkin pie filling?
Yes – huge difference! Pumpkin puree is just cooked and pureed pumpkin with nothing added. Pumpkin pie filling contains added sugar, spices, and often thickeners or dairy, specifically formulated for making pumpkin pie. Using pie filling in this recipe creates overly sweet, incorrectly spiced bread with wrong texture. Always use pure pumpkin puree. Check the label – ingredients should only list pumpkin.
Q: Why is my bread dry or dense?
Dry, dense bread usually results from: too much flour (measure properly by spooning and leveling), overmixing the batter (develops too much gluten), overbaking (check doneness early), or old leavening agents (baking soda/powder lose potency after 6 months). Make sure to measure flour correctly, mix just until combined, check doneness at 55 minutes, and use fresh leavening agents. Also ensure you’re using the full cup of pumpkin – it provides essential moisture.
Conclusion
There you have it – everything you need to make the most delicious, moist, perfectly spiced pumpkin chocolate chip bread that will fill your home with the most amazing fall aromas! This easy pumpkin bread recipe with chocolate chips proves that the best things in life are often the simplest – just a few pantry ingredients mixed together and baked into something truly special.
The beauty of this pumpkin chocolate chip quick bread is how it brings together all the flavors we love about fall baking in one perfect loaf. The warm spices, the rich pumpkin, and those melty pockets of chocolate create something that’s comforting, delicious, and feels like a cozy autumn hug. Whether you’re baking it for your family’s breakfast, gifting it to neighbors, or serving it at holiday gatherings, this bread always impresses.
I hope this recipe becomes a fall tradition in your kitchen like it is in mine! There’s something so satisfying about pulling a golden-brown loaf of homemade pumpkin bread from the oven, knowing it’s going to taste absolutely incredible.