
Get ready to fall in love with this creamy garlic chicken thighs recipe—tender, juicy chicken smothered in a luxurious garlic cream sauce that’s so good you’ll want to lick the pan. This one-pan chicken dinner is the kind of recipe that looks and tastes like you spent hours in the kitchen, but it comes together in about 30 minutes with minimal effort and even less cleanup.
Whether you’re planning a cozy weeknight dinner, looking for an impressive date night meal, or need something special for Sunday supper, these creamy chicken thighs deliver every single time. The combination of golden-brown, perfectly seasoned chicken and rich, garlicky cream sauce is absolutely irresistible. Serve it over mashed potatoes, pasta, rice, or with crusty bread to soak up every drop of that incredible sauce, and prepare for everyone at your table to ask for seconds.
This easy garlic chicken recipe proves that simple ingredients can create extraordinary results. You probably have everything you need in your pantry and fridge right now—chicken thighs, garlic, cream, and basic seasonings transform into something that tastes like it came from a high-end restaurant. The best part? It all cooks in one skillet, which means minimal dishes and maximum flavor. This is the kind of recipe you’ll make again and again, the one that becomes your go-to when you need dinner to be both easy and special.
History / Background: A Classic European Technique
Creamy garlic chicken dishes have roots in European cooking, particularly French and Italian cuisines where cream sauces and garlic are foundational elements. The French have long mastered the art of pan sauces, using the flavorful browned bits (fond) left in the pan after cooking meat to create rich, complex sauces. This technique, called “deglazing,” forms the basis for countless classic French dishes.
In French cuisine, chicken cooked in cream sauce appears in various regional preparations. “Poulet à la Crème” (chicken in cream) is a traditional Normandy dish that celebrates the region’s famous dairy products. The French technique of creating a cream-based pan sauce involves deglazing with wine or broth, reducing the liquid, and finishing with heavy cream—exactly the method we use in this recipe.
Italian cooking also embraces the combination of chicken, garlic, and cream, though Italian versions often include ingredients like sun-dried tomatoes, spinach, or Parmesan cheese. The Mediterranean love affair with garlic means it appears abundantly in Italian chicken dishes, providing both flavor and the health benefits garlic has been prized for throughout history.
The specific combination of chicken thighs (rather than breasts) with cream sauce gained popularity in American home cooking during the late 20th century as home cooks discovered that thighs are more forgiving, flavorful, and economical than chicken breasts. Thighs remain juicy and tender even if slightly overcooked, making them perfect for busy home cooks who need reliable results.
The one-pan preparation method became especially popular in recent decades as home cooks sought ways to create impressive meals without spending hours cooking or cleaning. By cooking everything in a single skillet—searing the chicken, building the sauce, and finishing the dish—home cooks could achieve restaurant-quality results with minimal fuss.
Today, creamy garlic chicken has become a beloved weeknight staple in American kitchens, representing the perfect fusion of European technique and practical American home cooking. It’s comfort food that feels elegant, a simple recipe that tastes complex, and a dish that brings people together around the table with its irresistible aroma and flavor.
Why You’ll Love This Recipe
This creamy garlic chicken thighs recipe is about to become your new favorite go-to dinner. It strikes that perfect balance between impressively delicious and realistically achievable—the kind of recipe that makes you feel like a culinary genius without requiring actual genius-level skills.
Here’s what makes this creamy chicken recipe absolutely irresistible:
- Restaurant Quality at Home: That luscious, velvety garlic cream sauce tastes like something from an upscale bistro, but you’re making it in your own kitchen for a fraction of the cost
- One-Pan Wonder: Everything cooks in a single skillet, which means less cleanup and more time to actually enjoy your evening
- Quick Weeknight Dinner: From start to finish in about 30 minutes—perfect for busy weeknights when you want something special without the stress
- Juicy, Never Dry: Chicken thighs stay incredibly moist and tender, unlike chicken breasts which can easily dry out. You’ll get perfect results every time
- Budget-Friendly: Chicken thighs are one of the most affordable cuts of chicken, and the other ingredients are simple pantry staples
- Impressive but Easy: This dish looks and tastes fancy enough to serve to guests, but it’s simple enough to make any Tuesday night
- Garlic Lover’s Dream: If you love garlic (and who doesn’t?), this recipe delivers bold garlic flavor without being overwhelming
- Versatile Serving Options: Pairs beautifully with pasta, rice, mashed potatoes, zoodles, or crusty bread—adapt it to whatever you’re craving
- Keto and Low-Carb Friendly: This recipe naturally fits low-carb and keto diets. Just serve with cauliflower rice or zucchini noodles
- Make-Ahead Friendly: The chicken actually tastes even better the next day, making it perfect for meal prep or advance preparation
- Comfort Food Perfection: Rich, creamy, satisfying, and warming—this is the kind of dinner that makes you feel cozy and content
Ingredient Notes: Simple Ingredients, Spectacular Results
Understanding your ingredients helps you achieve the best possible results. Here’s what you’ll need and why each component matters:
Chicken Thighs (Bone-In, Skin-On): The star of this dish! Bone-in, skin-on chicken thighs are the best choice for several reasons. The skin crisps beautifully when seared, adding textural contrast to the creamy sauce. The bones add flavor and help the meat stay incredibly juicy during cooking. Thighs have more fat than breasts, which translates to more flavor and a more forgiving cooking process. You can use boneless, skinless thighs if you prefer (reduce cooking time by about 5 minutes), but you’ll miss out on that crispy skin and some flavor depth.
Garlic: Fresh garlic cloves are essential—this recipe uses a generous amount because garlic is the star flavor. Mince it finely so it distributes evenly throughout the sauce. Don’t substitute with garlic powder here; fresh garlic provides the aromatic, complex flavor this dish needs. If you’re a true garlic lover, you can even increase the amount slightly.
Heavy Cream: Creates that luxuriously rich, velvety sauce that coats everything beautifully. Heavy cream (also called heavy whipping cream) has the highest fat content, which means it won’t curdle when simmered and creates the silkiest texture. Half-and-half can work in a pinch but won’t be quite as rich. For a lighter version, you can use half chicken broth and half cream, though the sauce will be thinner.
Chicken Broth: Adds depth and savory flavor to the sauce while providing liquid to deglaze the pan and capture all those flavorful browned bits. Use good-quality, low-sodium chicken broth so you can control the salt level. Homemade chicken stock is even better if you have it.
Butter: Works together with olive oil for searing the chicken. Butter adds rich flavor and helps achieve beautiful browning, while olive oil raises the smoke point so the butter doesn’t burn.
Olive Oil: Helps the chicken achieve that gorgeous golden-brown sear. Extra-virgin olive oil adds the best flavor, though regular olive oil works fine too.
All-Purpose Flour: Used to lightly coat the chicken before searing, which helps achieve better browning and also helps thicken the sauce slightly. For gluten-free, use a 1:1 gluten-free flour blend.
Italian Seasoning: A convenient blend of dried herbs (typically basil, oregano, rosemary, and thyme) that adds complexity without needing multiple herb containers. You can make your own blend or use individual dried herbs.
Paprika: Adds subtle sweetness, color, and depth to the chicken seasoning. Regular paprika works fine, but smoked paprika adds an extra dimension of flavor if you have it.
Parmesan Cheese: Freshly grated Parmesan stirred into the finished sauce adds nutty, salty, umami richness that takes the flavor to the next level. Always grate it fresh from a block rather than using pre-grated—it melts better and tastes significantly better.
Fresh Parsley: A garnish that adds color, freshness, and a slight peppery note that brightens the rich sauce. Don’t skip it—the fresh herb contrast is important.
Salt and Black Pepper: Essential for seasoning each component properly. Use kosher salt for even seasoning and freshly ground black pepper for the best flavor.
Equipment Needed
Having the right tools makes cooking this dish easier and more enjoyable. Here’s what you’ll need:
- Large Oven-Safe Skillet or Cast Iron Pan (12-inch recommended): You need a pan large enough to fit all the chicken thighs without overcrowding. Cast iron is ideal because it maintains steady heat and goes from stovetop to oven seamlessly, but any heavy-bottomed, oven-safe skillet works great
- Tongs: For flipping the chicken and transferring it in and out of the pan without piercing the meat (which would release juices)
- Meat Thermometer: Ensures your chicken is perfectly cooked to 165°F without overcooking. This inexpensive tool takes the guesswork out of cooking meat
- Whisk or Wooden Spoon: For stirring the sauce and scraping up the flavorful browned bits from the bottom of the pan
- Measuring Cups and Spoons: For accurate measurements of liquids, flour, and seasonings
- Shallow Dish or Plate: For dredging the chicken in seasoned flour
- Garlic Press or Sharp Knife: For mincing the garlic finely and efficiently
- Cutting Board: For prep work—mincing garlic and chopping parsley
- Paper Towels: For patting the chicken dry before seasoning (crucial for achieving crispy skin)

Creamy Garlic Chicken Thighs Recipe
- Total Time: 35 minutes
- Yield: 4 servings 1x
- Diet: Gluten Free
Description
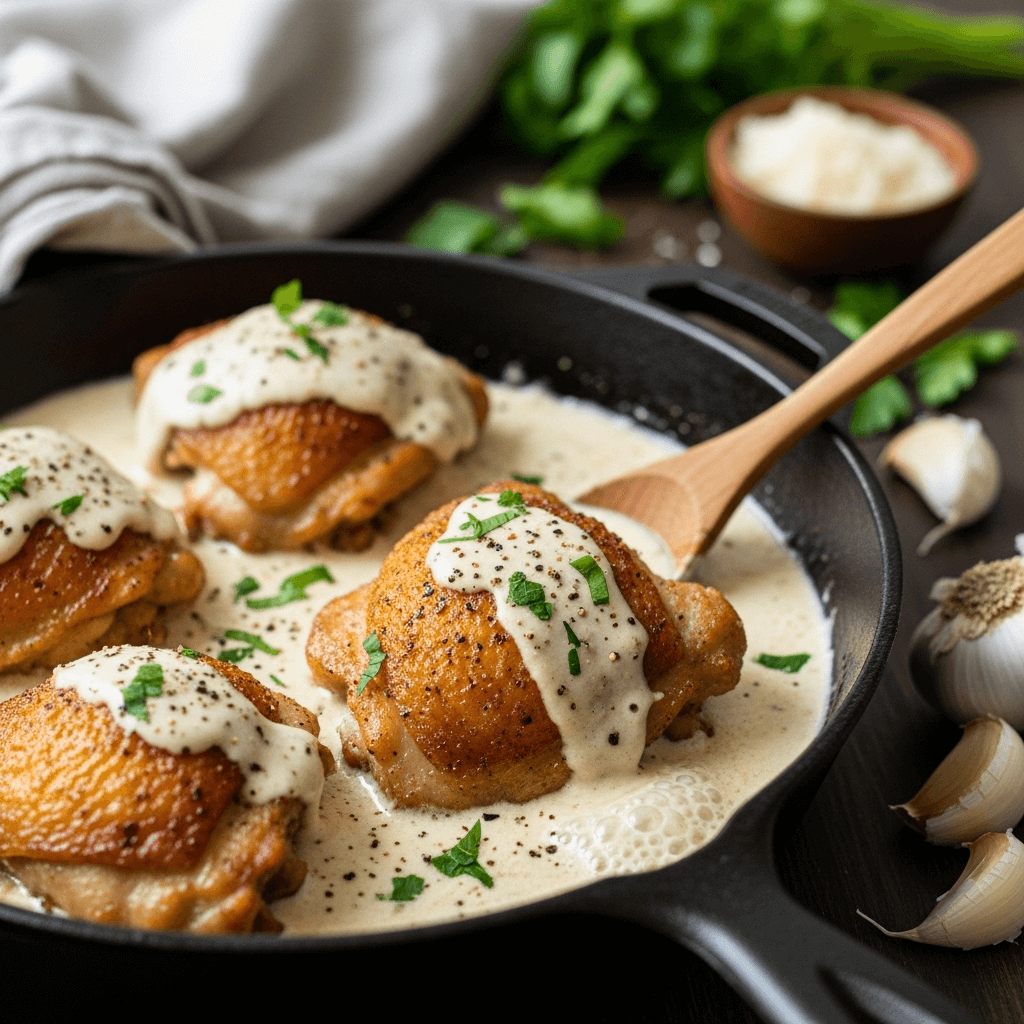
These creamy garlic chicken thighs feature perfectly seared, golden-brown chicken with crispy skin, smothered in a rich, velvety garlic cream sauce. This easy one-pan chicken dinner comes together in just 35 minutes and tastes like restaurant-quality comfort food. The savory cream sauce is perfect for spooning over mashed potatoes, pasta, or rice!
Ingredients
For the Chicken:
- 6 bone-in, skin-on chicken thighs (about 2–2.5 pounds)
- 1/3 cup all-purpose flour (or gluten-free flour blend)
- 1 teaspoon salt
- 1/2 teaspoon black pepper
- 1 teaspoon paprika
- 1 teaspoon Italian seasoning
- 2 tablespoons olive oil
- 2 tablespoons butter
For the Creamy Garlic Sauce:
- 6 cloves garlic, minced (about 2 tablespoons)
- 1 cup chicken broth (low-sodium recommended)
- 1 cup heavy cream
- 1/2 cup freshly grated Parmesan cheese
- 1 teaspoon Italian seasoning
- 1/4 teaspoon red pepper flakes (optional, for subtle heat)
- Salt and black pepper to taste
- 2 tablespoons fresh parsley, chopped (for garnish)
Instructions
Step 1: Prep and Season the Chicken
Remove the chicken thighs from the refrigerator and pat them completely dry with paper towels—this is crucial for achieving crispy skin. In a shallow dish, combine the flour, salt, black pepper, paprika, and Italian seasoning. Mix well. Dredge each chicken thigh in the seasoned flour mixture, coating both sides and shaking off any excess. Set the coated chicken aside on a clean plate. Preheat your oven to 375°F (190°C).
Step 2: Sear the Chicken to Golden Perfection
Heat a large, oven-safe skillet (preferably cast iron) over medium-high heat. Add the olive oil and butter, swirling to coat the bottom of the pan. Once the butter melts and begins to sizzle, carefully place the chicken thighs skin-side down in the pan. Don’t move them! Let them sear undisturbed for 5-7 minutes until the skin is deeply golden brown and crispy. Use tongs to flip each thigh and sear the other side for another 4-5 minutes until golden. The chicken won’t be fully cooked yet—that’s fine. Transfer the seared chicken to a plate and set aside.
Step 3: Build the Aromatic Garlic Base
Pour off all but about 2 tablespoons of the fat from the skillet (leave those flavorful browned bits on the bottom). Reduce heat to medium. Add the minced garlic to the pan and sauté for about 1 minute, stirring constantly, until fragrant and just beginning to turn golden. Be careful not to burn it—burnt garlic tastes bitter.
Step 4: Deglaze and Create the Sauce
Pour in the chicken broth and use a wooden spoon or whisk to scrape up all those delicious browned bits stuck to the bottom of the pan (this is called deglazing and adds incredible flavor to your sauce). Let the broth simmer for 2-3 minutes to reduce slightly. Pour in the heavy cream and stir to combine. Add the Italian seasoning and red pepper flakes if using. Bring the mixture to a gentle simmer.
Step 5: Add Cheese and Season
Reduce the heat to medium-low and gradually stir in the freshly grated Parmesan cheese, whisking until it melts completely into the sauce and creates a smooth, creamy consistency. Taste the sauce and adjust seasoning with salt and black pepper as needed. Remember that it will concentrate slightly as it cooks, so don’t oversalt at this stage.
Step 6: Return Chicken and Finish in Oven
Nestle the seared chicken thighs back into the skillet, skin-side up, spooning some of the creamy sauce over the meat (but try to keep the crispy skin mostly above the sauce). Transfer the entire skillet to your preheated 375°F oven. Bake for 15-18 minutes, or until a meat thermometer inserted into the thickest part of a thigh reads 165°F. The sauce should be bubbling gently around the chicken.
Step 7: Rest and Serve
Remove the skillet from the oven (careful—the handle is HOT!). Let the chicken rest for 5 minutes to allow the juices to redistribute. The sauce will thicken slightly as it sits. Garnish generously with fresh chopped parsley. Serve the chicken with plenty of that gorgeous creamy garlic sauce spooned over the top.
Notes
- Chicken Size Matters: Larger chicken thighs may need an extra 5 minutes in the oven. Always check with a meat thermometer for accuracy.
- Boneless Skinless Option: You can use boneless, skinless thighs. Reduce oven time to about 12-15 minutes and skip the flour dredging if desired.
- Make It Lighter: Substitute half the heavy cream with additional chicken broth for a lighter (though less rich) sauce.
- Crispy Skin Secret: Patting the chicken completely dry before seasoning is the single most important step for crispy skin. Don’t skip it!
- Pan Size: Don’t overcrowd your pan. If your skillet isn’t large enough for all 6 thighs with space between them, cook in batches or use a larger pan.
- Sauce Consistency: If your sauce seems too thin, let it simmer on the stovetop for a few extra minutes after removing the chicken. If too thick, whisk in a splash more broth or cream.
- Prep Time: 10 minutes
- Cook Time: 25 minutes
- Category: Dinner
- Method: Stovetop
- Cuisine: European-American
Nutrition
- Serving Size: 1 chicken thigh with sauce (1.5 portions of thigh)
- Calories: 520
- Sugar: 2g
- Sodium: 680mg
- Fat: 38g
- Saturated Fat: 18g
- Unsaturated Fat: 16g
- Trans Fat: 0g
- Carbohydrates: 10g
- Fiber: 0g
- Protein: 35g
- Cholesterol: 215mg
Tips & Variations: Make It Your Own
Add Vegetables:
- Stir in 2 cups fresh spinach during the last 2 minutes of cooking—it will wilt beautifully into the sauce
- Add 1 cup sliced mushrooms when you sauté the garlic for earthy flavor
- Include sun-dried tomatoes (about 1/3 cup, chopped) for tangy sweetness
- Toss in 1 cup cherry tomatoes that burst and sweeten in the sauce
Flavor Variations:
- Lemon Garlic: Add the zest and juice of 1 lemon to the sauce for bright, fresh flavor
- Tuscan Style: Add sun-dried tomatoes, spinach, and an extra tablespoon of Italian seasoning
- Cajun Creamy Chicken: Replace Italian seasoning with Cajun seasoning and add a pinch of cayenne
- Herb Lovers: Add 2 tablespoons fresh thyme leaves and 1 tablespoon fresh rosemary to the sauce
- White Wine Addition: Deglaze with 1/2 cup white wine before adding the chicken broth for extra depth
Lighter Versions:
- Use half cream and half chicken broth instead of all heavy cream
- Substitute Greek yogurt for half the heavy cream (add it at the end, off heat, to prevent curdling)
- Remove the chicken skin before cooking to significantly reduce fat and calories
- Use light cream cheese (4 oz) whisked into the sauce instead of heavy cream for richness with fewer calories
Different Proteins:
- Use boneless, skinless chicken breasts (pound to even thickness, reduce cooking time)
- Try pork chops instead of chicken for a delicious variation
- Use thick white fish fillets like cod or halibut (reduce cooking time significantly)
Sauce Enhancements:
- Add 2 tablespoons Dijon mustard for tangy complexity
- Stir in 1 tablespoon capers for briny, sophisticated flavor
- Include 1/4 cup white wine or dry sherry
- Add 1 teaspoon fresh thyme or rosemary
Cheese Variations:
- Use Gruyère instead of Parmesan for a nuttier, more complex flavor
- Try Pecorino Romano for a sharper, saltier taste
- Mix in some cream cheese for extra richness and thickness
Pro Chef Tips: Restaurant-Quality Results
Dry Chicken is Crispy Chicken: The number one secret to achieving restaurant-quality crispy skin is starting with completely dry chicken. Moisture is the enemy of crispiness. After patting dry with paper towels, let the chicken sit on a plate uncovered in the refrigerator for 30 minutes if you have time. This air-drying step removes even more surface moisture and results in incredible skin crispiness.
Don’t Move the Chicken: When you place the chicken skin-side down in the hot pan, resist the urge to move it, poke it, or check it for at least 5 minutes. Moving it prevents proper browning and can cause the skin to stick and tear. The chicken will release naturally from the pan when it’s properly seared. If it’s sticking, it’s not ready to flip yet.
Temperature Matters: Your pan needs to be properly heated before adding the chicken. To test, flick a drop of water into the pan—it should sizzle and evaporate immediately. If it just sits there, the pan isn’t hot enough. Too-cool pans lead to pale, soft skin instead of crispy, golden perfection.
The Fond is Flavor Gold: Those browned bits stuck to the bottom of your pan after searing the chicken are called “fond,” and they’re packed with concentrated flavor. When you deglaze with chicken broth and scrape them up, they dissolve into your sauce, creating incredible depth. This is a fundamental French technique that separates good sauces from great ones.
Room Temperature Ingredients: Heavy cream straight from the refrigerator can shock the hot pan and may curdle or separate. Let your cream sit at room temperature for 15-20 minutes before using, or warm it very gently. This ensures it incorporates smoothly into your sauce.
Gradual Cheese Addition: Add grated Parmesan slowly while stirring constantly. Dumping it all in at once can cause clumping. The gentle, gradual approach with constant stirring ensures the cheese melts smoothly and creates a silky sauce rather than a grainy one.
Finishing in the Oven: Starting on the stovetop and finishing in the oven is a professional technique that ensures even cooking. The stovetop gives you that beautiful sear and crispy skin, while the gentle, even heat of the oven cooks the chicken through without drying it out or burning the skin.
Let It Rest: Resting meat after cooking allows the juices to redistribute throughout the meat rather than running out onto your cutting board (or plate). Even just 5 minutes makes a noticeable difference in juiciness. Be patient—it’s worth the wait.
Common Mistakes to Avoid
Mistake #1: Overcrowding the Pan
If you try to cram too many chicken thighs into a pan that’s too small, they’ll steam instead of sear. Steaming leads to soft, pale, rubbery skin instead of crispy, golden deliciousness. The thighs should have at least half an inch of space between them. If your pan isn’t big enough, cook in batches—the crispy skin is worth it.
Mistake #2: Not Patting the Chicken Dry
Wet chicken cannot get crispy, period. The moisture has to evaporate before browning can occur, which means your chicken sits in the pan longer (overcooking) and still doesn’t crisp up. Take the extra 30 seconds to thoroughly pat each piece dry with paper towels. This one simple step dramatically improves your results.
Mistake #3: Moving the Chicken Too Soon
When chicken goes into a hot pan, the proteins need time to sear and form a crust. If you try to flip too early, the skin will stick and tear, leaving you with a mess. Let it sear undisturbed for a full 5-7 minutes. You’ll know it’s ready to flip when it releases easily from the pan. If it’s sticking, give it another minute.
Mistake #4: Cooking on Too-High Heat Throughout
While you need high heat to sear the chicken initially, keeping the heat too high when making the sauce will cause the cream to break and separate, and the garlic can burn. After searing the chicken, reduce to medium or medium-low for building the sauce. Gentle heat creates smooth, velvety cream sauces.
Mistake #5: Not Using a Meat Thermometer
Guessing when chicken is done leads to either undercooked (unsafe) or overcooked (dry) results. A $10 instant-read thermometer takes all the guesswork out. Chicken is perfectly cooked at 165°F internal temperature. This single tool will dramatically improve all your chicken cooking, not just this recipe.
Mistake #6: Using Pre-Grated Parmesan
Pre-grated Parmesan is coated with anti-caking agents (usually cellulose) that prevent it from melting smoothly. It creates grainy, clumpy sauce instead of silky smooth. Always grate Parmesan fresh from a block for cooking. Save the pre-grated stuff for sprinkling on pasta.
Storage & Meal Prep: Planning Ahead
Refrigerator Storage:
Store leftover creamy garlic chicken in an airtight container in the refrigerator for up to 4 days. The chicken and sauce can be stored together. Interestingly, the flavors meld and deepen overnight, so many people find the leftovers taste even better than fresh. The sauce will thicken considerably when cold—this is completely normal.
Reheating Instructions:
For best results, reheat gently on the stovetop in a covered skillet over medium-low heat. Add a splash of chicken broth or cream to thin the sauce back to its original consistency. Heat until the chicken reaches 165°F throughout, stirring the sauce occasionally. You can also reheat individual portions in the microwave at 50% power in 1-minute intervals, stirring between each interval, though the microwave won’t restore the crispy skin.
Maintaining Crispy Skin:
Unfortunately, crispy chicken skin doesn’t survive refrigeration and reheating well—it will become soft. If crispy skin is important to you, remove the chicken from the sauce before storing and reheat the chicken in a 400°F oven for 10 minutes to re-crisp the skin, while reheating the sauce separately on the stovetop.
Meal Prep Tips:
This recipe works wonderfully for meal prep. Divide the chicken and sauce among 4 containers along with your choice of sides (rice, pasta, or roasted vegetables). The complete meals will keep in the refrigerator for 4 days. Reheat individual portions as needed throughout the week for quick, delicious lunches or dinners.
Food Safety:
Never leave cooked chicken at room temperature for more than 2 hours (1 hour if the temperature is above 90°F). Refrigerate leftovers within this window to prevent bacterial growth.
Make-Ahead & Freezer Notes: Ultimate Convenience
Make-Ahead Method (Same Day):
You can sear the chicken and make the sauce up to 4 hours ahead. Leave the chicken at room temperature if cooking within 1 hour, or refrigerate if longer. When ready to serve, return the chicken to the sauce and proceed with the oven step, adding about 5 extra minutes if the chicken has been refrigerated.
Make-Ahead Method (Day Before):
Fully cook the chicken and sauce, let cool completely, then refrigerate in an airtight container. The next day, reheat gently on the stovetop over medium-low heat, covered, until the chicken reaches 165°F throughout. This method actually enhances the flavor as the chicken marninates in the sauce overnight.
Freezing Cooked Chicken:
This dish freezes reasonably well for up to 3 months, though the texture of the sauce may change slightly upon thawing. Let the chicken and sauce cool completely, then transfer to freezer-safe containers or bags, removing as much air as possible. Label with the date. The crispy skin will not survive freezing and thawing, so if crispy skin is important, this dish is best enjoyed fresh.
Thawing and Reheating from Frozen:
Thaw frozen chicken and sauce overnight in the refrigerator, never at room temperature. Reheat gently on the stovetop over medium-low heat, adding a splash of cream or broth to refresh the sauce. Stir occasionally and heat until the chicken reaches 165°F. You may need to whisk the sauce to re-emulsify it if it has separated slightly.
Freezing Just the Sauce:
The sauce alone freezes beautifully for up to 4 months. Make a double batch of sauce, use half fresh, and freeze half for an easy head start on future meals. Thaw in the refrigerator overnight, reheat gently, and whisk smooth. Pour over freshly cooked chicken for a quick dinner shortcut.
Individual Portions:
For ultimate convenience, freeze individual portions of chicken with sauce in single-serving containers. These are perfect for quick lunches or when just one or two people need dinner. Thaw overnight and reheat in the microwave.
Serving Suggestions: Complete Your Meal
Creamy garlic chicken thighs pair beautifully with a variety of sides that complement the rich, savory sauce. Here are my favorite combinations:
Starchy Sides (Perfect for Sauce Soaking):
- Creamy Mashed Potatoes: The classic choice—ultra-creamy mashed potatoes are perfect for soaking up every drop of that garlicky sauce
- Pasta: Fettuccine, pappardelle, or egg noodles tossed in a little butter make an excellent base for the chicken and sauce
- Rice: White rice, brown rice, or cauliflower rice (for low-carb) all work wonderfully
- Polenta: Creamy polenta creates an elegant, restaurant-style presentation
- Crusty Bread: Artisan bread, garlic bread, or dinner rolls for mopping up sauce
- Roasted Potatoes: Baby potatoes roasted with rosemary and olive oil add textural contrast
Vegetable Sides:
- Roasted Asparagus: The slight bitterness balances the rich cream sauce perfectly
- Green Beans: Simply steamed or sautéed with garlic and lemon
- Roasted Brussels Sprouts: Their caramelized edges complement the creamy chicken
- Sautéed Spinach: Cook spinach with garlic and a squeeze of lemon for a quick, healthy side
- Roasted Broccoli: Crispy roasted broccoli adds color and nutrition
- Mixed Salad: A simple green salad with vinaigrette cuts through the richness
Complete Meal Ideas:
- Elegant Dinner: Serve the chicken over creamy polenta with roasted asparagus and a glass of Chardonnay
- Comfort Food Night: Pair with mashed potatoes, roasted carrots, and dinner rolls
- Low-Carb Meal: Serve over zucchini noodles with roasted Brussels sprouts
- Family Style: Set out the skillet with pasta, green beans, and garlic bread for everyone to serve themselves
Beverage Pairings: This rich, creamy dish pairs wonderfully with crisp white wines like Chardonnay, Pinot Grigio, or Sauvignon Blanc. For red wine lovers, try a light-bodied Pinot Noir. Non-alcoholic options include sparkling water with lemon, iced tea, or a crisp apple cider.
FAQs: Your Questions Answered
Q: Can I use chicken breasts instead of thighs?
A: Yes, but with modifications. Chicken breasts are leaner and cook faster, so they’re more prone to drying out. If using breasts, pound them to even thickness (about 3/4 inch), skip the oven step entirely, and simply simmer them in the sauce on the stovetop for 12-15 minutes until they reach 165°F. Thighs are more forgiving and flavorful, which is why they’re recommended, but breasts absolutely work.
Q: Can I make this in a slow cooker or Instant Pot?
A: For slow cooker: sear the chicken first for best flavor, then place everything in the slow cooker on low for 4-5 hours. Add the cream and Parmesan during the last 30 minutes to prevent separation. For Instant Pot: use the sauté function to sear chicken and build the sauce, then pressure cook on high for 8 minutes with natural release. The stovetop-to-oven method gives the best results, but these appliances work for convenience.
Q: Is this recipe keto-friendly?
A: Absolutely! This creamy garlic chicken is naturally low in carbohydrates and high in fat, making it perfect for ketogenic diets. The 10g of carbs per serving come mostly from the flour dredging. To reduce further, skip the flour coating or use almond flour. Serve with cauliflower rice, zucchini noodles, or steamed vegetables instead of pasta or potatoes.
Q: Why did my sauce separate or look curdled?
A: Cream sauces can “break” (separate into fat and liquid) if heated too aggressively or if acidic ingredients are added improperly. To prevent this: use medium or medium-low heat when making the sauce, avoid boiling the cream (gentle simmering is fine), and let your cream come to room temperature before adding to the hot pan. If your sauce breaks, remove from heat and whisk vigorously while adding a tablespoon of cold cream—this often brings it back together.
Q: Can I make this dairy-free?
A: Yes, with substitutions. Use coconut cream (the thick part from a can of full-fat coconut milk) instead of heavy cream—it provides richness without dairy taste in savory dishes. Replace the butter with olive oil, and use nutritional yeast instead of Parmesan cheese for a cheesy flavor. The texture won’t be identical, but it will still be creamy and delicious.
Q: My chicken skin isn’t crispy. What went wrong?
A: The most common cause is wet chicken. The skin must be completely dry before it hits the hot pan. Other culprits include overcrowding the pan (causes steaming), not letting the pan get hot enough before adding the chicken, or moving the chicken before it’s had time to sear properly. Pat the chicken very dry, ensure your pan is properly heated, give the pieces space, and resist the urge to move them for at least 5 minutes.
Q: How do I know when the chicken is done?
A: The only reliable way is using a meat thermometer. Insert it into the thickest part of the thigh (avoiding the bone) and look for 165°F. Visual cues can be misleading—clear juices running from the chicken when pierced is a good sign, but temperature is the only foolproof method. Invest in an instant-read thermometer for consistently perfect chicken every time.
Conclusion: Your New Go-To Chicken Recipe
This creamy garlic chicken thighs recipe deserves a permanent spot in your dinner rotation. It’s proof that you don’t need complicated techniques or expensive ingredients to create something truly spectacular. Just simple, quality ingredients prepared with a few key techniques, and you’ve got a restaurant-worthy meal that’ll have everyone at your table asking when you’re making it again.
The beauty of this easy garlic chicken recipe is how it makes you look like a culinary genius with minimal effort. The one-pan preparation means you’re not chained to the kitchen all evening, and the fact that it actually tastes better as leftovers makes it perfect for meal prep or advance cooking. Whether you’re cooking for your family on a busy Tuesday or trying to impress someone special on date night, these creamy chicken thighs deliver every single time.
I hope you love this recipe as much as I do! It’s become one of my most-requested dishes—friends and family are always surprised when I tell them how easy it is. The combination of crispy-skinned chicken and that rich, velvety garlic cream sauce is just irresistible.
Have you tried this creamy garlic chicken recipe? I’d love to hear how it turned out! Drop a comment below with your thoughts, any variations you tried, or what you served alongside it. And if you loved it, please rate the recipe and share it on Pinterest so other home cooks can discover it too!
Happy cooking, and enjoy every creamy, garlicky, delicious bite! 🍗