

Is there anything more delightful than biting into a perfectly balanced lemon bar with its buttery shortbread crust and bright, tangy lemon filling topped with a snowy dusting of powdered sugar? These classic lemon bars are the quintessential sunny dessert that brings instant joy to any occasion. The combination of sweet and tart flavors, creamy texture, and crumbly crust creates a harmonious dessert experience that’s been beloved by generations of home bakers across America.
This easy lemon bars recipe is incredibly versatile—perfect for spring and summer gatherings, potlucks, bake sales, afternoon tea parties, or whenever you need a crowd-pleasing dessert that looks impressive but comes together with simple pantry ingredients. They’re elegant enough for Easter brunch, Mother’s Day celebrations, or bridal showers, yet easy enough to whip up on a random Tuesday when you’re craving something sweet and refreshing. Best of all, these homemade lemon bars can be prepared in about an hour from start to finish, with most of that time being hands-off baking. The active prep time is minimal, making them an ideal choice for busy bakers who want bakery-quality results without spending all day in the kitchen.
History / Background
Lemon bars, also known as lemon squares, have a fascinating culinary history that reflects America’s love affair with citrus desserts. While the exact origins are somewhat murky, most food historians trace lemon bars back to the early-to-mid 20th century in the United States, likely emerging sometime in the 1960s or 1970s. They represent a distinctly American interpretation of European lemon curd traditions, simplified and transformed into a portable bar cookie format that suited the country’s casual entertaining style.
The recipe likely evolved from traditional British lemon curd tarts and chess pie-style desserts that were popular in the American South. Clever home bakers discovered that by creating a sturdy shortbread base and topping it with a simplified lemon custard filling that could set firmly enough to cut into neat squares, they could create an elegant dessert that was both portable and practical—perfect for church socials, community gatherings, and potluck dinners that defined mid-century American social life.
Lemon bars gained widespread popularity through community cookbooks and church fundraiser recipe collections before eventually making their way into mainstream cookbooks and magazines in the 1970s and 1980s. The recipe’s simplicity and the fact that it required only basic pantry ingredients made it accessible to home bakers everywhere. Fresh lemons, eggs, butter, flour, and sugar—ingredients that most households kept on hand—were all you needed to create something special.
Today, these classic lemon dessert bars remain one of the most popular bar cookie recipes in America. They’ve stood the test of time because they strike the perfect balance between sophistication and simplicity. Whether served at a fancy garden party or packed in a lunchbox, lemon bars bring that same bright, cheerful flavor that has made them a timeless favorite for over half a century.
Why You’ll Love This Recipe
This best lemon bars recipe has been tested and perfected to deliver consistent, bakery-quality results every single time you make them. They’re the ideal dessert for both beginner bakers and experienced cooks looking for a reliable, crowd-pleasing recipe.
- Perfect sweet-tart balance – The tangy lemon filling contrasts beautifully with the buttery, sweet shortbread crust for a flavor combination that’s never too sweet or too sour
- Impressive yet simple – Looks like you spent hours in the kitchen, but it’s actually one of the easiest desserts you’ll ever make
- No special equipment needed – Just a baking pan, bowl, and whisk—no mixer required
- Make-ahead friendly – Tastes even better the next day, making them perfect for stress-free entertaining
- Feeds a crowd – One batch yields 16 generous bars, ideal for parties, bake sales, or potlucks
- Uses simple ingredients – No exotic ingredients or special trips to specialty stores required
- Beautiful presentation – The bright yellow filling and powdered sugar topping look stunning on any dessert table
- Great for any season – While perfect for spring and summer, the bright citrus flavor is welcome year-round
- Portable and neat – No messy plating required—these bars hold their shape perfectly
- Always gets compliments – One of those recipes people will ask you to make again and again
Ingredient Notes
Fresh Lemons: The star ingredient! You’ll need 4-5 medium lemons to get both the zest and juice required. Always use fresh lemons, never bottled lemon juice—the difference in flavor is dramatic. Look for lemons that feel heavy for their size (indicating juiciness) with smooth, bright yellow skin. Meyer lemons create a slightly sweeter, more floral flavor if you can find them.
Butter: Use unsalted butter for the crust so you can control the salt level. The butter should be cold for the crust and at room temperature when mixing into the filling. Real butter is essential here—don’t substitute with margarine or spreads, as they contain too much water and won’t create the proper shortbread texture.
All-Purpose Flour: Creates structure in both the crust and helps thicken the lemon filling. For gluten-free lemon bars, you can use a 1:1 gluten-free flour blend, though the crust texture will be slightly more crumbly.
Granulated Sugar: Sweetens both layers. The sugar in the filling also helps create that signature smooth, custard-like texture.
Eggs: Large eggs are standard for this recipe. They bind the filling and create that creamy, set texture. Room temperature eggs incorporate more smoothly into the filling.
Powdered Sugar: Used in the crust for a tender, melt-in-your-mouth texture and as a beautiful finishing dusting on top. Also called confectioners’ sugar or icing sugar.
Baking Powder: A small amount helps the filling set properly and creates a slightly lighter texture.
Salt: Just a pinch enhances all the other flavors and balances the sweetness. Don’t skip it—it makes a real difference.
Equipment Needed
- 9×13-inch baking pan (metal or glass)
- Parchment paper (highly recommended for easy removal)
- Medium mixing bowl for crust
- Large mixing bowl for filling
- Whisk
- Microplane or box grater (for lemon zest)
- Citrus juicer or reamer
- Measuring cups and spoons
- Rubber spatula
- Fork (for mixing crust)
- Fine-mesh sieve (for dusting powdered sugar)
- Sharp knife for cutting bars
- Cooling rack
Pro Tip: Lining your pan with parchment paper with overhang on two sides creates “handles” that let you lift the entire batch out of the pan for perfectly clean cuts.
Print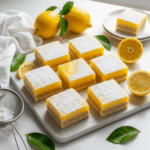
Lemon Bars Recipe
- Total Time: 1 hour (plus cooling time)
- Yield: 16 bars 1x
- Diet: Vegetarian
Description
These classic lemon bars feature a buttery shortbread crust topped with a smooth, tangy lemon filling and dusted with powdered sugar. Perfectly balanced between sweet and tart, they’re the ultimate crowd-pleasing dessert that’s surprisingly easy to make. Fresh lemon juice and zest create bright, authentic citrus flavor in every bite.
Ingredients
For the Shortbread Crust:
- 2 cups (240g) all-purpose flour
- ½ cup (60g) powdered sugar
- ¼ teaspoon salt
- 1 cup (2 sticks/226g) unsalted butter, cold and cubed
For the Lemon Filling:
- 4 large eggs, room temperature
- 1⅔ cups (333g) granulated sugar
- ¼ cup (30g) all-purpose flour
- ⅔ cup (160ml) fresh lemon juice (from 4–5 lemons)
- 1 tablespoon lemon zest (from 1–2 lemons)
- ½ teaspoon baking powder
- Pinch of salt
For Topping:
- 2–3 tablespoons powdered sugar for dusting
Instructions
- Preheat and prep: Preheat your oven to 350°F (175°C). Line a 9×13-inch baking pan with parchment paper, leaving overhang on two opposite sides for easy removal later. This step is optional but highly recommended for clean cuts.
- Make the crust: In a medium bowl, whisk together the flour, powdered sugar, and salt. Add the cold cubed butter. Using a fork, pastry cutter, or your fingertips, work the butter into the flour mixture until it resembles coarse crumbs with some pea-sized butter pieces remaining. The mixture should hold together when pressed.
- Press and pre-bake crust: Press the crust mixture evenly into the bottom of the prepared pan, using your hands or the bottom of a measuring cup to create an even layer that goes slightly up the sides (about ¼ inch). Prick the crust all over with a fork to prevent bubbling. Bake for 18-20 minutes until the edges are lightly golden. Remove from oven and set aside while you prepare the filling. Leave the oven on.
- Prepare lemon filling: While the crust bakes, make the filling. In a large bowl, whisk the eggs thoroughly. Add the granulated sugar and whisk until well combined and slightly thickened, about 1 minute. Add the flour, lemon juice, lemon zest, baking powder, and salt. Whisk until completely smooth with no lumps remaining.
- Pour and bake: Carefully pour the lemon filling over the hot crust (it’s okay if it’s still hot). Gently tap the pan on the counter to release any air bubbles. Bake for 22-25 minutes, until the filling is set around the edges but still has a slight jiggle in the center. The center will firm up as it cools. Don’t overbake or the filling will become grainy.
- Cool completely: Remove from the oven and place on a cooling rack. Let cool to room temperature, about 1 hour, then refrigerate for at least 2 hours before cutting. This chilling time is essential for clean cuts.
- Cut and serve: Once completely chilled, use the parchment paper overhang to lift the bars out of the pan. Place on a cutting board and use a sharp knife to cut into 16 squares (4 rows by 4 rows). Wipe the knife clean between cuts for the neatest edges. Dust generously with powdered sugar just before serving using a fine-mesh sieve.
Notes
- For easiest cutting, use a sharp knife and wipe it clean with a damp towel between each cut.
- The filling should jiggle slightly when you remove it from the oven—it will continue to set as it cools.
- Store cut bars in an airtight container with parchment paper between layers to prevent sticking.
- For thicker bars, use a 9×9-inch pan and adjust baking times (add 2-3 minutes to each baking stage).
- The lemon zest can be added to the crust mixture instead of the filling for even more lemon flavor throughout.
- These taste even better the next day after the flavors have melded together.
- Prep Time: 15 minutes
- Cook Time: 45 minutes
- Category: Dessert
- Method: Baking
- Cuisine: American
Nutrition
- Serving Size: 1 bar (1/16 of recipe)
- Calories: 248
- Sugar: 24g
- Sodium: 85mg
- Fat: 12g
- Saturated Fat: 7g
- Unsaturated Fat: 4g
- Trans Fat: 0g
- Carbohydrates: 33g
- Fiber: 0.5g
- Protein: 3g
- Cholesterol: 78mg
Tips & Variations
Lime bars variation: Substitute fresh lime juice and zest for the lemon to create tangy lime bars. You’ll need about 5-6 limes. The flavor is equally delicious with a slightly different tropical twist.
Mixed citrus bars: Use a combination of lemon, lime, and orange juice for a complex, layered citrus flavor. Keep the total juice amount at ⅔ cup.
Berry lemon bars: Add ½ cup of fresh blueberries or raspberries scattered over the crust before pouring the filling. The berries add beautiful color and complementary flavor.
Lavender lemon bars: Add 1 teaspoon of culinary lavender buds to the crust mixture for an elegant, floral variation that’s perfect for spring entertaining.
Extra lemony version: Increase the lemon zest to 2 tablespoons for an even more pronounced lemon flavor.
Brown butter crust: Brown the butter before making the crust for a nutty, caramelized depth of flavor that takes these bars to the next level.
Gluten-free option: Use a 1:1 gluten-free flour blend for both the crust and filling. The texture will be slightly more delicate but still delicious.
Lighter version: Use half butter and half coconut oil in the crust, and reduce the sugar in the filling to 1⅓ cups if you prefer less sweetness.
Pro Chef Tips
Zest before juicing: Always zest your lemons before cutting and juicing them—it’s nearly impossible to zest a juiced lemon half. Use only the bright yellow outer layer of peel, avoiding the bitter white pith underneath.
Room temperature matters: Bringing eggs to room temperature before whisking helps them incorporate more smoothly into the filling, creating a smoother, more uniform custard. Quick trick: place cold eggs in a bowl of warm water for 5 minutes.
The parchment paper trick: Cut your parchment paper longer than the pan so you have handles on opposite sides. This makes lifting the entire batch out effortless and allows you to cut on a cutting board instead of in the pan, resulting in much neater bars.
Hot crust + cold filling technique: While most recipes add the filling to a hot crust, for even cleaner results, some bakers prefer letting the crust cool for 10 minutes first. Experiment to see which method you prefer.
The jiggle test: When checking if the filling is done, gently shake the pan. The edges should be set, but the center should have a slight jiggle (like Jell-O). It will firm up completely as it cools. Overbaking creates a grainy, curdled texture.
Knife cleaning method: For professional-looking cuts, keep a tall glass of hot water nearby. Dip your knife in the hot water and wipe it dry between each cut. This melts any filling on the blade and prevents dragging.
Powdered sugar timing: Don’t dust with powdered sugar until just before serving, especially if storing in the refrigerator. The moisture causes the sugar to dissolve and disappear. For make-ahead situations, dust right before serving or provide a small sieve at the table so guests can dust their own.
Common Mistakes to Avoid
Not pre-baking the crust long enough: If the crust is underbaked, it will be soggy instead of crisp and crumbly. The edges should be lightly golden brown before you add the filling. An undercooked crust can’t be fixed later, so make sure it’s properly baked before proceeding.
Overbaking the filling: This is the most common mistake that leads to a grainy, curdled texture instead of smooth and creamy. The filling should still have a slight jiggle in the center when you remove it from the oven. Remember, it will continue to set as it cools and during refrigeration. When in doubt, slightly underbake rather than overbake.
Cutting before completely cool: I know it’s tempting when they smell so good, but cutting warm lemon bars results in a messy disaster. The filling needs to be completely set and chilled (at least 2 hours in the refrigerator) to cut cleanly. Be patient—this waiting period makes all the difference in presentation.
Using bottled lemon juice: Fresh is essential here. Bottled lemon juice has a flat, one-dimensional flavor and often contains preservatives that can affect the texture of the filling. Fresh lemons create bright, authentic citrus flavor that bottled juice simply cannot match.
Skipping the parchment paper: While not absolutely necessary, parchment paper makes removing and cutting the bars infinitely easier. Without it, you’ll struggle to get the first bar out cleanly, and subsequent bars won’t be as neat. The small extra step saves huge frustration later.
Storage & Meal Prep
Room temperature storage: Lemon bars can sit at room temperature for up to 2 hours, making them perfect for parties and gatherings. However, for longer storage, refrigeration is necessary due to the egg-based filling.
Refrigerator storage: Store cut lemon bars in an airtight container in the refrigerator for up to 5 days. Place parchment paper or wax paper between layers to prevent sticking. The bars actually taste better after a day in the fridge as the flavors meld together.
Maintaining crispness: The crust will soften slightly during refrigeration, but you can refresh them by letting them sit at room temperature for 20-30 minutes before serving. For an extra crispy crust, place bars on a baking sheet and warm in a 300°F oven for 5 minutes (watch carefully to prevent the filling from melting).
Serving from refrigeration: While safe to eat cold, lemon bars taste best at cool room temperature. Remove from the refrigerator 15-30 minutes before serving for optimal texture and flavor.
Travel tips: These bars travel beautifully. Pack in a single layer in an airtight container with parchment between bars. Keep them cool in a cooler with ice packs if transporting for more than an hour.
Make-Ahead & Freezer Notes
Advance preparation: Lemon bars are an excellent make-ahead dessert. You can bake them up to 3 days in advance, store covered in the refrigerator, and dust with powdered sugar just before serving. Many bakers find the flavor actually improves after a day or two.
Freezing baked bars: These freeze beautifully for up to 3 months. Cut into bars, then freeze in a single layer on a baking sheet for 1 hour. Once solid, transfer to a freezer-safe container or bag with parchment paper between layers. Do not dust with powdered sugar before freezing.
Thawing instructions: Thaw frozen bars in the refrigerator overnight or at room temperature for 1-2 hours. Dust with powdered sugar just before serving.
Freezing just the crust: For ultimate freshness, you can pre-bake the crust, let it cool completely, wrap tightly, and freeze for up to 1 month. When ready to finish, bake the frozen crust at 350°F for 5 minutes to warm through, then add the fresh filling and proceed with the recipe.
Gift-giving tip: Individually wrap bars in plastic wrap, then place in decorative boxes or tins. They stay fresh and are ready to give as thoughtful homemade gifts. Include a note mentioning they should be refrigerated.
Serving Suggestions
These bright, sunny lemon bars are versatile enough for any occasion and pair beautifully with a variety of beverages and accompaniments.
Beverage pairings: Serve with hot tea (Earl Grey is especially lovely), iced tea, fresh lemonade, coffee, or champagne for an elegant brunch. The citrus flavors pair particularly well with herbal teas like chamomile or mint.
Dessert spreads: Arrange on a platter with other bar cookies and brownies for a dessert table at parties. The bright yellow color stands out beautifully and adds visual variety to mixed dessert platters.
Afternoon tea service: Cut into smaller squares (25 instead of 16) for perfect tea-time portions. Serve alongside scones, finger sandwiches, and other petit fours for an elegant afternoon tea.
Brunch favorite: These are ideal for Easter brunch, Mother’s Day breakfast, baby showers, or bridal showers. Their cheerful appearance and refreshing flavor make them perfect for morning and early afternoon gatherings.
Summer celebrations: Serve at picnics, barbecues, pool parties, and summer potlucks. They’re refreshing in warm weather and hold up well in moderate heat if kept cool.
Plating ideas: Serve on white plates to make the bright yellow color pop. Garnish the plate with fresh berries, a sprig of mint, or a thin lemon wheel for an elegant presentation.
Ice cream pairing: While delicious on their own, a small scoop of vanilla ice cream or a dollop of fresh whipped cream alongside turns these into a more substantial plated dessert.
FAQs Section
Why are my lemon bars runny?
Runny lemon bars typically result from underbaking the filling or cutting them before they’re completely cooled and chilled. The filling should have a slight jiggle in the center when removed from the oven, but it needs at least 2 hours of refrigeration to fully set. If you’ve chilled them and they’re still runny, return to the oven and bake for another 5 minutes. Also ensure you measured the flour correctly—too little flour can prevent proper setting.
Can I make lemon bars without eggs?
Eggs are essential for the traditional texture and structure of lemon bars, so true substitution is difficult. However, some bakers have success using commercial egg replacers designed for baking (follow package directions for replacing 4 eggs). The texture won’t be quite as smooth and creamy, but it can work. Aquafaba (chickpea liquid) doesn’t work well for this recipe.
How do I prevent a soggy crust?
Pre-baking the crust thoroughly (18-20 minutes until edges are golden) is crucial. The crust must be fully baked before adding the filling. Also, make sure you prick the crust with a fork before pre-baking to allow steam to escape and prevent bubbling. Some bakers also brush the hot crust with a thin layer of beaten egg white before adding the filling to create a moisture barrier.
Can I use Meyer lemons instead of regular lemons?
Absolutely! Meyer lemons create a slightly sweeter, more floral flavor that’s absolutely delicious in lemon bars. Since they’re less tart than regular lemons, you might want to reduce the sugar in the filling by 2-3 tablespoons to maintain balance. You may also need one extra Meyer lemon since they’re typically smaller and less juicy than regular lemons.
Why do my lemon bars taste eggy?
An eggy taste usually means the filling was overbaked, causing the eggs to curdle slightly. Remove the bars from the oven when the center still has a slight jiggle. The residual heat will continue cooking the filling as it cools. Also ensure you’re using fresh eggs—older eggs can contribute to off-flavors. Using plenty of fresh lemon juice and zest will overpower any subtle egg flavor.
Can I double this recipe?
Yes, but you’ll need to bake in two separate 9×13-inch pans rather than trying to fit everything in one large pan. Doubled recipes in oversized pans often bake unevenly, with overcooked edges and undercooked centers. Making two pans gives you better control over baking times and more consistent results.
How do I get perfectly square edges when cutting?
Use the parchment paper overhang to lift the entire batch onto a cutting board. Use a long, sharp knife and wipe it clean with a damp towel between each cut. Make sure the bars are thoroughly chilled—warm bars are impossible to cut neatly. Some bakers score the top lightly before making full cuts to guide knife placement for evenly sized bars.
Conclusion
These classic lemon bars are proof that sometimes the simplest recipes are the very best. With their buttery shortbread crust, tangy-sweet filling, and beautiful presentation, they’ve earned their place as one of America’s most beloved desserts. Whether you’re baking them for a special occasion or just because you’re craving something bright and delicious, this foolproof recipe delivers perfect results every single time.
The best part? Once you master this basic technique, you’ll find yourself making these bars again and again, maybe experimenting with the variations or simply enjoying them exactly as they are. They’re one of those recipes that becomes part of your regular rotation because they’re just that good—and just that easy.
I’d love to hear how your lemon bars turn out! Did you try any of the variations? Are you serving them for a special occasion or just treating yourself? Drop a comment below and let me know, and don’t forget to rate the recipe so other bakers know what to expect. If these lemon bars brought sunshine to your kitchen, please share this recipe on Pinterest—your pins help other home bakers discover these delicious treats!
Now grab those lemons and get ready to make the best lemon bars you’ve ever tasted. Happy baking, my friend!