

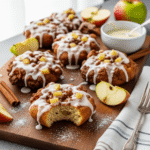
If you’ve ever walked past a bakery and caught the irresistible aroma of fresh apple fritters, you know exactly what magic smells like. These homemade apple fritters are everything you dream about – golden and crispy on the outside, tender and cake-like on the inside, studded with chunks of sweet cinnamon apples, and finished with a glossy vanilla glaze that drips down the sides in the most beautiful way.
Apple fritters are the perfect marriage of doughnut and apple pie, bringing together the best of both worlds into one handheld treat. Unlike traditional doughnuts that are perfectly round and uniform, fritters have that wonderfully irregular, rustic shape with crispy edges and nooks that catch extra glaze. Each bite delivers warm spices, tender apple pieces, and that satisfying contrast between the crunchy exterior and soft, fluffy interior.
These treats are incredibly versatile and perfect for so many occasions. Serve them warm for a special weekend breakfast or brunch that’ll have everyone gathering around the kitchen. They make an impressive addition to holiday brunches, church potlucks, or bake sales where they disappear in minutes. Pack them for road trips, enjoy them as an afternoon snack with coffee, or serve them as a dessert that feels casual yet totally indulgent. Whenever you make these homemade apple fritters, prepare for requests for the recipe because they’re genuinely that good.
History / Background
Apple fritters have a fascinating culinary history that stretches back centuries and across continents. The concept of fruit fritters – fruit pieces coated in batter and deep-fried – has roots in medieval European cooking, where fritters were enjoyed as special treats during festivals and celebrations. The word “fritter” itself comes from the Latin “frictura,” meaning “to fry.”
In colonial America, apple fritters became particularly popular as a way to showcase the abundant apple harvests that were central to early American agriculture. Dutch settlers brought their tradition of “oliebollen” (oil balls) – sweet fried dough often filled with apples and raisins – which influenced American fritter-making traditions. German immigrants contributed their “apfelkuchen” techniques, and French settlers shared their expertise in creating light batters for “beignets aux pommes.”
By the 19th century, apple fritters had become a beloved staple in American cuisine, particularly in regions with thriving apple orchards like New England, the Mid-Atlantic states, and eventually the Pacific Northwest. They appeared in church cookbooks, community gatherings, and eventually became a bakery favorite across the country. The Pennsylvania Dutch particularly embraced apple fritters, often serving them during harvest celebrations and county fairs.
What makes American apple fritters unique is their generous size and the way they incorporate chunky apple pieces directly into a tender, cake-like batter rather than simply coating apple slices. This creates those characteristic irregular shapes and ensures every bite contains fruit. The addition of the sweet glaze is distinctly American, transforming a simple fried pastry into an indulgent treat that’s become iconic in bakeries and doughnut shops nationwide. Today, apple fritters remain one of the most popular items at artisan doughnut shops and continue to evoke nostalgia for simpler times and grandmother’s kitchen.
Why You’ll Love This Recipe
This homemade apple fritters recipe is about to become your new favorite weekend baking project, and here’s why it absolutely deserves a spot in your regular rotation:
First, let’s talk about that incredible flavor. We’re using real apples (not pie filling!), warm cinnamon, a hint of nutmeg, and vanilla that all come together in perfect harmony. The apples stay tender but not mushy, maintaining their texture while contributing natural sweetness and that iconic apple pie flavor. The glaze adds sweetness without being overwhelming, creating a perfectly balanced treat.
Key Benefits:
- Tastes Better Than Bakery – Freshly made fritters are incomparably better than store-bought, with a tender texture and fresh apple flavor you can’t get from day-old bakery items
- Easier Than You Think – No yeast, no rising time, no complicated techniques. This is a simple batter that comes together in minutes
- Budget-Friendly – Uses basic pantry staples and affordable apples, making impressive treats without breaking the bank
- Customizable – Easy to adjust sweetness, spice levels, apple varieties, and even make different flavor variations
- Crowd-Pleaser – Appeals to all ages, from kids to grandparents. Perfect for gatherings and guaranteed compliments
- Makes Your House Smell Amazing – The aroma of cinnamon apples frying is absolutely heavenly and will have everyone asking “what are you making?”
- Special Occasion Worthy – Impressive enough for holidays, brunches, and special breakfasts without requiring professional skills
- Portion Control Friendly – Freezes beautifully, so you can make a full batch but enjoy them over time
- Fun to Make – There’s something deeply satisfying about frying these golden beauties and watching them puff up perfectly
Ingredient Notes
Let’s break down what makes these apple fritters so incredible, ingredient by ingredient. Understanding each component helps you make smart substitutions and truly master this recipe.
Apples – The star ingredient! You’ll need about 2 cups of peeled, diced apples (roughly 2-3 medium apples). Granny Smith apples are my top choice because their tartness balances the sweet glaze beautifully, and they hold their shape during frying without turning to mush. Honeycrisp apples add wonderful sweetness and maintain great texture. Braeburn, Jonagold, or Pink Lady also work excellently. Avoid Red Delicious or overly soft apples that break down too quickly.
All-Purpose Flour – Creates the structure of your fritter. The protein content in all-purpose flour gives you that perfect tender-yet-sturdy texture. For gluten-free fritters, use a 1:1 gluten-free baking flour blend, though the texture will be slightly different.
Granulated Sugar – Provides sweetness to the batter without making it overly sweet since the glaze adds more. This amount creates a balanced, lightly sweet base that lets the apple flavor shine.
Baking Powder – The leavening agent that makes these fritters light and fluffy inside rather than dense. Make sure yours is fresh (test it by adding a teaspoon to hot water – it should bubble vigorously).
Spices (Cinnamon & Nutmeg) – These warm spices are essential for that classic apple pie flavor. Ground cinnamon adds sweetness and warmth, while nutmeg contributes depth and complexity. Freshly grated nutmeg is incredible if you have it, but pre-ground works perfectly fine.
Salt – Never skip the salt! It enhances all the other flavors and prevents the fritters from tasting flat or one-dimensional.
Milk – Whole milk creates the richest texture, but 2% or even buttermilk work beautifully. Buttermilk adds a subtle tang and extra tenderness. For dairy-free, use unsweetened almond milk or oat milk.
Eggs – Bind everything together and add richness. The eggs help create structure while keeping the interior moist and tender.
Butter – Melted butter adds rich flavor and keeps the fritters moist. It also contributes to that golden color. For dairy-free, use melted coconut oil or vegan butter.
Vanilla Extract – Pure vanilla extract is worth it here. It enhances the sweetness and adds aromatic depth that imitation vanilla just can’t match.
Oil for Frying – Use a neutral oil with a high smoke point like vegetable oil, canola oil, or peanut oil. You’ll need enough to fill your pot about 2-3 inches deep for proper frying.
Powdered Sugar for Glaze – Creates that signature smooth, sweet glaze that hardens slightly as it cools. Sifting prevents lumps.
Equipment Needed
You don’t need any special equipment to make bakery-quality apple fritters at home! Here’s what you’ll use:
- Large heavy-bottomed pot or Dutch oven – Essential for deep frying. Heavy bottoms distribute heat evenly and maintain temperature better than thin pots
- Candy/deep-fry thermometer – Critical for maintaining proper oil temperature (350°F). This is the difference between perfectly golden fritters and greasy or burnt ones
- Large mixing bowls (2) – One for dry ingredients, one for wet ingredients
- Whisk – For combining ingredients smoothly
- Rubber spatula – For folding in apples and scraping bowls
- Measuring cups and spoons – For accurate measurements
- Vegetable peeler and sharp knife – For preparing apples
- Slotted spoon or spider strainer – For safely removing fritters from hot oil
- Wire cooling rack set over baking sheet – Allows air circulation so bottoms don’t get soggy
- Paper towels – For draining excess oil
- Small bowl – For mixing the glaze
- Fork or small whisk – For drizzling glaze
- Kitchen timer – For tracking frying time
Apple Fritters Recipe
- Total Time: 35 minutes
- Yield: 10-12 fritters 1x
- Diet: Vegetarian
Description
These homemade apple fritters are crispy, golden, and loaded with tender cinnamon apples. Finished with a sweet vanilla glaze, they’re even better than your favorite bakery version and surprisingly easy to make at home. Perfect for weekend breakfasts or special occasions!
Ingredients
For the Fritters:
- 2 cups apples, peeled and diced (about 2–3 medium apples)
- 2 cups all-purpose flour
- 1/3 cup granulated sugar
- 2 teaspoons baking powder
- 1 1/2 teaspoons ground cinnamon
- 1/4 teaspoon ground nutmeg
- 1/2 teaspoon salt
- 2/3 cup whole milk
- 2 large eggs
- 3 tablespoons unsalted butter, melted
- 1 teaspoon vanilla extract
- Vegetable oil for frying (about 6-8 cups)
For the Glaze:
- 2 cups powdered sugar, sifted
- 1/4 cup milk
- 1 teaspoon vanilla extract
- Pinch of salt
Instructions
- Prepare the apples: Peel, core, and dice your apples into small 1/4 to 1/2-inch pieces. You want them small enough to distribute throughout the fritters but large enough to provide texture. Pat them dry with paper towels to remove excess moisture. Set aside.
- Mix dry ingredients: In a large mixing bowl, whisk together the flour, granulated sugar, baking powder, cinnamon, nutmeg, and salt until well combined and no lumps remain. This ensures even distribution of leavening and spices.
- Combine wet ingredients: In a separate medium bowl, whisk together the milk, eggs, melted butter, and vanilla extract until smooth and fully incorporated. Make sure your melted butter isn’t too hot or it might cook the eggs.
- Create the batter: Pour the wet ingredients into the dry ingredients. Using a rubber spatula or wooden spoon, gently fold together until just combined. Don’t overmix – a few small lumps are perfectly fine. Overmixing develops gluten and creates tough fritters. The batter will be thick, similar to a muffin batter.
- Add the apples: Gently fold the diced apples into the batter until evenly distributed. The batter should be thick enough to hold the apples suspended rather than sinking to the bottom.
- Heat the oil: Pour oil into your heavy-bottomed pot or Dutch oven to a depth of 2-3 inches. Heat over medium-high heat until it reaches 350°F on your thermometer. This temperature is crucial – test it before adding any batter. If you don’t have a thermometer, drop a small bit of batter into the oil; it should sizzle immediately and float to the surface.
- Fry the fritters: Once oil reaches temperature, use a 1/4 cup measuring cup or large spoon to scoop batter and carefully drop it into the hot oil. Don’t overcrowd – fry only 2-3 fritters at a time depending on your pot size. They’ll expand as they cook. Fry for 2-3 minutes on the first side until deep golden brown, then carefully flip using a slotted spoon. Fry another 2-3 minutes on the second side until evenly golden and cooked through. The fritters should float and puff up beautifully.
- Drain and cool: Remove fritters with a slotted spoon and place on a wire rack set over a baking sheet lined with paper towels. This allows excess oil to drip away while maintaining crispiness. Let them cool for about 5 minutes before glazing. Monitor your oil temperature between batches and adjust heat as needed to maintain 350°F.
- Make the glaze: While fritters cool slightly, whisk together the sifted powdered sugar, milk, vanilla extract, and pinch of salt in a medium bowl until completely smooth. The glaze should be thick but pourable – if it’s too thick, add milk one teaspoon at a time; if too thin, add more powdered sugar.
- Glaze the fritters: Once fritters have cooled for about 5 minutes (warm but not hot), dip the top of each fritter into the glaze, letting excess drip back into the bowl. Alternatively, use a spoon to drizzle glaze generously over each fritter. Place back on the wire rack and let the glaze set for about 10 minutes. For extra indulgence, you can double-glaze by applying a second coat after the first one sets.
- Serve: Enjoy warm or at room temperature. These are absolutely divine when slightly warm, with the glaze still soft and the apples tender and fragrant.
Notes
- Oil temperature is critical: Use a thermometer and maintain 350°F. Too hot and fritters burn outside while staying raw inside; too cool and they absorb excess oil and become greasy.
- Don’t overcrowd the pot: Frying too many at once drops the oil temperature significantly and results in greasy fritters.
- Batter consistency: The batter should be thick and chunky with apples. If it seems too thin, add 1-2 tablespoons more flour.
- Apple prep: Smaller dice means more even distribution, but don’t mince them or you’ll lose that satisfying apple texture.
- Glaze timing: Wait until fritters cool slightly (about 5 minutes) or the glaze will be too thin and slide right off.
- Storage: Best enjoyed fresh, but store in an airtight container at room temperature for up to 2 days or refrigerate for up to 4 days.
- Prep Time: 15 minutes
- Cook Time: 20 minutes
- Category: Dessert
- Method: Deep Frying
- Cuisine: American
Nutrition
- Serving Size: 1 fritter
- Calories: 285
- Sugar: 24g
- Sodium: 220mg
- Fat: 12g
- Saturated Fat: 3g
- Unsaturated Fat: 8g
- Trans Fat: 0g
- Carbohydrates: 42g
- Fiber: 2g
- Protein: 4g
- Cholesterol: 45mg
Tips & Variations
These apple fritters are wonderfully adaptable! Here are some delicious ways to customize them to your taste:
Spiced Variations: Beyond cinnamon and nutmeg, try adding 1/4 teaspoon of ground cardamom for a sophisticated, slightly floral note. Apple pie spice (which contains cinnamon, nutmeg, allspice, and sometimes ginger and cardamom) works beautifully – use 2 teaspoons in place of the individual spices. For fall vibes, add a pinch of ground cloves or ginger.
Different Apple Varieties: Mix apple varieties for more complex flavor! Try half Granny Smith (tart) and half Honeycrisp (sweet) for perfect balance. For intense apple flavor, use Jonagold or Braeburn. Avoid soft apples like McIntosh that break down too easily.
Add-Ins and Mix-Ins: Stir in 1/2 cup chopped pecans or walnuts for crunch and nutty flavor. Add 1/3 cup raisins or dried cranberries for chewy sweetness. Try 1/4 cup mini chocolate chips for a fun twist kids will love. A tablespoon of bourbon or dark rum in the batter adds sophisticated depth (the alcohol cooks off).
Glaze Variations:
- Maple Glaze: Replace half the milk with pure maple syrup
- Cinnamon Glaze: Add 1/2 teaspoon cinnamon to the powdered sugar
- Caramel Glaze: Use brown sugar instead of powdered sugar and add an extra tablespoon of butter
- Lemon Glaze: Add 1 tablespoon fresh lemon juice and 1 teaspoon lemon zest
- Cream Cheese Glaze: Beat 2 oz softened cream cheese with powdered sugar and thin with milk
Lighter Version: For slightly less indulgent fritters, bake instead of frying. Drop spoonfuls onto a parchment-lined baking sheet and bake at 400°F for 12-15 minutes until golden. They won’t be as crispy but still taste wonderful, especially with the glaze.
Smaller Portions: Use a cookie scoop (about 2 tablespoons) to make mini fritters – perfect for parties or portion control. Reduce frying time to about 1-2 minutes per side.
Pro Chef Tips
Want bakery-level results? These professional techniques make all the difference:
Temperature control is everything: This cannot be stressed enough. Invest in a good thermometer and maintain 350°F religiously. Professional bakers know that consistent temperature is the single most important factor in frying. If the oil gets too hot, reduce heat immediately; if it cools down, let it come back up to temperature before adding more fritters.
The batter rest trick: Let your mixed batter (with apples) rest for 10 minutes before frying. This allows the flour to fully hydrate and the baking powder to activate, resulting in lighter, fluffier fritters with better texture.
Cut apples uniformly: Equal-sized apple pieces cook at the same rate, ensuring some aren’t mushy while others are still crunchy. Take an extra minute to dice them uniformly – it matters.
Don’t skimp on oil: Using enough oil (at least 2-3 inches) maintains temperature stability. When you add cold batter to hot oil, it drops the temperature; more oil means less temperature fluctuation. Also, deeper oil allows fritters to float and cook evenly on all sides.
The fold, don’t stir method: When combining wet and dry ingredients, use a folding motion with a rubber spatula rather than stirring or beating. This minimizes gluten development and keeps fritters tender instead of tough and chewy.
Double-fry for extra crispiness: This is a professional technique. Fry fritters once at 325°F until just cooked through but pale (about 3-4 minutes total), let them rest for 5 minutes, then fry again at 375°F for 1 minute to create an incredibly crispy exterior while keeping the inside tender. It’s an extra step but creates amazing texture.
Glaze while warm, not hot: The ideal temperature for glazing is when fritters are warm to the touch but not so hot that they’ll melt the glaze instantly. About 5 minutes of cooling is perfect. The residual warmth helps the glaze adhere and creates that beautiful semi-set finish.
Common Mistakes to Avoid
Even experienced bakers can stumble with fritters. Here’s how to avoid the most common pitfalls:
Mistake #1: Overmixing the batter. This is huge! Once you combine wet and dry ingredients, mix only until just combined. You should still see some small lumps. Overmixing develops gluten, resulting in tough, chewy fritters instead of tender, cake-like ones. Think muffin batter, not pancake batter – gentle folding is key.
Mistake #2: Incorrect oil temperature. Too hot (above 375°F) and your fritters will burn on the outside while staying raw inside. Too cool (below 325°F) and they’ll absorb excess oil, becoming greasy and heavy instead of light and crispy. Always use a thermometer – guessing is the fastest way to disappointing results.
Mistake #3: Overcrowding the pot. When you add too many fritters at once, the oil temperature drops dramatically, and the fritters stick together. Fry in small batches (2-3 at a time) even though it’s tempting to do more. Patience here is rewarded with perfectly golden, crispy fritters.
Mistake #4: Using wet apples. If your diced apples are too wet, they’ll make the batter watery and the fritters won’t hold together properly. After dicing, pat apples dry with paper towels. This simple step prevents soggy fritters and helps maintain proper batter consistency.
Mistake #5: Flipping too early or too often. Let fritters cook undisturbed for 2-3 minutes before flipping. If you flip too early, they may fall apart because the crust hasn’t set. Flip only once per side. Constant flipping interrupts the cooking process and prevents proper browning.
Storage & Meal Prep
While apple fritters are absolutely best enjoyed fresh and warm, proper storage means you can still enjoy them for days afterward.
Room Temperature Storage: Store completely cooled, glazed fritters in an airtight container lined with paper towels (to absorb any moisture) at room temperature for up to 2 days. Place paper towels between layers if stacking. They’ll lose some crispiness but still taste delicious.
Refrigerator Storage: For longer storage, refrigerate in an airtight container for up to 4 days. The cool temperature helps maintain food safety but does make them firmer. Let them come to room temperature before eating, or reheat gently.
Reheating for Best Results:
- Oven method (best for texture): Preheat oven to 350°F. Place fritters on a baking sheet and warm for 5-8 minutes until heated through. This method revives some of the crispiness.
- Air fryer method: Heat at 350°F for 3-4 minutes. This restores crispiness beautifully.
- Microwave method (quickest): Microwave for 15-20 seconds. While convenient, this method makes them softer rather than crispy.
- Toaster oven: 350°F for 5 minutes works great for 1-2 fritters.
Pro tip: If fritters become too soft during storage, a quick 2-minute stint in a 375°F oven can revive much of that crispy exterior.
Freezer Storage: Fritters freeze surprisingly well! See the detailed freezer section below.
Make-Ahead & Freezer Notes
Good news – these apple fritters are very freezer-friendly, making them perfect for batch cooking!
Freezing Unglazed Fritters (Recommended):
The best method is to freeze fritters before glazing. Once fried and completely cooled, arrange them in a single layer on a baking sheet and freeze until solid (about 2 hours). Then transfer to freezer-safe bags or containers, separating layers with parchment paper. They’ll keep beautifully for up to 3 months.
When ready to enjoy, thaw at room temperature for about 30 minutes, then reheat in a 350°F oven for 8-10 minutes until warmed through. Make fresh glaze and apply while warm. This method gives you the best texture and that fresh-glazed taste.
Freezing Glazed Fritters:
You can also freeze already-glazed fritters, though the glaze may crack slightly during thawing. Freeze the same way (single layer until solid, then transfer to bags). Thaw at room temperature and reheat gently. The glaze will soften as they warm up.
Make-Ahead Batter:
Unfortunately, fritter batter doesn’t hold well once mixed because the baking powder begins reacting immediately. However, you can prepare your dry ingredients and wet ingredients separately up to 24 hours in advance. Store dry ingredients in a bowl covered with plastic wrap. Store wet ingredients in the refrigerator. When ready to cook, bring wet ingredients to room temperature, combine everything, and fry immediately.
Partially Fried Method:
For the ultimate make-ahead strategy, use the double-fry technique mentioned in Pro Tips. Fry fritters at 325°F until just cooked but pale (3-4 minutes), cool completely, and freeze. When ready to serve, fry directly from frozen at 375°F for 2-3 minutes until golden and crispy. Glaze immediately. This produces incredibly fresh-tasting results.
Prep Shortcuts:
Dice apples up to 4 hours ahead. Toss with a little lemon juice to prevent browning, drain well, and pat dry before using. Measure and mix your dry ingredients the night before. These small steps make morning frying much more manageable.
Serving Suggestions
Apple fritters are delicious on their own, but these pairings make them even more special:
Beverages:
- Fresh hot coffee (the classic pairing) – the slight bitterness complements the sweet glaze perfectly
- Hot apple cider or spiced cider for a double-apple experience
- Chai tea latte or spiced tea for warm autumn vibes
- Cold milk (kids especially love this)
- Hot chocolate for an indulgent breakfast treat
- Cappuccino or latte for a café-style morning
Breakfast/Brunch Spread:
- Crispy bacon or breakfast sausage for savory contrast
- Scrambled eggs or a vegetable frittata for a complete meal
- Fresh fruit salad (berries, melon, grapes) to balance the richness
- Greek yogurt with honey and granola for lighter sides
- Orange juice or fresh-squeezed apple juice
- Maple sausage links that echo the sweet-savory theme
Dessert Presentation:
- Serve warm with a scoop of vanilla ice cream melting on top
- Add a dollop of freshly whipped cream and caramel drizzle
- Dust with extra cinnamon sugar instead of glaze for rustic presentation
- Serve alongside warm custard sauce or crème anglaise
- Top with chopped toasted pecans and extra caramel
Entertaining Ideas:
- Create a fritter bar with different glaze options (vanilla, maple, caramel, chocolate)
- Arrange on a tiered cake stand for brunch buffets
- Wrap individually in parchment paper tied with twine for bake sale presentation
- Serve in individual baskets lined with checkered cloth for picnic charm
- Pair with seasonal decorations for fall gatherings and apple-picking celebrations
Coffee Shop Style:
- Serve on white plates with a small cappuccino, fresh flowers, and morning newspaper for that weekend café vibe at home
FAQs Section
Q: Can I bake these instead of frying?
A: Yes, though they’ll be more like apple fritter muffins than traditional fritters. Scoop batter into muffin tins or onto a parchment-lined baking sheet. Bake at 400°F for 12-15 minutes until golden and a toothpick comes out clean. They won’t have the crispy exterior of fried fritters but still taste wonderful, especially glazed. For more crispiness, brush with melted butter before baking.
Q: Why did my fritters turn out greasy?
A: This is almost always a temperature issue. If oil is too cool (below 325°F), fritters absorb excess oil instead of forming a quick seal. Use a thermometer to maintain 350°F consistently. Also, make sure you’re draining fritters properly on a wire rack (not flat paper towels which trap steam and oil underneath). Overcrowding the pot also drops temperature and causes greasiness.
Q: Can I make these gluten-free?
A: Absolutely! Use a 1:1 gluten-free baking flour blend (brands like Bob’s Red Mill or King Arthur work well). The texture will be slightly different – perhaps a bit more delicate – but they’re still delicious. Make sure your baking powder is gluten-free certified. Don’t overmix gluten-free batter as it can become gummy.
Q: My fritters fell apart while frying. What went wrong?
A: The batter was likely too thin or too wet. This can happen if apples release moisture into the batter, if you used too much milk, or if you overmixed. Make sure to pat apples dry before adding them. The batter should be very thick – almost like a chunky cookie dough. If it seems thin, stir in 2-3 tablespoons more flour before frying.
Q: Can I use apple pie filling instead of fresh apples?
A: While fresh apples are strongly recommended for best flavor and texture, you can use canned apple pie filling in a pinch. Drain it very well and chop the apples into smaller pieces. Reduce sugar in the batter to 1/4 cup since pie filling is already sweetened. The results won’t be quite as good but will work.
Q: How do I know when fritters are fully cooked inside?
A: Proper oil temperature and timing usually ensure doneness, but if you’re uncertain, you can test one: the internal temperature should reach 190-200°F, or break one open – it should be fluffy and cake-like inside, not doughy or wet. If fritters are browning too quickly on the outside but seem raw inside, your oil is too hot. Reduce heat and cook longer at lower temperature.
Q: Can I make these dairy-free?
A: Yes! Use dairy-free milk (almond, oat, or soy) and replace butter with melted coconut oil or vegan butter. For the glaze, use dairy-free milk. The taste will be slightly different but still delicious. Coconut oil adds a subtle tropical note that actually pairs nicely with apples.
Conclusion
There you have it – your complete guide to making absolutely incredible homemade apple fritters that rival any bakery! These golden, crispy treats filled with tender cinnamon apples and topped with that gorgeous glaze are so much easier to make than you might think, and the results are truly spectacular.
Whether you’re making these for a special weekend breakfast, a holiday brunch, or just because you’re craving something sweet and comforting, these apple fritters deliver every single time. The combination of crispy edges, tender cake-like interior, chunks of spiced apples, and that luscious vanilla glaze creates pure magic in every bite.
The beauty of this recipe is its versatility – you can make it exactly as written for classic perfection, or customize it with different spices, glazes, or add-ins to make it your own. Once you try these homemade apple fritters, you’ll never look at store-bought versions the same way again!
I can’t wait to hear how your apple fritters turn out! Did you try any of the variations? What glaze flavor did you choose? Please leave a comment below sharing your experience, photos, and any creative twists you discovered. Your feedback helps other home bakers and creates a wonderful community of apple fritter lovers!
If you loved this recipe, please share it on Pinterest, Instagram, or Facebook so your friends and family can enjoy these delicious treats too. Pin this recipe to your “Best Breakfast Recipes” or “Easy Desserts” board so you can find it again when the apple fritter craving hits. And don’t forget to rate this recipe – it really helps others know what to try!
Happy frying, and here’s to many mornings filled with the incredible aroma of homemade apple fritters! 🍎