
If you’ve ever craved the warm, comforting flavors of homemade apple pie but didn’t want to fuss with rolling out pastry dough and crimping edges, then these apple pie bars are about to become your new favorite dessert. These delightful apple pie bars recipe treats combine all the best parts of traditional apple pie—buttery crust, cinnamon-spiced apple filling, and that irresistible crumbly topping—in an easy-to-make bar form that’s perfect for potlucks, holiday gatherings, or a cozy weekend baking session.
What makes these easy apple pie bars so special is their convenience. Instead of carefully transferring delicate pie dough and worrying about soggy bottoms, you simply press the crust into a baking pan, layer on the spiced apples, add a buttery streusel topping, and bake. The result? Perfectly portioned dessert bars that slice beautifully and taste just as good as (if not better than) traditional apple pie. They’re ideal for serving at fall festivals, Thanksgiving dinners, Christmas cookie exchanges, or anytime you want to bring a crowd-pleasing dessert that travels well and feeds a group.
History / Background
Apple pie has been a symbol of American comfort food for centuries, with the phrase “as American as apple pie” becoming part of our cultural lexicon. However, the origins of apple pie actually trace back to medieval Europe, particularly England, where early versions appeared as early as the 14th century. When European settlers came to America, they brought their beloved pie recipes with them, and the dessert evolved using native American apples that flourished in the New World.
The concept of apple pie bars is a more modern innovation, likely emerging in the mid-20th century when home bakers began experimenting with simpler, more portable versions of classic desserts. As community cookbooks and church potlucks became increasingly popular in the 1950s and 1960s, recipes that could feed a crowd and travel well became essential. Apple pie bars fit the bill perfectly—offering all the beloved flavors of traditional pie in a format that could be easily cut into squares, stacked on plates, and shared at gatherings.
These dessert bars represent the American spirit of innovation and practicality. They maintain the nostalgic, homey appeal of classic apple pie while adapting to modern lifestyles where convenience matters. Today, apple pie bars have secured their place in the American baking repertoire, especially beloved in the Midwest and rural communities where apple orchards are plentiful and fall baking traditions run deep.
Why You’ll Love This Recipe
These homemade apple pie bars are the perfect solution for busy bakers who want impressive results without the intimidation factor of traditional pie-making. The recipe delivers all the comforting flavors you crave in a format that’s remarkably forgiving and easy to prepare.
Here’s why this recipe will become your go-to dessert:
- Easier than traditional pie – No need for perfect pie crust techniques or worrying about crimping edges
- Feeds a crowd effortlessly – One pan makes 24 generous servings, perfect for potlucks and parties
- Portable and mess-free – Bars travel beautifully without the fuss of transporting a whole pie
- Make-ahead friendly – Prepare the components in advance or bake a day ahead
- Uses simple pantry ingredients – No specialty items required, just wholesome basics
- Customizable spice levels – Adjust cinnamon, nutmeg, and sweetness to your preference
- Kid-approved dessert – The bar format makes it easy for little hands to enjoy
- Budget-friendly – Apples are affordable, especially during peak season
- Perfect texture combination – Buttery crust, tender apples, and crunchy streusel topping
Ingredient Notes
Understanding your ingredients is key to baking success. Here’s what you’ll need for these delicious apple pie bars and why each component matters:
All-Purpose Flour – Forms the base of both the crust and streusel topping. It provides structure while remaining tender. You can substitute with a 1:1 gluten-free flour blend if needed.
Unsalted Butter – Creates that rich, flaky texture in the crust and crumbly topping. Using unsalted allows you to control the salt level. Make sure it’s cold for the crust and softened for easier mixing.
Granulated Sugar & Brown Sugar – Granulated sugar sweetens the crust, while brown sugar in the filling and topping adds moisture and a deeper caramel flavor. Light or dark brown sugar both work beautifully.
Apples – The star ingredient! Granny Smith apples are ideal because they hold their shape during baking and provide a tart contrast to the sweet elements. Honeycrisp, Braeburn, or a mix of varieties also work wonderfully. You’ll need about 6-7 medium apples.
Ground Cinnamon – The essential spice that defines apple pie flavor. Use fresh cinnamon for the best aroma and taste.
Nutmeg & Allspice – These warm spices complement the cinnamon and add complexity. Freshly grated nutmeg is incredible, but pre-ground works fine.
Lemon Juice – Brightens the apple filling and prevents the apples from browning. It also helps balance the sweetness.
Cornstarch – Thickens the apple juices as they cook, preventing soggy bars. Don’t skip this ingredient!
Vanilla Extract – Adds depth and rounds out all the flavors beautifully.
Salt – Enhances sweetness and balances flavors. Just a pinch makes a significant difference.
Old-Fashioned Oats (Optional) – Adding oats to the streusel topping creates extra texture and a wholesome, rustic quality.
Equipment Needed
Having the right tools makes baking these apple pie bars a breeze. Here’s what you’ll need:
- 9×13-inch baking pan – Standard size for bar recipes; ensure it’s at least 2 inches deep
- Parchment paper or aluminum foil – For lining the pan and easy removal
- Large mixing bowls (2-3) – For preparing crust, filling, and topping separately
- Pastry cutter or fork – For cutting butter into flour to create the crumbly texture
- Apple peeler/corer – Makes prep work much faster, though a sharp knife works too
- Sharp chef’s knife – For slicing apples evenly
- Cutting board – Preferably one designated for fruits
- Measuring cups and spoons – For accurate measurements
- Wooden spoon or rubber spatula – For mixing the apple filling
- Whisk – For combining dry ingredients
- Cooling rack – Allows air circulation for even cooling
- Sharp knife or bench scraper – For cutting the finished bars into clean squares

Apple Pie Bars Recipe
- Total Time: 1 hour 15 minutes
- Yield: 24 bars 1x
- Diet: Vegetarian
Description
These easy apple pie bars feature a buttery shortbread crust, a layer of cinnamon-spiced apple filling, and a crumbly streusel topping. They deliver all the classic flavors of homemade apple pie in a convenient, portable bar form that’s perfect for feeding a crowd.
Ingredients
For the Crust:
- 3 cups all-purpose flour
- 1 cup granulated sugar
- 1 teaspoon baking powder
- ½ teaspoon salt
- 1 cup (2 sticks) cold unsalted butter, cut into cubes
- 1 large egg, lightly beaten
- 1 teaspoon vanilla extract
For the Apple Filling:
- 6–7 medium Granny Smith apples (about 3 pounds), peeled, cored, and thinly sliced
- ½ cup granulated sugar
- ⅓ cup brown sugar, packed
- 3 tablespoons all-purpose flour
- 2 tablespoons cornstarch
- 1½ tablespoons ground cinnamon
- ½ teaspoon ground nutmeg
- ¼ teaspoon ground allspice
- 2 tablespoons lemon juice
- 1 teaspoon vanilla extract
- Pinch of salt
For the Streusel Topping:
- Reserved crust mixture (about 1½ cups)
- ½ cup old-fashioned oats (optional)
- ½ teaspoon ground cinnamon
Instructions
- Preheat and Prepare Pan: Preheat your oven to 375°F (190°C). Line a 9×13-inch baking pan with parchment paper, leaving an overhang on the sides for easy removal. Lightly grease the parchment with butter or cooking spray.
- Make the Crust: In a large bowl, whisk together 3 cups flour, 1 cup granulated sugar, baking powder, and ½ teaspoon salt. Add the cold butter cubes and use a pastry cutter or fork to cut the butter into the flour mixture until it resembles coarse crumbs with pea-sized pieces of butter throughout.
- Add Egg to Crust: Add the beaten egg and vanilla extract to the flour mixture. Stir with a fork until the mixture begins to clump together. It will still look crumbly—this is perfect.
- Reserve Topping: Remove about 1½ cups of the crust mixture and place it in a separate bowl. Mix in the oats and ½ teaspoon cinnamon. Set this aside for the streusel topping. Refrigerate if your kitchen is warm.
- Press Crust into Pan: Press the remaining crust mixture firmly and evenly into the bottom of your prepared pan. Use your hands or the bottom of a measuring cup to create an even layer. The crust should cover the entire bottom with no gaps.
- Prepare Apple Filling: In a large bowl, combine the sliced apples, ½ cup granulated sugar, brown sugar, 3 tablespoons flour, cornstarch, cinnamon, nutmeg, allspice, lemon juice, vanilla, and a pinch of salt. Toss everything together until the apples are evenly coated with the spice mixture.
- Layer the Apples: Spread the apple mixture evenly over the pressed crust layer. Try to distribute the apples in an even layer for consistent baking.
- Add Streusel Topping: Crumble the reserved topping mixture over the apples, distributing it as evenly as possible. Some gaps are fine—you want a rustic, crumbly appearance.
- Bake: Place the pan in the preheated oven and bake for 45-50 minutes, or until the topping is golden brown and you can see the filling bubbling around the edges. The apples should be tender when pierced with a knife.
- Cool Completely: Remove the pan from the oven and place it on a cooling rack. Allow the bars to cool completely in the pan, at least 2 hours. This cooling time is crucial—it allows the filling to set properly so the bars cut cleanly.
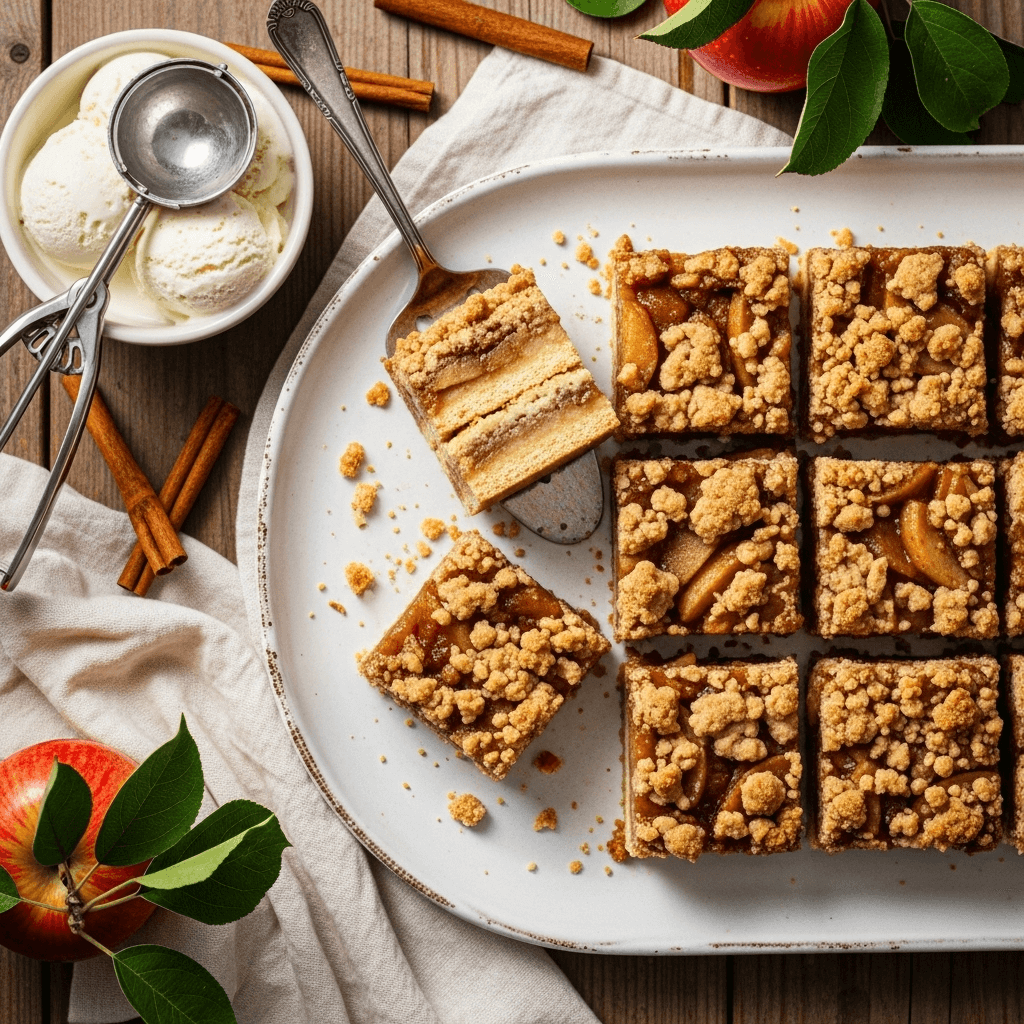
- Cut and Serve: Once completely cooled, use the parchment paper overhang to lift the entire block out of the pan. Place on a cutting board and use a sharp knife to cut into 24 squares (6 rows by 4 rows). Wipe the knife clean between cuts for the neatest edges.
- Optional Finishing Touch: Dust with powdered sugar or drizzle with a simple vanilla glaze before serving. Serve with vanilla ice cream or whipped cream for an extra-special treat.
Notes
- Apple Variety: While Granny Smith apples are recommended for their tartness and firm texture, you can use a mix of apple varieties for more complex flavor. Try combining Granny Smith with Honeycrisp or Gala.
- Cutting Cold: For the cleanest cuts, chill the completely cooled bars in the refrigerator for 30 minutes before slicing.
- Preventing Soggy Bottoms: The cornstarch and flour in the filling are essential for absorbing apple juices. Don’t reduce these thickeners.
- Make It Ahead: You can prepare the crust mixture and apple filling separately up to 24 hours in advance. Store in the refrigerator and assemble when ready to bake.
- Altitude Adjustments: If baking above 3,000 feet, reduce baking powder to ¾ teaspoon and increase oven temperature by 25°F.
- Prep Time: 25 minutes
- Cook Time: 50 minutes
- Category: Dessert
- Method: Baking
- Cuisine: American
Nutrition
- Serving Size: 1 bar (1/24 of recipe)
- Calories: 215
- Sugar: 18g
- Sodium: 85mg
- Fat: 8g
- Saturated Fat: 5g
- Unsaturated Fat: 2.5g
- Trans Fat: 0g
- Carbohydrates: 35g
- Fiber: 2g
- Protein: 2g
- Cholesterol: 30mg
Tips & Variations
Transform these classic apple pie bars into something uniquely yours with these creative variations:
Caramel Apple Pie Bars: Drizzle caramel sauce over the apple layer before adding the streusel topping. You can also drizzle more caramel over the finished bars for extra decadence.
Apple Cranberry Bars: Add 1 cup of fresh or dried cranberries to the apple filling for a tart contrast and beautiful color. Perfect for Thanksgiving!
Maple Pecan Topping: Replace ¼ cup of the sugar in the streusel with maple sugar and add ½ cup of chopped pecans to the topping for a nutty, autumn-inspired twist.
Healthier Version: Substitute half the all-purpose flour with whole wheat flour, use coconut sugar instead of granulated sugar, and replace butter with coconut oil for a more wholesome version.
Spiced Rum Apple Bars: Add 2 tablespoons of dark rum to the apple filling for an adult-friendly variation with deeper flavor notes.
Gluten-Free Option: Use a 1:1 gluten-free flour blend in place of all-purpose flour throughout the recipe. The texture will be slightly different but still delicious.
Dairy-Free Adaptation: Replace butter with vegan butter or coconut oil in equal amounts for a dairy-free version that’s just as tasty.
Extra Crumb Topping: Love the streusel? Make 1.5x the topping recipe for an extra-thick, crunchy layer.
Pro Chef Tips
Elevate your apple pie bars from good to absolutely spectacular with these professional techniques:
1. Keep Everything Cold: When making the crust, use cold butter straight from the refrigerator and even chill your mixing bowl for 10 minutes beforehand. Cold butter creates those flaky, tender layers that make the crust exceptional.
2. Slice Apples Uniformly: Cut your apple slices to a consistent thickness (about ⅛ inch) so they cook evenly. A mandoline slicer makes this incredibly easy and saves time.
3. Prevent a Soggy Crust: Blind bake the crust for 10 minutes before adding the apple filling. This creates a barrier that keeps the crust crisp even with all that juicy filling on top.
4. Taste Your Apples: Before mixing the filling, taste your apples! If they’re particularly tart, add an extra 2 tablespoons of sugar. If they’re very sweet, reduce the sugar slightly and add a bit more lemon juice.
5. Don’t Overmix the Crust: When combining the butter and flour, stop as soon as you achieve a crumbly texture with visible butter pieces. Overmixing develops gluten, which makes the crust tough rather than tender.
6. Use the Right Baking Temperature: Don’t be tempted to increase the oven temperature to speed things up. The moderate heat of 375°F allows the apples to soften completely while the crust and topping brown perfectly.
7. Cool Completely Before Cutting: This is the most important tip! The filling needs at least 2 hours to set completely. Cutting too early results in messy bars with runny filling. Be patient—it’s worth the wait.
8. Sharpen Your Knife: Use a very sharp knife and wipe it clean between each cut for professional-looking bars with clean edges.
Common Mistakes to Avoid
Learn from common pitfalls to ensure perfect apple pie bars every time:
1. Using Warm Butter in the Crust: This is the number one mistake that leads to a tough, dense crust instead of a flaky, tender one. Always use cold butter straight from the refrigerator and work quickly to prevent it from warming up.
2. Skipping the Thickeners: Some bakers omit or reduce the cornstarch and flour thinking it’s unnecessary, but these ingredients are crucial for absorbing apple juices and preventing soggy, runny bars. Always include the full amount.
3. Not Cooling Long Enough: Cutting into warm bars is tempting, but the filling won’t have set properly. You’ll end up with a messy pile instead of neat squares. Cool for at least 2 hours, or refrigerate for cleaner cuts.
4. Overcrowding the Apple Layer: Mounding too many apples creates uneven baking and can make the bars difficult to cut. Aim for a relatively even layer, and save extra apple slices for another use.
5. Leaving Apples Too Large: Large apple chunks won’t cook through in the baking time, leaving you with crunchy bits in an otherwise tender dessert. Slice apples thinly and uniformly for the best texture.
Storage & Meal Prep
Proper storage keeps your apple pie bars fresh and delicious for days:
Room Temperature: Store completely cooled bars in an airtight container at room temperature for up to 2 days. Separate layers with parchment paper to prevent sticking.
Refrigerator Storage: For longer storage, keep the bars in an airtight container in the refrigerator for up to 5 days. The cold actually helps firm up the bars, making them easier to handle and eat on-the-go.
Reheating: To enjoy warm bars, place individual portions on a microwave-safe plate and heat for 15-20 seconds. For a crispier topping, reheat in a 300°F oven for 8-10 minutes. You can also enjoy these bars cold straight from the refrigerator—they’re delicious both ways!
Preventing Sogginess: Always ensure the bars are completely cooled before storing. Warm bars release steam in a sealed container, which creates condensation and makes them soggy.
Transporting: These bars travel beautifully for potlucks and parties. Keep them in the baking pan covered with foil, or layer them in a portable container with parchment between layers.
Make-Ahead & Freezer Notes
These apple pie bars are wonderfully freezer-friendly and perfect for advance preparation:
Freezing Baked Bars: Once completely cooled, wrap individual bars tightly in plastic wrap, then place them in a freezer-safe container or bag. Freeze for up to 3 months. Thaw overnight in the refrigerator or at room temperature for 2 hours.
Freezing Unbaked: You can assemble the entire pan of unbaked bars, cover tightly with plastic wrap and foil, and freeze for up to 2 months. Bake directly from frozen, adding an extra 15-20 minutes to the baking time.
Make-Ahead Components: Prepare the crust mixture up to 3 days ahead and store in the refrigerator. The apple filling can be made a day ahead and refrigerated, though you may need to drain excess liquid before using.
Best Reheating Method: For frozen bars, thaw completely first. Then reheat in a 300°F oven for 10-12 minutes until warmed through. This method restores the crispy topping texture better than microwaving.
Freezing Tips: Flash-freeze cut bars on a baking sheet for 1 hour before wrapping individually. This prevents them from sticking together and allows you to grab single servings as needed.
Serving Suggestions
Make your apple pie bars even more irresistible with these serving ideas:
Classic Pairing: Serve warm bars with a generous scoop of vanilla ice cream that melts into all the nooks and crannies. The combination of warm spiced apples and cold creamy ice cream is unbeatable.
Whipped Cream Topping: A dollop of freshly whipped cream (or store-bought) adds a light, airy contrast to the dense, fruity bars. Add a pinch of cinnamon to the whipped cream for extra flavor.
Caramel Drizzle: Warm caramel sauce drizzled over the top takes these bars to dessert heaven. Try salted caramel for a sophisticated sweet-salty combination.
Coffee or Tea Service: These bars pair beautifully with hot coffee, chai tea, or apple cider. They’re perfect for afternoon tea or a coffee break.
Dessert Board: Include these bars on a fall dessert board alongside pumpkin cookies, cinnamon rolls, and chocolate-covered pretzels for a stunning spread.
Breakfast Treat: These bars are substantial enough to serve as a special weekend breakfast or brunch item alongside coffee and fresh fruit.
Holiday Presentation: For holidays, dust with powdered sugar through a stencil to create snowflakes or festive patterns. Serve on a vintage platter with cinnamon sticks and fresh apple slices as garnish.
With Cheese: For a sophisticated touch, serve alongside sharp cheddar cheese slices. The combination of sweet apple pie and savory cheese is a classic pairing that dates back centuries.
FAQs Section
Q: Can I use a different type of apple?
A: Absolutely! While Granny Smith apples are recommended for their tartness and firm texture that holds up during baking, you can use Honeycrisp, Braeburn, Jonagold, or even a mixture of varieties. Avoid very soft apples like Red Delicious or McIntosh, as they tend to become mushy. For the best results, combine a tart apple with a sweet variety for complex flavor.
Q: Why are my apple pie bars soggy?
A: Soggy bars usually result from not using enough thickener (cornstarch and flour), cutting the bars before they’ve cooled completely, or using apples that are too juicy. Make sure to include the full amount of thickeners in the recipe, let the bars cool for at least 2 hours, and consider blind-baking the crust for 10 minutes before adding the filling for extra insurance against sogginess.
Q: Can I make these bars in advance?
A: Yes! These bars actually taste even better the next day as the flavors meld together. Bake them up to 2 days ahead and store covered at room temperature, or up to 5 days ahead if refrigerated. You can also freeze them for up to 3 months. They’re perfect for holiday prep or busy weeks when you want homemade desserts without last-minute stress.
Q: How do I get clean cuts when slicing the bars?
A: The secret to clean cuts is patience and a sharp knife. Let the bars cool completely (2+ hours), or better yet, refrigerate them for 30 minutes before cutting. Use a large, sharp knife and wipe it clean with a damp cloth between each cut. Chilling firms up the filling and makes slicing much neater.
Q: Can I reduce the sugar in this recipe?
A: You can reduce the sugar slightly, but keep in mind that it affects both sweetness and texture. The sugar in the filling helps draw out moisture from the apples and combines with the cornstarch to create the proper consistency. You can safely reduce the total sugar by up to ¼ cup, but I wouldn’t recommend going lower. Taste your apples first—if they’re very sweet, start with a smaller reduction.
Q: What’s the difference between apple pie bars and apple crumble bars?
A: The main difference is the crust. Apple pie bars typically have a shortbread-style crust that’s more structured and cookie-like, similar to pie crust, while apple crumble bars usually have an oat-based, streusel-like base and topping throughout. Both are delicious, but pie bars tend to be neater to serve and have a more refined texture.
Q: Can I make these bars gluten-free?
A: Yes! Substitute a 1:1 gluten-free flour blend for the all-purpose flour throughout the recipe. Look for blends that contain xanthan gum, which helps provide structure. The texture will be slightly different—perhaps a bit more crumbly—but they’ll still be delicious. Make sure your oats are certified gluten-free if you’re serving someone with celiac disease.
Conclusion
These easy apple pie bars bring together everything we love about classic American desserts—warm cinnamon-spiced apples, a buttery crust, and that irresistible crumbly topping—all in a convenient, shareable format that’s perfect for any occasion. Whether you’re a seasoned baker or just starting your baking journey, this recipe is forgiving, flexible, and guaranteed to impress your family and friends.
The beauty of this apple pie bars recipe is its versatility. Serve them warm with ice cream for a cozy fall dessert, pack them in lunchboxes for a special treat, or present them on a pretty platter at your next potluck. They’re equally at home at casual weeknight dinners and elegant holiday gatherings.
I’d love to hear how your apple pie bars turn out! Did you add your own creative twist? Serve them with a special topping? Share your results in the comments below, and don’t forget to save this recipe to your Pinterest boards so you can make them again and again. Tag me in your photos—I genuinely love seeing your baking creations!
Happy baking, friends! May your kitchen smell like cinnamon and your apple pie bars turn out perfectly golden and delicious. 🍎