
Get ready to fall in love with this incredibly delicious spicy garlic shrimp recipe that’s packed with bold flavors and ready in just 15 minutes! These succulent shrimp are sautéed to perfection in a vibrant sauce loaded with garlic, a kick of heat, and aromatic spices that create an absolutely irresistible combination. This easy garlic shrimp recipe is perfect for busy weeknights when you want something impressive without spending hours in the kitchen.
This quick spicy shrimp dish is incredibly versatile—serve it over rice, toss it with pasta, pile it onto crusty bread, add it to tacos, or simply enjoy it with a side of vegetables. The combination of plump, juicy shrimp with a spicy garlic butter sauce creates a restaurant-quality meal that tastes like you spent hours cooking, but it comes together in minutes!
Whether you’re cooking for a weeknight family dinner, entertaining guests, planning a romantic date night, or just craving something delicious and satisfying, this spicy garlic shrimp recipe delivers every time. It’s naturally gluten-free, keto-friendly, low-carb, and can easily be adjusted to your preferred spice level. Once you see how quick and easy this is, it’ll become your go-to seafood recipe!
History / Background
Garlic shrimp dishes have a rich culinary history that spans multiple cultures and cuisines around the world. The combination of shrimp and garlic is beloved from the Mediterranean to Asia, Latin America to the American South, each region adding its own unique twist to this classic pairing.
In Spanish cuisine, “Gambas al Ajillo” (garlic shrimp) is a beloved tapas dish that dates back centuries. Traditionally prepared in small earthenware dishes called “cazuelas,” this simple preparation features shrimp sizzled in olive oil with lots of sliced garlic and sometimes a touch of chili pepper. The dish originated in coastal regions of Spain where fresh seafood was abundant, and home cooks needed quick, flavorful ways to prepare their catch.
Asian cuisines, particularly Chinese and Thai cooking, have their own versions of spicy garlic shrimp. Chinese “Suàn Róng Xiā” features shrimp stir-fried with minced garlic, ginger, and chili peppers, often finished with soy sauce and rice wine. Thai preparations might include fish sauce, lime, and Thai chilies for that signature sweet-spicy-sour balance.
In Latin American and Caribbean cuisines, shrimp dishes often feature bold flavors like garlic, lime, and various peppers. From Mexican “Camarones al Mojo de Ajo” to Cuban garlic shrimp preparations, the emphasis is on fresh seafood enhanced with aromatic garlic and bright citrus.
The American South has its own garlic shrimp traditions, with dishes like New Orleans-style BBQ shrimp (which actually contains no BBQ sauce but is loaded with garlic, butter, and spices) and Low Country shrimp preparations that showcase the region’s abundant seafood.
What makes spicy garlic shrimp so universally beloved is its simplicity and speed. Shrimp cook incredibly quickly—usually just 2-3 minutes—making them perfect for fast meals. The marriage of garlic’s pungent aroma, the sweetness of shrimp, and the excitement of spicy heat creates a flavor combination that transcends cultural boundaries. Today, home cooks around the world prepare their own versions, making this dish a global favorite that’s endlessly adaptable to personal tastes and available ingredients!
Why You’ll Love This Recipe
This spicy garlic shrimp recipe is about to become your new favorite quick dinner! The combination of succulent shrimp, aromatic garlic, and just the right amount of heat creates a flavor explosion that’s absolutely addictive. Every bite is bursting with bold flavors that taste like restaurant-quality cooking but come together in your own kitchen in minutes.
Here’s why this easy spicy garlic shrimp will be on repeat in your house:
- Lightning Fast – Ready in just 15 minutes from start to finish, perfect for busy weeknights!
- Restaurant-Quality Flavor – Tastes like an expensive dinner out but costs a fraction and you control the quality
- Incredibly Versatile – Serve over rice, pasta, cauliflower rice, zoodles, or with crusty bread
- Naturally Low-Carb & Keto – High protein, minimal carbs, fits perfectly into healthy eating plans
- Gluten-Free Friendly – Naturally gluten-free with no modifications needed
- Customizable Heat – Adjust spice level from mild to fire-breathing hot
- Simple Ingredients – Uses pantry staples and readily available fresh shrimp
- Minimal Cleanup – One skillet meal means less time washing dishes!
- Impressive Yet Easy – Looks and tastes fancy enough for company but simple enough for beginners
- Budget-Friendly – Shrimp is affordable, especially when bought frozen
- Meal Prep Champion – Make ahead and reheat for quick lunches throughout the week
- Family-Friendly – Kids love shrimp, and you can control the spice for their portions
Whether you’re a seafood lover looking for new recipes or someone who needs quick, healthy dinners that don’t sacrifice flavor, this spicy garlic shrimp recipe checks all the boxes. The best part? Even kitchen beginners can nail this recipe on the first try!
Ingredient Notes
Let’s break down what makes this spicy garlic shrimp so incredibly delicious. Each ingredient plays an important role!
Shrimp – The star of the show! Use large or jumbo shrimp (21-25 count or 16-20 count per pound) for the best results. You’ll need about 1½ pounds, which serves 4 people generously. Buy them peeled and deveined to save time—frozen shrimp work perfectly and are often fresher than “fresh” shrimp at the store since they’re frozen immediately after catching. Thaw frozen shrimp in the refrigerator overnight or quickly under cold running water. Pat them completely dry before cooking for the best sear. Leave tails on for presentation or remove for easier eating—your choice!
Garlic – Fresh garlic is non-negotiable for this recipe! You’ll need 6-8 cloves, minced. Fresh garlic provides that pungent, aromatic flavor that defines this dish. Don’t use pre-minced jarred garlic—it lacks the vibrant flavor of fresh. Mince it finely so it cooks evenly and distributes throughout the sauce. If you really love garlic, add more! Substitution: In a pinch, garlic powder can work (1 teaspoon = 1 clove) but fresh is infinitely better.
Butter – Creates the rich, luxurious sauce that coats the shrimp. Unsalted butter is preferred so you can control the salt level. You’ll need about 4 tablespoons. The butter helps carry flavors and creates that glossy, restaurant-style sauce. Substitution: Ghee works beautifully, or use olive oil for a lighter, more Mediterranean take (though it won’t be quite as rich).
Olive Oil – Combined with butter for sautéing. The oil raises the smoke point, preventing the butter from burning while cooking. Extra virgin olive oil adds flavor; regular olive oil works too. You’ll need 2 tablespoons.
Red Pepper Flakes – Provides the signature heat! Start with 1 teaspoon for moderate heat, adjusting up or down based on your spice tolerance. Crushed red pepper flakes give consistent heat throughout the dish. Substitution: Fresh minced chili peppers (jalapeño, serrano, Thai chilies), cayenne pepper, or hot sauce can all provide heat.
Paprika – Adds color, subtle sweetness, and depth. Smoked paprika is particularly delicious, giving a subtle smoky note. Use 1 teaspoon. Regular sweet paprika works too. This is more about flavor depth than heat.
Lemon Juice – Fresh lemon juice brightens all the flavors and cuts through the richness of butter. The acidity balances everything perfectly. You’ll need juice from one lemon (about 3 tablespoons). Substitution: Lime juice works beautifully and adds a slightly different citrus note.
White Wine – Optional but wonderful! Dry white wine (like Sauvignon Blanc or Pinot Grigio) adds depth and acidity. You’ll need about ¼ cup. Substitution: Chicken broth, seafood stock, or just extra lemon juice and water work fine.
Fresh Parsley – For garnish and a pop of fresh flavor. Cilantro also works if you prefer. Fresh herbs make the dish look beautiful and add brightness.
Salt and Black Pepper – Essential for seasoning. Taste and adjust at the end since shrimp and butter both contain some sodium naturally.
Equipment Needed
This is truly a simple one-pan dish that requires minimal equipment:
- Large Skillet or Sauté Pan – A 12-inch skillet is ideal for cooking shrimp in a single layer without crowding. Cast iron, stainless steel, or non-stick all work great.
- Sharp Knife – For mincing garlic and chopping herbs.
- Cutting Board – For prep work.
- Measuring Spoons – For accurate spice measurements.
- Spatula or Wooden Spoon – For stirring and flipping shrimp.
- Paper Towels – Essential for patting shrimp dry before cooking.
- Tongs – Helpful for flipping individual shrimp (optional).
- Lemon Juicer – Makes extracting lemon juice easier (optional).
- Serving Platter or Bowl – For presenting your beautiful shrimp.
Optional but Nice:
- Garlic Press – If you don’t want to mince garlic by hand
- Microplane or Zester – For adding lemon zest (optional but delicious!)

Spicy Garlic Shrimp Recipe
- Total Time: 15 minutes
- Yield: 4 servings 1x
- Diet: Gluten Free
Description
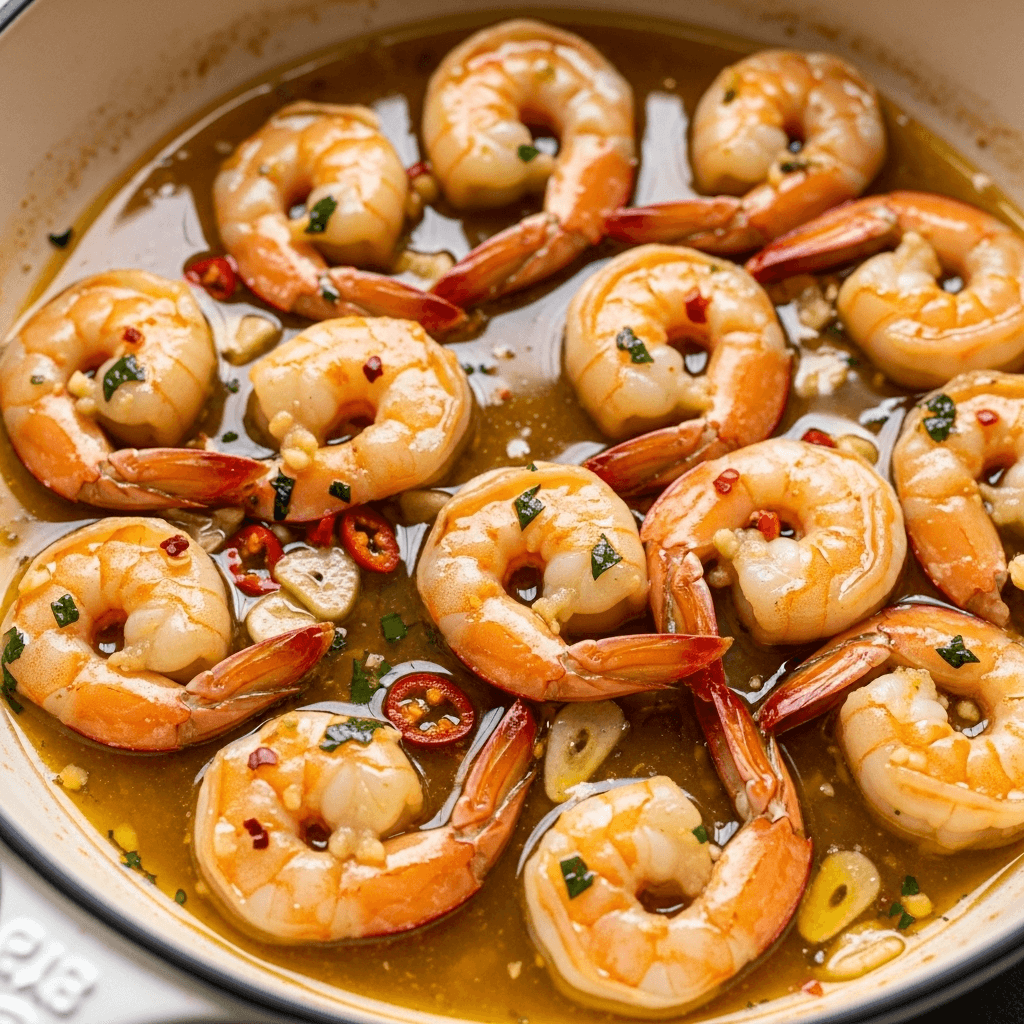
This quick and easy spicy garlic shrimp recipe features succulent shrimp sautéed in a flavorful sauce loaded with garlic, butter, and a kick of heat. Ready in just 15 minutes, this restaurant-quality dish is perfect for busy weeknights, impressive enough for entertaining, and endlessly versatile. Serve over rice, pasta, or with crusty bread for an irresistible meal!
Ingredients
- 1½ pounds large shrimp (21–25 count), peeled and deveined
- 6–8 cloves garlic, minced (about 2 tablespoons)
- 4 tablespoons unsalted butter
- 2 tablespoons olive oil
- 1 teaspoon red pepper flakes (adjust for heat preference)
- 1 teaspoon paprika (smoked paprika preferred)
- ¼ cup dry white wine (optional, or use chicken broth)
- 3 tablespoons fresh lemon juice (about 1 lemon)
- 1 teaspoon lemon zest (optional)
- ½ teaspoon salt (adjust to taste)
- ½ teaspoon black pepper
- ¼ cup fresh parsley, chopped (for garnish)
- Extra lemon wedges (for serving)
Instructions
Step 1: Prep the Shrimp
Pat the shrimp completely dry with paper towels—this is crucial for getting a good sear! Moisture is the enemy of a nice crust. Season the dried shrimp lightly with salt and black pepper on both sides. Set aside while you prepare other ingredients. If your shrimp still have tails, you can leave them on for presentation or remove them for easier eating.
Step 2: Prepare Your Ingredients
Mince the garlic finely and have it ready near your stove. Measure out all your spices, lemon juice, and wine. Once cooking begins, things move fast with shrimp, so having everything prepped and within reach is important. Chop your fresh parsley. This “mise en place” (everything in its place) makes cooking smooth and stress-free.
Step 3: Heat the Pan
Heat a large 12-inch skillet over medium-high heat. Add 2 tablespoons of butter and 2 tablespoons of olive oil. Let the butter melt and foam. The combination of butter and oil gives you the rich butter flavor while preventing burning. The pan is ready when the butter is bubbling and fragrant but not brown.
Step 4: Sear the Shrimp
Add the shrimp to the hot pan in a single layer—don’t crowd them or they’ll steam instead of sear. You may need to work in batches depending on your pan size. Cook for 1-2 minutes without moving them so they develop a nice golden crust on the bottom. Flip and cook another 1-2 minutes on the other side until they’re pink and just cooked through. Shrimp are done when they form a “C” shape (not a tight “O” which means overcooked). Remove cooked shrimp to a plate and set aside.
Step 5: Make the Spicy Garlic Sauce
Reduce heat to medium. In the same skillet, add the remaining 2 tablespoons of butter. Once melted, add the minced garlic and red pepper flakes. Sauté for 30-45 seconds, stirring constantly, until fragrant—be careful not to burn the garlic! It should be golden and aromatic, not brown. Add the paprika and stir for another 10 seconds.
Step 6: Deglaze and Build Flavor
Pour in the white wine (or broth) and lemon juice. Scrape up any browned bits from the bottom of the pan with your spatula—that’s pure flavor! Let the sauce simmer and reduce slightly for about 1-2 minutes. It should thicken just a bit and smell absolutely amazing. Add lemon zest if using.
Step 7: Combine and Finish
Return the cooked shrimp to the skillet along with any accumulated juices from the plate. Toss everything together, coating the shrimp in the spicy garlic sauce for about 30 seconds to 1 minute until the shrimp are heated through and coated. Taste and adjust seasoning with more salt, pepper, or lemon juice as needed.
Step 8: Garnish and Serve
Remove from heat immediately—you don’t want to overcook the shrimp! Transfer to a serving platter or individual plates. Sprinkle generously with fresh chopped parsley and serve with extra lemon wedges on the side. Provide crusty bread for soaking up that incredible sauce, or serve over your choice of rice, pasta, or vegetables. Enjoy immediately while hot!
Notes
- Shrimp Size: Large or jumbo shrimp work best for this recipe. Smaller shrimp cook too quickly and are easier to overcook.
- Don’t Overcook: Shrimp cook very fast! They’re done when pink and opaque, forming a “C” shape. Overcooked shrimp are rubbery and tough.
- Dry Shrimp Well: Patting shrimp dry before cooking is essential for getting that nice sear instead of steaming them.
- Fresh Garlic: Don’t substitute jarred minced garlic—fresh makes a huge difference in flavor and aroma.
- Heat Level: Start with less red pepper flakes if heat-sensitive (½ teaspoon), or increase to 1½-2 teaspoons if you love spicy food.
- Wine Substitute: If not using wine, substitute with chicken broth, seafood stock, or just use extra lemon juice and a splash of water.
- Serving Size: This recipe serves 4 as a main course or 6-8 as an appetizer.
- Prep Time: 10 minutes
- Cook Time: 05 minutes
- Category: Appetizer
- Method: Stovetop
- Cuisine: Mediterranean, American
Nutrition
- Serving Size: About 6 ounces (ⅼ of recipe)
- Calories: 285
- Sugar: 1g
- Sodium: 890mg
- Fat: 18g
- Saturated Fat: 8g
- Unsaturated Fat: 9g
- Trans Fat: 0g
- Carbohydrates: 04g
- Fiber: 0g
- Protein: 26g
- Cholesterol: 285mg
Tips & Variations
Extra Spicy Garlic Shrimp: Double the red pepper flakes, add fresh minced jalapeños or serrano peppers, or finish with a drizzle of sriracha or hot sauce for serious heat lovers.
Creamy Garlic Shrimp: Stir in ¼ cup of heavy cream or coconut cream after deglazing for a rich, creamy sauce that’s absolutely decadent.
Asian-Inspired Version: Add fresh ginger along with the garlic, use sesame oil instead of olive oil, finish with soy sauce instead of lemon juice, and garnish with sesame seeds and scallions.
Mediterranean Style: Use only olive oil (no butter), add cherry tomatoes and Kalamata olives, finish with fresh basil and feta cheese.
Honey Garlic Shrimp: Add 1-2 tablespoons of honey to the sauce for a sweet-spicy combination that’s incredibly popular.
Cajun Spiced Shrimp: Replace the paprika and red pepper flakes with 2 tablespoons of Cajun seasoning for New Orleans-style flavors.
Lemon Herb Version: Reduce the heat and add fresh herbs like thyme, oregano, and extra lemon for a brighter, less spicy version.
Coconut Shrimp: Add coconut milk to the sauce and garnish with toasted coconut flakes for tropical flair.
Tomato Garlic Shrimp: Add a cup of halved cherry tomatoes when making the sauce and let them soften and burst—delicious over pasta!
Dairy-Free: Replace butter with additional olive oil or ghee for a dairy-free version that’s still incredibly flavorful.
Pro Chef Tips
Room Temperature Shrimp: Let thawed shrimp sit at room temperature for 10-15 minutes before cooking. Cold shrimp added to a hot pan can cool the pan down and cause steaming rather than searing. Room temperature shrimp cook more evenly.
High Heat is Your Friend: Don’t be afraid of high heat! Shrimp need hot, fast cooking for that perfect sear and texture. A hot pan creates the flavorful browned crust while keeping interiors tender and juicy. If your pan isn’t hot enough, shrimp will release water and simmer rather than sear.
The Garlic Timing: Garlic burns easily and becomes bitter. That’s why we cook the shrimp first, remove them, then cook the garlic in a slightly cooler pan. This ensures perfectly golden, fragrant garlic without any burnt bitterness. Never walk away when garlic is in the pan—it goes from perfect to burnt in seconds!
Save That Fond: Those browned bits stuck to the bottom of your pan after cooking shrimp? That’s “fond,” and it’s pure flavor gold! When you deglaze with wine or broth, scrape those bits up—they dissolve into your sauce and add incredible depth.
The “C” Rule: Perfectly cooked shrimp form a “C” shape. If they curl into a tight “O” shape, they’re overcooked and will be tough. Remove them the second they turn pink and opaque—residual heat will finish the cooking.
Finish with Fresh: Adding fresh lemon juice and herbs at the very end preserves their bright, vibrant flavors. If added too early, heat dulls their impact. Always finish with fresh elements right before serving.
Quality Matters: With so few ingredients, quality really shines through. Use good butter, fresh garlic, real lemon juice, and the best shrimp you can afford. Avoid pre-cooked shrimp—they’ll be rubbery when reheated.
Common Mistakes to Avoid
Overcooking the Shrimp: This is the number one mistake! Shrimp cook incredibly fast—usually just 2-3 minutes total. Overcooked shrimp become rubbery, tough, and lose their sweet flavor. The moment they turn pink and opaque, remove them from heat. Remember they’ll continue cooking from residual heat. Slightly underdone is better than overdone since you’ll toss them back in the sauce briefly.
Crowding the Pan: When shrimp are packed too tightly in the pan, they release moisture that can’t evaporate quickly enough, causing them to steam rather than sear. This prevents that delicious golden crust from forming. Cook in batches if necessary, leaving space between each shrimp. A properly seared shrimp should have a golden-brown exterior.
Using Wet Shrimp: If you skip drying the shrimp, they’ll release moisture when they hit the hot pan, again causing steaming rather than searing. Always pat shrimp completely dry with paper towels before seasoning and cooking. This simple step dramatically improves texture and flavor.
Burning the Garlic: Garlic burns quickly and becomes acrid and bitter when overcooked. Always add garlic after removing shrimp from the pan (when the pan is slightly cooler), and stir constantly for just 30-45 seconds until fragrant. If you accidentally burn garlic, start over—burnt garlic will ruin the entire dish with bitterness.
Not Having Ingredients Ready: Shrimp cooking moves fast! If you’re scrambling to find your lemon or chop parsley while shrimp are cooking, you’ll overcook them. Have everything measured, chopped, and within arm’s reach before you start cooking. This “mise en place” approach is essential for quick-cooking dishes.
Using Poor Quality Shrimp: Pre-cooked shrimp from the deli section or shrimp that smell fishy won’t give you good results. Buy raw shrimp (fresh or frozen) that smell clean and oceanic. Frozen shrimp are often fresher than “fresh” since they’re frozen immediately on the boat.
Storage & Meal Prep
Refrigerator Storage: Store leftover spicy garlic shrimp in an airtight container in the refrigerator for up to 3 days. The shrimp and sauce store beautifully together. Keep in mind that reheated shrimp won’t be quite as tender as freshly cooked, but they’re still delicious!
Reheating Instructions: The key to reheating shrimp is gentle, quick heat to avoid overcooking. Best method: Place shrimp in a skillet over medium-low heat with a splash of water, broth, or additional butter. Heat just until warmed through, about 2-3 minutes, tossing frequently. Microwave method: Heat in 30-second increments, stirring between each, just until warm (usually 1-1½ minutes total). Never overheat or shrimp will become rubbery.
Meal Prep Strategy: This dish is fantastic for meal prep! Cook the shrimp recipe on Sunday, portion into containers with rice or vegetables, and you have healthy, delicious lunches or quick dinners ready all week. The flavors actually deepen after a day in the fridge!
Sauce Separation: If the butter sauce separates after refrigeration (it often does), simply reheat gently and whisk or stir to re-emulsify. A tiny splash of water or lemon juice while reheating can help bring it back together.
Leftover Ideas: Chop leftover shrimp and add to quesadillas, toss with pasta, add to salads, stuff into tacos or wraps, or serve over cauliflower rice for different meals throughout the week.
Make-Ahead & Freezer Notes
Prepping Ahead: You can prep components ahead to make cooking even faster! Peel and devein shrimp, mince garlic, measure spices, and chop herbs up to 24 hours ahead. Store prepped ingredients separately in the refrigerator in airtight containers. When ready to cook, everything comes together in minutes!
Marinating Shrimp: For even more flavor, you can marinate the shrimp in the garlic, olive oil, and spices for 15-30 minutes before cooking (no longer or the acid will start “cooking” them). Pat dry before adding to the hot pan.
Freezing Cooked Shrimp: While not ideal (shrimp texture suffers slightly when frozen after cooking), you can freeze this dish for up to 1 month. Cool completely, transfer to freezer-safe containers, and freeze. Thaw overnight in the refrigerator before reheating gently.
Freezing Raw Shrimp: The better option is to freeze raw shrimp. Buy shrimp when on sale, portion into freezer bags, and freeze for up to 3 months. Thaw in the refrigerator overnight or under cold running water when ready to use. This way, you’re cooking fresh shrimp rather than reheating cooked ones.
Make-Ahead Sauce: You can make the garlic butter sauce ahead (steps 5-6) and refrigerate for up to 2 days. When ready to serve, cook fresh shrimp and toss with reheated sauce. This gives you the best texture since shrimp are freshly cooked.
Party Prep: For entertaining, prep all ingredients ahead, then cook the shrimp right before serving. They take less than 10 minutes to cook, and your guests will love watching (and smelling!) this dramatic dish come together. Serve immediately while hot.
Serving Suggestions
Classic Pairings: Serve spicy garlic shrimp over fluffy white rice, jasmine rice, or brown rice to soak up that incredible sauce. Crusty French bread or garlic bread is perfect for mopping up every last drop!
Low-Carb Options: Serve over cauliflower rice, zucchini noodles (zoodles), or shirataki noodles for a keto-friendly, low-carb meal that’s equally satisfying.
Pasta Perfection: Toss with angel hair pasta, linguine, spaghetti, or fettuccine for a quick shrimp pasta dinner. The sauce coats the noodles beautifully!
Vegetable Sides: Pair with roasted asparagus, sautéed green beans, roasted Brussels sprouts, grilled zucchini, or a simple green salad with lemon vinaigrette.
Grain Bowls: Create a healthy grain bowl with quinoa, farro, or couscous as the base, add the shrimp, and top with avocado, cherry tomatoes, and cucumber for a complete meal.
Taco Tuesday: Use the spicy garlic shrimp as a taco filling! Serve in warm tortillas with shredded cabbage, avocado, cilantro, and lime crema.
Appetizer Style: Serve as an elegant appetizer with toothpicks and lemon wedges alongside cocktails. Provide crusty bread for guests to make their own shrimp crostini.
Mediterranean Plate: Create a mezze-style plate with the shrimp, hummus, tzatziki, olives, feta cheese, cucumber, and warm pita bread.
Wine Pairing: This dish pairs beautifully with crisp white wines like Sauvignon Blanc, Pinot Grigio, or unoaked Chardonnay. The acidity cuts through the butter while complementing the seafood.
Complete Meal Ideas:
- Shrimp + garlic bread + Caesar salad
- Shrimp over pasta + roasted vegetables + glass of white wine
- Shrimp + rice pilaf + steamed broccoli
- Shrimp tacos + black beans + Mexican street corn
FAQs Section
Can I use frozen shrimp for this recipe?
Absolutely! Frozen shrimp are often fresher than “fresh” shrimp at the grocery store since they’re frozen immediately after catching. Just thaw them completely before cooking—either overnight in the refrigerator or quickly by placing them in a colander under cold running water for 10-15 minutes. Pat them very dry before cooking for best results. Never cook shrimp from frozen for this recipe as they’ll release too much moisture.
How do I know when shrimp are done cooking?
Shrimp are done when they turn pink and opaque throughout, and form a loose “C” shape. The cooking time is very quick—just 2-3 minutes total, about 1-2 minutes per side. If they curl into a tight “O” or spiral shape, they’re overcooked. You can also check the internal temperature—it should reach 120-145°F. When in doubt, slightly undercook rather than overcook; residual heat will finish cooking them.
Can I make this less spicy?
Yes! Reduce or omit the red pepper flakes entirely for a mild garlic shrimp. You can also use sweet paprika instead of smoked, which removes any heat from that ingredient. The beauty of this recipe is that you control the heat level. Start with just ¼ teaspoon of red pepper flakes for very mild heat, or skip it altogether for a completely mild version that’s still incredibly flavorful.
What size shrimp should I buy?
For this recipe, large shrimp (21-25 count per pound) or jumbo shrimp (16-20 count per pound) work best. The “count” refers to how many shrimp are in one pound—lower numbers mean bigger shrimp. Larger shrimp are easier to cook without overdoing them and have better texture. Extra-large (26-30 count) also work but cook very quickly. Avoid tiny salad shrimp as they’ll overcook in seconds.
Can I use pre-cooked shrimp?
It’s not recommended. Pre-cooked shrimp are already fully cooked, so when you “cook” them again, they become rubbery and tough. This recipe is designed for raw shrimp that cook in the flavorful sauce. If you only have pre-cooked shrimp, your best bet is to make the sauce, then just warm the pre-cooked shrimp in it for 30-60 seconds—don’t actually cook them.
Is this recipe really gluten-free?
Yes! Shrimp, butter, olive oil, garlic, and spices are all naturally gluten-free. Just make sure your spices haven’t been processed in facilities with gluten cross-contamination if you’re highly sensitive. If serving over pasta, use gluten-free pasta. For a completely gluten-free meal, serve over rice or with gluten-free bread.
Can I double this recipe for a crowd?
Absolutely! This recipe scales beautifully. When doubling, you may need to work in batches to avoid crowding the pan, or use two large skillets simultaneously. Everything else stays the same—just multiply the ingredients. This is perfect for parties and gatherings since it comes together so quickly even in large quantities.
Conclusion
Congratulations—you now have everything you need to make restaurant-quality spicy garlic shrimp in your own kitchen! This easy garlic shrimp recipe is truly a game-changer for busy home cooks. In just 15 minutes, you can have a meal that’s packed with bold, vibrant flavors, looks impressive, and satisfies everyone at your table.
The beauty of this quick spicy shrimp recipe is its incredible versatility and simplicity. Whether you’re serving it over rice for a weeknight dinner, tossing it with pasta for a romantic date night, or presenting it as an elegant appetizer for guests, it always delivers. The combination of succulent shrimp, aromatic garlic, a kick of heat, and that buttery lemon sauce is simply irresistible!
I’d absolutely love to hear how your spicy garlic shrimp turns out! Did you adjust the heat level? What did you serve it with? Did it disappear as quickly as it does in my house? Leave a comment below and share your experience! And if this recipe helped you create something delicious, please pin it to Pinterest so other home cooks can discover this quick and flavorful meal too. Your pins help support this blog and inspire me to keep creating recipes that make your life easier and more delicious!
Now grab those shrimp, heat up that skillet, and get ready to make the easiest, most flavorful dinner that’ll have everyone asking for seconds. Happy cooking!