

Get ready for the ultimate comfort food—this Creamy Chicken and Rice is a one-pot wonder that brings together tender chicken, fluffy rice, and a luscious creamy sauce that will have your family asking for seconds. This easy chicken and rice recipe is everything you want in a weeknight dinner: simple, satisfying, and loaded with flavor. Imagine perfectly seasoned chicken nestled in creamy, herb-infused rice that’s cooked to fluffy perfection, all made in a single skillet or pot.
Whether you’re looking for a cozy family dinner, meal prep for the week, or something comforting on a chilly evening, this one-pot chicken and rice delivers every single time. It’s the kind of recipe that feels like a warm hug—familiar, reliable, and absolutely delicious. The best part? Everything cooks together in one pot, which means minimal cleanup and maximum flavor as the chicken and rice meld together beautifully. This creamy chicken rice casserole-style dish is perfect for busy weeknights when you need something hearty and homemade without spending hours in the kitchen.
History / Background
While there’s no single origin story for chicken and rice (it’s been a staple combination in cuisines worldwide for centuries), the creamy American-style version we know today has its roots in Southern and Midwestern home cooking traditions. Rice cultivation in the American South dates back to the 1600s, and chicken has always been an affordable, accessible protein for home cooks.
The concept of creamy chicken and rice likely evolved from several culinary traditions. French cuisine contributed techniques for creating creamy sauces with butter, flour, and cream. European settlers brought casserole-style cooking methods where proteins and starches cooked together in one vessel. Southern cooks perfected the art of making humble ingredients taste extraordinary through proper seasoning and slow, patient cooking.
During the mid-20th century, one-pot meals gained massive popularity in American households as women entered the workforce in larger numbers and needed efficient dinner solutions. Recipes that could be assembled quickly, cooked in one vessel, and feed a family became essential. Cream of mushroom soup-based casseroles dominated the 1950s and 60s, but by the 1980s and 90s, home cooks began returning to scratch-made versions with fresh ingredients and real cream.
The modern creamy chicken and rice recipe represents this evolution—it honors the convenience of one-pot cooking and the comfort of creamy casseroles, but uses fresh, wholesome ingredients rather than canned soups. It’s become a Pinterest favorite and weeknight staple because it perfectly balances convenience with quality, delivering restaurant-worthy flavor with minimal effort.
Today, creamy chicken and rice is beloved across America as the ultimate comfort food. It’s the recipe grandmas pass down, the dish that appears at church potlucks, and the dinner that makes everything feel right with the world. It represents home cooking at its finest: simple, nourishing, and made with love.
Why You’ll Love This Recipe
This easy creamy chicken and rice recipe is about to become your most-cooked weeknight dinner, and here’s exactly why it deserves that honor:
This isn’t just another chicken and rice recipe—it’s the definitive version that balances creamy richness with perfectly fluffy rice and tender, juicy chicken. Everything cooks together in one pot, creating layers of flavor as the chicken releases its juices into the rice and the cream creates a luscious sauce that brings it all together. The result is comfort food that tastes like you spent hours in the kitchen, but actually comes together in under an hour.
- True One-Pot Meal: Everything cooks in a single pot or skillet—minimal dishes and maximum convenience
- Budget-Friendly: Uses affordable ingredients like chicken thighs or breasts, rice, and pantry staples
- Family-Approved: Even picky eaters love this mild, creamy, comforting dish
- Meal Prep Friendly: Makes excellent leftovers that reheat beautifully throughout the week
- Customizable: Easy to adapt with different vegetables, seasonings, or types of rice
- Foolproof Method: Hard to mess up with clear instructions and forgiving techniques
- Protein and Carbs in One: Complete meal that doesn’t need much else
- Restaurant-Quality Flavor: Tastes like something from a fancy bistro, made at home
- Kid-Friendly: Mild enough for children but flavorful enough for adults
- Perfect for Any Season: Comforting in winter, light enough for summer
Ingredient Notes
Let’s break down what makes this creamy chicken and rice so deliciously satisfying:
Chicken: Boneless, skinless chicken breasts or thighs both work beautifully. Thighs are more forgiving and flavorful (harder to overcook), while breasts are leaner. You can also use bone-in, skin-on chicken pieces for deeper flavor—just adjust cooking time. Cut into uniform pieces so everything cooks evenly. About 1.5-2 pounds feeds 4-6 people generously.
Long-Grain White Rice: This is key for fluffy, separate grains. Jasmine or basmati rice work wonderfully and add fragrance. Don’t use instant rice (it turns mushy) or brown rice (requires different liquid ratios and cooking times). Rinse the rice before using to remove excess starch and prevent gumminess.
Chicken Broth: The flavor foundation of this dish. Use low-sodium broth so you can control salt levels. Homemade stock is amazing if you have it, but quality store-bought works perfectly. The rice absorbs all this flavor, so don’t use water—it makes a huge difference!
Heavy Cream: Creates that signature luscious, creamy sauce. Heavy cream (also called heavy whipping cream) has the highest fat content and won’t curdle when simmered. You can substitute half-and-half for a lighter version, though the sauce will be thinner. Avoid milk—it’s too thin and likely to curdle.
Butter: Adds richness and helps create a silky sauce. Unsalted butter is best so you control seasoning. Don’t skip it—the butter helps thicken the sauce and carries flavor beautifully.
Onion and Garlic: The aromatic base that builds flavor depth. Yellow or white onions work best. Fresh garlic is essential—don’t use pre-minced from a jar, which tastes bitter. These two ingredients transform simple chicken and rice into something special.
All-Purpose Flour: Just a tablespoon or two helps thicken the creamy sauce and prevents it from being too thin. This creates that perfect consistency where the sauce coats the rice without being soupy or dry.
Italian Seasoning or Herbs: A blend of dried oregano, basil, thyme, and rosemary adds complexity. You can use individual herbs if you prefer, or substitute with Herbs de Provence. Fresh herbs work too—use triple the amount since dried herbs are more concentrated.
Paprika: Adds subtle color and mild, sweet pepper flavor. Smoked paprika gives a hint of smokiness that’s lovely but optional.
Frozen Peas or Vegetables (Optional): Add color, nutrition, and texture. Frozen peas, carrots, corn, or green beans all work. Add them during the last 5-10 minutes of cooking so they don’t get mushy.
Equipment Needed
You only need basic kitchen equipment for this simple one-pot meal:
Essential Equipment:
- Large Deep Skillet or Dutch Oven: A 12-inch skillet with a lid or a 5-6 quart Dutch oven works perfectly. You need enough room for the rice to expand. Cast iron, stainless steel, or enameled cast iron all work great.
- Lid: Essential for trapping steam so the rice cooks properly. If your skillet doesn’t have a lid, use aluminum foil tightly crimped around the edges.
- Wooden Spoon or Spatula: For stirring and scraping up browned bits from the pan.
- Measuring Cups and Spoons: Accurate measurements matter for proper rice-to-liquid ratio.
- Sharp Knife and Cutting Board: For prepping chicken, onions, and garlic.
- Tongs or Spatula: For flipping chicken pieces.
Optional but Helpful:
- Meat Thermometer: Ensures chicken reaches 165°F internal temperature.
- Fine-Mesh Strainer: For rinsing rice to remove excess starch.
- Ladle: For serving the creamy rice.
Creamy Chicken and Rice Recipe
- Total Time: 45 minutes
- Yield: 6 servings 1x
- Diet: Gluten Free
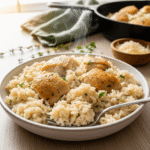
Description
Creamy, comforting one-pot chicken and rice with tender chicken, fluffy rice, and a rich, velvety sauce. This easy weeknight dinner is made entirely in one skillet for minimal cleanup and maximum flavor!
Ingredients
For the Chicken:
- 1.5–2 pounds boneless, skinless chicken breasts or thighs, cut into bite-size pieces
- 1 teaspoon salt
- 1/2 teaspoon black pepper
- 1 teaspoon paprika
- 2 tablespoons olive oil or butter
For the Rice:
- 2 tablespoons butter
- 1 medium onion, diced
- 4 cloves garlic, minced
- 1 1/2 cups long-grain white rice, rinsed
- 2 1/2 cups low-sodium chicken broth
- 1 cup heavy cream
- 1 teaspoon Italian seasoning (or 1/2 teaspoon each dried thyme and oregano)
- 1/2 teaspoon salt (adjust to taste)
- 1/4 teaspoon black pepper
- 2 tablespoons all-purpose flour (optional, for thicker sauce)
Optional Add-Ins:
- 1 cup frozen peas or mixed vegetables
- 1/2 cup grated Parmesan cheese
- Fresh parsley or thyme for garnish
- Red pepper flakes for heat
Instructions
- Season the Chicken: Pat the chicken pieces dry with paper towels. Season all over with salt, pepper, and paprika. This initial seasoning is important for flavor!
- Brown the Chicken: Heat 2 tablespoons olive oil or butter in a large, deep skillet or Dutch oven over medium-high heat. Once hot and shimmering, add the chicken pieces in a single layer. Don’t overcrowd—work in batches if needed. Cook for 3-4 minutes per side until golden brown. The chicken doesn’t need to be fully cooked through yet—it will finish cooking with the rice. Remove chicken to a plate and set aside.
- Sauté Aromatics: Reduce heat to medium. In the same skillet, add 2 tablespoons butter. Once melted, add the diced onion and cook for 3-4 minutes until softened and translucent, stirring occasionally. Add the minced garlic and cook for 1 minute until fragrant. Don’t let the garlic burn!
- Toast the Rice (Optional but Recommended): Add the rinsed rice to the skillet and stir to coat with the butter and aromatics. Toast for 1-2 minutes, stirring constantly. This step adds nutty flavor and helps the rice cook up fluffy and separate.
- Add Liquids and Seasonings: Sprinkle the flour over the rice mixture (if using) and stir for 30 seconds to cook the raw flour taste. Pour in the chicken broth, scraping up any browned bits from the bottom of the pan—this adds tons of flavor! Add the heavy cream, Italian seasoning, salt, and pepper. Stir everything together until well combined.
- Add Chicken Back: Nestle the browned chicken pieces into the rice mixture, along with any accumulated juices from the plate. The chicken should be partially submerged in the liquid. Bring the mixture to a gentle boil.
- Simmer: Once boiling, reduce heat to low, cover tightly with a lid, and simmer for 18-20 minutes without lifting the lid. The rice needs steam to cook properly, so resist the urge to peek! The liquid should be absorbed and the rice should be tender.
- Add Vegetables (Optional): If using frozen peas or vegetables, uncover the skillet after 18 minutes, quickly stir them in, then cover again and cook for 5 more minutes until heated through and the rice is fully tender.
- Rest: Remove from heat and let stand, covered, for 5 minutes. This resting period allows the rice to finish steaming and the sauce to thicken slightly.
- Fluff and Serve: Uncover, fluff the rice gently with a fork, and stir everything together. The sauce should be creamy and coat the rice beautifully. If it seems too thick, stir in a splash of cream or broth. If too thin, let it sit uncovered for a few minutes. Taste and adjust seasonings—add more salt, pepper, or herbs as needed.
- Garnish and Enjoy: Sprinkle with freshly grated Parmesan cheese and chopped fresh parsley if desired. Serve hot straight from the skillet!
Notes
- Rice-to-Liquid Ratio: The standard ratio is 1 part rice to 1.5-2 parts liquid. Don’t add more liquid or you’ll get mushy rice.
- Don’t Peek: Keep the lid on while the rice cooks! Lifting it releases steam and prevents proper cooking.
- Chicken Options: Bone-in, skin-on chicken pieces work too—just increase cooking time to 30-35 minutes.
- Make it Gluten-Free: Skip the flour or use gluten-free flour. The sauce will be slightly thinner but still delicious.
- Adjust Thickness: For thicker sauce, use the flour. For thinner, skip it and add extra cream at the end if needed.
- Leftovers: Rice dishes thicken considerably as they cool and sit. Add a splash of broth or cream when reheating.
- Prep Time: 10 minutes
- Cook Time: 35 minutes
- Category: Dinner
- Method: Stovetop
- Cuisine: American
Nutrition
- Serving Size: 1/6 of recipe (approximately 1.5 cups)
- Calories: 485
- Sugar: 3g
- Sodium: 650mg
- Fat: 22g
- Saturated Fat: 11g
- Unsaturated Fat: 9g
- Trans Fat: 0g
- Carbohydrates: 42g
- Fiber: 1g
- Protein: 30g
- Cholesterol: 115mg
Tips & Variations
Flavor Variations:
- Mushroom Chicken and Rice: Sauté 8 oz sliced mushrooms with the onions for earthy flavor
- Lemon Herb: Add 2 tablespoons lemon juice and fresh dill for bright, fresh notes
- Cajun Chicken: Use Cajun seasoning instead of Italian herbs for spicy Southern flair
- Garlic Parmesan: Double the garlic and stir in 1/2 cup Parmesan at the end
- Tuscan Style: Add sun-dried tomatoes, spinach, and Parmesan for Italian-inspired version
- Curry Chicken Rice: Swap Italian seasoning for curry powder and add coconut milk
- Mexican-Inspired: Use taco seasoning, add black beans and corn, top with cheese
- Asian Fusion: Add soy sauce, ginger, and sesame oil; use jasmine rice
Protein Swaps:
- Turkey: Ground turkey or turkey breast pieces work beautifully
- Pork: Boneless pork chops or tenderloin, cut into pieces
- Shrimp: Add raw shrimp during the last 5 minutes of cooking
- Sausage: Smoked sausage or Italian sausage adds tons of flavor
- Vegetarian: Skip the chicken and double the vegetables; use vegetable broth
Healthier Modifications:
- Lighter: Use half-and-half or milk instead of heavy cream (sauce will be thinner)
- Low-Carb: Use cauliflower rice instead of regular rice (add during last 10 minutes)
- More Veggies: Add broccoli, spinach, bell peppers, or zucchini
- Whole Grain: Use brown rice (requires more liquid and 40-45 minutes cooking time)
Pro Chef Tips
Here are professional secrets to making the absolute best creamy chicken and rice:
Brown the Chicken Properly: Don’t skip this step! Browning creates fond (those delicious browned bits) on the bottom of the pan that adds incredible depth of flavor to the entire dish. Make sure your pan is hot and the chicken is dry before adding it—this ensures good browning rather than steaming. Those golden-brown pieces aren’t just for looks—they’re flavor bombs. Don’t worry about cooking the chicken through at this stage; it finishes cooking with the rice.
The Rice Rinsing Rule: Always rinse your rice under cold water until the water runs mostly clear. This removes excess surface starch that can make your rice gummy and sticky instead of fluffy with separate grains. It only takes 30 seconds but makes a noticeable difference in texture. Use a fine-mesh strainer and run cold water while gently stirring the rice with your fingers.
Don’t Lift That Lid: This is the hardest rule to follow but the most important! Once you cover the rice to simmer, don’t lift the lid to check on it. Every time you peek, you release steam that the rice needs to cook properly. Trust the timing and process. Set a timer for 18-20 minutes and walk away. The rice will be perfect, I promise. Lifting the lid results in unevenly cooked rice—mushy on the bottom, crunchy on top.
Layer Your Seasoning: Season at multiple stages rather than just once. Season the chicken before browning, season the rice mixture when you add the broth, then taste and adjust at the end. This creates complex, well-rounded flavor throughout the dish rather than one-dimensional seasoning. Each layer builds on the previous one, creating depth that makes the difference between good and restaurant-quality.
The Resting Period Matters: After the rice finishes cooking, let it rest covered for 5 minutes off the heat. This allows the rice to finish steaming, the chicken to stay juicy, and the sauce to thicken slightly as it cools. It also makes the dish easier to serve—freshly cooked rice is too hot and fragile. This rest period is when everything comes together perfectly.
Control Your Heat: Use medium-high for browning, medium for sautéing aromatics, and low for simmering the rice. Rice needs gentle, even heat to cook properly. Too high and the bottom burns before the top cooks; too low and it takes forever and can get gummy. Adjust your heat as needed based on your stove—you should see gentle bubbling around the edges when you first cover it, then barely any movement once it’s simmering.
Save That Fond: When you deglaze the pan with broth, use your wooden spoon to scrape up all those browned bits stuck to the bottom. This fond is concentrated flavor that enriches the entire dish. If you see brown bits on the pan bottom after browning chicken, you’re doing it right! That’s liquid gold that gets incorporated into your sauce.
Common Mistakes to Avoid
Mistake #1: Using Too Much Liquid
Adding too much broth or cream makes the rice mushy, soupy, and overcooked. The rice-to-liquid ratio is crucial—generally 1 cup rice to 1.5-2 cups total liquid (including the cream). More liquid doesn’t mean better rice; it means mushy, overcooked rice swimming in too much sauce. Stick to the measurements in the recipe. If you want more sauce at the end, you can always add a splash of cream after the rice is cooked, but you can’t fix rice that’s been cooked in too much liquid.
Mistake #2: Cooking Over High Heat the Entire Time
Many home cooks keep the heat too high throughout cooking, which causes the bottom to burn while the top stays undercooked, or causes all the liquid to evaporate too quickly before the rice is tender. Once you bring the mixture to a boil, immediately reduce to low heat for the simmer phase. The liquid should barely bubble—gentle steam is what cooks rice properly. High heat creates unevenly cooked rice and can scorch your pan.
Mistake #3: Stirring the Rice While It Cooks
Once you cover the rice to simmer, don’t stir it! Stirring releases starch from the rice grains and creates a gummy, sticky, porridge-like texture instead of fluffy individual grains. The only time you stir is at the very beginning when combining ingredients, and at the very end when fluffing. The rice cooks perfectly undisturbed under its steam blanket. Trust the process and keep your spoon out of the pot!
Mistake #4: Using the Wrong Type of Rice
Instant rice turns to mush in this recipe because it’s pre-cooked and rehydrated. Brown rice won’t cook through in the time specified and requires more liquid. Short-grain or sushi rice gets too sticky. Always use long-grain white rice (jasmine or basmati work wonderfully) for the best texture and results. Each type of rice has different starch content and cooking requirements, so substitutions don’t work well without adjusting the entire recipe.
Mistake #5: Not Adjusting Seasoning at the End
Seasoning gets diluted as it cooks into the rice and sauce, so what tasted perfect at the beginning might taste bland at the end. Always taste your final dish before serving and adjust with more salt, pepper, herbs, or even a squeeze of lemon juice. This final seasoning adjustment is what separates amateur cooking from professional-level flavor. It only takes 30 seconds but transforms the dish.
Storage & Meal Prep
Refrigerator Storage:
Store leftover creamy chicken and rice in an airtight container in the refrigerator for up to 4 days. The rice will absorb more liquid as it sits and become thicker, which is normal. When reheating, you’ll need to add moisture back in.
Reheating Instructions:
The best way to reheat is on the stovetop. Place the desired portion in a skillet or saucepan over medium-low heat. Add 2-4 tablespoons of chicken broth, cream, or milk and stir gently, breaking up any clumps. Heat until warmed through, about 5-7 minutes. You can also microwave individual portions: place in a microwave-safe bowl, add 1-2 tablespoons of liquid, cover with a damp paper towel, and microwave on 50% power for 2-3 minutes, stirring halfway through. The lower power prevents drying out.
Meal Prep Strategy:
This recipe is fantastic for meal prep! Make a big batch on Sunday and portion into individual containers for easy grab-and-go lunches throughout the week. The flavors actually improve after a day as everything melds together. Pack reheating liquid separately or add it just before reheating to prevent the rice from getting too soggy.
Portion Control:
Divide the finished dish into 6 equal portions (about 1.5 cups each) and store in individual meal prep containers. This makes it easy to track servings and grab exactly what you need without portioning from a large container each time.
Make-Ahead & Freezer Notes
Preparing Components in Advance:
You can prep components ahead to make dinner time faster. Cut and season the chicken up to 24 hours ahead and store covered in the refrigerator. Dice the onions and garlic and store in separate containers. Measure out the rice and seasonings. When ready to cook, everything comes together quickly with minimal active prep.
Partially Cook Method:
For entertaining or very busy weeks, you can cook the dish about 80% of the way through, then cool and refrigerate for up to 2 days. When ready to serve, add a splash of broth, cover, and finish cooking for 10-15 minutes until heated through and the rice is fully tender. This method works well for dinner parties when you want to time everything perfectly.
Freezing Instructions:
Creamy chicken and rice freezes reasonably well, though the texture of the rice changes slightly upon thawing (it can be softer). Let the dish cool completely, then portion into freezer-safe containers or heavy-duty freezer bags. Remove as much air as possible to prevent freezer burn. Freeze for up to 3 months. Label with the date and contents.
Thawing and Reheating from Frozen:
The best method is to thaw overnight in the refrigerator, then reheat on the stovetop with a splash of cream or broth. You can also reheat from frozen: place the frozen portion in a saucepan with 1/4 cup liquid, cover, and heat over low heat for 15-20 minutes, stirring occasionally and breaking up clumps as it thaws. The texture won’t be exactly like fresh, but it’s still delicious and convenient.
Best Freezing Practices:
For optimal texture, slightly undercook the rice before freezing (cook for 15 minutes instead of 20). The rice continues softening when reheated, so starting with slightly firmer rice prevents mushiness. Also, portion into single-serving sizes before freezing for easier reheating.
Serving Suggestions
This creamy chicken and rice is a complete meal on its own, but here are delicious ways to round out dinner:
Simple Side Dishes:
- Green Salad: A crisp salad with vinaigrette cuts through the richness perfectly
- Steamed Broccoli: Simple, healthy, and classic pairing
- Roasted Green Beans: With garlic and lemon for bright flavor
- Roasted Asparagus: Elegant and seasonal
- Glazed Carrots: Sweet carrots complement the savory rice
- Sautéed Spinach: Quick, nutritious, and adds color
Bread Options:
- Garlic Bread: For soaking up extra creamy sauce
- Dinner Rolls: Soft and buttery
- Crusty Baguette: Perfect for mopping up every drop
- Biscuits: Southern-style comfort with your comfort food
- Naan or Flatbread: For an international twist
Additional Vegetable Sides:
- Roasted Brussels Sprouts: Caramelized and crispy
- Cucumber Tomato Salad: Fresh and cooling contrast
- Coleslaw: Tangy crunch balances creaminess
- Grilled Zucchini: Light and summery
- Corn on the Cob: Sweet and buttery
Beverage Pairings:
- White Wine: Chardonnay or Pinot Grigio pair beautifully
- Iced Tea: Sweet or unsweetened
- Sparkling Water: With lemon or lime
- Light Beer: For casual dinners
- Lemonade: Refreshing for family dinners
Make it a Complete Meal:
While the chicken and rice contain protein and carbs, adding a vegetable side and some crusty bread creates a well-rounded, satisfying dinner that feels special but isn’t complicated.
FAQs Section
Can I use brown rice instead of white rice?
Yes, but you’ll need to adjust the recipe significantly. Brown rice requires more liquid (about 3 cups total instead of 2.5 cups) and much longer cooking time (40-45 minutes instead of 20). The texture and flavor will also be different—nuttier and chewier. Follow the same method but increase liquid and time. You can’t simply substitute brown rice using the white rice timing or it will be crunchy and undercooked.
Why is my rice mushy or undercooked?
Mushy rice usually means too much liquid or overcooking, while undercooked rice means too little liquid or not enough cooking time. Make sure you’re measuring accurately—use measuring cups, not just estimating. Also check that you’re using long-grain white rice, not instant or short-grain. If your rice is undercooked after the specified time, add 1/4 cup more broth, cover, and cook 5 more minutes. If it’s mushy, you likely used too much liquid or lifted the lid too many times during cooking.
Can I make this in a slow cooker or Instant Pot?
Yes! For a slow cooker: brown the chicken first (skip if pressed for time), then add everything to the slow cooker and cook on LOW for 3-4 hours or HIGH for 1.5-2 hours. For an Instant Pot: use the sauté function to brown chicken and cook aromatics, add remaining ingredients, seal the lid, and pressure cook on HIGH for 8 minutes with natural release for 10 minutes. Both methods work, though the stovetop version has the best texture.
What if I don’t have heavy cream?
You can substitute with half-and-half (the sauce will be thinner), whole milk (much thinner sauce), or a mixture of milk and butter (1 cup milk + 2 tablespoons butter mimics cream somewhat). For dairy-free, use full-fat coconut milk, though the flavor will be slightly different. Avoid skim or low-fat milk—they’re too thin and likely to curdle. The higher the fat content, the creamier and more stable your sauce will be.
Can I use pre-cooked rotisserie chicken?
Absolutely! This is a great shortcut. Skip the browning step and add the shredded rotisserie chicken during the last 5-10 minutes of cooking, just to heat through. You’ll miss the fond from browning, so add an extra tablespoon of butter when sautéing the onions for more flavor. This method cuts prep time significantly and is perfect for using up leftover rotisserie chicken.
How do I prevent the rice from sticking to the bottom?
Make sure you reduce the heat to low once you cover the pot—gentle simmering, not vigorous boiling. Use a heavy-bottomed pan that distributes heat evenly. Don’t stir the rice while it cooks (stirring releases starch and makes it stick). If your stove runs hot, use a heat diffuser or the smallest burner. A little light sticking on the very bottom is normal and actually delicious (it’s called socarrat in Spanish cooking), but it shouldn’t burn.
Can I double this recipe?
Yes, but you’ll need a very large skillet or pot (at least 14 inches or 7-8 quarts). A 12-inch skillet isn’t big enough for a double batch. You may need to brown the chicken in batches. The cooking time remains roughly the same, though it might need an extra 5 minutes since there’s more volume. Alternatively, make two separate batches in regular pans—it’s actually easier and more reliable than one giant batch.
Conclusion
There you have it—the ultimate guide to making restaurant-quality creamy chicken and rice right in your own kitchen! This one-pot wonder proves that comfort food doesn’t have to be complicated. With simple techniques, everyday ingredients, and just 45 minutes, you can create a dish that brings the whole family to the table with smiles on their faces.
The beauty of this easy chicken and rice recipe is its versatility and reliability. Make it exactly as written for classic comfort food, or customize it with your favorite vegetables, proteins, and seasonings. It works for busy weeknight dinners, Sunday meal prep, potluck contributions, or cozy date nights at home. The one-pot method means you spend less time cleaning and more time enjoying your delicious dinner.
Once you master this basic technique, you’ll find yourself making it again and again, tweaking it to suit your mood and what’s in your fridge. It’s one of those foundational recipes that every home cook should have in their back pocket—the kind of dish that makes you feel like a kitchen rockstar even on your most exhausted days.
I’d absolutely love to hear how your creamy chicken and rice turns out! Did you add mushrooms? Try the lemon herb variation? Serve it to your family who devoured it? Drop a comment below and share your experience. And if you loved this recipe as much as my family does, please hit that Pinterest save button and share it with your friends—it helps other home cooks discover easy, delicious recipes like this one!
Now go grab that skillet and get cooking—comfort food awaits!